
© Bill Garvin
What do scuba diving, golf, offshore sailboat racing, surfing, swimming, and horseback riding all have in common? For a photographer, they all require special considerations for taking great shots, whether that means using a simple point-and-shoot camera or a sophisticated SLR In some cases, special gear and equipment may be necessary to shoot these sports; in others, it may simply mean that there are exceptional issues as to how the sport needs to be accessed, viewed, or photographed.
As with extreme and adventure sports, some of these specialized sports could arguably be included in other sections of this book. However, this chapter covers how they're different and, combined with information throughout this text, you'll be ready to go out and take winning shots!
Whatever your passion, there's a way to shoot it Photographers are innovators and inventors at heart; they love to find new and creative ways to capture the world in a way it's never been seen before.
Specialized sports shooting often involves dealing with how to safely and effectively get in and out of a situation that has issues preventing normal photography It may involve animals, water, special vehicles and equipment, or simply the need to be more than commonly aware of how the sport is played As with extreme and adventure sports, how you protect and carry your gear, as well as how you access it effectively for where you are and what you're doing, is always a consideration; this also affects the style of camera and other photographic equipment you may ultimately select for the quality and type of images you want to capture — and what you want to do with them.
This chapter covers a number of specialized sports and includes interviews with photographers adept at capturing the action In some cases, such as for photography in the open ocean, I let the photographers speak for themselves in covering positioning, settings, and getting the shots.
They shoot horses, don't they? Yes, they do, but not in the sense meant by the movie and book of the same name Photographing horseback riding, whether it's hunters and jumpers, horse racing, dressage, barrel racing, or any other style, involves knowing something not only about the sport but how to work around animals as well Horses are easily spooked by sudden sounds and movements, and cameras are very capable of causing them to be suddenly startled — which can be disastrous for horse and rider, as well as you, the photographer Even a simple shutter release can be enough for a horse to be distracted.
It can be difficult getting stop-action shots of any sport, and when you add an animal into the equation it can be even tougher. Take into consideration not only your camera and settings and how the event takes place, but make sure under all circumstances you are able to work around horses easily, calmly, and without disturbing them.
Some professional photographers, accredited by the organization running the event, will have access to areas of an arena that you will not have. They may set up a tripod and camera at a key point where horse and rider will come across a final jump or a point where official photos are taken. While you won't be able to go out in to the arena, the positioning these photographers take will give you a good idea of at least one of the best spots and angles from which to shoot.
If you can get an unobstructed view from behind the officials — meaning from the stands or at the edge of the arena — you can try an over-the-shoulder technique to get the same, or at least similar, shot However, this image will be taken from farther away than where they are, so you'll have to use a telephoto lens or choose a camera setting that maximizes megapixel capability That way, if you can't close in very tightly on the rider because of how far away you are, a high-megapixel image allows you to crop later and still have a large enough image to make a decent-sized print If you can get some time practicing at a local training barn, such as shown in Figure 8-1, you can learn the best timing to get your shots prepared for a bigger show.
Find interesting points in the event; for example, in barrel racing, running tightly around the barrel is a better shot than when they're just in an open run Horses clearing exceptionally high jumps make for better shots than just a simpler, lower jump; however, the less spectacular, lower jumps, as shown in Figure 8-2, are a good way for you to practice and to become proficient around horses.
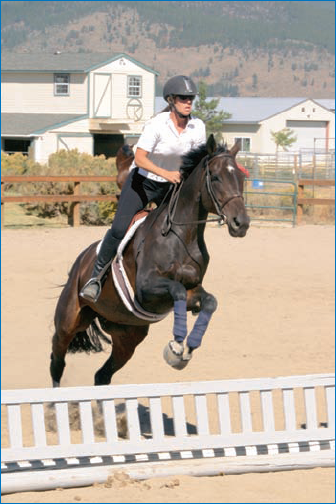
Figure 8-1. Before shooting a big event, practice your timing and photography at a small schooling show or training arena to learn to get the best equestrian shots and how to work easily around horses and riders.: © Amy Alden Timacheff

Figure 8-2. Horse arenas are filled with angles, so try to shoot as evenly as possible or else you'll need to rotate the image in your image-editing package to make sure it looks straight, but not at the expense of the tilting the horse and rider.: © Amy Alden Timacheff
Having a good angle from which to take the shot of the horse jumping or moving through an arena in any type of event is essential to getting a good shot In jumping, you definitely want to be ahead and positioned at about a 45-degree angle from horse and rider so you can get them coming over the jump.
Sometimes an unusual shot can be dramatic, such as the one being edited in Figure 8-2, where a telephoto lens compressed a complex set of jumps, the horse, and rider for an interesting look However, it wasn't quite straight, so a little tweak in an image editor is a quick fix For events where the rider and horse aren't jumping, try a tighter, forward-angle shot in narrow depth of field with horse and rider concentrating, as in Figure 8-3.
One thing you don't want to do is take photos of a jumping horse from behind, even at an angle; in addition to not being able to see faces, typically this isn't the most complimentary angle of either the horse or its rider!
When you're shooting action shots — ones that involve a horse moving at anything more than a trot — you'll have to ensure you have a fast enough shutter speed For a slower event, such as dressage, use a setting of 1/250; however, for jumping, cross-country, barrel racing, roping, or other events, set your camera to shoot at least at 1/500 second.
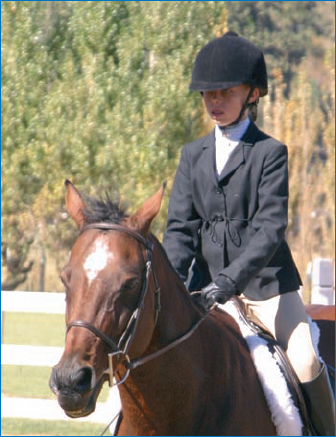
Figure 8-3. Horse-and-rider shots don't always have to include the entire horse and rider. For tighter images, be careful about what limbs on both horse and rider are being cut off and at what point. Avoid cutting off arms or legs at a joint.: © Amy Alden Timacheff
Don't use a flash at any time Turn it off manually and be sure it's not firing Also, make sure you turn off all sounds on your camera A focus beep, startup sound, or other noises can startle horses Some point-and-shoot cameras have bird sounds, camera click sounds when you release the shutter, and so on; turn all of these sounds off Make sure that you also turn off anything else that might make noise, such as a cell phone. Digital SLR cameras also have mechanical sounds as their shutters release — primarily from the mirror moving up-and-down on each frame — and this noise can be loud enough to bother a horse; however, it's not a sound that can be turned on or off, so it's best to ensure you're distant enough that it won't be distracting.
Watch your backgrounds when shooting horses, because horse shows — like a motocross event — can be very cluttered. The last thing you want is a great jumping image that has a porta-potty in the background. Find a good angle where the background is as clean as possible to create nice contrast between the horse and rider, and the background.
Dust is a big concern for cameras in horse arenas (see Figure 8-4), and you will want to limit opening your camera as much as possible. If you need to change flash cards, be absolutely sure you're in an area safe from a sudden dust-filled wind gust; it's better if you can make the switch inside a car or building if possible. If you're shooting with an SLR, the best alternative is to have two cameras — one with a midrange to telephoto, and the other with a wide-angle to midrange lens. This way, you can have a nearly full optical range without having to expose an open camera body to dust.
If your camera has a multiple exposure setting, allowing you to take several frames per second, equestrian events are excellent opportunities to practice this feature. Remember, if you have a point-and-shoot camera that has some shutter lag, you'll want to begin shooting before the horse gets to the jump; it may take some trial-and-error to get your timing right.

In terms of photography, golf is a specialized sport only because access and your behavior as a photographer matter so much around the sport. The ability to hit the ball with complete concentration is absolutely essential to golfers, and at all costs you, the photographer, must do everything necessary to stay out of sight and sound while shooting.
Large tournaments will, of course, be more restrictive than a friendly game among friends. If you're out shooting your wife or son on the course, then you can be more relaxed and free with the shots you take. However, for any tournament — whether it be a high school event or a pro tour — requires that you be exceptionally knowledgeable about and adept at the game and navigating a golf course during the event. For you to shoot from anywhere other than the spectator area will likely require that you obtain valid media or organizational credentials.
Being to the side or slightly behind the golfer is optimal for shooting the game, where you can see the swing, or the golfer crouched and scrutinizing the best path for the ball to the cup on a putting green You don't want to be in the golfer's line of vision if at all possible.
Some establishment shots of the golf course are good to have, and telling a story is a good approach to take when shooting an event And, in the case of golf, the story really isn't going to be about tracking a small ball around a huge course; instead, it's going to be about people Images of golfers' faces when they're concentrating, conversing, and swinging their clubs make for the most interesting images of the game While TV coverage shows the ball in flight across the course, a photo of a tiny white ball in midair isn't very compelling While few, if any sports benefit from an image of a ball by itself in the air, golf is one of the few where the ball is commonly tracked by TV cameras (hence the suggestion of not following suit with your digital still camera).
I like to take shots where it shows something interesting about the course with the golfer in the midst of it — especially if the natural surroundings are especially beautiful or different For example, Figure 8-5 is a photo I took at the Doha Golf Course in Qatar, where the terrain is rocky, sandy, and filled with cactus — not typical of most courses around the world.

Figure 8-5. This photo of a golfer concentrating on a Doha, Qatar, course shows concentration, the game, and unusual terrain.
Following a golfer throughout a course means you'll want to experiment with shots and use the terrain to your advantage Take shots above golfers as they are on a green, in a sand trap, or fishing a ball out of the water Shoot across a driving range from within the trees, or get low on the grass and get a wide-angle, low-to-high perspective Because you have a large area within which to move, you can be creative about your positioning.
A telephoto lens on an SLR or a decent telephoto capability/setting on a point-and-shoot is nearly essential in shooting golf, only because you really won't be able or want to get too close to the golfer so you can avoid distracting him or her As mentioned in positioning, use the terrain to your advantage as much as possible.
As with equestrian shooting, turn off your flash as well as any sounds your camera makes — even a simple beep when it focuses can be rather loud on some models Make sure you don't make any sudden moves, rattle equipment, or be otherwise noticeable at critical times during the game.
Wide-angle shots also can be effective to gain a nice perspective of the course with golf positioned in it. I don't really suggest getting too many shots of the course without a golfer in it — images just of tree lines, putting greens, and the like get boring quite quickly.
For driving shots, use a high-speed setting and multiple-frame exposure Your shutter speed should be at least 1/500, and probably substantially faster if possible A narrow depth-of-field image with your aperture wide open will look very nice with trees or other background scenes blurred and the golfer focused in contrast.
On the putting green, close-up, tight, narrow depth-of-field shots work well and should be shot from a low level, almost from the ball's perspective if you can manage to position yourself to that angle. Here, you don't need quite as fast a shutter speed — instead, keep your aperture wide open, drop your shutter speed to about 1/250 of a second or even slower, and make your ISO as slow as possible to still get a good exposure. This will create a very rich, low digital noise image with good color saturation — which is especially nice to show a beautiful green.
Shooting in and around the ocean is specialized digital sports photography for a number of reasons. Obviously, if you're in the water — for example, while scuba diving or trying to catch a surfer inside the pipe of a wave — you'll need a special camera housing or a camera that's specifically waterproof.
For non-waterproof cameras, salt water and sand can both be devastating to electronics, moving parts, lenses, and other equipment such as portable hard drives. Higher-end cameras used by journalists, such as the Canon 1D Mark II, feature extra seals and protection against the elements, but they still are not waterproof and can be damaged by salt and sand.
However, many photographers love the challenge and opportunities the ocean offers, and the resulting photos that can be so phenomenal and spectacular from a perspective rarely seen by most people.
Tip
For any sport shot in or around the water, have a good supply of moisture-absorbing desiccant Reusable containers of desiccant that will fit in your camera bag or case are availabel from most photography suppliers.
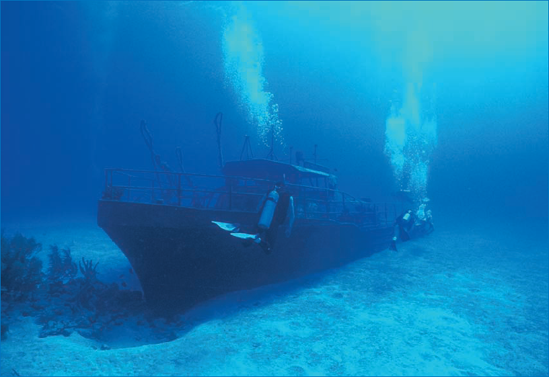
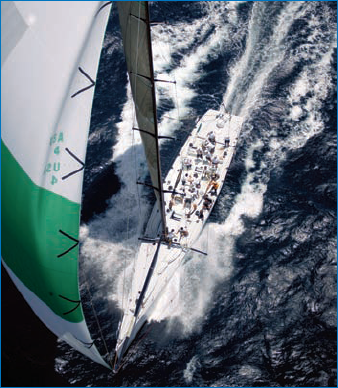
Sailing large racing yachts in open ocean is a more elite sport, one that most sport photographers will not be able to easily access; merely the need to use a helicopter to really get good shots is enough to deter most nonprofessional photographers (see Figure 8-6) However, after recently meeting a photographer in San Diego who specializes in this sport, I wanted to share a few thoughts from it only because the images are so incredible and many photographers unfamiliar with how it is photographed are curious about it.

Underwater photography is challenging, requires very special equipment, and is a wonderful way to capture sights of another world right here on our own planet. For years, the Nikonos series of underwater film cameras have defined the market for shooting below the surface of the ocean. Today, they still are highly popular and many digital images result from scans of negatives taken with them. However, new digital cameras such as the ones made by Sealife are waterproof and rated to depths that, while not as deep as what the Nikonos can reach, are sufficient for many divers. And the price of these cameras, which can include special underwater strobe lights and macro-lens capability (for close-up shots), is surprisingly reasonable for the average photographer.
More than almost any other type of sports photography, scuba diving requires highly specialized equipment, as seen in Figure 8-7. Divers need to have cameras or housings for their cameras that are not only waterproof, but also that are capable of handling the pressure of being many feet underwater. Furthermore, visibility through the water is far less than visibility through the air, and so the cameras will often have to be set and used differently when underwater at various depths than they would above the water. Settings for a deeper dive may be substantially different than when only 20 or 30 feet below the surface — which means the camera must have the capability not only of being able to be set to these exposures, but to also be changed easily while underwater.
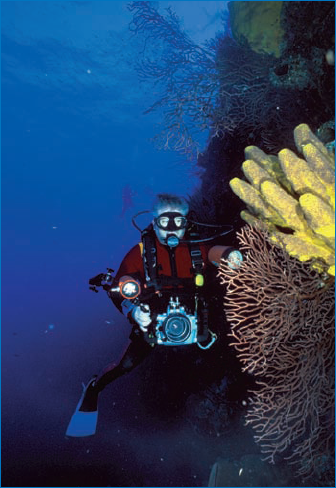
Figure 8-7. A shot of professional underwater photographer Bill Garvin at work with his SLR in an underwater housing along with specially mounted strobe lights.
Most underwater cameras feature large controls that can be changed while you are wearing gloves or have otherwise limited mobility. Further, they do not have SLR-type bodies, but instead use the rangefinder method of view finding because, when you're wearing a mask, you aren't easily able to see and frame your subject. Range finding involves framing your subject without looking through a through-the-lens viewfinder as you would in an SLR. Even if you are using an SLR underwater, you're still using a physical, crosshair-type attachment to frame your photo because you won't be effectively able to look through the camera's viewfinder with it contained in an underwater housing and with a mask on your face.
Instead of waterproof cameras, many photographers prefer to use underwater housings for their existing cameras A number of manufacturers, such as Ikelite, Aquatica, Sea & Sea, and Ewa-Marine, make various types of enclosures into which you can fit nearly any model of digital camera made Whether you have an SLR or a point-and-shoot, chances are you can find a waterproof housing to fit it for use at various depths underwater And, while some of these are reasonably affordable (around a few hundred dollars), some of the more heavy-duty, deeper-water-rated models can be very pricey—as much as several thousand dollars.
Lighting is an issue with underwater photography, and if you're going to give it a try you should consider using specialized strobe lights; this can make a huge difference in the quality of your images Most of the underwater housings include the capability to attach these lights to the housing and to connect to your camera.
Interview: Sharon Green
Sharon Green of UltimateSailing.com is a marine photojournalist who has been shooting the sport for more than 20 years. She shoots everything from small races to America's Cup, with a mix of boat sizes and classes. Based in California, she shoots everywhere from the South Pacific to Miami, Florida.
What does it take to capture the best shots in sailing?
Sailing is a magnificent, colorful, and dramatic sport. There are many variables with the constantly changing elements, such as sea conditions, boats, events, competitors, and locations. The challenge is to capture electrifying moments that take your breath away. Those moments and opportunities are very few, but when they happen...
What are some tips and tricks for the aspiring sailing photographer?
Get in close, anticipate the action, and shoot steady with a fast shutter speed. Use availabel light, and shoot at a shutter speed of at least 1/500 of a second.
Do you use any specialized equipment?
A cooler and a helicopter!
© Sharon Green
Shooting sailing is an elite and highly specialized type of photography to match the sport; however, the photos produced are often truly spectacular.
Unlike ocean sailing or scuba diving, surfing can be photographed from the shore or the water. The types of shots taken from either location will be different in a number of ways: how the images are composed and exposed, the skill required to take them, and the equipment necessary to do so.
Interview: Bill Garvin
Bill Garvin, of Florida's Garvin Marine Photography, has been shooting underwater since the early 1980s and pursues it as a full-time career. He says he now lives "with manatees, birds, turtles, and many other photo opportunities."
What is the best positioning for underwater photography?
Get as close to your subject as you can. There is particulate matter in water; you can help reduce it by getting as close as possible. Avoid tail shots, save your disk space. Don't chase the fish, because all you'll get are tail shots and extra tired from swimming. Sometimes by being stationary and becoming part of the reef, the fish will come to you. When you do get one in view, you need to see the eye and it must be in focus. The preferred angle is looking slightly up, or on the same plane.

© Bill Garvin
Shooting underwater requires specialized settings that can accommodate the unusual and limited lighting. It also requires patience and the willingness to wait for underwater life to come to you — such as this photo of divers swimming with a bull shark.
What are the best settings and how do you get the best shots?
Start out with macro settings so that you can get good results quickly and gain confidence. The TTL (metering the image "through the lens," which is a capability of some cameras that is especially effective for close-up shots) works great with macro. On a wide-angle setting you will have to switch to Manual mode. You cannot fill 75 to 80 percent of the frame on wide angle to get good results from the TTL setting.

© Bill Garvin
Taking a shot like this underwater is difficult; the underside of the fish is highly reflective, the sky above the water causes backlighting, and barracudas are notoriously elusive and rarely come close enough to photograph well.
Here are some of Bill's best tips for successful underwater photography:
When setting your strobes remember the 4-foot yardstick. Water magnifies a subject 4 feet away, making it appear to be 3 feet away. The camera's strobes, which are separately mounted from the camera, must be aimed at the actual image.
Double-check that lens caps are off, batteries are fresh, and that the waterproof covers are closed correctly. The first 10 feet are the most critical — keep an eye on the camera for problems, and if necessary get it back to the surface quickly.
The particulate matter in water can easily be lit up with a strobe. The typical over-lens strobe, as used in the air, makes underwater look like a snowstorm. Get the strobe away from the lens — hand-held to the side or away from the camera in some way.
Take a small dive light with you during the day. By shining it on a possible subject you can see the real color you will get. Water robs color, making a strawberry sponge look black; with the dive light you will see it is a bright strawberry red.
What other tips and tricks do you have?
Slow down – the faster you go, the less you see. Go slowly, look around, look in sponges, look under ledges, there is a lot there to see by taking your time. Also, be critical of your pictures. Look at them as you would critique someone else's; be honest and ask yourself what you can do to improve the composition and exposure. Ask your dive buddy to make suggestions about how the image would be more pleasing. Learn from the feedback!
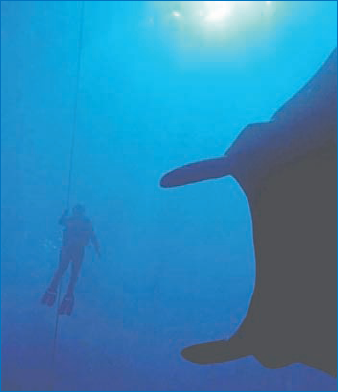
© Hollie Hailstone
With underwater shots, getting a finely detailed exposure of a diver's face or a fish's body isn't always critical. Sometimes, as in this photo of a manta ray and a diver, a silhouetted image against a blue ocean presents a dramatic, nearly duotone image.
Big surfing events always have numerous photographers perched on the shore with very long glass; if there ever was a perfect use for a 1200mm lens, this is the one. However, there has been increasing demand for cool, in-water shots that get close to surfers on big waves, as well as boogie-boarders, ocean kayakers, and wind surfers doing the same.
For shooting from the shoreline a long telephoto lens is necessary. It will be very difficult to get good shots of a surfer on a wave unless your camera has at the very least a 200mm lens, and preferably much longer focal length. Additionally, you will want to have your camera mounted on a monopod or tripod and use a hood large enough to reduce lens flare, glare, and blowing sand.
For many SLR cameras with interchangeable lenses, you can purchase lens extenders, which increase or extend the focal length of a telephoto lens A 2x coupler, for example, effectively changes a 70-200mm zoom lens into a 140-400mm; however, extenders reduce the aperture rating of the lens and can also limit the auto-focus capability of the camera When shooting surfing, however, you may be able to keep your camera on infinity, so auto-focus isn't a big issue Because it's usually very bright, a limited aperture is less of an issue, as well So an extender may work well for you if you want to increase focal length but don't want to spend the money for a new, longer telephoto lens.
Photos such as the one in Figure 8-8 require that you expose your camera to water, wind, and sand Protecting your equipment on the shore and in the water is essential Blowing sand will wreak havoc on a poorly gasketed camera if left exposed to it over time, so you may want to do something to protect it Some of the rain covers from Kata and Tenba may help in blocking sand and, to a degree, moisture from getting to your camera on the shore Because sand has a way of getting into everything, you will want to carry your extra equipment such as portable hard drives, a laptop, card readers, and extra lenses in an airtight, sealed case Or simply leave them in the car Just having them in a camera bag may not be sufficient protection.
In the water, the same type of system used with scuba diving is necessary — an underwater housing — although it won't need to be rated to deep depths unless you plan to dive with it However, if you plan to shoot from the surf, because it can be so powerful, you still may want to consider purchasing a better-quality housing to ensure your gear is fully protected should it happen to get pounded by big waves or hit by a board.

Figure 8-8. Late in the day or early in the morning is a good time to take shoreline shots, such as this one of two ocean kayakers.: © Amber Palmer
Interview: Neal Thatcher
Neal Thatcher, the son of a professional photographer, grew up in Hawaii and has been surfing and shooting since he was 10 years old Now a professional photographer and videographer based in Washington state, he has photographed surfing — both from the water and the shore — and now primarily shoots snow sports (see his spectacular shots in Chapter 5) in addition to his love for the water.
What kind of special equipment do you use to shoot surfing?
A water housing is required to get the types of shots I prefer — intimate and close up. Hawaii has an army of photographers on the shore capturing every wave a top rider breaks; having in-water gear and knowing where the wave will break is the most important part of getting shots that are different. I have three ports for my housings: one for my 15mm fisheye, one for my 24mm, and one for my 100mm lenses. If I'm shooting with my 100mm lens, I'm usually on a bodyboard for flotation and so I can be up higher to get a better vantage point.

©Neal Thatcher
Neal Thatcher likes the intimacy of an in-water shot that's close to a surfer breaking a wave.
How do you get the best position?
It's about knowing where the waves are breaking. On Oahu in Hawaii, I like to shoot at Sandy Beach, Pipeline, and some secret south-shore spots. Finding uncrowded waves is tough there, so you have to shoot very early in the morning or late afternoon — which is usually the best light, anyway!
How do you get the best shots?
The most important part is a knowledge of the sport and working closely with the athlete. You have to have great communication and plan where you will be in relation to the athlete; he or she must feel confident you will be there and ready to catch something that often cannot be reshot — both in surfing and in snowboarding. Safety is an important factor for both of you, so you have to know where the athlete will be to catch the shot and to stay safe. This can be a huge challenge with surfing, especially where you are also at the mercy of ever-changing waves. However, good riders will make sure you know where they are in the lineup at all times and when they are going to catch a wave.
I prefer to freeze the action so I usually shoot at a high speed of 1/500 or higher, and an aperture of 5.6 or wider. I like the color saturation of lower ISO, so I try to shoot at ISO 100 if at all possible; however I will shoot at higher ISO speeds if I have to in order to keep my target shutter speed range. I don't use flashes very often, and I like to shoot as much as possible in the early morning or late afternoon 'magic hour' lighting — especially for surfing.

©Neal Thatcher
Boogie-boarding has become a popular big-wave sport and requires some of the same photography skills as shooting surfing.
Any tips and tricks?
You need to have a passion and knowledge of the sport you choose to shoot or it will show in your work. Get out and do the sport first and have an idea of what makes it fun to do and watch. When you find great subjects, work with them often to build a chemistry between the two of you, to know what tricks they are going to do as well as their general tendencies and directions. You must always stay aware of this as well as everything else going on around you from other less-skilled riders who can put you in danger, changes in the weather, and increasing swells.
Extreme and specialized photography is very much fun and can put you together with some of the most outrageous people you will ever meet, but sometimes you must be the voice of reason. You will find that some athletes will do things well beyond their skill levels just to get a photo of it, and it is really not worth it to allow that to happen. Don't push riders beyond their comfort zones, and don't take silly risks to get a shot.

©Neal Thatcher
Waves are big and powerful, and can change in an instant, so it's important to be aware of everything around you when shooting in the water.
Swimming is hardly considered an extreme or adventure sport unless you're swimming in the open ocean. However, even photographing swimming can place it in the category of a specialized sport because the photographer must be prepared to work in and around the water.
The Athens 2004 Olympic Games had many spectacular shots of diving and swimming from underwater in the pool as well as from above and at waterlevel While you may not be donning dive gear and using an underwater housing to shoot your son's or daughter's local high school swim meet from the bottom of the deep end, there are some specialized considerations for shooting the sport if you're going to get some dramatic, tight shots of a competitive swimmer such as shown in Figure 8-9
If you're in the water shooting swimming, you'll need a light underwater housing for your camera or for the camera itself to be waterproof (as described in the section on scuba diving) If you're shooting from underwater up at swimmers, you may want to use a flash so that the diffused light from above the pool doesn't cause backlighting problems.
However, even if you're shooting from the surface of the water or poolside, you will nonetheless need to protect your camera and gear from being splashed.

Figure 8-9. The lighting in swimming halls can be dark and, while in some facilities you can use a flash, it may be prohibited in others — or simply not useful from where you are shooting. This image of US Olympic swimmer Megan Jendrick (Quann) was shot at ISO1600 without a flash.: © Nathan Jendrick
You may be able to use a flash in swimming pools, as long as the event organizers allow it For big, Olympic-sized facilities, a telephoto lens will be helpful to get close to the athletes even if they are far down a lane However, a good wide-angle shot from the end of the pool as several swimmers come in for a finish can be useful and interesting, so having a wide-angle or even a fisheye lens can make for some fun shots.
Interview: Nathan Jendrick
Nathan Jendrick is a professional photographer and journalist who has shot many swimming celebrities, including Michael Phelps, Megan Jendrick (formerly Megan Quann), Natalie Coughlin, Justin Gatlin, and others. In addition, he shoots other subjects and sports such as bodybuilding.
What's the best positioning for shooting swimming?
When it comes to photography, don't be afraid to get on the level of your subject whenever possible. If you're at the pool, know that chlorine won't hurt you and your pants will dry. The vast majority of photographs are taken by someone, between 5 and 6 feet tall, standing and aiming down. You don't want your shots to look like everyone else's; instead, get on their (swimmers') level, and take a unique shot. Many photos like the one pictured here would look bland if they had been taken by a 6-foot individual looking down toward the pool, seeing the water act almost as a jacket on the swimmer. The mirror image in the water are things seen now only because of the angle.

©Nathan Jendrick
Exploring angles, perspectives, and vantage points are the key to creating original and exciting images.
What do settings do you use?
A lot of people like to take pictures at less than their camera's highest resolution, mostly so they can fit more photos on their memory card. But depending on your location, this isn't always a good idea. Here's why: In dark environments, you need to shoot at a higher ISO setting, such as ISO800, along with a fast shutter speed. These are necessary to stop the action, but are murder on your picture because a high ISO can create so much noise in your image. If you're shooting at half the capability of your camera, when you try and edit your work later on, you'll be in trouble. Images taken with a shutter speed of 1/640 of a second and ISO1600 without a flash can create some fairly major issues. Now, combined with these settings if the image is taken at a lower resolution, the images would turn out to be far too dark — even after adjusting the levels; without the resolution, you may not have enough information to work with. So remember, even with smallmemory cards, you can save room by using your camera's full capability and your talent, to take one or two pictures that are exactly what you need, rather than taking 10 and hoping one turns out.
How do you get the best shots?
When shooting sports photos you'll want to make sure you choose your depth of field wisely. In the next shot, the swimmer is coming off of the wall to start his backstroke race; you can't see the starting block, but the viewer doesn't need to — what the swimmer is doing is obvious. If the block was included in the shot, because it was taken high above from a catwalk with a 70-200mm lens, the picture would have looked far away and needed a lot of zooming in later on. Assuming you have the equipment to zoom in, you can preempt your subject and get a better-posed photo by isolating your depth of field solely to what you want to capture. This is easy when you know what they're going to do: Swimmers all start backstroke races this way; runners all put one foot in front of the other: It's simple! Select a shutter speed appropriate for the action and light and then prefocus on the area where you're going to be shooting. When the person is about to enter the frame, take your shot. If you try to follow him or her, your picture won't come out sharp or, in really bad situations, your digital camera won't be able to focus at all and won't take even a single picture!

©Nathan Jendrick
A unique angle sometimes requires waiting for the subject to appear in your frame, as opposed to tracking him or her — which can result in poorer image quality.
Patrick Bates, a sports photographer and former high-level competitive swimmer who now works for Printroom.com also has these addition suggestions:
Look for emotional outbursts of energy, exertion, triumph, and disappointment.
Focus on the start and finish of a race.
In a relay, the handover moment is very important, and you can often get good emotional and personal shots when the swimmer looks at the close. It's also important to capture the team environment for relay events.
Capture swimmers that are poised on the blocks ready to dive or a water start for a backstroke event.
Try to get a sense of the timing of a swimmer's stroke and how he or she is breathing — otherwise you might frame a photo just right, but the swimmer's head may be turned in the wrong direction.
There are a variety of specialized sports that are unique because of equipment, access, environmental conditions, and other factors with which you must comply to get the shots. Whether it's under water, on a sandy beach, at a dusty horse show, or even on a hushed golf green, the creative challenge is to be able to integrate effectively with the environment and allow the athletes to perform their best — and to still take photographs that document the event in the most exciting, passionate way possible.
Using a point-and-shoot camera, in some cases, may actually make your life easier for taking some specialized photos; for example, a small underwater housing for a point-and-shoot is relatively affordable, and operating the camera underwater can be easier than an SLR. Plus, image quality on point-and-shoot cameras has become so good that they might do everything you need. On the other hand, if you're doing something professional with the images, or even submitting them to contests, you may need to have an SLR — if for no other reason than to be able to use a wide variety of lenses to get photos that are fast, far away, or very wide.
A few concepts are common among all sports photographers: Rarely use a flash, do as much as possible to control your camera manually, don't be afraid to use a higher ISO setting as opposed to compromising speed or aperture, be creative about your angles and perspectives, and know the sport you're shooting.