

© Amy Alden Timacheff.
In the last decade there has been an explosion in new extreme and adventure sports, ranging from bungee jumping to average citizens climbing Mount Everest And wherever these ordinary people are attempting extraordinary sports, digital cameras are sure to come along for the ride With the large-print capabilities of small point-and-shoot cameras, the huge array of products made to protect and carry them, and the ability to display images display online —even from the top of the world — you won't find a Himalayan expedition or a sky-diving day trip without at least one camera packed.
Of course, the list of these types of sports is growing daily, with new adventures being concocted by adventure seekers who have done and seen it all And virtually everyone wants to document the event on video and/or in photos This chapter covers several of these sports — some on the ground, some in the air — to give you some good ideas and advice as to how you can effectively and safely capture great photos of them, whether you're an observer or a participant.
Unless you're able to watch an adventure sport from a safe, accessible location, you'll most likely pack your photo gear with you. For sports such as rock climbing, hang gliding, paragliding, backpacking, sky diving, and back-country skiing, in addition to carrying your gear, you'll need to ensure you can store images and change camera components safely and quickly without needlessly exposing open cameras and lenses to the elements. For long-term journeys, such as backpacking or ski trips, you'll also need to be sure you have sufficient power to keep your equipment running.
Several companies today make excellent, highly rugged gear suitable for nearly any situation you may encounter Tamrac, Tenba, and LowePro are three fine manufacturers (there are several others) of packs made for carrying all sorts of camera gear, ranging from a small point-and-shoot to large packs with plenty of room for extra lenses, camera bodies, and even large laptop computers.
If you're carrying other gear on your back, such as for a backpacking trip, you may be limited in the amount of equipment you can take on a longer trip and still be able to travel comfortably In those cases, prioritize the equipment you carry For longer trips, power is king: If you run out of battery power, you can't take any more photos — plain and simple If you use a point-and-shoot camera that is powered by standard alkaline batteries, such as AA or AAA size, you can carry extras, but other cameras and larger SLRs run on batteries that must be recharged with a power source; in this case, for long trips, you'll want to have several extra batteries along Even extra batteries, however, can lose some power over time—especially in cold weather.
Whenever possible, I take an extra camera on a long trip just in case something happens to my primary camera or if I run into battery problems Even if you shoot with an SLR, if it runs out of batteries before you expect it to, you may be very glad to have a small point-and-shoot backup on hand to catch a few shots you otherwise might have missed.
In addition to your camera, you'll also probably need to think about power for any storage device or laptop you may bring along Once again, a device capable of using common batteries is preferable for long trips where you can't recharge I generally guide people away from taking laptops on long backcountry trips because they are fragile, heavy, and suffer from limited battery life If you can resist looking at your photos until you get home, other than on your camera's LCD, use a portable hard drive for downloads — or take enough flash cards to store all of your images.
Tip
Want to determine how many batteries you'll need for a long trip? Consult your camera manufacturer's Web site or your manual to check how many photos one set of charged batteries can shoot If it's not specified, contact the manufacturer directly Then you can estimate the number of photos you'll shoot in a day and carry about 20 percent more battery power than your estimate Also, remember that using your flash and your LCD will decrease your battery time.
A final note about digital cameras and batteries: For longer trips, do whatever you can to limit your camera's power consumption Many cameras, for example, can run either without displaying images on the LCD (which uses power) immediately after they are shot, or the amount of time the images are displayed automatically can be reduced to the shortest possible time You can also select, on some cameras, how quickly your camera automatically shuts down after not being used; you should set this to as short a time as possible as well Also, remember that if you review images on the LCD, you're using battery time, so try to resist looking at your shots until you get back to civilization.
If you put your camera gear into a pack used for other equipment, you need to ensure it is protected yet accessible Unless the weather is especially cold, and when I'm not traveling with a dedicated camera pack, I wrap my cameras and equipment in thin sheets of closed-cell foam that I hold together with strong rubber bands or small bungee cords; I then place these into waterproof bags (the heavy-duty zippered or press-and-seal bags work well); if it's going to be an especially wet trip, I use waterproof bags designed for kayaking, which are availabel from REI, Eastern Mountain Sports, and other outdoor equipment specialists If the weather is exceptionally cold, I do basically the same thing except that I keep my gear a bit deeper in the pack and closer to my body; it's less accessible, but it takes much longer for the cold to penetrate and consequently preserves battery life.
Before your trek, format all of your flash cards so you won't have to bother doing it later when you're in the backcountry or in the air Keep flash cards in a safe, waterproof case where you know that they will be protected from any harm whether it be from the elements or just from being squashed in a full pack I use small pelican-style, waterproof cases Inside the cases, if you are keeping all of your images on the cards and not downloading them, make sure you have a method for knowing which flash cards have been used and which have not Some people use two cases (one for used cards, one for fresh); others store spent cards in a small bag inside the case Whatever your method, do whatever you need to in order to prevent having to put a used card back into your camera to check it (which reduces battery life).
If you're going to be hang gliding or paragliding, you will need to secure your pack to an accessible point on the harness or on the front of you where you it can easily be reached. Placing it on your back obviously won't work. Furthermore, you may want to attach cameras and other equipment with a light lanyard to a secure point on the pack, such as to a D-ring or carrying strap. Providing you don't have too much equipment, even if you accidentally drop something, it will still be relatively safe. Of course, this won't work as well for lenses or other SLR components; however, I don't suggest that you change lenses while in the air unless it's absolutely necessary. It's a better idea to carry two cameras with different lenses instead.
Another equipment factor to consider with extreme and adventure photography is that you will need and want to protect your lenses with great care. Use lens caps on all of them, along with haze or skylight filters. Having a lens-cap keeper is a good idea; these consist of an elastic strap that goes around your lens with a small cord that connects to the outside of the lens cap with a small adhesive cap. Of course, if you are sky diving, removing and replacing a lens cap isn't really practical; then, you'll simply need to have the lens exposed, but consider a filter — it will be good protection and still let you shoot.
Depending on the type of adventure you're on, you may or may not want to have a camera strap Sometimes a simple handgrip is sufficient for holding your camera safely, but if there's any chance of dropping the camera, then use the strap There are also some camera restraint systems that allow you to attach the camera to the front of your body using an elastic harness that has a special release to allow you to remove the camera to take photos and bring it up to your face while it is still attached These are useful for some aerial sports and for hiking or skiing; however, you need to be sure the camera is protected if you were to trip and fall on a trail or ski slope.
These sports present incredible photography opportunities regardless of whether you are in the air or on the ground. And, they are slow enough that when you are in the air, you can take the time to actually get your equipment out safely, frame some great shots, and take decent photos(as opposed to sky diving, for example, where photography is much more difficult).
Note
Instead of shooting from the ground, which isn't necessarily much of a technical challenge, I'm focusing this section on how you can actually take photos from the air – of yourself and others in the sky with you.
Generally speaking, when shooting from the air, paragliding is easier than hang gliding for taking photos Because you're sitting in a harness, you can attach equipment before you take off in such a manner that it's reasonably accessible With hang gliding and other sports where your body is in a more awkward position for accessing and taking photos, it will take some forethought and practice to be able to effectively get to your gear and use it Photography in any sport, paragliding included, where your space is tight, access is limited, and dropping equipment is disastrous requires some thinking and practice to become proficient at shooting While you may be accustomed to whipping out your camera and shooting quick shots in other sports, in these situations it's not so simple.
Interview: Marc Chirico
As part of writing this book, I visited Seattle Paragliding to get some photos and tips about shooting in the air Located on the side of Tiger Mountain, on Seattle's East side and very close to my home, on any nice day I see 10, 20, and even as many as 50 paragliders soaring above the mountain Catching the thermals spiraling as high as they can for as long as possible, on clear days they get breathtaking views of Mount Rainier Marc Chirico, the owner of Seattle Paragliding and veteran paraglider, has seen many years of exciting paragliding action and has a good personal perspective of what makes for good photography of paragliding — whether it's done by professionals or amateurs.
At the training facility, which is located in the top floor of an old barn, we sat in paragliding harnesses suspended from the ceiling to talk about how the sport can be photographed.
What advice would you give about choosing position.
Try to get good action sequences on launch, and get the whole picture of the glider, pilot, and detail of the situation. However, I also like to key in on the pilot and his or her relationship to the ground; when people shoot they tend to get back too much and try to only get the entire thing, and they end up losing the personal moment as the pilot breaks freeof the Earth.

© Marc Chirico
A self-portrait of Marc Chirico, taken at 5,600 feet with his camera on the end of a pole
What kind of equipment do you prefer?
When taking passengers with equipment in a moving sport like paragliding, I don't think you normally have the stability for long-lens shots. Wide-angle shots are much better, typically. We push more for family-style digital shots with auto-focus or the focus set on infinity. I also like using a camera on a 6-foot pole with remote or timed activation to get a shot of a body in the abyss or myself flying.
What about getting the shots?
Try to take advantage of the terrain and the light. The first shot that comes to mind is when the sun is in your face (not above) and you get a silhouette at the 'golden hour'.
I also like 'perspective' shots taken with relation to topography and/or meteorological conditions. When taking a shot, even when handheld, it's nice to show it against a vertical rock face to show contrast and the frailty of the human body against something exposed. I like high-held shots with nothing underneath, and also cloud shots where you have a crisp blue sky against a sun-side cumulous. Another favorite is when there's high contrast, such as between an oppressively dark cloud with a bright ray of sunshine shining through.
Consequently, safety and accessibility are the two essential factors you'll need to add to your mix of steps to good digital photography if you intend to shoot while soaring above the Earth.
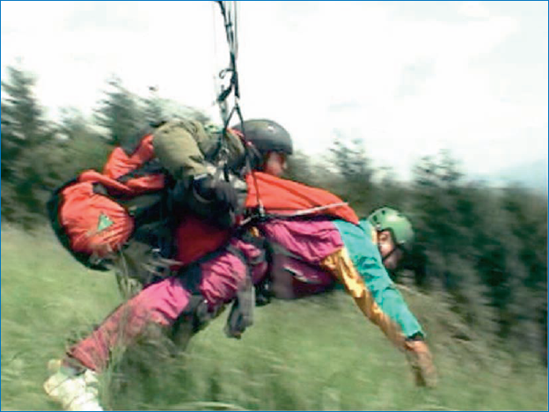
Taking photos of hang gliders and paragliders from the ground can yield some spectacular shots, whether they're taking off, aloft, or landing Figures 7-1 and 7-2 are two such shots, one of the paraglider in flight and the other of one landing In Figure 7-3, you can see a smaller-sized, lower-resolution snapshot of a tandem flight coming in for a hard landing.
When shooting from the ground, use your telephoto lens and position yourself so that you can get shots with features such as a mountaintop, cloud, or trees in the image to add perspective You can get shots of gliders by themselves, such as in Figure 7-2, but these should not be the only images you shoot Try to include the gliders with other gliders, and include as much perspective as you can.
If you're shooting from the air, your perspective and position may be limited to where you're flying A tandem flight where someone else is operating the glider is optimal for shooting because you don't have to worry about flying; instead you can concentrate on photography However, if you're flying as well as trying to shoot photos, do as much preparation work as you can to ensure your access to equipment is even easier.
Watch for good positions where you can get other gliders in flight with a nice background whenever possible Photos that make it appear that another glider is close to the trees or a cliff always add drama and interest to the photo — even if it's an illusion caused by your telephoto lens.
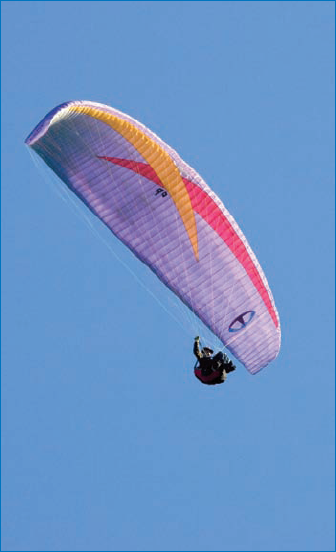
Figure 7-1. This photo of the paraglider aloft is a nice perspective, looking straight up. The emphasis of exposure on this shot is more on the canopy than the pilot.

Figure 7-2. Landing shots, when they show both canopy and pilot, should be exposed so that neither is over- or underexposed. Unlike shots where you're trying to really show the entire glider aloft, shots such as this can be a bit tighter; you don't have to worry if the entire canopy isn't in the photo.: © Marc Chirico
When taking shots from the ground, be sure you expose the images for the glider and not the sky or background An alternative would be if you wanted to silhouette a glider against a bright background such as a cloud or near-direct sunlight To do that, set your camera on a very fast shutter speed, such as 1/2500 or faster if your camera features speeds that high.
To get photos of pilots landing or taking off, you'll want to be set for stop-action photos by using a manual focus to ensure your camera is running as fast as possible. For cameras with shutter lag, make sure you time your shot so that you depress the shutter button before the "moment of truth" when the pilot lands or releases from Earth; this takes a bit of practice and, undoubtedly, you'll miss a few shots before you get your timing right.
Don't be too anxious to shoot tight shots at first; focus on getting your timing down and a well-focused image before closing in on a pilot's face. Set your exposure on someone standing at or near the landing zone or takeoff point, and make sure you're on manual mode for all settings — shutter speed, aperture, ISO, and focus — to have your camera operating as fast as possible. You may be able to use the flash, as well (this is especially useful if there's any backlighting that might cause problems); however, double-check with whomever is responsible for the landing or takeoff operation to be sure he or she doesn't mind the flash being used.
When in-flight, to get a good exposure of a glider, you should not rely on your camera to do it automatically. It tends to expose for the entire scene, which may be very much brighter than the exposure you'll want to have to get a good view of the pilot and possibly the canopy. If you have the ability and time while aloft, take some experimental shots and then make adjustments accordingly; however, to begin with, set your camera before you take off by taking shots in as similar a light as you can to what you think it will be while flying.
Silhouette Shooting
Here's some general steps you can follow to get a good silhouette shot:
Set your camera ISO to a lower sensitivity, such as ISO 100 or ISO 200. This limits the amount of digital noise in such a bright photo.
Try taking an automatic setting just shooting at the brightness. Check your LCD and read the information about the shot; see what settings your camera "chose" for the image.
Set the aperture (f-stop) and shutter speed manually to the numbers from your automatic shot. Chances are, you'll want your camera on its fastest shutter speed, whatever that is.
Using the settings from step 3, shoot your subject against a bright background, such as a bright light, cloud, or the sun.
Check the image and make adjustments. If the subject is too visible (not enough of a silhouette effect) and the background is too dark, try making the shutter speed faster or making your f-stop higher. If the image is too dark overall, open your f-stop a bit (make it a lower number).

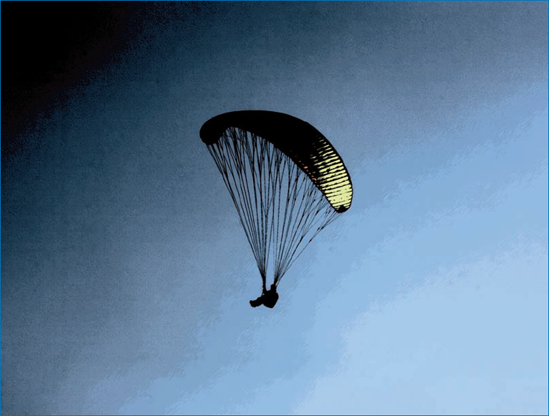
© Marc Chirico
A silhouette of a paraglider with the sun low in the sky.
High-contrast images with a glider against a sky or cloud are often excellent candidates for playing with artistic effects in image editing packages, such as seen in Figure 7-4.
As Marc Chirico points out, shooting with a telephoto setting probably isn't very useful when flying unless you're trying to get a shot of something on the ground. Plus, in this mode, your camera and your shots are more susceptible to motion and, unless you're set for very fastshots, you may end up with blurry images. If your camera has an image stabilization feature, it's a good idea to use it when you're flying no matter what settings you use.
Skydiving has ascended to new heights in recent years — meaning not just altitude, but in the antics and flying tricks people are attempting. Today, skydivers are jumping out of planes not just with parachutes, but also with snowboards, surfboards, skis, boogie boards, and other sporting goods that provide any type of surface conducive to "surfing" the sky.
As with paragliding and hang gliding, this section addresses how to shoot skydiving from the air Photographing this sport as a participant, as you can imagine, isn't easy Not only do you have to use a camera while plummeting to Earth at breakneck speed, you have to operate it in a rushing wind while looking through a pair of goggles.
Parasailing isn't as commonly shot from the air, but, more typically, as an observer Also, it's a much more common type of parachute sport As a result, it's also photographed more often than skydiving — and it's relatively easy to take shots of a parasailer if you're on thetowboat Shooting from a parasail isn't as simple a proposition, however, primarily because you're typically launched from and land in (or too dangerously close to) the water to be carrying a digital camera that's not waterproof.
If you're skydiving, you'll need to protect your equipment because of the speed and wind factors. If you're shooting other skydivers, you will want to jump behind them and slow your fall some, taking shots of them with a wide to medium lens setting (telephoto is really tough). If your camera has a multi-shot setting, use it and take as many photos as you can without maxing out the buffer. Another angle is for you to jump ahead of the other skydivers and shoot them coming toward you either at the same rate of speed as you or a bit faster.
Warning
Sky diving as well as other flying or sky sports can be extremely hazardous without proper training and experience Be sure to obtain proper training, and gain substantial experience aloft before attempting to try a secondary activity, such as photography.
You can also shoot skydiving from inside the airplane by attaching yourself to a harness and leaning out of the plane as the jumpers go off the wing. They fall quickly, however, so you'll only be lucky to get one good shot of them if they've released from the plane.
If you're jumping, once your chute is open, you can get photos of other skydivers more easily, similar to paragliding.
You'll want to use a harness system of some kind that allows you to fix your camera snug against your body, yet enables you to release it to take photos while still attached to the harness Some pro photographers have devised ingenious camera systems that attach to their helmets and other out-of-the-way places.
Tip
For some good shots and information about shooting skydiving, take a look at www.normankent.com, a fascinating Web site about an accomplished sky-diving photographer, stunt man, and cinematographer His site also features some advice for photography while jumping.
For parasailing, your position may very well be rather limited if you're on the boat. If so, work to document the event: the takeoff, ascension, some good shots aloft, and then the landing. If you've got buildings, mountains, or other objects behind the parasailer, try to get a nice perspective with both in the photos for good contrast.
For skydiving, it's tough to change your camera's settings once in freefall Instead, have the camera set ahead of time to a setting based on shooting out of the airplane or from the ground before You can try an automatic setting, as well, although this can be risky if you expose for a wide shot with your subject only being a relatively small part of the image As a result, the subject may turn out too dark if the shot automatically adjusts for the surrounding sky If your camera has the feature, using a spot meter-type setting will help you set it for a specific subject.
As I've said, unless you're a pro with high-end equipment, I don't advise using telephoto settings while skydiving; they're far too difficult to focus, stabilize, and center on a subject. Instead, shoot a midlevel setting at the very most and, in some cases, use a wide setting. If you're using an SLR, using a lens in the range of 24-70mm will be a good choice. Also, SLR telephoto lenses are large and cumbersome, which may be difficult to manage while skydiving.
Obviously, you won't be changing flash cards while skydiving That means you'll want to use as large a card as possible, and, because you're shooting subjects on a wider setting, you'll want to use a high megapixel shot because you'll probably need to crop the image later (you'll also need to crop because poorly framed and/or centered shots while skydiving are very common).
Remember, also, that you can obtain some spectacular shots from the ground, as well — especially if you're shooting someone coming in for a landing. When doing so, first set your camera for another skydiver or hang-glider pilot on the ground and be sure you have a good exposure. Then try that exposure on another person as they approach and touchdown at the landing zone.
For parasailing, you'll most often be shooting low to high, most likely from the boat (see Figure 7-5). When doing so, remember that the sky is very often brighter than your subject, meaning backlighting is a risk in getting good shots. You'll want to make sure you have set your camera manually so that it is exposing a person's face and body correctly, not the sky. Inside the boat, there is less light on a person than when he or she is soaring above, so take this into consideration. If you simply set the camera for the person in the boat, it may be a bit too much exposure, so increase your shutter speed by one level and, perhaps, decrease your aperture by one or one-half stops.
A telephoto setting might be used for one or two shots when parasailing; however, a wide perspective of the entire boat with the person behind it in the air is also a very good shot to take.

Climbing has become a very popular sport, both indoors and outdoors. Many gyms now have climbing walls (see Figure 7-6) that enable climbers of all skill levels to practice inside. Some may even trade perching themselves on treacherous rock faces for these indoor venues permanently. On the other hand, many serious climbers still love to head for the mountains for the challenges of natural rock faces and the thrill of getting to the top.

Figure 7-6. Climbing walls are popping-up in gyms, health clubs, schools, and recreational equipment stores everywhere.: © Amy Alden Timacheff
Photographing climbing can be spectacular, capturing athletes in peak condition under tremendous strain — both mental and physical. As with many other adventure and extreme sports, there are two ways to shoot it: while doing it or while watching it. If you're a spectator rather than a participant, your choices are limited to a low-to-high perspective when on the ground below or, if you're at the top of the rock, you can shoot down. When climbing, you are limited by the equipment you can safely carry and your mobility to get a good perspective.
Shooting from the ground, try to get more than just straight up from immediately below the climber, although images shot straight up can be cool especially if the climber is in a tough spot, as in Figure 7-7. If possible, get as far to the side as you can and shoot with a good angle to be able to show the person across and up the wall with a narrow depth-of-field shot.
Some indoor facilities will have midlevel and upper decks where you can observe climbers; these also are good spots from which to get good shots. However, remember that getting height is something climbers love to do, so you don't want to just shoot tight shots of them against the wall where you can't tell how high they've ascended. Also, a negative angle, where people attempt to climb up and backwards at the same time (for example, to scale an overhang), which is very difficult, makes for great shots. If you can get to the top of the rock or climbing wall and shoot down at an angle or diagonally, as in Figure 7-8, at a climber coming up the face with a lot of distance between him and the ground, it makes for an exciting image.
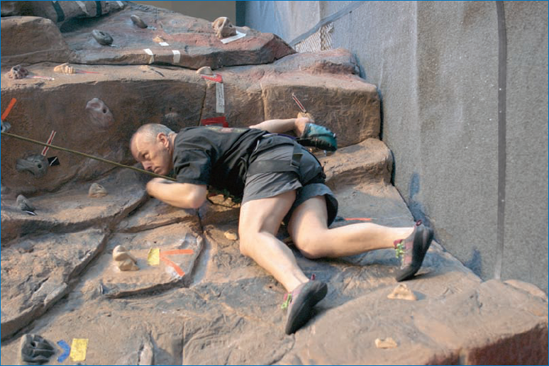
Figure 7-7. A climber negotiating a difficult move at an indoor facility, shot from the ground with a telephoto lens: © Amy Alden Timacheff

Figure 7-8. Shooting down at a climber from above and from an angle – whether shot from the top of the climb or while climbing it yourself, indoors or out – can be especially dramatic.: © Harry Haugen
Positioning yourself while climbing can be tricky, especially if you're free climbing (meaning you're not using a rope or harness) and have no way to steady yourself other than leaning into the rock face or wrapping your leg around a nearby tree trunk. You want to be in a position where you can access your equipment but you still may have to keep a grip with one hand on the wall. This may actually be easier on some outdoor climbs than on a climbing wall because natural rock faces (with some exceptions, of course) typically offer more spots (including trees and shrubs) where you can stop and rest without holding on with both your hands (see Figure 7-9).
The main thing to bear in mind when shooting climbers is that you want to present a broad set of images that show the various aspects of the ascent: the rock face, the difficulty of various aspects of the climbing, teamwork in belays, coming down if there's a rappel at the end, and so on. For positioning, this means you may have to do more work than some other climbers if you're working to document the climb, or that you may have to take an alternate route up in order to be far enough away to get good shots from above, across, and below the others.
When shooting from the ground, use a telephoto lens or setting on your camera to get up-close shots of climbers Additionally, however, shooting wide shots to get full perspectives of climbers high atop a wall is impressive and can even be breathtaking So, if you are shooting with an SLR and can afford to carry the extra lenses, do.

Figure 7-9. Natural rock faces sometimes offer spots where you can stop without having to hold on; this can be a good spot from which to take photos of other climbers.: © Harry Haugen
Now, if you are climbing with an SLR, you may want to carefully think about what kinds of shots you want to get Because if you want both close ups of climbers and wider shots to include the landscape of the rock face, you'll need to carry multiple lenses with you That will be in addition to everything else you need for the climb If you are seasoned climber, you know it is best to travel as lightly as possible, and attempt to take only what you'll really need — every additional ounce in a climb makes it tougher Also, remember that if you're carrying food or drinks in the same pack as your camera gear, you want to be sure nothing can break open and spill or expose your gear to undue humidity.
Carry your equipment as close to your body and attached as firmly as possible. A camera swinging from your shoulder or neck while climbing is not good for you or the camera. Harnesses, such as those made by LowePro and other companies, use soft neoprene straps to secure your camera to your body; however, also think about how the camera is positioned against you in case you are going to be very tight against the rock face or climbing wall.
Tip
While chalk is commonly used in climbing to help you grip rock, it's not a very friendly substance for camera gear If the minute particles get into your camera, they can cause severe problems with moving parts, spots on your CMOS or CCD, or dirt on lenses When shooting, do whatever you can to prevent the chalk from getting close to your equipment, and try not to open your camera during a climb While some cameras are more dust and dirt resistant than others, any equipment is subject to harm under these circumstances.
Because natural rock is an abstract form — meaning there are no precisely straight or geometric angles — you can shoot a distorted view such as you get with a fisheye or wide-angle lens and it can really look fantastic. However, if you shoot too close to a person with a very wide-angle lens (for example, 15mm), he or she will look very distorted and not particularly attractive; consequently, you should shoot wide shots with people in them from far enough away that the climbers are in the shot but not taking up more than about one-third to one-fourth of the image (or less).
Point-and-shoot camera quality, megapixel size, and electronics have improved vastly in the past few years, and the photos you can get with them are remarkably high quality. While to get truly commercial or fine art-quality images you will still need an SLR with an array of interchangeable lenses, for the average person, point-and-shoot cameras are a great place to begin shooting digital — especially if it's when you're dangling on the side of a rock face draped with karabiners, a chalk bag, and other hardware and gear as in Figure 7-10. The risks of dropping components, breaking them, and the sheer burden of carrying SLR equipment on a climb is such that your photography standards have to be pro level before you'll want to bother ascending with big gear.
Another factor that helps with photography in precarious positions is that point-and-shoot cameras have, in many cases, nearly full-manual operation — similar to what you find on an SLR — where you can set all of the controls, including shutter speed, aperture, and ISO to get good photos While they may not have the range of an SLR, and the operation may in some cases be a bit more cumbersome, they nonetheless provide many climbers with all the photography they'll ever need — at a fraction of the weight and risk.
Regardless of whether you're using an SLR or a point-and-shoot, you'll want to shoot in semi-manual or full manual mode While more tedious to learn and use at first, this will ultimately give you much better image quality and control over your photographs.
When shooting on a rock face in daylight you can disable your automatic flash unless you're shooting into dark spaces where a fill-flash might be useful. Generally speaking, automatic flashes tend to go off a bit too much when they aren't necessarily needed, and flash shots are rarely preferable over a naturally lighted exposure if there's enough ambient light to support it.

Figure 7-10. Climbers carry enough gear that the portability, accessibility, and image quality of a higher-end point-and-shoot camera is perfectly suited to climbing.: © Harry Haugen
When shooting at indoor climbing walls, whether you're on the wall or off, the light may be such that you'll need to use a flash. Some walls, such as the one at REI in Seattle (the largest indoor free-standing rock wall in the world) are surrounded by glass that allows lots of ambient light to get in; however, this isn't always the case. You can set your camera to a high ISO; if your images get sufficient light and the digital noise isn't too bad, that may work for you. Otherwise, using a flash may be necessary (if you can reduce the intensity of your flash — many external flashes offer this capability — it's a good idea because, while you may need some flash, you probably won't need to use it at full power).
Note
There are many extreme and adventure sports not covered specifically in this book, and new ones are added daily. Some sports, such as backcountry skiing or scuba diving, could reasonably be included in this chapter but I've put them into other ones for various reasons. Some, such as bungee jumping or ice climbing, while not addressed directly can be shot effectively based on the concepts presented for similar related sports.
Extreme and adventure sports are all the rage worldwide, whether they involve falling through open space or ascending seemingly impossible objects. However, shooting them can be challenging due to the burden of additional equipment, being able to get a good position, the elements, or the ability to access your gear.
If you're an observer of these sports, you may have the luxury of being able to move around and use more equipment. But, you may be limited in getting good shots of athletes at the peak moments of their pursuit. If you're a participant, then you're going to have to plan carefully not only what you're going to take with you and how you're going to carry it, but also how you are going to set your exposure when there are a lot of other things going on.
Wherever you are, shooting extreme and adventure sports is smorgasbord for photographers — there are so many opportunities and wonderful shots to take you may get more than you know what to do with. And, if you work to understand your camera and make the most of managing exposures and settings yourself, the shots will be that much better.