
From basketball to wrestling, fencing to ice hockey, and gymnastics to martial arts, worldwide indoor sports constitute a tremendous amount of athletic sports competition and recreation from tropical to arctic climates. Professional, semiprofessional, school, and amateur sports thrive in venues where there's climate control, lights, and creature comforts to keep athletes, spectators, and others happy.
For the digital sports photographer, however, indoor competition can present some significant challenges. The lighting can be abysmal, it can be difficult to get around a crowded sports hall to get a good photo, and traipsing around on hard floors all day can be rough on even the toughest shooter's knees.
For every negative, however, sports inside a building can make for some opportunities the outdoors can't beat. Weather is never a problem, for example, and at least the lighting — even if it is bad — remains constant throughout an event in both intensity and temperature (for white-balance). Furthermore, staging your shoot, if you have extra equipment you don't want to carry, can often be stored or anchored somewhere safe.
So indoor sports of all types require you, the photographer, to adapt to the environment, both from a logistical standpoint — meaning where you position yourself and how you get your shots — to technical issues for setting your camera to optimize sports-action photography results while dealing with various types and conditions of lighting. This chapter looks at lighting challenges as well as equipment involved in photographing various indoor competitive sports.
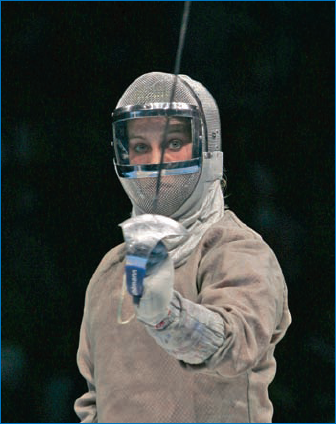
Indoor lighting for sports is often regulated and prescribed by sports organizations, but individual events may not adhere to it for reasons ranging from lack of awareness or inadequate resources and equipment to aesthetics or increased athletic drama. This may work to your benefit, or it may wreak havoc on your ability to get good shots Figure 6-1 illustrates a fencer photographed where the only light at the tournament was from overhead spotlights — which, in this case, provided a dramatic low-key lighting effect.
Indoors is where I spend most of my time shooting athletic competition. As the photographer for the International Fencing Federation (FIE), virtually every tournament takes place indoors Yet I'm continually surprised at what I find in every new venue.
In the last year, I shot in Qatar, Las Vegas, New York, Seattle, Bulgaria, Athens, Austria, Paris, Charlotte, and Algeria, and literally every venue had different lighting, different access issues, angles, challenges, and various other factors that directly affected my ability and my opportunities to get good photographs. In October 2003, shooting in Havana, Cuba, the lighting in the preliminaries hall was so bad (inconsistent and dark, primarily) that the FIE authorized photographers to use flash photography — something unprecedented in fencing This, of course, helped, but threw a new twist into how we as photographers had grown accustomed to shooting the sport.
While photographers deal with weather, temperature, dirt, and other factors outside, lighting is by far the biggest issue with indoor sports digital photography. Many cameras perfectly capable of capturing a good soccer photo outside even in cloudy daylight may be tough to use indoors without a flash. Furthermore, knowing how to set your white balance to match the lighting indoors without a flash is very important, and will prevent you from having to spend hours cleaning up color balance in an image editing package later.
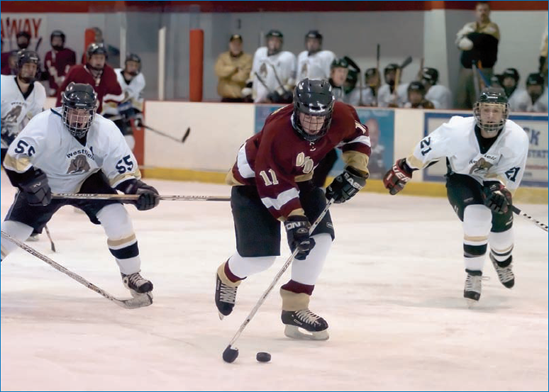
Some indoor sports even combine the challenges of indoor lighting with the same problems found in outdoor shoots. For example, Figure 6-2 illustrates a good action ice hockey photo where the colors of uniforms, the ice, and players' faces are well balanced — despite the fact that photographing on ice can be similar to photographing sports in the snow.
The equipment you select and use for shooting indoors is often determined by the type of lighting you anticipate (or know) you'll encounter. When shooting at major sports events, both amateur and professional, lighting is typically very consistent and bright, conforming to international or professional standards prescribed by sports federations. However, for any other sports events, all bets are off when it comes to lighting.
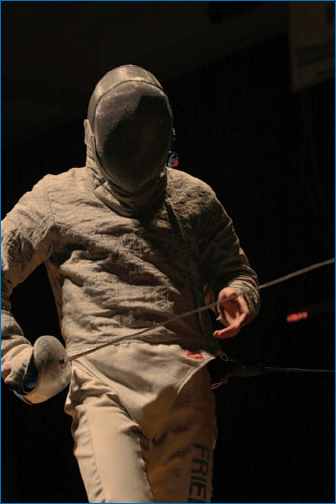
Figure 6-1. A fencer photographed in a final match at Duel in the Desert in Las Vegas, where the entire venue was darkened except for spotlights on the competitors — a challenging photography scenario but one, if shot correctly, that produces very interesting effects.
In fencing, as well as for other indoor sports, the lights are lowered during the final matches and then raised during the medal ceremonies — although I often change lenses between these events anyway. Lighting during preliminary rounds of various sports, leading up to semifinals and finals, is often spread throughout a large facility and lighting is typical of any large sports hall or gymnasium. Sometimes the lights are spread too far apart for effective photography illumination without a really fast camera and lens, and, in addition, sometimes the light can be quite varied (for example, if there is a combination of streaming outside sunlight coming into the venue through windows in combination with artificial lighting).
So, in order to get good photos in the varied lighting conditions you may experience, you'll want to ensure ahead of time that you have the equipment to get the kind of photos you need — most often without a flash. If you're taking photos of people in the stands, athletes warming up or off the court, or other non-action images, you can usually use your flash But the action shots are where the proverbial rubber meets the road in terms of the type of equipment you have versus the kind of images you want to capture.
Indoor sports are most often played on smaller surface areas than you find outdoors, so the really big lenses that you see pro photographers using on football, soccer, and baseball fields — 300mm, 400mm, and 600mm — aren't as useful indoors and can even become unwieldy in a crowded arena. It doesn't mean they aren't used, but rather that they are used less often.
This is good news if you're using a point-and-shoot camera or if you don't want to pay thousands of dollars for big lenses for your SLR Indoors you can sometimes get closer to the action, and bright indoor lighting may help you significantly to overcome any limitations your camera may have.
However, indoor photography can be challenging, as well, without higher-end equipment if the light is less than optimal or you don't have the access you'd like to players and action.
If you're shooting an SLR, it's good to have a few lenses that give you a focal length ranging from a reasonably wide setting — such as 24mm or wider — up to about 200mm or perhaps a bit longer — but not much more. Lenses longer than this, such as the 400mm lenses and longer that you see being used by photographers in football and baseball stadium shooting, are of less use indoors. This range is sufficient for most indoor venue, people, and action shots, even to get in rather tight if you need to. While more expensive, the fast zoom lenses that hold the same, wide aperture regardless of focal length (usually f/2 8 at the widest) are extremely useful and will allow you to shoot at faster shutter speeds (which is why they call them "fast" lenses).
If you intend to shoot sports indoors with a point-and-shoot, it's important that it's sensitive enough to capture the action without having to use a flash. That means you'll want a camera that can, preferably, range above ISO 400 (ISO 800 or higher is ideal), has a large-enough lens that it can let in sufficient light with a wide aperture, and can also shoot action shots at least at 1/250 second (and hopefully faster). Also, you'll want to be able to set these parameters manually, or at the very least at aperture and/or shutter priority modes. You can take some very good indoor sports shots with a point-and-shoot camera offering these features.
It's a good idea to carry your equipment in a secure, padded fanny pack or backpack when you're shooting sports indoors. Gyms, arenas, and other venues tend to be crowded and constructed of concrete and metal, materials that are not very forgiving if a camera or lens is knocked against a wall or dropped on the floor. Be sure to have lens caps on your lenses (a good idea no matter where you're shooting), use soft-rubber hoods (requiredfor many competitions if you're close to the athletes), and always use a haze or skylight filter on your lens(es). More than once, the filter has taken a hit when I dropped a lens but the lens remained intact — the same concept as what a helmet does for a cyclist's head.
At no other time will you need to be more aware of your how your f-stops — your camera's aperture settings — work than when you're shooting indoor competition with various focal lengths. It can make the difference between getting and not getting the shot you want. It's important to understand how shutter speed, ISO, and f-stops work with your various lens settings to optimize your image quality and to catch the action. Here are a few basics, just to remind you of how camera settings work:
Aperture, which is measured in f-stops, is the opening in the lens that allows light into the camera when you take a photo. When you take a photo, it opens and closes to the specified f-stop width.
Shutter speed is the amount of time it takes for the lens to open and close when you press the shutter button.
ISO is the sensitivity of the camera's light-absorbing chip that captures the digital image and is measured/indicated in whole numbers (for example, 50, 100, 200, 400, 800, and higher).
These three factors are forever intertwined to define the quality of your image. If the lens opens wide (a low f-stop setting, such as f/2.8), then your shutter speed can be fast to capture a stop-action event (creating a more shallow depth-of-field image). If your lens doesn't open as wide, then your shutter speed needs to be slower so there's time for more light to get to the image sensor (which will yield a deeper depth-of-field image).
Additionally, if less light is coming in, you can increase the ISO sensitivity. However, this is your last resort, because the higher your ISO sensitivity, the more digital noise there will be in the photo; this is especially true of less-expensive cameras.
Now, consider your lens; it can be various lengths. If it's long, not as much light can get in, so your settings must deal with this. You might wonder why your long shots turn out darker than your close ones, even if you think your settings are the same. They probably aren't — even in manual or aperture-priority modes, your camera's lens can only do what it is physically capable of doing.
High-end telephoto lenses, as discussed elsewhere in this book, have the ability to maintain the same aperture opening whether they're zoomed all the way out or all the way in. But this is an expensive feature, and, while pro photographers use it commonly, it is prohibitively expensive for most amateur, enthusiast, and even semipro shooters.
Note
For more about the high-end and telephoto lenses, see Chapter 3.
This means your lens will probably have a different aperture if it's extended out to full telephoto mode or if it's set to be wide; often the gap between these aperture ratings can be quite significant, such as f/2.8 and f/6.3 — nearly one-third smaller (remember, a smaller aperture or f-stop number is a wider opening — f/2.8 is much wider than f/6.3). As you zoom out, the aperture will only open to a smaller width.
The tough part of shooting indoor competition is that if you're shooting in a telephoto mode — meaning anything but being as close as possible to the action — you're going to have to do either of two things to get a good exposure: slow down your shutter speed or increase your ISO sensitivity — neither of which may be desirable, but necessary.
If you need to get stop-action shots, and your camera handles digital noise at higher ISO settings reasonably well, increase your ISO before you lower your shutter speed. If you get too much noise, however, you may have to lower the shutter speed to get an image of good quality.
The main point to bear in mind when shooting with a zoom lens is that it is most likely going to have a lower, slower capability when zoomed out than when zoomed in. For optimal results, do whatever you can to get as close to the lighted action as possible — this is the best solution to avoid having to make changes to your settings on the camera.
Most cameras have a built-in flash, sometimes called a wink flash. SLRs and some higher-end point-and-shoot cameras may have both a flash and a hot shoe for attaching an external flash, and very high-end SLR cameras only allow external flashes and have no built-in flash.
Note
Higher-end cameras also have the ability to have a synch cable attached to connect to external lighting systems.
If you have a built-in flash and you run on automatic mode, you need to be careful in sports halls to disable it unless you really plan to use the flash for a photo — and the use of a flash is allowed. Most indoor facilities are dark enough that the camera will think it needs to use the flash, and if you're close to the athletes this can be a bad thing as a sudden bright light can momentarily blind them. This can be dangerous to the athletes in many sports and is often prohibited (and, the last thing you want is an angry player or coach blaming you for an athlete losing in important point or score, or, even worse, being injured). Furthermore, if you're up in the stands, the flash firing won't do you much good. So turn it off and plan to compensate by running in a semi-manual or full-manual mode.
Got red-eye? This is caused by the reflection of the flash off of the retinas of the subject's eyes. It's especially a problem with people who have light skin and lighter colored eyes.
Many cameras offer a red-eye feature that flashes the flash briefly before the image is taken; this causes the person's eyes to react to the light, constricting the pupils before the image is taken. However, the red-eye feature slows your camera's reaction time from when you press the shutter release.
Victory and medal shots are when you're most likely to be close to athletes and using a flash, such as the image in Figure 6-3 of the French men's epee fencing team just after winning a gold medal in Athens.
Tip
If your camera supports it, using an external flash will help eliminate or at least reduce flash. You can also bounce your flash by pointing it away from subjects and using something to bounce the light in their direction — either a wall or ceiling, or a device you physically attach to the flash for this purpose.
Note
If you do get red-eye, no reason for despair: Most image-editing applications today work very well to eliminate it in your photo. For more on this, see Chapter 10.

Your camera's white-balance is the other major factor you'll want to be on top of when shooting indoors. Whether you set it manually or you use a camera's white-balance preset, you'll find different light in almost every facility in which you shoot.
As covered in the section on snow in Chapter 5, digital cameras see the world in averaged 18 percent gray. The term "white" balance is misleading; it's really a balance between black and white and an average of the full spectrum of light that's available. How the world is illuminated is measured in temperature (degrees of Kelvin); some lights are "hotter" than others. You want to have your camera setting matched as closely as possible to the temperature of the venue lighting in a sports hall.
This can be tricky. Lights, such as household lamps and spotlights, are not as hot as some other lights in terms of their temperature; this type of light is called tungsten, which refers to the kind of filaments used in the lamps. Other lights, such as studio flashes, are much hotter and vary according to the type and quality of strobe. A small built-in flash on a point-and-shoot may be very hot Still other types of lights, and those that you commonly find in a gymnasium or sports hall can be fluorescent, sodium or mercury vapor, or a variety of other types of lighting. However, these three are by far the most widely varying types of lights in terms of temperature, which can wreak havoc on your white-balance settings — and it's why no two venues are the same. Table 6-1 lists the types of light you are likely to encounter and the approximate Kelvin temperatures of each, as provided by Mark Rezzonico, vice president of Profoto.
Table 6-1. Kelvin Temperatures for Common Lighting
Temperature Range (in Degrees Kelvin) | |
|---|---|
"Wink" flashes | Approx. 10,000° |
External SLR camera flash | Approx. 5500° |
Medium-quality Studio Strobe | Approx. 7500°(may fluctuate as product ages) |
Professional Studio Strobe | Approx. 5300-5500° |
Common light bulb (tungsten) | Approx. 2800-3200° |
Sunlight | Can vary between 3500° and 10,000°. The variation depends on time of day, direction of sunlight, and time of year/light intensity. |
Daylight/sunlight average | 5400-5500° |
Sodium or mercury vapor, fluorescent | Varies |
Your camera probably has icons referring to various types of light you'll encounter: a sun, a little light bulb(this is tungsten), a fluorescent lamp, a flash, and perhaps clouds. Each of these is a specific Kelvin temperature that, when you select it, sets the camera to that corresponding white balance setting. For the fluorescent setting, which you would also normally use for sodium and mercury-vapor lights, the camera manufacturer has chosen to preset a temperature, but the temperature of these lights vary so widely that the preset can often be unreliable.
You may also have a custom white-balance setting that allows you to specifically set your camera to whatever temperature you want. Your camera may also be capable of allowing you to take a photo of something such as a gray card and then set the camera's white-balance to make the image balance correctly.
If you're intending to shoot regularly indoors with a wide variation in lighting (meaning many different locations), you may want to look at a product called the Expodisc White Balance filter, which is sold by most pro camera retailers including B & H Photo, Adorama, and others. This is a light disc that you hold in front of your camera lens as you take a photo in the light where you intend to shoot. It then allows you to take an accurate reading and set a custom white-balance in your camera (assuming it supports doing so) that, instead of simply reflecting light off of a white-balance gray card, the camera actually sees the light as it is I've met several photographers who swear by this product.
Tip
For more information about the Expodisc, visit www.expodisc.com Expoimaging, makers of the Expodisc, also make similar filters for warm balance.
Whatever the method, white-balance is something you'll need to change for various facilities. The first thing to do is to take a look at the types of light being used and set your camera accordingly. Chances are, the lights in a gymnasium, convention center, arena, or other venue are sodium or mercury-vapor types While these lights, which are usually spaced about every 20 feet or so, are slow to warm-up, they provide a lot of bright, white light in a large facility. For this type of light, you will want to try using a fluorescent preset in your camera. If it looks too blue or too red, you can also try your lightbulb or flash setting to see if it improves.
If you're shooting a highly spotlighted event, try the lightbulb (tungsten) setting first. Sometimes the lights at these events will also have colored gels (synthetic colored sheets) placed over them; the setting on your camera is the same regardless of the specific color. As you can see in Figure 6-4, in a stylized image of a fencer, gel-covered tungsten lights are shining behind him.

In the last 20 years, basketball has become a big-action sport with high-flying dunks and spectacular plays. Every sports photographer shooting the game has dreams and hopes of catching a player in midair dropping the ball into a swishing net.
As a team sport that moves back and forth across the court, shooting basketball is similar to shooting soccer and hockey, which is described in Chapter 4. The players move very quickly; keeping a visual lock on them as well as the ball can be very difficult. At the same time, you don't want to shoot too widely because then you risk losing the subject and the action in a busy arena.
If you do get onto the floor of a basketball game — whether it's professional, high school, or any other level of play — above all be cognizant of the players, fans, officials, and referees as you should be when photographing any sport. It's a fast, chaotic game, and it's easy to get in the way; this is also the sport that most commonly requires photographers to use soft-rubber hoods to protect the players should they run into the end of your camera.
To get the big-action shots in basketball, position yourself along the sideline at the end of the court. Most action of all types — whether it's battling for control of the ball, guarding a dribbling player, or shooting a free throw — takes place in this area, although it can happen equally at either end of the court so you will need to make some choices as to where you're located.
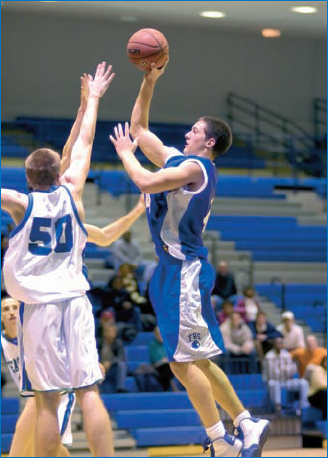
Many teams — high school and college included — are known for players who are the stars of the team, because of their abilities at handling the ball, scoring points, and making the big jumps. If you know who these players are, you can better choose which end to be at to be able to catch them when they make their moves. If you don't know the players, ask some fans; they'll be more than happy to give you more information than you probably ever wanted to know Shots like the one in Figure 6-5 are a product of anticipation and positioning.
If you're in the stands and locked into a specific seat, you may have little control over your positioning; moving away from your seat and going to the edge of the rails to shoot might work for a shot or two, but you'll probably have someone yelling at you quite quickly if you're in the way. With the right lens — meaning relatively long and fast — a potential solution may be going higher in the stands where you may have easier access and the fans are more likely to tolerate your presence (as long as you stay out of their way!).
If you're on the floor, you may have some options for seating and you may not. You'll need to plan to sit on the floor itself, out of the view of everyone else who needs or wants to see the action. Because you'll need to move around some, and because even semipros won't really need gigantic lenses, using a monopod is optional but you may find it just gets in the way. Wear comfortable clothes and plan to sit on a hard surface for a long time. You can also bring a small, portable stools or an insulating cushion (sports floors can get uncomfortably hard and cold).
Close to the action, use a wide-angle lens or setting on your camera — at least for some shots — to get enough of what's right in front of you into the image. If you're using an SLR camera, a fisheye lens (15mm or smaller) can make for a fun and interesting perspective, but not one you'll want for every shot. The distortion the lens creates is a great effect for establishment and dramatic one-of-a-kind shots, but it is not meant or intended to be used to document an entire event.

For basketball, getting the shots means getting the shots — as in basketball shots! Whether it's the ball being dunked, a tough lay-up, or even a nice free throw, you want the ball to be the center of the action. Another nice perspective is when a player is moving fast while dribbling with a defender tight at his or her side, or a face-off between opponents, such as the one in Figure 6-6. These common types of basketball action shots never lose their interest or value among editors, parents, sports fans, or players.
Your camera settings in basketball need to be ready to catch big, fast action. You probably don't want to start by taking images that are too tight; they'll be hard to focus and you want to get a bigger-game perspective before you begin to zoom in. If you're trying to get a jump shot, just having the photo of the players' hands and heads at the top of the basket won't reflect the drama created when seeing their entire bodies a few feet off the floor.
What does that mean in terms of specific settings? Have a medium-wide focal setting on your lens — for an SLR, that means probably somewhere between 50mm and 100mm — with a shutter speed of 1/250 at the very least, and preferably 1/500 or faster. Your f-stop should be set to as narrow a depth of field as you can handle to get the shot.
For a point-and-shoot camera, you'll want to be zoomed at a medium range and, if your camera offers shutter-speed priority, set your shutter for 1/250 or 1/500 second at the highest ISO you have. Take a look at the shots you get with that setting, and then adjust your settings from there accordingly — perhaps slowing the shutter speed if the shots are too dark, for example. If they're over-exposed, then you can decrease the ISO sensitivity.
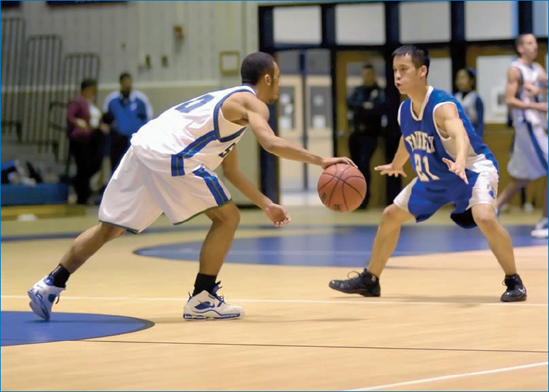
Figure 6-6. Whether in a tight run or a face-off, getting a basketball player dribbling a ball while facing an obstacle or challenge always makes for good visual drama.: © Joy Absalon
One good bit of news about basketball photography is that you can fix your focus on the basket and know that many basket shots — especially lay-ups and rebounds — will be just about within that distance. Jump shots may take place farther away from the basket, and your attention to a changing focal range will need to be keen. This means you can keep the focus on a manual setting as long as you're specifically shooting the basket shots — but don't forget that you've got your camera on a manual focus if you go back to shooting action on the floor.
Interview: Joy Absalon
Joy Absalon is an accomplished Virginia/Washington, D.C. -based sports photographer who shoots a variety of sports around the U.S. Some of her work is featured in this chapter and in Chapter 4. While Joy specializes in baseball — her passion and the sport about which she is most knowledgeable — she freelances in all sports photography and shoots for Potomac Nationals minor-league baseball team Her work appears in various publications such as At the Yard magazine, and she is an active member of Sportsshooter.com.
Joy Absalon, digital Nikon SLR and monopod in-hand, shoots a baseball game.
While Joy shoots baseball more than anything else, her prolific technique and photography skills can be and are applied to sports both indoors and out, including wrestling, volleyball, basketball, ice hockey, tennis, track and field, and gymnastics.
What camera settings work for you.
For most sports action images I shoot everything at f/2.8 or f/4 and a narrow depth of field. Doing so helps keep the background blurred so that the subject is the main focus of the photograph. I use no special lighting.
What does it take to capture the best photos for your sport(s)?
Since I specialize especially in pro baseball my response is geared toward that. A fast shutter speed is of the utmost importance when shooting a 95 mph fastball. For night games, I constantly monitor my shutter speed to maintain a minimum of 1/1000 of a second. If that means bumping the ISO up, then I do it. Knowledge of the sport is also extremely important. Being able to anticipate what is going to happen next is very helpful; for example, if there's a runner on first with no outs, I stay focused on second base in anticipation of a double play or an attempted steal.

© Joy Absalon
Baseball is the primary sports Joy shoots.
What tips do you have for aspiring sports photographers?
Watch your backgrounds. Make sure you are at the best angle possible to prevent distracting backgrounds; this is especially important if you do not have a fast lens that would help to blur or distort the background. If you are shooting your subject or child on a community field, local park, or school field, make sure there isn't a tree or pole that appears to be growing out from his or her head. Check that there aren't any trashcans or port-a-potties in the background. Don't just snap without looking around...if you see these items in the viewfinder, move a few feet to your right or left and check your composition again.
Don't cut off a limb Try not to cut off a player's arm or leg. If you must do so, then don't cut the limb off at the joint. Doing so tends to make the subject appear to be an amputee.
Fill the frame with your subject as much as possible. Your subject should be the main focus of the image, not the entire playing field. Using a telephoto zoom lens will assist you in properly framing your image over shooting with a fixed focal length lens.
Use the fastest shutter speed possible. This will help freeze action such as the movement of the ball, bat, or runner. Lenses with larger apertures, although much more expensive, will permit the camera to select higher shutter speeds..
Timing takes practice. And practice, and more practice. Timing peak action so that you can get a photo of your subject throwing a ball, hitting the ball, or running/sliding takes time. It's not something you master overnight. The wonderful thing about digital photography is that you no longer have to worry about the cost of buying and developing film. A favorite saying of mine is "shoot early and often." The more you practice (shoot) you should begin to see an improvement in the quality of your photographs. Keep a folder on your computer of images from the first game of the season. Periodically throughout the season, go back and open that first folder, and you'll be surprised at the improvement in your latest images. It's like everything else, the more you practice, the better you become.
Understand the rules and strategies of the game you are shooting. If you are interested in shooting the game and not just one subject (for example, your child), familiarize yourself with the rules of that game. In baseball you should look for the obvious: a runner on first with no outs (or one out) means you should watch for an attempted steal at second base or a possible double play. If you have a runner on third with no outs (or one out), watch for a play at home. Leadoff hitters tend to steal bases, so pay attention each time the leadoff hitter gets on base.
© Joy Absalon
Basketball, like baseball, is best shot looking up at the player.
Position is important. If at all possible, position yourself so that you are at field level. Try not to shoot down on your subject. You will get a better image if you are able to shoot up at your subject. Don't be afraid to get dirty. Kneel down on the ground and shoot. In baseball the player's hat or helmet tends to cast a dark shadow on the face. If the subject is looking down (at the plate or the base, for example), then being at a slightly lower level than the subject will help to capture the face. When shooting younger children, it's always best to shoot from their eye level, never down at them.
Be respectful and courteous. Don't get in the way of the players, coaches, officials, or professional photographers who may be there to photograph the event. Keep in mind that these people are working. I am always more than willing to share my knowledge with a parent or amateur photographer between innings or after a game. But even though it doesn't look like work, it is work for the professional who may be shooting that Little League game.
Don't be afraid to shoot through the fence if necessary. But remember, kneel down if at all possible and try not to obstruct another fan's enjoyment of the game while you are trying to photograph your subject.
Avoid shooting into the sun as this may cause lens flare. Again, move around and scout out a better shooting position.
To get tighter action shots in basketball, you will need an eagle's eye for focusing because it moves in all directions at high speed. Your auto-focus may be fast enough to catch it Perhaps you have focus tracking (Nikon)or AI Servo (Canon), which lets you keep focusing on a subject while it moves toward or away from you by keeping your finger down on the focus button. But even with automated features, it's tough to always be in focus. When using your auto-focus, it's easy to accidentally slip and focus on the crowd behind two players insteadof the players themselves.
As discussed with a other sports, if you pick a spot where you think action is likely to occur — such as under the basket or at another spot on the court — and set your focus for that spot, you can wait for the action to pass in that focal range; depending on your camera's speed, you may need to depress your shutter release as the athletes approach the spot instead of waiting to shoot the moment they are there.
For tighter shots, either increase your ISO or lower your shutter speed — or both — because the image will be too dark if kept on the wider setting that takes in a more highly lighted area. However, don't drop your shutter speed too much or you'll blur the action.
There are many types of martial arts: Tae Kwon Do, Karate, Judo, Aikido, Jiu Jitsu, Kung Fu, and others, all of which have various techniques and ways of presenting the sport. For example, some types are noncompetitive, but offer demonstrations and other events, while others host competitions.
It's very important that you know something about the specific martial art you want to shoot, because martial arts athletes are very particular about various ways the sport is presented, posed, and practiced. Subtle differences in how participants stand, hold equipment such as a sword, or at what point they are in a specific series of moves is important. As such, unless you're familiar with the intricacies, protocol, etiquette, and details of the sport, you'll want to have someone who's knowledgeable advise you so that you take not only well composed and exposed shots, but ones that are appropriately important for the sport itself. This is especially important if you are shooting a posed shot.
Finding the right position from which to shoot in martial arts will depend greatly on the type of event and martial art you are photographing. If it is a competition, then you'll want to find a good, unobstructed spot that's close enough for you to get good shots of the athletes' faces during moments of exertion and determination; however, you don't want to get so close that you are in danger of being in the way of a falling participant.
Commonly, you'll be shooting up toward the participants from a sitting position around the event if it's a competition. As with basketball, this will not only work as the best perspective for you, it also ensures that you don't get in the way of spectators or officials.
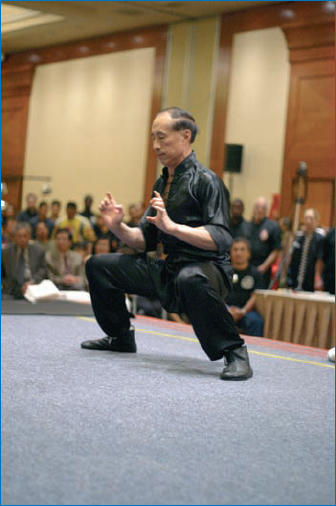
You should be able to get onto the floor at larger competitions and close to the area where the event is taking place, so finding the right spot should be relatively easy. In a more confined martial arts club, this becomes a bit more difficult as they tend to be small and sometimes dark In this situation, you'll want to watch an event or practice first before shooting so that you can scope out the area to find the best spots and to check your settings to be sure your camera will be able to get good shots. Getting a good, low angle in martial arts is desirable whether it's a demonstration or a competition, as you can see in Figure 6-7.
For martial arts, a narrow depth-of-field setting (meaning a wide aperture combined with a relatively fast shutter speed) is optimal to blur the background and emphasize the action — whether it's one or several athletes.
Because you can get closer to the subject, you typically won't have to use a telephoto lens; instead, you can use a standard portrait-length lens (approximately 50mm or so) and get perfectly good shots. Furthermore, in all but the most aggressive martial arts events and styles, a super-fast shutter speed isn't needed; you should be able to catch moves and even some action in the 1/125 to 1/250 range.
Some martial arts events, such as the one shown in Figure 6-8, feature exciting displays of extreme endurance or human capabilities. These can be lots of fun to shoot and serve as very memorable shots for personal use or for sale.
For martial arts competition where there are two participants in combat, you'll get optimal shots if it's possible to move around them to get various angles and catch the action. This means you'll be standing and shooting, so you'll need to be careful about your focusing — focusing manually with an SLR works very well, but takes a bit of practice — and you need to be cognizant of not getting in the way of spectators.
The use of flash, as in other sports, is often discouraged in martial arts.

A popular, big-arena sport, ice hockey is one of the toughest indoor sports to shoot. The crowds are notoriously wild (as are the players!); the venue stands are dark, and the ice is bright and white; the puck is nearly invisible when looking through a viewfinder or, worse yet, an LCD; and the action is fast and furious. As with baseball, the bigger the level of game with the best action means you may have the most limited access. This is an event where you will have to shoot from the stands, and, depending on where you are seated or positioned, you may have a large Plexiglas window in front of you.
For smaller regional or school games, you may be able to get special access where you undoubtedly will have one of the best views of the game where you can get not only great ice shots, but images of the players in the team boxes as well — which is very tough to do from the stands.
Getting a good position to take great shots in ice hockey may be tough unless you have special access. Pros like Joy Absalon shoot ice hockey from player level, as you can see in Figure 6-9. However, given that the rink is surrounded by protective, transparent material, if you don't have special access then you'll most probably want to be above that level because shooting through it will, without fail, cause your images to be distorted, unclear, and of poor quality (unless you can find a spot where there's an opening in the Plexiglas, which is what pro photographers are provided). The only exception to this is when you happen to get a shot of players banging-up against the Plexiglas and you're on the other side with a wide-angle lens to show in gruesome detail their faces and equipment squashed flat.
If you do have access to the side of the ice, you will want to get tight shots of the players at directly across the ice at body/eye level, or perhaps slightly up. You won't be able to move easily around the ice rink so you'll need to use your zoom lens capabilities quite a bit. If you have more than one camera, you can also have them set to different focal lengths or, in the case of SLRs, have different lenses so you can get various shots. You'll need to change lenses or have multiple cameras to shift from images down or across the ice to ones close by.
From the stands, you will need to be above the level where the Plexiglas obstructs your view; if you can't do that, do whatever you can to prevent reflections from distorting your images. You'll want to use a telephoto setting in most cases, although you may have to limit how far you zoom out in order to have the optimal aperture opening.
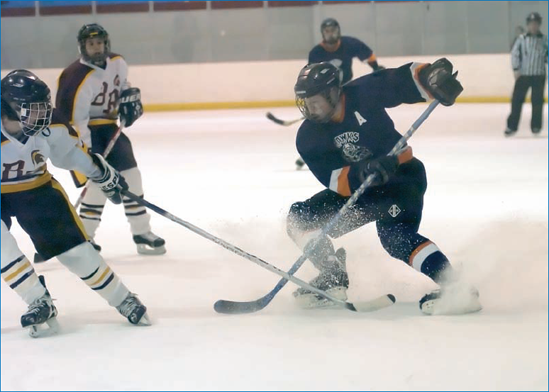
Figure 6-9. Pro photographers have access to the ice and to positioning that allows them to avoid having to take photos through Plexiglas.: © Joy Absalon
Tip
If you have a newer point-and-shoot camera that has a decently high megapixel capability, you may be able to use the larger images to get better shots; here's how: Instead of shooting at your maximum telephoto setting in a lower-light venue, take your photos at about one-third the telephoto range. This means you'll have a photo of more of the ice and players than you really want, but you'll be able to shoot at a better, wider aperture. If you shoot at your camera's highest megapixel capability, then later on when you're doing your image editing, you can crop the photo. If you shoot at a smaller megapixel level, you might end up cropping a photo that is too small to print effectively.
In ice hockey, there is a significant issue with white-balance; not only must you consider the lighting in the venue, but you also have to take into account the same factor as with snow: a large, white surface. If you simply take a photo of the bare ice with nothing on it, and you leave your camera at an automatic white-balance, it will render the ice a gray tone. As with the snow, override this by turning off your camera's automatic white-balance; try a preset for the specific kind of lighting in the venue (for example, the light bulb, or tungsten, setting may be a good place to start).
The most important factor in your settings is to ensure your camera is properly capturing skin tones and uniform colors; if the ice is a bit off-color, better it than the player. Also, ice in a hockey rink isn't going to have quite the same pristine whiteness you expect in a photo of a ski slope. Getting the puck, the players' faces, the uniforms, and also the ice exposed well — as in Figure 6-10 — is challenging even for high-end cameras.
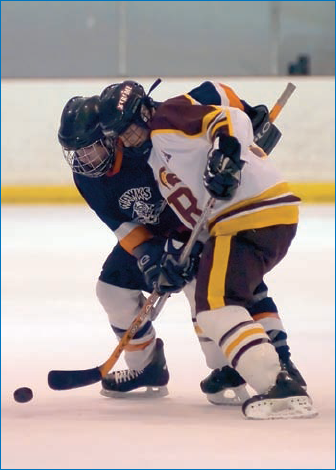
Figure 6-10. Shooting ice hockey involves making sure your exposure is set properly for the players first and the ice second.: © Joy Absalon
Because of the relatively limited access you will have to shooting the players, you're going to have to adapt your camera's focal and exposure settings to accommodate your lack of mobility. Hockey is a fast-action sport, and you want to emphasize higher shutter speeds if at all possible on your camera — so the trade-off, as is so common for indoor sports, will be your ISO. Even at your camera's widest aperture setting, you may get images that are just too dark if you're shooting at a shutter speed of 1/500 or faster. So you'll have to bump up your ISO to a more sensitive setting; for cameras capable of it, this might mean shooting at ISO800, 1200, or 1600. While the images will have more digital noise, it's better than blurred players.
Tip
Digital noise that comes from shooting at high ISO settings (1200, 1600, 3200) can be somewhat improved by using noise-reduction tools in various software packages. Adobe Photoshop CS2 has some sophisticated tools for noise reduction that you can selectively apply to images. Additionally, there are software packages that run as plug-ins to Photoshop and Photoshop Elements — Dfine is one that I use — that will reduce and, in some cases, virtually eliminate digital noise.
Because high school and other minor league and nonprofessional hockey games may be played in smaller venues, they often have lighting that's more conducive to being photographed with a camera normally challenged in darker conditions. For example, many of these games take place at commercial ice arenas where the lights are turned on all the way, and the illumination is more like a large gymnasium with sodium or mercury-vapor lighting. However, you'll still want to adjust your white-balance settings to account for the white ice and the players, but the white-balance will probably be different than in a professional sports arena where the ice is spotlighted.
Shooting wrestling is about getting the action, but it's even more about getting dramatic face shots of wrestlers pinned down, exerting themselves, and in a state of extreme physical endurance.
The area where the athletes wrestle is contained to a relatively small area, meaning you don't have to worry so much about covering the large space you do in full-arena sports like basketball or ice hockey. Instead, focus on the space inside the ring, in which you can often move around relatively freely.
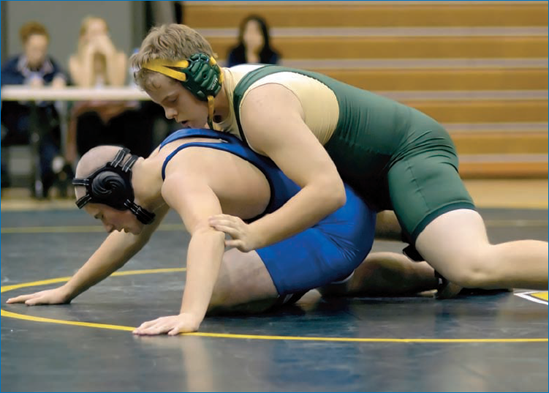
Some of the best shots of wrestling are from floor level, which means you may need to lie down and shoot straight across the floor with a midlevel telephoto setting. At the very least, you want to shoot while sitting on the floor to get an athlete's-eye view of the action, as in Figure 6-11.
There are distinct stages during a wrestling match. It normally begins with the athletes standing. At this stage, getting the takedown is a good image to capture and rarely results in anything but a good action move where both athletes are working hard at their game. You can use the same positioning with this shot — sitting on the floor — or you can shoot it from the stands if necessary. Generally speaking, however, it's better to try and avoid shooting down onto the wrestlers if at all possible; one or two shots from the stands won't hurt, but your perspective from floor level will have much more impact.
You'll probably want to shoot at a higher ISO setting, if not the highest that your camera features, in order to get some nice narrow depth-of-field images where the action is crisp. You can probably shoot at 1/250 but 1/500 or faster will stop the action much better.
In addition, you may want to experiment with a few intentionally blurred shots at lower shutter speeds — say 1/15 or slower — when the wrestlers are actively engaged and moving (not just when they're holding steady and trying to pin one another). While you shouldn't set all of your shots this way, a blurred image can have some interesting artistic effect, and you can play with it in Photoshop elements later by adding some cutout and/or poster-edge filters; this will work well with a blurry image.
To set your camera for the slower action, select your shutter-speed priority feature and set it to the slower speed. Still keep a high ISO, however, unless the image is much too overexposed after trying it and reviewing the image in your camera's LCD Figure 6-12, for example, while an action shot, didn't require a very fast shutter speed.
When shooting at floor level, use your telephoto lens or focal length (for a fixed-lens point-and-shoot) to get close to the action. You want the image to appear as if you were only a foot or two away from the wrestlers. And, once again, you'll want your ISO as high as possible.

Figure 6-12. These wrestlers are locked in combat as each tries to take the other down.: © Joy Absalon
Watch for good color reproduction in your athletes' faces; this adds to the effect of them exerting themselves. Wrestling is a colorful sport with bright, fitted uniforms emphasized by the often lean, muscular builds of the competitors; you want to capture this aspect of it and use it to photographic advantage as much as possible.
Shooting gymnastics is like photographing a three-ring circus: There's much from which to choose, and you can get a wide perspective of the entire event with all of its complexity and excitement, or you can choose to focus on a single event and aspect of it. This is another fast-action sport, and when shot indoors requires hard work to get the right settings on your camera to achieve the best possible image reproduction of the event.
Most commonly, gymnastics events are broadly lit with lighting that's relatively even throughout the venue. If you can get a good setting that stops the action, you should be able to use it with only minor variation for nearly every event. (You definitely don't want to use a flash in this sport; it can be quite dangerous to the competitors.)
You may or may not have freedom to move about in a gymnastics event. For larger, higher-level competitions, credentials are often required to be on the floor. There is too much going on to chance having someone unfamiliar with the layout and/or the sport get in the way of an athlete at a critical moment; it can be distracting and even dangerous. However, for lower-level events, you may be permitted to be on the floor, and if you are, you need to be highly aware of what's going on and at all costs do not get in the way of any event, athlete, or official. Figures 6-13 and 6-14 were shot from the floor at an exhibition. They required an ISO1600 setting to be properly exposed.
If you are on the floor, be sure you avoid getting in the way of the judges observing the athlete; however, they often have the best view in the house, so whatever you can do to be at a similar vantage point is often the surest way of being in the best position. For floor exercises, get a seat alongside the floor space but don't get so close that you constantly need to make dramatic focal-length changes; standing or sitting back just abit, as long as it's unobstructed, is better than being right at the edge.
For more non-floor events, such as rings, balance beam, vault, parallel bars, and uneven parallel bars, the best perspective is shooting up from a lower position. It makes the athlete look higher, the moves more perilous, and the action more dramatic than if you are at their level. However, from the stands you may be limited; if so, try to get a tight telephoto shot that emphasizes the athletes' faces and bodies as they exert themselves.

From the floor, you can shoot with a midrange setting from 50mm to 120mm; a wide-angle shot is sometimes effective, as well, if you're up close to an event (but don't get too close).
For the vault, rings, and other events where the athlete is moving in a relatively small area, you can set your focus manually and, for the most part, not have to worry about it. If you decide to close in tightly on the athlete's face or another part, such as hands or flexed muscles, then remember you'll probably need to bump up your ISO or drop your shutter speed to ensure your exposure is on target.
For floor exercises, athletes will be using a wider area for their performances; as a result, you'll need to vary your focal length accordingly and you should program your settings for more of a high-speed event. To get a gymnast in a midair flip or somersault, set your camera to at least 1/500 if you want to catch him or her in a stop-action shot. You may have trouble with a point-and-shoot camera if you try to auto-focus and catch the gymnast in an action move; you are better off setting the focus manually and finding a spot where you think the athlete will pass and trying to get it that way or by focusing on a single spot at the start of finish. Sometimes the shots where athletes throw their hands in the air as a signal of a victorious finish is worth as much as an action shot — especially if the action shot is going to be a poor exposure.
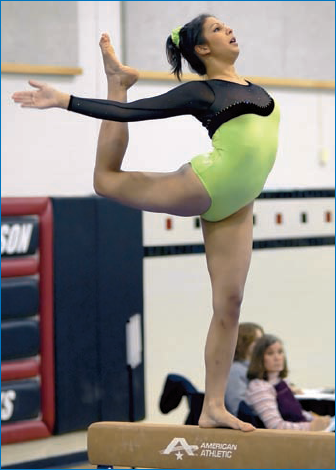
Stop-action gymnastics images require different positioning and settings for a balance beam (where the athlete is in a relatively small area) versus a floor exercise, where she may be virtually anywhere in a large area, as demonstrated in Figures 6-15 and 6-16.
If you're limited in your access to the floor, you'll need to shoot in telephoto mode to get the best shots; there's simply too much going on in a gymnastics meet to be able to get much out of a wide shot. That said, if it's too dark, then, as with hockey, you may want to have your camera set to its highest megapixel setting, take a wider shot that lets you have a reasonable shutter speed for action, and then crop it down later in your studio.


Because fencing is so close to my heart and it's what I spend most of my photographic time shooting (I'm a competitor in it, as well), it's hard for me to only spend a minimal amount of space writing about how to shoot the sport. However, I realize that there are some sports photographers — amateur, enthusiast, semiprofessional, and professional — who may never shoot a fencing bout.
Fencing, as mentioned elsewhere in this book, is a tough sport to shoot; the action is fast, the lightingis bad, and no flashes are allowed. Added to that, it's a sport where you cannot see the athletes' faces until their competition is finished (although this is changing somewhat now with clear face masks), so your ability to personalize your images of the fencers is also limited.
To effectively shoot fencing, you have to first understand the sport and the three different types of weapons — epee, saber, and foil — and how they are fenced because it is quite different. Epee is more slow and methodical, punctuated by fast moves; saber, on the other hand, happens very quickly and each encounter is over in an instant. High-level, championship fencing finals are fenced typically with bright overhead light and a darkened background and audience; however, the preliminaries as well as most other tournaments take place in standard venue/gymnasium lighting.
Note
To see the variety of venues and lighting, take a look at the many shots from allover the world on my Web site, www.FencingPhotos.com.
Most large fencing tournaments restrict photographers without credentials from being very close to the fencing strip; the referee moves up and down the piste (fencing strip), there are electrical cables everywhere to stumble over, and generally speaking being too close to fencers and shooting — even without a flash — can be distracting to them (or, worse yet, to their parents or coaches). It's been said that, second only to shooting, fencing is the fastest Olympic sport.
Most photographers who first try to shoot fencing attempt to do so from a 90-degree, perpendicular angle to the fencing strip. This is perhaps the most difficult and limiting spot from which to shoot the sport, and the likelihood of getting good shots is low. The best position, I've found, is to be about one-third to one-quarter from the end of either side of the fencing strip, and about 25 to 30 feet away; this provides optimal focal range for narrow depth-of-field shots so that you don't have to be constantly changing your focus.
Another reason to be at the position just described is that the referee may very well be in between you and the fencers as he or she moves back and forth — and often is in the way just at the wrong time during a great move. From the other side, if you are opposing the referee, you may have to deal with scoring equipment between you and the fencers. Figure 6-17, a stop-action shot from Athens 2004, is a dramatically athletic move by Russian fencing champion Tatiana Logounova.
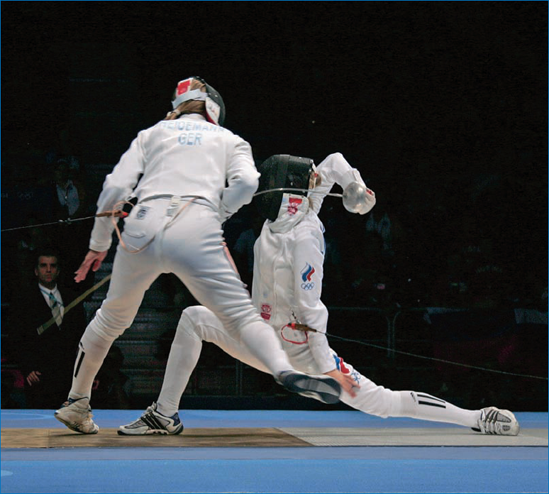
Figure 6-17. This move by Russia's Tatiana Logounova (right) never fails to astound fencers who see the image.
If you're in the stands watching a large fencing match, you will need a telephoto lens, or if you have a point-and-shoot camera, a telephoto setting and a high-enough ISO level that enables you to get the fencers in motion. From the stands, being at the angled position from the centerline is less important; the farther you are from the strip, the more you'll be able to simply pan your camera back and forth to get good perspectives.
Another interesting position is to be directly at the end of the strip, where you can get a shot of the fencer from the perspective of his or her opponent. This can be a really tough shot, however, because you must constantly change your focus setting to get the shots.
There are key moments in a fencing match that are good to capture: The salute by the fencers to each other and the referee at the beginning of the bout; big actions where the fencer is fleching or making another large, long attack; in-fighting, where the fencers are contorted at close range; and at the end of the match when they tear off their masks in victory or defeat. There are other moments and points, but these are important ones that typically take place in almost every bout.
When I shoot fencing, I most often use a 70–200mm zoom lens, and I shoot almost all action at f/2.8 and a shutter speed of at least 1/500. My ISO varies, of course, in order to do this, given the changing light in the different venues. The settings have to change during various non-action points during the bout; for example, I lower my shutter speed to 1/125 or 1/250 when the fencers take their one-minute breaks because they then take off their masks and I can get a good exposure of their faces, as well as their coaches.
Because the fencing world is slowly changing to clear face masks, the need to get good images of faces through the masks is increasingly important; this change has been driven largely by the International Fencing Federation's interest in having TV cameras and still photography personalize the sport to a greater degree. Figure 6-18 is an image of U.S. saber fencer and Olympic gold medalist Mariel Zagunis, taken in Athens at the 2004 Olympics. It highlights the value of clear masks.
For shooting at local and regional fencing tournaments, using a point-and-shoot camera requires you to shoot at its maximum ISO setting and widest aperture in order to be able to have as fast a shutter speed as possible without the image being too dark. It's better, also, to even shoot a little dark if you have to and then to lighten the photo later in Photoshop Elements or another image-editing package in order to get the shots. Fencing is so fast that even when I shoot at 1/500 of a second, I occasionally am unable to stop a fencing blade in motion.
Unless you can change your camera's settings very quickly, optimally you might want to have two cameras: one set for action, the other for people's faces. Barring that, usually you can take an automatic shot — including using the flash — when the fencers finish their bout and remove their masks (as long as it doesn't interfere with other fencing going on around you). To do this, you can shoot manually during the fencing bout and then, at the end, quickly change your camera to the automatic setting (for many cameras, this is done only by turning the wheel at the top of the camera from M (manual) to P (or whatever the automatic symbol may be for your camera). To get the shot of the Ukrainian fencing champion in Figure 6-19, I changed my camera settings to get a good exposure showing her face and details of her teammates instead of settings for high-speed action in white uniforms.
Indoor sports are tough to shoot because the lighting can be so varied and limited that it's challenging for most cameras to capture high-speed action without being pushed to the maximum capabilities of aperture and ISO. You'll need to practice your photography and learn how to effectively shoot stop-action images up close and from far away, depending on the types of sports you're shooting and the access that you have.
When shooting indoors, be cognizant of officials, spectators, athletes, sports equipment, and other factors that can get in your way — or vice versa. Moving around venues may be limited, as well, so how you position yourself is an essential part of getting the best shots.
Whether you're in a giant indoor stadium or at the local gym, indoor shooting can also be easier than outdoors because you don't have to deal with weather, and very often once you do get your camera settings right, you're set for all the shooting you'll do from that location. However, you'll also need to know what you might be able to do after the event in the digital studio, such as cropping bigger megapixel images that you take in order to get more light into your camera to allow you to take better action shots.