

Sports photographers capture virtually all their images in the field, not the studio. Because of this, they have little if any control over their environment to be able to set up lighting, poses, and positioning for the best shots. As a result, the equipment and techniques used to get the photos take on greater importance because they are the only factors the photographer can change and adjust.
I've discussed how to prepare for the digital sports photography shoot, but how does this work in the field? What techniques should be used for what situations? What is the best choice of equipment for different sports scenarios?
Professional Photographer Terrell Lloyd
My friend Terrell Lloyd is an official photographer for the San Francisco 49ers. He travels with the team and shoots all the games, and his images appear in print and online on behalf of the team.
Although Terrell on occasion shoots posed portraits of the players and cheerleaders, most of his work is done from the sidelines of big games amidst sports chaos. He must navigate among coaches, cheerleaders, team support staff, photojournalists, TV crews, referees, equipment, and myriad other obstacles, all of which potentially may stand directly between him and a great shot. So he comes to the game prepared, carrying gear with him, equipped with telephoto lenses, extra batteries, CompactFlash cards, and everything else he needs. Terrell is prepared to get the shots he needs in an unforgiving world with little regard for a roving photographer. He then navigates his way around the huge fields and stadiums to capture as many shots as possible. Terrell's shot of an airborne 49er receiving a pass looks almost as though the shot was taken from the field itself and not the sideline.

© Terrell Lloyd.
Terrell Lloyd's photo of San Francisco 49er pro football action shows the many types of staff, referees, and official personnel on the sidelines — all of whom are intent on seeing the action without interference — with whom the photographer must contend.
In Part II of this book, we take a specific look at individual types of sports and how to best photograph them, with help from a variety of amateur, enthusiast, and pro photographers. In this chapter, we take a more generalized look at shooting sports in the field based on well-established photography equipment configurations and methods of shooting.
In the wonderful, high-tech world of digital photography, we tend to think that no matter what kind of photo you take — no matter how poor it is, primarily — something can be done to treat it later when the image is being edited. "Don't worry, I can fix it in Photoshop" is a phrase that many photographers have uttered time and again.
Don't believe it for a minute! No matter how sophisticated your software is or how well you use it, nothing beats a well-composed, well-exposed photograph. Sure, you can crop the image and even adjust contrast, color, shadows, highlights, white balance, and other features, but the less you have to do in the post-pixel stage, the better the image ultimately will be. Furthermore, it means less time for you to be working in the studio when you could be out shooting!
Understanding the best equipment for taking certain types of shots, how to best compose them, and what exposures and settings are perfect for what you're shooting are well worth your time. This means getting to the venue early enough that you can shoot some test shots and, at the very least, take a look at them on your LCD.
When I'm taking lots of photographs at an event, especially where conditions are changing and I don't have the luxury of checking all my exposures in detail, I often shoot dark. That means I adjust the image down a "stop" or two, such as shooting at f/5.6 instead of f/3.5. Why? If I'm uncertain about an exposure, I always prefer a bit of a darker, underexposed image than one that is overexposed. If an image is too light, it's often impossible to add information; conversely, if an image is underexposed, typically it's possible to remove information by lightening the image, often revealing a perfectly exposed photo. The following series of figures demonstrate images that were overexposed, underexposed, and adjusted from being underexposed.
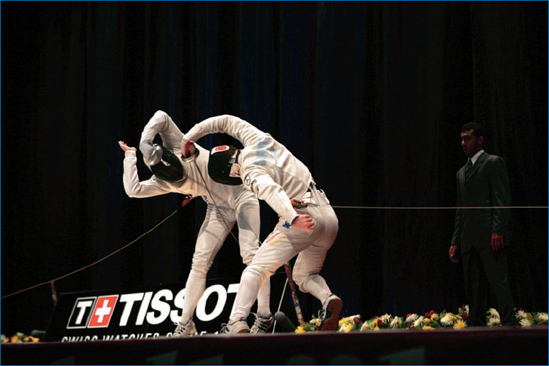
Figure 3-1, which is obviously overexposed, was taken a very slow shutter speed. And, it is so overexposed that the image is far beyond rescue — there is literally no digital information with which to work, it is blurry, and has almost taken on an artistically abstract effect. Had the image been shot at a shutter speed of at least 1/200, there might have been hope for using it if was a critical shot. Optimally, it should have been shot at 1/400 or 1/500 of a second.

Figure 3-1. This overexposed shot of fencers was taken at 1/12 of a second at ISO 400 and an aperture of f/208.
Figure 3-2 is underexposed. Because the light on the fencing strip varied from very bright to slightly dark, I chose to keep the camera set at my typical, one-stop-down setting of 1/400, ISO 500, and f/2.8.

Figure 3-2. This image of men's epee fencers on the final strip at a Grand Prix in Doha, Qatar, is slightly dark with the fencers' jackets obviously not as white as they should be, which was intentional.
Figure 3-3 shows the same image from Figure 3-2. Using the Levels control in Photoshop, I was able to improve the contrast and color — something I would not have been able to do had I overexposed the image as in Figure 3-2. As long your images are underexposed by only one f-stop and not much more, they should be highly editable.
Using the stop down method, you have a starting point from which you know you have a good exposure. Jot down the setting in a pocket notepad; you can also check the information setting by viewing an image displayed on your LCD. If I have changed my settings by choice or by accident, this lets me refer back to an image I took earlier on the same flash card to see where it was set. It's not uncommon when you're shooting in the field to inadvertently change a setting when you're shooting in manual mode — which is also why it's a good idea to check your LCD image preview on occasion (but not obsessively).
If areas of the field of play differ in terms of light, or if you'll have different lighting challenges during the event, then you should be prepared to shoot them with the appropriate settings. Figure 3-4, is an action tennis shot taken in bright, direct, midday sunlight — one of the hardest types of light in which to shoot. If you shoot too dark, the features in the person's face will all but disappear; if you shoot too light, you won't have any detail. Plus, with an action shot such as this one, you have to shoot with a fast shutter speed so that nothing is blurred.
I want to continue with the tennis track, thanks to Amber's action photo, and ask you to think about shooting a regional tennis match. You may want to put together a cheat sheet with notes that look something like Table 3-1 after you have a chance to check your settings. The settings here are primarily for SLR owners, and I've added suggested point-and-shoot settings as well (remember, your camera may differ according to the light, the venue, and other factors).
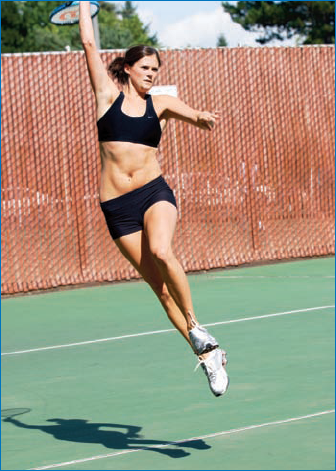
Figure 3-4. A dramatic action tennis shot by photographer Amber Palmer taken in harsh sunlight: © Amber Palmer
Table 3-1. Outdoor Tennis Cheat Sheet
Note
A fill flash is a limited flash setting where you aren't shooting to completely illuminate a dark area, but, rather, to fill in the areas of an already lighted subject where a little extra light will serve to eliminate shadows and other unwanted features.
Obviously, these are examples and not absolute settings for you to shoot a tournament, but it gives you an idea of the variations of lenses and settings for an event. With practice, you won't need the cheat sheet; you'll simply know what settings will work best for what you're shooting. However, until then, you may save yourself from missing a few important shots by keeping this type of information. Furthermore, if you shoot in the same venue again, you won't have to recheck if you keep this information handy.
Note
Remember that no two shots are alike, nor are any two events — even if they're in the same venue. Assuming that the same settings will work always work and not staying in-tune with the individual situation will inevitably result in mistakes being made; however, having a general idea and guideline will save you time and help you learn to replicate shots better.
If you are fortunate enough to be shooting sports with an SLR, you will find there are lenses for virtually anything you can imagine and accessory filters for them with almost equally as much variety. You can easily spend a fortune on just a few lenses, far beyond what your camera body cost. If you're shooting with a point-and-shoot camera, then you won't have to bother with changing or carrying lenses. Some point-and-shoot cameras come with remarkably sophisticated glass, which can have a notable effect on the price of the camera, but that good lens allows it to take far better, faster photos.
Lenses include an amazing amount of technology and engineering; optics is a fascinatingly complex area of science that has undergone tremendous advances and development over the last 50 years. A good lens can make all the difference in being able to get great shots by being fast, accurate, and well suited for a specific job. However, used incorrectly, it is just as capable of taking a bad photo as a good one.
Many sports photographers shooting big events like football, soccer, and baseball shoot fixed lenses that do not zoom. Why? Because, typically, fixed lenses produce better images that are clearer. Zoom lenses integrate extra components that can affect the quality of the image and prevent the photographer from being able to shoot at a single f-stop setting, which is why the fixed zoom lenses that allow you to have the same f-stop at all focal lengths are so expensive. These lenses typically don't telescope in and out, but rather move internal optical parts to adjust the telescopic range while staying within the same physical space — an amazing and expensive feat of optical engineering. Figure 3-5 shows pro football photographers working with fixed-focal length (big glass) lenses.
Many camera companies offer various levels of lenses, from consumer to professional. The Canon L series of lenses (identified by a single L on the lens body), for example, are its highest level of quality and engineering, which is reflected in the lens optics, speed, and cost. These professional lenses exceed other lenses and, accordingly, the images they produce are of superior quality, clarity, and accuracy. The lenses have to interact electronically with the camera to ensure a fast ability to auto-focus as well as to provide other features, such as image stabilization, faster focusing depending on the distance from camera to subject, and enhanced focal abilities depending on whether the camera is being tilted or panned in various shooting scenarios.
For the average camera enthusiast, these ultra-fast, hyper-expensive lenses are probably going to be overkill if for no other reason than a prohibitively high price tag (Canon L series lenses, for example, are often several thousand dollars; the fixed-lens, long lenses can be well over $10,000). So what's a photographer on a budget going to do?
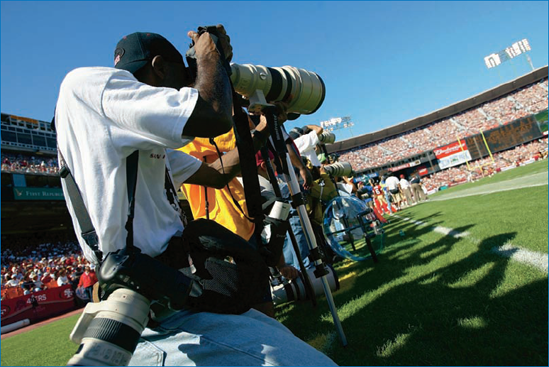
Figure 3-5. Terrell Lloyd, official San Francisco 49ers photographer, shoots big glass on the sidelines of a pro game. Note the monopod he uses to stabilize the lens, steady his shot, and keep his arm from wearing out!
First, it's important to note that you should have a set of lenses that includes the following, at the very least:
Wide angle: A lens or setting on a zoom lens capable of shooting a wide angle of coverage, for example, capturing a full football field. Usually in the 15mm to 24mm focal length range.
Portrait: A common, mid-range lens or lens setting suitable for getting a realistic photo similar to what you would see with your eye and commonly used for portraiture because of its true perspective. Typically in the 40mm to 70mm focal length range.
Telephoto: A lens or lens setting allowing a telescopic view, meaning you can see things far away as if they were closer. The angle of view is narrow, however. Typically in the 100mm to 400mm range (although it can be much higher, up to 1200mm).
The next set of figures demonstrates wide, portrait, and telephoto shots, all taken with the same camera and similar settings within a minute or two of each other. Notice how you can really change the effect and feeling of the image based on the focal length of the camera. Shooting with a wide-angle lens (which is just a widesetting on a point-and-shoot zoom) as in Figure 3-6, it's easy to tell that I'm standing on a dock — another boat is in the scene, and a jet contrail even creates a bit of a distracting element. The sailboat at the center of the image is hardly a real subject of the image at this point. However, as I move into a tighter shot by zooming in, the telephoto lens (or telephoto zoom function on a point-and-shoot) allows me to emphasize the sailboat as the subject, as shown in Figure 3-7. In fact, with the telephoto setting used in Figure 3-8, it could almost appear as if nothing else is around for miles and miles, and I could just as easily have been on another boat in the middle of a large body of water taking the shot!

Figure 3-6. A wide-angle (in this case, 35mm) shot of a water-sports area. Note the sailboat in the center, which becomes the subject as I zoom in (shown in Figures 3-7 and 3-8).

Figure 3-7. At a portrait or common focal length setting, in this case 70mm, the sailboat has begun to emerge as the subject. However, the detail is still limited and the extra trees and water really don't provide much artistic support to the photo.
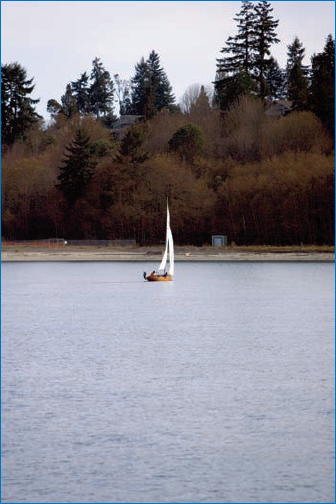
Figure 3-8. At a telephoto setting of 200mm, the boat is unmistakably the subject of the photo. If shot in a large enough megapixel format, the image could be cropped to "digitally zoom in further; a longer lens (more than 200mm) would also bring it in closer.
While you might find some lenses that are all-in-one, featuring the ability to zoom from a wide angle to a distant telephoto, I don't recommend them because you're usually giving up quality. It's fine to have zoom capability in wide-angle, portrait, and telephoto ranges, but trying to go from wide to telephoto in one lens is a bad compromise.
Less expensive zoom lenses are incapable of keeping the aperture open to the same width at wide versus telephoto lengths. The longer the focal length, the more narrow the aperture — simply because they aren't letting as much light in. This means that if you're zooming in and out, even if you set your camera for a wide aperture at a wide angle, it will be physically incapable of holding that width at telephoto lengths, meaning your image may be underexposed. Expensive, fast zoom lenses will keep the same aperture at all focal lengths (which is one reason they cost so much) because this involves significant optical engineering wizardry. You can tell which type of lens you have by looking at its specifications (in the manual or on the lens itself). If it is a range, such as f/3 5-f/5 6, then it will vary (f/3 5 when wide; f/5 6 when in telephoto); if it is simple f/2 8, then you know it will keep that same aperture.
The faster the lens you can afford for sports, the better Ideally, you should buy a lens that holds the same f-stop at all focal lengths At the very least, make sure that what you're shooting doesn't have an f-stop range that's more than one or two stops. More than that, and you'll be frustrated with the inability of it to capture lower-light images at full focal length.
If you're going to be shooting all your images outdoors, and you're reasonably certain the light will mostly be bright and strong (for example, if you're shooting baseball in Arizona), you can get away with slightly slower lenses. However, if you're shooting like I am, in indoor halls with subdued and changing light with fastaction, there's no substitute for fast glass.
There are many manufacturers of lenses that work with various camera types. Often, lenses such as Tamron or Sigma are significantly less expensive than a lens made by, say, Canon or Nikon.
Although these lenses may be perfectly good lenses, you want to test them with your camera to ensure that they focus as quickly as original equipment and that they are accurate. I've tested some aftermarket lenses that appeared to provide incredible speed for the price; however, several of these lenses shot images that were notably softer even when shooting exactly the same image at the same settings On the other hand, I've had several aftermarket lenses I've used that have been excellent quality. One of my favorites, which I still use, is the Tamron 17-24mm wide-angle lens.
Note
A soft image, in photography terms, is an image that is slightly out of focus.
If you're using a point-and-shoot camera, chances are good that you don't have the option of changing lenses; these cameras almost always come with a single lens that offers limited zooming capabilities. However, if you are considering a new camera or just want to better understand what your camera is capable of, this section ought to be very enlightening.
The optics in a point-and-shoot camera are probably the single-most important feature you want to consider when you buy one. No matter what whiz-bang features the camera may offer electronically, the bottom line is that an image is going to pass through the lens directly to the electronic sensor. How good the optics are determine show good your photo is more than anything else.
Most point-and-shoot cameras offer the ability to zoom optically or digitally. An optical zoom means that the glass in the lens is physically shifting to change the focal distance of the camera and shift from a wider to a more telephoto view or vice versa. When a digital zoom "zooms in," the camera simply crops some of the photo so that a smaller area is captured; in other words, a smaller amount of data is taken in by the sensor. You have a smaller photo, and you can't enlarge it to the full extent that you could with an optical zoom — at least not without losing image quality.
Some digital point-and-shoot cameras, such as Sony's Cyber-Shot models, attempt to use technology to overcome this limitation by using the full size of the sensor, but the result is still inferior to that of using glass to zoom. Camera companies resort to digital zooms because the technology takes up less space than providing lenses capable of broad-spectrum zooms, thus making the cameras bulkier than their marketing research tells them they should be to appeal to a size-conscious consumer base.
The bottom line is that if you're going to buy a point-and-shoot camera, look for the best possible optical range and size; typically larger cameras with bigger lenses mean better images (not a universal rule, but a place to begin). Certain companies, such as Canon, Nikon, and Olympus, also are known for superior optics as opposed to companies that come from more of a video or technology/computer orientation. Olympus, in particular, produces optics of very good quality because that was what the company primarily produced in its earliest days.
For shooting sports especially, you'll greatly appreciate a camera with superior optics. The ability to focus (manually and automatically) quickly and accurately, to be big enough to let in enough light, a large enough image that you can really capture what you see, and an optical zoom range broad enough to handle various distances inherent to sports are all important factors to consider.
Taking a good sports photo means having a number of factors working in harmony: knowing your equipment, understanding the sport, being in the right place to get the shot, and having a good eye for composition.
Most sports photography falls into the category of candid photography. According to Merriam-Webster, candid in terms of photography means "relating to photography of subjects acting naturally or spontaneously without being posed." This is a perfect description of sports photography!
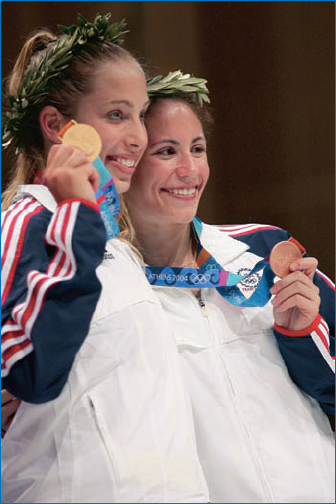
Although it's not completely uncommon for athletes to ham it up for the camera or to have a bit more of an adrenalin rush knowing that they're on-camera (although this happens more for TV than for still photography), typically they're quite oblivious to photographers and cameras unless they get in their way. Even world champions, when you get them away from the sport or when they're finished competing and are celebrating victory, have light, stress-reducing moments that make for great photo opportunities. Figures 3-9 and 3-10 show examples of lighter moments in sports photography.
Athletes pose only for a medal ceremony or for the obligatory team and player photos. Regardless of whether the players are kids or pros, taking these posed shots is a necessary part of professional photographers' athletic off-field responsibilities. This book isn't about doing that kind of photography, although I cover a few poses later in this chapter, so I want to focus on action-oriented, candid shots, which are the ones you're most likely going to be working to capture.

Figure 3-9. No matter what kind of photography you're doing — either for your friends, clients, or the public — adding some personality and fun to your images is good Here, Ukrainian Olympic foilist Sergei Golubitsky, one of the most famous contemporary Olympic fencing champions, shares a light moment during a world championship in Bulgaria
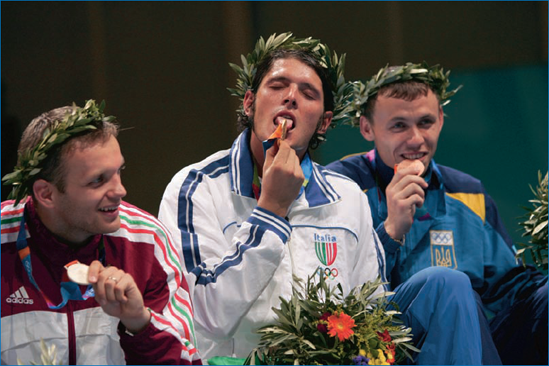
Figure 3-10. Here, Italian saber champion Aldo Montano literally licks his gold medal for all the cameras at the Athens 2004 games.
Good composition in sports photography means being able to see the action before and while it's happening, along with having a sense of what makes a good photo in general. Composition is a long and well-addressed topic in photography; entire books are dedicated to the topic.
Perhaps the most important factor in sports photography composition is being able to focus on a subject. If someone viewing the photo isn't sure what it is centered on — for example, if the photo contains just a group of players on a field, randomly placed — the photo is not meaningful or interesting. When a group of people isn't posing and the photos are candid, it's essential that you pick a subject for each shot — a central point in your image around which everything else revolves.
A sports subject may be an individual player alone, two players, where one or both of them is the subject, a single player running for a touchdown amidst a sea of other players, a sailboat tacking in front of another, or a race car in the process of overtaking another on a track. In any event, the photo is focused on something specifically happening in the scene.
This isn't to say that your subject is always in the center of the photo She may be off to the side as a ball flies toward her racquet, or he may a crashing surfer at the bottom of a towering wave. Yet the person viewing the photo is drawn to the subject because you intended it to be so when you took the shot or when you adjusted the photo in post-production.
In fact, you may have a photo that isn't very focused in terms of a subject. Sometimes, you can fix this later by cropping the photo to emphasize a part of the image that then becomes the subject and eliminates any confusion as to what the viewer is looking at. At other times, you may see something that requires you to adjust how you're shooting in order to capture a subject. Figure 3-11 shows a large group of Olympic fans in Athens, but it's not very interesting However, by turning on the flash and singling out an individual fan — in this case, a Polish man who had even painted his face in his national colors — the shot suddenly became far more interesting, and it's still obvious he's in a big crowd, as shown in Figure 3-12.
This isn't to say that a well-composed photo with a subject must be a tight image of just one person; it may be a wide shot of a large space Because we're talking about sports crowd shots, look at two photos of the opening ceremonies from the Olympic Games. In Figure 3-13, you can see the Icelandic performer Bjork on the far left of the image spreading her gown across the tops of all the athletes in a stadium of 70,000 people.


Figure 3-13. Icelandic singer Bjork is the subject of the image, yet she's not in a close up and not even in the center of the photo.
In Figure 3-14, the center of the image is the just-lit Olympic flame and the final Olympic torch carrier, seen below as the flame rises into its permanent spot.

Figure 3-14. The relationship between the flame and the torchbearer is clearly the subject in the midst of a massive crowd of onlookers.
A classic method for composing photographs is known as the rule of thirds, meaning that any photograph is divided among a tic-tac-toe-style grid of four lines forming nine squares.
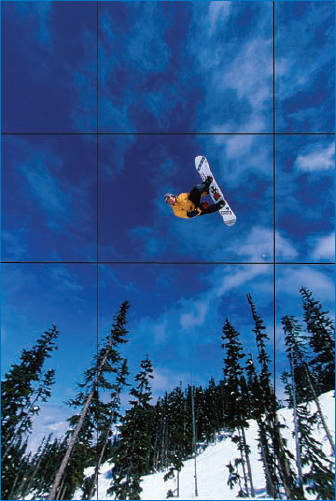
In Figure 3-15, photographer Neal Thatcher's spectacular shot of an extreme snowboarder in Canada's Blackcomb Mountain nicely represents the rule of thirds. The image is divided into a grid of nine squares. Top to bottom, one third of the image is the sky, one third is the sky with the subject (the snowboarder), and one third is the trees and snow.
The subject would be far less dramatic without the sky above and trees and slope below. The other parts of the image serve to emphasize the athlete and how high he is; in some cases, the empty space will make the subject look higher than he actually is.
Also, although the subject is roughly centered amidst the nine-square grid, this certainly isn't always the case using the rule of thirds However, in this image, it works very well, and the composition is nearly perfect.
That said, one of the things to remember about the rule of thirds is that it is a rule made to be broken. Photographers are always working with the thirds in creative ways, consciously and subconsciously. They may put the subject at the top, or they may flow action from left to right or bottom to top. However, they are almost always working with the simple rule of thirds in mind; making this a habit helps to ensure that images are more likely to be well composed from the beginning and yet have a tremendous amount of creative leeway. For example, in Figure 3-13, the performer Bjork is in the bottom, left-hand side of the image, but she could be considered the focal point; this is but one example of how the rule of thirds can be applied creatively.
Action shots are the heart and soul of sports photography. They are the shots where the goal is kicked, the ball is hit, the boxer is punched, the climber is caught in mid-rappel, or the snowboarder is upside down above the half-pipe. Whatever the shot, suffice it to say that the athlete is in the midst of an important and often game-making or winning move.
Note
Taking good action shots often requires taking lots and lots of bad or, more likely, boring shots to get a few good ones. This is something you just have to get used to in sports photography. In championship fencing semi-final and final events, I typically shoot multiple shots of every encounter between all fencers in every bout, for every event; in other words, I may shoot several hundred shots per hour for several hours. However, I cannot afford to not shoot all of them, simply because I never know from bout to bout when I'll see a spectacular move, and I have to be ready.
Let's say that you're shooting a diving competition. From the moment the diver appears at the top of the platform to when he or she hits the water, you should have your camera shooting and tracking the diver. The vast majority of images are probably going to be tossed later, but you're looking for the ones with perfect form, composition, focus, and so on. You may have one good shot of each diver or maybe several.
When you're shooting action where there is significant lateral movement as well as forward and backward movement, manually focusing on them may be difficult or even impossible. Assuming that your camera has a reasonably fast and accurate auto-focus, you want to set the focus on a spot focus — focusing just on a center point of your viewfinder, not the entire image.
Some cameras' auto-focus capabilities include being able to choose between a single-shot focus or what's called an AI Servo setting. With the former, you focus by pressing the focus button each time to focus on a subject; this can get tedious and inaccurate for fast-moving action sports. With the AI Servo setting, your camera keeps focusing and tracking on the center point as long as you keep the focus button pressed. This is very useful when an athlete is moving toward you or away from you and you can simply keep shooting — and it's another reason that pro photographers often set separate buttons for focusing and shooting. Otherwise, after each shot you take, your camera refocuses when you depress the shutter release for your next shot. That is unless you have the lens or camera set to be manually focused.
If your camera is slow and has significant shutter lag, this type of shooting — in fact, any kind of action shooting — may prove very challenging. Anticipating to the point of dealing with shutter lag is a crapshoot at best; you're much better off with a camera that can at least reliably shoot three frames per second. Although you'll experience a little shutter lag at that speed, at least you can get some shots even of fast-moving sports.
The more you can close in on action, the better. It's tempting to take wide shots where all the athletes' bodies are shown, but some of the most dramatic shots are quite close and leave out something in the image. Getting a tight image of an athlete's face gripped in the tension of competition outweighs a full body shot any day; notice in magazines such as Sports Illustrated how many shots leave out body parts that no self-respecting portrait photographer would dare eliminate.
The best action shots aren't just the classic poses and typical images that everyone expects to see. Look for interesting perspectives, angles, and expressions — the more original, the better.
My work as a fencing photographer became successful as a result of thinking not of the classical fencing move, but rather what would look exciting to people who may not know what fencing was all about. Fencing is a sport rife with passion and exhilaration, athletes ripping their masks off and screaming out a victory cry, leapinghigh into the air with gymnastic talent to achieve a single touch, but the images portraying it lacked energy, motion, and excitement. So I set out to change that and ultimately changed how the sport has been portrayed.
Look for key moments in any given sport. Such a moment may very well occur when it's expected, such as a baseball player sliding into a base, a goalie missing a ball as it goes into the net, or a rider poised atop a horse jumping a tall set of poles. However, it may also be something different as well: a swimmer's body as he does a kick-turn, a close-up of a hockey player's face riddled with intensity, or a coach's hopeful look as her gymnast completes a routine for a gold medal.
Action doesn't always mean conflict, a player in motion, or a ball in the air. It can mean a player just after a particularly difficult or successful move or before it — such as a baseball player poised for a hit. All these either directly show or imply action, and they can piece together a story about the athlete, how a sport is being played, or what that sport is all about.
Getting a good angle is key to being able to take sports photos. As a photographer at sporting events, you are often in a privileged group and can often perch somewhere that others cannot — even if you're doing it as an amateur. Consideration is frequently given to someone with a camera, no matter who he is, and it's up to you to take the opportunity. Don't assume that you won't be allowed to get close to the action just because you're not an official. This is definitely one pursuit where it's often easier to "ask forgiveness rather than permission." Photojournalists are notorious for getting themselves into spots no one ever thought they could and dealing with the consequences later.
But you must do this diplomatically and quietly, and you must behave according to acceptable standards. Ata U.S. national fencing tournament a few years ago, I saw a parent get into a near fistfight with a coach over a camera. The parent wanted to shoot video of his son fencing an important elimination bout and was getting in the line of sight of the coach, who insisted that the parent get out of the way. The bout between the coach and parent became more heated than the one on the fencing strip, and the referee at one point had to stop the fencers because of the distraction on the sidelines.
Who was right? Without question, it was the coach. A coach or other official always has the right to the sporting field over anyone from the media, family members, or anyone else who stands to get in the way.
Warning
When you take photos of a sporting event, you can often get closer to the action than spectators. However, that doesn't mean you can distract officials or athletes, and you have to be very careful not to get in the way of anyone involved in the games — on the sidelines or the field.
Look for angles that give an unusual perspective of the sport, in addition to common or familiar ones. Perhaps you can get above the action or shoot it from floor-level by lying on the ground. Climb up into the stands, get where other people may not be, and explore close ups and distance shots from each spot. Find out what works and what doesn't. This is what ultimately yields some of the best photos you can ever take.
Don't be afraid to shoot tight, closing in on an athlete's face or body. However, these should be only a part of your entire set of photos; just having tight shots — even good ones — isn't sufficient to get a full picture of an entire event any more than just having big, wide-angle shots.
Some of the most dramatic angles in sports require you to get into an uncomfortable or special position; they may even require special equipment or be risky, including these spots:
An underwater shot of a diver or swimmer, which means you need diving training and underwater housing equipment for your camera.
Climbing to a part of a cliff that's not a routed part of an ascent to view a fellow climber on a tricky precipice.
Getting access to a catwalk above a sports court to shoot players from directly above.
The photo in Figure 3-16 was taken of a desert four-wheeling Land Cruiser in the Saudi Arabian desert in Qatar. The driver took me on a different route through sand dunes so I could get a better view of the other vehicles as they barreled down a dangerously steep slope.
The tendency of many photographers who are looking at a sport for the first time through a viewfinder is to shoot it straight on, as you would watch it from the stands. This can be difficult, however, because athletes are often moving around, and a position that's 90 degrees or perpendicular to the line of action can be limiting in terms of your ability to focus on a maximum range of play, and it consequently reduces the number of usable shots you can take. Instead, poising yourself between 30 and 45 degrees from the center line of the action can yield the best results in action sports such as tennis, football, baseball, soccer, and others. After you establish a baseline of shots from these angles, you can begin to explore other perspectives to creatively fill in the story you're trying to tell.
In Figure 3-17, you can see optimal positioning based on this method. If you're shooting at a fast shutter speed with a narrow depth-of-field aperture, the 30 to 45 degree method is the most forgiving and gives you the widest range of focal accuracy. Furthermore, it gives you a perspective of the players, the action, and an opportunity to capture both close and wide-angle shots.


Still photography tells a story, and it may be in a single shot or a series of them. Think about what you're doing at an event, no matter what type of sport you're shooting. Are you trying to emphasize the drama of the sport or the technical demands? Are you showing the abilities of one athlete in particular, even if it's your son or daughter, or are you trying to show a wide range of players? How can you personalize a sport where you can't really see athletes' faces because they're wearing helmets, masks, or goggles?
The person viewing the photo doesn't necessarily have to see the entire set of images from the event to get a story out of it; you may very well be publishing an image that will be accompanied by a caption. Or perhaps you plan to put together a slide show that gives you the opportunity to present a sequence of action and events. What you intend to do with the photos may very well have an impact on what types of photos you take and how many of them you shoot. If you're waiting just for a couple of key moments where a player has a dramatic move or response to something happening, then you can focus just on that and work with close-ups to ensure that you catch the shot. On the other hand, if you need to show scores, interaction, movement, and other elements of a sport, then you need to take lots of photos from as many perspectives as you can locate.
Here are some thoughts about how you tell a story when shooting sports:
Decide ahead of the event what you intend to get out of it, photographically. Don't just shoot random shots.
Identify any players you need to shoot ahead of time, and make sure you can recognize them (or take good notes).
Mix your shots, between wide-angle, portrait, and close-up/telephoto. You may not use all of them, but this way you'll have the option later.
Determine whether you need a sequence of action, such as showing progression through a table of eliminations (quarter-finals, semi-finals, and finals, for example).
As you develop your sports-shooting skills, you'll find certain shots that you are especially good at, as well as ones you like to take more than others. This may be because you find that you have an eye for certain angles or images, or perhaps because you know a sport well and can anticipate action that other photographers seem to have a hard time getting.
As a photojournalist, I spent much time shooting people and faces, sometimes in difficult or challenging situations. I also have shot many images around the world and have found that I really love photographing people in all walks of life — many times when they weren't necessarily looking at me or even realizing that they were being photographed, which gave me a documentary style of photography. I very much enjoyed shooting in this manner, and it ultimately paid off in my sports and portrait work, and much of my sports work features faces of athletes as much as it does athletic action.
Figures 3-18, 3-19, and 3-20 give a sense of some of the elements of my own style.

Figure 3-18. A narrow depth-of-field photo captures Sheikh Saoud Al-Thani, prince of Qatar and vice president of the Asian Olympic Council, watching a fencing final in Athens. Behind and to the left is Monaco's Prince Albert.

Your specialty may be something entirely different. You may be adept at catching special aspects of a sport, and you may favor a certain angle over another. For example, you may love getting surfers inside a curling wave or skiers holding an extreme edge as they carve around a racing pole. You may find that you're especially good at shooting wide-angle shots of two football teams grappling with each other over a ball.
Whatever it is, it's important to be aware that you either have or will have a style that is distinctly yours, and that is a signature type of image you create just as a painter or a musician can be identified by a certain brush stroke or tonality on an instrument Over time, people will begin to identify, critique, appreciate, and recognize you for this style as it develops and is cultivated.
In photography, a good exposure is as important as, and often related to, good composition. It means that every part of your subject can be seen clearly and is in focus, and that there aren't areas that are overexposed or underexposed unless it is obviously intentional.
For example, you may shoot a baseball player's face in a split, meaning one side of his face is illuminated by the sun, and the other side is in shadow, which creates a dramatic effect. A good exposure takes into account all parts of the image: the main subject, the background, the light and the direction in which it is being cast, and areas of focus, as well as those that are blurred or obscured.
As a sports photographer, chances are good that you won't be posing many photos unless you decide to "go pro" and start shooting team and player shots on a regular basis. Still, it's good to know a little about posing athletes, so you may find these hints helpful, even for a family snapshot:
If you're posing individual players, have them sit or stand comfortably with their sports equipment: a bat and ball, a football and helmet, a fencing foil, or a lacrosse stick.
Don't try to have them hold their sports equipment unnaturally. Ask them how they hold it when they play, and have them hold it as naturally as possible given your limitations within the shot. Don't worry if you don't get 100 percent of the equipment in the photo.
Focus on the player's eyes for the best possible focus, especially if you're shooting with a wide aperture.
Have the player sit or stand with his body angled about 20 to 30 degrees away from you, with his face looking directly at the camera. If you angle him too much, the neck looks strained.
For large groups, put them into tiered layers about three deep with some people sitting or kneeling in the foreground. Have the people in the back row stand on benches or chairs.
With groups, instead of having people stand in straight lines, curve them into a slight semicircle; this naturally matches the shape of the lens and the eye.
Consider what's in the background, and make sure it enhances rather than distracts from the group.
To make sure you don't have anyone with their eyes shut in the image, have everyone close their eyes, and tell them you're counting to three and that on two you want them to open. Don't count too fast!
Have the members on either end of the group put their hands in their outside pockets, to wrap the group (this is providing they have pockets). This is better than having them stand with their hands loosely at their sides.
Be creative! Don't be afraid to take some fun photos of the group as well as formal, posed shots.
In Figure 3-21, Olympic fencing referees are posing with the fencing federation officials at the main venue in Athens. The background, with the Olympic fencing symbol, makes for an interesting backdrop as opposed to merely having everyone sit in the stands. Note how the group was arranged in a semicircular fashion; I was limited on available benches and had to improvise with a mix of standing and sitting. I probably should have had the gentleman on the far right pocket his handkerchief, however!

Figure 3-21. Olympic referees pose with international fencing federation officials in a formal shot.
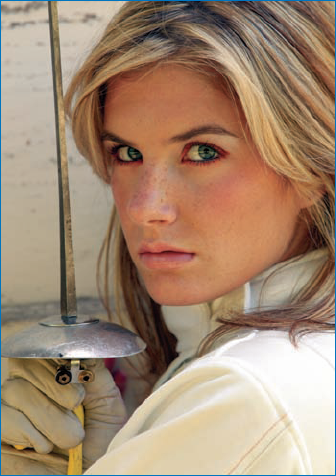
In Figure 3-22, a model poses for a shot that I use as a primary image for marketing materials for FencingPhotos.com. I was careful to have her hold the fencing foil correctly — something that athletic clients are especially aware of — and to make sure the foil wasn't brand, spanking new (that makes it look too posed!). The image was shot in RAW for a broad range of color and tonal definition (which is explained in more detail in the next section).
In today's digital world, many photographers rely on the RAW format to be able to carefully control detailed aspects of an image's exposure, emphasizing and de-emphasizing various areas of it to bring out or suppress various elements. This is something you can do also with key images where you want to do some touchup work.
Note
There are several file formats used in digital photography. Most cameras today shoot in JPEG format. For more details on the various formats, see Chapter 2.
However, generally speaking, sports photography differs from portraiture in the amount of work performed on the images in post-production. Furthermore, most sports images are shot in JPEG, which is a more nimble and easy format to use, but also one that isn't as forgiving and versatile when it comes to adjusting the exposure later.
This means that, as much as possible, sports images should be exposed as well as possible from the get-go. You need to understand exposure to take good photographs. Ask these questions:
What is the light like that you'll be shooting?
What is the very best white-balance setting for the event?
How bright or dark is it, and what should your ISO be so that your camera is sufficiently sensitive to the available light but limited enough to prevent digital noise?
Will you be shooting stop-action shots? If so, what is the minimum shutter speed that you'll want to have, and how wide-open should your aperture (f-stop) be accordingly?
Here's another rule of thirds. Earlier, in terms of composition, we spoke of the rule of thirds and how it applied to composing good photos. Another rule of thirds relates to composition and involves the intricate interplay among three essential factors in photography:
Shutter speed
Aperture
ISO
Every camera, even the simple point-and-shoot models, uses these three factors to take photos They are the foundation of photographic exposure, and you must understand them to take the very best photos possible.
If your camera's shutter speed, aperture (f-stop), and ISO (sensitivity) setting work together to create the perfect exposure If any of these is set incorrectly, the image can be adversely affected.
If your ISO is set too low, then you may not have enough light for how you have your speed and f-stop set. As with film, you need to increase the sensitivity of the media (in this case, your electronic sensor) to handle a lower or brighter light entering through the lens. Too much sensitivity, and your image may be overexposed or, in very low-light situations, have too much digital noise (this was called grain with film) Too little sensitivity, and your image is underexposed.
If your f-stop is set too high, meaning the aperture has a smaller opening (allowing less light into the camera), you may also have an underexposed image However, if you want to have a broad depth of field, meaning much of your image, no matter how deep the image is, will be in focus, then you need a higher f-stop Let's say that you want to shoot a team of football players and you have four rows of players standing on bleachers Your f-stop needs to be higher — say, f/11, f/16 or more — in order to have all rows in focus. A low f-stop, such as f/2 8 or f/3 5, would limit your ability to focusing only on one row.
Tip
Remember, a low f-stop (such as f/2 8 or f/3.5) means a wide opening (more light gets into the camera). This is what you want to use for narrow depth-of-field images.
If your shutter speed is very fast, such as 1/500 or 1/800 of a second, then you aren't letting in much light. However, at these speeds, you can produce a stop-action image without any blur, such as a ball about to hit a bat or a skier in mid-air. To do so, however, you need to have a wide enough aperture opening to accommodate the reduced light because of your fast shutter speed, which also means that you have only a limited area in which to focus. If you add a low-light situation to that, then you also have to make sure that your ISO is set high enough that you can catch the action.
Are you beginning to understand how these three factors — f-stops, shutter speeds, and ISO settings — work together?
If your camera is set to aperture or shutter priority, then it remains fixed on the setting you give it for one or the other and does everything else automatically You may want to do this if you know, for example, that you want stop-action shots at 1/500 of a second but the light is changing a little — perhaps clouds are going in and out of the sun. If you set your camera to shutter-speed priority and make sure you have a good ISO setting for the light you have (outdoors, it may be ISO 200 or 400), then your camera automatically adjusts the aperture to the proper setting for the light as it changes. You should note, however, that this may slow the camera just a hair because, for each shot, it must measure the light and set itself accordingly, which is one reason so many photographers shoot manually.
Tip
Use the lowest ISO setting you can without compromising your ability to shoot in the light you have. ISO 400 is a good indoor setting with or without a flash, and 200 is good in daylight outdoors on all but the sunniest of days.
Likewise, if you know that you want to have lots of narrow depth-of-field shots — such as getting close-ups of pitchers' faces as they stand on the pitcher's mound — then use your aperture priority setting, as low a number as your camera allows, and as the light permits.
Nonetheless, if you're just getting comfortable with shooting manually, using an aperture or shutter priority setting is a good mid-way exercise to get you accustomed to thinking along with your camera. Learning how these three factors interplay is essential to becoming good at taking photos that are well exposed and easy to edit.
When it comes to equipment and technique, sports photographers must be at the top of their game. Because they do all their shooting in the field, they have almost no control over their environment and must adapt their photography to suit the situation.
Selecting the right equipment can make a big difference in taking the best shots, and for some types of sports, inadequate equipment may make taking good photographs nearly impossible. So it's good to plan ahead and understand ahead of time what will be photographed, where, and how, not when it's taking place.
Technique also is an essential part of sports photography, and the adept photographer understands the fundamentals of exposure, light, and camera operation to ensure the photographs taken are intentional, not inadvertent. If the photographer is in control of the camera and understands how to take the shot he or she wants, then it frees up the ability to be creative, to tell a story with the image(s), and to be able to replicate shots that are successful. This, then, allows photographers from amateurs to pros to be able to develop their own distinctive and recognizable styles.