

© Joy Absalon
When it comes to athletic endeavors, outdoor field and court sports account for a large percentage of what we play and watch. Whether it's football, baseball, soccer, or tennis, one of these is always in season somewhere in the world. It's hard to drive into any town on earth and not find a few kids swinging a bat or kicking a ball. These sports have become a part of our national and cultural identity and are pastimes occupying the free moments of many people.
This chapter covers how three major sports — football, baseball, and soccer — can be photographed effectively whether you're taking snapshots of Little League or you aspire to bigger ranks; then, we will touch on key photographic elements for a number of other outdoor field and court sports such as tennis, track and field, lacrosse, and volleyball. While some of these sports, such as volleyball, track, and tennis, can also be played indoors, we're covering them in the outdoors section because a significant number of events take place outdoors (beach volleyball, especially, has become a notable outdoor sport).
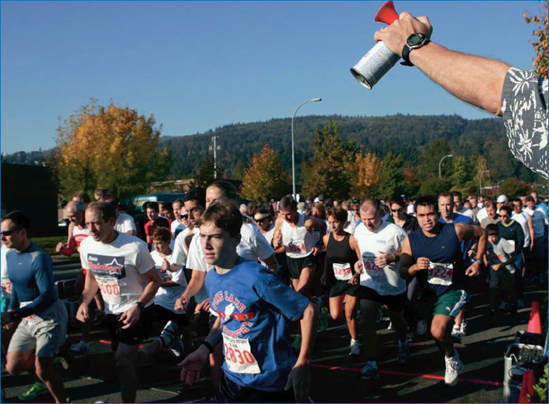
Much of how you watch and participate in field and court sports takes place while watching TV, where you can see all of the action as if you were on the field. Then you take to the fields and courts of your own neighborhoods and towns to mimic the pros and Olympic stars with tennis leagues, youth football, Little League baseball, soccer teams, and so on. On any given Saturday you can find weekend warriors of all ages out in pursuit of glory and fame among their peers and families. Access to some events — such as track and field — is relatively easy because of fewer spectators. As you can see in Figure 4-1, there are many options for positioning yourself to get good shots.

Figure 4-1. Images that catch athletes at their best in high school and college sports can last a lifetime.: © Joy Absalon
For neighborhood shots, getting close to the action isn't an issue. However, in the world of pro sports, including soccer, baseball, football, and tennis, you'll be lucky to shoot much beyond your seat in the stadium or arena. And, for sports such as football and soccer, the fields are so big you can't be sure you'll get very much from all but the very best seats — and that's assuming the action happens on your end of the field. Credentials for these types of events are hard to come by and are reserved for qualified media from recognized organizations and the few team and individual photographers recognized and/or hired by the sports organizations.
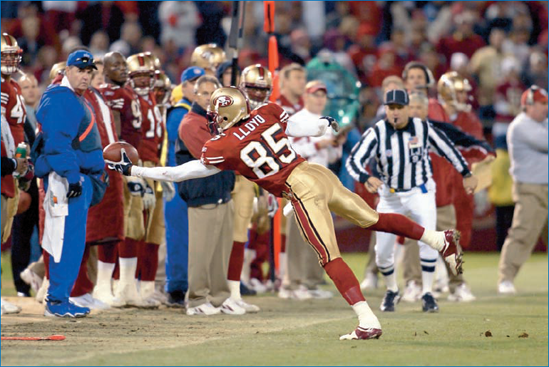
For professional photographers like Terrell Lloyd, photographer for the San Francisco 49ers, access to the best locations is part of the job. Figure 4-2 shows a photo taken from an area limited to authorized photographers.
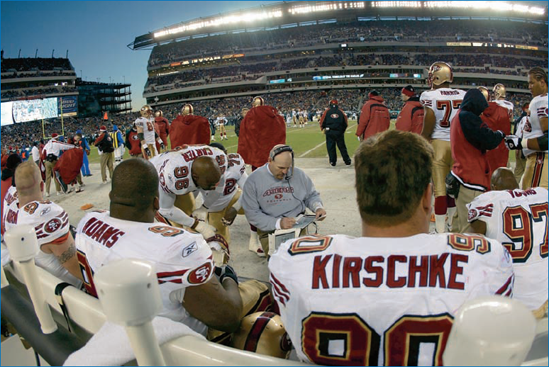
Figure 4-2. Getting close to pro teams and action is highly restricted and reserved for the media and staff photographers.: © Terrell Lloyd
Even shooting regional championships for various sports can be challenging in terms of being allowed close enough to the action to get any good shots0 Teams, leagues, and sports organizations are very skittish about granting rights to photographers — especially if an official photographer for the event.
Note
For an interesting look at shooting at amateur events, see Chapter 13. Not only does it touch on legal issues, you can also read about my trials and tribulations with a state soccer official intent upon securing his championship more tightly than the Super Bowl.
If you show up looking like a pro — fancy vest, big lenses, and other pro equipment — at a major professional or even a championship amateur game, you may be questioned by officials and/or security. While they may not mind someone coming onto the premises with what they perceive to be amateur equipment, they very well may take issue with you if they think you're a professional photographer.
Before you shoot an event of any significant size, you should check into any restrictions, limitations, or credentialing requirements there may be for photographers. Often officials may be concerned that you will be selling photos to which their own official photographer has an exclusive right to take and sell, or they may be concerned about player and team permissions to publish and/or sell photographs.
For local and amateur sports, getting access is usually not a concern. Unless you're planning to sell the images or use them commercially in some way, it's often easy to gain access to most areas of the court or field to shoot, as long as you're not in the way of players or officials.
Warning
More than one parent has been known to use a camera as a decoy and disguise just to get closer to his or her child on the field and then subsequently become involved in the action, much to the discontent of the coaches and referees. This isn't an advisable use of your camera.
For some sports, such as baseball, if you position yourself close to home plate or first base, you're bound to get some good shots. However, it may be tougher for big-field sports like football and soccer; you have to be close to an end zone, goal, or scrimmage line where action is going to take place — and you have to be there when it does.
Some outdoor sports allow you to position yourself in a spot where you can be certain athletes will pass. This way, you can preset your camera to the right exposure and even a manual focus, as shown in Figure 4-3.
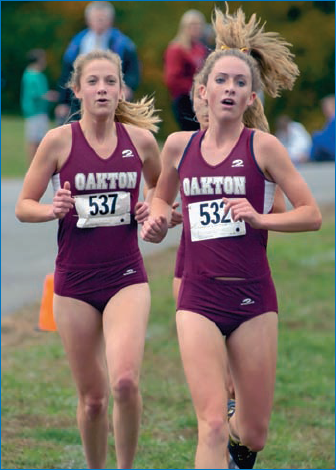
Figure 4-3. It takes preparation, such as setting your exposure and focus manually, to shoot an action photo at the exact time when athletes cross a focal point you've chosen. Then you can concentrate more on your composition and timing.: © Joy Absalon
At a local or amateur event, if you're politely walking around the venue or sitting in the stands with a point-and-shoot camera, or even with an SLR that doesn't have a gargantuan lens on it, you're probably going to be able to get plenty of shots. It is when you attempt to look the part of something that you're not by wearing a photographer's vest, carrying a big monopod attached to a large camera, and toting a bag full of gear that you may run into a few problems and attract unwanted attention. You may get questions from officials or coaches who take issue with you shooting; you may also get people wanting to buy photos. If you agree to do so (of course, you don't have to), it's important that you've got a good idea as to how you'll handle the workflow, processing, and fulfillment — and how much you'll charge.
The type of equipment you use when shooting outdoor field and court sports is almost entirely dependent upon three crucial elements:
The size of the venue
The access you have to the field or court and athletes
Weather and lighting
However, a monopod or tripod is a good tool to keep on hand regardless. For example, if you're using a bigger camera, or if you're trying to get long shots from up in the stands with any type of camera, you may find a monopod or tripod useful to steady things (it also helps prevent arm fatigue with big cameras). Or, if you're doing a really long exposure, such as a night shot where the light is very subdued and your camera is set for a timed shutter release, a tripod to hold your camera steady is a definite necessity.
If you're going to a pro game, you need a camera with a long lens in order to get shots that show a player and action very well. A point-and-shoot will let you get venue shots and you will be able to get player images if you sit close enough — or you can walk down to the edge of the stands by the field to take a few shots. But to get up-close images of a pitcher on the mound or a goalie deflecting a kicked ball, you need a fast telephoto lens that will hold a constant aperture at various focal lengths and a camera capable of responding quickly with multiple frames.
For a small game, it's possible to shoot with a point-and-shoot camera, but you're still going to have to overcome shutter lag for shooting action even if it's a six-year-old diving for the base. Fortunately, some of the newer mid- and higher-range point-and-shoot cameras are getting faster, but being able to anticipate the action never hurts your ability to get a good shot. Learning to set your camera on a shutter- or aperture-priority mode to minimize automatic settings optimizes the speed of the camera, and therefore your ability to get better shots.
The access you have to the field or court will dictate the lens you need to use. If you're at a big-field game, like soccer or football, a long lens comes in handy, or, if you're using a point-and-shoot, a camera with a long telephoto capability. This is true whether you're up in the stands or on the field. For tighter venues, such as for tennis, and also if you're able to get close to the action, then using a wide-angle as well as a portrait-sized lens works well. For sports such as track and field, you'll want to keep your distance from the athletes even if you can get close to the field, so here's where a long lens is useful as well.
You may also want to use a wide-angle lens to take a shot from the stands to show the full venue. If you're giving a slide show, it's good to have establishment shots that show the scope of the facility, as well as images that get people excited about the images to come. Figure 4-4, for example, helps tell a story about the 2004 Olympic Games in a slide show — and builds anticipation of the images to come.
If you have access to athletes after an event, such as when medals or trophies are being awarded, you'll want to use your flash. If your point-and-shoot supports it, or if you're using an SLR, then using an external flash that mounts to the camera provides better light and prevents problems such as red-eye.

Figure 4-4. Establishment shots of a sports venue — like this one of the Athens 2004 Olympic track-and-field site — are part of the photo story.
External flashes have the option of being swiveled into different directions to bounce the light and alter its intensity and area of coverage for your photo. By bouncing the light against the ceiling or a wall, you can limit how intense the flash is against your subject. Some photographers attach a white piece of cardboard taped to their flash that allows the light to be bounced to the subject with the flash facing up or back (you can also buy products that do this with a variety of effects). However, if you try bouncing the flash, your distance between where the light is bouncing and your subject, the color of the ceiling or wall, how you have your flash set (for example, if you set it manually at a lower intensity), and other parameters will affect your image. As a result, before you take critical photos with a different flash setting, it's good to practice it and understand how it will behave in various conditions.
Generally speaking, using a flash when shooting any type of sport is a bad idea, especially if you're close enough that an athlete or referee can be distracted by it. In large stadiums, it's common to see flashes going off in the audience all throughout the venue. However, they seldom have any effect except to illuminate the spectators in front of the camera — certainly not the stadium or the players. And, if you're close enough to competing athletes for it to be effective, you're probably prohibited from using it by the organizers. Save your flash for times and photo ops when athletes aren't competing, such as at medal ceremonies, off the field, locker-room shots, on the bench, and so on when it's most effective.
The weather plays a significant role in outdoor field and court sports, and it will have an effect on you as a photographer, as well. When it rains, obviously you do what's necessary to protect your equipment and to get shots that don't affect your equipment or mar your shots. If it's sunny, you need to deal with the light from whatever direction it's coming — directly overhead, from the side, through openings in a stadium, and so on. Whatever the weather, if the game continues, then you'll need to adapt to the conditions with your equipment and ability to shoot.
Chapter 5 describes products that can help you deal with the rain, even with a big camera with a long lens. There are rain covers available for your gear through which you put your hands to operate the controls, and they leave an opening at the front of the lens that provide an unobstructed view or your subject. However, this is challenging if you have to get inside the camera to change batteries, lenses, or flash cards; the last thing you want to do is to expose your camera's tender insides to the elements. In that situation, find a dry spot protected from the rain where you can work.
You can use a camera lens hood to help keep out unwanted light, whether the source is artificial or from the sun. However, using a hood may obstruct your flash — especially if you're shooting with a long lens or using a wink or built-in flash (not an external one). This can cause a dark semicircle at the bottom of your image; be careful to check this out before you use it in a critical situation.
Baseball is the great American sport, and it presents the perfect opportunity for taking great sports photos. Unlike some sports, in baseball many of the athletes stay in roughly the same place for just long enough to have their photos taken. Furthermore, because it has a pattern of play, you can predict where much of the action will take place. Finally, unlike football or soccer, baseball tends not to be play in inclement weather. What could be better?
The good news — maybe even great news for some photographers — is that to shoot baseball you don't necessarily have to have a really expensive camera and a giant telephoto lens. If you're up in the stands, you'll want something that has a long range and that can capture images without losing too much light to a small aperture. But if you have a good seat close to the field, or if you're shooting a small game, you should be able to get along fine with something less than professional.
Stop-action baseball shots show things the naked eye and even a TV camera won't catch, such as the moment captured in Figure 4-5.
Like shooting any sport, to document baseball you want to make sure you tell a story with a series of photos. That means you want to accomplish several things that you will be able to apply to many of the sports described in this book:
Establish the venue
Personalize the athletes
Visually describe the fans, coaches, and referees
Capture the action
Present the emotion
Glorify the victors

Figure 4-5. This remarkable shot shows the ball being indented by the force of the bat.: ©Joy Absalon
The bad news is that baseball is a very restrictive sport in general in terms of getting close to the action — even getting a spot on the sidelines of a semipro and a pro game is essentially impossible. The bigger the game, the farther away you're likely to be; even pro photographers with press credentials are rarely, if ever, able to get as close to baseball action as they'd really like to be.
As part of establishing the venue, you may be able to get some good shots of players warming up in the bullpen, sitting in the dugout, or in some pregame activities. And, of course, that's when it is likely to be easiest to move somewhere in the stands to take a photo where you might be shooed away during the actual game.
During a professional game you may have a tough time getting the spot you really want to get a good shot. If you're lucky enough to have a great seat, and you're using a camera with a fast lens and shutter, then you stand a chance of getting the shots. But, all too often, you'll find yourself behind the home-plate net, obstructed by a big fan who jumps up just at the moment you want to shoot, or so high in the stands that it would be challenging to get close to the player even with a 400mm lens.
If you can get close enough to the action to get some good shots, you're going to want to do the same thing as the batter: Keep your eye on the ball! Baseball shots, and in many cases any sport that involves a ball, are usually better if they contain the one critical nonhuman element: the ball, as you can see in Figure 4-6.
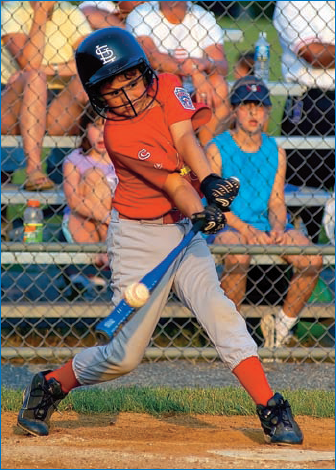
Figure 4-6. This photo not only shows a youth player in a very complimentary pose, but it also caught the ball at just the right moment.: ©Joy Absalon
If you can capture a shot where the ball is just being hit, thrown, or caught, or being used to tag a sliding runner, you've achieved something important in baseball photography. To do this, you'll need to anticipate when and where the ball will be, as well as the person who will be catching, throwing, or hitting it. And, referring back to the beginning of this section, this is where baseball is a bit more forgiving than some other sports: The pitcher stays put, the batter hits from one place, and the first baseman often stays put too. Unlike football, you won't have to wonder where the athlete will run when the action starts — at the very least, he's headed for first base and you can base your photographic plans on this assumption.
Of course, every now and then, it makes a nice portrait to show a batter standing ready to receive the ball even if it hasn't yet been pitched. That dead-serious, focused look on a Little Leaguer's face hits a home run in the heart of any doting baseball mom or dad, so don't miss these shots because you're so intent on getting the ball in the shot.
What are the best settings for baseball shots? As with other sports, your shots will vary depending on the light, the action or shot you're trying to get, and how close you are to your subject. Note the impact of the camera angle in Figure 4-7.

Figure 4-7. Extreme baseball shots, such as this one of LA Dodgers pitcher Chad Billingsley, are ones that have been made exceptionally dramatic not only by the player's body position, but also by the camera angle.: © Joy Absalon
Many of the same principles and rules described for shooting baseball apply to softball, as well, as illustrated in Figure 4-8.

Figure 4-8. This shot incorporates the ball, the player, some intense action, and a nice, big softball clearly focused at the center of the shot.: © Joy Absalon
To get good photos of baseball and softball, use the manual settings on your camera — at least use a shutter-speed priority so you can get a stop-action shot if possible. To get some action good shots, you'll have to make a few compromises. The first thing to do is set your ISO rating as high as you can stand to, based on how much digital noise the images have when you look at them on your computer or print them. Most point-and-shoot cameras are self-limiting for digital noise and may not be able to shoot above an ISO setting of about 400, which isn't that bad, but it reduces the camera's sensitivity in poor light. Compare that with many SLR cameras that can shoot at ISO ratings of 800, 1600, and even 3200.
Note
Digital noise is tiny spots of color or black specks placed randomly throughout an image. Digital noise is most visible in shots taken at a high ISO in subdued light. If you have experience with film photography, then you will know the term digital noise as grain.
For sunny days, choose the brightest light setting (often a sun icon). Using the automatic white-balance setting may slow down the camera when you're trying to get action shots. If it's bright outside, you can shoot at ISO 200 or 400 without too many worries. If it's really sunny and you can get away with a fast-enough shutter speed, drop your ISO another notch to 100; this gives you the best-possible image quality. In sunny weather, it's a tradeoff as to whether you expose your shot for the player, the ball, or the uniform, bat, and arm. Figure 4-9 is a great illustration of the right way to expose a shot where so much brightness and darkness are at play with the overall scene.

Figure 4-9. This softball shot is nicely averaged. The face is a bit underexposed, the ball is a bit overexposed, and the majority of the scene — the arm, bat, and uniform — are dead-on.: © Joy Absalon
With your ISO set to a suitable speed, set your camera to the shutter speed you think the camera will handle in order to get stop-action shots in baseball, given the lighting conditions. If it's bright enough, you will be able to get good action with the shutter speed at 1/500 of a second; if possible, go a little faster to 1/800. The faster the shutter speed, the more likely you are to stop the ball in midair just before the bat hits it.
If it's not bright enough, then you may need to drop the shutter to 1/250; this might cause a slight blurring of a fast-moving baseball, but you might get lucky. However, if you can't get your ISO above 400 and your lens aperture won't open more than about f/4.5, you may have to settle for a slower speed. Typically, the internal light meter will tell you if you've set your camera to a speed that is going to create an image that's too dark (check your manual). For example, the aperture or shutter speed you see in your LCD or through your viewfinder may flash at you.
Tip
If you're shooting with a flash, such as taking a fan or a dugout shot, you typically cannot take photos with a shutter speed faster than 1/250 of a second. If you do so, you're likely to get a black horizontal stripe across part of your photo where there is no image. So when you're setting your camera manually, remember that if you have to take flash shots you'll have to limit your shutter speed.
Nighttime shooting in a lighted baseball stadium is more difficult. Because you must work with artificial light instead of sunlight you'll need to bump up your ISO, lower your shutter speed, and alter your white-balance settings. Most stadiums use tungsten-type lights; set your camera to that setting or, if your camera has one, the little lightbulb icon for white balance. You might try the flash setting, as well. Generally speaking, you're most likely to get good action shots in the daytime rather than at an evening game.
Shots like the softball photo in Figure 4-10 aren't just the result of a fast camera and lens; they also require you to have a good eye, good positioning, and a strong sense of timing for the sport — and a bit of luck!

Figure 4-10. Keeping your eye on the ball sometimes has its disadvantages! Baseball and softball often provide great opportunities for exciting action shots like this one with your subject in a predictable, visible spot.: © Joy Absalon
For fan, dugout, and coaching shots, drop your shutter speed to somewhere between 1/60 and 1/250, depending on how much sun is available. But these shots are in darker areas, and, if you're closer to your subjects (either physically or using your telephoto lens), you'll need a bit more light. Also, these aren't typical action shots (well, an angry coach or screaming fan may be) so you don't need the stop-action features.
The rougher, tougher All-American sister sport to baseball, American football (as opposed to soccer, because the rest of the world calls soccer football) is more difficult to shoot than baseball for a number of reasons, whether at the local middle school field or at the giant professional stadium.
The good news about shooting football is that, unlike baseball, you will probably have much better access to the sidelines even though you may need credentials for college and pro games, as well as larger high school events (however, in pro games, if you have credentials you will get onto the sidelines — also unlike baseball). The bad news is that, also unlike baseball, your subject isn't going to stand in one location at the beginning of every play, nor is he or she going to run in one direction each time! As a result, while you might be close to the action, a bit of luck has to be in play as well as the athletes for you to be in the right place to get the shots.
Interview: Terrell Lloyd
Throughout this book, I've included several photos from my friend, San Francisco 49ers photographer Terrell Lloyd. I asked Terrell to offer some tips and tricks as well as top-notch examples of football photography because he's at the top of his own game as a football photography specialist with a very high-profile team.
What makes your sports photography different?.
Whether it's an engagement session, a studio portrait, or fast, hard-hitting sports action, an image is a dull canvas without the essence light can bring. My subjects have been great, exciting, and at times beautiful, but in attempting to find the best shot I am constantly on a quest for the best light. Like Tangina in the movie "Poltergeist," [n1]I find myself telling and willing my subjects to "come into the light."
The quest for light began when I took an environmental portrait class many years ago, prior to shooting sports. The instructor taught us the art of finding light, not light found in the classroom or available from a window, but light that can be found on location. She believed in the art of finding the best location, assessing the direction of the light, and placing the subject in the best position to shoot from the direction of the light.

© Terrell Lloyd
Terrell Lloyd uses ambient light to his advantage when shooting pro football as well as other types of image.
What's your best positioning?
Open shade, of course, and the direction of the light source in order to produce the best lighting situation for your subject. These are concepts that I learned in that environmental portraiture class years ago that I apply daily when shooting sports photography. Whether it's Little League baseball, club soccer, or professional football, I always try to put myself in the best possible light on the playing field by assessing the direction of my light source.
Sometimes the game will dictate my position. It may be a backlight situation or even shooting into the sun. Shooting under those conditions will not produce the best image. But if I can move to a different angle and find the direction of the light source, I seek it out.
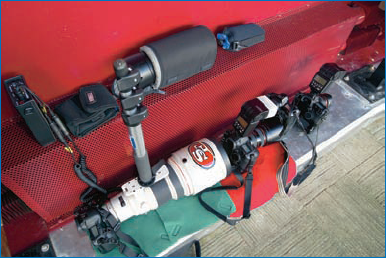
© Terrell Lloyd
Terrell uses a 400mm lens along with gear capable of handling the elements common to pro football games. Here you can see his equipment stored just away from the sidelines where he can reach what he needs for various parts of the game.
©Terrell Lloyd
A fast camera with a fast f/2.8 long lens is what it takes to make an image feel like it was taken from on the field.
How does lighting affect your settings and shots?
During the course of a complete game or match, the lighting will shift as the day progresses. In those instances, you have to take advantage of the direction of the light source and shoot as many images as possible while the favorable conditions exist. Whether it is offense or defense, as a photographer, you want the best shot the light brings you.
With the advances in technology, as photographers we can always adjust the settings on our cameras to assist us when the lighting is not as perfect as we would like it to be. Whether it is an aperture setting, shutter speed, ISO, white balance, or shooting in RAW mode, I can still attain high JPEG resolution by manipulating the different settings.
Football action can be very busy. The athletes and referees are running in several directions, the sidelines buzz with the cheerleaders and coaches, and then there are the fans in the stands screaming in the background. Assuming you are granted some free-ranging liberties around the field, you'll want to take these factors into consideration as you select a position on the sidelines to get the best shots.
Positioning yourself ahead and to the side of the action by about 30 to 45 degrees will ensure a good perspective of the play. If it's really tight, you may want to narrow it to be a bit more perpendicular to the line of scrimmage. However, you will want to be ready to not only take shots when the play begins, but when it ends, when the ball is in the air and being caught, and when the tackle takes place.
Once again, knowing the sport can help — even for a peewee game. For example, on third down the odds are that the next play will be a pass, so it's good to be a bit farther down the field and, hopefully, on the side where the receiver will be catching the ball. If it's close to the end zone, position yourself at the end of the field with a telephoto lens, if you have one, and possibly get a direct shot on the ball as it flies toward the receiver's waiting hands.
Shots from the stands can be good, as well, if you have a telephoto lens, or to take wide establishment shots of the field of play. Also, with a telephoto, you're in a position to take shots of the cheerleaders; they almost always spend more time facing the crowd than the players. Narrow depth-of-field shots of the faces of cheerleaders with the players blurred in the background can make for a nice environmental image to round out a slide show of a high school or college game.
As with positioning, getting the shots in football can be tricky given the cacophony and activity surrounding a perfectly good subject. However, as with baseball, keeping your eyes on the ball isn't such a bad idea — as well as on the person carrying the ball or about to carry it.
A random group of players running and falling in different directions has no inherent compositional value in photography. However, if a key person in the image is carrying the ball, suddenly a subject has appeared in the scene and gives new relevance to the seemingly chaotic action. With a player in motion carrying the ball, the image can be interpreted and perhaps even understood based upon the direction of the ball, the player's uniform, and what is ahead of and behind him. In Figure 4-11, the subject of the image is clearly identified by the fact that he's carrying the ball, everyone is after him, and he's the most clearly focused element in the photo.
So, here are a few guidelines to follow for getting the best shots in football:
When possible, shoot at a narrow depth of field to ensure your subject is obvious; this means having your aperture as wide as you can manage it to be and still stay focused.
If you can get close enough, and/or if you have a telephoto lens to get you close, shoot tight action. Don't worry about getting the entire team in the shot, or even an entire player's body. Fill your frame with action, faces, the ball, muscles, and motion.
Get personal with the players: Facial expressions, grimaces, pain, and concentration are all great aspects of the sport that most spectators can't get enough of and can't see very well from the stands.
As much as possible, be in front of the action, not behind it. You're better off with it moving toward you, not away from you.
When shooting narrow depth-of-field shots, you'll want to keep constant attention to your focus; it's very easy for a player to get out of focal range with a wide aperture, but this setting will often give you the best shots.
Get as close as possible, but stay out of the way of the action if it starts to come your way. You don't want to get hurt or to hurt a player.
Tip
If you are going to be on the sidelines, use a rubber hood on your camera lens — especially if you're shooting with a larger telephoto lens Many lenses come with hard-plastic hoods, but this can actually injure players if they run into you Instead, you can buy collapsible rubber hoods that I actually find more versatile and portable — and they also protect the lens if you bump it.
As for settings, in football your camera will have to be adjusted for whether the game is at night or during the day, as well as in sun, rain, snow, or other conditions Most often, you'll want to have it set for aperture priority, or a wide aperture if you're shooting manually; this will give you the best narrow depth-of-field images that will highlight the players and blur the surrounding scene With a wide aperture, you'll also be able to have a fast shutter speed for stop-action shots You should plan on shooting minimally at 1/250 second, and preferably faster if you can.
To adjust for the light conditions, you should change your ISO accordingly before narrowing your aperture or slowing your shutter speed Today's digital cameras are much better at handling digital noise than they were a few years ago, so shooting at higher ISO settings isn't as much of an issue as it used to be.

Figure 4-11. Narrow depth of field is a good tool for identifying a subject, but it can be challenging to get perfect focus on fast-moving targets.: © Terrell Lloyd
You'll also want to adjust your white balance settings for the conditions — a gray sky versus a sunny one, versus a stadium-light illuminated field Each will create a notably different colorcast in your images depending upon how your white balance is set You can set it to handle white balance automatically, but typically your camera will be marginally faster at shooting if you set it manually.
Don't forget that your work isn't over when the game ends. Getting shots of players celebrating and perhaps even commingling with fans is an essential part of the story you want to tell; images of defeat and loss, also, can be very emotional and powerful. Whether it's a pro football player who just guaranteed himself a starting position for another season or a nine-year-old who just scored his first winning touchdown, keep shooting until you've fully documented the event!
In Figure 4-12, sports photojournalist Jim McKiernan didn't worry about getting everything in the shot — he went for a close-in shot to emphasize action and emotion.

Soccer, or football as it's known outside the United States, has become a major force in world sports at every level, from amateur to pro, young to old. It's the only team and spectator sport in the United States that's in a major growth curve, and in many cases it has eclipsed baseball and football. There are photographers who specialize in taking soccer team and player photos for a living, and soccer action shots are now common in the major sports magazines, sports sections of newspapers, and on the Web.
Yet, soccer is even tougher than football in terms of shooting action on a big field. The action is fast, unpredictable, happens virtually anywhere on the field, and the goals are spread far apart. In football, at least, the action is being driven in one direction unless there's an interception. For soccer, possession of the ball can change hands in an instant, making a goal at either end of a large field at almost any time a real possibility.
A telephoto lens is nearly essential in soccer. The distances are just too great — even for pro shooters — to be able to get close without one. Most pro shooters in soccer use anywhere from 300mm to 600mm lenses and even higher; this means big, fast, hyper-expensive glass is being used to get almost anywhere on the field visually.
So much for the bad news. The good news about shooting soccer is that team members tend to be more spread out than in football, so you can close in on a few players instead of two clustered teams. The ball is in play more than football or baseball, so your opportunities to get shots of kicking, head shots, and two players vying for control of the ball are all quite good if you're ready for them and have some basic equipment.
Finding the right spots from which to shoot in soccer can be challenging. From the stands, you will be hard-pressed to take good photos of tight action without a long, long lens. Getting close to the field is highly desirable, but you'll need to be cognizant of what's going on in the game to ensure you can be where the action is — which, in the best of situations, involves a bit of luck as well as awareness.
Access is an important element in soccer if only because the field is already so large that you want to be as close as possible to effectively represent the game, show players' faces and emotions, and get tight action shots when they occur. Other than from the stands, there are three primary locations you'll want to frequent in shooting soccer.
The end zone, either behind the goal or at a 30- to 45-degree angle (meaning about 10 to 20 feet to the side of the goal, shooting toward the area just in front of it).
The centerline of the field, where statistically you will be able to get beginning starting shots as well as have a good reach to much of the play on the field. You can also often get shots of officials from the centerline, such as the one shown in Figure 4-13.
About halfway between the center and end of the field (one quarter of the entire field, as measured from the end of one side of the field). If you work between the center and the halfway point, with a telephoto lens you can capture a majority of the action.

Save the goal-area shots for exceptional situations and free-kick images; otherwise, you may find yourself at one end of the field when the players have suddenly run to the other!
In soccer, almost more than any other field sport, the concept of telling a story is essential. Because soccer games are long and sometimes few or no goals occur, you are in a unique situation to be able to show a lot of action and key moments in the event that someone can view in a short amount of time. And good soccer photos can be very dramatic and exciting; the camera can often capture moments that spectators will miss and will surprise even you when you get them downloaded onto your computer.
Long shots require a steady hand, image stabilization, and a setting that lets in enough light for a good exposure but fast enough to catch athletes in motion. A good example of a narrow depth-of field photo is in Figure 4-14. Note the nice stop-action effect in this shot.

Tip
Assuming you have some telephoto capability, even if it's not 300mm, you will want to make use of it with soccer. And, when shooting with a telephoto lens, a monopod is helpful because nearly all of your shots will be long ones. This will help steady your camera and let you shoot a bit faster.
For professionals, this means shooting with an f/2 8 telephoto lens and an ISO setting that matches the ambient light. However, most nonprofessionals will not have f/2 8 lenses — at least not ones that sustain an f/2 8 aperture when fully zoomed out. And because most of your shots in soccer will be long ones — perhaps at the full extension of your zoom's focal length — you will want to set your camera accordingly.
Tip
With sports like soccer, you will need to be able to carry as much of your chosen equipment with you as possible because the field of play is so large. You don't want to be traipsing all the way around the field and back to your car or the stands to change lenses or to download a card.
Here's how to set your camera for an optimal sports exposure at the extent of your camera's zoom capabilities.
Assuming the light is reasonably good, set your camera to shutter-speed priority with a shutter speed of 1/250 and ISO400. Check your manual if you aren't sure which setting shutter-speed priority is.
Extend your zoom lens to its farthest setting. This will be a fixed zoom lens if you are working with a point-and-shoot camera. If you have a zoom telephoto lens on an SLR, set a 70mm to 200mm at 200mm.
Take a few test shots and see which ones are best. The camera will have automatically set the aperture according to how it has read the light for the shots you took. Because the camera will make various choices of settings, you will want to review them and see which looks the best.
View the best shot on your LCD. Change the display to the information setting, if your camera has one (and many do). It will tell you the aperture setting (f-stop) it used for the shot.
Change from shutter-speed priority to the manual setting.
Set your camera to the same settings as mentioned in Step 1, but also set your camera's aperture to the f-stop that you noted in Step 4. This gives you the best settings under your specific circumstances.
These steps are just a starting point for getting the best settings. Your camera is now optimally set to continue to take shots based on a setting you know works — at least for the shot you took in the test, and with the light as it was for that shot. If the light changes, if you change the focal/zoom length, or if you get substantially farther away or closer to the action, then you may need to adjust the settings accordingly.
At 1/250 of a second, your camera will stop the action in soccer reasonably well. You can still shoot faster, especially if it's a sunny day, to get even better shots where the ball appears to be frozen in midair or at the end of a soccer shoe. But 1/250 is a safe, general setting that will help you begin to take good shots that are exposed well for various lighting and action situations. From there, you can branch out and experiment with different settings.
Multiple-frame shooting capability will help you when you're photographing a goal kick or heading. And, you can actually get away with fewer frames per second in soccer than in some sports if you follow the action and keep shooting. This means that you don't have to necessarily be using a super-fast shooting camera; however, a fast lens (meaning f/2 8, typically) will help if you have one.
Tip
Be prepared for shooting in inclement weather. Rain, snow, or mud will not necessarily stop a soccer game. Camera rain products like those made by Kata and Tenba will help you protect your gear if it's nasty outside.
Sometimes warm-ups can provide excellent shot opportunities, like the one in Figure 4-15. If you do get closer to the players — such as before or after they go onto the field — remember that you will need to adjust your settings, and you may even want to use a flash. If you're trying to get various shots around the stadium or field where players are in various situations, then you can effectively set your camera to the automatic setting, with an ISO of 200 or 400.
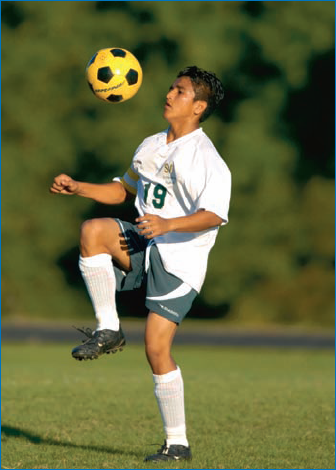
Figure 4-15. Images of soccer players warming up or just playing with the ball can be fun to take and will help add color to documenting an event.: © Joy Absalon
You may also want to take a nice, wide-angle shot of the field, end zone/goal, or crowd. To do so, you probably won't want to use a flash but you'll want to use a slow shutter speed — perhaps as slow as 1/60 or 1/125, depending on the time of day and field lights — and an aperture setting that's small enough to have a wide depth of field (f/5.6 at the very least; perhaps as much as f/11 or higher).
Also, a wide-angle lens, on occasion, can be put to good use if you're standing behind the goal to catch a dramatic shot where you can get close and the action is wide. It's a good way to catch a diving goalie.
There are so many field and court outdoor sports that it's impossible to fit each into this book — even though they all require some specific and specialized considerations for capturing great photos of them. Many of the techniques for positioning yourself to take good shots, as well as how to set your camera effectively, with the major sports already covered in this chapter can be applied to other sports as well. Be logical. Keep your eye and lens on the ball or the subject of the play (it might even be feet, for example, in a race), look for tight action, and capture emotion. All of these are common to photographers shooting every sport taking place on the field of play.
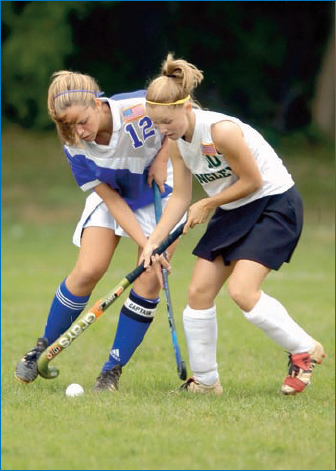
For any sport, the more you can personalize it, the better Figures 4-16 and 4-17 are a good example of capturing very different dimensions of a player — in this case a field hockey goalie.
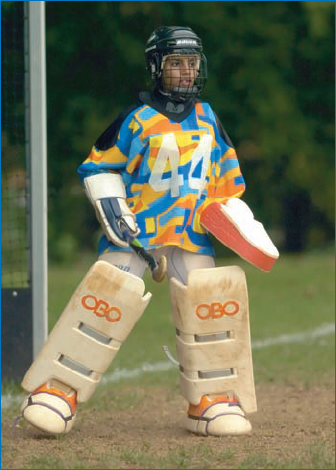
Figure 4-16. A field hockey goalie in full gear — an interesting and important photo for documenting and visually describing an event: © Joy Absalon

Figure 4-17. A player's face close up is an equally important photo because it presents a very personal side of the sport and event, even if it's not showing action, victory, or defeat.: © Joy Absalon
Before you take a brief look at some other sports, first look at some general rules for shooting almost any type of outdoor competitive sport:
Focus your shots on a distinctive element of the sport
An individual player carrying or hitting a ball or engaged in a specific action.
The ball in motion as it leaves or approaches a player(s).
A critical moment of action.
A personal reaction or response to a play.
Don't be afraid to shoot tight shots of players and action.
Get establishment shots of the venue, fans, and officials.
Move around as much as you can to gain various perspectives of the game.
Simplify your images as much as possible, whether that means limiting the players in a shot, blurring the background by using narrow depth of field, or finding unique angles that isolate plays and players.
Make sure your photo has a subject, as opposed to just a mass of athletes — a runner with a ball, two players engaged in a battle for a ball, a player hitting a ball, a sprinter in the lead of a race.
Track and field has many events, so shooting from the stands is difficult without a long lens. Try and get onto the field and move around the various events as much as you can; however, be careful where you go so that you don't get in the way of an event that's starting or ending (not to mention to avoid getting in the way of an airborne object like a javelin or shot put).
Track and field events allow athletes to be shown close up in moments of extreme exertion, as shown in Figure 4-18.

Use a fast, stop-action setting (for example, 1/500 of a second or faster) with your camera on shutter-speed priority or manual mode to get a runner breaking the tape at the finish line, leaping over the high jump bar, or pole-vaulting. Track them with your camera after having set your focus on the point where you'll take the shot ahead of time, and this will optimize your chance of getting a well-focused, stop-action image, like the midair photo in Figure 4-19.
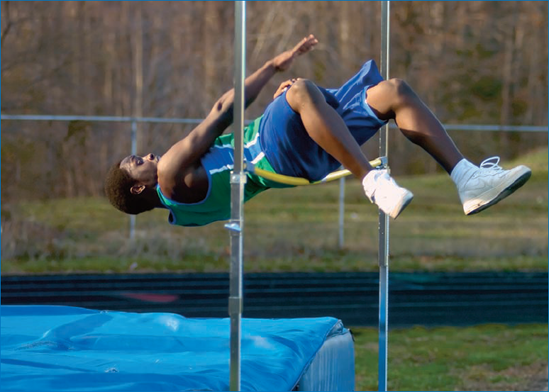
Figure 4-19. Classic action photos of athletes in midair, such as this one of a high jumper, never lose their drama and interest.: © Joy Absalon
Track and field events today have taken on a real sense of cool, which you can leverage in tight action shots that make the athletes look their best, as shown in Figure 4-20.

Figure 4-20. The long and triple jumps have become very popular among spectators, have turned more than one athlete into a star, and make for good action shots.: © Joy Absalon
Whether you're shooting on a track or at the finish line of a big race, isolating individual runners exerting to break a record or just win a tight heat make for very dramatic shots. Another good shot is a cluster of runners at the beginning of a big race. To get good shots, position yourself ahead of the finish line where you can really see the athlete's face as he or she finishes.
If you're trying to catch the action from the sidelines, such as when they pass by, then you'll need to pan your camera by moving it from left to right or vice versa. Keep a single focal point so the camera isn't constantly adjusting its auto-focus, which will slow it down and likely not be focused when you want it to be.
Note
Higher-end cameras use an AI Servo mode that lets them auto-focus constantly on a target that is very fast; however, this feature is not as fast or reliable on anything but the top-level Nikon and Canon products.
The beginning of a marathon race makes for some good wider-angle shots, such as the one in Figure 4-21.
Tip
For any school sports — whether primary, middle, high school, or college — be sure to inform the officials on the field or running the event that you are going to be photographing if you intend to be anywhere but the stands They will want to know you're there and give you permission to do so (or not, as the case may be).
A fast-action, increasingly popular field sport, lacrosse is enjoying a surge in popularity across the U.S. with both girls and boys. Taking photos of lacrosse players in action means dealing with a large field, a relatively small ball, and lightning-fast moves among players. In Figure 4-22, Joy Absalon has taken a unique shot of players battling for the ball.

Figure 4-22. In lacrosse, some of the best shots are of a ball lying still on the field.: © Joy Absalon
Add to that the players wearing lots of protective gear, and you have a sport that, for shooting, is like a combination of soccer, baseball, football, and racquetball all in one.
As with other sports, lacrosse and field hockey involve receiving and passing the ball, but with a stick, on the ground or through the air. You can focus on the ball in football and soccer, but when the ball is such a small object as it is in lacrosse and field hockey, you may find it tough to do so — especially when shooting with a telephoto lens. It's better to be aware of the ball and shoot the human action, but don't worry too much about the ball being perfectly poised in each shot. Photos like the one in Figure 4-23 are very tough to catch.
Field hockey, while less challenging for the photographer due to far less protective gear, nonetheless represents some of the same challenges with a big field, small ball, and fast action, as shown in Figure 4-24. Be prepared to take lots of telephoto images to get a few good ones.

Volleyball shots are most dramatic when they show players diving for the ball or slamming it down over the net. At the Athens 2004 Olympic Games, beach volleyball was one of the most popular sports to be televised and photographed because of the scantily clad athletes as well as cheerleaders — a recent development in Olympic sports.
Whether it's on the sand or a field, volleyball shots are almost all stop-action and tight. With so many players in a relatively small area for full-team games, it may be hard to close in on just a few players, so you'll want to shoot narrow depth-of-field shots and get tight either through the net or just to the side.
Note
For more on photographing volleyball, see Chapter 6.
Shooting tennis requires a good sense of timing and some knowledge of the sport. Knowing when and where the ball will be, as well as the player scrambling to hit it, can make the difference between a good shot and a bad one.
Does that mean you need the ball in every image? Not necessarily, but it helps. An action shot of a tennis player with his or her arm and racquet extended might look good, but it will almost certainly look better if there's a ball approaching or leaving the scene.
The three tennis images in Figures 4-25, 4-26, and 4-27 are similar, but different in distinctive ways. Each of the shots is taken from the same position, about midcourt at an angle facing the athlete as he or she moves toward the side where the photographer is shooting, which provides optimal perspective.

Figure 4-25. This image is taken with an overcast sky, giving an even tone to the athlete and scene, a stop-action effect, and yet no shadows that over- or underexpose any part of the image. For this image, the camera ISO needs to be a bit higher than in open sunlight (it was shot at ISO400).: © Joy Absalon

Figure 4-26. Strong sunlight makes for some nice shadows that, while causing a bit of a split effect on the athlete (meaning one vertical half is darker than the other), add to the depth and drama of the shot and give good color and saturation.: © Joy Absalon
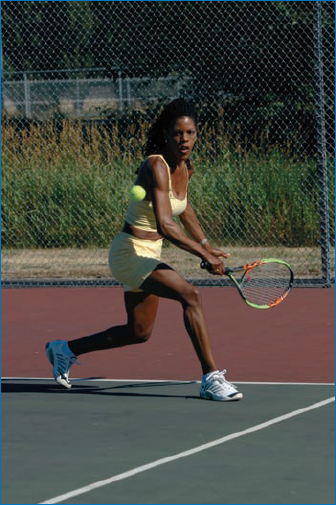
Figure 4-27. In this shot, strong sunlight also provides saturation and contrast to the image, as well as a split on the athlete. The exposure has to be set correctly also to match what the athlete is wearing — you don't want the ball to disappear against a shirt or shorts of the same color — and for the skin to ensure the exposure optimizes skin tonality. In this case, the angled sunlight helps to emphasize muscle tone and athletic exertion.: © Amber Palmer
If you have a telephoto lens, shooting tennis from the stands at a higher-level match isn't a bad idea at all. Tennis matches tend to be a bit closer in than other outdoor sports, so a good 70-200mm zoom lens can do wonders from a midlevel seat. If you can get to court level, you'll want to be close to the net, shooting at an angle as athletes run toward you. This may present a challenge for you if you choose to use auto-focus; it's better, at least with less-expensive cameras, to pick a point on the court where it's likely the athlete will cross your line of focus in a good action move, and where you've focused manually. Then you can pan and wait for the right shots; this method is more likely to return a good photo of the many you'll take than trying to randomly catch a good focused action shot anywhere on the court.
If the light is strong — such as midday sun — you can catch faster-action tennis shots with good exposures; however, you may find that detail in the athletes' faces is lost due to shadows. Flat light, such as what you get on a cloudy day, is optimal because it allows you to get good action shots and retain facial detail unmarred by shadows caused by overhead bright light.
Outdoor field and court sports are some of the most popular sports played, and the most photographed. Yet, taking photos of baseball, football, soccer, and others can be challenging in many ways and require knowledge of the sports, the best access possible, and, in some cases, high-end equipment.
Yet very much can be accomplished with consumer digital cameras in photographing these action sports, and outdoor light, at least during the day, is almost always superior to any indoor lighting you'll find. So many point-and-shoot cameras are very capable of catching memorable moments even in high-speed sports like lacrosse or football.
Getting the right position around a big field is as important as having the right exposure. Knowing where you're most likely to catch big action is essential no matter what kind of camera you shoot. Also, having a sense of how to document an event is important, meaning presenting a rounded set of images that include action, player personalities, victory and defeat, spectators, officials, and the venue overall.