

Zenhome1. © Anacleto Rapping—Los Angeles Times.
Chapter 7 Overview
This chapter looks at the process known as digital workflow, which has five basic steps: camera control, exposure, neutral balance, capture, and storage. These steps allow your creativity to be realized. The chapter also presents three approaches to photographic problem solving: a digital camera tethered to a computer in the studio, a remote removable media camera system on location, and digital capture. The techniques explained in this chapter are for camera systems that allow variation from automatic settings. Although this discussion is primarily intended for various types of professional camera systems, many of the methods or functions addressed here apply to prosumer and consumer cameras as well.
Workflow
Digital workflow refers to the steps used to acquire an image. While the full workflow process continues beyond the act of capturing the image, this chapter focuses only on the formation of the image on the sensor, its transfer to filing, and global control of the image within the image capture sequence. Many think that the technical aspects are critical to making images. As with all photography, however, the resulting image is not entirely dependent on the equipment and its technical function alone; rather, the strength of an image is the product of the eye and mind of the photographer teamed with the capture abilities of a digital system. While not technical, creativity is the first and most important step in the workflow. Though creativity is not involved with the operating system, at times the system can dictate the limits of creativity.
For this discussion, we will consider a tethered system and a non-tethered system. Tethered systems use the functions and memory of a computer or external memory and control unit, while non-tethered systems use removable media and onboard memory and control to handle the imaging process. The major differences between these two methods are that a non-tethered system offers the freedom of not being attached to a secondary piece of equipment but a tethered system offers the enhanced control functions and larger display provided by a computer.
Tethered system A tethered system uses a cable or tether to connect the camera to a computer or external control unit.
In a non-tethered system, the on-board functions replace the computer or control unit, and because of the sophistication of the camera controls this is accomplished without major changes in workflow. Regardless of whether or not the camera is tethered, there is no requirement that either type of system must be confined to or excluded from the studio. Some camera systems can be used in both modes, but for this discussion of workflow it will be easier to view them as separate and distinct systems.
This discussion of technical workflow does not attempt to present every potential operation for every camera system. Manufacturers offer varying software protocols, and applications and processes will differ. For this reason, it is important to read and understand the operation manual of a particular system.
Basic Technical Steps
After the creative portion of the image-making process, some basic technical steps in digital capture workflow follow, regardless of tethering. Some basic steps include camera operational controls, neutral tone balancing, capture, global corrections, and writing to storage. The order of some of these steps may vary slightly and may be augmented in some systems. The ability to review images in some workflows allows ongoing recognition and correction of problems and adds flexibility to the process. There are several points in the workflow when adjustments can be made.
One issue facing all photographers is cleanliness of the imaging surface. It may seem out of place in a discussion of the workflow, but maintaining the cleanliness of the sensor saves considerable effort in the workflow after capture. If film gets dirty, it can be changed between exposures, but digital sensors remain in place for multiple uses, and any imperfections on the sensor’s surface will show up on all of the images; therefore, the care, cleaning, and maintenance of the sensor are ongoing concerns. Systems with interchangeable lenses or changeable backs are particularly susceptible to dirt and defects on the surface of the sensor which can degrade the quality of the final image. Cleaning a sensor is not simply wiping the surface; it is critical to follow the manufacturer’s directions.
Storage Formatting
Whether a system is tethered or not, the image must be recorded in some type of storage system. Each camera or system will save images in a particular way; therefore, before capturing an image, formatting and checking the storage of the camera or system is important. Several types of removable media are available, and the formats are not necessarily compatible. For tethered camera systems, it is critical to ensure that enough space is available on the computer’s storage unit to acquire and save the images that will be made.

Retro Clock. © Ralph Masullo.
Camera Controls
Camera operational controls include image positioning, focus, capture speed, and aperture controls. These systems may be automatic or manual, but it is important to keep in mind that it takes more time to correct an image later than it does to properly capture the desired the image on location. Doing it over in some cases is not an option. The use of a tethered system can be compared to using a single-lens reflex (SLR) system with a large image size. The computer monitor can be used to check compositional elements, lighting, depth of field, and focus and offers the best representation of the captured image, as it is more accurate than what is viewed through the camera’s optical viewing system.
Exposure
It is best to start with an exposure method used previously. Knowing the ISO setting for the sensor allows the use of a light meter or non-metered system to establish the starting exposure point. Regardless of the way exposure is calculated, manually or automatically, metering the important highlight and shadow details establishes the level and range of exposure. Overexposure is not correctable after exposure, and noise in underexposed areas can destroy detail. Even with a liquid crystal display (LCD), care must be taken to avoid overexposure. Because of the small size of many oncamera LCDs, it may be difficult to identify and avoid blooming or overexposure.
With a tethered system, the level of the highlight can be measured and then brought into the range of the sensor by adjusting the exposure. In this way, exposures, as seen or as measured on the display, can be adjusted to meet expectations. Typically, a histogram function or overexposure warnings are used for exposure problem correction. The histogram graphs the number of pixels in an image at each of the captured light values. When the histogram shows a large number of pixels at the white end, this is an indication of potential overexposure. The control on many cameras allows setting the exposure by adjusting high and low histogram levels to fit within the exposure limits. By using this graphical interface with a slider, histogram, or other representation, control is gained for selected areas of interest and potential exposure errors are avoided.
Histogram The histogram is a graph that shows how the light values in the image are distributed. The height of the lines in the histogram represents the number of pixels that are found in the image at any particular value.
Because overexposure is the more significant concern, exposure must be set to limit the effect of the brightest critical area of the image. A safe point is to set the important brightest portions of the image at a value of 242 or below (on a 24-bit color space). While exposure is used to limit the highlight’s effect on the sensor, lighting effects are used, when practical, to bring shadow detail into the useable exposure range.
Neutral Balance
Color management of digital imaging is a major issue. Neutral tone balancing is the first step in controlling color reproduction. Once exposure levels have been established, the light’s neutral balance must be established. The human perceptual system holds color, brightness, and other aspects of vision constant as light color changes. When our mind holds constant an impression of neutral tones on a grayscale, this concept is known as perceptual constancy. We see and relate to a white house as white even though it is overcast and the light is actually blue in cast. Likewise, we do not notice the yellow cast of continuous (hot) lighting when in a light-controlled studio. For film, balancing for light bias can be accomplished with filters, but digital capture software in the system allows correction without any additional equipment.
Perceptual constancy Our perceptual systems find it easier to hold things constant rather than relearn them continually. This means that when we have learned a color we will interpret it consistently regardless of minor fluctuations in the actual color simulation.
Our inability to see subtle light color changes and our perceptual constancy force us to rely on the sophistication of sensors and software to aid in balancing the captured light. It should be noted that if false color is used (e.g., gels or colored lights), these lighting effects should not be applied when neutral balancing. Placing and then color measuring a known neutral tone in the scene is the most common way to achieve neutral balance. This may involve the use of a gray card or color checker in the scene or a neutral-light-penetrating lens covering. Because the sensor reads color, the mix of light of the known neutral can be adjusted to reduce the color bias of the light.
When a neutral target is in the scene, balancing is accomplished by selecting the target on the computer screen or display or reading the total light penetrating the translucent lens cover; recording the red, green, and blue (RGB) values; and adjusting the color to neutral or equal values of red, green, and blue. This is done in the system by adjusting the captured light values of each channel so that they approximate the same value. A pure neutral means that the values in each channel have the same numeric value. Most systems allow for an automatic adjustment that will apply either a gain change to the sensor or an after-capture correction that achieves balance.
While these systems can operate automatically, some situations, such as capturing light from a sunset, dictate manual adjustment of the neutral balance to achieve the desired colors. To allow the capture of the warm color produced in a sunset, manual settings or use of the camera’s programmed daylight balance are recommended.
Batch processing occurs when software modifies all files after the images are captured and stored. Batch processing allows the capture of images without adjusting the light for each shot. Gray balance information obtained during setup is applied in the background as the images are processed or after capture processing by imaging software. Known light conditions can be saved as light profiles that can be used later in similar situations. Many software packages come with preset light balances for such use. These light profiles are for common light sources and allow speedier workflows; in addition, they can be applied to image files that have been previously saved.
Batch processing When an image has been adjusted to a desired look, the steps used to make the adjustments can be saved, and the algorithm can be used on succeeding images made under the same conditions. If all the images use this algorithm at one time, then they have been batch processed.
Profiles Profiles are computer tools that coordinate the input of digital images to their output.
Balancing the light for capture applies an input profile to the sensor or file that allows the image to be more faithfully reproduced in the digital system. Profiles are the function that coordinates input to output and provides the consistency that the system needs. Without going into detail with regard to how profiles actually work, there are reasons for choosing a particular profile system. Input profiles maintain information from the captured image. This information, which can be saved with the image file, makes archiving an important function for the system. While there will be consistency in output from whatever printer is used, the output will not necessarily be maximized using this type of system.
Beyond color balancing the image to the light, many systems allow adjustment of the way the sensor relates to the dynamic range of the light in the scene. This is known as a gamma adjustment. By changing the gamma, the image is portrayed with more or less contrast. A gamma setting of 1.8 is used when the image will be output to a print material and a gamma setting of 2.2 is used for either video or monitorbased presentations.
Gamma adjustment The slope of the curve formed by graphing the input values of the captured image compared to its output values is referred to as gamma. A gamma adjustment is a computer control that changes the relationship between input and output values.
Capture
With a tethered camera system, a test shot should be made for a final check of the basics: focus, lighting, and contrast. The small size of LCDs on most camera systems does not allow checking fine focus, but it does allow a check of composition, contrast, and overall exposure. For tethered systems, the larger size of most computer monitors makes these operations easy. The options for capture vary depending on the system. Some tethered systems offer the option to fire the shutter from either the camera or the computer. Other systems require shutter operation from either the camera or the computer, but not both. Operating from the computer allows control of the software along with the capture sequencing. The major advantage of this type of operation is a higher level of control.
Operation from a computer is not always advantageous. In many situations, the best operation mode for a camera is on-camera operation. Smaller format, nontethered digital cameras can be held in the hand, thus providing flexibility and movement while photographing. This is particularly desirable when photographing on location or in action situations where the photographer or the subject is moving.
Regardless of the method used to make the exposure, sequencing of the process must take a particular path. As was explained earlier, the sensor must be prepared to accept the light charge. While this is not a problem with newer camera systems, allowances may have to be made for charging the sensor. For older camera systems with camera backs, this is accomplished by using a two-part cable release that activates the sensor before allowing the shutter to open. This sequencing issue is why some lower end cameras do not capture the image when the shutter release is pressed but delay for a short time.
Storage
Once the image is captured it must be stored. Regardless of how the output will be used, at this point the image should be saved in its purest form. With cameras that will write a RAW file (an uninterpolated file), use that file format. When the camera has built-in compression, the compression function should be turned off, if possible. If it cannot, then save the file in the largest file available. Keep the original file as it was captured. Use copied files for post-capture corrections or manipulations. Data are lost or changed anytime a file is changed, but data can be copied faithfully, so an original file can be duplicated as many times as necessary to correct or manipulate the image; however, once the original file has been changed it cannot be restored. The next chapter addresses file types and compression.
Approaches
This part of the chapter follows the digital workflow through three situations to show three different approaches to digital capture, beginning with a studio illustration, followed by a photoshoot outdoors, and finally a situation in which a difficult lighting problem must be solved.
Scott Miles: In the Studio
Perhaps the easiest workflow to follow is in the studio with a tethered camera. The steps in this situation cover all the major areas discussed thus far, and the tethering of the computer allows greater interaction within the workflow. The studio environment offers great advantages with regard to saving time and providing maximum control of the many variables, but these advantages alone do not make a good photograph. After all, it is what is in the picture and how the image is organized that will make the difference; thus, the choice of subject and its styling must be of greatest importance.
One of the advantages of using a digital camera is styling within the frame. Because many digital systems support live viewing with the camera stationary, elements of the image can be moved within the scene and viewed on the monitor to see the effect of these choices in the frame of the image. This setup allows the styling to be very exacting. Details such as locations of and interactions between elements of the image can be managed. Little things that might go unnoticed in film-based photography can be addressed, such as unintended interactions between elements or wrinkles in background materials. The computer screen highlights these little details, as well as major structures apparent in a viewfinder.

Figure 7-1 Scott Miles uses the monitor to compose and focus the camera.
After or in concert with the styling, the lighting must be established. Regardless of the sophistication of the digital camera and supporting software, lighting is key. Working in the studio provides ultimate control over lighting. While adjustments to lighting may be carried out in later stages of the workflow, it pays to spend time creating the lighting that will produce the desired atmosphere and illumination. Many modifications can be made in post-production processing, but the effects of bad lighting are difficult to eliminate. When the lighting has been established, the camera and capture functions really begin to operate. With a tethered system, the issue of formatting memory is eliminated from the workflow; however, it is important to make sure that the computer has the required space available to store the images.

Figure 7-2 Lighting is created to provide exposure and the mood of the photograph.
The camera controls include focus, lens choice, aperture, shutter speed, and, in some cases, camera movement. With a tethered camera, the focus can be viewed and evaluated on the computer. As explained in Chapter 4, choices of angle of view, aperture, and movement may create capture problems if not adequately thought out and addressed. The use of wide-angle lenses or camera movements can particularly alter a sensor’s ability to acquire the proper level of light needed for exposure. At the extremes of the coverage of the lens of distance or off axis with camera movements. Depth of field is another issue effectively addressed by use of a tethered digital camera, as the tethered camera allows more efficient handling of any problems arising due to small apertures. Because the camera is interacting with its capture software, adjustments to small aperture problems can easily be addressed by changing exposure points in the system.
Thus far in our discussion, the image on the computer has been used to style and to adjust the light, but not to control the exposure. Setting the exposure, then, is the next step in the workflow. Any appropriate metering method can be used, but the tethered camera offers greater exposure control and metering is not required. With the tethered system, exposure is set by adjusting the shadow point and the highlight point using tools in the capture software. This adjustment of light values prevents a loss of detail in the extremes.
With digital capture, controlling highlights is extremely important. Using the system’s software, the exposure for the brightest highlight can be brought to a value of 242 to avoid potential blooming or clipping. A grayscale can be placed in the scene after the lighting is set so a tonal range can be metered, with the software adjusting the highlight value against a known tonal value.
The highlight exposure level is adjusted to avoid clipping, but if not enough light reaches into the shadow areas these details will either be lost or contaminated by noise. Because the light environment in the studio is controlled, the shadow detail can be addressed with fill light. Using the grayscale, light can be changed so that the black level has a digital value of at least 12. By placing a grayscale in the image, the lighting and exposure can be set within the limits of the sensor. The exposure is set to the highlight (white value at 242), and the lighting is modified to set the black point (black value at 12).
As either the highlight or shadow point for exposure is moved, the other will also move. A strategy that addresses both ends is possible in the studio. The exposure is set for the highlight, and then the shadow level is moved by adding or subtracting light until it reaches its desired level. The effect of these adjustments can be seen in the histogram, with all exposures falling between 12 and 242.
At this point, the capture needs to be neutral balanced. A good way to do so is to place three small, neutral-toned balls in the scene. These balls can be easily made or purchased. They should have a matte finish in white, gray, and black and should be mounted on flexible wire attached to a base. These three balls provide all the tonal values necessary for neutral balancing. There are two reasons to use this type of device for neutral balancing. First, the spheres will react to the light in the scene and the surfaces of the tone balls will show the effect of both the main and fill lighting. Depending on the type of capture system, neutral balance can be found in numerous points on the balls. Second, color biases can come from the subject even though the color is perceived as neutral.

Figure 7-3 A gray scale is placed into the scene and used to set the white and black exposure.
When colored gels are used to change the color of the light, these gels should be removed from the lights when neutral balancing. Light reflecting from colored surfaces will change the color balancing, and the balancing points should be carefully placed to avoid color contamination from reflecting fills.
At this point, the first exposure is made. Because the camera is tethered, the computer can be used as instant proof of the capture. If there are any noticeable problems, the process can be modified at any point above. It is also possible to adjust some of the software controls, such as gamma control, to establish the desired contrast in the image.

Figure 7-4 Neutral-toned spheres can be used to neutral balance the image. Also a color checker can be used for checking.
Christopher Broughton: On Location
Images by Christopher Broughton are examples of unique digital images that have been made on location, far away from the studio and without use of a tethered system. When using digital cameras on location, the workflow starts well before reaching the location. Planning is crucial for a successful shoot. Operating away from a base limits what can be accomplished. Everything required to support the photography will have to be brought with the photographer. In planning, multiple removable media are reformatted to ensure enough storage for the time on location and the functionality of the media. Also, batteries are charged. Because the shoot will be away from recharging potentials, extra batteries are also packed to enable extended shooting. Beyond these two specific digital capture requirements, all other items, such as tripod, lens shades, etc., become part of the planning for location photography.

Round Lake, Alaska. © 2004 by Christopher Broughton.
On location, the capture workflow begins. As with all other photography, framing the image is the first step. In this example, a perspective-correcting lens was used to allow building a panorama image without a special camera body or an excessive wide-angle lens. The perspective-correcting lens can shift on one axis, which allows it to point at different angles without changing the position and attitude of the sensor. This allows framing to produce three successive images without a change in perspective between the images. Without a change in perspective, the resulting montage image can be easily assembled.
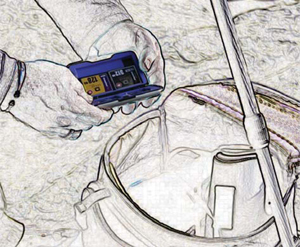
Figure 7-5 Prior to going on location, removable media should be formatted to facilitate making pictures without delays.
For the image, Round Lake, Alaska a tripod was used, and the camera was leveled. When the camera is leveled with its back vertical, the tripod holds the sensor in a true vertical position such that, with the lens mounted to shift horizontally, the image path is across the horizon. Because this particular image was shot into a setting sun, a basic exposure was chosen with the knowledge that a histogram would be required to achieve the correct exposure. Once the test exposure was made, the histogram was viewed on the LCD. As would be expected, the histogram showed a strong spike where the sun’s energy was captured. Because the sun is the brightest object in the scene, it was allowed to be exposed and show at the white end of the histogram. It was important that the shadow detail was not lost, and that was confirmed on the histogram.
In the studio, neutral balancing would be the next step, but in nature white balance destroys the color of the light. For this picture, a preset “daylight” balance was chosen to allow the color of the light to affect the image. If the color of the light was neutralized, then the sunset color would have been lost. At this point, the lens was moved to the extreme position on one side and the first picture was taken. The lens was then shifted to the center or “zeroed” position, and the second image was captured. The zeroed position of the lens can be easily found as the mounting has a click registration in this position. Finally, the lens was shifted to the other extreme end, and the last image was captured. Because the camera used had a fast recycle time and large buffer, the three captures were taken very quickly, in less than two seconds. The speed of the successive shots eliminated major changes in the landscape during the exposure. After the images were captured, the three separate images were composited using imaging software to create the panorama.

Figure 7-6 While the image is framed, a level is used (see inset) to maintain level horizon.
Russ McConnell: Overcoming Photographic Limitations
The image constructed by Russ McConnell is an example of how understanding the capabilities of digital capture allows the photographer to overcome problems. While the image appears to be a normal architectural interior photograph, digital imaging enabled its production. As is often the case, the people who were in charge of this space were not aware of what photographers need to make such an image. During the arrangements to photograph this space, discussion moved to the amount of lighting equipment that would be used and assurances were given that enough power and outlets would be available; however, when the photographer arrived on the site, it became clear that not enough power was available to handle the lighting. Only four of the 60+ lights that had been brought to the shoot could be used at any one time. Rather than scrap the shoot, digital capture with post-capture layering was utilized.
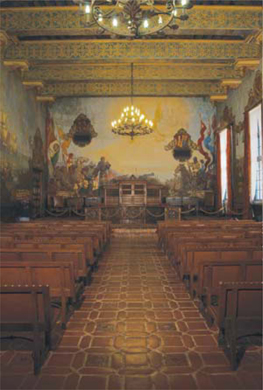
Figure 7-7 The ambient light present in the room prior to lighting.
The workflow for this image became dependent on its being captured within the digital environment. Being able to project the workflow into post-capture layering was a requirement of this image. Because there was not enough power to light the entire room adequately for a single capture, the image would have to be captured in sections and the image would be composed using lighting layers in postcapture processing. Because digital capture cannot accept successive exposures, separate exposures for each lighting section needed to be made. To aid the post-capture processing and reassembly of the final image, careful notes were taken as the shot progressed.
The lighting was created in sectors to deal with areas or details. As the scene’s lighting was segmented, so was the image’s capture. In this image, the 18 captures were layered using post-capture software. With the camera secured on a tripod, the point of view remained constant for all the exposures. It was important to keep the exposure consistent for the later layering. It was also necessary to keep the f-stop constant. If the f-stop had changed during successive exposures, the depth of field would have varied, causing image misalignment and size variation when the focus changed.

Figure 7-8 and Figure 7-9 Two of the lighting patterns that became layers in the final composite.

Santa Barbara Courthouse Mural Room. © Russ McConnell.
Segmenting the image capture created a series of workflows. In each section of the image, the light had to be set up to acquire the desired pattern or detail. Because the light in the room was mixed, each section of the capture required an individual exposure. The individual exposures created a baseline for all of the images as they were merged.
While each layer had individually calculated exposures, the neutral balance had to remain constant across layers for color consistency. For this shot, the majority of the lighting was tungsten, so that was the chosen balance for all 18 layers. The choice of white balancing for tungsten lighting gave the external light coming through the windows a cool blue look.
Summary
- Even though the technical concerns are important, the care taken to style and design the photograph is critical to creating great images.
- The five basic steps in digital workflow are camera control, exposure, neutral balance, capture, and storage.
- Digital workflow can be used with a tethered camera in the studio or on location with a stand-alone system.
Glossary of Terms
Batch processing When an image has been adjusted to a desired look, the steps used to make the adjustments can be saved, and the algorithm can be used on succeeding images made under the same conditions. If all the images use this algorithm at one time, then they have been batch processed.
Gamma adjustment The slope of the curve formed by graphing the input values of the captured image compared to its output values is referred to as gamma. A gamma adjustment is a computer control that changes the relationship between input and output values.
Histogram The histogram is a graph that shows how the light values in the image are distributed. The height of the lines in the histogram represents the number of pixels that are found in the image at any particular value.
Perceptual constancy Our perceptual systems find it easier to hold things constant rather than relearn them continually. This means that when we have learned a color we will interpret it consistently regardless of minor fluctuations in the actual color simulation.
Profiles Profiles are computer tools that coordinate the input of digital images to their output.
Tethered system A tethered system uses a cable or tether to connect the camera to a computer or external control unit.