
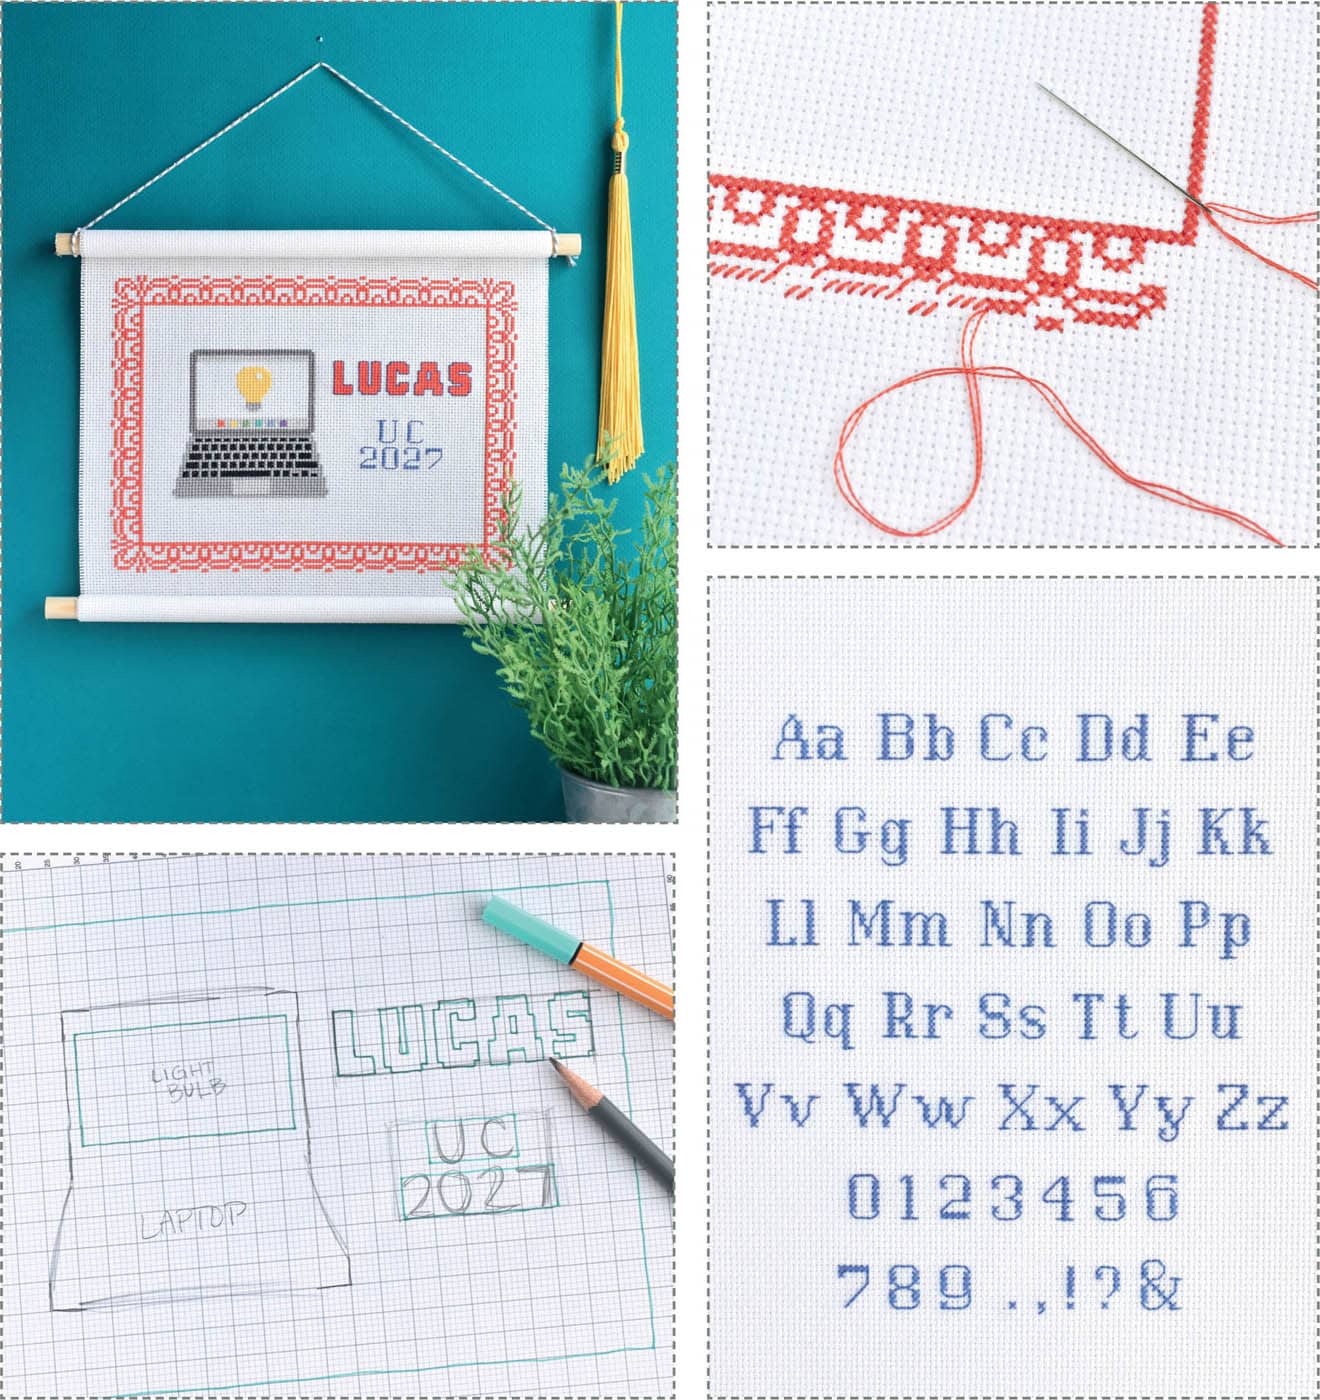
PLANNING YOUR DESIGN
Before you start designing a custom graduation cross stitch project, you need to do something important. Take a deep breath. No, really. Did you do it? Good.
The reason that’s important is that sometimes people get a little (or a lot!) nervous about changing cross stitch designs or making their own pattern. But you don’t need to worry about it because it’s not that difficult. It’s also okay if you make a mistake or things aren’t all lined up perfectly. You’re probably the only one who will ever know.
With that out of the way, it’s time to start planning out your design.
Let’s Talk About Size
This isn’t about the size of your graduating class. We’re talking cross stitch size. Graduation certificates and other customized gifts can come in lots of shapes and sizes, and if you feel comfortable, you can do all kinds of things to change up the dimensions of what you’re making. To make it easier, the charts in this book all have a common size in mind.
The biggest factor that affects size in cross stitch is the fabric count. With Aida cloth, the count tells how many stitches there are per inch so the count or weave of the fabric will alter the dimensions of your work.
All of the patterns in this book are presented in a way that makes them perfect for stitching a project on 14-count Aida, which will fit in an 8" x 10" frame. You won’t have to adjust anything if you plan on making your project that size.
Stitching on a higher count Aida, such as 16- or 18-count will make the design smaller. This can be helpful if you want to make a smaller piece.


If you use evenweave linen, you typically stitch over two threads. This means the count is actually listed at twice the size of how many stitches you’ll have per inch. For example, 28-count linen is equivalent to 14-count Aida.
WHAT’S IN A NAME? Celebratory borders and educational icons are an important part of your graduation cross stitch, but the graduate’s name is what really matters. Because names have varying numbers of letters, they may or may not easily fit into your design. The alphabet section (here) has more information about how to work with the different styles of letters, so look through that as you plan the name portion of your design.
For long names, or when you want to include a middle or surname, you may need to use a smaller alphabet, use only top and bottom borders, or make your project horizontal. Whatever that looks like, figure out the size of the name first.
DATES AND OTHER DETAILS. As you start planning your design, the next important thing to consider is what other details you want to include. It may just be the graduation year, or it could be the name or initials of the school, the completed grade, the name of a teacher, or an area of study. There’s no set rule for what you should have on your cross stitch. Plan your design around the vital information.
PICKING ALL THE PIECES. With the name and other text details decided, it’s time to get down to style. If it looks like you’ll have a lot of extra room, you can use any of the borders, education icons, and mini motifs that you want. Mix and match them to fit with the personal style of the graduate or simply go with what you think looks fun.
Each of the elements that you have to choose from are completely optional, so if the larger education designs don’t work into your plan, skip them! If you need to adapt a border or want to use several mini motifs, you can do that too! As long as it fits on the grid, the choice is up to you and the options are endless.
There’s no set rule for what you should have on your cross stitch. It’s all just about what you feel should be there.


Sketching It Out
We do a lot of things digitally, but sometimes paper and a pen or pencil is easier, and that’s the case for planning your graduation design. You can work directly on the grid paper in the back of this book or make a copy so you can sketch and make notes with abandon. This won’t be a chart that you use to follow for each stitch, but it will be a blueprint for the placement of each element.
With your grid paper ready, grab a freshly sharpened pencil and felt-tip pen (they’re easier to see on the grid) because things are about to get exciting.
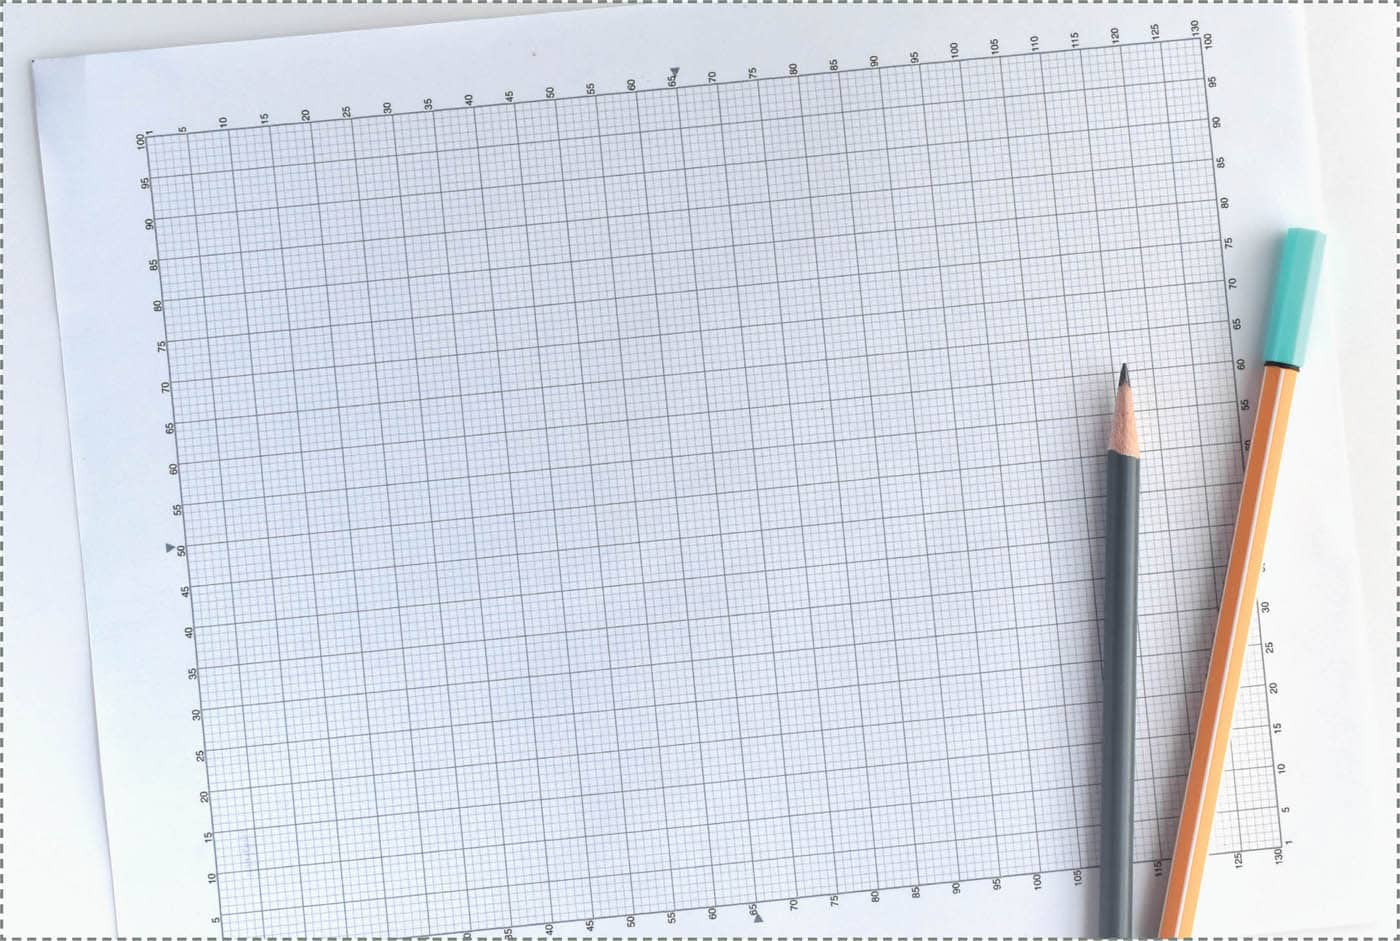
COUNTING STITCHES. There’s a lot of counting stitches when you do cross stitch. The 14-count, 8" x 10" grid is 100 squares x 130 squares, with a count every five squares and an arrow marking the center of each side. Those markings are on the patterns as well, so you can use them to help you count.
Take note of the height and width of all the elements you want to include, from the border and education icon to the total size of the name and other details.
Another helpful tip to keep you on track as you stitch and count stitches is to use a single strand of contrasting embroidery thread and stitch an outline of the grid. Go up and down every five stitches just like the grid divisions (essentially, you are creating a running stitch). You can do this on the outside and to mark other sections. After you finish all of the cross stitch you can remove these stitches. Simply snip the thread in a few places and pull the pieces out.
CUT & PASTE. You’ve probably done a bit of digital cut and paste with text, but those terms come from an old-school way of designing a page, which you can do here. This step is entirely optional, but if you’re a visual person, it can really help your planning. To do this, make a copy of the different pieces you want to use and cut them out. Next, arrange them on the page to see what looks best to you and paste them down (or don’t . . . you may want to keep things flexible for now).
It’s okay if the grids aren’t all exactly the same size. As long as you know how many squares are in each element and what will fit in the different areas, arranging the pieces this way just lets you get an idea of how it will look.
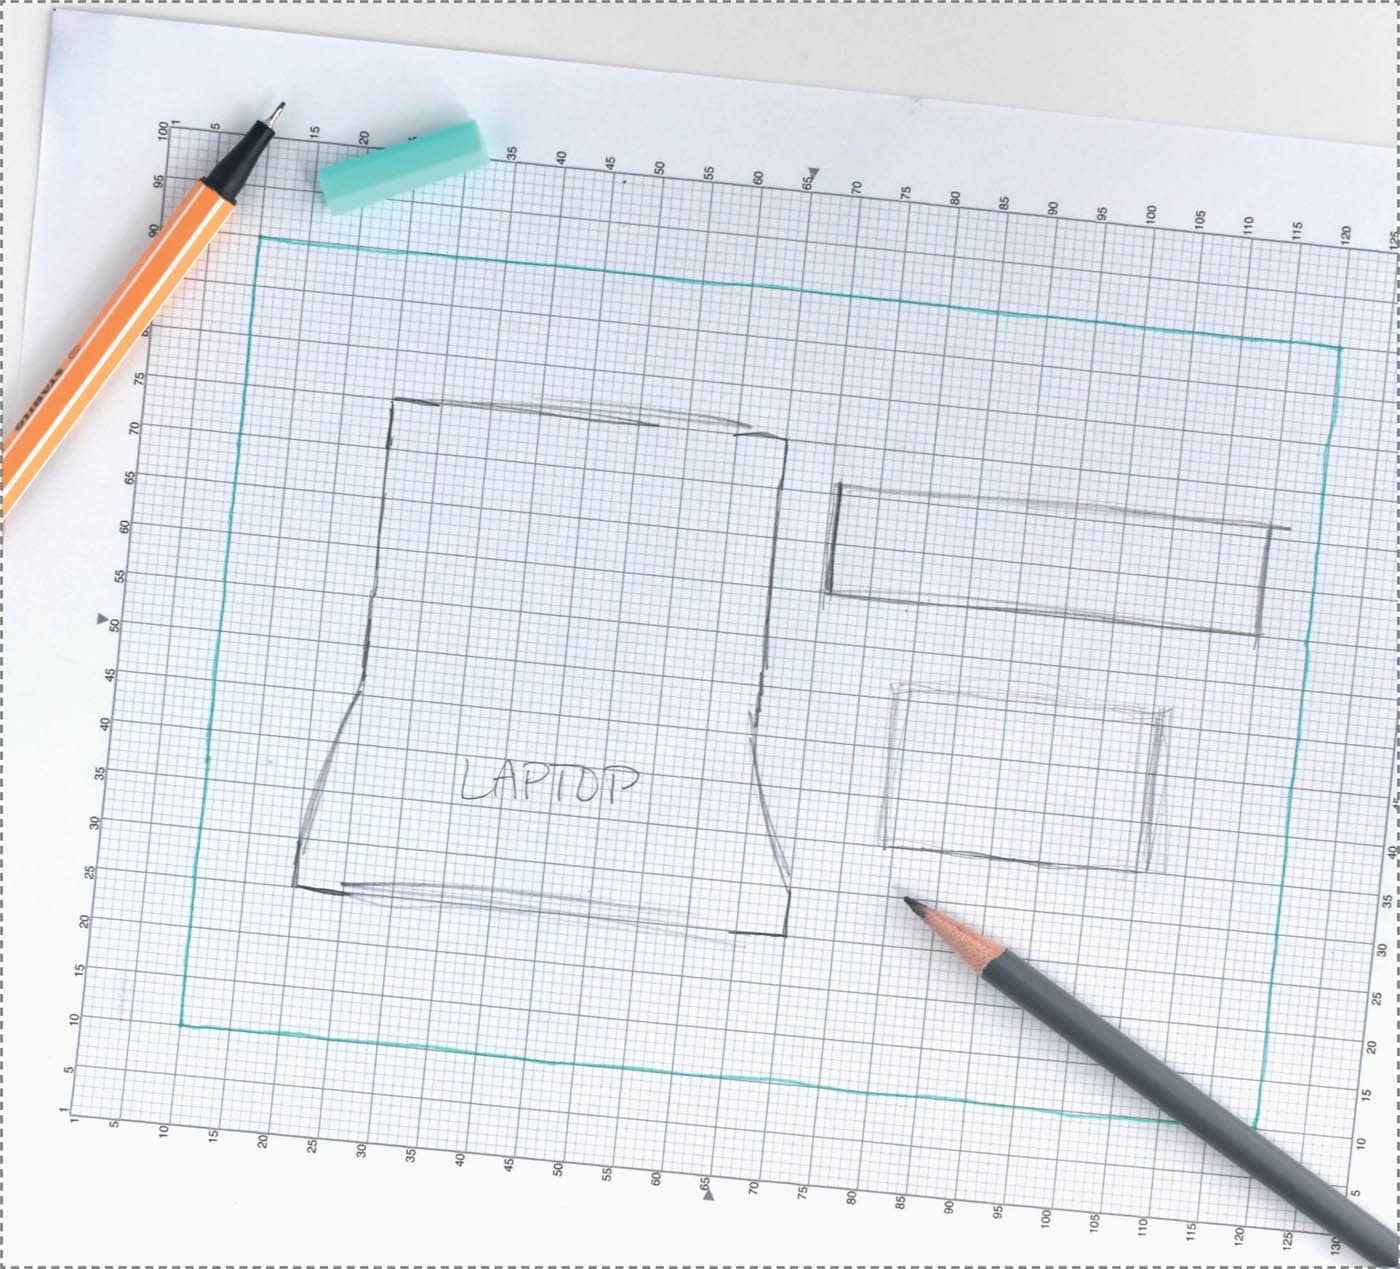
THE BORDER. You can look at each of the borders as a block of stitching along the sides, even when they aren’t solid. Because of this, one way to add your border to the grid blueprint is to draw it in as an outlined block. For this example, the fancy scroll border is 10 squares wide all around the edges. It’s also set up horizontally, so the pattern will be turned. If you are using one of the borders that has customizable number patterns, it’s helpful to sketch those in on the grid as well.
THE NAME AND DETAILS.
Each letter or number in the name or year is like a mini cross stitch chart in itself, and when combined with spacing between, it becomes one block of stitching. You can count the overall width and height of the individual letters and mark those on your grid or you can mark the entire name as one big rectangle. You can even do both! But it’s not vital to draw in every stitch or square for the letters unless you want to.
Use the same process for all of the other text elements. Start with a block that’s the width of all the letters or numbers (with spaces!) and make it more detailed as needed.
THE EDUCATION DESIGNS. The large education designs come in different shapes and sizes, but sketching them onto your grid doesn’t require lots of detail. Just like the other elements, look at the total width and height of the design within the chart.
You can mark the total size on the grid with a few lines or lightly sketch the general shape of the design. Having this overall shape on the grid can help as you add in extra details because you’ll see where there’s room for those things. You’ll be amazed how you can squeeze things in!
Use a pencil with a good eraser because sometimes you’ll need more fine tuning. Look at the overall block(s) of text and other elements to see how they might need to move a square or two so that the whole design is balanced. When the design is settled, outline the sections with a felt-tip pen so it’s easier to see.

As you start stitching, you’ll want to look back to this design for your lettering placement and the spacing of all the elements, even if you refer to the charts in the book for everything else.
Choosing Your Colors
You’ve made it through a lot of information about creating your custom graduation cross stitch design, but take another deep breath because there’s one more way to make your project truly unique—and that’s with the colors that you choose!
All of the cross stitch charts in this book include DMC embroidery floss numbers, which is what the samples use. These colors, however, are really just suggestions. If you like them, use them exactly as they are! But if you want to use a different brand of thread, match hair or skin colors, or swap in school colors, the colors are very easy to switch out.
COLOR FAMILIES.
There are a few main colors used throughout the book: red, yellow, green, aqua, indigo, violet, tan, brown, and gray. For each of these colors, you might encounter a light, medium, and dark shade of that color, which is kind of like a little color family. These colors are almost always very near each other on the color charts, racks, or bins of embroidery floss. You can use this color family idea as a guide for using different brands of thread or for changing out the colors.
As you look through the sections with the patterns, you’ll find tips for adapting them, and changing the colors is the easiest way to do that. All you need to do is look at the color families that are in the design and swap in your own color family choices.
