
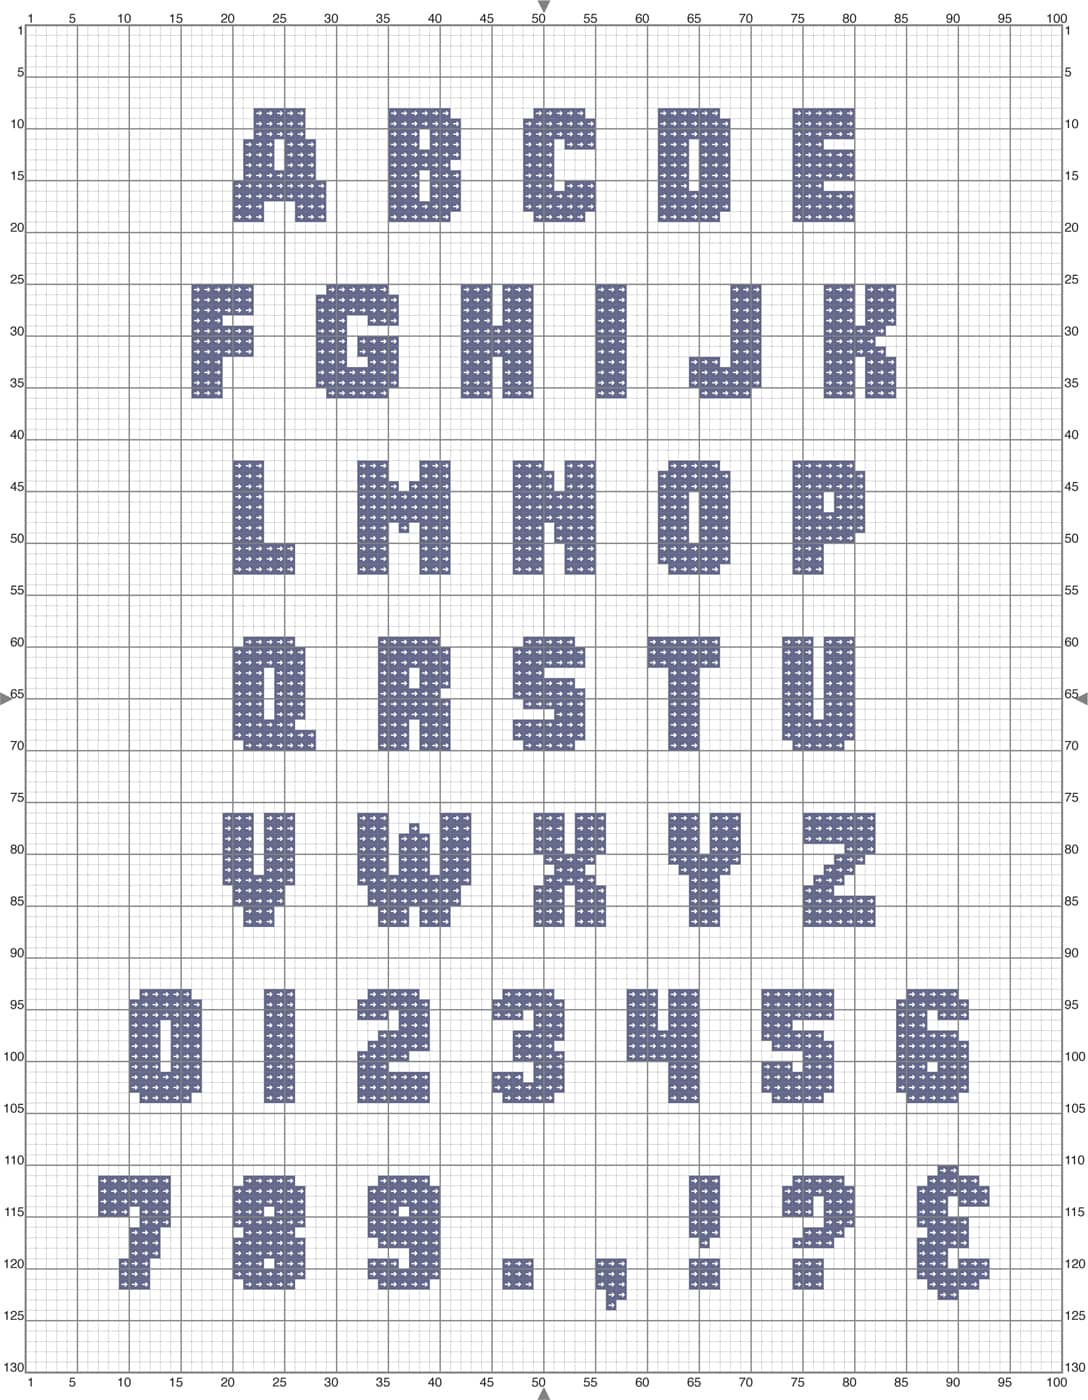
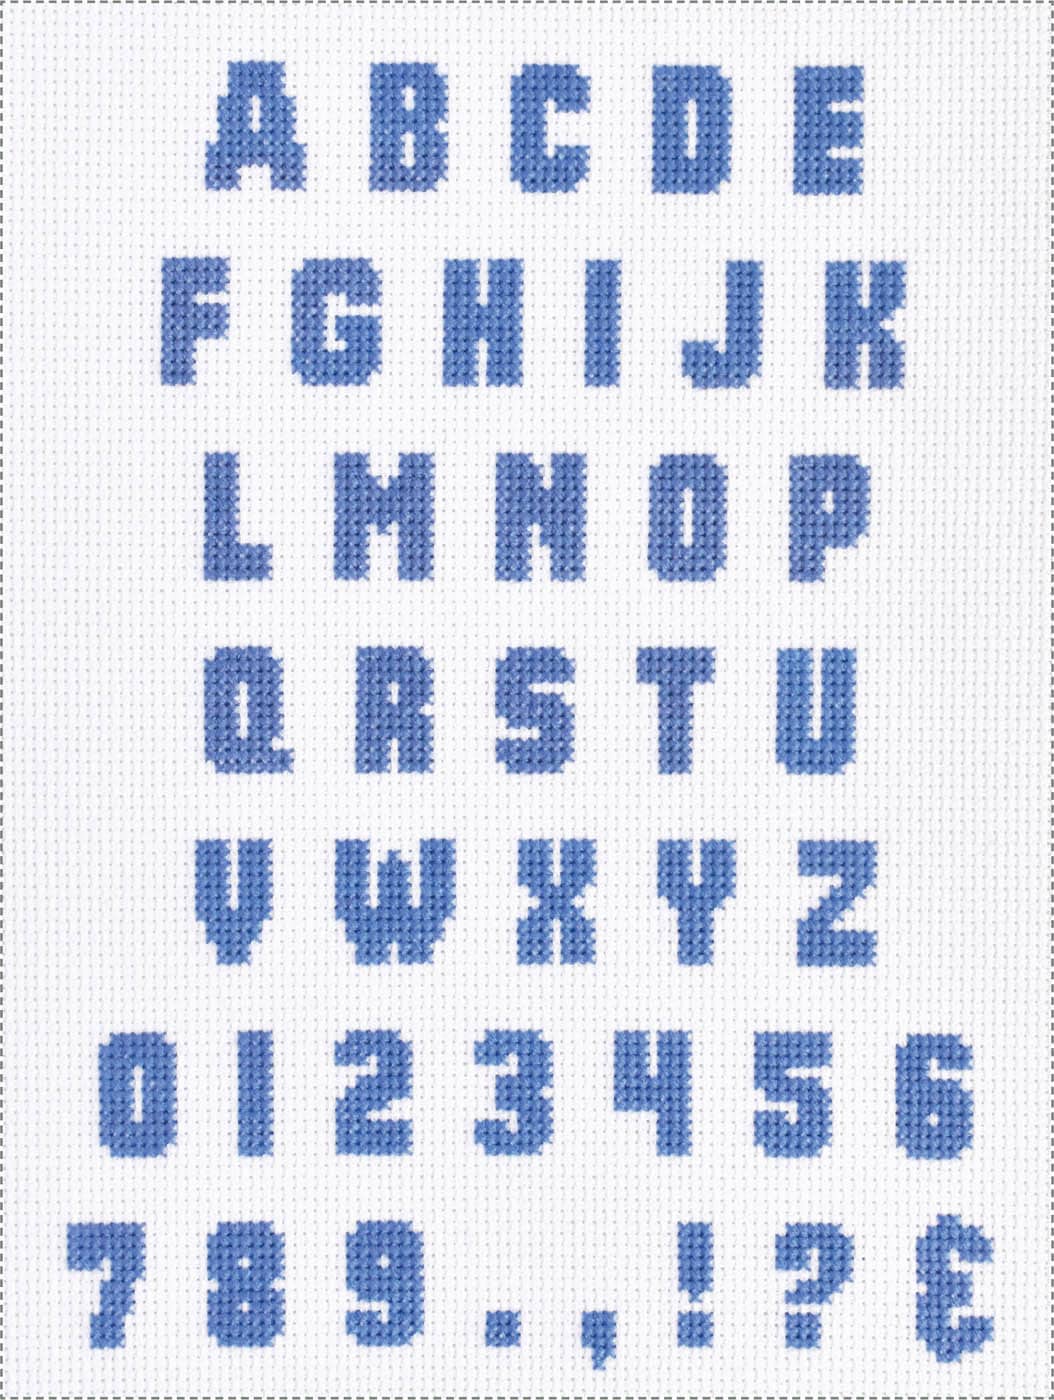
ALPHABETS
Stitching something for an educational milestone means celebrating an individual and customizing it just for them! To help you create a complete design with the Cross Stitch Celebrations: Graduation patterns, there are four sets of letter and number designs. Use them to add a name, graduation year or full date, school name or initials, or even a special area of study.
The varsity alphabet makes a big statement, while the smaller alphabets are perfect for longer names, or when you’re making something small. And if you want the focus to be on the graduation year, you’ll love the extra-large numbers!

Choosing an Alphabet
The most important factor when deciding which alphabet(s) to use in your project is size. Ensuring that a name and all the information you’re including will fit is crucial. The varsity alphabet is ideal for most names that are up to eleven or twelve letters long when making a horizontal project or for shorter names on vertical projects.
The playful and serif alphabets are suitable for most names and dates, no matter the size. In this case, it’s all about deciding what you want the feeling of your project to have. You can go for something light-hearted or kid-friendly or opt for a more serious and traditional style.
Spacing
As you plan out the name and other information on your graduation cross stitch, it’s important to pay attention to the spacing of the letters and words. This can be a small detail that makes a big difference in how your finished piece turns out. Working out the lettering on paper first will help ensure that you’re happy with the placement before you start stitching.
For each of the alphabet styles, leaving one or two squares between each letter is a good rule of thumb. But there are always exceptions. For example, letters that have a lot of open space on an extending curve or serifs (those little lines that stick out on the sides of the letters!) can look funny if you keep the spacing the same. In these cases, tighten the space between the letters to close up that awkward gap.
On the extra-large numbers, you can stitch them with some space between them or make them touch so it becomes one large date block.
When stitching spaces between words, leave at least three or four squares between them so it’s obvious that there’s a break.
Ways to Adapt the Patterns
Each alphabet is shown in a single color, but of course, you should choose whatever color works best with the overall style of your project. The extra-large numbers have a darker border, but these can also be changed to a single color.
Instead of stitching the letters and numbers with one color (or mostly one color), try creating a design within them. On all but the serif alphabet, you can also outline the letters or numbers with backstitch in a second color—perfect for featuring school colors!
Want to give the extra-large numbers a more balloon-like style? Keep the darkest shade around the edges, then stitch the center area with the lightest color in a color family. Keep some of the middle shade around that, with a bit of the dark shade in the lower left. A few long backstitches at the inside curves really makes it look like foil balloons!

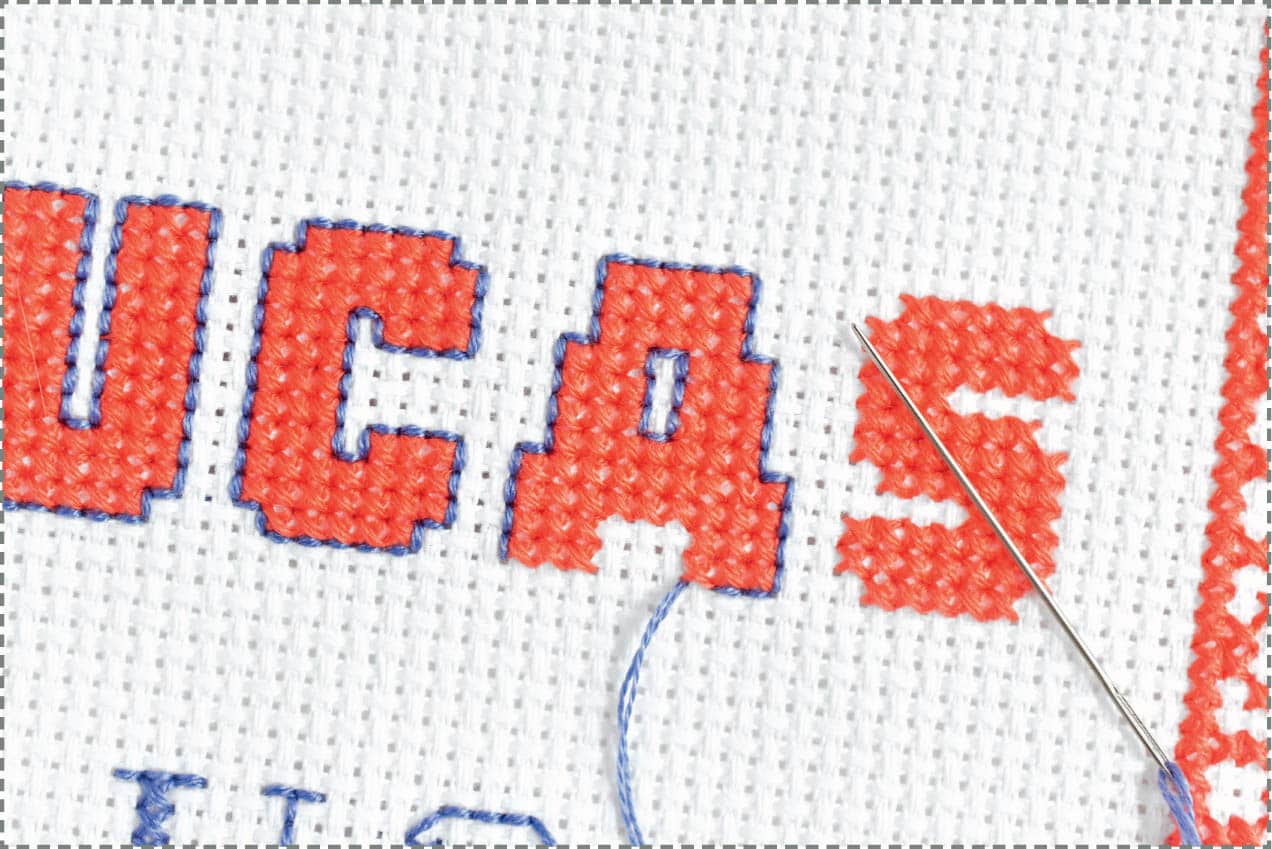
Varsity Alphabet
Instructions
 If the name, word, or year you’re stitching is centered on the design, begin at the center to make sure it’s in the correct location. For left- or right-aligned text, start at one end and work across.
 Working with two strands of embroidery floss, start each letter in your design at the top and work down to the bottom.
 Avoid carrying the floss across large spaces between the letters or words. Start each letter with a fresh piece of thread if you need to.
 3807 (DMC)
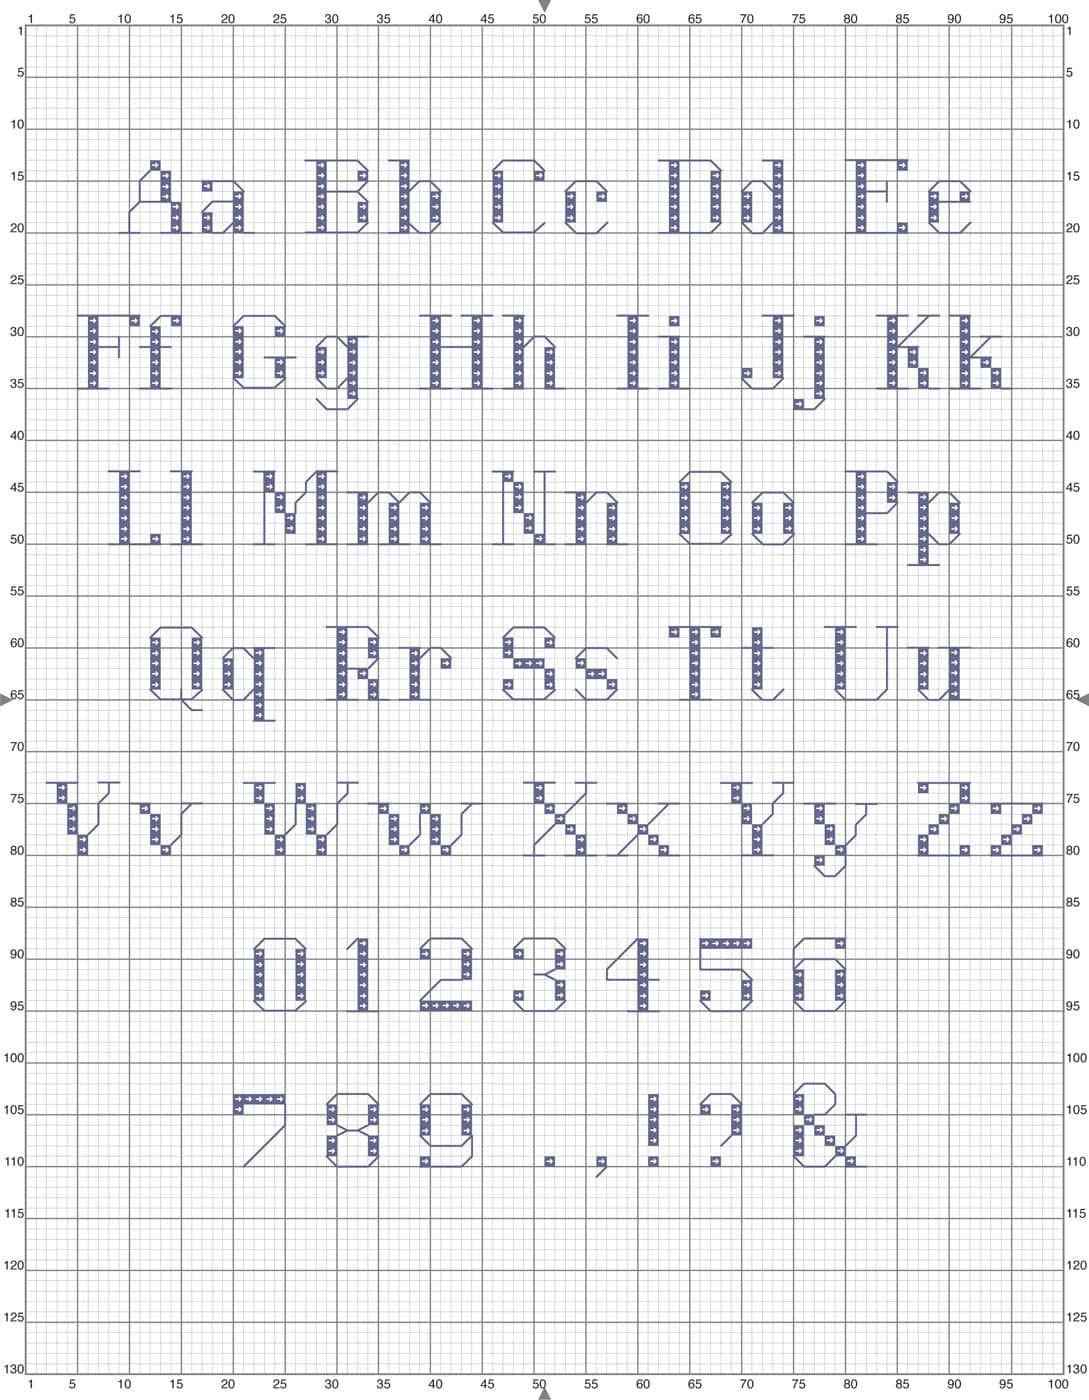
Playful Alphabet

Instructions
 Start stitching at the middle letter/number(s) for center-aligned names, words, or dates, or at one end for left- or right-aligned text.
 Thread your needle with two strands of embroidery floss and stitch the first letter or number.
 It’s best to work from top to bottom, but if you need to work from bottom to top on some, pay attention to how you form the stitches so you don’t undo the previous stitch.
 If the bottom of one letter is just one square away from the next letter, you can jump to it and continue. For larger gaps, start a new thread.
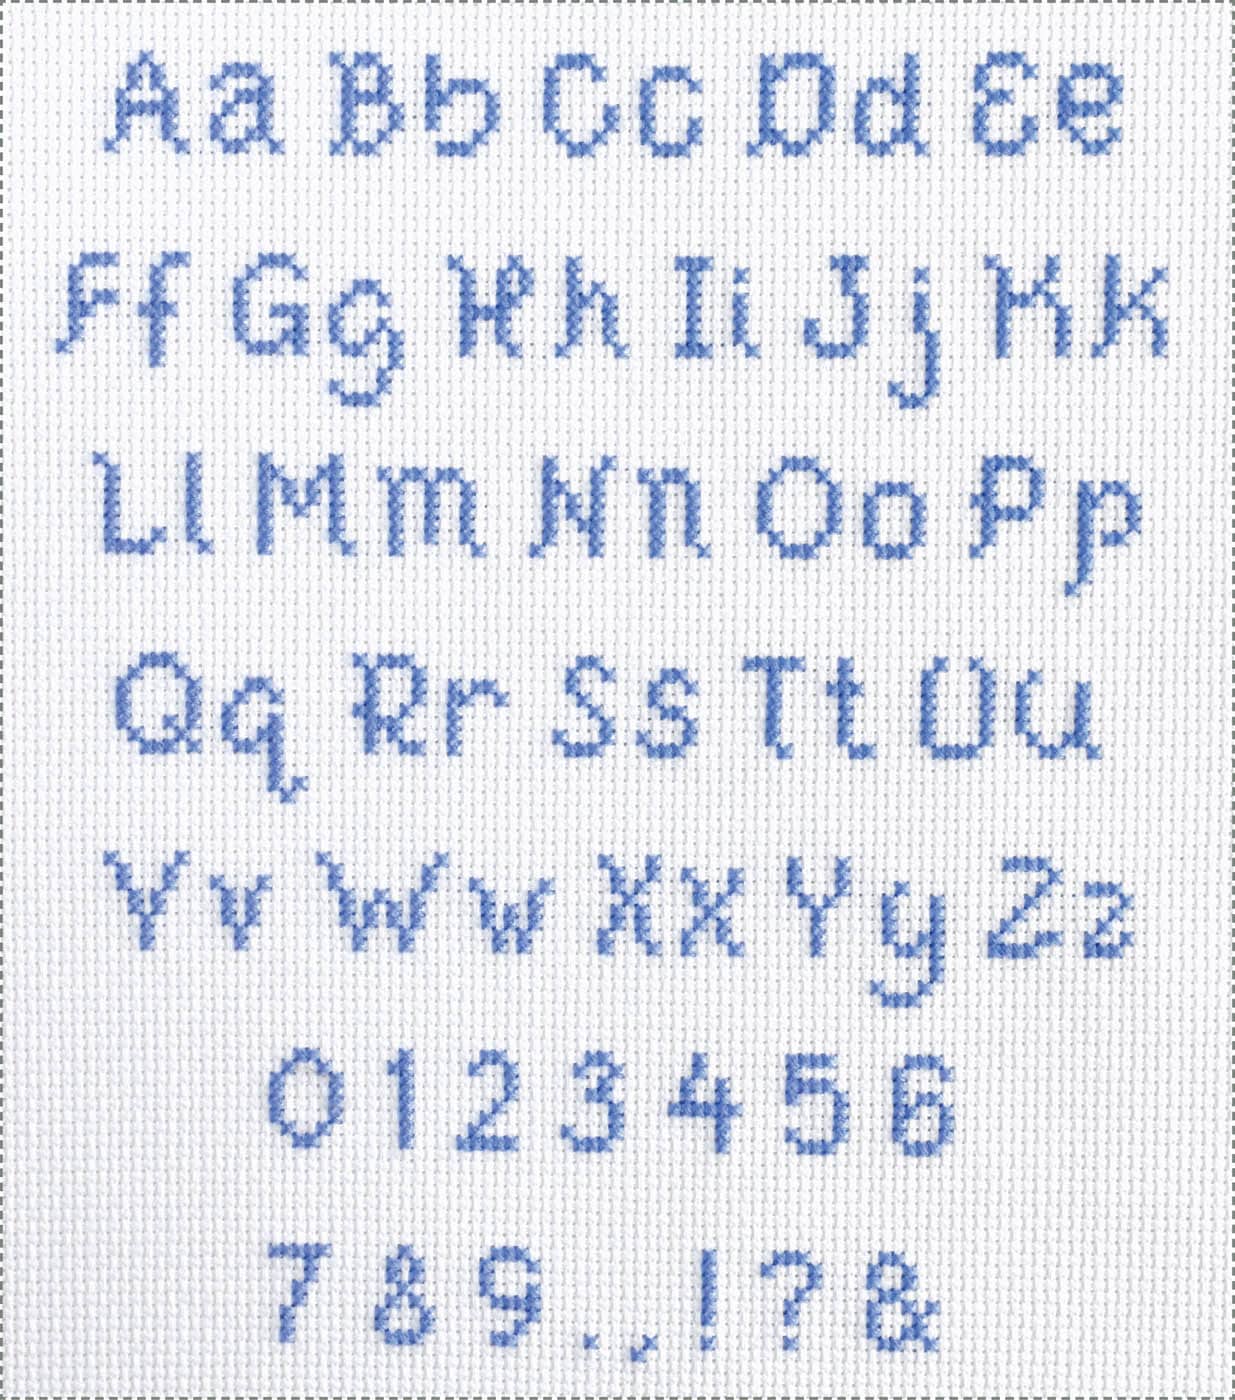
 156 (DMC)
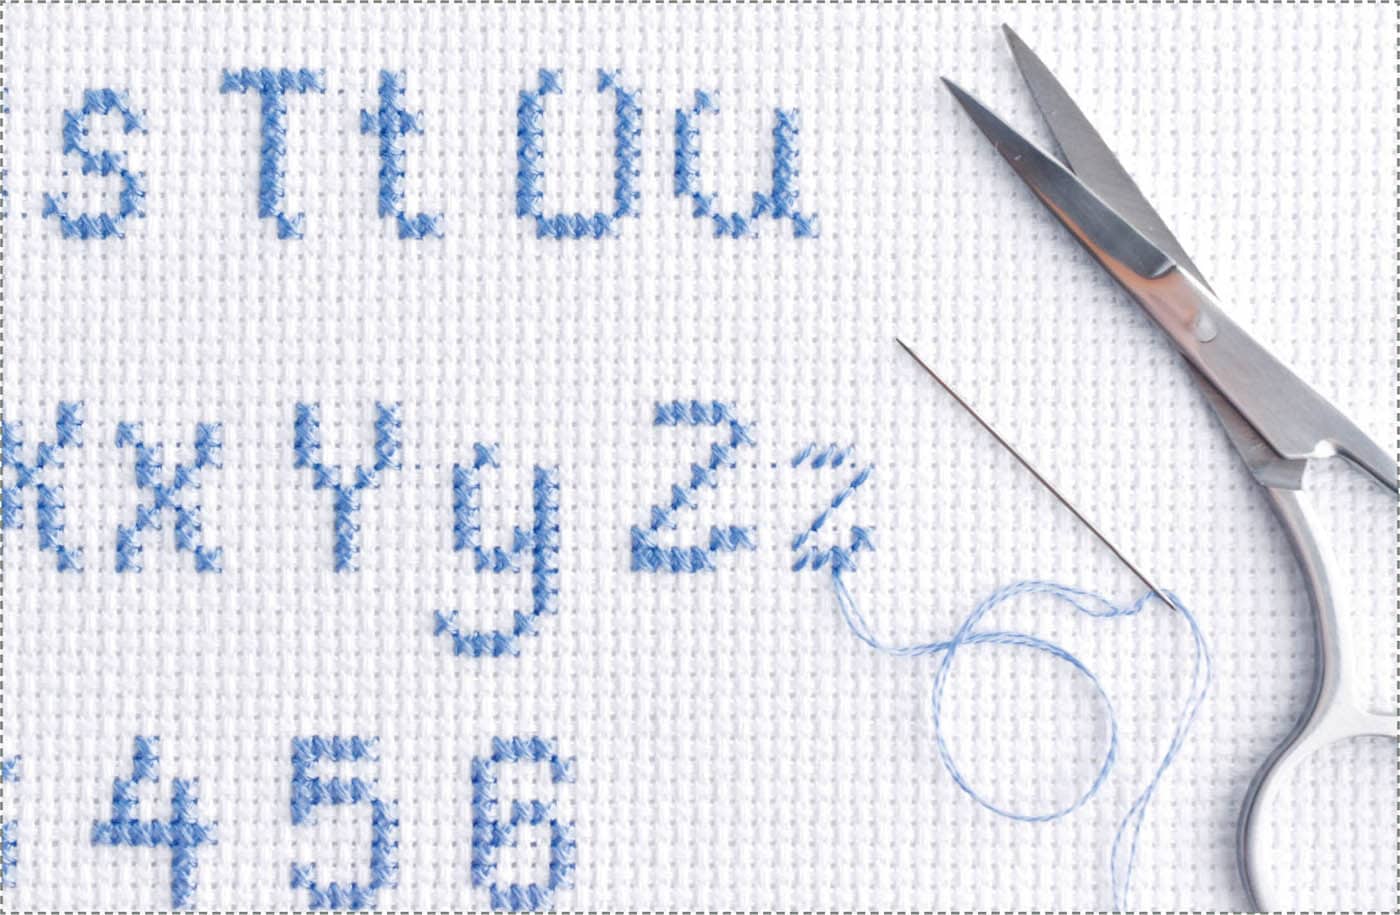
Serif Alphabet
Instructions
 Begin at the middle of the name, word, or year and work out to the right and left for centered text. Begin at one end for left- or right-aligned names, words, or years.
 Use two strands of embroidery floss for the letters and numbers. Switch back and forth between whole cross stitches and backstitch.
 When the letters are close, you can jump between them without starting a new thread, but always check that you can’t see the thread through the fabric.
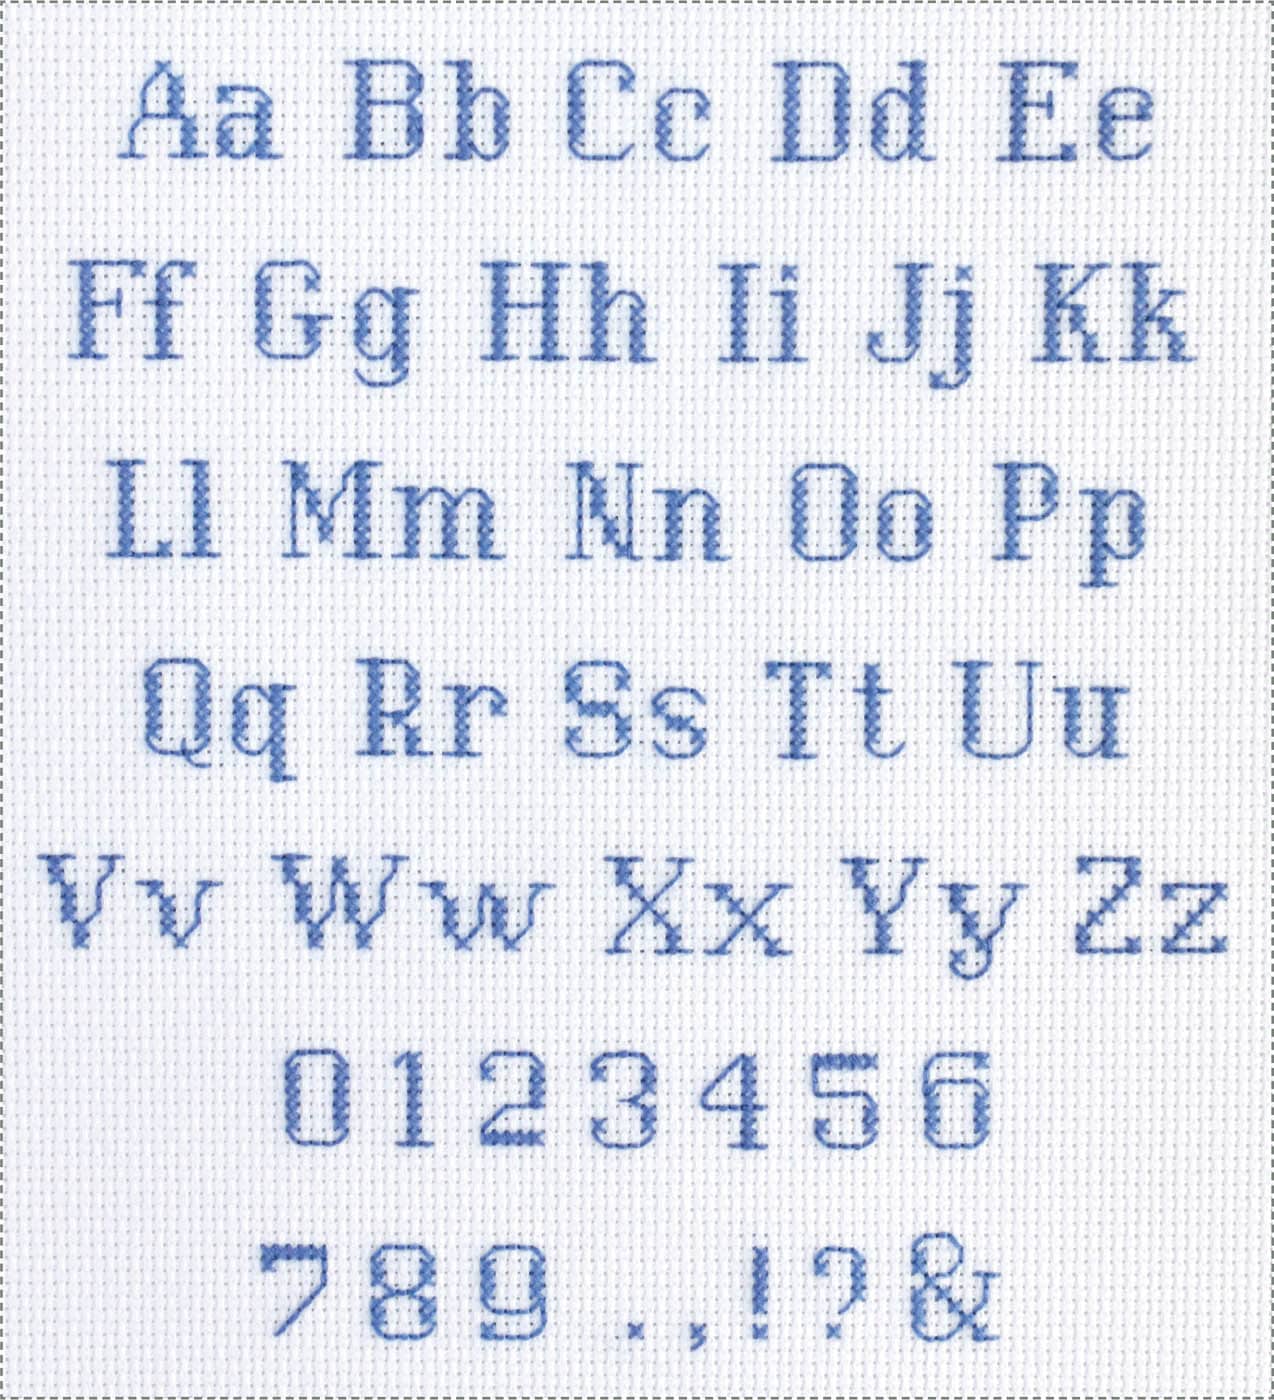
3807 (DMC)
![]() 3807 (DMC)
3807 (DMC)
Extra-Large Numbers
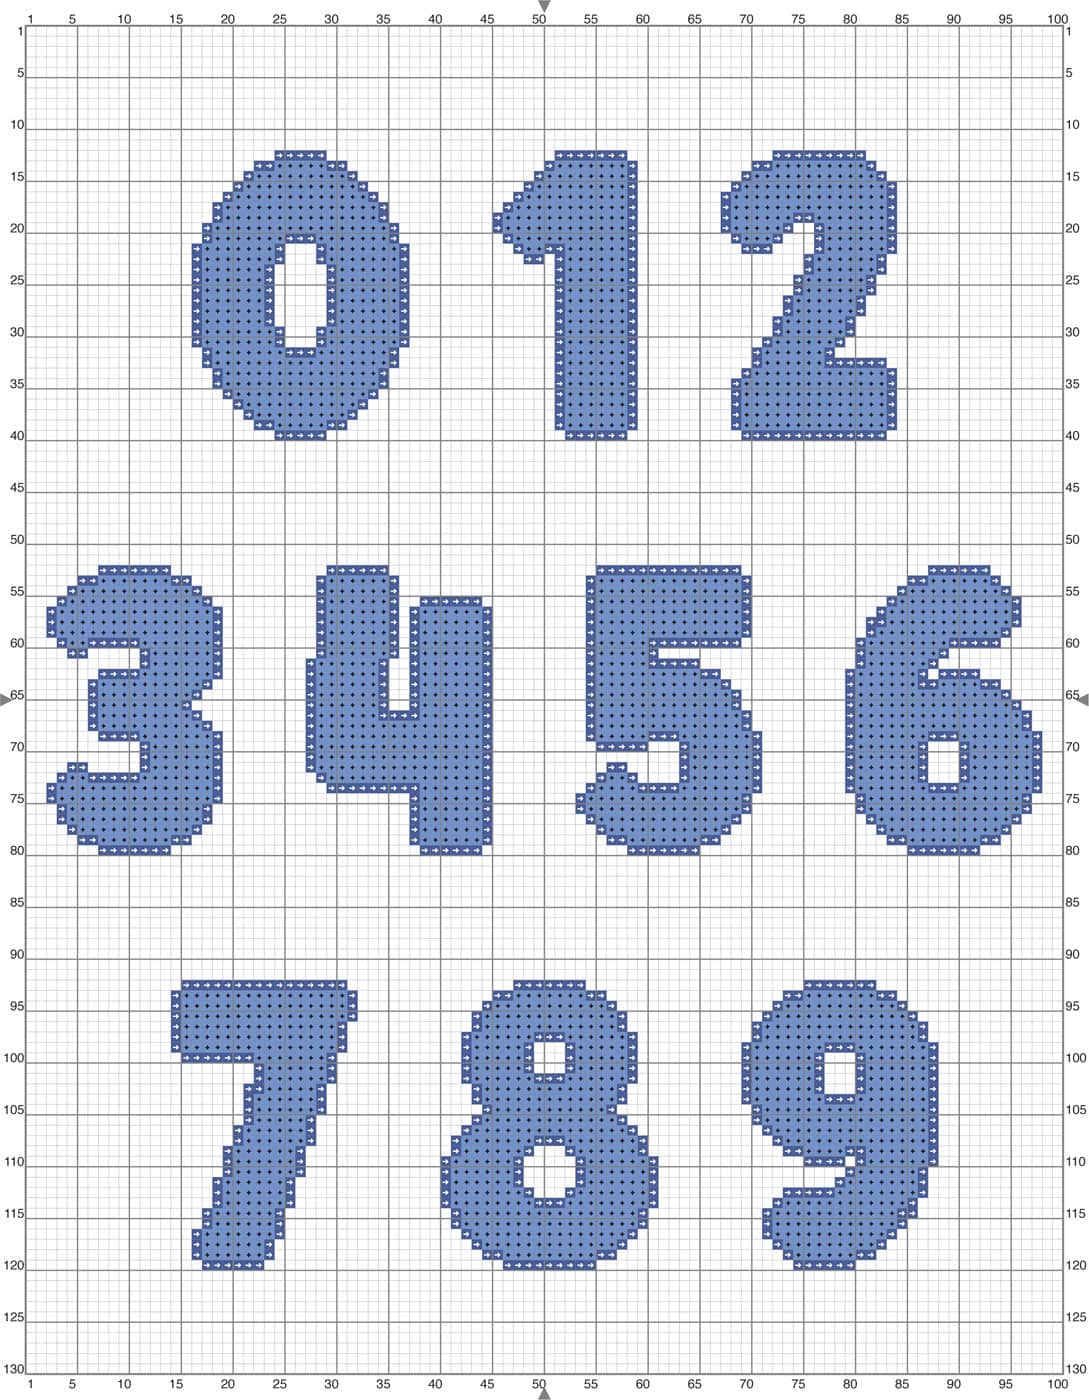
Instructions
 Begin at the middle of the year and work out to the right and left.
 Use two strands of embroidery floss throughout. Start with the inside of the numbers, working from top to bottom.
 After you stitch the inside part of the numbers, stitch the darker color around the outside.

156 (DMC)
3807 (DMC)