
Chapter 3: Configuring Jenkins
To start any continuous delivery process, we need an automation server such as Jenkins. However, configuring Jenkins can be difficult, especially when the amount of tasks assigned to it increases over time. What's more, since Docker allows the dynamic provisioning of Jenkins agents, is it worth spending time to configure everything correctly upfront, with scalability in mind?
In this chapter, we'll present Jenkins, which can be used separately or together with Docker. We will show that the combination of these two tools produces surprisingly good results – automated configuration and flexible scalability.
This chapter will cover the following topics:
- What is Jenkins?
- Installing Jenkins
- Jenkins – Hello World
- Jenkins architecture
- Configuring agents
- Custom Jenkins images
- Configuration and management
Technical requirements
To follow along with the instructions in this chapter, you'll need the following hardware/software:
- Java 8+
- At least 4 GB of RAM
- At least 1 GB of free disk space
- Docker Engine installed
All the examples and solutions to the exercises in this chapter can be found on GitHub at https://github.com/PacktPublishing/Continuous-Delivery-With-Docker-and-Jenkins-3rd-Edition/tree/main/Chapter03.
Code in Action videos for this chapter can be viewed at https://bit.ly/3DP02TW.
What is Jenkins?
Jenkins is an open source automation server written in Java. With very active community-based support and a huge number of plugins, it is one of the most popular tools for implementing continuous integration and continuous delivery processes. Formerly known as Hudson, it was renamed after Oracle bought Hudson and decided to develop it as proprietary software. Jenkins was forked from Hudson but remained open source under the MIT license. It is highly valued for its simplicity, flexibility, and versatility.
Jenkins outshines other continuous integration tools and is the most widely used software of its kind. That's all possible because of its features and capabilities.
Let's walk through the most interesting parts of Jenkins' characteristics:
- Language-agnostic: Jenkins has a lot of plugins, which support most programming languages and frameworks. Moreover, since it can use any shell command and any software, it is suitable for every automation process imaginable.
- Extensible by plugins: Jenkins has a great community and a lot of available plugins (over a thousand). It also allows you to write your own plugins in order to customize Jenkins for your needs.
- Portable: Jenkins is written in Java, so it can be run on any operating system. For convenience, it is also delivered in a lot of versions – Web Application Archive (WAR) files, Docker images, Helm charts, Kubernetes operators, Windows binaries, macOS binaries, and Linux binaries.
- Supports most Source Control Management (SCM) tools: Jenkins integrates with virtually every source code management or build tool that exists. Again, because of its large community and number of plugins, there is no other continuous integration tool that supports so many external systems.
- Distributed: Jenkins has a built-in mechanism for the master/agent mode, which distributes its execution across multiple nodes, located on multiple machines. It can also use heterogeneous environments; for example, different nodes can have different operating systems installed.
- Simplicity: The installation and configuration process is simple. There is no need to configure any additional software or the database. It can be configured completely through a GUI, XML, or Groovy scripts.
- Code-oriented: Jenkins pipelines are defined as code. Also, Jenkins itself can be configured using YAML/XML files or Groovy scripts. That allows you to keep the configuration in the source code repository and helps in the automation of the Jenkins configuration.
Now that you have a basic understanding of Jenkins, let's move on to installing it.
Installing Jenkins
There are different methods of installing Jenkins, and you should choose the one that best suits your needs. Let's walk through all the options you have and then describe the most common choices in detail:
- Servlet: Jenkins is written in Java and natively distributed as a web application in the WAR format, dedicated to running inside an application server (such as Apache Tomcat or GlassFish); consider this option if you deploy all your applications as servlets.
- Application: The Jenkins WAR file embeds the Jetty application server, so it can be directly run with the Java command, and therefore, the Java Runtime Environment (JRE) is the only requirement to start Jenkins; consider this option if you use bare-metal servers and/or you need to install multiple Jenkins instances on one machine.
- Dedicated package: Jenkins is distributed for most operating systems in a form of dedicated packages (MSI for Windows, the Homebrew package for macOS, the deb package for Debian/Ubuntu, and so on); consider this option for the simplest installation and configuration if you use bare-metal servers.
- Docker: Jenkins is distributed in a form of a Docker image, and so the only requirement is to have Docker installed; consider this option for the simplest installation if you use Docker in your ecosystem.
- Kubernetes: Jenkins provides a Helm chart and a Kubernetes operator to simplify its installation, management, and scaling in a Kubernetes cluster; consider this option for the simplest Jenkins scaling and management.
- Cloud: Jenkins is hosted in a form of Software as a Service (SaaS) by a number of platforms; consider this option if you don't want to think about server maintenance and Jenkins installation.
Each installation method has its own pros and cons. Let's describe the most common approaches, starting from using a Jenkins Docker image.
Information
You can find a detailed description of each installation method at https://www.jenkins.io/doc/book/installing/.
Installing Jenkins with Docker
The Jenkins image is available in the Docker Hub registry, so in order to install its latest version, we should execute the following command:
$ docker run -p <host_port>:8080 -v <host_volume>:/var/jenkins_home jenkins/jenkins
We need to specify the following parameters:
- The first host_port parameter: The port on which Jenkins is visible outside of the container.
- A second host_volume parameter: This specifies the directory where the Jenkins home is mapped. It needs to be specified as volume; therefore, it is persisted permanently because it contains the configuration, pipeline builds, and logs.
As an example, let's follow the installation steps:
- Prepare the volume directory: We need a separate directory to keep the Jenkins data. Let's prepare one with the following commands:
$ mkdir $HOME/jenkins_home
- Run the Jenkins container: Let's run the container as a daemon and give it a proper name with the following command:
$ docker run -d -p 8080:8080
-v $HOME/jenkins_home:/var/jenkins_home
--name jenkins jenkins/jenkins
- Check whether Jenkins is running: After a moment, we can check whether Jenkins has started correctly by printing the logs:
$ docker logs jenkins
Running from: /usr/share/jenkins/jenkins.war
webroot: EnvVars.masterEnvVars.get("JENKINS_HOME")
...
Information
In the production environment, you may also want to set up some additional parameters; for details, please refer to https://www.jenkins.io/doc/book/installing/docker/.
After performing these steps, you can access your Jenkins instance at http://localhost:8080/.
Installing Jenkins with dedicated packages
If you don't use Docker on your servers, then the simplest way is to use dedicated packages. Jenkins supports most operating systems – for example, MSI for Windows, the Homebrew package for macOS, and the deb package for Debian/Ubuntu.
As an example, in the case of Ubuntu, it's enough to run the following commands to install Jenkins (and the required Java dependency):
$ sudo apt-get update
$ sudo apt-get -y install default-jdk
$ wget -q -O - https://pkg.jenkins.io/debian/jenkins.io.key | sudo apt-key add –
$ sudo sh -c 'echo deb http://pkg.jenkins.io/debian-stable binary/ > /etc/apt/sources.list.d/jenkins.list'
$ sudo apt-get update
$ sudo apt-get -y install jenkins
After successful installation, the Jenkins instance is accessible via http://localhost:8080/.
Initial configuration
No matter which installation you choose, starting Jenkins requires a few configuration steps. Let's walk through them step by step:
- Open Jenkins in the browser, at http://localhost:8080.
- Jenkins will ask for the administrator password. It can be found in the Jenkins logs:
$ docker logs jenkins
...
Jenkins initial setup is required. An admin user has been
created
and a password generated.
Please use the following password to proceed to installation:
c50508effc6843a1a7b06f6491ed0ca6
...
- After accepting the initial password, Jenkins asks whether to install the suggested plugins, which are adjusted for the most common use cases. Your answer depends on your needs, of course. However, as the first Jenkins installation, it's reasonable to let Jenkins install all the recommended plugins.
- After the plugin installation, Jenkins asks you to set up a username, password, and other basic information. If you skip it, the token from step 2 will be used as the admin password.
The installation is then complete, and you should see the Jenkins dashboard:

Figure 3.1 – A successful Jenkins installation
Now, let's see how to install Jenkins if your deployment environment is a Kubernetes cluster.
Installing Jenkins in Kubernetes
There are two methods of installing Jenkins in Kubernetes – a Helm chart and a Kubernetes operator. Let's look at the simpler option and use the Helm tool.
Tip
For more details about the Helm tool and its installation procedure, please visit https://helm.sh/.
Use the following commands to install Jenkins:
$ helm repo add jenkinsci https://charts.jenkins.io
$ helm repo update
$ helm install jenkins jenkinsci/jenkins
After executing the preceding commands, Jenkins is installed. You can check its logs with the following command:
$ kubectl logs sts/jenkins jenkins
Running from: /usr/share/jenkins/jenkins.war
...
By default, the Jenkins instance is configured with one admin account, secured with the randomly generated password. To check this password, execute the following command:
$ kubectl get secret jenkins -o jsonpath="{.data.jenkins-admin-password}" | base64 --decode
nn1Pvq7asHPYz7EUHhc4PH
Now, you'll be able to log in to Jenkins with the following credentials:
- Username: admin
- Password: nn1Pvq7asHPYz7EUHhc4PH
By default, Jenkins is not exposed outside the Kubernetes cluster. To make it accessible from your local machine, run the following command:
$ kubectl port-forward sts/jenkins 8080:8080
After this, you can open your browser at http://localhost:8080/ and log in with the aforementioned credentials.
Information
Please visit https://www.jenkins.io/doc/book/installing/kubernetes/ for more information about installing Jenkins in Kubernetes.
One of the biggest benefits of installing Jenkins in the Kubernetes cluster instead of a single machine is that it provides horizontal scaling out of the box. Jenkins agents are automatically provisioned using Jenkins' Kubernetes plugin.
We will cover scaling Jenkins in the Jenkins architecture section and more about Kubernetes in Chapter 6, Clustering with Kubernetes. Now, let's see how you can use Jenkins in the cloud.
Jenkins in the cloud
If you don't want to install Jenkins yourself, there are companies that offer Jenkins hosted in the cloud. Note, however, that Jenkins was never built with a cloud-first approach in mind, so most offerings are, in fact, generic cloud solutions that help in installing and managing the Jenkins application for you.
The solution I recommend is Google Cloud Marketplace, which automatically deploys Jenkins in Google Kubernetes Engine. Read more at https://cloud.google.com/jenkins. Other companies that offer hosted Jenkins include Kamatera and Servana.
When we finally have Jenkins up and running, we are ready to create our first Jenkins pipeline.
Jenkins – Hello World
Everything in the entire IT world starts with the Hello World example, to show that the basics work fine. Let's follow this rule and use it to create the first Jenkins pipeline:
- Click on New Item:
Figure 3.2 – New Item in the Jenkins web interface
- Enter hello world as the item name, choose Pipeline, and click on OK:

Figure 3.3 – A new pipeline in the Jenkins web interface

Figure 3.4 – Pipeline script in the Jenkins web interface
- Then, in the Script textbox, we can enter the pipeline script:
pipeline {
agent any
stages {
stage("Hello") {
steps {
echo 'Hello World'
}
}
}
}
- Click on Save.
- Click on Build Now:

Figure 3.5 – Build Now in the Jenkins web interface
We should see #1 under Build History. If we click on it, and then on Console Output, we will see the log from the pipeline build:
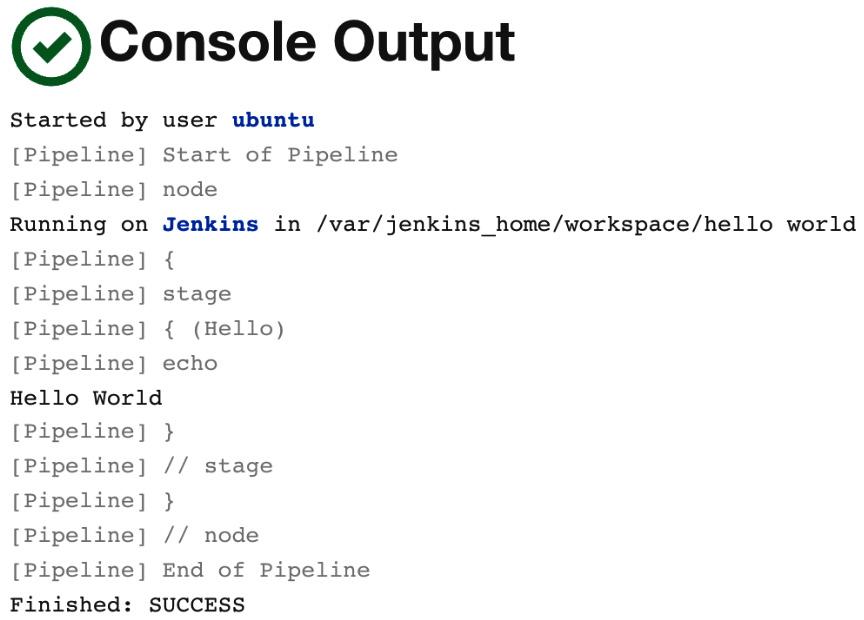
Figure 3.6 – Console Output in the Jenkins web interface
The successful output in this first example means that Jenkins is installed correctly. Now, let's look at the possible Jenkins architecture.
Information
We will describe more about the pipeline syntax in Chapter 4, Continuous Integration Pipeline.
Jenkins architecture
Hello World is executed in almost no time at all. However, the pipelines are usually more complex, and time is spent on tasks such as downloading files from the internet, compiling source code, or running tests. One build can take from minutes to hours.
In common scenarios, there are also many concurrent pipelines. Usually, a whole team, or even a whole organization, uses the same Jenkins instance. How can we ensure that the builds will run quickly and smoothly?
Master and agents
Jenkins becomes overloaded sooner than it seems. Even in the case of a small (micro) service, the build can take a few minutes. That means that one team committing frequently can easily kill the Jenkins instance.
For that reason, unless the project is really small, Jenkins should not execute builds at all but delegate them to the agent (slave) instances. To be precise, the Jenkins server we're currently running is called the Jenkins master, and it can delegate execution tasks to Jenkins agents.
Let's look at a diagram presenting the master-agent interaction:

Figure 3.7 – The Jenkins master-agent interaction
In a distributed build environment, the Jenkins master is responsible for the following:
- Receiving build triggers (for example, after a commit to GitHub)
- Sending notifications (for example, email or Slack messages sent after a build failure)
- Handling HTTP requests (interaction with clients)
- Managing the build environment (orchestrating the job executions on agents)
The build agent is a machine that takes care of everything that happens after the build has started.
Since the responsibilities of the master and the agents are different, they have different environmental requirements:
- Master: This is usually (unless the project is really small) a dedicated machine with RAM ranging from 200 MB for small projects to 70+ GB for huge single-master projects.
- Agent: There are no general requirements (other than the fact that it should be capable of executing a single build; for example, if the project is a huge monolith that requires 100 GB of RAM, then the agent machine needs to satisfy these needs).
Agents should also be as generic as possible. For instance, if we have different projects – one in Java, one in Python, and one in Ruby – then it would be perfect if each agent could build any of these projects. In such a case, the agents can be interchanged, which helps to optimize the usage of resources.
Tip
If agents cannot be generic enough to match all projects, then it's possible to label (tag) agents and projects so that the given build will be executed on a given type of agent.
Scalability
As with everything in the software world, with growing usage, a Jenkins instance can quickly become overloaded and unresponsive. That is why we need to think upfront about scaling it up. There are two possible methods – vertical scaling and horizontal scaling.
Vertical scaling
Vertical scaling means that when the master's load grows, more resources are applied to the master's machine. So, when new projects appear in our organization, we buy more RAM, add CPU cores, and extend the HDD drives. This may sound like a no-go solution; however, it is used often, even by well-known organizations. Having a single Jenkins master set on ultra-efficient hardware has one very strong advantage – maintenance. Any upgrades, scripts, security settings, role assignments, or plugin installations have to be done in one place only.
Horizontal scaling
Horizontal scaling means that when an organization grows, more master instances are launched. This requires a smart allocation of instances to teams, and in extreme cases, each team can have its own Jenkins master. In that case, it might even happen that no agents are needed.
The drawbacks are that it may be difficult to automate cross-project integrations and that a part of the team's development time is spent on the maintenance of Jenkins. However, horizontal scaling has some significant advantages:
- Master machines don't need to be special, in terms of hardware.
- Different teams can have different Jenkins settings (for example, different sets of plugins).
- Teams usually feel better and work with Jenkins more efficiently if the instance is their own.
- If one master instance is down, it does not impact the whole organization.
- The infrastructure can be segregated into standard and mission-critical.
Test and production instances
Apart from the scaling approach, there is one more issue – how to test the Jenkins upgrades, new plugins, or pipeline definitions. Jenkins is critical to the whole company. It guarantees the quality of the software and, in the case of continuous delivery, deploys to the production servers. That is why it needs to be highly available, and it is definitely not for the purpose of testing. It means there should always be two instances of the same Jenkins infrastructure – test and production.
Sample architecture
We already know that there should be agents and (possibly multiple) masters and that everything should be duplicated in the test and production environments. However, what would the complete picture look like?
Luckily, there are a lot of companies that have published how they used Jenkins and what kind of architectures they created. It would be difficult to measure whether more of them preferred vertical or horizontal scaling, but it ranged from having only one master instance to having one master for each team.
Let's look at the example of Netflix to get a picture of a complete Jenkins infrastructure (Netflix shared it as a planned infrastructure at the Jenkins User Conference in San Francisco in 2012):
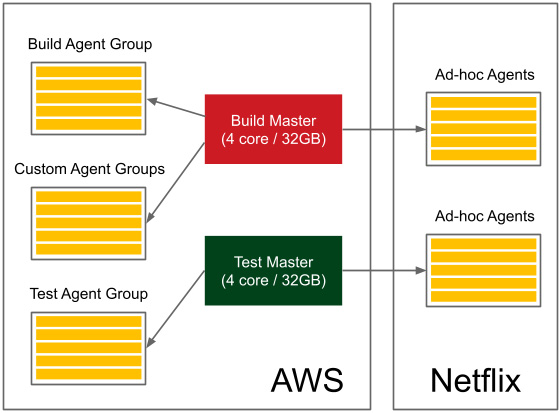
Figure 3.8 – The Jenkins infrastructure from Netflix
They have test and production master instances, with each of them owning a pool of agents and additional ad hoc agents. Altogether, it serves around 2,000 builds per day. Also, note that a part of their infrastructure is hosted on AWS and another part is on their own servers.
You should already have a rough idea of what the Jenkins infrastructure can look like, depending on the type of organization.
Now, let's focus on the practical aspects of setting the agents.
Configuring agents
You've seen what the agents are and when they can be used. However, how do we set up an agent and let it communicate with the master? Let's start with the second part of the question and describe the communication protocols between the master and the agent.
Communication protocols
In order for the master and the agent to communicate, a bidirectional connection has to be established.
There are different options for how it can be initiated:
- SSH: The master connects to the agent using the standard SSH protocol. Jenkins has an SSH client built in, so the only requirement is the SSH daemon (sshd) server configured on the agents. This is the most convenient and stable method because it uses standard Unix mechanisms.
- Java web start: A Java application is started on each agent machine, and the TCP connection is established between the Jenkins agent application and the master Java application. This method is often used if the agents are inside the firewalled network and the master cannot initiate the connection.
Once we know the communication protocols, let's look at how we can use them to set the agents.
Setting agents
At a low level, agents always communicate with the Jenkins master using one of the protocols described previously. However, at a higher level, we can attach agents to the master in various ways. The differences concern two aspects:
- Static versus dynamic: The simplest option is to add agents permanently in the Jenkins master. The drawback of such a solution is that we always need to manually change something if we need more (or fewer) agent nodes. A better option is to dynamically provision agents as they are needed.
- Specific versus general-purpose: Agents can be specific (for example, different agents for the projects based on Java 8 and Java 11) or general-purpose (an agent acts as a Docker host and a pipeline is built inside a Docker container).
These differences resulted in four common strategies for how agents are configured:
- Permanent agents
- Permanent Docker host agents
- Jenkins Swarm agents
- Dynamically provisioned Docker agents
- Dynamically provisioned Kubernetes agents
Let's examine each of the solutions.
Permanent agents
We will start with the simplest option, which is to permanently add specific agent nodes. It can be done entirely via the Jenkins web interface.
Configuring permanent agents
In the Jenkins master, when we open Manage Jenkins and then Manage Nodes and Clouds, we can view all the attached agents. Then, by clicking on New Node, giving it a name, setting its type to Permanent Agent, and confirming with the Create button, we should finally see the agent's setup page:

Figure 3.9 – Permanent agent configuration
Let's walk through the parameters we need to fill in:
- Name: This is the unique name of the agent.
- Description: This is a human-readable description of the agent.
- Number of executors: This is the number of concurrent builds that can be run on the agent.
- Remote root directory: This is the dedicated directory on the agent machine that the agent can use to run build jobs (for example, /var/jenkins); the most important data is transferred back to the master, so the directory is not critical.
- Labels: This includes the tags to match the specific builds (tagged the same) – for example, only projects based on Java 8.
- Usage: This is the option to decide whether the agent should only be used for matched labels (for example, only for acceptance testing builds), or for any builds.
- Launch method: This includes the following:
- Launch agent by connecting it to the controller: Here, the connection will be established by the agent; it is possible to download the JAR file and the instructions on how to run it on the agent machine.
- Launch agent via execution of command on the controller: This is the custom command run on the master to start the agent; in most cases, it will send the Java Web Start JAR application and start it on the agent (for example, ssh <agent_hostname> java -jar ~/bin/slave.jar).
- Launch agents via SSH: Here, the master will connect to the agent using the SSH protocol.
- Availability: This is the option to decide whether the agent should be up all the time or the master should turn it offline under certain conditions.
Tip
The Java Web Start agent uses port 50000 for communication with the Jenkins master; therefore, if you use the Docker-based Jenkins master, you need to publish that port (-p 50000:50000).
When the agents are set up correctly, it's possible to update the master built-in node configuration with Number of executors set to 0 so that no builds will be executed on it, and it will only serve as the Jenkins UI and the build's coordinator.
Information
For more details and step-by-step instructions on how to configure permanent Jenkins agents, visit https://www.jenkins.io/doc/book/using/using-agents/.
Understanding permanent agents
As we've already mentioned, the drawback of such a solution is that we need to maintain multiple agent types (labels) for different project types. Such a situation is presented in the following diagram:

Figure 3.10 – Permanent agents
In our example, if we have three types of projects (java7, java8, and ruby), then we need to maintain three separately labeled (sets of) agents. That is the same issue we had while maintaining multiple production server types, as described in Chapter 2, Introducing Docker. We addressed the issue by having Docker Engine installed on the production servers. Let's try to do the same with Jenkins agents.
Permanent Docker host agents
The idea behind this solution is to permanently add general-purpose agents. Each agent is identically configured (with Docker Engine installed), and each build is defined along with the Docker image, inside of which the build is run.
Configuring permanent Docker host agents
The configuration is static, so it's done exactly the same way as we did with the permanent agents. The only difference is that we need to install Docker on each machine that will be used as an agent. Then, we usually don't need labels because all the agents can be the same. After the agents are configured, we define the Docker image in each pipeline script:
pipeline {
agent {
docker {
image 'openjdk:8-jdk-alpine'
}
}
...
}
When the build is started, the Jenkins agent starts a container from the Docker image, openjdk:8-jdk-alpine, and then executes all the pipeline steps inside that container. This way, we always know the execution environment and don't have to configure each agent separately, depending on the particular project type.
Understanding permanent Docker host agents
Looking at the same scenario we used for the permanent agents, the diagram looks like this:
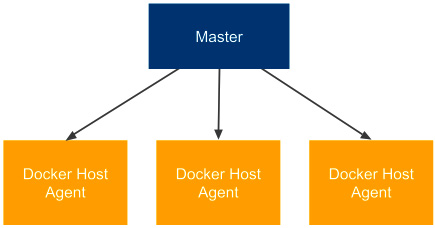
Figure 3.11 – Permanent Docker host agents
Each agent is exactly the same, and if we want to build a project that depends on Java 8, then we would define the appropriate Docker image in the pipeline script (instead of specifying the agent label).
Jenkins Swarm agents
So far, we have always had to permanently define each of the agents in the Jenkins master. Such a solution, although good enough in many cases, can be a burden if we need to frequently scale the number of agent machines. Jenkins Swarm allows you to dynamically add agents without the need to configure them in the Jenkins master.
Configuring Jenkins Swarm agents
The first step to using Jenkins Swarm is to install the Swarm plugin in Jenkins. We can do it through the Jenkins web UI, under Manage Jenkins and Manage Plugins. After this step, the Jenkins master is prepared for Jenkins agents to be dynamically attached.
The second step is to run the Jenkins Swarm agent application on every machine that will act as a Jenkins agent. We can do it using the swarm-client.jar application.
Information
The swarm-client.jar application can be downloaded from the Jenkins Swarm plugin page at https://plugins.jenkins.io/swarm/. On that page, you can also find all the possible options for its execution.
To attach the Jenkins Swarm agent node, run the following command:
$ java -jar path/to/swarm-client.jar -url ${JENKINS_URL} -username ${USERNAME}
After successful execution, we should notice that a new agent has appeared on the Jenkins master, and when we run a build, it will be started on this agent.
Understanding Jenkins Swarm agents
Let's look at the following diagram that presents the Jenkins Swarm configuration:

Figure 3.12 – Jenkins Swarm agents
Jenkins Swarm allows you to dynamically add agents, but it says nothing about whether to use specific or Docker-based agents, so we can use it for both. At first glance, Jenkins Swarm may not seem very useful. After all, we have moved setting agents from the master to the agent, but we still have to do it manually. However, with the use of a clustering system such as Kubernetes or Docker Swarm, Jenkins Swarm apparently enables the dynamic scaling of agents on a cluster of servers.
Dynamically provisioned Docker agents
Another option is to set up Jenkins to dynamically create a new agent each time a build is started. Such a solution is obviously the most flexible one, since the number of agents dynamically adjusts to the number of builds. Let's take a look at how to configure Jenkins this way.
Configuring dynamically provisioned Docker agents
First, we need to install the Docker plugin. As always, with Jenkins plugins, we can do this in Manage Jenkins and Manage Plugins. After the plugin is installed, we can start the following configuration steps:
- Open the Manage Jenkins page.
- Click on the Manage Nodes and Clouds link.
- Click on the Configure Clouds link.
- Click on Add a new cloud and choose Docker.
- Fill in the Docker agent details, as shown in the following screenshot:
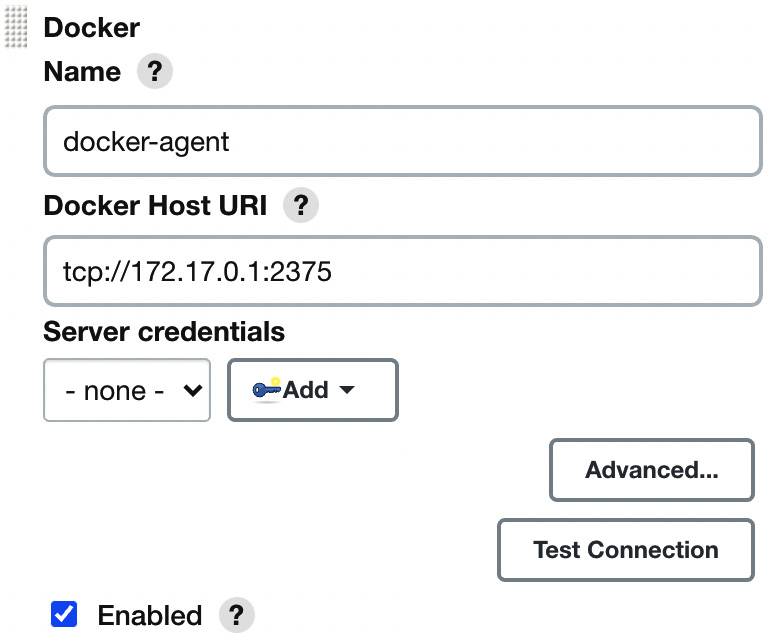
Figure 3.13 – Docker agent configuration
- Most parameters do not need to be changed; however (apart from selecting Enabled), we need to at least set the Docker host URL (the address of the Docker host machine where agents will be run).
Tip
If you plan to use the same Docker host where Jenkins is running, then the Docker daemon needs to listen on the docker0 network interface. You can do it in a similar way as to what's described in the Installing on a server section in Chapter 2, Introducing Docker, by changing one line in the /lib/systemd/system/docker.service file to ExecStart=/usr/bin/dockerd -H 0.0.0.0:2375 -H fd://.
- Click on Docker Agent templates... and select Add Docker Template.
- Fill in the details about the Docker agent image:

Figure 3.14 – Docker Agent templates configuration
We can use the following parameters:
- Docker Image: The most popular agent image from the Jenkins community is jenkins/agent (used for the default connect method, which is Attach Docker container).
- Instance Capacity: This defines the maximum number of agents running at the same time; to start with, it can be set to 10.
Information
Instead of jenkins/agent, it's possible to build and use your own agent images. This may be helpful in the case of specific environment requirements – for example, you need Golang installed. Note also that for other agent connect methods (Launch via SSH or Launch via JNLP), you will need different agent Docker imagers (jenkins/ssh-agent or jenkins/inbound-agent). For details, please check https://plugins.jenkins.io/docker-plugin/.
After saving, everything will be set up. We can run the pipeline to observe that the execution really takes place on the Docker agent, but first, let's dig a little deeper in order to understand how the Docker agents work.
Understanding dynamically provisioned Docker agents
Dynamically provisioned Docker agents can be treated as a layer over the standard agent mechanism. It changes neither the communication protocol nor how the agent is created. So, what does Jenkins do with the Docker agent configuration we provided?
The following diagram presents the Docker master-agent architecture we've configured:

Figure 3.15 – Dynamically provisioned Docker agents
Let's describe how the Docker agent mechanism is used, step by step:
- When the Jenkins job is started, the master runs a new container from the jenkins/agent image on the agent Docker host.
- The jenkins/agent container starts the Jenkins agent and attaches it to the Jenkins master's nodes pool.
- Jenkins executes the pipeline inside the jenkins/agent container.
- After the build, the master stops and removes the agent container.
Information
Running the Jenkins master as a Docker container is independent of running Jenkins agents as Docker containers. It's reasonable to do both, but any of them will work separately.
The solution is somehow similar to the permanent Docker agent solution because, as a result, we run the build inside a Docker container. The difference, however, is in the agent node configuration. Here, the whole agent is dockerized – not only the build environment.
Tip
The Jenkins build usually needs to download a lot of project dependencies (for example, Gradle/Maven dependencies), which may take a lot of time. If Docker agents are automatically provisioned for each build, then it may be worthwhile to set up a Docker volume for them to enable caching between the builds.
Dynamically provisioned Kubernetes agents
We can dynamically provision agents on Kubernetes similar to how we did with the Docker host. The benefit of such an approach is that Kubernetes is a cluster of multiple physical machines that can easily scale up or down, according to needs.
Configuring dynamically provisioned Kubernetes agents
Firstly, we need to install the Kubernetes plugin. Then, we can follow the same steps when we installed the Docker agents. The difference starts when we click on Add a new cloud. This time, we need to select Kubernetes instead of Docker and fill in all the details about the Kubernetes cluster:

Figure 3.16 – Kubernetes agent configuration
You need to fill in Kubernetes URL, which is the address of your Kubernetes cluster. Usually, you will also need to enter the credentials of your Kubernetes cluster. Then, you must click on Add Pod Template and fill in Pod Template analogously to what you did for Docker Template in the case of the Docker plugin.
Information
For more detailed instructions on how to set up the Jenkins Kubernetes plugin, visit https://plugins.jenkins.io/kubernetes/.
After successful configuration, when you start a new build, Jenkins automatically provisions a new agent in Kubernetes and uses it for the pipeline execution.
Tip
If you install Jenkins in Kubernetes using Helm, as described at the beginning of this chapter, it is automatically configured with the Kubernetes plugin and automatically provisions Jenkins agents in the same Kubernetes cluster where the Jenkins master is deployed. This way, with one Helm command, we install a fully functional and scalable Jenkins ecosystem!
Understanding dynamically provisioned Kubernetes agents
Dynamically provisioning an agent in Kubernetes works very similarly to provisioning an agent in the Docker host. The difference is that now we interact with a cluster of machines, not just a single Docker host. This approach is presented in the following diagram:

Figure 3.17 – Dynamically provisioned Kubernetes agents
Kubernetes nodes can be dynamically added and removed, which makes the whole master-agent architecture very flexible in terms of needed resources. When we experience too many Jenkins builds, we can easily add a new machine to the Kubernetes cluster and, therefore, improve the Jenkins capacity.
We have covered a lot of different strategies on how to configure Jenkins agents. Let's move on and test our configuration.
Testing agents
No matter which agent configuration you have chosen, you can now check whether everything works correctly.
Let's go back to the Hello World pipeline. Usually, the builds last longer than the Hello World example, so we can simulate it by adding sleeping to the pipeline script:
pipeline {
agent any
stages {
stage("Hello") {
steps {
sleep 300 // 5 minutes
echo 'Hello World'
}
}
}
}
After clicking on Build Now and going to the Jenkins main page, we should see that the build is executed on an agent. Now, if we click on the build many times, multiple builds should be started in parallel (as shown in the following screenshot):
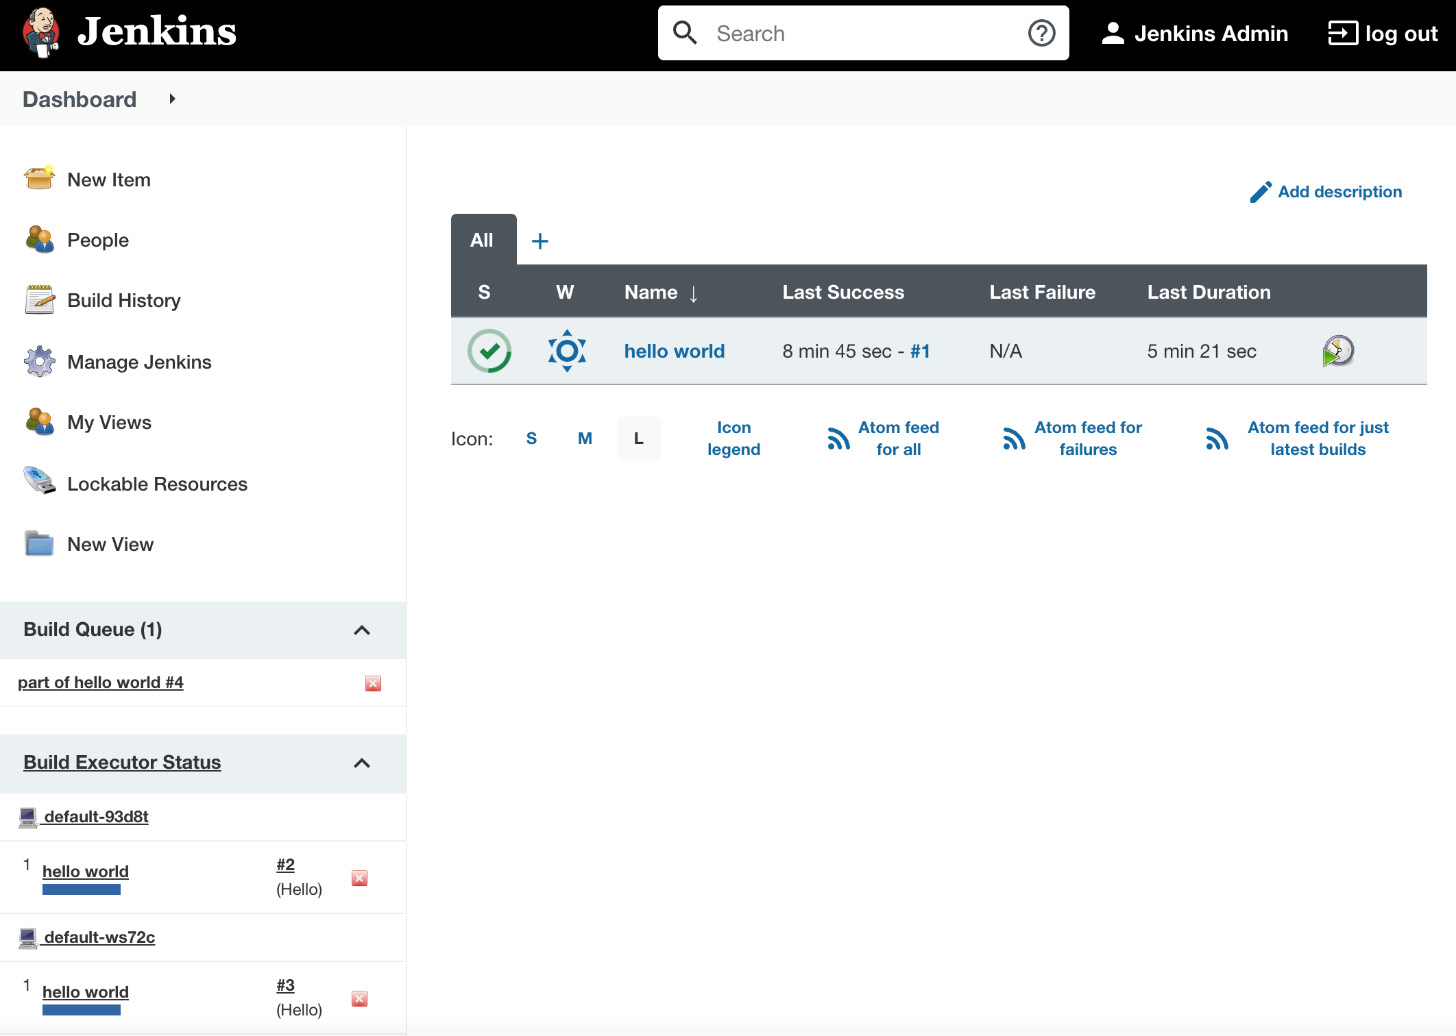
Figure 3.18 – Jenkins running multiple builds on Jenkins agents
Tip
To prevent job executions on the master, remember to set # of executors to 0 for the master node in the Manage Nodes configuration.
Having seen that the agents are executing our builds, we have confirmed that they are configured correctly. Before we move on and see how to create our own Jenkins images, let's clarify one nuance, the difference between Docker agents and the Docker pipeline build.
Comparing Docker pipeline builds and Docker agents
The Jenkins pipeline build executes inside a Docker container in two cases – permanent Docker host agents and dynamically provisioned Docker/Kubernetes agents. However, there is a subtle difference between both solutions, which requires a few words of clarification.
Docker pipeline builds
If your agent is a Docker host, then you can specify your pipeline runtime from the Jenkins user perspective. In other words, if your project has some special build runtime requirements, you can dockerize them and describe your pipeline script as follows:
agent {
docker {
image 'custom-docker-image'
}
}
Such an approach means that from the user's perspective, you are free to choose the Docker image used for your build. What's more, you can even decide to execute the build directly on the host, not inside the Docker container, which may be especially useful when the steps in your pipeline need a Docker host that may not be accessible from inside the container. We will see an example of such a requirement in the later chapters of this book.
Docker agents
If your agent itself is a Docker container, then you specify the Docker image used from the Jenkins admin perspective. In such a situation, if your project has some specific build runtime requirements, then you need to do the following:
- Create a custom Docker image that uses jenkins/agent as the base image.
- Ask a Jenkins admin to include it in the Docker/Kubernetes plugin configuration and assign a special label to the given agent.
- Use the specific agent label inside your pipeline script.
This means that for a project with custom requirements, the setup is slightly more complex.
There is one more open question: what about a scenario when your pipeline requires access to the Docker host – for example, to build Docker images? Is there a way to use Docker inside a Docker container? Docker-in-Docker comes to the rescue.
Docker-in-Docker
There is a solution called Docker-in-Docker (DIND), which allows you to use Docker inside a Docker container. Technically, it requires granting privileged permissions to the Docker container, and there is a related configuration field inside the Jenkins Docker plugin. Note, however, that allowing a container to access the Docker host is a potential security hole, so you should always take extra precautions before applying such a configuration.
We have finally covered everything about the Jenkins agent configuration. Now, let's move on and look at how, and for what reasons, we can create our own Jenkins images.
Custom Jenkins images
So far, we have used Jenkins images pulled from the internet. We used jenkins/jenkins for the master container and jenkins/agent (or jenkins/inbound-agent or jenkins/ssh-agent) for the agent container. However, you may want to build your own images to satisfy the specific build environment requirements. In this section, we will cover how to do it.
Building the Jenkins agent
Let's start with the agent image because it's more frequently customized. The build execution is performed on the agent, so it's the agent that needs to have the environment adjusted to the project we want to build – for example, it may require the Python interpreter if our project is written in Python. The same applies to any library, tool, or testing framework, or anything that is needed by the project.
There are four steps to building and using the custom image:
- Create a Docker file.
- Build the image.
- Push the image into a registry.
- Change the agent configuration on the master.
As an example, let's create an agent that serves the Python project. We can build it on top of the jenkins/agent image, for the sake of simplicity. Let's do it using the following four steps:
- Dockerfile: In a new directory, create a file named Dockerfile, with the following content:
FROM jenkins/agent
USER root
RUN apt-get update &&
apt-get install -y python
USER jenkins
- Build the image: We can build the image by executing the following command:
$ docker build -t leszko/jenkins-agent-python .
- Push the image into a registry: To push the image, execute the following command (if you build the image on Docker Engine that is used by the Jenkins master, you can skip this step):
$ docker push leszko/jenkins-agent-python
Tip
This step assumes that you have an account on Docker Hub (change leszko to your Docker Hub name) and that you have already executed docker login. We'll cover more on Docker registries in Chapter 5, Automated Acceptance Testing.
- Change the agent configuration on the master: The last step, of course, is to set leszko/jenkins-agent-python instead of jenkins/agent in the Jenkins master's configuration (as described in the Dynamically provisioned Docker agents section).
Tip
If you have pushed your image to the Docker Hub registry and the registry is private, then you'll also need to configure the appropriate credentials in the Jenkins master configuration.
What if we need Jenkins to build two different kinds of projects – for example, one based on Python and another based on Ruby? In that case, we can prepare an agent that's generic enough to support both – Python and Ruby. However, in the case of Docker, it's recommended to create a second agent image (leszko/jenkins-agent-ruby by analogy). Then, in the Jenkins configuration, we need to create two Docker templates and label them accordingly.
Information
We used jenkins/agent as the base image, but we can use jenkins/inbound-agent and jenkins/ssh-agent in exactly the same manner.
Building the Jenkins master
We already have a custom agent image. Why would we also want to build our own master image? One of the reasons might be that we don't want to use agents at all, and since the execution will be done on the master, its environment has to be adjusted to the project's needs. That is, however, a very rare case. More often, we will want to configure the master itself.
Imagine the following scenario: your organization scales Jenkins horizontally, and each team has its own instance. There is, however, some common configuration – for example, a set of base plugins, backup strategies, or the company logo. Then, repeating the same configuration for each of the teams is a waste of time. So, we can prepare the shared master image and let the teams use it.
Jenkins is natively configured using XML files, and it provides the Groovy-based DSL language to manipulate them. That is why we can add the Groovy script to the Dockerfile in order to manipulate the Jenkins configuration. Furthermore, there are special scripts to help with the Jenkins configuration if it requires something more than XML changes – for instance, plugin installation.
Information
All possibilities of the Dockerfile instructions are well described on the GitHub page at https://github.com/jenkinsci/docker.
As an example, let's create a master image with docker-plugin already installed and a number of executors set to 5. In order to do it, we need to perform the following:
- Create the Groovy script to manipulate config.xml, and set the number of executors to 5.
- Create the Dockerfile to install docker-plugin, and execute the Groovy script.
- Build the image.
Let's use the three steps mentioned and build the Jenkins master image:
- Groovy script: Create a new directory and the executors.groovy file with the following content:
import jenkins.model.*
Jenkins.instance.setNumExecutors(5)
Tip
The complete Jenkins API can be found on the official page at http://javadoc.jenkins.io/.
- Dockerfile: In the same directory, create a Docker file:
FROM jenkins/jenkins:lts-jdk11
COPY executors.groovy /usr/share/jenkins/ref/init.groovy.d/executors.groovy
RUN jenkins-plugin-cli --plugins docker-plugin github-branch-source:1.8
- Build the image: We can finally build the image:
$ docker build -t jenkins-master .
After the image is created, each team in the organization can use it to launch their own Jenkins instance.
Tip
Similar to the Jenkins agent image, you can build the master image as leszko/jenkins-master and push it into your Docker Hub account.
Having our own master and agent images lets us provide the configuration and build environment for the teams in our organization. In the next section, you'll see what else is worth being configured in Jenkins.
Information
You can also configure Jenkins master as well as Jenkins pipelines using the YAML-based configuration with the Configuration as Code plugin. Read more at https://www.jenkins.io/projects/jcasc/.
Configuration and management
We have already covered the most crucial part of the Jenkins configuration – agent provisioning. Since Jenkins is highly configurable, you can expect many more possibilities to adjust it to your needs. The good news is that the configuration is intuitive and accessible via the web interface, so it does not require a detailed description. Everything can be changed under the Manage Jenkins sub-page. In this section, we will focus on only a few aspects that are most likely to be changed – plugins, security, and backup.
Plugins
Jenkins is highly plugin-oriented, which means that a lot of features are delivered by the use of plugins. They can extend Jenkins in an almost unlimited way, which, taking into consideration the large community, is one of the reasons why Jenkins is such a successful tool. With Jenkins' openness comes risk, and it's better to download only plugins from a reliable source or check their source code.
There are literally tons of plugins to choose from. Some of them were already installed automatically, during the initial configuration. Others (Docker and Kubernetes plugins) were installed when setting the Docker agents. There are plugins for cloud integration, source control tools, code coverage, and much more. You can also write your own plugin, but it's better to check whether the one you need is already available.
Information
There is an official Jenkins page to browse plugins at https://plugins.jenkins.io/.
Security
The way you should approach Jenkins security depends on the Jenkins architecture you have chosen within your organization. If you have a Jenkins master for every small team, then you may not need it at all (under the assumption that the corporate network is firewalled). However, if you have a single Jenkins master instance for the whole organization, then you'd better be sure you've secured it well.
Jenkins comes with its own user database; we already created a user during the initial configuration process. You can create, delete, and modify users by opening the Manage Users setting page. The built-in database can be a solution in the case of small organizations; however, for a large group of users, you will probably want to use the Lightweight Directory Access Protocol (LDAP) instead. You can choose it on the Configure Global Security page. There, you can also assign roles, groups, and users. By default, the Logged-in users can do anything option is set, but in a large-scale organization, you should probably consider using more detailed permission granularity.
Backup
As the old saying goes, there are two types of people: those who back up, and those who will back up. Believe it or not, the backup is something you probably want to configure. What files should be backed up, and from which machines? Luckily, agents automatically send all the relevant data back to the master, so we don't need to bother with them. If you run Jenkins in a container, then the container itself is also not of interest, since it does not hold a persistent state. The only place we are interested in is the Jenkins home directory.
We can either install a Jenkins plugin (which will help us to set periodic backups) or simply set a cron job to archive the directory in a safe place. To reduce the size, we can exclude the subfolders that are not of interest (that will depend on your needs; however, almost certainly, you don't need to copy the following: war, cache, tools, and workspace).
Information
If you automate your Jenkins master setup (by building a custom Docker image or using the Jenkins Configuration as Code plugin), then you may consider skipping the Jenkins backup configuration.
Jenkins Blue Ocean UI
The first version of Hudson (the former Jenkins) was released in 2005. It's been on the market for more than 15 years now. However, its look and feel haven't changed much. We've used it for quite a while, and it's hard to deny that it looks outdated. Blue Ocean is the plugin that has redefined the user experience of Jenkins. If Jenkins is aesthetically displeasing to you or its workflow does not feel intuitive enough, then it's definitely worth giving Blue Ocean a try (as shown in the following screenshot):
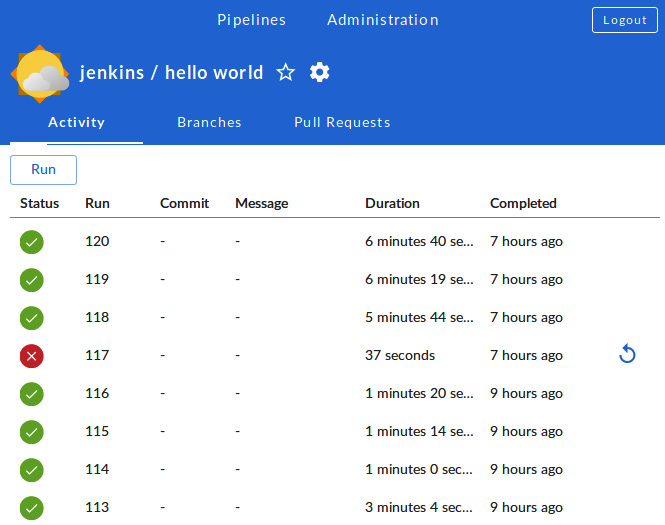
Figure 3.19 – The Jenkins Blue Ocean UI
Information
You can read more on the Blue Ocean page at https://www.jenkins.io/doc/book/blueocean/.
Summary
In this chapter, we covered the Jenkins environment and its configuration. The knowledge we have gained is sufficient to set up the complete Docker-based Jenkins infrastructure. The key takeaway points from the chapter are as follows:
- Jenkins is a general-purpose automation tool that can be used with any language or framework.
- Jenkins is highly extensible by plugins, which can be written or found on the internet.
- Jenkins is written in Java, so it can be installed on any operating system. It's also officially delivered as a Docker image.
- Jenkins can be scaled using the master-agent architecture. The master instances can be scaled horizontally or vertically, depending on an organization's needs.
- Jenkins agents can be implemented with the use of Docker, which helps in automatic configuration and dynamic agent allocation.
- Custom Docker images can be created for both the Jenkins master and Jenkins agent.
- Jenkins is highly configurable, and some aspects that should always be considered are security and backups.
In the next chapter, we will focus on something that we already touched on with the Hello World example – pipelines. We will describe the idea behind and the method for building a complete continuous integration pipeline.
Exercises
You learned a lot about Jenkins configuration throughout this chapter. To consolidate your knowledge, we recommend the following exercises on preparing Jenkins images and testing the Jenkins environment:
- Create Jenkins master and agent Docker images and use them to run a Jenkins infrastructure capable of building Ruby projects:
- Create the Jenkins master Dockerfile, which automatically installs the Docker plugin.
- Build the master image and run the Jenkins instance.
- Create the agent Dockerfile (suitable for the dynamic agent provisioning), which installs the Ruby interpreter.
- Build the agent image.
- Change the configuration in the Jenkins instance to use the agent image.
- Create a pipeline that runs a Ruby script printing Hello World from Ruby:
- Create a new pipeline.
- Use the following shell command to create the hello.rb script on the fly:
sh "echo "puts 'Hello World from Ruby'" > hello.rb"
- Add the command to run hello.rb, using the Ruby interpreter.
- Run the build and observe the console's output.
Questions
To verify your knowledge from this chapter, please answer the following questions:
- Is Jenkins provided in the form of a Docker image?
- What is the difference between a Jenkins master and a Jenkins agent (slave)?
- What is the difference between vertical and horizontal scaling?
- What are the two main options for master-agent communication when starting a Jenkins agent?
- What is the difference between setting up a permanent agent and a permanent Docker agent?
- When would you need to build a custom Docker image for a Jenkins agent?
- When would you need to build a custom Docker image for a Jenkins master?
- What is Jenkins Blue Ocean?
Further reading
To read more about Jenkins, please refer to the following resources:
- Jenkins Handbook: https://www.jenkins.io/doc/book/
- Jenkins Essentials, Mitesh Soni: https://www.packtpub.com/virtualization-and-cloud/jenkins-essentials-second-edition
- Jenkins: The Definitive Guide, John Ferguson Smart: https://www.oreilly.com/library/view/jenkins-the-definitive/9781449311155/