
Chapter 6: Clustering with Kubernetes
So far, in this book, we have covered the fundamental aspects of the acceptance testing process. In this chapter, we will see how to change the Docker environment from a single Docker host into a cluster of machines and how to change an independent application into a system composed of multiple applications.
This chapter covers the following topics:
- Server clustering
- Introducing Kubernetes
- Kubernetes installation
- Using Kubernetes
- Advanced Kubernetes
- Application dependencies
- Alternative cluster management systems
Technical requirements
To follow along with the instructions in this chapter, you'll need the following hardware/software requirements:
- At least 4 GB of RAM
- At least 1 GB of free disk space
- Java JDK 8+
All the examples and solutions to the exercises in this chapter can be found in this book's GitHub repository at https://github.com/PacktPublishing/Continuous-Delivery-With-Docker-and-Jenkins-3rd-Edition/tree/main/Chapter06.
Code in Action videos for this chapter can be viewed at https://bit.ly/3rcffcz.
Server clustering
So far, we have interacted with each of the machines individually. What we did was connect to the localhost Docker daemon server. We could have used the -H option in the docker run command to specify the address of the remote Docker, but that would still mean deploying our application to a single Docker host machine. In real life, however, if servers share the same physical location, we are not interested in which particular machine the service is deployed in. All we need is to have it accessible and replicated in many instances to support high availability. How can we configure a set of machines to work that way? This is the role of clustering.
In the following subsections, you will be introduced to the concept of server clustering and the Kubernetes environment, which is an example of cluster management software.
Introducing server clustering
A server cluster is a set of connected computers that work together in such a way that they can be used similarly to a single system. Servers are usually connected through the local network by a connection that's fast enough to ensure that the services that are being run are distributed. A simple server cluster is presented in the following diagram:

Figure 6.1 – Server clustering
A user accesses the cluster through a master host, which exposes the cluster API. There are multiple nodes that act as computing resources, which means that they are responsible for running applications. The master, on the other hand, is responsible for all other activities, such as the orchestration process, service discovery, load balancing, and node failure detection.
Introducing Kubernetes
Kubernetes is an open source cluster management system that was originally designed by Google. Looking at the popularity charts, it is a clear winner among other competitors, such as Docker Swarm and Apache Mesos. Its popularity has grown so fast that most cloud platforms provide Kubernetes out of the box. It's not Docker-native, but there are a lot of additional tools and integrations to make it work smoothly with the whole Docker ecosystem; for example, kompose can translate Docker Compose files into Kubernetes configurations.
Information
In the first edition of this book, I recommended Docker Compose and Docker Swarm for application dependency resolution and server clustering. While they're both good tools, Kubernetes' popularity has grown so high recently that I decided to use Kubernetes as the recommended approach and keep Docker-native tooling as an alternative.
Let's take a look at the simplified architecture of Kubernetes:

Figure 6.2 – Simplified Kubernetes architecture
The Kubernetes control plane (master), which is actually a set of cluster services, is responsible for enforcing the desired state of your applications. In other words, you specify your deployment setup in a declarative manner (four replicas of a web service exposing port 8080) and the control plane is responsible for making it happen. A Kubernetes Node, on the other hand, is a worker. You may see it just as a (Docker) container host with a special Kubernetes process (called kubelet) installed.
From the user's perspective, you provide a declarative deployment configuration in the form of a YAML file and pass it to the Kubernetes control plane through its API. Then, the control plane reads the configuration and installs the deployment. Kubernetes introduces the concept of a Pod, which represents a single deployment unit. The Pod contains Docker containers, which are scheduled together. While you can put multiple containers into a single Pod, in real-life scenarios, you will see that most Pods contain just a single Docker container. Pods are dynamically built and removed depending on the requirement changes that are expressed in the YAML configuration updates.
You will gain more practical knowledge about Kubernetes in later sections of this chapter, but first, let's name the features that make Kubernetes such a great environment.
Kubernetes features overview
Kubernetes provides a number of interesting features. Let's walk through the most important ones:
- Container balancing: Kubernetes takes care of the load balancing of Pods on nodes; you specify the number of replicas of your application and Kubernetes takes care of the rest.
- Traffic load balancing: When you have multiple replicas of your application, the Kubernetes service can load balance the traffic. In other words, you create a service with a single IP (or DNS) and Kubernetes takes care of load balancing the traffic to your application replicas.
- Dynamic horizontal scaling: Each deployment can be dynamically scaled up or down; you specify the number of application instances (or the rules for autoscaling) and Kubernetes starts/stops Pod replicas.
- Failure recovery: Pods (and nodes) are constantly monitored and if any of them fail, new Pods are started so that the declared number of replicas is constant.
- Rolling updates: An update to the configuration can be applied incrementally; for example, if we have 10 replicas and we would like to make a change, we can define a delay between the deployment to each replica. In such a case, when anything goes wrong, we never end up with a scenario where a replica isn't working correctly.
- Storage orchestration: Kubernetes can mount a storage system of your choice to your applications. Pods are stateless in nature and, therefore, Kubernetes integrates with a number of storage providers, such as Amazon Elastic Block Storage (EBS), Google Compute Engine (GCE) Persistent Disk, and Azure Data Storage.
- Service discovery: Kubernetes Pods are ephemeral in nature and their IPs are dynamically assigned, but Kubernetes provides DNS-based service discovery for this.
- Run everywhere: Kubernetes is an open source tool, and you have a lot of options of how to run it: on-premises, cloud infrastructure, or hybrid.
Now that we have some background about Kubernetes, let's see what it all looks like in practice, starting with the installation process.
Kubernetes installation
Kubernetes, just like Docker, consists of two parts: the client and the server. The client is a command-line tool named kubectl and it connects to the server part using the Kubernetes API. The server is much more complex and is as we described in the previous section. Obviously, to do anything with Kubernetes, you need both parts, so let's describe them one by one, starting with the client.
Kubernetes client
The Kubernetes client, kubectl, is a command-line application that allows you to perform operations on the Kubernetes cluster. The installation process depends on your operating system. You can check out the details on the official Kubernetes website: https://kubernetes.io/docs/tasks/tools/.
After you have successfully installed kubectl, you should be able to execute the following command:
$ kubectl version --client
Client Version: version.Info{Major:"1", Minor:"22", GitVersion:"v1.22.4", ...
Now that you have the Kubernetes client configured, we can move on to the server.
Kubernetes server
There are multiple ways to set up a Kubernetes server. Which one you should use depends on your needs, but if you are completely new to Kubernetes, then I recommend starting from a local environment.
Local environment
Even though Kubernetes itself is a complex clustering system, there are a few tools that can simplify your local development setup. Let's walk through the options you have, which include Docker Desktop, kind, and minikube.
Docker Desktop
Docker Desktop is an application that is used to set up a local Docker environment on macOS or Windows. As you may remember from the previous chapters, the Docker daemon can only run natively on Linux, so for other operating systems, you need to get it running on a VM. Docker Desktop provides a super-intuitive way to do this, and luckily, it also supports the creation of Kubernetes clusters.
If you have Docker Desktop installed, then all you need to do is check the Enable Kubernetes box in the user interface, as shown in the following screenshot. From here, the Kubernetes cluster will start and kubectl will be configured:

Figure 6.3 – Kubernetes in Docker Desktop
Starting from this point, you are ready to use the Kubernetes cluster.
kind
If you use the Linux operating system and can't, or just don't want to, use Docker Desktop, then your second simplest option is kind (short for Kubernetes in Docker). It's a tool for which the only requirement is to have Docker installed and configured.
After installing kind, you can start and configure your local Kubernetes cluster with this one command:
$ kind create cluster
Information
You can check the kind installation steps at https://kind.sigs.k8s.io/docs/user/quick-start/.
minikube
minikube is a command-line tool that starts a fully functional Kubernetes environment inside a VM. It is backed up by a VM hypervisor, so you need to have VirtualBox, Hyper-V, VMware, or a similar tool installed. The instructions to install minikube depend on your operating system, and you can find instructions for each at https://minikube.sigs.k8s.io/docs/start/.
Information
minikube is an open source tool that you can find on GitHub at https://github.com/kubernetes/minikube.
After you have successfully installed minikube, you can start your Kubernetes cluster with the following command:
$ minikube start
minikube starts a Kubernetes cluster and automatically configures your Kubernetes client with the cluster URL and credentials, so you can move directly to the Verifying the Kubernetes setup section.
Cloud platforms
Kubernetes has become so popular that most cloud computing platforms provide it as a service. The leader here is Google Cloud Platform (GCP), which allows you to create a Kubernetes cluster within a few minutes. Other cloud platforms, such as Microsoft Azure, Amazon Web Services (AWS), and IBM Cloud, also have Kubernetes in their portfolios. Let's take a closer look at the three most popular solutions—GCP, Azure, and AWS.
Google Cloud Platform
You can access GCP at https://cloud.google.com/. After creating an account, you should be able to open their web console (https://console.cloud.google.com). One of the services in their portfolio is called Google Kubernetes Engine (GKE).
You can create a Kubernetes cluster by clicking in the user interface or by using the GCP command-line tool, called gcloud.
Information
You can read how to install gcloud on your operating system at the official GCP website: https://cloud.google.com/sdk/docs/install.
To create a Kubernetes cluster using the command-line tool, it's enough to execute the following command:
$ gcloud container clusters create test-cluster
Apart from creating a Kubernetes cluster, it automatically configures kubectl.
Microsoft Azure
Microsoft Azure also offers a very quick Kubernetes setup thanks to Azure Kubernetes Service (AKS). Like GCP, you can use either a web interface or a command-line tool to create a cluster.
Information
You can access the Azure web console at https://portal.azure.com/. To install the Azure command-line tool, check the installation guide on their official page at https://docs.microsoft.com/en-us/cli/azure/install-azure-cli.
To create a Kubernetes cluster using the Azure command-line tool, assuming you already have an Azure resource group created, it's enough to run the following command:
$ az aks create -n test-cluster -g test-resource-group
After a few seconds, your Kubernetes cluster should be ready. To configure kubectl, run the following command:
$ az aks get-credentials -n test-cluster -g test-resource-group
By doing this, you will have successfully set up a Kubernetes cluster and configured kubectl.
Amazon Web Services
AWS provides a managed Kubernetes service called Amazon Elastic Kubernetes Service (EKS). You can start using it by accessing the AWS web console at https://console.aws.amazon.com/eks or using the AWS command-line tool.
Information
You can check all the information (and the installation guide) for the AWS command-line tool at its official website: https://docs.aws.amazon.com/cli/.
As you can see, using Kubernetes in the cloud is a relatively simple option. Sometimes, however, you may need to install an on-premises Kubernetes environment from scratch on your own server machines. Let's discuss this in the next section.
On-premises
Installing Kubernetes from scratch on your own servers makes sense if you don't want to depend on cloud platforms or if your corporate security policies don't allow it. The installation process is relatively complex and out of the scope of this book, but you can find all the details in the official documentation at https://kubernetes.io/docs/setup/production-environment/.
Now that we have the Kubernetes environment configured, we can check that kubectl is connected to the cluster correctly and that we are ready to start deploying our applications.
Verifying the Kubernetes setup
No matter which Kubernetes server installation you choose, you should already have everything configured and the Kubernetes client should be filled with the cluster's URL and credentials. You can check this with the following command:
$ kubectl cluster-info
Kubernetes control plane is running at https://kubernetes.docker.internal:6443
CoreDNS is running at https://kubernetes.docker.internal:6443/api/v1/namespaces/kube-system/services/kube-dns:dns/proxy
This is the output for the Docker Desktop scenario and is why you can see localhost. Your output may be slightly different and may include more entries. If you see no errors, then everything is correct, and we can start using Kubernetes to run applications.
Using Kubernetes
We have the whole Kubernetes environment ready and kubectl configured. This means that it's high time to finally present the power of Kubernetes and deploy our first application. Let's use the leszko/calculator Docker image that we built in the previous chapters and start it in multiple replicas on Kubernetes.
Deploying an application
In order to start a Docker container on Kubernetes, we need to prepare a deployment configuration as a YAML file. Let's name it deployment.yaml:
apiVersion: apps/v1
kind: Deployment (1)
metadata:
name: calculator-deployment (2)
labels:
app: calculator
spec:
replicas: 3 (3)
selector: (4)
matchLabels:
app: calculator
template: (5)
metadata:
labels: (6)
app: calculator
spec:
containers:
- name: calculator (7)
image: leszko/calculator (8)
ports: (9)
- containerPort: 8080
In this YAML configuration, we have to ensure the following:
- We have defined a Kubernetes resource of the Deployment type from the apps/v1 Kubernetes API version.
- The unique deployment name is calculator-deployment.
- We have defined that there should be exactly 3 of the same Pods created.
- selector defines how Deployment finds Pods to manage, in this case, just by the label.
- template defines the specification for each created Pod.
- Each Pod is labeled with app: calculator.
- Each Pod contains a Docker container named calculator.
- A Docker container was created from the image called leszko/calculator.
- The Pod exposes container port 8080.
To install the deployment, run the following command:
$ kubectl apply -f deployment.yaml
You can check that the three Pods, each containing one Docker container, have been created:
$ kubectl get pods
NAME READY STATUS RESTARTS AGE
calculator-deployment-dccdf8756-h2l6c 1/1 Running 0 1m
calculator-deployment-dccdf8756-tgw48 1/1 Running 0 1m
calculator-deployment-dccdf8756-vtwjz 1/1 Running 0 1m
Each Pod runs a Docker container. We can check its logs by using the following command:
$ kubectl logs pods/calculator-deployment-dccdf8756-h2l6c
You should see the familiar Spring logo and the logs of our Calculator web service.
Information
To look at an overview of kubectl commands, please check out the official guide: https://kubernetes.io/docs/reference/kubectl/overview/.
We have just performed our first deployment to Kubernetes, and with just a few lines of code, we have three replicas of our Calculator web service application. Now, let's see how we can use the application we deployed. For this, we'll need to understand the concept of a Kubernetes Service.
Deploying a Kubernetes Service
Each Pod has an IP address in the internal Kubernetes network, which means that you can already access each Calculator instance from another Pod running in the same Kubernetes cluster. But how do we access our application from the outside? That is the role of a Kubernetes Service.
The idea of Pods and Services is that Pods are mortal—they get terminated, and then they get restarted. The Kubernetes orchestrator only cares about the right number of Pod replicas, not about the Pod's identity. That's why, even though each Pod has an (internal) IP address, we should not stick to it or use it. Services, on the other hand, act as a frontend for Pods. They have IP addresses (and DNS names) that can be used. Let's look at the following diagram, which presents the idea of a Pod and Service:
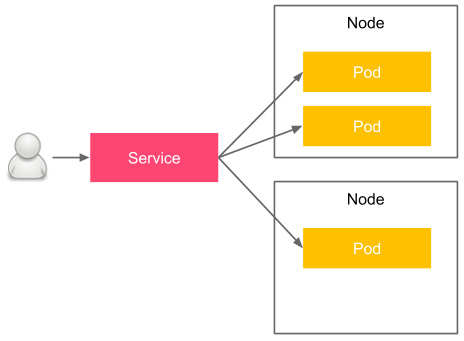
Figure 6.4 – Kubernetes Pod and Service
Pods are physically placed on different nodes, but you don't have to worry about this since Kubernetes takes care of the right orchestration and introduces the abstraction of a Pod and Service. The user accesses the Service, which load balances the traffic between the Pod replicas. Let's look at an example of how to create a service for our Calculator application.
Just like we did for the Deployment, we start from a YAML configuration file. Let's name it service.yaml:
apiVersion: v1
kind: Service
metadata:
name: calculator-service
spec:
type: NodePort
selector:
app: calculator
ports:
- port: 8080
This is a configuration for a simple service that load balances the traffic to all the Pods that meet the criteria we mentioned in selector. To install the service, run the following command:
$ kubectl apply -f service.yaml
You can then check that the service was correctly deployed by running the following command:
$ kubectl get service calculator-service
NAME TYPE CLUSTER-IP EXTERNAL-IP PORT(S) AGE
calculator-service NodePort 10.19.248.154 <none> 8080:32259/TCP 13m
To check that the service points to the three Pod replicas we created in the previous section, run the following command:
$ kubectl describe service calculator-service | grep Endpoints
Endpoints: 10.16.1.5:8080,10.16.2.6:8080,10.16.2.7:8080
From the last two commands we ran, we can see that the service is available under the IP address of 10.19.248.154 and that it load balances the traffic to three Pods with the IPs of 10.16.1.5, 10.16.2.6, and 10.16.2.7. All of these IP addresses, for both the Service and Pod, are internal to the Kubernetes cluster network.
Information
To read more about Kubernetes Services, please visit the official Kubernetes website at https://kubernetes.io/docs/concepts/services-networking/service/.
In the next section, we'll take a look at how to access a service from outside the Kubernetes cluster.
Exposing an application
To understand how your application can be accessed from the outside, we need to start with the types of Kubernetes Services. You can use four different service types, as follows:
- ClusterIP (default): The service has an internal IP only.
- NodePort: Exposes the service on the same port of each cluster node. In other words, each physical machine (which is a Kubernetes node) opens a port that is forwarded to the service. Then, you can access it by using <NODE-IP>:<NODE-PORT>.
- LoadBalancer: Creates an external load balancer and assigns a separate external IP for the service. Your Kubernetes cluster must support external load balancers, which works fine in the case of cloud platforms, but may not work if you use minikube.
- ExternalName: Exposes the service using a DNS name (specified by externalName in the spec).
If you use a Kubernetes instance that's been deployed on a cloud platform (for example, GKE), then the simplest way to expose your service is to use LoadBalancer. By doing this, GCP automatically assigns an external public IP for your service, which you can check with the kubectl get service command. If we had used it in our configuration, then you could have accessed the Calculator service at http://<EXTERNAL-IP>:8080.
While LoadBalancer seems to be the simplest solution, it has two drawbacks:
- First, it's not always available, for example, if you deployed on-premises Kubernetes or used minikube.
- Second, external public IPs are usually expensive. A different solution is to use a NodePort service, as we did in the previous section.
Now, let's see how we can access our service.
We can repeat the same command we ran already:
$ kubectl get service calculator-service
NAME TYPE CLUSTER-IP EXTERNAL-IP PORT(S) AGE
calculator-service NodePort 10.19.248.154 <none> 8080:32259/TCP 13m
You can see that port 32259 was selected as a node port. This means that we can access our Calculator service using that port and the IP of any of the Kubernetes nodes.
The IP address of your Kubernetes node depends on your installation. If you used Docker Desktop, then your node IP is localhost. In the case of minikube, you can check it with the minikube ip command. In the case of cloud platforms or the on-premises installation, you can check the IP addresses with the following command:
$ kubectl get nodes -o jsonpath='{ $.items[*].status.addresses[?(@.type=="ExternalIP")].address }'
35.192.180.252 35.232.125.195 104.198.131.248
To check that you can access Calculator from the outside, run the following command:
$ curl <NODE-IP>:32047/sum?a=1&b=2
3
We made an HTTP request to one of our Calculator container instances and it returned the right response, which means that we successfully deployed the application on Kubernetes.
Tip
The kubectl command offers a shortcut to create a service without using YAML. Instead of the configuration we used, you could just execute the following command:
$ kubectl expose deployment calculator-deployment --type=NodePort --name=calculator-service.
What we've just learned gives us the necessary basics about Kubernetes. We can now use it for the staging and production environments and, therefore, include it in the continuous delivery process. Before we do so, however, let's look at a few more Kubernetes features that make it a great and useful tool.
Advanced Kubernetes
Kubernetes provides a way to dynamically modify your deployment during runtime. This is especially important if your application is already running in production and you need to support zero-downtime deployments. First, let's look at how to scale up an application and then present the general approach Kubernetes takes on any deployment changes.
Scaling an application
Let's imagine that our Calculator application is getting popular. People have started using it and the traffic is so high that the three Pod replicas are overloaded. What can we do now?
Luckily, kubectl provides a simple way to scale up and down deployments using the scale keyword. Let's scale our Calculator deployment to 5 instances:
$ kubectl scale --replicas 5 deployment calculator-deployment
That's it, our application is now scaled up:
$ kubectl get pods
NAME READY STATUS RESTARTS AGE
calculator-deployment-dccdf8756-h2l6c 1/1 Running 0 19h
calculator-deployment-dccdf8756-j87kg 1/1 Running 0 36s
calculator-deployment-dccdf8756-tgw48 1/1 Running 0 19h
calculator-deployment-dccdf8756-vtwjz 1/1 Running 0 19h
calculator-deployment-dccdf8756-zw748 1/1 Running 0 36s
Note that, from now on, the service we created load balances the traffic to all 5 Calculator Pods. Also, note that you don't even need to wonder about which physical machine each Pod runs on, since this is covered by the Kubernetes orchestrator. All you have to think about is your desired number of application instances.
Information
Kubernetes also provides a way to autoscale your Pods, depending on its metrics. This feature is called the HorizontalPodAutoscaler, and you can read more about it at https://kubernetes.io/docs/tasks/run-application/horizontal-pod-autoscale/.
We have just seen how we can scale applications. Now, let's take a more generic look at how to update any part of a Kubernetes deployment.
Updating an application
Kubernetes takes care of updating your deployments. Let's make a change to deployment.yaml and add a new label to the Pod template:
apiVersion: apps/v1
kind: Deployment
metadata:
name: calculator-deployment
labels:
app: calculator
spec:
replicas: 5
selector:
matchLabels:
app: calculator
template:
metadata:
labels:
app: calculator
label: label
spec:
containers:
- name: calculator
image: leszko/calculator
ports:
- containerPort: 8080
Now, if we repeat this and apply the same deployment, we can observe what happens with the Pods:
$ kubectl apply -f deployment.yaml
$ kubectl get pods
NAME READY STATUS RESTARTS AGE
pod/calculator-deployment-7cc54cfc58-5rs9g 1/1 Running 0 7s
pod/calculator-deployment-7cc54cfc58-jcqlx 1/1 Running 0 4s
pod/calculator-deployment-7cc54cfc58-lsh7z 1/1 Running 0 4s
pod/calculator-deployment-7cc54cfc58-njbbc 1/1 Running 0 7s
pod/calculator-deployment-7cc54cfc58-pbthv 1/1 Running 0 7s
pod/calculator-deployment-dccdf8756-h2l6c 0/1 Terminating 0 20h
pod/calculator-deployment-dccdf8756-j87kg 0/1 Terminating 0 18m
pod/calculator-deployment-dccdf8756-tgw48 0/1 Terminating 0 20h
pod/calculator-deployment-dccdf8756-vtwjz 0/1 Terminating 0 20h
pod/calculator-deployment-dccdf8756-zw748 0/1 Terminating 0 18m
We can see that Kubernetes terminated all the old Pods and started the new ones.
Information
In our example, we modified the deployment of the YAML configuration, not the application itself. However, modifying the application is actually the same. If we make any change to the source code of the application, we need to build a new Docker image with the new version and then update this version in deployment.yaml.
Every time you change something and run kubectl apply, Kubernetes checks whether there is any change between the existing state and the YAML configuration, and then, if needed, it performs the update operation we described previously.
This is all well and good, but if Kubernetes suddenly terminates all Pods, we may end up in a situation where all the old Pods are already killed and none of the new Pods are ready yet. This would make our application unavailable for a moment. How do we ensure zero-downtime deployments? That's the role of rolling updates.
Rolling updates
A rolling update entails incrementally terminating old instances and starting new ones. In other words, the workflow is as follows:
- Terminate one of the old Pods.
- Start a new Pod.
- Wait until the new Pod is ready.
- Repeat step 1 until all old instances are replaced.
Information
The concept of a rolling update works correctly only if the new application version is backward compatible with the old application version. Otherwise, we risk having two different incompatible versions at the same time.
To configure it, we need to add the RollingUpdate strategy to our deployment and specify readinessProbe, which makes Kubernetes aware when the Pod is ready. Let's modify deployment.yaml:
apiVersion: apps/v1
kind: Deployment
metadata:
name: calculator-deployment
labels:
app: calculator
spec:
replicas: 5
strategy:
type: RollingUpdate
rollingUpdate:
maxUnavailable: 25%
maxSurge: 0
selector:
matchLabels:
app: calculator
template:
metadata:
labels:
app: calculator
spec:
containers:
- name: calculator
image: leszko/calculator
ports:
- containerPort: 8080
readinessProbe:
httpGet:
path: /sum?a=1&b=2
port: 8080
Let's explain the parameters we used in our configuration:
- maxUnavailable: The maximum number of Pods that can be unavailable during the update process; in our case, Kubernetes won't terminate at the same time when there's more than one Pod (75% * 5 desired replicas).
- maxSurge: The maximum number of Pods that can be created over the desired number of Pods; in our case, Kubernetes won't create any new Pods before terminating an old one.
- path and port: The endpoint of the container to check for readiness; an HTTP GET request is sent to <POD-IP>:8080/sum?a=1&b=2 and when it finally returns 200 as the HTTP status code, the Pod is marked as ready.
Tip
By modifying the maxUnavailable and maxSurge parameters, we can decide whether Kubernetes first starts new Pods and later terminates old ones or, as we did in our case, first terminates old Pods and later starts new ones.
We can now apply the deployment and observe that the Pods are updated one by one:
$ kubectl apply -f deployment.yaml
$ kubectl get pods
NAME READY STATUS RESTARTS AGE
calculator-deployment-78fd7b57b8-npphx 0/1 Running 0 4s
calculator-deployment-7cc54cfc58-5rs9g 1/1 Running 0 3h
calculator-deployment-7cc54cfc58-jcqlx 0/1 Terminating 0 3h
calculator-deployment-7cc54cfc58-lsh7z 1/1 Running 0 3h
calculator-deployment-7cc54cfc58-njbbc 1/1 Running 0 3h
calculator-deployment-7cc54cfc58-pbthv 1/1 Running 0 3h
That's it, we have just configured a rolling update for our Calculator deployment, which means that we can provide zero-downtime releases.
Information
Kubernetes also provides a different way of running applications. You can use StatefulSet instead of Deployment, and then the rolling update is always enabled (even without specifying any additional strategy).
Rolling updates are especially important in the context of continuous delivery, because if we deploy very often, then we definitely can't afford any downtime.
Tip
After playing with Kubernetes, it's good to perform the cleanup to remove all the resources we created. In our case, we can execute the following commands to remove the service and deployment we created:
$ kubectl delete -f service.yaml
$ kubectl delete -f deployment.yaml
We've already presented all the Kubernetes features that are needed for the continuous delivery process. Let's look at a short summary and add a few words about other useful features.
Kubernetes objects and workloads
The execution unit in Kubernetes is always a Pod, which contains one or more (Docker) containers. There are multiple different resource types to orchestrate Pods:
- Deployment: This is the most common workload, which manages the life cycle of the desired number of replicated Pods.
- StatefulSet: This is a specialized Pod controller that guarantees the ordering and uniqueness of Pods. It is usually associated with data-oriented applications (in which it's not enough to say, my desired number of replicas is 3, as in the case of a Deployment, but rather, I want exactly 3 replicas, with always the same predictable Pod names, and always started in the same order).
- DaemonSet: This is a specialized Pod controller that runs a copy of a Pod on each Kubernetes node.
- Job/CronJob: This is a workflow that's dedicated to task-based operations in which containers are expected to exist successfully.
Information
You may also find a Kubernetes resource called ReplicationController, which is deprecated and has been replaced by Deployment.
Apart from Pod management, there are other Kubernetes objects. The most useful ones that you may often encounter are as follows:
- Service: A component that acts as an internal load balancer for Pods.
- ConfigMap: This decouples configuration from the image content; it can be any data that's defined separately from the image and then mounted onto the container's filesystem.
- Secret: This allows you to store sensitive information, such as passwords.
- PersistentVolume/PersistentVolumeClaim: These allow you to mount a persistent volume into a (stateless) container's filesystem.
Actually, there are many more objects available, and you can even create your own resource definitions. However, the ones we've mentioned here are the most frequently used in practice.
We already have a good understanding of clustering in Kubernetes, but Kubernetes isn't just about workloads and scaling. It can also help with resolving dependencies between applications. In the next section, we will approach this topic and describe application dependencies in the context of Kubernetes and the continuous delivery process.
Application dependencies
Life is easy without dependencies. In real life, however, almost every application links to a database, cache, messaging system, or another application. In the case of (micro) service architecture, each service needs a bunch of other services to do its work. The monolithic architecture does not eliminate the issue—an application usually has some dependencies, at least to the database.
Imagine a newcomer joining your development team; how much time does it take to set up the entire development environment and run the application with all its dependencies?
When it comes to automated acceptance testing, the dependencies issue is no longer only a matter of convenience—it becomes a necessity. While, during unit testing, we could mock the dependencies, the acceptance testing suite requires a complete environment. How do we set it up quickly and in a repeatable manner? Luckily, Kubernetes can help thanks to its built-in DNS resolution for Services and Pods.
The Kubernetes DNS resolution
Let's present the Kubernetes DNS resolution with a real-life scenario. Let's say we would like to deploy a caching service as a separate application and make it available for other services. One of the best in-memory caching solutions is Hazelcast, so let's use it here. In the case of the Calculator application, we need Deployment and Service. Let's define them both in one file, hazelcast.yaml:
apiVersion: apps/v1
kind: Deployment
metadata:
name: hazelcast
labels:
app: hazelcast
spec:
replicas: 1
selector:
matchLabels:
app: hazelcast
template:
metadata:
labels:
app: hazelcast
spec:
containers:
- name: hazelcast
image: hazelcast/hazelcast:5.0.2
ports:
- containerPort: 5701
---
apiVersion: v1
kind: Service
metadata:
name: hazelcast
spec:
selector:
app: hazelcast
ports:
- port: 5701
Similar to what we did previously for the Calculator application, we will now define the Hazelcast configuration. Let's start it in the same way:
$ kubectl apply -f hazelcast.yaml
After a few seconds, the Hazelcast caching application should start. You can check its Pod logs with the kubectl logs command. We also created a service of a default type (ClusterIP, which is only exposed inside the same Kubernetes cluster).
So far, so good—we did nothing different from what we've already seen in the case of the Calculator application. Now comes the most interesting part. Kubernetes provides a way of resolving a service IP using the service name. What's even more interesting is that we know the Service name upfront—in our case, it's always hazelcast. So, if we use this as the cache address in our application, the dependency will be automatically resolved.
Information
Actually, Kubernetes DNS resolution is even more powerful, and it can resolve Services in a different Kubernetes namespace. Read more at https://kubernetes.io/docs/concepts/services-networking/dns-pod-service/.
Before we show you how to implement caching inside the Calculator application, let's take a moment to overview the system we will build.
Multiapplication system overview
We already have the Hazelcast server deployed on Kubernetes. Before we modify our Calculator application so that we can use it as a caching provider, let's take a look at a diagram of the complete system we want to build:

Figure 6.5 – Sample multiapplication deployment
The user uses the Calculator Service, which load balances the traffic to a Calculator Pod. Then, the Calculator Pod connects to the Hazelcast Service (using its name, hazelcast). The Hazelcast Service redirects to the Hazelcast Pod.
If you look at the diagram, you can see that we have just deployed the Hazelcast part (Hazelcast Service and Hazelcast Pod). We also deployed the Calculator part (Calculator Service and Calculator Pod) in the previous section. The final missing part is the Calculator code to use Hazelcast. Let's implement it now.
Multiapplication system implementation
To implement caching with Hazelcast in our Calculator application, we need to do the following:
- Add the Hazelcast client library to Gradle.
- Add the Hazelcast cache configuration.
- Add Spring Boot caching.
- Build a Docker image.
Let's proceed step by step.
Adding the Hazelcast client library to Gradle
In the build.gradle file, add the following configuration to the dependencies section:
implementation 'com.hazelcast:hazelcast:5.0.2'
This adds the Java libraries that take care of communication with the Hazelcast server.
Adding the Hazelcast cache configuration
Add the following parts to the src/main/java/com/leszko/calculator/CalculatorApplication.java file:
package com.leszko.calculator;
import com.hazelcast.client.config.ClientConfig;
import org.springframework.boot.SpringApplication;
import org.springframework.boot.autoconfigure.SpringBootApplication;
import org.springframework.cache.annotation.EnableCaching;
import org.springframework.context.annotation.Bean;
@SpringBootApplication
@EnableCaching
public class CalculatorApplication {
public static void main(String[] args) {
SpringApplication.run(CalculatorApplication.class, args);
}
@Bean
public ClientConfig hazelcastClientConfig() {
ClientConfig clientConfig = new ClientConfig();
clientConfig.getNetworkConfig().addAddress("hazelcast");
return clientConfig;
}
}
This is a standard Spring cache configuration. Note that for the Hazelcast server address, we use hazelcast, which is automatically available thanks to the Kubernetes DNS resolution.
Tip
In real life, if you use Hazelcast, you don't even need to specify the service name, since Hazelcast provides an autodiscovery plugin dedicated to the Kubernetes environment. Read more at https://docs.hazelcast.com/hazelcast/latest/deploy/deploying-in-kubernetes.html.
We also need to remove the Spring context test automatically created by Spring Initializr, src/test/java/com/leszko/calculator/CalculatorApplicationTests.java.
Next, let's add caching to the Spring Boot service.
Adding Spring Boot caching
Now that the cache is configured, we can finally add caching to our web service. In order to do this, we need to change the src/main/java/com/leszko/calculator/Calculator.java file so that it looks as follows:
package com.leszko.calculator;
import org.springframework.cache.annotation.Cacheable;
import org.springframework.stereotype.Service;
@Service
public class Calculator {
@Cacheable("sum")
public int sum(int a, int b) {
try {
Thread.sleep(3000);
}
catch (InterruptedException e) {
e.printStackTrace();
}
return a + b;
}
}
We added the @Cacheable annotation to make Spring automatically cache every call of the sum() method. We also added sleeping for 3 seconds, just for the purpose of testing, so that we could see that the cache works correctly.
From now on, the sum calculations are cached in Hazelcast, and when we call the /sum endpoint of the Calculator web service, it will first try to retrieve the result from the cache. Now, let's build our application.
Building a Docker image
As the next step, we need to remove the Spring default context test, src/test/java/com/leszko/calculator/CalculatorApplicationTests.java (to avoid failing because of the missing Hazelcast dependency).
Now, we can rebuild the Calculator application and the Docker image with a new tag. Then, we will push it to Docker Hub once more:
$ ./gradlew build
$ docker build -t leszko/calculator:caching .
$ docker push leszko/calculator:caching
Obviously, you should change leszko to your Docker Hub account.
The application is ready, so let's test it all together on Kubernetes.
Multiapplication system testing
We should already have the Hazelcast caching server deployed on Kubernetes. Now, let's change the deployment for the Calculator application to use the leszko/calculator:caching Docker image. You need to modify image in the deployment.yaml file:
image: leszko/calculator:caching
Then, apply the Calculator deployment and service:
$ kubectl apply -f deployment.yaml
$ kubectl apply -f service.yaml
Let's repeat the curl operation we did before:
$ curl <NODE-IP>:<NODE-PORT>/sum?a=1&b=2
The first time you execute it, it should reply in 3 seconds, but all subsequent calls should be instant, which means that caching works correctly.
Tip
If you're interested, you can also check the logs of the Calculator Pod. You should see some logs there that confirm that the application is connected to the Hazelcast server:
Members [1] {
Member [10.16.2.15]:5701 - 3fca574b-bbdb-4c14-ac9d-73c45f56b300
}
You can probably already see how we could perform acceptance testing on a multicontainer system. All we need is an acceptance test specification for the whole system. Then, we could deploy the complete system into the Kubernetes staging environment and run a suite of acceptance tests against it. We'll talk about this in more detail in Chapter 8, Continuous Delivery Pipeline.
Information
In our example, the dependent service was related to caching, which doesn't really change the functional acceptance tests we created in Chapter 5, Automated Acceptance Testing.
That's all we need to know about how to approach dependent applications that are deployed on the Kubernetes cluster in the context of continuous delivery. Nevertheless, before we close this chapter, let's write a few words about Kubernetes' competitors, that is, other popular cluster management systems.
Alternative cluster management systems
Kubernetes is not the only system that can be used to cluster Docker containers. Even though it's currently the most popular one, there may be some valid reasons to use different software. Let's walk through the alternatives.
Docker Swarm
Docker Swarm is a native clustering system for Docker that turns a set of Docker hosts into one consistent cluster, called a swarm. Each host connected to the swarm plays the role of a manager or a worker (there must be at least one manager in a cluster). Technically, the physical location of the machines does not matter; however, it's reasonable to have all Docker hosts inside one local network; otherwise, managing operations (or reaching a consensus between multiple managers) can take a significant amount of time.
Information
Since Docker 1.12, Docker Swarm is natively integrated into Docker Engine in swarm mode. In older versions, it was necessary to run the swarm container on each of the hosts to provide the clustering functionality.
Let's look at the following diagram, which presents the terminology and the Docker Swarm clustering process:

Figure 6.6 – Docker Swarm
In Docker Swarm mode, a running image is called a Service, as opposed to a container, which is run on a single Docker host. One service runs a specified number of tasks. A task is an atomic scheduling unit of the swarm that holds the information about the container and the command that should be run inside the container. A replica is each container that is run on the node. The number of replicas is the expected number of all containers for the given service.
We start by specifying a service, the Docker image, and the number of replicas. The manager automatically assigns tasks to worker nodes. Obviously, each replicated container is run from the same Docker image. In the context of the presented flow, Docker Swarm can be viewed as a layer on top of the Docker Engine mechanism that is responsible for container orchestration.
Information
In the first edition of this book, Docker Swarm was used for all the examples that were provided. So, if Docker Swarm is your clustering system of choice, you may want to read the first edition.
Another alternative to Kubernetes is Apache Mesos. Let's talk about it now.
Apache Mesos
Apache Mesos is an open source scheduling and clustering system that was started at the University of California, Berkeley, in 2009, long before Docker emerged. It provides an abstraction layer over CPU, disk space, and RAM. One of the great advantages of Mesos is that it supports any Linux application, but not necessarily (Docker) containers. This is why it's possible to create a cluster out of thousands of machines and use it for both Docker containers and other programs, for example, Hadoop-based calculations.
Let's look at the following diagram, which presents the Mesos architecture:

Figure 6.7 – Apache Mesos
Apache Mesos, similar to other clustering systems, has the master-slave architecture. It uses node agents that have been installed on every node for communication, and it provides two types of schedulers:
- Chronos: For cron-style repeating tasks
- Marathon: To provide a REST API to orchestrate services and containers
Apache Mesos is very mature compared to other clustering systems, and it has been adopted in a large number of organizations, such as Twitter, Uber, and CERN.
Comparing features
Kubernetes, Docker Swarm, and Mesos are all good choices for the cluster management system. All of them are free and open source, and all of them provide important cluster management features, such as load balancing, service discovery, distributed storage, failure recovery, monitoring, secret management, and rolling updates. All of them can also be used in the continuous delivery process without huge differences. This is because, in the Dockerized infrastructure, they all address the same issue—the clustering of Docker containers. Nevertheless, the systems are not exactly the same. Let's take a look at the following table, which presents the differences:

Obviously, apart from Kubernetes, Docker Swarm, and Apache Mesos, there are other clustering systems available on the market. Especially in the era of cloud platforms, there are very popular platform-specific systems, for example, Amazon Elastic Container Service (ECS). The good news is that if you understand the idea of clustering Docker containers, then using another system won't be difficult for you.
Summary
In this chapter, we took a look at the clustering methods for Docker environments that allow you to set up complete staging and production environments. Let's go over some of the key takeaways from this chapter:
- Clustering is a method of configuring a set of machines in a way that, in many respects, can be viewed as a single system.
- Kubernetes is the most popular clustering system for Docker.
- Kubernetes consists of the Kubernetes server and the Kubernetes client (kubectl).
- The Kubernetes server can be installed locally (through minikube or Docker Desktop), on the cloud platform (AKS, GKE, or EKS), or manually on a group of servers. Kubernetes uses YAML configurations to deploy applications.
- Kubernetes provides features such as scaling and rolling updates out of the box.
- Kubernetes provides DNS resolution, which can help when you're deploying systems that consist of multiple dependent applications.
- The most popular clustering systems that support Docker are Kubernetes, Docker Swarm, and Apache Mesos.
In the next chapter, we will describe the configuration management part of the continuous delivery pipeline.
Exercises
In this chapter, we have covered Kubernetes and the clustering process in detail. In order to enhance this knowledge, we recommend the following exercises:
- Run a hello world application on the Kubernetes cluster:
- The hello world application can look exactly the same as the one we described in the exercises for Chapter 2, Introducing Docker.
- Deploy the application with three replicas.
- Expose the application with the NodePort service.
- Make a request (using curl) to the application.
- Implement a new feature, Goodbye World!, and deploy it using a rolling update:
- This feature can be added as a new endpoint, /bye, which always returns Goodbye World!.
- Rebuild a Docker image with a new version tag.
- Use the RollingUpdate strategy and readinessProbe.
- Observe the rolling update procedure.
- Make a request (using curl) to the application.
Questions
To verify your knowledge from this chapter, please answer the following questions:
- What is a server cluster?
- What is the difference between a Kubernetes control plane and Kubernetes Node?
- Name at least three cloud platforms that provide a Kubernetes environment out of the box.
- What is the difference between a Kubernetes deployment and service?
- What is the Kubernetes command for scaling deployments?
- Name at least two cluster management systems other than Kubernetes.
Further reading
To find out more about Kubernetes, please refer to the following resources:
- Kubernetes official documentation: https://kubernetes.io/docs/home/
- Nigel Poulton: The Kubernetes Book (https://leanpub.com/thekubernetesbook)