
Chapter 2: Introducing Docker
In this chapter, we will discuss how the modern continuous delivery (CD) process looks by introducing Docker, the technology that changed the information technology (IT) industry and the way servers are used.
This chapter covers the following topics:
- What is Docker?
- Installing Docker
- Running Docker hello-world
- Docker components
- Docker applications
- Building Docker images
- Docker container states
- Docker networking
- Using Docker volumes
- Using names in Docker
- Docker cleanup
- Docker commands overview
Technical requirements
To complete this chapter, you'll need to meet the following hardware/software requirements:
- At least 4 gigabytes (GB) of random-access memory (RAM)
- macOS 10.15+, Windows 10/11 Pro 64-bit, Ubuntu 20.04+, or other Linux operating systems
All the examples and solutions to the exercises can be found at https://github.com/PacktPublishing/Continuous-Delivery-With-Docker-and-Jenkins-3rd-Edition/tree/main/Chapter02.
Code in Action videos for this chapter can be viewed at https://bit.ly/3LJv1n6.
What is Docker?
Docker is an open source project designed to help with application deployment using software containers. This approach means running applications together with the complete environment (files, code libraries, tools, and so on). Therefore, Docker—similar to virtualization—allows an application to be packaged into an image that can be run everywhere.
Containerization versus virtualization
Without Docker, isolation and other benefits can be achieved with the use of hardware virtualization, often called virtual machines (VMs). The most popular solutions are VirtualBox, VMware, and parallels. A VM emulates a computer architecture and provides the functionality of a physical computer. We can achieve complete isolation of applications if each of them is delivered and run as a separate VM image.
The following diagram presents the concept of virtualization:
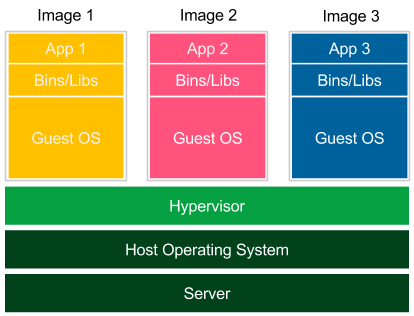
Figure 2.1 – Virtualization
Each application is launched as a separate image with all dependencies and a guest operating system. Images are run by the hypervisor, which emulates the physical computer architecture. This method of deployment is widely supported by many tools (such as Vagrant) and dedicated to development and testing environments. Virtualization, however, has three significant drawbacks, as outlined here:
- Low performance: The VM emulates the whole computer architecture to run the guest operating system, so there is a significant overhead associated with executing each operation.
- High resource consumption: Emulation requires a lot of resources and has to be done separately for each application. This is why, on a standard desktop machine, only a few applications can be run simultaneously.
- Large image size: Each application is delivered with a full operating system, so deployment on a server implies sending and storing a large amount of data.
The concept of containerization presents a different solution, as we can see here:
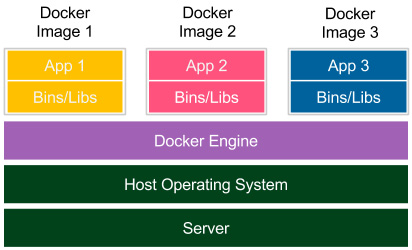
Figure 2.2 – Containerization
Each application is delivered together with its dependencies, but without the operating system. Applications interface directly with the host operating system, so there is no additional layer of the guest operating system. This results in better performance and no wasted resources. Moreover, shipped Docker images are significantly smaller.
Notice that, in the case of containerization, isolation happens at the level of the host operating system's processes. This doesn't mean, however, that the containers share their dependencies. Each of them has its own libraries in the right version, and if any of them is updated, it has no impact on the others. To achieve this, Docker Engine creates a set of Linux namespaces and control groups for the container. This is why Docker security is based on Linux kernel process isolation. This solution, although mature enough, could be considered slightly less secure than the complete operating system-based isolation offered by VMs.
The need for Docker
Docker containerization solves a number of problems seen in traditional software delivery. Let's take a closer look.
Environment
Installing and running software is complex. You need to make decisions about the operating system, resources, libraries, services, permissions, other software, and everything your application depends on. Then, you need to know how to install it. What's more, there may be some conflicting dependencies. What do you do then? What if your software needs an upgrade of a library, but the other resources do not? In some companies, such issues are solved by having classes of applications, and each class is served by a dedicated server, such as a server for web services with Java 7, and another one for batch jobs with Java 8. This solution, however, is not balanced in terms of resources and requires an army of IT operations teams to take care of all the production and test servers.
Another problem with the environment's complexity is that it often requires a specialist to run an application. A less technical person may have a hard time setting up MySQL, Open Database Connectivity (ODBC), or any other slightly more sophisticated tool. This is particularly true for applications not delivered as an operating system-specific binary but that require source code compilation or any other environment-specific configuration.
Isolation
Keep the workspace tidy. One application can change the behavior of another one. Imagine what could happen. Applications share one filesystem, so if application A writes something to the wrong directory, application B reads the incorrect data. They share resources, so if there is a memory leak in application A, it can freeze not only itself but also application B. They share network interfaces, so if applications A and B both use port 8080, one of them will crash. Isolation concerns the security aspects, too. Running a buggy application or malicious software can cause damage to other applications. This is why it is a much safer approach to keep each application inside a separate sandbox, which limits the scope of possible damage to the application itself.
Organizing applications
Servers often end up looking messy, with a ton of running applications nobody knows anything about. How will you check which applications are running on the server and which dependencies each of them is using? They could depend on libraries, other applications, or tools. Without the exhaustive documentation, all we can do is look at the running processes and start guessing. Docker keeps things organized by having each application as a separate container that can be listed, searched, and monitored.
Portability
Write once, run anywhere, said the slogan while advertising the earliest versions of Java. Indeed, Java addresses the portability issue quite well. However, I can still think of a few cases where it fails; for example, the incompatible native dependencies or the older version of the Java Runtime. Moreover, not all software is written in Java.
Docker moves the concept of portability one level higher; if the Docker version is compatible, the shipped software works correctly, regardless of the programming language, operating system, or environment configuration. Docker, then, can be expressed by the following slogan: Ship the entire environment instead of just code.
Kittens and cattle
The difference between traditional software deployment and Docker-based deployment is often expressed with an analogy of kittens and cattle. Everybody likes kittens. Kittens are unique. Each has its own name and needs special treatment. Kittens are treated with emotion. We cry when they die. On the contrary, cattle exist only to satisfy our needs. Even the form cattle is singular since it's just a pack of animals treated together—no naming, no uniqueness. Surely, they are unique (the same as each server is unique), but this is irrelevant. This is why the most straightforward explanation of the idea behind Docker is treat your servers like cattle, not pets.
Alternative containerization technologies
Docker is not the only containerization system available on the market. Actually, the first versions of Docker were based on the open source Linux Containers (LXC) system, which is an alternative platform for containers. Other known solutions are Windows Server containers, OpenVZ, and Linux Server. Docker, however, overtook all other systems because of its simplicity, good marketing, and startup approach. It works under most operating systems, allows you to do something useful in less than 15 minutes, and has a lot of simple-to-use features, good tutorials, a great community, and probably the best logo in the IT industry!
We already understand the idea of Docker, so let's move on to the practical part and start from the beginning: Docker installation.
Installing Docker
Docker's installation process is quick and simple. Currently, it's supported on most Linux operating systems, and a wide range of them have dedicated binaries provided. macOS and Windows are also well supported with native applications. However, it's important to understand that Docker is internally based on the Linux kernel and its specifics, and this is why, in the case of macOS and Windows, it uses VMs (HyperKit for macOS and Hyper-V for Windows) to run the Docker Engine environment.
Prerequisites for Docker
The Docker Community Edition requirements are specific for each operating system, as outlined here:
- macOS:
- macOS 10.15 or newer
- At least 4 GB of RAM
- No VirtualBox prior to version 4.3.30 installed
- Windows:
- 64-bit Windows 10/11
- The Hyper-V package enabled
- At least 4 GB of RAM
- Linux:
- 64-bit architecture
- Linux kernel 3.10 or later
If your machine does not meet these requirements, the solution is to use VirtualBox with the Ubuntu operating system installed. This workaround, even though it sounds complicated, is not necessarily the worst method, especially considering that the Docker Engine environment is virtualized anyway in the case of macOS and Windows. Furthermore, Ubuntu is one of the best-supported systems for using Docker.
Information
All examples in this book have been tested on the Ubuntu 20.04 operating system.
Installing on a local machine
The Docker installation process is straightforward and is described in detail on its official page: https://docs.docker.com/get-docker/.
Docker Desktop
The simplest way to use Docker in your local environment is to install Docker Desktop. This way, in just a few minutes, you have a complete Docker development environment all set up and running. For Windows and macOS users, Docker Desktop provides a native application that hides all the setup difficulties behind the scenes. Technically, Docker Engine is installed inside a VM because Docker requires the Linux kernel to operate. Nevertheless, as a user, you don't even need to think about this—you install Docker Desktop and you are ready to start using the docker command. You can see an overview of Docker Desktop in the following screenshot:

Figure 2.3 – Docker Desktop
Apart from Docker Engine, Docker Desktop provides a number of additional features, as follows:
- A user interface (UI) to display images, containers, and volumes
- A local Kubernetes cluster
- Automatic Docker updates
- Volume mounting with the local filesystem integration
- (Windows) Support for Windows containers
- (Windows) Integration with Windows Subsystem for Linux (WSL)/WSL version 2 (WSL2)
Note
Please visit https://docs.docker.com/get-docker/ for Docker Desktop installation guides.
Docker for Ubuntu
Visit https://docs.docker.com/engine/install/ubuntu/ to find a guide on how to install Docker on an Ubuntu machine.
In the case of Ubuntu 20.04, I've executed the following commands:
$ sudo apt-get update
$ sudo apt-get -y install ca-certificates curl gnupg lsb-release
$ curl -fsSL https://download.docker.com/linux/ubuntu/gpg | sudo gpg --dearmor -o /usr/share/keyrings/docker-archive-keyring.gpg
$ echo "deb [arch=$(dpkg --print-architecture) signed-by=/usr/share/keyrings/docker-archive-keyring.gpg] https://download.docker.com/linux/ubuntu $(lsb_release -cs) stable" | sudo tee /etc/apt/sources.list.d/docker.list > /dev/null
$ sudo apt-get update
$ sudo apt-get -y install docker-ce docker-ce-cli containerd.io
After all operations are completed, Docker should be installed. However, at the moment, the only user allowed to use Docker commands is root. This means that the sudo keyword must precede every Docker command.
We can enable other users to use Docker by adding them to the docker group, as follows:
$ sudo usermod -aG docker <username>
After a successful logout, everything is set up. With the latest command, however, we need to take some precautions not to give the Docker permissions to an unwanted user and thereby create a vulnerability in the Docker Engine environment. This is particularly important in the case of installation on the server machine.
Docker for other Linux distributions
Docker supports most Linux distributions and architectures. For details, please check the official page at https://docs.docker.com/engine/install/.
Testing the Docker installation
No matter which installation you've chosen (macOS, Windows, Ubuntu, Linux, or something else), Docker should be set up and ready. The best way to test it is to run the docker info command. The output message should be similar to the following:
$ docker info
Containers: 0
Running: 0
Paused: 0
Stopped: 0
Images: 0
…
Installing on a server
In order to use Docker over the network, it's possible to either take advantage of cloud platform providers or manually install Docker on a dedicated server.
In the first case, the Docker configuration differs from one platform to another, but it is always very well described in dedicated tutorials. Most cloud platforms enable Docker hosts to be created through user-friendly web interfaces or describe exact commands to execute on their servers.
The second case (installing Docker manually) does require a few words, however.
Dedicated server
Installing Docker manually on a server does not differ much from the local installation.
Two additional steps are required, which include setting the Docker daemon to listen on the network socket and setting security certificates. These steps are described in more detail here:
- By default, due to security reasons, Docker runs through a non-networked Unix socket that only allows local communication. It's necessary to add listening on the chosen network interface socket so that external clients can connect. In the case of Ubuntu, the Docker daemon is configured by systemd, so, in order to change the configuration of how it's started, we need to modify one line in the /lib/systemd/system/docker.service file, as follows:
ExecStart=/usr/bin/dockerd -H <server_ip>:2375
By changing this line, we enabled access to the Docker daemon through the specified Internet Protocol (IP) address. All the details on the systemd configuration can be found at https://docs.docker.com/config/daemon/systemd/.
- This step of server configuration concerns Docker security certificates. This enables only clients authenticated by a certificate to access the server. A comprehensive description of the Docker certificate configuration can be found at https://docs.docker.com/engine/security/protect-access/. This step isn't strictly required; however, unless your Docker daemon server is inside a firewalled network, it is essential.
Information
If your Docker daemon is run inside a corporate network, you have to configure the HyperText Transfer Protocol (HTTP) proxy. A detailed description can be found at https://docs.docker.com/config/daemon/systemd/.
The Docker environment is set up and ready, so we can start the first example.
Running Docker hello-world
Enter the following command into your console:
$ docker run hello-world
Unable to find image 'hello-world:latest' locally
latest: Pulling from library/hello-world
1b930d010525: Pull complete
Digest: sha256:2557e3c07ed1e38f26e389462d03ed943586f744621577a99efb77324b0fe535
Status: Downloaded newer image for hello-world:latest
Hello from Docker!
This message shows that your installation appears to be working correctly.
...
Congratulations! You've just run your first Docker container. I hope you can already see how simple Docker is. Let's examine what happened under the hood, as follows:
- You ran the Docker client with the run command.
- The Docker client contacted the Docker daemon and asked to create a container from the image called hello-world.
- The Docker daemon checked whether it contained the hello-world image locally and, since it didn't, requested the hello-world image from the remote Docker Hub registry.
- The Docker Hub registry contained the hello-world image, so it was pulled into the Docker daemon.
- The Docker daemon created a new container from the hello-world image that started the executable producing the output.
- The Docker daemon streamed this output to the Docker client.
- The Docker client sent it to your Terminal.
The projected flow is represented in the following diagram:
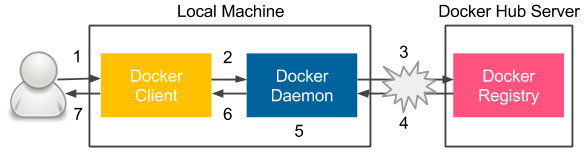
Figure 2.4 – Steps of the docker run command execution
Let's now look at each Docker component that was illustrated in this section.
Docker components
Docker is actually an ecosystem that includes a number of components. Let's describe all of them, starting with a closer look at the Docker client-server architecture.
Docker client and server
Let's look at the following diagram, which presents the Docker Engine architecture:
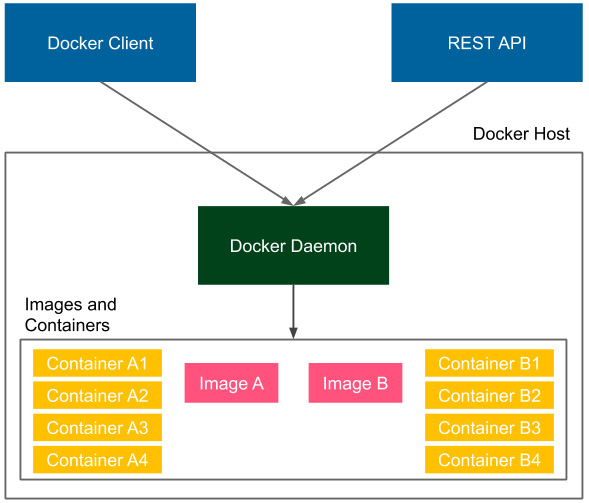
Figure 2.5 – Docker client-server architecture
Docker Engine consists of the following three components:
- A Docker daemon (server) running in the background
- A Docker Client running as a command tool
- A Docker REpresentational State Transfer (REST) application programming interface (API)
Installing Docker means installing all the components so that the Docker daemon runs on our computer all the time as a service. In the case of the hello-world example, we used the Docker client to interact with the Docker daemon; however, we could do exactly the same thing using the REST API. Also, in the case of the hello-world example, we connected to the local Docker daemon. However, we could use the same client to interact with the Docker daemon running on a remote machine.
Tip
To run the Docker container on a remote machine, you can use the -H option: docker -H <server_ip>:2375 run hello-world.
Docker images and containers
An image is a stateless building block in the Docker world. You can think of an image as a collection of all the files necessary to run your application, together with the recipe on how to run it. An image is stateless, so you can send it over the network, store it in the registry, name it, version it, and save it as a file. Images are layered, which means that you can build an image on top of another image.
A container is a running instance of an image. We can create many containers from the same image if we want to have many instances of the same application. Since containers are stateful, this means we can interact with them and make changes to their states.
Let's look at the following example of a container and image layered structure:
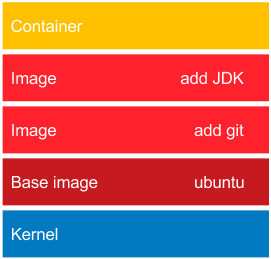
Figure 2.6 – Layered structure of Docker images
At the bottom, there is always the base image. In most cases, this represents an operating system, and we build our images on top of the existing base images. It's technically possible to create your own base images; however, this is rarely needed.
In our example, the ubuntu base image provides all the capabilities of the Ubuntu operating system. The add git image adds the Git toolkit. Then, there is an image that adds the Java Development Kit (JDK) environment. Finally, on the top, there is a container created from the add JDK image. Such a container is able, for example, to download a Java project from the GitHub repository and compile it to a Java ARchive (JAR) file. As a result, we can use this container to compile and run Java projects without installing any tools on our operating system.
It is important to note that layering is a very smart mechanism to save bandwidth and storage. Imagine that we have the following application that is also based on Ubuntu:
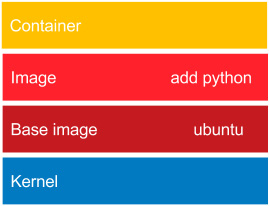
Figure 2.7 – Reusing layers of Docker images
This time, we files will use the Python interpreter. While installing the add python image, the Docker daemon will note that the ubuntu image is already installed, and what it needs to do is only to add the Python layer, which is very small. So, the ubuntu image is a dependency that is reused. The same applies if we would like to deploy our image in the network. When we deploy the Git and JDK application, we need to send the whole ubuntu image. However, while subsequently deploying the Python application, we need to send just the small add python layer.
Now that we understand what the Docker ecosystem consists of, let's describe how we can run applications packaged as Docker images.
Docker applications
A lot of applications are provided in the form of Docker images that can be downloaded from the internet. If we know the image name, it would be enough to run it in the same way we did with the hello-world example. How can we find the desired application image on Docker Hub? Let's take MongoDB as an example. These are the steps we need to follow:
- If we want to find it on Docker Hub, we have two options, as follows:
- Search on the Docker Hub Explore page (https://hub.docker.com/search/).
- Use the docker search command.
In the second case, we can perform the following operation:
$ docker search mongo
NAME DESCRIPTION STARS OFFICIAL AUTOMATED
mongo MongoDB document databases... 8293 [OK]
...
- There are many interesting options. How do we choose the best image? Usually, the most appealing one is the one without any prefix, since it means that it's an official Docker Hub image and should therefore be stable and maintained. The images with prefixes are unofficial, usually maintained as open source projects. In our case, the best choice seems to be mongo, so in order to run the MongoDB server, we can run the following command:
$ docker run mongo
Unable to find image 'mongo:latest' locally
latest: Pulling from library/mongo
7b722c1070cd: Pull complete
...
Digest: sha256:a7c1784c83536a3c686ec6f0a1c570ad5756b94a1183af88c07df82c5b64663c
{"t":{"$date":"2021-11-17T12:23:12.379+00:00"},"s":"I", "c":"CONTROL", "id":23285, "ctx":"-","msg":"Automatically disabling TLS 1.0, to force-enable TLS 1.0 specify --sslDisabledProtocols 'none'"}
...
That's all we need to do. MongoDB has started. Running applications as Docker containers is that simple because we don't need to think of any dependencies; they are all delivered together with the image. Docker can be treated as a useful tool to run applications; however, the real power lies in building your own Docker images that wrap the programs together with the environment.
Information
On the Docker Hub service, you can find a lot of applications; they store millions of different images.
Building Docker images
In this section, we will see how to build Docker images using two different methods: the docker commit command and a Dockerfile automated build.
docker commit
Let's start with an example and prepare an image with the Git and JDK toolkits. We will use Ubuntu 20.04 as a base image. There is no need to create it; most base images are available in the Docker Hub registry. Proceed as follows:
- Run a container from ubuntu:20.04 and connect it to its command line, like this:
$ docker run -i -t ubuntu:20.04 /bin/bash
We've pulled the ubuntu:20.04 image, run it as a container, and then called the /bin/bash command in an interactive way (-i flag). You should see the Terminal of the container. Since containers are stateful and writable, we can do anything we want in its Terminal.
- Install the Git toolkit, as follows:
root@dee2cb192c6c:/# apt-get update
root@dee2cb192c6c:/# apt-get install -y git
- Check whether the Git toolkit is installed by running the following command:
root@dee2cb192c6c:/# which git
/usr/bin/git
- Exit the container, like this:
root@dee2cb192c6c:/# exit
- Check what has changed in the container by comparing its unique container identifier (ID) to the ubuntu image, as follows:
$ docker diff dee2cb192c6c
The preceding command should print a list of all files changed in the container.
- Commit the container to the image, like this:
$ docker commit dee2cb192c6c ubuntu_with_git
We've just created our first Docker image. Let's list all the images of our Docker host to see whether the image is present, as follows:
$ docker images
REPOSITORY TAG IMAGE ID CREATED SIZE
ubuntu_with_git latest f3d674114fe2 About a minute ago 205 MB
ubuntu 20.04 20bb25d32758 7 days ago 87.5 MB
mongo latest 4a3b93a299a7 10 days ago 394 MB
hello-world latest fce289e99eb9 2 weeks ago 1.84 kB
As expected, we see hello-world, mongo (installed before), ubuntu (the base image pulled from Docker Hub), and the freshly built ubuntu_with_git image. By the way, we can observe that the size of each image corresponds to what we've installed on the image.
Now, if we create a container from the image, it will have the Git tool installed, as illustrated in the following code snippet:
$ docker run -i -t ubuntu_with_git /bin/bash
root@3b0d1ff457d4:/# which git
/usr/bin/git
root@3b0d1ff457d4:/# exit
Dockerfile
Creating each Docker image manually with the commit command could be laborious, especially in the case of build automation and the CD process. Luckily, there is a built-in language to specify all the instructions that should be executed to build a Docker image.
Let's start with an example similar to the one with Git. This time, we will prepare an ubuntu_with_python image, as follows:
- Create a new directory and a file called Dockerfile with the following content:
FROM ubuntu:20.04
RUN apt-get update &&
apt-get install -y python
- Run the following command to create an ubuntu_with_python image:
$ docker build -t ubuntu_with_python .
- Check that the image was created by running the following command:
$ docker images
REPOSITORY TAG IMAGE ID CREATED SIZE
ubuntu_with_python latest d6e85f39f5b7 About a minute ago 147 MB
ubuntu_with_git_and_jdk latest 8464dc10abbb 3 minutes ago 580 MB
ubuntu_with_git latest f3d674114fe2 9 minutes ago 205 MB
ubuntu 20.04 20bb25d32758 7 days ago 87.5 MB
mongo latest 4a3b93a299a7 10 days ago 394 MB
hello-world latest fce289e99eb9 2 weeks ago 1.84 kB
We can now create a container from the image and check that the Python interpreter exists in exactly the same way we did after executing the docker commit command. Note that the ubuntu image is listed only once even though it's the base image for both ubuntu_with_git and ubuntu_with_python.
In this example, we used the first two Dockerfile instructions, as outlined here:
- FROM defines an image on top of which the new image will be built
- RUN specifies the commands to run inside the container.
The other widely used instructions are detailed as follows:.
- COPY/ADD copies a file or a directory into the filesystem of the image.
- ENTRYPOINT defines which application should be run in the executable container.
A complete guide of all Dockerfile instructions can be found on the official Docker page at https://docs.docker.com/engine/reference/builder/.
Complete Docker application
We already have all the information necessary to build a fully working application as a Docker image. As an example, we will prepare, step by step, a simple Python hello-world program. The steps are always the same, no matter which environment or programming language we use.
Writing the application
Create a new directory and, inside this directory, create a hello.py file with the following content:
print "Hello World from Python!"
Close the file. This is the source code of our application.
Preparing the environment
Our environment will be expressed in the Dockerfile. We need instructions to define the following:
- Which base image should be used
- How to install the Python interpreter
- How to include hello.py in the image
- How to start the application
In the same directory, create the Dockerfile, like this:
FROM ubuntu:20.04
RUN apt-get update &&
apt-get install -y python
COPY hello.py .
ENTRYPOINT ["python", "hello.py"]
Building the image
Now, we can build the image exactly the same way we did before, as follows:
$ docker build -t hello_world_python .
Running the application
We run the application by running the container, like this:
$ docker run hello_world_python
You should see a friendly Hello World from Python! message. The most interesting thing in this example is that we are able to run the application written in Python without having the Python interpreter installed in our host system. This is possible because the application packed as an image has the environment already included.
Tip
An image with the Python interpreter already exists in the Docker Hub service, so in a real-life scenario, it would be enough to use it.
Environment variables
We've run our first homemade Docker application. However, what if the execution of the application depends on some conditions?
For example, in the case of the production server, we would like to print Hello to the logs, not to the console, or we may want to have different dependent services during the testing phase and the production phase. One solution would be to prepare a separate Dockerfile for each case; however, there is a better way: environment variables.
Let's change our hello-world application to print Hello World from <name_passed_as_environment_variable> !. In order to do this, we need to proceed with the following steps:
- Change the hello.py Python script to use the environment variable, as follows:
import os
print "Hello World from %s !" % os.environ['NAME']
- Build the image, like this:
$ docker build -t hello_world_python_name .
- Run the container passing the environment variable, like this:
$ docker run -e NAME=Rafal hello_world_python_name
Hello World from Rafal !
- Alternatively, we can define an environment variable value in Dockerfile, such as the following:
ENV NAME Rafal
- Run the container without specifying the -e option, as follows:
$ docker build -t hello_world_python_name_default .
$ docker run hello_world_python_name_default
Hello World from Rafal !
Environment variables are especially useful when we need to have different versions of the Docker container depending on its purpose; for example, to have separate profiles for production and testing servers.
Information
If an environment variable is defined both in the Dockerfile and as a flag, then the flag takes precedence.
Docker container states
Every application we've run so far was supposed to do some work and stop—for example, we've printed Hello from Docker! and exited. There are, however, applications that should run continuously, such as services.
To run a container in the background, we can use the -d (--detach) option. Let's try it with the ubuntu image, as follows:
$ docker run -d -t ubuntu:20.04
This command started the Ubuntu container but did not attach the console to it. We can see that it's running by using the following command:
$ docker ps
CONTAINER ID IMAGE COMMAND STATUS PORTS
NAMES
95f29bfbaadc ubuntu:20.04 "/bin/bash" Up 5 seconds kickass_stonebraker
This command prints all containers that are in a running state. What about our old, already exited containers? We can find them by printing all containers, like this:
$ docker ps -a
CONTAINER ID IMAGE COMMAND STATUS PORTS
NAMES
95f29bfbaadc ubuntu:20.04 "/bin/bash" Up 33 seconds kickass_stonebraker
34080d914613 hello_world_python_name_default "python hello.py" Exited lonely_newton
7ba49e8ee677 hello_world_python_name "python hello.py" Exited mad_turing
dd5eb1ed81c3 hello_world_python "python hello.py" Exited thirsty_bardeen
...
Note that all the old containers are in an exited state. There are two more states we haven't observed yet: paused and restarting.
All of the states and the transitions between them are presented in the following diagram:
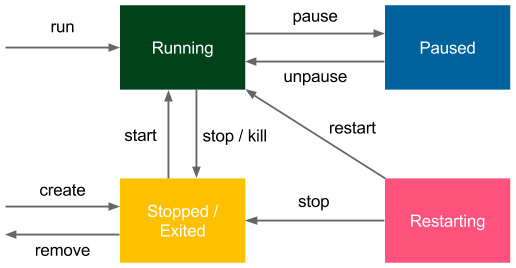
Figure 2.8 – Docker container states
Pausing Docker containers is very rare, and technically, it's done by freezing the processes using the SIGSTOP signal. Restarting is a temporary state when the container is run with the --restart option to define a restarting strategy (the Docker daemon is able to automatically restart the container in case of failure).
The preceding diagram also shows the Docker commands used to change the Docker container state from one state to another.
For example, we can stop running the Ubuntu container, as shown here:
$ docker stop 95f29bfbaadc
$ docker ps
CONTAINER ID IMAGE COMMAND CREATED STATUS PORTS NAMES
Information
We've always used the docker run command to create and start a container. However, it's possible to just create a container without starting it (with docker create).
Having grasped the details of Docker states, let's describe the networking basics within the Docker world.
Docker networking
Most applications these days do not run in isolation; they need to communicate with other systems over the network. If we want to run a website, web service, database, or cache server inside a Docker container, we need to first understand how to run a service and expose its port to other applications.
Running services
Let's start with a simple example and run a Tomcat server directly from Docker Hub, as follows:
$ docker run -d tomcat
Tomcat is a web application server whose UI can be accessed by port 8080. Therefore, if we installed Tomcat on our machine, we could browse it at http://localhost:8080. In our case, however, Tomcat is running inside the Docker container.
We started it the same way we did with the first Hello World example. We can see that it's running, as follows:
$ docker ps
CONTAINER ID IMAGE COMMAND STATUS PORTS NAMES
d51ad8634fac tomcat "catalina.sh run" Up About a minute 8080/tcp jovial_kare
Since it's run as a daemon (with the -d option), we don't see the logs in the console right away. We can, however, access it by executing the following code:
$ docker logs d51ad8634fac
If there are no errors, we should see a lot of logs, which indicates that Tomcat has been started and is accessible through port 8080. We can try going to http://localhost:8080, but we won't be able to connect. This is because Tomcat has been started inside the container and we're trying to reach it from the outside. In other words, we can reach it only if we connect with the command to the console in the container and check it there. How do we make running Tomcat accessible from outside?
We need to start the container, specifying the port mapping with the -p (--publish) flag, as follows:
-p, --publish <host_port>:<container_port>
So, let's first stop the running container and start a new one, like this:
$ docker stop d51ad8634fac
$ docker run -d -p 8080:8080 tomcat
After waiting a few seconds, Tomcat should have started, and we should be able to open its page—http://localhost:8080.
The following screenshot illustrates how Docker container ports are published:
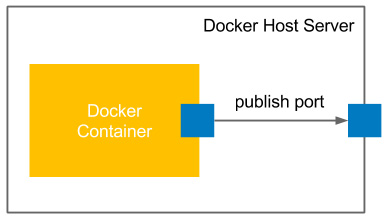
Figure 2.9 – Publishing Docker container ports
Such a simple port mapping command is sufficient in most common Docker use cases. We are able to deploy (micro) services as Docker containers and expose their ports to facilitate communication. However, let's dive a little deeper into what happened under the hood.
Information
Docker also allows us to publish to the specific host network interface with -p <ip>:<host_port>:<container_port>.
Container networks
We have connected to the application that is running inside the container. In fact, the connection is two-way because, if you remember from our previous examples, we executed the apt-get install commands from inside and the packages were downloaded from the internet. How is this possible?
If you check the network interfaces on your machine, you can see that one of the interfaces is called docker0, as illustrated here:
$ ifconfig docker0
docker0 Link encap:Ethernet HWaddr 02:42:db:d0:47:db
inet addr:172.17.0.1 Bcast:0.0.0.0 Mask:255.255.0.0
...
The docker0 interface is created by the Docker daemon in order to connect with the Docker container. Now, we can see which interfaces are created inside the Tomcat Docker container created with the docker inspect command, as follows:
$ docker inspect 03d1e6dc4d9e
This prints all the information about the container configuration in JavaScript Object Notation (JSON) format. Among other things, we can find the part related to the network settings, as illustrated in the following code snippet:
"NetworkSettings": {
"Bridge": "",
"Ports": {
"8080/tcp": [
{
"HostIp": "0.0.0.0",
"HostPort": "8080"
}
]
},
"Gateway": "172.17.0.1",
"IPAddress": "172.17.0.2",
"IPPrefixLen": 16,
}
Information
In order to filter the docker inspect response, we can use the --format option—for example, docker inspect --format '{{ .NetworkSettings.IPAddress }}' <container_id>.
We can observe that the Docker container has an IP address of 172.17.0.2 and it communicates with the Docker host with an IP address of 172.17.0.1. This means that in our previous example, we could access the Tomcat server even without the port forwarding, using http://172.17.0.2:8080. Nevertheless, in most cases, we run the Docker container on a server machine and want to expose it outside, so we need to use the -p option.
Note that, by default, the containers don't open any routes from external systems. We can change this default behavior by playing with the --network flag and setting it as follows:
- bridge (default): Network through the default Docker bridge
- none: No network
- container: Network joined with the other (specified) container
- host: Host's network stack
- NETWORK: User-created network (using the docker network create command)
The different networks can be listed and managed by the docker network command, as follows:
$ docker network ls
NETWORK ID NAME DRIVER SCOPE
b3326cb44121 bridge bridge local
84136027df04 host host local
80c26af0351c none null local
If we specify none as the network, we will not be able to connect to the container, and vice versa; the container has no network access to the external world. The host option makes the container network interfaces (CNIs) identical to the host. They share the same IP addresses, so everything started on the container is visible outside. The most popular option is the default one (bridge) because it lets us define explicitly which ports should be published and is both secure and accessible.
Exposing container ports
We mentioned a few times that the container exposes the port. In fact, if we dig deeper into the Tomcat image on GitHub (https://github.com/docker-library/tomcat), we can see the following line in the Dockerfile:
EXPOSE 8080
This Dockerfile instruction stipulates that port 8080 should be exposed from the container. However, as we have already seen, this doesn't mean that the port is automatically published. The EXPOSE instruction only informs users which ports they should publish.
Automatic port assignment
Let's try to run the second Tomcat container without stopping the first one, as follows:
$ docker run -d -p 8080:8080 tomcat
0835c95538aeca79e0305b5f19a5f96cb00c5d1c50bed87584cfca8ec790f241
docker: Error response from daemon: driver failed programming external connectivity on endpoint distracted_heyrovsky (1b1cee9896ed99b9b804e4c944a3d9544adf72f1ef3f9c9f37bc985e9c30f452): Bind for 0.0.0.0:8080 failed: port is already allocated.
This error may be common. In such cases, we have to either take care of the uniqueness of the ports on our own or let Docker assign the ports automatically using one of the following versions of the publish command:
- -p <container_port>: Publishes the container port to the unused host port
- -p (--publish-all): Publishes all ports exposed by the container to the unused host ports, as follows:
$ docker run -d -P tomcat
078e9d12a1c8724f8aa27510a6390473c1789aa49e7f8b14ddfaaa328c8f737b
$ docker port 078e9d12a1c8
8080/tcp -> 0.0.0.0:32772
We can see that the second Tomcat instance has been published to port 32772, so it can be browsed at http://localhost:32772.
After understanding Docker network basics, let's see how to provide a persistence layer for Docker containers using Docker volumes.
Using Docker volumes
Imagine that you would like to run a database as a container. You can start such a container and enter data. Where is it stored? What happens when you stop the container or remove it? You can start a new one, but the database will be empty again. Unless it's your testing environment, you'd expect to have your data persisted permanently.
A Docker volume is the Docker host's directory mounted inside the container. It allows the container to write to the host's filesystem as if it were writing to its own. The mechanism is presented in the following diagram:
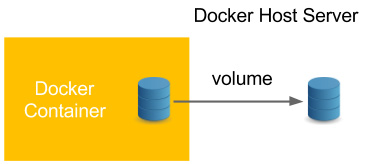
Figure 2.10 – Using a Docker volume
Docker volumes enable the persistence and sharing of a container's data. Volumes also clearly separate the processing from the data. Let's start with the following example:
- Specify a volume with the -v <host_path>:<container_path> option and then connect to the container, as follows:
$ docker run -i -t -v ~/docker_ubuntu:/host_directory ubuntu:20.04 /bin/bash
- Create an empty file in host_directory in the container, like this:
root@01bf73826624:/# touch /host_directory/file.txt
- Check whether the file was created in the Docker host's filesystem by running the following command:
root@01bf73826624:/# exit
exit
$ ls ~/docker_ubuntu/
file.txt
- We can see that the filesystem was shared and the data was therefore persisted permanently. Stop the container and run a new one to see if our file will still be there, as follows:
$ docker run -i -t -v ~/docker_ubuntu:/host_directory ubuntu:20.04 /bin/bash
root@a9e0df194f1f:/# ls /host_directory/
file.txt
root@a9e0df194f1f:/# exit
- Instead of specifying a volume with the -v flag, it's possible to specify it as an instruction in the Dockerfile, as in the following example:
VOLUME /host_directory
In this case, if we run the Docker container without the -v flag, the container's /host_directory path will be mapped into the host's default directory for volumes, /var/lib/docker/vfs/. This is a good solution if you deliver an application as an image and you know it requires permanent storage for some reason (for example, storing application logs).
Information
If a volume is defined both in a Dockerfile and as a flag, the flag command takes precedence.
Docker volumes can be much more complicated, especially in the case of databases. More complex use cases of Docker volumes are, however, outside the scope of this book.
Information
A very common approach to data management with Docker is to introduce an additional layer, in the form of data volume containers. A data volume container is a Docker container whose only purpose is to declare a volume. Then, other containers can use it (with the --volumes-from <container> option) instead of declaring the volume directly. Read more at https://docs.docker.com/storage/volumes/.
After understanding Docker volumes, let's see how we can use names to make working with Docker images/containers more convenient.
Using names in Docker
So far, when we've operated on containers, we've always used autogenerated names. This approach has some advantages, such as the names being unique (no naming conflicts) and automatic (no need to do anything). In many cases, however, it's better to give a user-friendly name to a container or an image.
Naming containers
There are two good reasons to name a container: convenience and the possibility of automation. Let's look at why, as follows:
- Convenience: It's simpler to make any operations on a container when addressing it by name than by checking the hashes or the autogenerated name.
- Automation: Sometimes, we would like to depend on the specific naming of a container.
For example, we would like to have containers that depend on each other and to have one linked to another. Therefore, we need to know their names.
To name a container, we use the --name parameter, as follows:
$ docker run -d --name tomcat tomcat
We can check (with docker ps) that the container has a meaningful name. Also, as a result, any operation can be performed using the container's name, as in the following example:
$ docker logs tomcat
Please note that when a container is named, it does not lose its identity. We can still address the container by its autogenerated hash ID, just as we did before.
Information
A container always has both an ID and a name. It can be addressed by either of them, and both are unique.
Tagging images
Images can be tagged. We already did this when creating our own images—for example, in the case of building the hello_world_python image, as illustrated here:
$ docker build -t hello_world_python .
The -t flag describes the tag of the image. If we don't use it, the image will be built without any tags and, as a result, we would have to address it by its ID (hash) in order to run the container.
The image can have multiple tags, and they should follow this naming convention:
<registry_address>/<image_name>:<version>
A tag consists of the following parts:
- registry_address: IP and port of the registry or the alias name
- image_name: Name of the image that is built—for example, ubuntu
- version: A version of the image in any form—for example, 20.04, 20170310
We will cover Docker registries in Chapter 5, Automated Acceptance Testing. If an image is kept on the official Docker Hub registry, we can skip the registry address. This is why we've run the tomcat image without any prefix. The last version is always tagged as the latest and it can also be skipped, so we've run the tomcat image without any suffix.
Information
Images usually have multiple tags; for example, all these three tags are the same image: ubuntu:18.04, ubuntu:bionic-20190122, and ubuntu:bionic.
Last but not least, we need to learn how to clean up after playing with Docker.
Docker cleanup
Throughout this chapter, we have created a number of containers and images. This is, however, only a small part of what you will see in real-life scenarios. Even when containers are not running, they need to be stored on the Docker host. This can quickly result in exceeding the storage space and stopping the machine. How can we approach this concern?
Cleaning up containers
First, let's look at the containers that are stored on our machine. Here are the steps we need to follow:
- To print all the containers (irrespective of their state), we can use the docker ps -a command, as follows:
$ docker ps -a
CONTAINER ID IMAGE COMMAND STATUS PORTS NAMES
95c2d6c4424e tomcat "catalina.sh run" Up 5 minutes 8080/tcp tomcat
a9e0df194f1f ubuntu:20.04 "/bin/bash" Exited jolly_archimedes
01bf73826624 ubuntu:20.04 "/bin/bash" Exited suspicious_feynman
...
- In order to delete a stopped container, we can use the docker rm command (if a container is running, we need to stop it first), as follows:
$ docker rm 47ba1c0ba90e
- If we want to remove all stopped containers, we can use the following command:
$ docker container prune
- We can also adopt a different approach and ask the container to remove itself as soon as it has stopped by using the --rm flag, as in the following example:
$ docker run --rm hello-world
In most real-life scenarios, we don't use stopped containers, and they are left only for debugging purposes.
Cleaning up images
Cleaning up images is just as important as cleaning up containers. They can occupy a lot of space, especially in the case of the CD process, when each build ends up in a new Docker image. This can quickly result in a no space left on device error. The steps are as outlined here:
- To check all the images in the Docker container, we can use the docker images command, as follows:
$ docker images
REPOSITORY TAG IMAGE ID CREATED SIZE
hello_world_python_name_default latest 9a056ca92841 2 hours ago 202.6 MB
hello_world_python_name latest 72c8c50ffa89 2 hours ago 202.6 MB
...
- To remove an image, we can call the following command:
$ docker rmi 48b5124b2768
- In the case of images, the automatic cleanup process is slightly more complex. Images don't have states, so we cannot ask them to remove themselves when not used. A common strategy would be to set up a cron cleanup job, which removes all old and unused images. We could do this using the following command:
$ docker image prune
Information
If we have containers that use volumes, then, in addition to images and containers, it's worth thinking about cleaning up volumes. The easiest way to do this is to use the docker volume prune command.
With the cleaning up section, we've come to the end of the main Docker description. Now, let's do a short wrap-up and walk through the most important Docker commands.
Tip
Use the docker system prune command to remove all unused containers, images, and networks. Additionally, you can add the –volumes parameter to clean up volumes.
Docker commands overview
All Docker commands can be found by executing the following help command:
$ docker help
To see all the options of any particular Docker command, we can use docker help <command>, as in the following example:
$ docker help run
There is also a very good explanation of all Docker commands on the official Docker page at https://docs.docker.com/engine/reference/commandline/docker/. It's worth reading, or at least skimming, through.
In this chapter, we've covered the most useful commands and their options. As a quick reminder, let's walk through them, as follows:

Summary
In this chapter, we covered the Docker basics, which is enough for building images and running applications as containers. Here are the key takeaways.
The containerization technology addresses the issues of isolation and environment dependencies using Linux kernel features. This is based on a process separation mechanism, so, therefore, no real performance drop is observed. Docker can be installed on most systems but is supported natively only on Linux. Docker allows us to run applications from images available on the internet and to build our own images. An image is an application packed together with all the dependencies.
Docker provides two methods for building images—a Dockerfile or committing a container. In most cases, the first option is used. Docker containers can communicate over the network by publishing the ports they expose. Docker containers can share persistent storage using volumes. For the purpose of convenience, Docker containers should be named, and Docker images should be tagged. In the Docker world, there is a specific convention for how to tag images. Docker images and containers should be cleaned from time to time in order to save on server space and avoid no space left on device errors.
In the next chapter, we will look at the Jenkins configuration and find out how Jenkins can be used in conjunction with Docker.
Exercises
We've covered a lot of material in this chapter. To consolidate what we have learned, we recommend the following two exercises:
- Run CouchDB as a Docker container and publish its port, as follows:
Tip
You can use the docker search command to find the CouchDB image.
- Run the container.
- Publish the CouchDB port.
- Open the browser and check that CouchDB is available.
- Create a Docker image with a REST service, replying Hello World to localhost:8080/hello. Use any language and framework you prefer. Here are the steps you need to follow:
Tip
The easiest way to create a REST service is to use Python with the Flask framework (https://flask.palletsprojects.com/). Note that a lot of web frameworks, by default, start an application only on the localhost interface. In order to publish a port, it's necessary to start it on all interfaces (app.run(host='0.0.0.0') in the case of a Flask framework).
- Create a web service application.
- Create a Dockerfile to install dependencies and libraries.
- Build the image.
- Run the container that is publishing the port.
- Check that it's running correctly by using the browser (or curl).
Questions
To verify the knowledge acquired from this chapter, please answer the following questionsUse L-numbering for this list
- What is the main difference between containerization (such as with Docker) and virtualization (such as with VirtualBox)?
- What are the benefits of providing an application as a Docker image? Name at least two.
- Can the Docker daemon be run natively on Windows and macOS?
- What is the difference between a Docker image and a Docker container?
- What does it mean when saying that Docker images have layers?
- What are two methods of creating a Docker image?
- Which command is used to create a Docker image from a Dockerfile?
- Which command is used to run a Docker container from a Docker image?
- In Docker terminology, what does it mean to publish a port?
- What is a Docker volume?
Further reading
If you're interested in getting a deeper understanding of Docker and related technologies, please have a look at the following resources:
- Docker documentation—Get started: https://docs.docker.com/get-started/
- The Docker Book by James Turnbull: https://dockerbook.com/