
Chapter 5: Automated Acceptance Testing
We've configured the commit phase of the continuous delivery (CD) process and it's now time to address the acceptance testing phase, which is usually the most challenging part. By gradually extending the pipeline, we will see different aspects of a well-executed acceptance testing automation.
This chapter covers the following topics:
- Introducing acceptance testing
- Installing and using the Docker Registry
- Acceptance tests in the Jenkins pipeline
- Writing acceptance tests
Technical requirements
To complete this chapter, you'll need the following software:
- Jenkins
- Docker
- The Java Development Kit (JDK) 8+
All examples and solutions to the exercises can be found at https://github.com/PacktPublishing/Continuous-Delivery-With-Docker-and-Jenkins-3rd-Edition/tree/main/Chapter05.
Code in Action videos for this chapter can be viewed at https://bit.ly/3Ki1alm.
Introducing acceptance testing
Acceptance testing is a step performed to determine whether the business requirements or contracts are met. It involves black-box testing against a complete system from a user perspective, and a positive result means acceptance of the software delivery. Sometimes also called user acceptance testing (UAT) or end-user testing, it is a phase of the development process where software meets a real-world audience.
Many projects rely on manual steps performed by quality assurers (QAs) or users to verify the functional and non-functional requirements (FRs and NFRs), but still, it's way more reasonable to run them as programmed repeatable operations.
Automated acceptance tests, however, can be considered difficult due to their specifics, as outlined here:
- User-facing: They need to be written together with a user, which requires an understanding between two worlds—technical and non-technical.
- Dependencies integration: The tested application should be run together with its dependencies in order to check that the system as a whole works properly.
- Staging environment: The staging (testing) environment needs to be identical to the production one so as to ensure the same functional and non-functional behavior.
- Application identity: Applications should be built only once, and the same binary should be transferred to production. This eliminates the risk of different building environments.
- Relevance and consequences: If the acceptance test passes, it should be clear that the application is ready for release from the user's perspective.
We address all these difficulties in different sections of this chapter. Application identity can be achieved by building the Docker image only once and using Docker Registry for its storage and versioning. Creating tests in a user-facing manner is explained in the Writing acceptance tests section, and the environment identity is addressed by the Docker tool itself and can also be improved by other tools described in the next chapters.
Information
Acceptance testing can have multiple meanings; in this book, we treat acceptance testing as a complete integration test suite from a user perspective, excluding NFRs such as performance, load, and recovery.
Since we understand the goal and meaning of acceptance testing, let's describe the first aspect we need—the Docker Registry.
Installing and using the Docker Registry
The Docker Registry is a store for Docker images. To be precise, it is a stateless server application that allows the images to be published (pushed) and later retrieved (pulled). In Chapter 2, Introducing Docker, we already saw an example of the Registry when running the official Docker images, such as hello-world. We pulled the images from Docker Hub, which is an official cloud-based Docker Registry. Having a separate server to store, load, and search software packages is a more general concept called the software repository or, in even more general terms, the artifact repository. Let's look closer at this idea.
The artifact repository
While the source control management stores the source code, the artifact repository is dedicated to storing software binary artifacts, such as compiled libraries or components, later used to build a complete application. Why do we need to store binaries on a separate server using a separate tool? Here's why:
- File size: Artifact files can be large, so the systems need to be optimized for their download and upload.
- Versions: Each uploaded artifact needs to have a version that makes it easy to browse and use. Not all versions, however, have to be stored forever; for example, if there was a bug detected, we may not be interested in the related artifact and remove it.
- Revision mapping: Each artifact should point to exactly one revision of the source control and, what's more, the binary creation process should be repeatable.
- Packages: Artifacts are stored in a compiled and compressed form so that these time-consuming steps don't need to be repeated.
- Access control: Users can be restricted differently in terms of access to the source code and artifact binary.
- Clients: Users of the artifact repository can be developers outside the team or organization who want to use the library via its public application programming interface (API).
- Use cases: Artifact binaries are used to guarantee that exactly the same build version is deployed to every environment to ease the rollback procedure in case of failure.
Information
The most popular artifact repositories are JFrog Artifactory and Sonatype Nexus.
The artifact repository plays a special role in the CD process because it guarantees that the same binary is used throughout all pipeline steps.
Let's look at the following diagram to understand how it works:
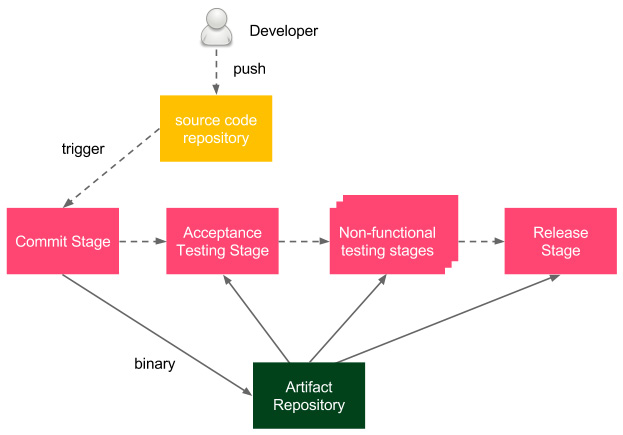
Figure 5.1 – Artifact repository in the CD process
The developer pushes a change to the source code repository, which triggers the pipeline build. As the last step of the commit stage, a binary is created and stored in the artifact repository. Afterward, during all other stages of the delivery process, the same binary is (pulled and) used.
Information
The binary is often called the release candidate, and the process of moving the binary to the next stage is called promotion.
Depending on the programming language and technologies, the binary formats can differ. For example, in the case of Java, Java ARchive (JAR) files are usually stored and, in the case of Ruby, gem files. We work with Docker, so we will store Docker images as artifacts, and the tool to store Docker images is called the Docker Registry.
Information
Some teams maintain two repositories at the same time; the artifact repository for JAR files and the Docker Registry for Docker images. While it may be useful during the first phase of the Docker introduction, there is no good reason to maintain both forever.
Installing a Docker Registry
First, we need to install a Docker Registry. There are a number of options available, but all of them fall into two categories: a cloud-based Docker Registry and a self-hosted Docker Registry. Let's dig into them.
Cloud-based Docker Registry
The benefit of using a cloud-based service is that you don't need to install or maintain anything on your own. There are a number of cloud offerings available; however, Docker Hub is by far the most popular. That is why we will use it throughout this book.
Docker Hub
Docker Hub provides a Docker Registry service and other related features, such as building images, testing them, and pulling code directly from the code repository. Docker Hub is cloud-hosted, so it does not really need any installation process. All you need to do is create a Docker Hub account, as follows:
- Open https://hub.docker.com/ in a browser.
- In Sign Up, fill in the password, email address, and Docker identifier (ID).
- After receiving an email and clicking the activation link, an account is created.
Docker Hub is definitely the simplest option to start with, and it allows the storing of both private and public images.
Docker Hub alternatives
There are more cloud offerings worth mentioning. First of all, each of the following three main cloud platforms offers its own Docker Registry:
- Amazon Elastic Container Registry (ECR)
- Google Artifact Registry
- Azure Container Registry
Other widely used solutions include the following:
- Quay Container Registry
- JFrog Artifactory
- GitLab Container Registry
All of the mentioned registries implement the same Docker Registry protocol, so the good news is that no matter which you choose, the commands used are exactly the same.
Self-hosted Docker Registry
Cloud solutions may not always be acceptable. They are not free for enterprises and, what's even more important, a lot of companies have policies not to store their software outside their own network. In this case, the only option is to install a self-hosted Docker Registry.
The Docker Registry installation process is quick and simple, but making it secure and available in public requires setting up access restrictions and the domain certificate. This is why we split this section into three parts, as follows:
- Installing the Docker Registry application
- Adding a domain certificate
- Adding an access restriction
Let's have a look at each part.
Installing the Docker Registry application
The Docker Registry is available as a Docker image. To start this, we can run the following command:
$ docker run -d -p 5000:5000 --restart=always --name registry registry:2
Tip
By default, the registry data is stored as a Docker volume in the default host filesystem's directory. To change it, you can add -v <host_directory>:/var/lib/registry. Another alternative is to use a volume container.
The command starts the registry and makes it accessible through port 5000. The registry container is started from the registry image (version 2). The --restart=always option causes the container to automatically restart whenever it's down.
Tip
Consider setting up a load balancer and starting a few Docker Registry containers in case of a large number of users. Note that, in such a case, they need to share the storage or have a synchronization mechanism in place.
Adding a domain certificate
If the registry is run on the localhost, then everything works fine and no other installation steps are required. However, in most cases, we want to have a dedicated server for the registry so that the images are widely available. In that case, Docker requires the securing of the registry with Secure Sockets Layer/Transport Layer Security (SSL/TLS). The process is very similar to the public web server configuration and, similarly, it's highly recommended that you have the certificate signed by a certificate authority (CA). If obtaining a CA-signed certificate is not an option, we can self-sign a certificate or use the --insecure-registry flag.
Information
You can read about creating and using self-signed certificates at https://docs.docker.com/registry/insecure/#use-self-signed-certificates.
Once the certificates are either signed by the CA or self-signed, we can move domain.crt and domain.key to the certs directory and start the registry, which listens on the default HyperText Transfer Protocol Secure (HTTPS) port, as follows:
$ docker run -d -p 443:443 --restart=always --name registry -v `pwd`/certs:/certs -e REGISTRY_HTTP_ADDR=0.0.0.0:443 -e REGISTRY_HTTP_TLS_CERTIFICATE=/certs/domain.crt -e REGISTRY_HTTP_TLS_KEY=/certs/domain.key registry:2
Using the --insecure-registry flag is not recommended since it provides no proper CA verification.
Information
Read more about setting up Docker registries and making them secure in the official Docker documentation at https://docs.docker.com/registry/deploying/.
Adding an access restriction
Unless we use the registry inside a highly secure private network, we should configure authentication.
The simplest way to do this is to create a user with a password using the htpasswd tool from the registry image, as follows:
$ mkdir auth
$ docker run --entrypoint htpasswd httpd:2 -Bbn <username> <password> > auth/htpasswd
The command runs the htpasswd tool to create an auth/htpasswd file (with one user inside). Then, we can run the registry with that one user authorized to access it, like this:
$ docker run -d -p 443:443 --restart=always --name registry -v `pwd`/auth:/auth -e "REGISTRY_AUTH=htpasswd" -e "REGISTRY_AUTH_HTPASSWD_REALM=Registry Realm" -e REGISTRY_AUTH_HTPASSWD_PATH=/auth/htpasswd -v `pwd`/certs:/certs -e REGISTRY_HTTP_ADDR=0.0.0.0:443 -e REGISTRY_HTTP_TLS_CERTIFICATE=/certs/domain.crt -e REGISTRY_HTTP_TLS_KEY=/certs/domain.key registry:2
The command, in addition to setting the certificates, creates an access restriction limited to the users specified in the auth/passwords file.
As a result, before using the registry, a client needs to specify the username and password.
Important Note
Access restriction doesn't work in the case of the --insecure-registry flag.
Using the Docker Registry
When our registry is configured, we can show how to work with it in three stages, as follows:
- Building an image
- Pushing the image into the registry
- Pulling the image from the registry
Building an image
Let's use the example from Chapter 2, Introducing Docker, and build an image with Ubuntu and the Python interpreter installed. In a new directory, we need to create a Dockerfile, as follows:
FROM ubuntu:20.04
RUN apt-get update &&
apt-get install -y python
Now, we can build the image with the following command:
$ docker build -t ubuntu_with_python .
After the image is built, we can push it into the Docker Registry.
Pushing the image into the registry
In order to push the created image, we need to tag it according to the naming convention, like this:
<registry_address>/<image_name>:<tag>
The registry_address value can be either of the following:
- A username in the case of Docker Hub
- A domain name or Internet Protocol (IP) address with a port for a private registry (for example, localhost:5000)
Information
In most cases, <tag> is in the form of the image/application version.
Let's tag the image to use Docker Hub, as follows:
$ docker tag ubuntu_with_python leszko/ubuntu_with_python:1
Remember to use your Docker Hub username instead of leszko.
Tip
We could have also tagged the image in the build command, like this: docker build -t leszko/ubuntu_with_python:1.
If the repository has access restriction configured, we need to authorize it first, like this:
$ docker login --username <username> --password <password>
Information
If you use a Docker Registry other than Docker Hub, then you also need to add a Uniform Resource Locator (URL) to the login command—for example, docker login quay.io.
Now, we can store the image in the registry using the push command, as follows:
$ docker push leszko/ubuntu_with_python:1
Note that there is no need to specify the registry address because Docker uses the naming convention to resolve it. The image is stored, and we can check it using the Docker Hub web interface available at https://hub.docker.com.
Pulling the image from the registry
To demonstrate how the registry works, we can remove the image locally and retrieve it from the registry, like this:
$ docker rmi ubuntu_with_python leszko/ubuntu_with_python:1
We can see that the image has been removed using the docker images command. Then, let's retrieve the image back from the registry by executing the following code:
$ docker pull leszko/ubuntu_with_python:1
Tip
If you use a free Docker Hub account, you may need to change the ubuntu_with_python repository to public before pulling it.
We can confirm that the image is back with the docker images command.
When we have the registry configured and understand how it works, we can see how to use it inside the CD pipeline and build the acceptance testing stage.
Acceptance tests in the Jenkins pipeline
We already understand the idea behind acceptance testing and know how to configure the Docker Registry, so we are ready for its first implementation inside the Jenkins pipeline.
Let's look at the following diagram, which presents the process we will use:
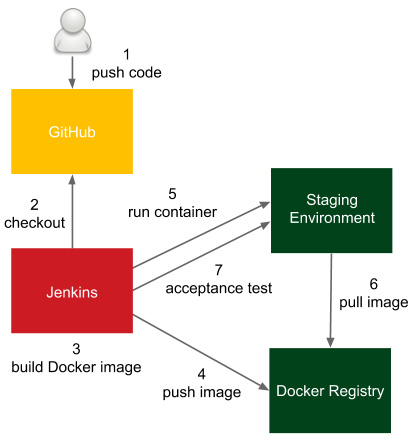
Figure 5.2 – Acceptance tests in the Jenkins pipeline
- The developer pushes a code change to GitHub.
- Jenkins detects the change, triggers the build, and checks out the current code.
- Jenkins executes the commit phase and builds the Docker image.
- Jenkins pushes the image to the Docker Registry.
- Jenkins runs the Docker container in the staging environment.
- The Docker host on the staging environment needs to pull the image from the Docker Registry.
- Jenkins runs the acceptance test suite against the application running in the staging environment.
Information
For the sake of simplicity, we will run the Docker container locally (and not on a separate staging server). In order to run it remotely, we need to use the -H option or configure the DOCKER_HOST environment variable.
Let's continue the pipeline we started in Chapter 4, Continuous Integration Pipeline, and add three more stages, as follows:
- Docker build
- Docker push
- Acceptance test
Keep in mind that you need to have the Docker tool installed on the Jenkins executor (agent or master, in the case of agentless configuration) so that it can build Docker images.
Tip
If you use dynamically provisioned Docker agents, then make sure you use the Docker-in-Docker (DinD) solution. For the sake of simplicity, you can use the leszko/jenkins-docker-slave image. Remember to also mark the privileged option in the Docker agent configuration.
The Docker build stage
We would like to run the calculator project as a Docker container, so we need to create a Dockerfile and add the Docker build stage to the Jenkinsfile.
Adding a Dockerfile
Let's create a Dockerfile in the root directory of the calculator project, as follows:
FROM openjdk:11-jre
COPY build/libs/calculator-0.0.1-SNAPSHOT.jar app.jar
ENTRYPOINT ["java", "-jar", "app.jar"]
Information
The default build directory for Gradle is build/libs/, and calculator-0.0.1-SNAPSHOT.jar is the complete application packaged into one JAR file. Note that Gradle automatically versioned the application using the 0.0.1-SNAPSHOT Maven-style version.
The Dockerfile uses a base image that contains the Java Runtime Environment 11 (JRE 11) (openjdk:11-jre). It also copies the application JAR (created by Gradle) and runs it. Let's now check whether the application builds and runs by executing the following code:
$ ./gradlew build
$ docker build -t calculator .
$ docker run -p 8080:8080 --name calculator calculator
Using the preceding commands, we've built the application, built the Docker image, and run the Docker container. After a while, we should be able to open the browser at http://localhost:8080/sum?a=1&b=2 and see 3 as a result.
We can stop the container and push the Dockerfile to the GitHub repository, like this:
$ git add Dockerfile
$ git commit -m "Add Dockerfile"
$ git push
Adding the Docker build to the pipeline
The final step we need to perform is to add the Docker build stage to the Jenkinsfile. Usually, the JAR packaging is also declared as a separate Package stage, as illustrated in the following code snippet:
stage("Package") {
steps {
sh "./gradlew build"
}
}
stage("Docker build") {
steps {
sh "docker build -t leszko/calculator ."
}
}
Information
We don't explicitly version the image, but each image has a unique hash ID. We will cover explicit versioning in the following chapters.
Note that we used the Docker Registry name in the image tag. There is no need to have the image tagged twice as calculator and leszko/calculator.
When we commit and push the Jenkinsfile, the pipeline build should start automatically and we should see all boxes in green. This means that the Docker image has been built successfully.
Tip
If you see a failure in the Docker build stage, then most probably, your Jenkins executor doesn't have access to the Docker daemon. In case you use the Jenkins master as the executor, make sure that the jenkins user is added to the docker user group. In case you use Jenkins agents, make sure they have access to the Docker daemon.
The Docker push stage
When the image is ready, we can store it in the registry. The Docker push stage is very simple. It's enough to add the following code to the Jenkinsfile:
stage("Docker push") {
steps {
sh "docker push leszko/calculator"
}
}
Information
If the Docker Registry has access restricted, first, we need to log in using the docker login command. Needless to say, the credentials must be well secured—for example, using a dedicated credential store, as described on the official Docker page at https://docs.docker.com/engine/reference/commandline/login/#credentials-store.
As always, pushing changes to the GitHub repository triggers Jenkins to start the build and, after a while, we should have the image automatically stored in the registry.
The acceptance testing stage
To perform acceptance testing, we first need to deploy the application to the staging environment and then run the acceptance test suite against it.
Adding a staging deployment to the pipeline
Let's add a stage to run the calculator container, as follows:
stage("Deploy to staging") {
steps {
sh "docker run -d --rm -p 8765:8080 --name calculator leszko/calculator"
}
}
After running this stage, the calculator container is running as a daemon, publishing its port as 8765, and being removed automatically when stopped.
Finally, we are ready to add the acceptance test to our Jenkins pipeline.
Adding an acceptance test to the pipeline
Acceptance testing usually requires running a dedicated black-box test suite that checks the behavior of the system. We will cover it in the Writing acceptance tests section. At the moment, for the sake of simplicity, let's perform acceptance testing simply by calling the web service endpoint with the curl tool and checking the result using the test command.
In the root directory of the project, let's create an acceptance_test.sh file, as follows:
#!/bin/bash
test $(curl localhost:8765/sum?a=1&b=2) -eq 3
We call the sum endpoint with the a=1 and b=2 parameters and expect to receive 3 in response.
Then, an Acceptance test stage can be added, as follows:
stage("Acceptance test") {
steps {
sleep 60
sh "chmod +x acceptance_test.sh && ./acceptance_test.sh"
}
}
Since the docker run -d command is asynchronous, we need to wait, using the sleep operation to make sure the service is already running.
Information
There is no good way to check whether the service is already running. An alternative to sleeping could be a script checking every second to see whether the service has already started.
At this point, our pipeline has already performed the automated acceptance tests. One last thing we should never forget about is to add a cleanup stage.
Adding a cleanup stage environment
As the final stage of acceptance testing, we can add the staging environment cleanup. The best place to do this is in the post section, to make sure it executes even in case of failure. Here's the code we need to execute:
post {
always {
sh "docker stop calculator"
}
}
This statement makes sure that the calculator container is no longer running on the Docker host.
Writing acceptance tests
So far, we used the curl command to perform a suite of acceptance tests. That is, obviously, a considerable simplification. Technically speaking, if we write a REpresentational State Transfer (REST) web service, we could write all black-box tests as a big script with a number of curl calls. However, this solution would be very difficult to read, understand, and maintain. What's more, the script would be completely incomprehensible to non-technical, business-related users. How do we address this issue and create tests with a good structure that are readable by users and meet their fundamental goal: automatically checking that the system is as expected? I will answer this question throughout this section.
Writing user-facing tests
Acceptance tests are written with users and should be comprehensible to users. This is why the choice of a method for writing them depends on who the customer is.
For example, imagine a purely technical person. If you write a web service that optimizes database storage and your system is used only by other systems and read-only by other developers, your tests can be expressed in the same way as unit tests. As a rule, the test is good if understood by both developers and users.
In real life, most software is written to deliver a specific business value, and that business value is defined by non-developers. Therefore, we need a common language to collaborate. On one side, there is the business, which understands what is needed but not how to do it; on the other side, the development team knows how but doesn't know what. Luckily, there are a number of frameworks that helps to connect these two worlds, such as Cucumber, FitNesse, JBehave, and Capybara. They differ from each other, and each of them may be a subject for a separate book; however, the general idea of writing acceptance tests is the same and is shown in the following diagram:
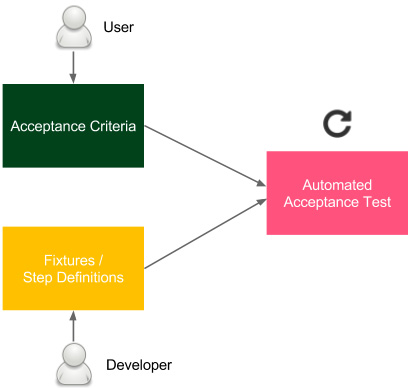
Figure 5.3 – User-facing acceptance tests
The acceptance criteria are written by users (or a product owner as their representative), with the help of developers. They are usually written in the form of the following scenarios:
Given I have two numbers: 1 and 2
When the calculator sums them
Then I receive 3 as a result
Developers write the testing implementation, called fixtures or step definitions, that integrates the human-friendly domain-specific language (DSL) specification with the programming language. As a result, we have an automated test that can be easily integrated into the CD pipeline.
Needless to add, writing acceptance tests is a continuous Agile process, not a Waterfall one. It requires constant collaboration, during which the test specifications are improved and maintained by both developers and the business.
Information
In the case of an application with a user interface (UI), it can be tempting to perform the acceptance test directly through the interface (for example, by recording Selenium scripts). However, this approach, when not done properly, can lead to tests that are slow and tightly coupled to the interface layer.
Let's see how writing acceptance tests looks in practice and how to bind them to the CD pipeline.
Using the acceptance testing framework
Let's use the Cucumber framework and create an acceptance test for the calculator project. As previously described, we will do this in three stages, as follows:
- Creating acceptance criteria
- Creating step definitions
- Running an automated acceptance test
Creating acceptance criteria
Let's put the business specification in src/test/resources/feature/calculator.feature, as follows:
Feature: Calculator
Scenario: Sum two numbers
Given I have two numbers: 1 and 2
When the calculator sums them
Then I receive 3 as a result
This file should be created by users with the help of developers. Note that it is written in a way that non-technical people can understand.
Creating step definitions
The next step is to create Java bindings so that the feature specification will be executable. In order to do this, we create a new file, src/test/java/acceptance/StepDefinitions.java, as follows:
package acceptance;
import io.cucumber.java.en.Given;
import io.cucumber.java.en.Then;
import io.cucumber.java.en.When;
import org.springframework.web.client.RestTemplate;
import static org.junit.Assert.assertEquals;
/** Steps definitions for calculator.feature */
public class StepDefinitions {
private String server = System.getProperty("calculator.url");
private RestTemplate restTemplate = new RestTemplate();
private String a;
private String b;
private String result;
@Given("^I have two numbers: (.*) and (.*)$")
public void i_have_two_numbers(String a, String b) throws Throwable {
this.a = a;
this.b = b;
}
@When("^the calculator sums them$")
public void the_calculator_sums_them() throws Throwable {
String url = String.format("%s/sum?a=%s&b=%s", server, a, b);
result = restTemplate.getForObject(url, String.class);
}
@Then("^I receive (.*) as a result$")
public void i_receive_as_a_result(String expectedResult) throws Throwable {
assertEquals(expectedResult, result);
}
}
Each line (Given, When, and Then) from the feature specification file is matched by regular expressions (regexes) with the corresponding method in the Java code. Wildcards (.*) are passed as parameters. Note that the server address is passed as the calculator.url Java property. The method performs the following actions:
- i_have_two_numbers: Saves parameters as fields
- the_calculator_sums_them: Calls the remote calculator service and stores the result in a field
- i_receive_as_a_result: Asserts that the result is as expected
Running an automated acceptance test
To run an automated test, we need to make a few configurations, as follows:
- Add the Java Cucumber libraries. In the build.gradle file, add the following code to the dependencies section:
testImplementation("io.cucumber:cucumber-java:7.2.0")
testImplementation("io.cucumber:cucumber-junit:7.2.0")
- Add the Gradle target. In the same file, add the following code:
tasks.register('acceptanceTest', Test) {
include '**/acceptance/**'
systemProperties System.getProperties()
}
test {
useJUnitPlatform()
exclude '**/acceptance/**'
}
This splits the tests into unit tests (run with ./gradlew test) and acceptance tests (run with ./gradlew acceptanceTest).
- Add a JUnit Test Runner, add a new file, src/test/java/acceptance/AcceptanceTest.java, as follows:
package acceptance;
import io.cucumber.junit.CucumberOptions;
import io.cucumber.junit.Cucumber;
import org.junit.runner.RunWith;
/** Acceptance Test */
@RunWith(Cucumber.class)
@CucumberOptions(features = "classpath:feature")
public class AcceptanceTest { }
This is the entry point to the acceptance test suite.
After this configuration, if the server is running on the localhost, we can test it by executing the following code:
$ ./gradlew acceptanceTest
-Dcalculator.url=http://localhost:8765
Obviously, we can add this command instead of acceptance_test.sh. This would make the Cucumber acceptance test run in the Jenkins pipeline.
Acceptance test-driven development
Acceptance tests, as with most aspects of the CD process, are less about technology and more about people. The test quality depends, of course, on the engagement of users and developers, but also, what is maybe less intuitive is the time when the tests are created.
The last question to ask is this: During which phase of the software development life cycle should the acceptance tests be prepared? Or, to rephrase it: Should we create acceptance tests before or after writing the code?
Technically speaking, the result is the same; the code is well covered with both unit and acceptance tests. However, it's tempting to consider writing tests first. The idea of test-driven development (TDD) can be well adapted for acceptance testing. If unit tests are written before the code, the resulting code is cleaner and better structured. Analogously, if acceptance tests are written before the system feature, the resulting feature corresponds better to the customer's requirements.
This process, often called acceptance TDD, is presented in the following diagram:
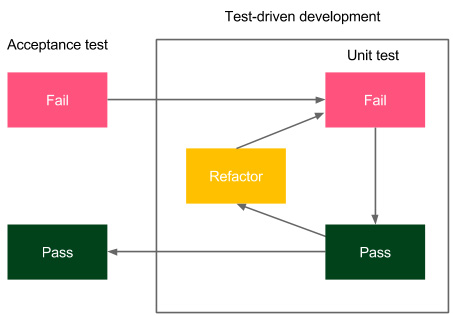
Figure 5.4 – Acceptance TDD
Users (with developers) write the acceptance criteria specification in the human-friendly DSL format. Developers write the fixtures, and the tests fail. Then, feature development starts using the TDD methodology internally. Once the feature is completed, the acceptance test should pass, and this is a sign that the feature is completed.
A very good practice is to attach the Cucumber feature specification to the request ticket in the issue-tracking tool (for example, JIRA) so that the feature would always be requested together with its acceptance test. Some development teams take an even more radical approach and refuse to start the development process if no acceptance tests are prepared. There is a lot of sense in that. After all, how can you develop something that the client can't test?
Summary
In this chapter, you learned how to build a complete and functional acceptance test stage, which is an essential part of the CD process. Here are the key takeaways:
- Acceptance tests can be difficult to create because they combine technical challenges (application dependencies; setting up the environment) with personal challenges (developer/business collaboration).
- Acceptance testing frameworks provide a way to write tests in a human-friendly language that makes them comprehensible to non-technical people.
- The Docker Registry is an artifact repository for Docker images.
- The Docker Registry fits well with the CD process because it provides a way to use exactly the same Docker image throughout the stages and environments.
In the next chapter, we will cover clustering and service dependencies, which is the next step toward creating a complete CD pipeline.
Exercises
We covered a lot of new material throughout this chapter, so to aid your understanding, I recommend doing the following exercises:
- Create a Ruby-based web service, book-library, to store books.
The acceptance criteria are delivered in the form of the following Cucumber feature:
Scenario: Store book in the library
Given Book "The Lord of the Rings" by "J.R.R. Tolkien" with ISBN number "0395974682"
When I store the book in library
Then I am able to retrieve the book by the ISBN number
Proceed as follows:
- Write step definitions for the Cucumber test.
- Write the web service (the simplest way is to use the Sinatra framework (http://www.sinatrarb.com/), but you can also use Ruby on Rails).
- The book should have the following attributes: name, author, and International Standard Book Number (ISBN).
- The web service should have the following endpoints:
- POST /books to add a book
- GET /books/<isbn> to retrieve the book
- The data can be stored in the memory.
- At the end, check that the acceptance test is green.
- Add book-library as a Docker image to the Docker Registry by doing the following:
- Create an account on Docker Hub.
- Create a Dockerfile for the application.
- Build the Docker image and tag it according to the naming convention.
- Push the image to Docker Hub.
- Create a Jenkins pipeline to build the Docker image, push it to the Docker Registry, and perform acceptance testing by doing the following:
- Create a Docker build stage.
- Create Docker login and Docker push stages.
- Add an Acceptance test stage to the pipeline.
- Run the pipeline and observe the result.
Questions
To verify the knowledge acquired from this chapter, please answer the following questions:
- What is the Docker Registry?
- What is Docker Hub?
- What is the convention for naming Docker images (later pushed to the Docker Registry)?
- What is the staging environment?
- Which Docker commands would you use to build an image and push it into Docker Hub?
- What is the main purpose of acceptance testing frameworks such as Cucumber and FitNesse?
- What are the three main parts of a Cucumber test?
- What is acceptance TDD?
Further reading
To learn more about Docker Registry, acceptance testing, and Cucumber, please refer to the following resources:
- Docker Registry documentation: https://docs.docker.com/registry/
- Jez Humble, David Farley—Continuous Delivery: https://continuousdelivery.com/
- Cucumber framework: https://cucumber.io/