
Chapter 8: Continuous Delivery Pipeline
In this chapter, we will focus on the missing parts of the final pipeline, which are the environments and infrastructure, application versioning, and non-functional testing.
We will be covering the following topics:
- Environments and infrastructure
- Non-functional testing
- Application versioning
- Completing the continuous delivery pipeline
Technical requirements
To follow this chapter, you'll need the following:
- A Jenkins instance (with Java 8+, Docker, and kubectl installed on your Jenkins agents)
- A Docker registry (for example, an account on Docker Hub)
- Two Kubernetes clusters
All the examples and solutions for the exercises in this chapter can be found on GitHub at https://github.com/PacktPublishing/Continuous-Delivery-With-Docker-and-Jenkins-3rd-Edition/tree/main/Chapter08.
Code in Action videos for this chapter can be viewed at https://bit.ly/3JeyQ1X.
Environments and infrastructure
So far, we have deployed our applications to some servers – that is, Docker hosts, Kubernetes clusters, and pure Ubuntu servers (in the case of Ansible). However, when we think more deeply about the continuous delivery (CD) process (or the software delivery process in general), we need to logically group our resources. There are two main reasons why this is important:
- The physical location of machines matters
- No testing should be done on the production machines
Taking these facts into consideration, in this section, we will discuss different types of environments, their role in the CD process, and the security aspect of our infrastructure.
Types of environments
There are four common environment types – production, staging, QA (testing), and development. Let's discuss each of them one by one.
Production
The production environment is the environment that is used by the end user. It exists in every company and is the most important environment.
The following diagram shows how most production environments are organized:
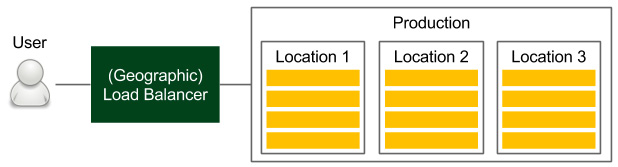
Figure 8.1 – Production environment
Users access the service through the load balancer, which chooses the machine. If the application is released in multiple physical locations, then the (first) device is usually a DNS-based geographic load balancer. In each location, we have a cluster of servers. If we use Docker and Kubernetes, for example, this means that in each location, we have at least one Kubernetes cluster.
The physical location of machines matters because the request-response time can differ significantly, depending on the physical distance. Moreover, the database and other dependent services should be located on a machine that is close to where the service is deployed. What's even more important is that the database should be sharded in a way that minimizes the replication overhead between different locations; otherwise, we may end up waiting for the databases to reach a consensus between their instances, which will be located far away from each other. More details on the physical aspects are beyond the scope of this book, but it's important to remember that Docker and Kubernetes themselves do not solve this problem.
Information
Containerization and virtualization allow you to think about servers as infinite resources; however, some physical aspects such as location are still relevant.
Staging
The staging environment is where the release candidate is deployed to perform the final tests before going live. Ideally, this environment is a mirror of the production environment.
The following diagram shows what such an environment should look like in the context of the delivery process:

Figure 8.2 – Staging environment
Note that the staging environment is a clone of the production environment. If the application is deployed in multiple locations, then the staging environment should also have multiple locations.
In the CD process, all automated acceptance tests (both functional and non-functional) are run against this environment. While most functional tests don't usually require identical production-like infrastructure, in the case of non-functional (especially performance) tests, it is a must.
To save costs, it's not uncommon for the staging infrastructure to differ from the production environment (usually, it contains fewer machines). Such an approach can, however, lead to many production issues. Michael T. Nygard, in Release It! Design and Deploy Production-Ready Software, gives an example of a real-life scenario in which fewer machines were used in the staging environment than in production.
The story goes like this: in one company, the system was stable until a certain code change caused the production environment to become extremely slow, even though all the stress tests were passed. How was this possible? This happened because there was a synchronization point where each server communicated with the others. In the case of the staging environment, there was one server, so there was no blocker. In production, however, there were many servers, which resulted in servers waiting for each other. This example is just the tip of the iceberg, and many production issues may fail to be tested by acceptance tests if the staging environment is different from the production environment.
QA
The QA environment (also called the testing environment) is intended for the QA team to perform exploratory testing and for external applications (that depend on our service) to perform integration testing. The use cases and the infrastructure of the QA environment are shown in the following diagram:
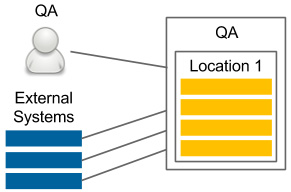
Figure 8.3 – QA environment
While staging does not need to be stable (in the case of CD, it is changed after every code change that's committed to the repository), the QA instance needs to provide a certain amount of stability and expose the same (or backward-compatible) API as the production environment. In contrast to the staging environment, the infrastructure can be different from that of the production environment since its purpose is not to ensure that the release candidate works properly.
A very common case is to allocate fewer machines (for example, only from one location) to the QA instance.
Information
Deploying to the QA environment is usually done in a separate pipeline so that it's independent of the automatic release process. Such an approach is convenient because the QA instance has a different life cycle than the production one (for instance, the QA team may want to perform testing on the experimental code branched from the trunk).
Development
The development environment can be created as a shared server for all developers, or each developer can have a development environment for themselves. The following is a simple diagram of this:
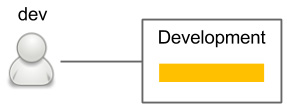
Figure 8.4 – Development environment
The development environment always contains the latest version of the code. It is used to enable integration between developers and can be treated the same way as the QA environment. However, it is used by developers, not QAs.
Now that we've looked at all the environments, let's see how they fit into the CD process.
Environments in continuous delivery
In the CD process, the staging environment is indispensable. In some very rare cases, when performance is not important and the project doesn't have many dependencies, we can perform the acceptance tests on the local (development) Docker host, but that should be an exception, not a rule. In such cases, we always risk some production issues occurring that are related to the environment.
The other environments are usually not important in terms of CD. If we would like to deploy to the QA or development environment with every commit, then we can create separate pipelines for that purpose (being careful not to obscure the main release pipeline). In many cases, deployment to the QA environment is triggered manually since it has a different life cycle from production.
Securing environments
All environments need to be well secured – that's clear. What's even more obvious is that the most important requirement is to keep the production environment secure because our business depends on it, and the consequences of any security flaw can be the most serious.
Information
Security is a broad topic. In this section, we will only focus on the topics related to the CD process. Nevertheless, setting up a complete server infrastructure requires much more security knowledge.
In the CD process, the Jenkins agent must have access to servers so that it can deploy the application.
There are different approaches for providing agents with the server's credentials:
- Put an SSH key in the agent: If we don't use dynamic Docker slave provisioning, then we can configure Jenkins agent machines so that they contain private SSH keys.
- Put an SSH key in the agent image: If we use dynamic Docker slave provisioning, we can add the SSH private key to the Docker agent image; however, this creates a possible security hole since anyone who has access to that image would have access to the production servers.
- Use Jenkins credentials: We can configure Jenkins to store credentials and use them in the pipeline.
- Copy to the slave Jenkins plugin: We can copy the SSH key dynamically into the slave while starting the Jenkins build.
Each solution has some advantages and drawbacks. While using any of them, we have to take extra caution since, when an agent has access to the production environment, anyone breaking into that agent can break into the production environment.
The riskiest solution is to put SSH private keys into the Jenkins agent image since everywhere the image is stored (the Docker registry or Docker host within Jenkins) needs to be well secured.
Now that we've covered the infrastructure, let's look at a topic that we haven't covered yet – non-functional testing.
Non-functional testing
We learned a lot about functional requirements and automated acceptance testing in the previous chapters. But what should we do with non-functional requirements? Or even more challenging, what if there are no requirements? Should we skip them in the CD process? We will answer these questions throughout this section.
Non-functional aspects of the software are always important because they can cause a significant risk to how the system operates.
For example, many applications fail because they are unable to bear the load of a sudden increase in the number of users. In one of his books, Jakob Nielsen writes about the user experience that 1 second is about the limit for the user's flow of thought to stay uninterrupted. Imagine that our system, with its growing load, starts to exceed that limit. Users may stop using the service just because of its performance. Taking this into consideration, non-functional testing is just as important as functional testing.
To cut a long story short, we should always take the following steps for non-functional testing:
- Decide which non-functional aspects are crucial to our business.
- For each of them, we must do the following:
- Specify the tests the same way we did for acceptance testing
- Add a stage to the CD pipeline (after acceptance testing, while the application is still deployed on the staging environment)
- The application comes to the release stage only after all the non-functional tests have passed.
Irrespective of the type of non-functional test, the idea is always the same. The approach, however, may differ slightly. Let's examine different test types and the challenges they pose.
Types of non-functional test
Functional tests are always related to the same aspect – the behavior of the system. In contrast, non-functional tests are concerned with a lot of different aspects. Let's discuss the most common system properties and how they can be tested inside the CD process.
Performance testing
Performance tests are the most widely used non-functional tests. They measure the responsiveness and stability of the system. The simplest performance test we can create is one that sends a request to the web service and measures its round-trip time (RTT).
There are different definitions of performance testing. They are often meant to include load, stress, and scalability testing. Sometimes, they are also described as white-box tests. In this book, we will define performance testing as the most basic form of black-box test to measure the latency of the system.
For performance testing, we can use a dedicated framework (for Java, the most popular is JMeter) or just use the same tool we used for our acceptance tests. A simple performance test is usually added as a pipeline stage, just after the acceptance tests. Such a test should fail if the RTT exceeds the given limit and it detects bugs that slow down our service.
Tip
The JMeter plugin for Jenkins can show performance trends over time.
Load testing
Load tests are used to check how the system functions when there are a lot of concurrent requests. While a system can be very fast with a single request, this doesn't mean that it works fast enough with 1,000 requests being worked on at the same time. During load testing, we measure the average request-response time of many concurrent calls, which are usually performed from many machines. Load testing is a very common QA phase in the release cycle. To automate it, we can use the same tools that we do when conducting a simple performance test; however, in the case of larger systems, we may need a separate client environment to perform a large number of concurrent requests.
Stress testing
Stress testing, also called capacity testing or throughput testing, is a test that determines how many concurrent users can access our service. It may sound the same as load testing, but in the case of load testing, we set the number of concurrent users (throughput) to a given number, check the response time (latency), and make the build fail if that limit is exceeded. During stress testing, however, we keep the latency constant and increase the throughput to discover the maximum number of concurrent calls when the system is still operable. Therefore, the result of a stress test may be a notification that our system can handle 10,000 concurrent users, which helps us prepare for the peak usage time.
Stress testing is not well suited for the CD process because it requires long tests with an increasing number of concurrent requests. It should be prepared as a separate script of a separate Jenkins pipeline and triggered on demand when we know that the code change can cause performance issues.
Scalability testing
Scalability testing explains how latency and throughput change when we add more servers or services. The perfect characteristic would be linear, which means that if we have one server and the average request-response time is 500 ms when it's used by 100 parallel users, then adding another server would keep the response time the same and allow us to add another 100 parallel users. In reality, it's often hard to achieve this because of the need to keep data consistent between servers.
Scalability testing should be automated and provide a graph that shows the relationship between the number of machines and the number of concurrent users. Such data helps determine the limits of the system and the point at which adding more machines doesn't help.
Scalability tests, similar to stress tests, are hard to put into the CD pipeline and should be kept separate.
Soak testing
Soak tests, also called endurance tests or longevity tests, run the system for a long time to see if the performance drops after a certain period. They detect memory leaks and stability issues. Since they require a system to run for a long time, it doesn't make sense to run them inside the CD pipeline.
Security testing
Security testing deals with different aspects related to security mechanisms and data protection. Some security aspects are purely functional requirements, such as authentication, authorization, and role assignment. These elements should be checked the same way as any other functional requirement – during the acceptance test phase. Other security aspects are non-functional; for example, the system should be protected against SQL injection. No client would probably specify such a requirement, but it's implicit.
Security tests should be included in the CD process as a pipeline stage. They can be written using the same frameworks as the acceptance tests or with dedicated security testing frameworks – for example, behavior-driven development (BDD) security.
Information
Security should also always be a part of the explanatory testing process, in which testers and security experts detect security holes and add new testing scenarios.
Maintainability testing
Maintainability tests explain how simple a system is to maintain. In other words, they judge code quality. We have already described stages in the commit phase that check test coverage and perform static code analysis. The Sonar tool can also provide an overview of the code quality and the technical debt.
Recovery testing
Recovery testing is a technique that's used to determine how quickly the system can recover after it's crashed because of a software or hardware failure. The best case would be if the system doesn't fail at all, even if a part of its service is down. Some companies even perform production failures on purpose to check if they can survive a disaster. The most well-known example is Netflix and their Chaos Monkey tool, which randomly terminates instances of the production environment. Such an approach forces engineers to write code that makes systems resilient to failures.
Recovery testing is not part of the CD process, but rather a periodic event that checks its overall health.
Tip
You can read more about Chaos Monkey at https://github.com/Netflix/chaosmonkey.
Many more nonfunctional test types are closer to or further from the code and the CD process. Some of them relate to the law, such as compliance testing, while others are related to documentation or internationalization. There's also usability testing and volume testing (which check whether the system behaves well when it's handling large amounts of data). Most of these tests, however, have no part in the CD process.
Non-functional challenges
Non-functional aspects pose new challenges to software development and delivery. Let's go over some of them now:
- Long test runs: The tests can take a long time to run and may need a special execution environment.
- Incremental nature: It's hard to set the limit value when the test should fail (unless the SLA is well-defined). Even if the edge limit is set, the application would probably incrementally approach the limit. In most cases, no code changes will cause the test to fail.
- Vague requirements: Users usually don't have much input when it comes to non-functional requirements. They may provide some guidelines concerning the request-response time or the number of users; however, they probably won't know much about maintainability, security, or scalability.
- Multiplicity: There are a lot of different non-functional tests and choosing which should be implemented means making some compromises.
The best approach to address non-functional aspects is to perform the following steps:
- Make a list of all the non-functional test types.
- Explicitly cross out the tests you don't need for your system. There may be a lot of reasons you don't need one kind of test, such as the following:
- The service is super small, and a simple performance test is enough.
- The system is internal only and exclusively available for read-only purposes, so it may not need any security checks.
- The system is designed for one machine only and does not need any scaling.
- The cost of creating certain tests is too high.
- Split your tests into two groups:
- Continuous Delivery: It is possible to add it to the pipeline.
- Analysis: It is not possible to add it to the pipeline because of its execution time, nature, or associated cost.
- For the CD group, implement the related pipeline stages.
- For the analysis group, do the following:
- Create automated tests
- Schedule when they should be run
- Schedule meetings to discuss their results and take action
Tip
A very good approach is to have a nightly build with the long tests that don't fit the CD pipeline. Then, it's possible to schedule a weekly meeting to monitor and analyze the trends of system performance.
As we can see, there are many types of non-functional tests, and they pose additional challenges to the delivery process. Nevertheless, for the sake of the stability of our system, these tests should never be skipped. The technical implementation differs based on the test's type, but in most cases, they can be implemented similarly to functional acceptance tests and should be run against the staging environment.
Tip
If you're interested in the topic of non-functional testing, system properties, and system stability, then read the book Release It!, by Michael T. Nygard.
Now that we've discussed the nonfunctional testing, let's look at another aspect that we haven't looked at in too much detail – application versioning.
Application versioning
So far, throughout every Jenkins build, we have created a new Docker image, pushed it into the Docker registry, and used the latest version throughout the process. However, such a solution has at least three disadvantages:
- If, during the Jenkins build, after the acceptance tests, someone pushes a new version of the image, then we can end up releasing the untested version.
- We always push an image that's named in the same way so that, effectively, it is overwritten in the Docker registry.
- It's very hard to manage images without versions just by using their hashed-style IDs.
What is the recommended way of managing Docker image versions alongside the CD process? In this section, we'll look at the different versioning strategies and learn how to create versions in the Jenkins pipeline.
Versioning strategies
There are different ways to version applications.
Let's discuss the most popular solutions that can be applied alongside the CD process (when each commit creates a new version):
- Semantic versioning: The most popular solution is to use sequence-based identifiers (usually in the form of x.y.z). This method requires a commit to be made to the repository by Jenkins to increase the current version number, which is usually stored in the build file. This solution is well supported by Maven, Gradle, and other build tools. The identifier usually consists of three numbers:
- x: This is the major version; the software does not need to be backward compatible when this version is incremented.
- y: This is the minor version; the software needs to be backward compatible when the version is incremented.
- z: This is the build number (also called the patch version); this is sometimes also considered as a backward-and forward-compatible change.
- Timestamp: Using the date and time of the build for the application version is less verbose than sequential numbers, but it's very convenient in the case of the CD process because it does not require Jenkins to commit it back to the repository.
- Hash: A randomly generated hash version shares the benefit of the date-time and is probably the simplest solution possible. The drawback is that it's not possible to look at two versions and tell which is the latest one.
- Mixed: There are many variations of the solutions described earlier – for example, the major and minor versions with the date-time.
All of these solutions can be used alongside the CD process. Semantic versioning, however, requires a commit to be made to the repository from the build execution so that the version is increased in the source code repository.
Information
Maven (and other build tools) popularized version snapshotting, which added a SNAPSHOT suffix to the versions that haven't been released and have been kept just for the development process. Since CD means releasing every change, there are no snapshots.
Now, let's learn how to adapt versioning in the Jenkins pipeline.
Versioning in the Jenkins pipeline
As we mentioned earlier, there are different possibilities when it comes to using software versioning, and each of them can be implemented in Jenkins.
As an example, let's use the date-time.
Information
To use the timestamp information from Jenkins, you need to install the Build Timestamp plugin and set the timestamp format in the Jenkins configuration under Manage Jenkins | Configure System | Build Timestamp. You can set the pattern to, for example, yyyyMMdd-HHmm.
Everywhere we use the Docker image, we need to add the ${BUILD_TIMESTAMP} tag suffix.
For example, the Docker build stage should look like this:
sh "docker build -t leszko/calculator:${BUILD_TIMESTAMP} ."
After making these changes, when we run the Jenkins build, the image should be tagged with the timestamp's version in our Docker registry.
With versioning completed, we are finally ready to complete the CD pipeline.
Completing the continuous delivery pipeline
Now that we've covered Ansible, environments, non-functional testing, and versioning, we are ready to extend the Jenkins pipeline and finalize a simple, but complete, CD pipeline.
Follow these steps:
- Create the inventory of staging and production environments.
- Use version in the Kubernetes deployment.
- Use a remote Kubernetes cluster as the staging environment.
- Update the acceptance tests so that they use the staging Kubernetes cluster.
- Release the application to the production environment.
- Add a smoke test that makes sure the application was released successfully.
Let's start by creating an inventory.
Inventory
We looked at the inventory file in the previous chapter while describing Ansible. To generalize this concept, an inventory contains a list of environments that describe how to access them. In this example, we'll use Kubernetes directly, so the Kubernetes configuration file, which is usually stored in .kube/config, will act as the inventory.
Information
As we explained in the previous chapter, depending on your needs, you may use kubectl directly or via Ansible or Terraform. These approaches are suitable for the CD pipeline.
Let's configure two Kubernetes clusters – staging and production. Your .kube/config file should look similar to the following one:
apiVersion: v1
clusters:
- cluster:
certificate-authority-data: LS0tLS1CR...
server: https://35.238.191.252
name: staging
- cluster:
certificate-authority-data: LS0tLS1CR...
server: https://35.232.61.210
name: production
contexts:
- context:
cluster: staging
user: staging
name: staging
- context:
cluster: production
user: production
name: production
users:
- name: staging
user:
token: eyJhbGciOiJSUzI1NiIsImtpZCI6I...
- name: production
user:
token: eyJ0eXAiOiJKV1QiLCJhbGciOiJSU...
The Kubernetes configuration stores the following information for each cluster:
- cluster: The address of the cluster (Kubernetes master endpoint) and its CA certificate
- context: The binding of the cluster and user
- user: The authorization data to access the Kubernetes cluster
Tip
The simplest way to create two Kubernetes clusters is to use Google Kubernetes Engine (GKE), then configure kubectl using gcloud container clusters get-credentials, and finally rename the cluster context with kubectl config rename-context <original-context-name> staging. Note that you may also need to create a GCP Firewall rule to allow traffic into your Kubernetes nodes.
You also need to make sure that the Kubernetes configuration is available on the Jenkins agent nodes. As we mentioned in the previous sections, think carefully about your security so that no unauthorized persons can access your environments via the Jenkins agent.
Now that we've defined the inventory, we can prepare the Kubernetes deployment configuration so that it can work with application versioning.
Versioning
Kubernetes YAML files are the same as what we defined in the previous chapters. The only difference is that we need to introduce a template variable for the application version. Let's make one change in the deployment.yaml file:
image: leszko/calculator:{{VERSION}}
Then, we can fill the version in Jenkinsfile:
stage("Update version") {
steps {
sh "sed -i 's/{{VERSION}}/${BUILD_TIMESTAMP}/g' deployment.yaml"
}
}
Now, we can change acceptance testing to use the remote staging environment.
The remote staging environment
Depending on our needs, we could test the application by running it on the local Docker host (as we did previously) or using the remote (and clustered) staging environment. The former solution is closer to what happens in production, so it can be considered a better one.
To do this, we need to change the command we use from docker to kubectl. Let's modify the related part of our Jenkinsfile:
stage("Deploy to staging") {
steps {
sh "kubectl config use-context staging"
sh "kubectl apply -f hazelcast.yaml"
sh "kubectl apply -f deployment.yaml"
sh "kubectl apply -f service.yaml"
}
}
First, we switched kubectl to use the staging context. Then, we deployed the Hazelcast server. Finally, we deployed Calculator into the Kubernetes server. At this point, we have a fully functional application in our staging environment. Let's see how we need to modify the acceptance testing stage.
The acceptance testing environment
The Acceptance test stage looks the same as it did in the previous chapter. The only thing we need to change is the IP and port of our service to the one from the remote Kubernetes cluster. As we explained in Chapter 6, Clustering with Kubernetes, the way you should do this depends on your Kubernetes Service type. We used NodePort, so we need to make the following change in Jenkinsfile:
stage("Acceptance test") {
steps {
sleep 60
sh "chmod +x acceptance-test.sh && ./acceptance-test.sh"
}
}
The acceptance-test.sh script should look as follows:
#!/bin/bash
set -x
NODE_IP=$(kubectl get nodes -o jsonpath='{ $.items[0].status.addresses[?
(@.type=="ExternalIP")].address }')
NODE_PORT=$(kubectl get svc calculator-service -o=jsonpath='{.spec.ports[0].nodePort}')
./gradlew acceptanceTest -Dcalculator.url=http://${NODE_IP}:${NODE_PORT}
First, we used sleep to wait for our application to be deployed. Then, using kubectl, we fetched the IP address (NODE_IP) and the port (NODE_PORT) of our service. Finally, we executed the acceptance testing suite.
Tip
If you use Minishift for your Kubernetes cluster, then you can fetch NODE_IP using minishift ip. If you use Docker for Desktop, then your IP will be localhost.
Now that all our tests are in place, it's time to release the application.
Release
The production environment should be as close to the staging environment as possible. The Jenkins stage for the release should also be as close as possible to the Deploy to staging step.
In the simplest scenario, the only difference will be the Kubernetes configuration context and the application configuration (for example, in the case of a Spring Boot application, we would set a different Spring profile, which results in taking a different application.properties file). In our case, there are no application properties, so the only difference is the kubectl context:
stage("Release") {
steps {
sh "kubectl config use-context production"
sh "kubectl apply -f hazelcast.yaml"
sh "kubectl apply -f deployment.yaml"
sh "kubectl apply -f service.yaml"
}
}
Once the release has been done, we may think that everything is complete; however, one stage is missing – smoke testing.
Smoke testing
A smoke test is a very small subset of acceptance tests whose only purpose is to check that the release process is completed successfully; otherwise, we could have a situation where the application is perfectly fine, but where there is an issue in the release process, so we may end up with a non-working production environment.
The smoke test is usually defined in the same way as the acceptance test. So, the Smoke test stage in the pipeline should look like this:
stage("Smoke test") {
steps {
sleep 60
sh "chmod +x smoke-test.sh && ./smoke-test.sh"
}
}
Once everything has been set up, the CD build should run automatically, and the application should be released to production. With that, we have finished analyzing the CD pipeline in its simplest, but fully productive, form.
Complete Jenkinsfile
To summarize, in the past few chapters, we have gone through quite a few stages that have resulted in us creating a complete CD pipeline that can be used in many projects.
The following is the complete Jenkinsfile for the Calculator project:
pipeline {
agent any
triggers {
pollSCM('* * * * *')
}
stages {
stage("Compile") { steps { sh "./gradlew compileJava" } }
stage("Unit test") { steps { sh "./gradlew test" } }
stage("Code coverage") { steps {
sh "./gradlew jacocoTestReport"
sh "./gradlew jacocoTestCoverageVerification"
} }
stage("Static code analysis") { steps {
sh "./gradlew checkstyleMain"
} }
stage("Build") { steps { sh "./gradlew build" } }
stage("Docker build") { steps {
sh "docker build -t leszko/calculator:${BUILD_TIMESTAMP} ."
} }
stage("Docker push") { steps {
sh "docker push leszko/calculator:${BUILD_TIMESTAMP}"
} }
stage("Update version") { steps {
sh "sed -i 's/{{VERSION}}/${BUILD_TIMESTAMP}/g' deployment.yaml"
} }
stage("Deploy to staging") { steps {
sh "kubectl config use-context staging"
sh "kubectl apply -f hazelcast.yaml"
sh "kubectl apply -f deployment.yaml"
sh "kubectl apply -f service.yaml"
} }
stage("Acceptance test") { steps {
sleep 60
sh "chmod +x acceptance-test.sh && ./acceptance-test.sh"
} }
// Performance test stages
stage("Release") { steps {
sh "kubectl config use-context production"
sh "kubectl apply -f hazelcast.yaml"
sh "kubectl apply -f deployment.yaml"
sh "kubectl apply -f service.yaml"
} }
stage("Smoke test") { steps {
sleep 60
sh "chmod +x smoke-test.sh && ./smoke-test.sh"
} }
}
}
The preceding code is a declarative description of the whole CD process, which starts with checking out the code and ends with releasing it to production. Congratulations – with this code, you have completed the main goal of this book, which is to create a CD pipeline!
Summary
In this chapter, we completed the CD pipeline, which means we can finally release the application. The following are the key takeaways from this chapter:
- When it comes to CD, two environments are indispensable: staging and production.
- Non-functional tests are an essential part of the CD process and should always be considered as pipeline stages.
- Non-functional tests that don't fit the CD process should be used as periodic tasks to monitor the overall performance trends.
- Applications should always be versioned; however, the versioning strategy depends on the type of application.
- A minimal CD pipeline can be implemented as a sequence of scripts that ends with two stages: release and smoke test.
- The smoke test should always be added as the last stage of the CD pipeline to check whether the release was successful.
In the next chapter, we will look at some of the advanced aspects of the CD pipeline.
Exercises
In this chapter, we have covered a lot of new aspects of the CD pipeline. To help you understand these concepts, we recommend that you complete the following exercises:
- Add a performance test that tests the hello world service:
- The hello world service can be taken from the previous chapter.
- Create a performance-test.sh script that makes 100 calls and checks whether the average request-response time is less than 1 second.
- You can use Cucumber or the curl command for the script.
- Create a Jenkins pipeline that builds the hello world web service as a versioned Docker image and performs performance tests:
- Create a Docker build (and Docker push) stage that builds the Docker image with the hello world service and adds a timestamp as a version tag.
- Use the Kubernetes deployment from the previous chapters to deploy the application.
- Add the Deploy to staging stage, which deploys the image to the remote machine.
- Add the Performance testing stage, which executes performance-test.sh.
- Run the pipeline and observe the results.
Questions
To check your knowledge of this chapter, answer the following questions:
- Name at least three different types of software environments.
- What is the difference between the staging and QA environments?
- Name at least five types of non-functional tests.
- Should all non-functional tests be part of the CD pipeline?
- Name at least two types of application versioning strategies.
- What is a smoke test?
Further reading
To learn more about the CD pipeline, please refer to the following resources:
- Sameer Paradkar: Mastering Non-Functional Requirements: https://www.packtpub.com/application-development/mastering-non-functional-requirements.
- Sander Rossel: Continuous Integration, Delivery, and Deployment: https://www.packtpub.com/application-development/continuous-integration-delivery-and-deployment.