Chapter 7: Instrumentation Libraries
Understanding the ins and outs of the OpenTelemetry API is quite helpful for manually instrumenting code. But what if we could save ourselves some of that work and still have visibility into what our code is doing? As covered in Chapter 3, Auto-Instrumentation, one of the initial objectives of OpenTelemetry is providing developers with tools to instrument their applications at a minimal cost. Instrumentation libraries combined with auto-instrumentation enable users to start with OpenTelemetry without learning the APIs, and leverage the community's efforts and expertise.
This chapter will investigate the components of auto-instrumentation, how they can be configured, and how they interact with instrumentation libraries. Diving deeper into the implementation details of instrumentation libraries will allow us to understand precisely how telemetry data is produced. Although telemetry created automatically may seem like magic, we'll seek to unveil the mechanics behind this illusion. The chapter covers the following main topics:
- Auto-instrumentation configuration and its components
- The Requests library instrumentor
- Automatic configuration
- Revisiting the grocery store
- The Flask library instrumentor
- Finding instrumentation libraries
With this information, we will revisit some of our existing code in the grocery store to simplify our code and manage and improve the generated telemetry. Along the way, we will look at the specifics of existing third-party libraries supported by the OpenTelemetry project. Let's start with setting up our environment.
Technical requirements
The examples in this chapter are provided in this book's companion repository, found here: https://github.com/PacktPublishing/Cloud-Native-Observability. The source code can be downloaded via git as per the following command:
$ git clone https://github.com/PacktPublishing/Cloud-Native-Observability
$ cd Cloud-Native-Observability/chapter07
The completed examples from this chapter are in the chapter7 directory. If you'd prefer the refactor along, copy the code from chapter6 as a starting point. Next, we'll need to ensure the version of Python on your system is at least 3.6. You can verify it with the following commands:
$ python --version
Python 3.8.9
$ python3 --version
Python 3.8.9
This chapter will use the same opentelemetry-api, opentelemetry-sdk, and opentelemetry-propagator-b3 packages we installed in previous chapters. In addition, we will use the opentelemetry-instrumentation and opentelemetry-distro packages. Install the packages via pip now:
$ pip install opentelemetry-api
opentelemetry-sdk
opentelemetry-instrumentation
opentelemetry-propagator-b3
opentelemetry-distro
We will need to install additional packages libraries used by our applications: the Flask and Requests libraries. Lastly, we will install the instrumentation libraries that automatically instrument the calls for those libraries. The standard naming convention for instrumentation libraries in OpenTelemetry is to prefix the library's name being instrumented with opentelemetry-instrumentation-. Use pip to install those packages now:
$ pip install flask
opentelemetry-instrumentation-flask
requests
opentelemetry-instrumentation-requests
Ensure all the required packages have been installed by looking at the output from pip freeze, which lists all the packages installed:
$ pip freeze | grep opentelemetry
opentelemetry-api==1.9.0
opentelemetry-distro==0.28b0
opentelemetry-instrumentation==0.28b0
opentelemetry-instrumentation-flask==0.28b0
opentelemetry-instrumentation-requests==0.28b0
opentelemetry-instrumentation-wsgi==0.28b0
opentelemetry-propagator-b3==1.9.0
opentelemetry-proto==1.9.0
opentelemetry-sdk==1.9.0
opentelemetry-semantic-conventions==0.28b0
opentelemetry-util-http==0.28b0
Throughout the chapter, we will rely on two scripts made available by the opentelemetry-instrumentation package: opentelemetry-instrument and opentelemetry-bootstrap. Ensure these scripts are available in your path with the following commands:
$ opentelemetry-instrument --help
usage: opentelemetry-instrument [-h]...
$ opentelemetry-bootstrap --help
usage: opentelemetry-bootstrap [-h]...
Now that we have all the packages installed and the code available, let's see how auto-instrumentation works in practice.
Auto-instrumentation configuration
Since auto-instrumentation aims to get started as quickly as possible, let's see how fast we can generate telemetry with as little code as possible. The following code makes a web request to https://www.cloudnativeobservability.com and prints the HTTP response code:
http_request.py
import requests
url = "https://www.cloudnativeobservability.com"
resp = requests.get(url)
print(resp.status_code)
When running the code, assuming network connectivity is available and the URL we're requesting connects us to a server that is operating normally, we should see 200 printed out:
$ python http_request.py
200
Great, the program works; now it's time to instrument it. The following command uses the opentelemetry-instrument application to wrap the application we created. We will look more closely at the command and its options shortly. For now, run the command:
$ opentelemetry-instrument --traces_exporter console
--metrics_exporter console
--logs_exporter console
python http_request.py
If everything went according to plan, we should now see the following output, which contains telemetry:
output
200
{
"name": "HTTP GET",
"context": {
"trace_id": "0x953ca1322b930819077a921a838df0cd",
"span_id": "0x5b3b72c9c836178a",
"trace_state": "[]"
},
"kind": "SpanKind.CLIENT",
"parent_id": null,
"start_time": "2021-11-25T17:38:21.331540Z",
"end_time": "2021-11-25T17:38:22.033434Z",
"status": {
"status_code": "UNSET"
},
"attributes": {
"http.method": "GET",
"http.url": "https://www.cloudnativeobservability.com",
"http.status_code": 200
},
"events": [],
"links": [],
"resource": {
"telemetry.sdk.language": "python",
"telemetry.sdk.name": "opentelemetry",
"telemetry.sdk.version": "1.9.0",
"telemetry.auto.version": "0.28b0",
"service.name": "unknown_service"
}
}
Okay, that's exciting, but what just happened? Figure 7.1 shows how the opentelemetry-instrument command is instrumenting the code for our web request by doing the following:
- Loading the configuration options defined by the OpenTelemetryDistro class, which is part of the opentelemetry-distro package.
- Automatically configuring the telemetry pipelines for traces, metrics, and logs via OpenTelemetryConfigurator. The details of how this configuration is set will become clearer shortly.
- Iterating through instrumentor classes registered via entry points in the Python environment under opentelemetry_instrumentor to find available instrumentation libraries. In doing so, it finds and loads the RequestsInstrumentor class defined in the opentelemetry-instrumentation-requests package.
- With the instrumentation library loaded, the call to get is now processed by the requests instrumentation library, which creates a span before calling the original get method.
The preceding steps are depicted in the following diagram:

Figure 7.1 – opentelemetry-instrument
The configuration of the telemetry pipeline involves a few different mechanisms loaded via entry points at various times before the application code is executed. Thinking back to Chapter 3, Auto-Instrumentation, we introduced entry points (https://packaging.python.org/specifications/entry-points/) as a mechanism that allows Python packages to register classes or methods globally. The combination of entry points, interfaces, and options to choose from can make the configuration process a bit complex to understand.
OpenTelemetry distribution
The first step in the configuration process is loading classes registered under the opentelemetry_distro entry point. This entry point is reserved for classes adhering to the BaseDistro interface, and its purpose is to allow implementors to set configuration options at the earliest possible time. The term distro is short for distribution, a concept that is still being officially defined in OpenTelemetry. Essentially, a distro is a way for users to customize OpenTelemetry to fit their needs, allowing them to reduce the complexity of deploying and using OpenTelemetry. For example, the default configuration for OpenTelemetry Python is to configure an OpenTelemetry protocol exporter for all signals. This is accomplished via the OpenTelemetryDistro class mentioned previously. The following code shows us how the OpenTelemetryDistro class configures the default exporter by setting environment variables:
OpenTelemetryDistro class
class OpenTelemetryDistro(BaseDistro):
"""
The OpenTelemetry provided Distro configures a default
configuration out of the box.
"""
def _configure(self, **kwargs):
os.environ.setdefault(OTEL_TRACES_EXPORTER, "otlp_proto_grpc")
os.environ.setdefault(OTEL_METRICS_EXPORTER, "otlp_proto_grpc")
os.environ.setdefault(OTEL_LOGS_EXPORTER, "otlp_proto_grpc")
As a user, you could create your distribution to preconfigure all the specific parameters needed to tailor auto-instrumentation for your environment: for example, protocol, destination, and transport options. A list of open source examples extending the BaseDistro interface can be found here: https://github.com/PacktPublishing/Cloud-Native-Observability/tree/main/chapter7#opentelemetry-distro-implementations. With those options configured, you can then provide an entry point to your implementation of the BaseDistro interface, package it up, and add this new package as a dependency in your applications. Therefore, the distribution makes deploying a consistent configuration across a distributed system easier.
OpenTelemetry configurator
The next piece of the configuration puzzle is what is currently known in OpenTelemetry Python as the configurator. The purpose of the configurator is to load all the components defined in the configuration specified by the distro. Another way is to think of the distro as the co-pilot, deciding where the car needs to go, and the configurator as the driver. The configurator is an extensible and declarative interface for configuring OpenTelemetry. It is loaded by auto-instrumentation via, and you may have guessed it, an entry point. The opentelemetry_configurator entry point is reserved for classes adhering to the _BaseConfigurator interface, whose sole purpose is to prepare the logs, metrics, and traces pipelines to produce telemetry.
Important Note
As you may have noticed, the _BaseConfigurator class is preceded by an underscore. This is done intentionally for classes that are not officially part of the supported OpenTelemetry API in Python and warrant extra caution. Methods and classes that are not supported formally can and often do change with new releases.
The implementation of the _BaseConfigurator interface loaded in the previous example, the OpenTelemetryConfigurator class configures a telemetry pipeline for each signal using components from the standard opentelemetry-sdk package. As a user, this configurator is precisely what you want most of the time. However, if a user wishes to provide an alternative SDK, it would be possible to provide their configurator implementation to use this SDK instead.
This covers the two main entry points used by auto-instrumentation. We will continue discussing additional entry points throughout this chapter. As a reference, the following table captures the entry points used by OpenTelemetry Python along with the interface each entry point expects. The table also shows us a brief description of what each entry point is used for:

Figure 7.2 – Entry points used in OpenTelemetry Python
Similar to OpenTelemetryDistro, the OpenTelemetryConfigurator class and its parent use environment variables to achieve its goal of configuring OpenTelemetry for the end use.
Environment variables
To provide additional flexibility to users, OpenTelemetry supports the configuration of many of its components across all languages via environment variables. These variables are defined in the OpenTelemetry specification, ensuring each compliant language implementation understands them. This allows users to re-use the same configuration options across any language they choose. I recommend reading the complete list of options available in the specification repository found here: https://github.com/open-telemetry/opentelemetry-specification/blob/main/specification/sdk-environment-variables.md.
We will look more closely at specific variables as we refactor the grocery store further in this chapter. Many, but not all, of the environment variables used by auto-instrumentation are part of the specification linked previously. This is because the implementation details of each language may require additional variables not relevant to others. Language-specific environment variables are supported in the following format:
OTEL_{LANGUAGE}_{FEATURE}
As we'll see shortly, Python-specific options are prefixed with OTEL_PYTHON_. Any option with this prefix will only be found in Python, and the naming convention helps set that expectation with users.
Command-line options
The last tool available to configure OpenTelemetry without editing the application code is the use of command-line arguments, which can be set when invoking opentelemetry-instrument. Recall the command we used to call in the earlier example:
$ opentelemetry-instrument --traces_exporter console
--metrics_exporter console
--logs_exporter console
python http_request.py
This command used command-line arguments to override the traces, metrics, and logs exporters to use the console exporter instead of the configured default. All options available via command line can be listed using the --help flag when invoking opentelemetry-instrument. These options are the same as those available through environment variables, with a slightly easier name for convenience. The name of the command-line argument is the name of the environment variable in lowercase without the OTEL_ or OTEL_PYTHON prefix. The following table shows a few examples:

Figure 7.3 – Environment variable to command-line argument translations
With that, we've covered how auto-instrumentation configures OpenTelemetry to generate the telemetry we saw. But what about the instrumented call? Let's see how the Requests library instrumentation works.
Requests library instrumentor
The Instrumentor interface provides instrumentation libraries with the minimum requirements a library must provide to support auto-instrumentation. Implementors must provide an implementation for _instrument and _uninstrument, that's all. The instrumentation implementation details vary from one library to another depending on whether the library offers any event or callback mechanisms for instrumentation. In the case of the Requests library, the opentelemetry-instrumentation-requests library relies on monkey patching the Session.request and Session.send methods from the requests library. This instrumentation library does the following:
- Provides a wrapper method for the library calls that it instruments, and intercepts calls through those wrappers
- Upon invocation, creates a new span by calling the start_as_current_span method of the OpenTelemetry API, ensuring the span name follows semantic conventions
- Injects the context information into the request headers via the context API's attach method to ensure the tracing data is propagated to the request's destination
- Reads the response and sets the status code accordingly via the span's set_status method
Important Note
Instrumentation libraries must check if the span will be recorded before adding additional attributes to avoid potentially costly operations. This is done to minimize the instrumentation's impact on existing applications when it is not in use.
Additional implementation details can be found in the opentelemetry-python-contrib repository: https://github.com/open-telemetry/opentelemetry-python-contrib/blob/main/instrumentation/opentelemetry-instrumentation-requests/src/opentelemetry/instrumentation/requests/__init__.py. The code may inspire you to write and contribute an instrumentation library of your own.
Additional configuration options
The Requests instrumentation library supports the following additional configurable options:
- span_callback: A callback mechanism to inject additional information into a span is available via this parameter. For example, this allows users to inject additional information from the response into the span.
- name_callback: The default name of a span created by the requests instrumentation library is in the HTTP {method} format. The name_callback parameter allows users to customize the name of the span as needed.
- excluded_urls: There are HTTP destinations for which capturing telemetry may not be desirable, a typical case being requests made to a health check endpoint. The excluded_urls parameter supports configuring a comma-separated list of URLs exempt from telemetry. This parameter is also configurable via the OTEL_PYTHON_REQUESTS_EXCLUDED_URLS environment variable and is available for use with auto-instrumentation.
As you may have noted by reading the description of each configuration option, not all these options are available for configuration via auto-instrumentation. It's possible to use instrumentation libraries without auto-instrumentation. Let's see how.
Manual invocation
The following code updates the previous example to configure a tracer and instrument the requests.get call via the instrumentation library:
http_request.py
import requests
from opentelemetry import trace
from opentelemetry.sdk.trace import TracerProvider
from opentelemetry.sdk.trace.export import (
BatchSpanProcessor,
ConsoleSpanExporter,
)
from opentelemetry.instrumentation.requests import RequestsInstrumentor
def configure_tracer():
exporter = ConsoleSpanExporter()
span_processor = BatchSpanProcessor(exporter)
provider = TracerProvider()
provider.add_span_processor(span_processor)
trace.set_tracer_provider(provider)
configure_tracer()
RequestsInstrumentor().instrument()
url = "https://www.cloudnativeobservability.com"
resp = requests.get(url)
print(resp.status_code)
This is quite a bit of additional code. Since we're no longer relying on auto-instrumentation, we must configure the tracing pipeline manually. Running this code without invoking opentelemetry-instrument looks like this:
$ python http_request.py
This should yield very similar telemetry to what we saw earlier. The following shows an excerpt of that output:
output
200
{
"name": "HTTP GET",
"context": {
"trace_id": "0xc2ee1f399911a10d361231a46c6fec1b",
...
We can further customize the telemetry produced by configuring additional options we discussed previously. The following code example will customize the name of the span and add other attributes to the data generated. It does so by doing the following:
- Adding a rename_span method to replace the HTTP prefix in the name
- Adding the add_response_attribute method to append header information from the response object as a span attribute
- Updating the call to instrument to utilize the new functionality
http_request.py
def rename_span(method, url):
return f"Web Request {method}"
def add_response_attributes(span, response):
span.set_attribute("http.response.headers", str(response.headers))
configure_tracer()
RequestsInstrumentor().instrument(
name_callback=rename_span,
span_callback=add_response_attributes,
)
Running the updated code should give us the slightly updated telemetry as per the following abbreviated sample output:
output
200
{
"name": "Web Request GET",
"attributes": {
"http.method": "GET",
"http.url": "https://www.cloudnativeobservability.com",
"http.status_code": 200,
"http.response.headers": "{'Connection': 'keep-alive', 'Content-Length': '1864', 'Server': 'GitHub.com'
...
With this, we've now seen how to leverage the Requests instrumentation library without using auto-instrumentation. The added flexibility of the features not available through auto-instrumentation is nice, but configuring pipelines is tedious. Thankfully, it's possible to get the best of both worlds by using auto-instrumentation and configuring the instrumentor manually. Update the example to remove all the configuration code. The following is all that should be left:
http_request.py
import requests
from opentelemetry.instrumentation.requests import RequestsInstrumentor
def rename_span(method, url):
return f"Web Request {method}"
def add_response_attributes(span, response):
span.set_attribute("http.response.headers", str(response.headers))
RequestsInstrumentor().instrument(
name_callback=rename_span,
span_callback=add_response_attributes,
)
resp = requests.get("https://www.cloudnativeobservability.com")
print(resp.status_code)
Run the new code via the following command we used earlier in the chapter:
$ opentelemetry-instrument --traces_exporter console
--metrics_exporter console
--logs_exporter console
python http_request.py
Looking at the output, it's clear that something didn't go as planned. The following warning appears at the top of the output:
Attempting to instrument while already instrumented
Additionally, if you look through the telemetry generated, the span name is back to its original value, and the response headers attribute is missing. Recall that the opentelemetry-instrument script iterates through all the installed instrumentors before calling the application code. This means that by the time our application code is executed, the Request instrumentor has already instrumented the Requests library.
Double instrumentation
Many instrumentation libraries have a safeguard in place to prevent double instrumentation. Double instrumentation in most cases would mean that every piece of telemetry generated is recorded twice. This causes all sorts of problems, from potential added performance costs to making telemetry analysis difficult.
We can ensure that the library isn't instrumented first to mitigate this issue. Add the following method call to your code:
http_request.py
import requests
from opentelemetry.instrumentation.requests import RequestsInstrumentor
...
RequestsInstrumentor().uninstrument()
RequestsInstrumentor().instrument(
name_callback=rename_span,
span_callback=add_response_attributes,
)
Running this code once more shows us that the warning is gone and that the telemetry contains the customization we expected. All this with much simpler code. Great! Let's see now how we can apply this to the grocery store.
Automatic configuration
We added new instrumentation in the past three chapters and watched how we could generate more information each time we instrumented the code. We will now see how we can continue to provide the same level of telemetry but simplify our lives by removing some of the code. The first code we will be removing is the configuration code we extracted into the common.py module. If you recall from previous chapters, the purpose of the configure_tracer, configure_meter, and configure_logger methods, which we will review in detail shortly, is to do the following:
- Configure the emitter of telemetry.
- Configure the destination and mechanism to output the telemetry.
- Add resource information to identify our service.
As we saw earlier in this chapter, the opentelemetry-instrument script enables us to remove the code doing the configuration by interpreting environment variables or command-line arguments that will do the same thing. We will review the configuration code for each signal and look at the flags that can be used to replace the code with environment variables. One of the configurations common to all signals is the resource information; let's start there.
Configuring resource attributes
A resource provides information about the source of the telemetry. If you look through the common.py code, you may recall that each method used to configure a signal also called methods to configure the resource. The code looks something like the following:
common.py
local_resource = LocalMachineResourceDetector().detect()
resource = local_resource.merge(
Resource.create(
{
ResourceAttributes.SERVICE_NAME: name,
ResourceAttributes.SERVICE_VERSION: version,
}
)
)
The code uses a resource detector to fill in the hostname and IP address automatically. A current limitation of auto-instrumentation in Python is the lack of support for configuring resource detectors. Thankfully, since the functionality of our resource detector is somewhat limited, it's possible to replace it, as we'll see shortly.
The code also adds a service name and version information to our resource. Resource attributes can be configured for auto-instrumentation through one of the following options:

Figure 7.4 – Resource configuration
Note that the command-line arguments are shown here for reference only. For the remainder of the chapter, the commands used to run applications will use environment variables. The format of the parameters used for both methods is interchangeable. However, the OpenTelemetry specification only officially supports environment variables. These are consistent across implementations.
The following shows how using only environment variables to configure resources can produce the same result as the previous code. The example uses the hostname system utility to retrieve the name of the current host and ipconfig to retrieve the IP address. The invocation for these tools may vary depending on your system:
$ OTEL_RESOURCE_ATTRIBUTES="service.name=chap7-Requests-app,
service.version=0.1.2,
net.host.name='hostname',
net.host.ip='ipconfig getifaddr en0'"
opentelemetry-instrument --traces_exporter console
--metrics_exporter console
--logs_exporter console
python http_request.py
The resource information in the output from this command now includes the following details:
output
"resource": {
"telemetry.sdk.language": "python",
"telemetry.sdk.name": "opentelemetry",
"telemetry.sdk.version": "1.9.0",
"service.name": "chap7-Requests-app",
"service.version": "0.1.2",
"net.host.name": "cloud",
"net.host.ip": "10.0.0.141",
"telemetry.auto.version": "0.28b0"
}
We can now start configuring signals with resource attributes out of the way.
Configuring traces
The following code shows the configure_tracer method used to configure the tracing pipeline. Note that the code no longer contains resource configuration as we've already taken care of that:
common.py
def configure_tracer(name, version):
exporter = ConsoleSpanExporter()
span_processor = BatchSpanProcessor(exporter)
provider = TracerProvider()
provider.add_span_processor(span_processor)
trace.set_tracer_provider(provider)
return trace.get_tracer(name, version)
The main components to configure for tracing to emit telemetry are as follows:
- TracerProvider
- SpanProcessor
- SpanExporter
It's possible to set both TracerProvider and SpanExporter via environment variables. This is not the case for SpanProcessor. The OpenTelemetry SDK for Python defaults to using BatchSpanProcessor when auto-instrumentation is used in combination with the opentelemetry-distro package. Options for configuring BatchSpanProcessor are available via environment variables.
Important Note
BatchSpanProcessor will satisfy most use cases. However, if your application requires an alternative SpanProcessor implementation, it can be specified via a custom OpenTelemetry distribution package. Custom span processors can filter or enhance data before it is exported.
Another component we haven't talked about much yet is the sampler, which we'll cover in Chapter 12, Sampling. For now, it's enough to know that the sampler is also configurable via environment variables.
The following table shows the options for configuring the tracing pipeline. The acronym BSP stands for BatchSpanProcessor:

Figure 7.5 – Tracing configuration
As we continue adding configuration options, the command used to launch the application can get quite unruly. To alleviate this, I recommend exporting each variable as we go along. The following exports the OTEL_RESOURCE_ATTRIBUTES variable we previously set:
$ export OTEL_RESOURCE_ATTRIBUTES="service.name=chap7-Requests-app, service.version=0.1.2, net.host.name='hostname', net.host.ip='ipconfig getifaddr en0'"
We've already configured the exporter via command-line arguments in previous examples. The following shows us configuring the exporter and provider via environment variables. The console and sdk strings correspond to the name of the entry point for the ConsoleSpanExporter and the OpenTelemetry SDK TracerProvider classes:
$ OTEL_TRACES_EXPORTER=console
OTEL_PYTHON_TRACER_PROVIDER=sdk
opentelemetry-instrument --metrics_exporter console
--logs_exporter console
python http_request.py
Reading the output from the previous command is uneventful as it is just setting the same configuration in another way. However, we can now move on to metrics with this configuration in place.
Configuring metrics
The configuration for metrics is similar to the configuration for tracing, as we can see from the following code for the configure_meter method:
common.py
def configure_meter(name, version):
exporter = ConsoleMetricExporter()
provider = MeterProvider()
set_meter_provider(provider)
return get_meter_provider().get_meter(
name=name,
version=version,
)
At the time of writing, the specification for metrics is reaching stability. As such, the support for auto-instrumentation and configuration will likely solidify over the coming months. For now, this section will focus on the options that are available and not likely to change, which covers the following:
- MeterProvider
- MetricExporter
The following table shows the options available to configure the metrics pipeline:

Figure 7.6 – Metrics configuration
The following command is provided as a reference for configuring MeterProvider and MetricsExporter via environment variables:
$ OTEL_METRICS_EXPORTER=console
OTEL_PYTHON_METER_PROVIDER=sdk
opentelemetry-instrument --logs_exporter console
python http_request.py
Note that running the previous command as is results in an error as it does not configure the tracing signal. Any signal not explicitly configured defaults to using the OpenTelemetry Protocol (OTLP) exporter, which we've not installed in this environment. As the application does not currently produce metrics, we wouldn't expect to see any changes in the telemetry emitted.
Configuring logs
The configure_logger method configures the following OpenTelemetry components:
- LogEmitterProvider
- LogProcessor
- LogExporter
common.py
def configure_logger(name, version):
provider = LogEmitterProvider()
set_log_emitter_provider(provider)
exporter = ConsoleLogExporter()
provider.add_log_processor(BatchLogProcessor(exporter))
logger = logging.getLogger(name)
logger.setLevel(logging.DEBUG)
handler = OTLPHandler()
logger.addHandler(handler)
return logger
As with metrics, the configuration and auto-instrumentation for the logging signal are still currently under development. The following table can be used as a reference for the environment variables and command-line arguments available to configure logging at the time of writing:

Figure 7.7 – Logging configuration
As with the tracing configuration's span processor, there isn't currently a mechanism for configuring the log processor via auto-instrumentation. This can change in the future. Using those options, we know how to configure the last signal for auto-instrumentation:
$ OTEL_LOGS_EXPORTER=console
OTEL_PYTHON_LOG_EMITTER_PROVIDER=sdk
opentelemetry-instrument python http_request.py
We're almost ready to revisit the grocery store code with the signals and resources configured. The last thing left to configure is propagation.
Configuring propagation
Context propagation provides the ability to share context information across distributed systems. This can be accomplished via various mechanisms, as we discovered in Chapter 4, Distributed Tracing – Tracing Code Execution. To ensure applications can interoperate with any of the propagation formats, OpenTelemetry supports configuring propagators via the following environment variable:

Figure 7.8 – Propagator configuration
Later in this chapter, an application will need to configure the B3 and TraceContext propagators. OpenTelemetry makes it possible to configure multiple propagators by specifying a comma-separated list. As mentioned earlier, with so many configuration options, using environment variables can become hard to manage. An effort is underway to add support for configuration files to OpenTelemetry, but the timeline on when that will be available is still in flux.
Recall the code we instrumented in the last three chapters. Let's go through it now and leverage configuration and the instrumentation libraries wherever possible.
Revisiting the grocery store
It's finally time to use all this new knowledge about auto-instrumentation to clean up the grocery store application. This section will showcase the simplified code that continues to produce the telemetry we've come to expect over the last few chapters. The custom decorators have been removed, as has the code configuring the tracer provider, meter provider, and log emitter provider. All we're left with now is the application code.
Legacy inventory
The legacy inventory service is a great place to start. It is a small Flask application with a single endpoint. The Flask instrumentor, installed at the beginning of the chapter via the opentelemetry-instrumentation-flask package, will replace the manual instrumentation code we previously added. The following code instantiates the Flask app and provides the /inventory endpoint:
legacy_inventory.py
#!/usr/bin/env python3
from flask import Flask, jsonify
app = Flask(__name__)
@app.route("/inventory")
def inventory():
products = [
{"name": "oranges", "quantity": "10"},
{"name": "apples", "quantity": "20"},
]
return jsonify(products)
if __name__ == "__main__":
app.run(port=5001)
If you remember from previous chapters, this service was configured to use the B3 format propagator. This will be reflected in the configuration options we pass in when starting the service via auto-instrumentation:
$ OTEL_RESOURCE_ATTRIBUTES="service.name=legacy-inventory,
service.version=0.9.1,
net.host.name='hostname',
net.host.ip='ipconfig getifaddr en0'"
OTEL_TRACES_EXPORTER=console
OTEL_PYTHON_TRACER_PROVIDER=sdk
OTEL_METRICS_EXPORTER=console
OTEL_PYTHON_METER_PROVIDER=sdk
OTEL_LOGS_EXPORTER=console
OTEL_PYTHON_LOG_EMITTER_PROVIDER=sdk
OTEL_PROPAGATORS=b3
opentelemetry-instrument python legacy_inventory.py
With this service running, let's look at the next one.
Grocery store
The next service to revisit is the grocery store. This service is also a Flask application and will leverage the same instrumentation library. In addition, it will use the Requests instrumentor to add telemetry to the calls it makes to the legacy inventory. The code looks like this:
grocery_store.py
#!/usr/bin/env python3
from logging.config import dictConfig
import requests
from flask import Flask
from opentelemetry.instrumentation.wsgi import OpenTelemetryMiddleware
dictConfig(
{
"version": 1,
"handlers": {
"otlp": {
"class": "opentelemetry.sdk._logs.OTLPHandler",
}
},
"root": {"level": "DEBUG", "handlers": ["otlp"]},
}
)
app = Flask(__name__)
app.wsgi_app = OpenTelemetryMiddleware(app.wsgi_app)
@app.route("/")
def welcome():
return "Welcome to the grocery store!"
@app.route("/products")
def products():
url = "http://localhost:5001/inventory"
resp = requests.get(url)
return resp.text
if __name__ == "__main__":
app.run(port=5000)
Running the application will look very similar to running the legacy inventory with only a few different parameters:
- service.name and service.version will be updated to reflect the different applications.
- The propagators will be configured to use both B3 and TraceContext formats, making it possible for context to be propagated from the shopper through to the legacy inventory.
In a separate terminal window, with the legacy inventory service still running, run the following to start the grocery store:
$ OTEL_RESOURCE_ATTRIBUTES="service.name=grocery-store,
service.version=0.1.2,
net.host.name='hostname',
net.host.ip='ipconfig getifaddr en0'"
OTEL_TRACES_EXPORTER=console
OTEL_PYTHON_TRACER_PROVIDER=sdk
OTEL_METRICS_EXPORTER=console
OTEL_PYTHON_METER_PROVIDER=sdk
OTEL_LOGS_EXPORTER=console
OTEL_PYTHON_LOG_EMITTER_PROVIDER=sdk
OTEL_PROPAGATORS=b3,tracecontext
opentelemetry-instrument python grocery_store.py
The grocery store is up and running. Now we just need to generate some requests via the shopper service.
Shopper
Finally, the shopper application initiates the request through the system. The RequestsInstrumentor instruments web requests to the grocery store. Of course, the backend requests don't tell the whole story about what goes on inside the shopper application.
As discussed in Chapter 3, Auto-Instrumentation, auto-instrumentation can be pretty valuable. In rare cases, it can even be enough to cover most of the functionality within an application. Applications focused on Create, Read, Update, and Delete operations (https://en.wikipedia.org/wiki/CRUD) may not contain enough business logic to warrant manual instrumentation. Operators of applications relying heavily on instrumented libraries may also gain enough visibility from auto-instrumentation.
However, you'll want to add additional details about your code in most scenarios. For those cases, it's crucial to combine auto-instrumentation with manual instrumentation. Such is the case for the last application in our system. The following code shows us the simplified version of the shopper service. As you can see from the code, there is still manual instrumentation code, but no configuration to be seen, as this is all managed by auto-instrumentation. Additionally, you'll note that the get call from the requests module no longer requires manual instrumentation:
shopper.py
#!/usr/bin/env python3
import logging
import requests
from opentelemetry import trace
from opentelemetry.sdk._logs import OTLPHandler
tracer = trace.get_tracer("shopper", "0.1.2")
logger = logging.getLogger("shopper")
logger.setLevel(logging.DEBUG)
logger.addHandler(OTLPHandler())
@tracer.start_as_current_span("add item to cart")
def add_item_to_cart(item, quantity):
span = trace.get_current_span()
span.set_attributes(
{
"item": item,
"quantity": quantity,
}
)
logger.info("add {} to cart".format(item))
@tracer.start_as_current_span("browse")
def browse():
resp = requests.get("http://localhost:5000/products")
add_item_to_cart("orange", 5)
@tracer.start_as_current_span("visit store")
def visit_store():
browse()
if __name__ == "__main__":
visit_store()
It's time to generate some telemetry! Open a third terminal and launch the shopper application with the following command:
$ OTEL_RESOURCE_ATTRIBUTES="service.name=shopper,
service.version=0.1.3,
net.host.name='hostname',
net.host.ip='ipconfig getifaddr en0'"
OTEL_TRACES_EXPORTER=console
OTEL_PYTHON_TRACER_PROVIDER=sdk
OTEL_METRICS_EXPORTER=console
OTEL_PYTHON_METER_PROVIDER=sdk
OTEL_LOGS_EXPORTER=console
OTEL_PYTHON_LOG_EMITTER_PROVIDER=sdk
opentelemetry-instrument python shopper.py
This command should have generated telemetry from all three applications visible in the individual terminal windows.
Important note
Since the metrics and logging signals are under active development, the instrumentation libraries we use in this chapter only support tracing. Therefore, we will focus on the tracing data being emitted for the time being. It's possible that by the time you're reading this, those libraries also emit logs and metrics.
We will not go through it in detail since the tracing data being emitted is similar to the data we've already inspected for the grocery store. Looking through the distributed trace generated, we can see the following:
- Spans generated for each application; the service.name and service.version resource attributes should reflect this.
- The trace ID has been propagated correctly across application boundaries. Check the trace_id field across all three terminals to confirm.
- The Requests and Flask instrumentation libraries have automatically populated attributes.
The following diagram offers a visualization of the spans generated across the system. Spans are identified as having been automatically generated (A) or manually generated (M).
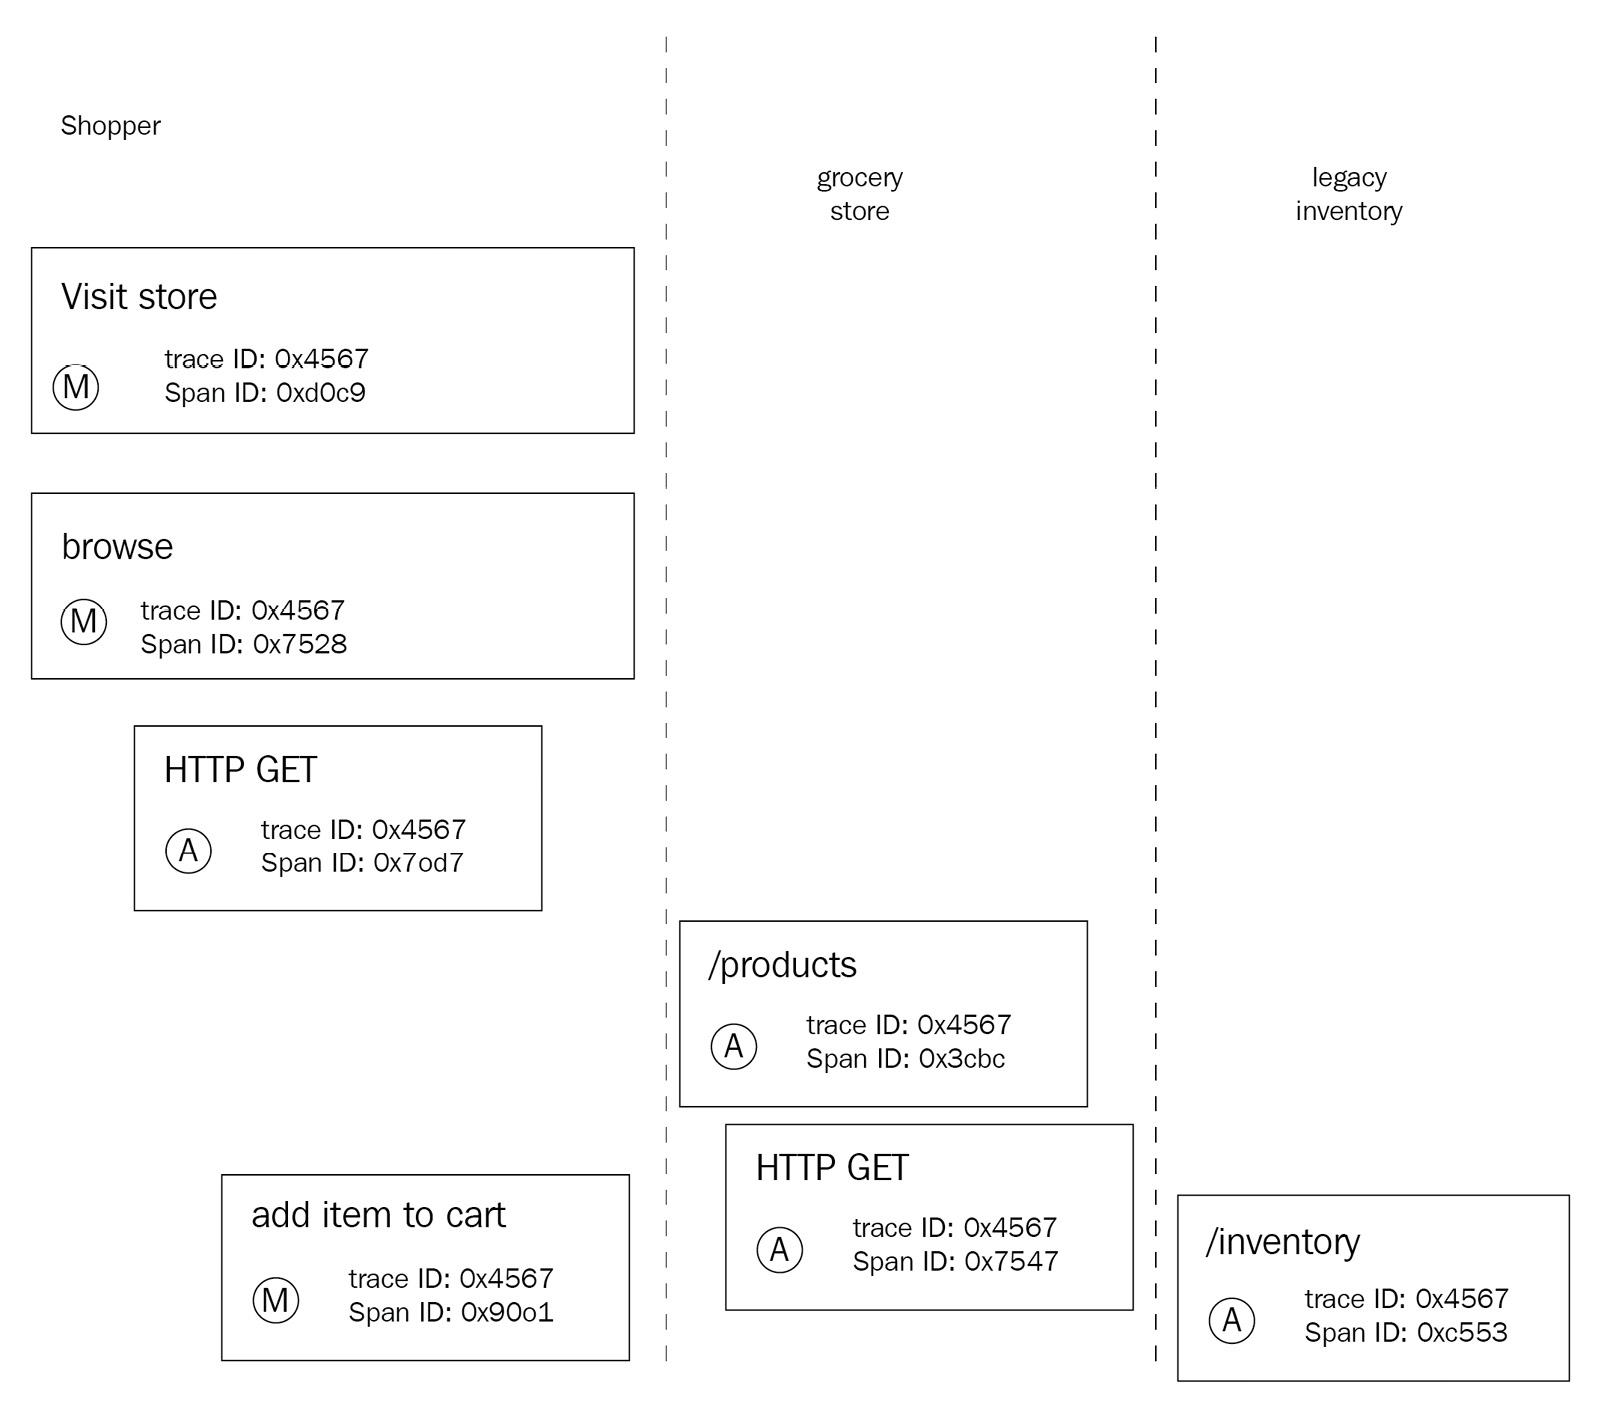
Figure 7.9 – Tracing information generated
This is one of the most exciting aspects of OpenTelemetry. We have telemetry generated by two applications that contain no instrumentation code. The developers of those applications don't need to learn about OpenTelemetry for their applications to produce information about their service, which can be helpful to diagnose issues in the future. Getting started has never been easier. Let's take a quick look at how the Flask instrumentation works.
Flask library instrumentor
Like the Requests library, the Flask instrumentation library contains an implementation of the BaseInstrumentor interface. The code is available in the OpenTelemetry Python contrib repository at https://github.com/open-telemetry/opentelemetry-python-contrib/blob/main/instrumentation/opentelemetry-instrumentation-flask/src/opentelemetry/instrumentation/flask/__init__.py. The implementation leverages a few different aspects of the Flask library to achieve instrumentation. It wraps the original Flask app and registers a callback via the before_request method. It then provides a middleware to execute instrumentation code at response time. This allows the instrumentation to capture the beginning and the end of requests through the library.
Additional configuration options
The following options are available to configure FlaskInstrumentor further:
- excluded_urls: Supports a comma-separated list of regular expressions for excluding specific URLs from producing telemetry. This option is also configurable with auto-instrumentation via the OTEL_PYTHON_FLASK_EXCLUDED_URLS environment variable.
- request_hook: A method to be executed before every Request received by the Flask application.
- response_hook: Similar to the request_hook argument, the response_hook allows a user to configure a method to be performed before a response is returned to the caller.
Important Note
When using the Flask instrumentation library with auto-instrumentation, it's essential to know that the debug mode may cause issues. By default, the debug mode uses a reloader, which causes the auto-instrumentation to fail. For more information on disabling the reloader, see the OpenTelemetry Python documentation: https://opentelemetry-python.readthedocs.io/en/latest/examples/auto-instrumentation/README.html#instrumentation-while-debugging.
The Requests and Flask instrumentation libraries are just two of many instrumentation libraries available for Python developers.
Finding instrumentation libraries
A challenge with instrumentation libraries is keeping track of which libraries are available across different languages. The libraries available for Python currently live in the opentelemetry-collector-contrib repository (https://github.com/open-telemetry/opentelemetry-python-contrib), but that may not always be the case.
OpenTelemetry registry
The official OpenTelemetry website provides a searchable registry (https://opentelemetry.io/registry/) that includes packages across languages. This information for this registry is stored in a GitHub repository, which can be updated via pull Requests.
opentelemetry-bootstrap
To make getting started even more accessible, the OpenTelemetry Python community maintains the opentelemetry-bootstrap tool, installed via the opentelemetry-instrumentation package. This tool looks at all installed packages in an environment and lists instrumentation libraries for that environment. It's possible to use the command also to install instrumentation libraries. The following command shows us how to use opentelemetry-bootstrap to list packages:
$ opentelemetry-bootstrap
opentelemetry-instrumentation-logging==0.28b0
opentelemetry-instrumentation-urllib==0.28b0
opentelemetry-instrumentation-wsgi==0.28b0
opentelemetry-instrumentation-flask==0.28b0
opentelemetry-instrumentation-jinja2==0.28b0
opentelemetry-instrumentation-requests==0.28b0
opentelemetry-instrumentation-urllib3==0.28b0
Looking through that list, there are a few additional packages that we may want to install now that we know about them. Conveniently, the -a install option installs all the listed packages.
Summary
Instrumentation libraries for third-party libraries are an excellent way for users to use OpenTelemetry with little to no effort. Additionally, instrumentation libraries don't require users to wait for third-party libraries to support OpenTelemetry directly. This helps reduce the burden on the maintainers of those third-party libraries by not asking them to support APIs, which are still evolving.
This chapter allowed us to understand how auto-instrumentation leverages instrumentation libraries to simplify the user experience of adopting OpenTelemetry. By inspecting all the components that combine to make it possible to simplify the code needed to configure telemetry pipelines, we were able to produce telemetry with little to no instrumentation code.
Revisiting the grocery store then allowed us to compare the telemetry generated by auto-instrumented code with manual instrumentation. Along the way, we took a closer look at how different instrumentations are implemented and their configurable options.
Although instrumentation libraries make it possible for users to start using OpenTelemetry today, they require the installation of another library within environments, taking on additional dependencies. As instrumentation libraries have only just started maturing, this may cause users to hesitate to adopt them. Ideally, as OpenTelemetry adoption increases and its API reaches stability across signals, third-party library maintainers will start instrumenting the libraries themselves with OpenTelemetry, removing the need for an additional library. This has already begun with some frameworks, such as Spring in Java and .NET Core libraries.
With the knowledge of OpenTelemetry signals, instrumentation libraries, and auto-instrumentation in our toolbelt, we will now focus on what to do with the telemetry data we're producing. The following few chapters will focus on collecting, transmitting, and analyzing OpenTelemetry data. First, all this data must go somewhere, and the OpenTelemetry Collector is a perfect destination. This will be the topic of the next chapter.