
4. Control Statements: Part 1
Objectives
In this chapter you’ll learn:
![]() To use the
To use the if and if...else selection statements to choose among alternative actions.
![]() To use the
To use the while repetition statement to execute statements in a program repeatedly.
![]() Counter-controlled repetition and sentinel-controlled repetition.
Counter-controlled repetition and sentinel-controlled repetition.
![]() To use the increment, decrement and assignment operators.
To use the increment, decrement and assignment operators.
Let’s all move one place on.
—Lewis Carroll
The wheel is come full circle.
—William Shakespeare
How many apples fell on Newton’s head before he took the hint!
—Robert Frost
All the evolution we know of proceeds from the vague to the definite.
—Charles Sanders Peirce
Outline
In this chapter, we introduce C++’s if, if...else and while statements, three of the building blocks that allow you to specify the logic required for member functions to perform their tasks. We devote a portion of this chapter (and Chapters 5 and 7) to further developing the GradeBook class introduced in Chapter 3. In particular, we add a member function to the GradeBook class that uses control statements to calculate the average of a set of student grades. Another example demonstrates additional ways to combine control statements to solve a similar problem. We introduce C++’s assignment operators and explore C++’s increment and decrement operators. These additional operators abbreviate and simplify many program statements.
Böhm and Jacopini’s research1 demonstrated that all programs could be written in terms of only three control structures, namely, the sequence structure, the selection structure and the repetition structure. The term “control structures” comes from the field of computer science. When we introduce C++’s implementations of control structures, we’ll refer to them in the terminology of the C++ standard document2 as “control statements.”
The sequence structure is built into C++. Unless directed otherwise, C++ statements execute one after the other in the order in which they are written—that is, in sequence. The Unified Modeling Language (UML) activity diagram of Fig. 4.1 illustrates a typical sequence structure in which two calculations are performed in order. C++ allows us to have as many actions as we want in a sequence structure. As we’ll soon see, anywhere a single action may be placed, we may place several actions in sequence.

In this figure, the two statements involve adding a grade to a total variable and adding 1 to a counter variable. Such statements might appear in a program that averages several student grades. To calculate an average, the total of the grades is divided by the number of grades. A counter variable would be used to keep track of the number of values being averaged. You’ll see similar statements in the program of Section 4.6.
Activity diagrams are part of the UML. An activity diagram models the workflow (also called the activity) of a portion of a software system. Such workflows may include a portion of an algorithm, such as the sequence structure in Fig. 4.1. Activity diagrams are composed of special-purpose symbols, such as action state symbols (a rectangle with its left and right sides replaced with arcs curving outward), diamonds and small circles; these symbols are connected by transition arrows, which represent the flow of the activity. Activity diagrams help you develop and represent algorithms. As you’ll see, activity diagrams clearly show how control structures operate.
Consider the sequence-structure activity diagram of Fig. 4.1. It contains two action states that represent actions to perform. Each action state contains an action expression—e.g., “add grade to total” or “add 1 to counter”—that specifies a particular action to perform. Other actions might include calculations or input/output operations. The arrows in the activity diagram are called transition arrows. These arrows represent transitions, which indicate the order in which the actions represented by the action states occur—the program that implements the activities illustrated by the activity diagram in Fig. 4.1 first adds grade to total, then adds 1 to counter.
The solid circle located at the top of the activity diagram represents the activity’s initial state—the beginning of the workflow before the program performs the modeled activities. The solid circle surrounded by a hollow circle that appears at the bottom of the activity diagram represents the final state—the end of the workflow after the program performs its activities.
Figure 4.1 also includes rectangles with the upper-right corners folded over. These are called notes in the UML. Notes are explanatory remarks that describe the purpose of symbols in the diagram. Notes can be used in any UML diagram—not just activity diagrams. Figure 4.1 uses UML notes to show the C++ code associated with each action state in the activity diagram. A dotted line connects each note with the element that the note describes. Activity diagrams normally do not show the C++ code that implements the activity. We use notes for this purpose here to illustrate how the diagram relates to C++ code. For more information on the UML, see our optional case study, which appears in the Software Engineering Case Study sections at the ends of Chapters 1–7, 9 and 13, or visit www.uml.org.
C++ provides three types of selection statements (discussed in this chapter and Chapter 5). The if selection statement either performs (selects) an action if a condition (predicate) is true or skips the action if the condition is false. The if...else selection statement performs an action if a condition is true or performs a different action if the condition is false. The switch selection statement (Chapter 5) performs one of many different actions, depending on the value of an integer expression.
The if selection statement is a single-selection statement because it selects or ignores a single action (or, as we’ll soon see, a single group of actions). The if...else statement is called a double-selection statement because it selects between two different actions (or groups of actions). The switch selection statement is called a multiple-selection statement because it selects among many different actions (or groups of actions).
C++ provides three types of repetition statements that enable programs to perform statements repeatedly as long as a condition remains true. The repetition statements are the while, do...while and for statements. (Chapter 5 presents the do...while and for statements.) The while and for statements perform the action (or group of actions) in their bodies zero or more times—if the loop-continuation condition is initially false, the action (or group of actions) will not execute. The do...while statement performs the action (or group of actions) in its body at least once.
Each of the words if, else, switch, while, do and for is a C++ keyword. These words are reserved by the C++ programming language to implement various features, such as C++’s control statements. Keywords must not be used as identifiers, such as variable names. Figure 4.2 provides a complete list of C++ keywords.
Fig. 4.2 C++ keywords.
|
C++ Keywords |
||||
|---|---|---|---|---|
|
Keywords common to the C and C++ programming languages |
||||
|
|
|
|
|
|
|
|
|
|
|
|
|
|
|
|
|
|
|
|
|
|
|
|
|
|
|
|
|
|
|
|
|
|
|
|
|
|
|
|||
|
C++-only keywords |
||||
|
|
|
|
|
|
|
|
|
|
|
|
|
|
|
|
|
|
|
|
|
|
|
|
|
|
|
|
|
|
|
|
|
|
|
|
|
|
|
|
|
|
|
|
|
|
|
|
|
|
|
|||
C++ has only three kinds of control structures, which from this point forward we refer to as control statements: the sequence statement, selection statements (three types—if, if...else and switch) and repetition statements (three types—while, for and do...while). As with the sequence statement of Fig. 4.1, we can model each control statement as an activity diagram. Each diagram contains an initial state and a final state, which represent a control statement’s entry point and exit point, respectively. These single-entry/single-exit control statements are attached to one another by connecting the exit point of one to the entry point of the next. We call this control-statement stacking. There is only one other way to connect control statements—called control-statement nesting, in which one control statement is contained inside another.
Software Engineering Observation 4.1
Any C++ program we’ll ever build can be constructed from only seven different types of control statements (sequence, if, if...else, switch, while, do...while and for) combined in only two ways (control-statement stacking and control-statement nesting). This is the essence of simplicity.
Programs use selection statements to choose among alternative courses of action. For example, suppose the passing grade on an exam is 60. The statement
if ( grade >= 60 )
cout << "Passed";
determines whether the condition grade >= 60 is true or false. If it is true, "Passed" is printed and the next statement in order is performed. If the condition is false, the printing is ignored and the next statement in order is performed. Note that the second line of this selection statement is indented. Such indentation is optional, but recommended.
Figure 4.3 illustrates the single-selection if statement. It contains what is perhaps the most important symbol in an activity diagram—the diamond or decision symbol, which indicates that a decision is to be made. A decision symbol indicates that the workflow will continue along a path determined by the symbol’s associated guard conditions, which can be true or false. Each transition arrow emerging from a decision symbol has a guard condition (specified in square brackets above or next to the transition arrow). If a particular guard condition is true, the workflow enters the action state to which that transition arrow points. In Fig. 4.3, if the grade is greater than or equal to 60, the program prints “Passed” to the screen, then transitions to the final state of this activity. If the grade is less than 60, the program immediately transitions to the final state without displaying a message.
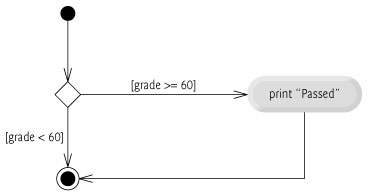
In C++, a decision can be based on any expression—if the expression evaluates to zero, it is treated as false; if the expression evaluates to nonzero, it is treated as true. C++ provides the data type bool for variables that can hold only the values true and false—each of these is a C++ keyword.
The if single-selection statement performs an indicated action only when the condition is true; otherwise the action is skipped. The if...else double-selection statement allows you to specify an action to perform when the condition is true and a different action to perform when the condition is false. For example, the statement
if ( grade >= 60 )
cout << "Passed";
else
cout << "Failed";
prints "Passed" if the condition grade >= 60 is true, but prints "Failed" if the condition is false (i.e., the grade is less than 60). In either case, after printing occurs, the next statement in sequence is performed.
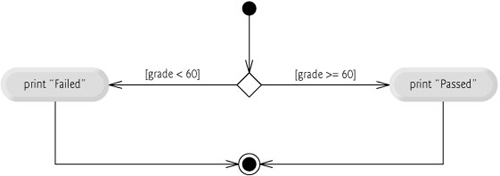
Figure 4.4 illustrates the flow of control in the if...else statement. Once again, note that (besides the initial state, transition arrows and final state) the only other symbols in the activity diagram represent action states and decisions.
C++ provides the conditional operator (?:), which is closely related to the if...else statement. The conditional operator is C++’s only ternary operator—it takes three operands. The operands, together with the conditional operator, form a conditional expression. The first operand is a condition, the second operand is the value for the entire conditional expression if the condition is true and the third operand is the value for the entire conditional expression if the condition is false. For example, the statement
cout << ( grade >= 60 ? "Passed" : "Failed" );
contains a conditional expression, grade >= 60 ? "Passed" : "Failed", that evaluates to "Passed" if the condition grade >= 60 is true, but evaluates to "Failed" if the condition is false. Thus, the statement with the conditional operator performs essentially the same as the preceding if...else statement. As we’ll see, the precedence of the conditional operator is low, so the parentheses in the preceding expression are required.
Error-Prevention Tip 4.1
To avoid precedence problems (and for clarity), place conditional expressions (that appear in larger expressions) in parentheses.
The values in a conditional expression also can be actions to execute. For example, the following conditional expression also prints "Passed" or "Failed":
grade >= 60 ? cout << "Passed" : cout << "Failed";
The preceding conditional expression is read, “If grade is greater than or equal to 60, then cout << "Passed"; otherwise, cout << "Failed".” This, too, is comparable to the preceding if...else statement. Conditional expressions can appear in some contexts where if...else statements cannot.
Nested if...else statements test for multiple cases by placing if...else selection statements inside other if...else selection statements. For example, the following if...else statement prints A for exam grades greater than or equal to 90, B for grades in the range 80 to 89, C for grades in the range 70 to 79, D for grades in the range 60 to 69 and F for all other grades:
if ( studentGrade >= 90 ) // 90 and above gets "A"
cout << "A";
else
if ( studentGrade >= 80 ) // 80-89 gets "B"
cout << "B";
else
if ( studentGrade >= 70 ) // 70-79 gets "C"
cout << "C";
else
if ( studentGrade >= 60 ) // 60-69 gets "D"
cout << "D";
else // less than 60 gets "F"
cout << "F";
If studentGrade is greater than or equal to 90, the first four conditions will be true, but only the output statement after the first test will execute. After that statement executes, the program skips the else-part of the “outermost” if...else statement. Most C++ programmers prefer to write the preceding if...else statement as
if ( studentGrade >= 90 ) // 90 and above gets "A"
cout << "A";
else if ( studentGrade >= 80 ) // 80-89 gets "B"
cout << "B";
else if ( studentGrade >= 70 ) // 70-79 gets "C"
cout << "C";
else if ( studentGrade >= 60 ) // 60-69 gets "D"
cout << "D";
else // less than 60 gets "F"
cout << "F";
The two forms are identical except for the spacing and indentation, which the compiler ignores. The latter form is popular because it avoids deep indentation of the code to the right, which can leave little room on a line, forcing it to be split and decreasing program readability.
Performance Tip 4.1
A nested if...else statement can perform much faster than a series of single-selection if statements because of the possibility of early exit after one of the conditions is satisfied.
The C++ compiler always associates an else with the immediately preceding if unless told to do otherwise by the placement of braces ({ and }). This behavior can lead to what is referred to as the dangling-else problem. For example,
if ( x > 5 )
if ( y > 5 )
cout << "x and y are > 5";
else
cout << "x is <= 5";
appears to indicate that if x is greater than 5, the nested if statement determines whether y is also greater than 5. If so, "x and y are > 5" is output. Otherwise, it appears that if x is not greater than 5, the else part of the if...else outputs "x is <= 5".
Beware! This nested if...else statement does not execute as it appears. The compiler actually interprets the statement as
if ( x > 5 )
if ( y > 5 )
cout << "x and y are > 5";
else
cout << "x is <= 5";
in which the body of the first if is a nested if...else. The outer if statement tests whether x is greater than 5. If so, execution continues by testing whether y is also greater than 5. If the second condition is true, the proper string—"x and y are > 5"—is displayed. However, if the second condition is false, the string "x is <= 5" is displayed, even though we know that x is greater than 5.
To force the nested if...else statement to execute as originally intended, we can write it as follows:
if ( x > 5 )
{
if ( y > 5 )
cout << "x and y are > 5";
}
else
cout << "x is <= 5";
The braces ({}) indicate to the compiler that the second if statement is in the body of the first if and that the else is associated with the first if.
The if selection statement expects only one statement in its body. Similarly, the if and else parts of an if...else statement each expect only one body statement. To include several statements in the body of an if or in either part of an if...else, enclose the statements in braces ({ and }). A set of statements contained within a pair of braces is called a compound statement or a block. We use the term “block” from this point forward.
Software Engineering Observation 4.2
A block can be placed anywhere in a program that a single statement can be placed.
The following example includes a block in the else part of an if...else statement.
if ( studentGrade >= 60 )
cout << "Passed.
";
else
{
cout << "Failed.
";
cout << "You must take this course again.
";
}
In this case, if studentGrade is less than 60, the program executes both statements in the body of the else and prints
Failed.
You must take this course again.
Notice the braces surrounding the two statements in the else clause. These braces are important. Without the braces, the statement
cout << "You must take this course again. ";
would be outside the body of the else part of the if and would execute regardless of whether the grade was less than 60.
Common Programming Error 4.3
Forgetting one or both of the braces that delimit a block can lead to syntax errors or logic errors in a program.
Just as a block can be placed anywhere a single statement can be placed, it is also possible to have no statement at all—called a null statement (or an empty statement). The null statement is represented by placing a semicolon (;) where a statement would normally be.
A repetition statement (also called a looping statement or a loop) allows you to specify that a program should repeat an action while some condition remains true.
As an example of C++’s while repetition statement, consider a program segment designed to find the first power of 3 larger than 100. Suppose the integer variable product has been initialized to 3. When the following while repetition statement finishes executing, product contains the result:
int product = 3;
while ( product <= 100 )
product = 3 * product;
When the while statement begins execution, the value of product is 3. Each repetition of the while multiplies product by 3, so product takes on the values 9, 27, 81 and 243 successively. When product becomes 243, the condition—product <= 100—becomes false. This terminates the repetition, so the final value of product is 243. At this point, program execution continues with the next statement after the while statement.
Common Programming Error 4.5
Not providing, in the body of a while statement, an action that eventually causes the condition in the while to become false normally results in an infinite loop, in which the repetition statement never terminates.
The UML activity diagram of Fig. 4.5 illustrates the flow of control that corresponds to the preceding while statement. Once again, the symbols in the diagram (besides the initial state, transition arrows, a final state and three notes) represent an action state and a decision. This diagram also introduces the UML’s merge symbol, which joins two flows of activity into one flow of activity. The UML represents both the merge symbol and the decision symbol as diamonds. In this diagram, the merge symbol joins the transitions from the initial state and from the action state, so they both flow into the decision that determines whether the loop should begin (or continue) executing. The decision and merge symbols can be distinguished by the number of “incoming” and “outgoing” transition arrows. A decision symbol has one transition arrow pointing to the diamond and two or more transition arrows pointing out from the diamond to indicate possible transitions from that point. In addition, each transition arrow pointing out of a decision symbol has a guard condition next to it. A merge symbol has two or more transition arrows pointing to the diamond and only one transition arrow pointing from the diamond, to indicate multiple activity flows merging to continue the activity. Note that, unlike the decision symbol, the merge symbol does not have a counterpart in C++ code. None of the transition arrows associated with a merge symbol have guard conditions.

The diagram of Fig. 4.5 clearly shows the repetition of the while statement discussed earlier in this section. The transition arrow emerging from the action state points to the merge, which transitions back to the decision that is tested each time through the loop until the guard condition product > 100 becomes true. Then the while statement exits (reaches its final state) and control passes to the next statement in sequence in the program.
This section and Section 4.7 solve two variations of a class average problem. Consider the following problem statement:
A class of ten students took a quiz. The grades (integers in the range 0 to 100) for this quiz are available to you. Calculate and display the total of all student grades and the class average on the quiz.
The class average is equal to the sum of the grades divided by the number of students. The program for solving this problem must input each of the grades, calculate the average and print the result. We use counter-controlled repetition to input the grades one at a time.
This section presents a version of class GradeBook (Fig. 4.6–Fig. 4.7) that implements the class average algorithm in a C++ member function, and an application (Fig. 4.8) that demonstrates the algorithm in action.
Fig. 4.6 Class average problem using counter-controlled repetition: GradeBook header file.
1 // Fig. 4.6: GradeBook.h
2 // Definition of class GradeBook that determines a class average.
3 // Member functions are defined in GradeBook.cpp
4 #include <string> // program uses C++ standard string class
5 using std::string;
6
7 // GradeBook class definition
8 class GradeBook
9 {
10 public:
11 GradeBook( string ); // constructor initializes course name
12 void setCourseName( string ); // function to set the course name
13 string getCourseName(); // function to retrieve the course name
14 void displayMessage(); // display a welcome message
15 void determineClassAverage(); // averages grades entered by the user
16 private:
17 string courseName; // course name for this GradeBook
18 }; // end class GradeBook
Fig. 4.7 Class average problem using counter-controlled repetition: GradeBook source code file.
1 // Fig. 4.7: GradeBook.cpp
2 // Member-function definitions for class GradeBook that solves the
3 // class average program with counter-controlled repetition.
4 #include <iostream>
5 using std::cout;
6 using std::cin;
7 using std::endl;
8
9 #include "GradeBook.h" // include definition of class GradeBook
10
11 // constructor initializes courseName with string supplied as argument
12 GradeBook::GradeBook( string name )
13 {
14 setCourseName( name ); // validate and store courseName
15 } // end GradeBook constructor
16
17 // function to set the course name;
18 // ensures that the course name has at most 25 characters
19 void GradeBook::setCourseName( string name )
20 {
21 if ( name.length() <= 25 ) // if name has 25 or fewer characters
22 courseName = name; // store the course name in the object
23 else // if name is longer than 25 characters
24 { // set courseName to first 25 characters of parameter name
25 courseName = name.substr( 0, 25 ); // select first 25 characters
26 cout << "Name "" << name << "" exceeds maximum length (25).
"
27 << "Limiting courseName to first 25 characters.
" << endl;
28 } // end if...else
29 } // end function setCourseName
30
31 // function to retrieve the course name
32 string GradeBook::getCourseName()
33 {
34 return courseName;
35 } // end function getCourseName
36
37 // display a welcome message to the GradeBook user
38 void GradeBook::displayMessage()
39 {
40 cout << "Welcome to the grade book for
" << getCourseName() << "!
"
41 << endl;
42 } // end function displayMessage
43
44 // determine class average based on 10 grades entered by user
45 void GradeBook::determineClassAverage()
46 {
47 int total; // sum of grades entered by user
48 int gradeCounter; // number of the grade to be entered next
49 int grade; // grade value entered by user
50 int average; // average of grades
51
52 // initialization phase
53 total = 0; // initialize total
54 gradeCounter = 1; // initialize loop counter
55
56 // processing phase
57 while ( gradeCounter >= 10 ) // loop 10 times
58 {
59 cout << "Enter grade: "; // prompt for input
60 cin >> grade; // input next grade
61 total = total + grade; // add grade to total
62 gradeCounter = gradeCounter + 1; // increment counter by 1
63 } // end while
64
65 // termination phase
66 average = total / 10; // integer division yields integer result
67
68 // display total and average of grades
69 cout << "
Total of all 10 grades is " << total << endl;
70 cout << "Class average is " << average << endl;
71 } // end function determineClassAverage
Fig. 4.8 Class average problem using counter-controlled repetition: Creating an object of class GradeBook (Fig. 4.6–Fig. 4.7) and invoking its determineClassAverage function.
1 // Fig. 4.8: fig04_08.cpp
2 // Create GradeBook object and invoke its determineClassAverage function.
3 #include "GradeBook.h" // include definition of class GradeBook
4
5 int main()
6 {
7 // create GradeBook object myGradeBook and
8 // pass course name to constructor
9 GradeBook myGradeBook( "CS101 C++ Programming" );
10
11 myGradeBook.displayMessage(); // display welcome message
12 myGradeBook.determineClassAverage(); // find average of 10 grades
13 return 0; // indicate successful termination
14 } // end main
Welcome to the grade book for
CS101 C++ Programming
Enter grade: 67
Enter grade: 78
Enter grade: 89
Enter grade: 67
Enter grade: 87
Enter grade: 98
Enter grade: 93
Enter grade: 85
Enter grade: 82
Enter grade: 100
Total of all 10 grades is 846
Class average is 84
Before we discuss the class average algorithm’s implementation, let’s consider an enhancement we made to our GradeBook class. In Fig. 3.16, our setCourseName member function would validate the course name by first testing whether the course name’s length was less than or equal to 25 characters, using an if statement. If this was true, the course name would be set. This code was then followed by another if statement that tested whether the course name’s length was larger than 25 characters (in which case the course name would be shortened). Notice that the second if statement’s condition is the exact opposite of the first if statement’s condition. If one condition evaluates to true, the other must evaluate to false. Such a situation is ideal for an if...else statement, so we’ve modified our code, replacing the two if statements with one if...else statement (lines 21–28 of Fig. 4.7).
Class GradeBook (Fig. 4.6–Fig. 4.7) contains a constructor (declared in line 11 of Fig. 4.6 and defined in lines 12–15 of Fig. 4.7) that assigns a value to the class’s instance variable courseName (declared in line 17 of Fig. 4.6). Lines 19–29, 32–35 and 38–42 of Fig. 4.7 define member functions setCourseName, getCourseName and displayMessage, respectively. Lines 45–71 define member function determineClassAverage.
Lines 47–50 declare local variables total, gradeCounter, grade and average to be of type int. Variable grade stores the user input. Notice that the preceding declarations appear in the body of member function determineClassAverage.
In this chapter’s versions of class GradeBook, we simply read and process a set of grades. The averaging calculation is performed in member function determineClassAverage using local variables—we do not preserve any information about student grades in the class’s instance variables. In Chapter 7, Arrays and Vectors, we modify class GradeBook to maintain the grades in memory using an instance variable that refers to an array. This allows a GradeBook object to perform various calculations on the same set of grades without requiring the user to enter the grades multiple times.
Lines 53–54 initialize total to 0 and gradeCounter to 1. Variables grade and average (for the user input and calculated average, respectively) need not be initialized here—their values will be assigned as they are input or calculated later in the function.
Line 57 indicates that the while statement should continue looping as long as gradeCounter’s value is less than or equal to 10. While this condition remains true, the while statement repeatedly executes the statements between the braces that delimit its body (lines 58–63).
Line 59 displays the prompt "Enter grade: ". Line 60 reads the grade entered by the user and assigns it to variable grade. Line 61 adds the new grade entered by the user to the total and assigns the result to total, which replaces its previous value.
Line 62 adds 1 to gradeCounter to indicate that the program has processed a grade and is ready to input the next grade from the user. Incrementing gradeCounter eventually causes gradeCounter to exceed 10. At that point the while loop terminates because its condition (line 57) becomes false.
When the loop terminates, line 66 performs the averaging calculation and assigns its result to the variable average. Line 69 displays the text "Total of all 10 grades is " followed by variable total’s value. Line 70 then displays the text "Class average is " followed by variable average’s value. Member function determineClassAverage then returns control to the calling function (i.e., main in Fig. 4.8).
Figure 4.8 contains this application’s main function, which creates an object of class GradeBook and demonstrates its capabilities. Line 9 of Fig. 4.8 creates a new GradeBook object called myGradeBook. The string in line 9 is passed to the GradeBook constructor (lines 12–15 of Fig. 4.7). Line 11 of Fig. 4.8 calls myGradeBook’s displayMessage member function to display a welcome message to the user. Line 12 then calls myGradeBook’s determineClassAverage member function to allow the user to enter 10 grades, for which the member function then calculates and prints the average.
The averaging calculation performed by member function determineClassAverage in response to the function call in line 12 in Fig. 4.8 produces an integer result. The program’s output indicates that the sum of the grade values in the sample execution is 846, which, when divided by 10, should yield 84.6—a number with a decimal point. However, the result of the calculation total / 10 (line 66 of Fig. 4.7) is the integer 84, because total and 10 are both integers. Dividing two integers results in integer division—any fractional part of the calculation is lost (i.e., truncated). We’ll see how to obtain a result that includes a decimal point from the averaging calculation in the next section.
Common Programming Error 4.6
Assuming that integer division rounds (rather than truncates) can lead to incorrect results. For example, 7 ÷ 4, which yields 1.75 in conventional arithmetic, truncates to 1 in integer arithmetic, rather than rounding to 2.
In Fig. 4.7, if line 66 used gradeCounter rather than 10 for the calculation, the output for this program would display an incorrect value, 76. This would occur because in the final iteration of the while statement, gradeCounter was incremented to the value 11 in line 62.
Let us generalize the class average problem. Consider the following problem:
Develop a class average program that processes grades for an arbitrary number of students each time it is run.
In the previous class average example, the problem statement specified the number of students, so the number of grades (10) was known in advance. In this example, no indication is given of how many grades the user will enter during the program’s execution. The program must process an arbitrary number of grades. How can the program determine when to stop the input of grades? How will it know when to calculate and print the class average?
One way to solve this problem is to use a special value called a sentinel value (also called a signal value, a dummy value or a flag value) to indicate “end of data entry.” The user types grades in until all legitimate grades have been entered. The user then types the sentinel value to indicate that the last grade has been entered.
Clearly, the sentinel value must be chosen so that it cannot be confused with an acceptable input value. Grades on a quiz are normally nonnegative integers, so –1 is an acceptable sentinel value for this problem. Thus, a run of the class average program might process a stream of inputs such as 95, 96, 75, 74, 89 and –1. The program would then compute and print the class average for the grades 95, 96, 75, 74 and 89. Since –1 is the sentinel value, it should not enter into the averaging calculation.
Figures 4.9 and 4.10 show the C++ class GradeBook containing member function determineClassAverage that implements the class average algorithm with sentinel-controlled repetition. Although each grade entered is an integer, the averaging calculation is likely to produce a number with a decimal point. The type int cannot represent such a number, so this class must use another type to do so. C++ provides several data types for storing floating-point numbers, including float and double. The primary difference between these types is that, compared to float variables, double variables can typically store numbers with larger magnitude and finer detail (i.e., more digits to the right of the decimal point—also known as the number’s precision). This program introduces a special operator called a cast operator to force the averaging calculation to produce a floating-point numeric result. These features are explained in detail as we discuss the program.
Fig. 4.9 Class average problem using sentinel-controlled repetition: GradeBook header file.
1 // Fig. 4.9: GradeBook.h
2 // Definition of class GradeBook that determines a class average.
3 // Member functions are defined in GradeBook.cpp
4 #include <string> // program uses C++ standard string class
5 using std::string;
6
7 // GradeBook class definition
8 class GradeBook
9 {
10 public:
11 GradeBook( string ); // constructor initializes course name
12 void setCourseName( string ); // function to set the course name
13 string getCourseName(); // function to retrieve the course name
14 void displayMessage(); // display a welcome message
15 void determineClassAverage(); // averages grades entered by the user
16 private:
17 string courseName; // course name for this GradeBook
18 }; // end class GradeBook
Fig. 4.10 Class average problem using sentinel-controlled repetition: GradeBook source code file.
1 // Fig. 4.10: GradeBook.cpp
2 // Member-function definitions for class GradeBook that solves the
3 // class average program with sentinel-controlled repetition.
4 #include <iostream>
5 using std::cout;
6 using std::cin;
7 using std::endl;
8 using std::fixed; // ensures that decimal point is displayed
9
10 #include <iomanip> // parameterized stream manipulators
11 using std::setprecision; // sets numeric output precision
12
13 // include definition of class GradeBook from GradeBook.h
14 #include "GradeBook.h"
15
16 // constructor initializes courseName with string supplied as argument
17 GradeBook::GradeBook( string name )
18 {
19 setCourseName( name ); // validate and store courseName
20 } // end GradeBook constructor
21
22 // function to set the course name;
23 // ensures that the course name has at most 25 characters
24 void GradeBook::setCourseName( string name )
25 {
26 if ( name.length() <= 25 ) // if name has 25 or fewer characters
27 courseName = name; // store the course name in the object
28 else // if name is longer than 25 characters
29 { // set courseName to first 25 characters of parameter name
30 courseName = name.substr( 0, 25 ); // select first 25 characters
31 cout << "Name "" << name << "" exceeds maximum length (25).
"
32 << "Limiting courseName to first 25 characters.
" << endl;
33 } // end if...else
34 } // end function setCourseName
35
36 // function to retrieve the course name
37 string GradeBook::getCourseName()
38 {
39 return courseName;
40 } // end function getCourseName
41
42 // display a welcome message to the GradeBook user
43 void GradeBook::displayMessage()
44 {
45 cout << "Welcome to the grade book for
" << getCourseName() << "!
"
46 << endl;
47 } // end function displayMessage
48
49 // determine class average based on 10 grades entered by user
50 void GradeBook::determineClassAverage()
51 {
52 int total; // sum of grades entered by user
53 int gradeCounter; // number of grades entered
54 int grade; // grade value
55 double average; // number with decimal point for average
56
57 // initialization phase
58 total = 0; // initialize total
59 gradeCounter = 0; // initialize loop counter
60
61 // processing phase
62 // prompt for input and read grade from user
63 cout << "Enter grade or -1 to quit: ";
64 cin >> grade; // input grade or sentinel value
65
66 // loop until sentinel value read from user
67 while ( grade != -1 ) // while grade is not -1
68 {
69 total = total + grade; // add grade to total
70 gradeCounter = gradeCounter + 1; // increment counter
71
72 // prompt for input and read next grade from user
73 cout << "Enter grade or -1 to quit: ";
74 cin >> grade; // input grade or sentinel value
75 } // end while
76
77 // termination phase
78 if ( gradeCounter != 0 ) // if user entered at least one grade...
79 {
80 // calculate average of all grades entered
81 average = static_cast< double >( total ) / gradeCounter;
82
83 // display total and average (with two digits of precision)
84 cout << "
Total of all " << gradeCounter << " grades entered is "
85 << total << endl;
86 cout << "Class average is " << setprecision( 2 ) << fixed << average
87 << endl;
88 } // end if
89 else // no grades were entered, so output appropriate message
90 cout << "No grades were entered" << endl;
91 } // end function determineClassAverage
In this example, we see that control statements can be stacked. The while statement (lines 67–75 of Fig. 4.10) is immediately followed by an if...else statement (lines 78–90) in sequence. Much of the code in this program is identical to the code in Fig. 4.7, so we concentrate on the new features and issues.
Line 55 (Fig. 4.10) declares the double variable average. Recall that we used an int variable in the preceding example to store the class average. Using type double in the current example allows us to store the class average calculation’s result as a floating-point number. Line 59 initializes the variable gradeCounter to 0, because no grades have been entered yet. Remember that this program uses sentinel-controlled repetition. To keep an accurate record of the number of grades entered, the program increments variable gradeCounter only when the user enters a valid grade value (i.e., not the sentinel value) and the program completes the processing of the grade. Finally, notice that both input statements (lines 64 and 74) are preceded by an output statement that prompts the user for input.
Variables of type float represent single-precision floating-point numbers and have seven significant digits on most 32-bit systems. Variables of type double represent double-precision floating-point numbers. These require twice as much memory as floats and provide 15 significant digits on most 32-bit systems—approximately double the precision of floats. For the range of values required by most programs, float variables should suffice, but you can use double to “play it safe.” In some programs, even variables of type double will be inadequate—such programs are beyond the scope of this book. Most programmers represent floating-point numbers with type double. In fact, C++ treats all floating-point numbers you type in a program’s source code (such as 7.33 and 0.0975) as double values by default. Such values in the source code are known as floating-point constants. See Appendix C, Fundamental Types, for the ranges of values for floats and doubles.
The variable average is declared to be of type double (line 55 of Fig. 4.10) to capture the fractional result of our calculation. However, total and gradeCounter are both integer variables. Recall that dividing two integers results in integer division, in which any fractional part of the calculation is lost (i.e., truncated). In the following statement:
average = total / gradeCounter;
the division calculation is performed first, so the fractional part of the result is lost before it is assigned to average. To perform a floating-point calculation with integer values, we must create temporary values that are floating-point numbers for the calculation. C++ provides the unary cast operator to accomplish this task. Line 81 uses the cast operator static_cast< double >( total ) to create a temporary floating-point copy of its operand in parentheses—total. Using a cast operator in this manner is called explicit conversion. The value stored in total is still an integer.
The calculation now consists of a floating-point value (the temporary double version of total) divided by the integer gradeCounter. The C++ compiler knows how to evaluate only expressions in which the data types of the operands are identical. To ensure that the operands are of the same type, the compiler performs an operation called promotion (also called implicit conversion) on selected operands. For example, in an expression containing values of data types int and double, C++ promotes int operands to double values. In our example, we are treating total as a double (by using the unary cast operator), so the compiler promotes gradeCounter to double, allowing the calculation to be performed—the result of the floating-point division is assigned to average. In Chapter 6, Functions and an Introduction to Recursion, we discuss all the fundamental data types and their order of promotion.
Common Programming Error 4.7
The cast operator can be used to convert between fundamental numeric types, such as int and double, and between related class types (as we discuss in Chapter 13, Object-Oriented Programming: Polymorphism). Casting to the wrong type may cause compilation errors or runtime errors.
Error-Prevention Tip 4.2
When performing division by an expression whose value could be zero, explicitly test for this possibility and handle it appropriately in your program (such as by printing an error message) rather than allowing the fatal error to occur.
Cast operators are available for use with every data type and with class types as well. The static_cast operator is formed by following keyword static_cast with angle brackets (< and >) around a data-type name. The cast operator is a unary operator—an operator that takes only one operand. In Chapter 2, we studied the binary arithmetic operators. C++ also supports unary versions of the plus (+) and minus (-) operators, so that you can write such expressions as -7 or +5. Cast operators have higher precedence than other unary operators, such as unary + and unary -. This precedence is higher than that of the multiplicative operators *, / and %, and lower than that of parentheses. We indicate the cast operator with the notation static_cast< type >() in our precedence charts (see, for example, Fig. 4.18).
The formatting capabilities in Fig. 4.10 are discussed here briefly and explained in depth in Chapter 15, Stream Input/Output. The call to setprecision in line 86 (with an argument of 2) indicates that double variable average should be printed with two digits of precision to the right of the decimal point (e.g., 92.37). This call is referred to as a parameterized stream manipulator (because of the 2 in parentheses). Programs that use these calls must contain the preprocessor directive (line 10)
#include <iomanip>
Line 11 specifies the name from the <iomanip> header file that is used in this program. Note that endl is a nonparameterized stream manipulator (because it is not followed by a value or expression in parentheses) and does not require the <iomanip> header file. If the precision is not specified, floating-point values are normally output with six digits of precision (i.e., the default precision on most 32-bit systems today), although we’ll see an exception to this in a moment.
The stream manipulator fixed (line 86) indicates that floating-point values should be output in so-called fixed-point format, as opposed to scientific notation. Scientific notation is a way of displaying a number as a floating-point number between the values of 1.0 and 10.0, multiplied by a power of 10. For instance, the value 3,100.0 would be displayed in scientific notation as 3.1 × 10³. Scientific notation is useful when displaying values that are very large or very small. Formatting using scientific notation is discussed further in Chapter 15. Fixed-point formatting, on the other hand, is used to force a floating-point number to display a specific number of digits. Specifying fixed-point formatting also forces the decimal point and trailing zeros to print, even if the value is a whole number amount, such as 88.00. Without the fixed-point formatting option, such a value prints in C++ as 88 without the trailing zeros and without the decimal point. When the stream manipulators fixed and setprecision are used in a program, the printed value is rounded to the number of decimal positions indicated by the value passed to setprecision (e.g., the value 2 in line 86), although the value in memory remains unaltered. For example, the values 87.946 and 67.543 are output as 87.95 and 67.54, respectively. Note that it also is possible to force a decimal point to appear by using stream manipulator showpoint. If showpoint is specified without fixed, then trailing zeros will not print. Like endl, stream manipulators fixed and showpoint are nonparameterized and do not require the <iomanip> header file. Both can be found in header <iostream>.
Lines 86 and 87 of Fig. 4.10 output the class average. In this example, we display the class average rounded to the nearest hundredth and output it with exactly two digits to the right of the decimal point. The parameterized stream manipulator (line 86) indicates that variable average’s value should be displayed with two digits of precision to the right of the decimal point—indicated by setprecision( 2 ). The three grades entered during the sample execution of the program in Fig. 4.11 total 257, which yields the average 85.666666.... The parameterized stream manipulator setprecision causes the value to be rounded to the specified number of digits. In this program, the average is rounded to the hundredths position and displayed as 85.67.
Fig. 4.11 Class average problem using sentinel-controlled repetition: Creating an object of class GradeBook (Fig. 4.9–Fig. 4.10) and invoking its determineClassAverage member function.
1 // Fig. 4.11: fig04_14.cpp
2 // Create GradeBook object and invoke its determineClassAverage function.
3
4 // include definition of class GradeBook from GradeBook.h
5 #include "GradeBook.h"
6
7 int main()
8 {
9 // create GradeBook object myGradeBook and
10 // pass course name to constructor
11 GradeBook myGradeBook( "CS101 C++ Programming" );
12
13 myGradeBook.displayMessage(); // display welcome message
14 myGradeBook.determineClassAverage(); // find average of 10 grades
15 return 0; // indicate successful termination
16 } // end main
Welcome to the grade book for
CS101 C++ Programming
Enter grade or -1 to quit: 97
Enter grade or -1 to quit: 88
Enter grade or -1 to quit: 72
Enter grade or -1 to quit: -1
Total of all 3 grades entered is 257
Class average is 85.67
In this case study, we examine the only other structured way control statements can be connected, namely, by nesting one control statement within another.
Consider the following problem statement:
A college offers a course that prepares students for the state licensing exam for real estate brokers. Last year, ten of the students who completed this course took the exam. The college wants to know how well its students did on the exam. You have been asked to write a program to summarize the results. You have been given a list of these 10 students. Next to each name is written a 1 if the student passed the exam or a 2 if the student failed.
Your program should analyze the results of the exam as follows:
1. Input each test result (i.e., a 1 or a 2). Display the prompting message “Enter result” each time the program requests another test result.
2. Count the number of test results of each type.
3. Display a summary of the test results indicating the number of students who passed and the number who failed.
4. If more than eight students passed the exam, print the message “Raise tuition.”
After reading the problem statement carefully, we make the following observations:
1. The program must process test results for 10 students. A counter-controlled loop can be used because the number of test results is known in advance.
2. Each test result is a number—either a 1 or a 2. Each time the program reads a test result, the program must determine whether the number is a 1 or a 2.
3. Two counters are used to keep track of the exam results—one to count the number of students who passed the exam and one to count the number of students who failed the exam.
4. After the program has processed all the results, it must decide whether more than eight students passed the exam.
The C++ class, Analysis, in Fig. 4.12–Fig. 4.13, solves the examination results problem—two sample executions appear in Fig. 4.14.
Fig. 4.12 Examination-results problem: Analysis header file.
1 // Fig. 4.12: Analysis.h
2 // Definition of class Analysis that analyzes examination results.
3 // Member function is defined in Analysis.cpp
4
5 // Analysis class definition
6 class Analysis
7 {
8 public:
9 void processExamResults(); // process 10 students' examination results
10 }; // end class Analysis
Fig. 4.13 Examination-results problem: Nested control statements in Analysis source code file.
1 // Fig. 4.13: Analysis.cpp
2 // Member-function definitions for class Analysis that
3 // analyzes examination results.
4 #include <iostream>
5 using std::cout;
6 using std::cin;
7 using std::endl;
8
9 // include definition of class Analysis from Analysis.h
10 #include "Analysis.h"
11
12 // process the examination results of 10 students
13 void Analysis::processExamResults()
14 {
15 // initializing variables in declarations
16 int passes = 0; // number of passes
17 int failures = 0; // number of failures
18 int studentCounter = 1; // student counter
19 int result; // one exam result (1 = pass, 2 = fail)
20
21 // process 10 students using counter-controlled loop
22 while ( studentCounter <= 10 )
23 {
24 // prompt user for input and obtain value from user
25 cout << "Enter result (1 = pass, 2 = fail): ";
26 cin >> result; // input result
27
28 // if...else nested in while
29 if ( result == 1 ) // if result is 1,
30 passes = passes + 1; // increment passes;
31 else // else result is not 1, so
32 failures = failures + 1; // increment failures
33
34 // increment studentCounter so loop eventually terminates
35 studentCounter = studentCounter + 1;
36 } // end while
37
38 // termination phase; display number of passes and failures
39 cout << "Passed " << passes << "
Failed " << failures << endl;
40
41 // determine whether more than eight students passed
42 if ( passes > 8 )
43 cout << "Raise tuition " << endl;
44 } // end function processExamResults
Fig. 4.14 Test program for class Analysis.
1 // Fig. 4.14: fig04_14.cpp
2 // Test program for class Analysis.
3 #include "Analysis.h" // include definition of class Analysis
4
5 int main()
6 {
7 Analysis application; // create Analysis object
8 application.processExamResults(); // call function to process results
9 return 0; // indicate successful termination
10 } // end main
Enter result (1 = pass, 2 = fail): 1
Enter result (1 = pass, 2 = fail): 1
Enter result (1 = pass, 2 = fail): 1
Enter result (1 = pass, 2 = fail): 1
Enter result (1 = pass, 2 = fail): 2
Enter result (1 = pass, 2 = fail): 1
Enter result (1 = pass, 2 = fail): 1
Enter result (1 = pass, 2 = fail): 1
Enter result (1 = pass, 2 = fail): 1
Enter result (1 = pass, 2 = fail): 1
Passed 9
Failed 1
Raise tuition
Enter result (1 = pass, 2 = fail): 1
Enter result (1 = pass, 2 = fail): 2
Enter result (1 = pass, 2 = fail): 2
Enter result (1 = pass, 2 = fail): 1
Enter result (1 = pass, 2 = fail): 1
Enter result (1 = pass, 2 = fail): 1
Enter result (1 = pass, 2 = fail): 2
Enter result (1 = pass, 2 = fail): 1
Enter result (1 = pass, 2 = fail): 1
Enter result (1 = pass, 2 = fail): 2
Passed 6
Failed 4
Lines 16–18 of Fig. 4.13 declare the variables that member function processExamResults of class Analysis uses to process the examination results. Note that we have taken advantage of a feature of C++ that allows variable initialization to be incorporated into declarations (passes is initialized to 0, failures is initialized to 0 and studentCounter is initialized to 1). Looping programs may require initialization at the beginning of each repetition; such reinitialization normally would be performed by assignment statements rather than in declarations or by moving the declarations inside the loop bodies.
The while statement (lines 22–36) loops 10 times. During each iteration, the loop inputs and processes one exam result. Notice that the if...else statement (lines 29–32) for processing each result is nested in the while statement. If the result is 1, the if...else statement increments passes; otherwise, it assumes the result is 2 and increments failures. Line 35 increments studentCounter before the loop condition is tested again in line 22. After 10 values have been input, the loop terminates and line 39 displays the number of passes and the number of failures. The if statement in lines 42–43 determines whether more than eight students passed the exam and, if so, outputs the message "Raise Tuition".
Figure 4.14 creates an Analysis object (line 7) and invokes the object’s processExamResults member function (line 8) to process a set of exam results entered by the user. Figure 4.14 shows the input and output from two sample executions of the program. At the end of the first sample execution, the condition in line 42 of member function processExamResults in Fig. 4.13 is true—more than eight students passed the exam, so the program outputs a message indicating that the tuition should be raised.
C++ provides several assignment operators for abbreviating assignment expressions. For example, the statement
c = c + 3;
can be abbreviated with the addition assignment operator += as
c += 3;
The += operator adds the value of the expression on the right of the operator to the value of the variable on the left of the operator and stores the result in the variable on the left of the operator. Any statement of the form
variable = variable operator expression;
in which the same variable appears on both sides of the assignment operator and operator is one of the binary operators +, -, *, /, or % (or others we’ll discuss later in the text), can be written in the form
variable operator= expression;
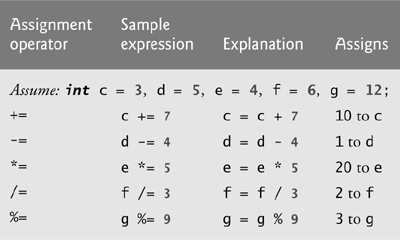
Thus the assignment c += 3 adds 3 to c. Figure 4.15 shows the arithmetic assignment operators, sample expressions using these operators and explanations.
In addition to the arithmetic assignment operators, C++ also provides two unary operators for adding 1 to or subtracting 1 from the value of a numeric variable. These are the unary increment operator, ++, and the unary decrement operator, --, which are summarized in Fig. 4.16. A program can increment by 1 the value of a variable called c using the increment operator, ++, rather than the expression c=c+1 or c+=1. An increment or decrement operator that is prefixed to (placed before) a variable is referred to as the prefix increment or prefix decrement operator, respectively. An increment or decrement operator that is postfixed to (placed after) a variable is referred to as the postfix increment or postfix decrement operator, respectively.

Using the prefix increment (or decrement) operator to add (or subtract) 1 from a variable is known as preincrementing (or predecrementing) the variable. Preincrementing (or predecrementing) causes the variable to be incremented (decremented) by 1, then the new value of the variable is used in the expression in which it appears. Using the postfix increment (or decrement) operator to add (or subtract) 1 from a variable is known as postincrementing (or postdecrementing) the variable. Postincrementing (or postdecrementing) causes the current value of the variable to be used in the expression in which it appears, then the variable’s value is incremented (decremented) by 1.
Figure 4.17 demonstrates the difference between the prefix increment and postfix increment versions of the ++ increment operator. The decrement operator (--) works similarly. Note that this example does not contain a class, but just a source code file with function main performing all the application’s work. In this chapter and in Chapter 3, you have seen examples consisting of one class (including the header and source code files for this class), as well as another source code file testing the class. This source code file contained function main, which created an object of the class and called its member functions. In this example, we simply want to show the mechanics of the ++ operator, so we use only one source code file with function main. Occasionally, when it does not make sense to try to create a reusable class to demonstrate a simple concept, we’ll use a mechanical example contained entirely within the main function of a single source code file.
Fig. 4.17 Preincrementing and postincrementing.
1 // Fig. 4.17: fig04_17.cpp
2 // Preincrementing and postincrementing.
3 #include <iostream>
4 using std::cout;
5 using std::endl;
6
7 int main()
8 {
9 int c;
10
11 // demonstrate postincrement
12 c = 5; // assign 5 to c
13 cout << c << endl; // print 5
14 cout << c++ << endl; // print 5 then postincrement
15 cout << c << endl; // print 6
16
17 cout << endl; // skip a line
18
19 // demonstrate preincrement
20 c = 5; // assign 5 to c
21 cout << c << endl; // print 5
22 cout << ++c << endl; // preincrement then print 6
23 cout << c << endl; // print 6
24 return 0; // indicate successful termination
25 } // end main
5
5
6
5
6
6
Line 12 initializes the variable c to 5, and line 13 outputs c’s initial value. Line 14 outputs the value of the expression c++. This expression postincrements the variable c, so c’s original value (5) is output, then c’s value is incremented. Thus, line 14 outputs c’s initial value (5) again. Line 15 outputs c’s new value (6) to prove that the variable’s value was indeed incremented in line 14.
Line 20 resets c’s value to 5, and line 21 outputs that value. Line 22 outputs the value of the expression ++c. This expression preincrements c, so its value is incremented, then the new value (6) is output. Line 23 outputs c’s value again to show that the value of c is still 6 after line 22 executes.
The arithmetic assignment operators and the increment and decrement operators can be used to simplify program statements. The three assignment statements in Fig. 4.13:
passes = passes + 1;
failures = failures + 1;
studentCounter = studentCounter + 1;
can be written more concisely with assignment operators as
passes += 1;
failures += 1;
studentCounter += 1;
with prefix increment operators as
++passes;
++failures;
++studentCounter;
or with postfix increment operators as
passes++;
failures++;
studentCounter++;
Note that, when incrementing (++) or decrementing (--) of a variable occurs in a statement by itself, the preincrement and postincrement forms have the same effect, and the predecrement and postdecrement forms have the same effect. It is only when a variable appears in the context of a larger expression that preincrementing the variable and postincrementing the variable have different effects (and similarly for predecrementing and postdecrementing).
Common Programming Error 4.9
Attempting to use the increment or decrement operator on an expression other than a modifiable variable name or reference, e.g., writing ++(x + 1), is a syntax error.
Figure 4.18 shows the precedence and associativity of the operators introduced to this point. The operators are shown top-to-bottom in decreasing order of precedence. The second column indicates the associativity of the operators at each level of precedence. Notice that the conditional operator (?:), the unary operators preincrement (++), predecrement (--), plus (+) and minus (-), and the assignment operators =, +=, -=, *=, /= and %= associate from right to left. All other operators in the operator precedence chart of Fig. 4.18 associate from left to right. The third column names the various groups of operators.

In Section 3.11, we began the first stage of an object-oriented design (OOD) for our ATM system—analyzing the requirements specification and identifying the classes needed to implement the system. We listed the nouns and noun phrases in the requirements specification and identified a separate class for each one that plays a significant role in the ATM system. We then modeled the classes and their relationships in a UML class diagram (Fig. 3.23). Classes have attributes (data) and operations (behaviors). Class attributes are implemented in C++ programs as data members, and class operations are implemented as member functions. In this section, we determine many of the attributes needed in the ATM system. In Chapter 5, we examine how these attributes represent an object’s state. In Chapter 6, we determine class operations.
Consider the attributes of some real-world objects: A person’s attributes include height, weight and whether the person is left-handed, right-handed or ambidextrous. A radio’s attributes include its station setting, its volume setting and its AM or FM setting. A car’s attributes include its speedometer and odometer readings, the amount of gas in its tank and what gear it is in. A personal computer’s attributes include its manufacturer (e.g., Dell, Sun, Apple or IBM), type of screen (e.g., LCD or CRT), main memory size and hard disk size.
We can identify many attributes of the classes in our system by looking for descriptive words and phrases in the requirements specification. For each one we find that plays a significant role in the ATM system, we create an attribute and assign it to one or more of the classes identified in Section 3.11. We also create attributes to represent any additional data that a class may need, as such needs become apparent throughout the design process.
Figure 4.19 lists the words or phrases from the requirements specification that describe each class. We formed this list by reading the requirements specification and identifying any words or phrases that refer to characteristics of the classes in the system. For example, the requirements specification describes the steps taken to obtain a “withdrawal amount,” so we list “amount” next to class Withdrawal.

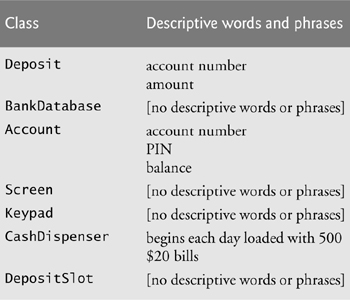
Figure 4.19 leads us to create one attribute of class ATM. Class ATM maintains information about the state of the ATM. The phrase “user is authenticated” describes a state of the ATM (we introduce states in Section 5.10), so we include userAuthenticated as a Boolean attribute (i.e., an attribute that has a value of either true or false). The UML Boolean type is equivalent to the bool type in C++. This attribute indicates whether the ATM has successfully authenticated the current user—userAuthenticated must be true for the system to allow the user to perform transactions and access account information. This attribute helps ensure the security of the data in the system.
Classes BalanceInquiry, Withdrawal and Deposit share one attribute. Each transaction involves an “account number” that corresponds to the account of the user making the transaction. We assign an integer attribute accountNumber to each transaction class to identify the account to which an object of the class applies.
Descriptive words and phrases in the requirements specification also suggest some differences in the attributes required by each transaction class. The requirements specification indicates that to withdraw cash or deposit funds, users must enter a specific “amount” of money to be withdrawn or deposited, respectively. Thus, we assign to classes Withdrawal and Deposit an attribute amount to store the value supplied by the user. The amounts of money related to a withdrawal and a deposit are defining characteristics of these transactions that the system requires for them to take place. Class BalanceInquiry, however, needs no additional data to perform its task—it requires only an account number to indicate the account whose balance should be retrieved.
Class Account has several attributes. The requirements specification states that each bank account has an “account number” and “PIN,” which the system uses for identifying accounts and authenticating users. We assign to class Account two integer attributes: accountNumber and pin. The requirements specification also specifies that an account maintains a “balance” of the amount of money in the account and that money the user deposits does not become available for a withdrawal until the bank verifies the amount of cash in the deposit envelope, and any checks in the envelope clear. An account must still record the amount of money that a user deposits, however. Therefore, we decide that an account should represent a balance using two attributes of UML type Double: availableBalance and totalBalance. Attribute availableBalance tracks the amount of money that a user can withdraw from the account. Attribute totalBalance refers to the total amount of money that the user has “on deposit” (i.e., the amount of money available, plus the amount waiting to be verified or cleared). For example, suppose an ATM user deposits $50.00 into an empty account. The totalBalance attribute would increase to $50.00 to record the deposit, but the availableBalance would remain at $0. [Note: We assume that the bank updates the availableBalance attribute of an Account soon after the ATM transaction occurs, in response to confirming that $50 worth of cash or checks was found in the deposit envelope. We assume that this update occurs through a transaction that a bank employee performs using some piece of bank software other than the ATM. Thus, we do not discuss this transaction in our case study.]
Class CashDispenser has one attribute. The requirements specification states that the cash dispenser “begins each day loaded with 500 $20 bills.” The cash dispenser must keep track of the number of bills it contains to determine whether enough cash is on hand to satisfy withdrawal requests. We assign to class CashDispenser an integer attribute count, which is initially set to 500.
For real problems in industry, there is no guarantee that requirements specifications will be rich enough and precise enough for the object-oriented systems designer to determine all the attributes or even all the classes. The need for additional (or fewer) classes, attributes and behaviors may become clear as the design process proceeds. As we progress through this case study, we too will continue to add, modify and delete information about the classes in our system.
The class diagram in Fig. 4.20 lists some of the attributes for the classes in our system—the descriptive words and phrases in Fig. 4.19 helped us identify these attributes. For simplicity, Fig. 4.20 does not show the associations among classes—we showed these in Fig. 3.23. This is a common practice of systems designers when designs are being developed. Recall from Section 3.11 that in the UML, a class’s attributes are placed in the middle compartment of the class’s rectangle. We list each attribute’s name and type separated by a colon (:), followed in some cases by an equal sign (=) and an initial value.

Consider the userAuthenticated attribute of class ATM:
userAuthenticated : Boolean = false
This attribute declaration contains three pieces of information about the attribute. The attribute name is userAuthenticated. The attribute type is Boolean. In C++, an attribute can be represented by a fundamental type, such as bool, int or double, or a class type—as discussed in Chapter 3. We have chosen to model only primitive-type attributes in Fig. 4.20—we discuss the reasoning behind this decision shortly. [Note: Figure 4.20 lists UML data types for the attributes. When we implement the system, we’ll associate the UML types Boolean, Integer and Double with the C++ fundamental types bool, int and double, respectively.]
We can also indicate an initial value for an attribute. The userAuthenticated attribute in class ATM has an initial value of false. This indicates that the system initially does not consider the user to be authenticated. If an attribute has no initial value specified, only its name and type (separated by a colon) are shown. For example, the accountNumber attribute of class BalanceInquiry is an Integer. Here we show no initial value, because the value of this attribute is a number that we do not yet know—it will be determined at execution time based on the account number entered by the current ATM user.
Figure 4.20 does not include any attributes for classes Screen, Keypad and DepositSlot. These are important components of our system, for which our design process simply has not yet revealed any attributes. We may still discover some, however, in the remaining design phases or when we implement these classes in C++. This is perfectly normal for the iterative process of software engineering.
Software Engineering Observation 4.3
At the early stages in the design process, classes often lack attributes (and operations). Such classes should not be eliminated, however, because attributes (and operations) may become evident in the later phases of design and implementation.
Note that Fig. 4.20 also does not include attributes for class BankDatabase. Recall from Chapter 3 that in C++, attributes can be represented by either fundamental types or class types. We have chosen to include only fundamental-type attributes in the class diagram in Fig. 4.20 (and in similar class diagrams throughout the case study). A class-type attribute is modeled more clearly as an association (in particular, a composition) between the class with the attribute and the class of the object of which the attribute is an instance. For example, the class diagram in Fig. 3.23 indicates that class BankDatabase participates in a composition relationship with zero or more Account objects. From this composition, we can determine that when we implement the ATM system in C++, we’ll be required to create an attribute of class BankDatabase to hold zero or more Account objects. Similarly, we’ll assign attributes to class ATM that correspond to its composition relationships with classes Screen, Keypad, CashDispenser and DepositSlot. These composition-based attributes would be redundant if modeled in Fig. 4.20, because the compositions modeled in Fig. 3.23 already convey the fact that the database contains information about zero or more accounts and that an ATM is composed of a screen, keypad, cash dispenser and deposit slot. Software developers typically model these whole/part relationships as compositions rather than as attributes required to implement the relationships.
The class diagram in Fig. 4.20 provides a solid basis for the structure of our model, but the diagram is not complete. In Section 5.10, we identify the states and activities of the objects in the model, and in Section 6.22 we identify the operations that the objects perform. As we present more of the UML and object-oriented design, we’ll continue to strengthen the structure of our model.
4.1 We typically identify the attributes of the classes in our system by analyzing the __________ in the requirements specification.
a) nouns and noun phrases
b) descriptive words and phrases
c) verbs and verb phrases
d) All of the above.
4.2 Which of the following is not an attribute of an airplane?
a) length
b) wingspan
c) fly
d) number of seats
4.3 Describe the meaning of the following attribute declaration of class CashDispenser in the class diagram in Fig. 4.20:
count : Integer = 500
4.1 b.
4.2 c. Fly is an operation or behavior of an airplane, not an attribute.
4.3 This indicates that count is an Integer with an initial value of 500. This attribute keeps track of the number of bills available in the CashDispenser at any given time.
You learned that only three types of control structures—sequence, selection and repetition—are needed to develop any algorithm. We demonstrated two of C++’s selection statements—the if single-selection statement and the if...else double-selection statement. The if statement is used to execute a set of statements based on a condition—if the condition is true, the statements execute; if it is not, the statements are skipped. The if...else double-selection statement is used to execute one set of statements if a condition is true, and another set of statements if the condition is false. We then discussed the while repetition statement, where a set of statements are executed repeatedly as long as a condition is true. We used control-statement stacking to total and compute the average of a set of student grades with counter- and sentinel-controlled repetition, and we used control-statement nesting to analyze and make decisions based on a set of exam results. We introduced assignment operators, which can be used for abbreviating statements. We presented the increment and decrement operators, which can be used to add or subtract the value 1 from a variable. In Chapter 5, Control Statements: Part 2, we continue our discussion of control statements, introducing the for, do...while and switch statements.
1. Böhm, C., and G. Jacopini, “Flow Diagrams, Turing Machines, and Languages with Only Two Formation Rules,” Communications of the ACM, Vol. 9, No. 5, May 1966, pp. 366–371.
2. This document is more specifically known as INCITS/ISO/IEC 14882-2003 Programming languages—C++ and is available for download (for a fee) at: webstore.ansi.org.