
Often a programmer will be working with large amounts of data stored in arrays. It may be necessary to determine whether an array contains a value that matches a certain key value. The process of finding a particular element of an array is called searching. In this section we discuss the simple linear search.
The linear search (Fig. 7.19, lines 37–44) compares each element of an array with a search key (line 40). Because the array is not in any particular order, it is just as likely that the value will be found in the first element as the last. On average, therefore, the program must compare the search key with half the elements of the array. To determine that a value is not in the array, the program must compare the search key to every element of the array.
Fig. 7.19 Linear search of an array.
1 // Fig. 7.19: fig07_19.cpp
2 // Linear search of an array.
3 #include <iostream>
4 using std::cout;
5 using std::cin;
6 using std::endl;
7
8 int linearSearch( const int [], int, int ); // prototype
9
10 int main()
11 {
12 const int arraySize = 100; // size of array a
13 int a[ arraySize ]; // create array a
14 int searchKey; // value to locate in array a
15
16 for ( int i = 0; i < arraySize; i++ )
17 a[ i ] = 2 * i; // create some data
18
19 cout << "Enter integer search key: ";
20 cin >> searchKey;
21
22 // attempt to locate searchKey in array a
23 int element = linearSearch( a, searchKey, arraySize );
24
25 // display results
26 if ( element != -1 )
27 cout << "Found value in element " << element << endl;
28 else
29 cout << "Value not found" << endl;
30
31 return 0; // indicates successful termination
32 } // end main
33
34 // compare key to every element of array until location is
35 // found or until end of array is reached; return subscript of
36 // element if key or -1 if key not found
37 int linearSearch( const int array[], int key, int sizeOfArray )
38 {
39 for ( int j = 0; j < sizeOfArray; j++ )
40 if ( array[ j ] == key ) // if found,
41 return j; // return location of key
42
43 return -1; // key not found
44 } // end function linearSearch
Enter integer search key: 36
Found value in element 18
Enter integer search key: 37
Value not found
The linear searching method works well for small arrays or for unsorted arrays (i.e., arrays whose elements are in no particular order). However, for large arrays, linear searching is inefficient.
Sorting data (i.e., placing the data into some particular order such as ascending or descending) is one of the most important computing applications.
The program in Fig. 7.20 sorts the values of the 10-element array data into ascending order. The technique we use is called insertion sort—a simple, but inefficient, sorting algorithm. The first iteration of this algorithm takes the second element and, if it is less than the first element, swaps it with the first element (i.e., the program inserts the second element in front of the first element). The second iteration looks at the third element and inserts it into the correct position with respect to the first two elements, so all three elements are in order. At the ith iteration of this algorithm, the first i elements in the original array will be sorted.
Fig. 7.20 Sorting an array with insertion sort.
1 // Fig. 7.20: fig07_20.cpp
2 // This program sorts an array's values into ascending order.
3 #include <iostream>
4 using std::cout;
5 using std::endl;
6
7 #include <iomanip>
8 using std::setw;
9
10 int main()
11 {
12 const int arraySize = 10; // size of array a
13 int data[ arraySize ] = { 34, 56, 4, 10, 77, 51, 93, 30, 5, 52 };
14 int insert; // temporary variable to hold element to insert
15
16 cout << "Unsorted array:
";
17
18 // output original array
19 for ( int i = 0; i < arraySize; i++ )
20 cout << setw( 4 ) << data[ i ];
21
22 // insertion sort
23 // loop over the elements of the array
24 for ( int next = 1; next < arraySize; next++ )
25 {
26 insert = data[ next ]; // store the value in the current element
27
28 int moveItem = next; // initialize location to place element
29
30 // search for the location in which to put the current element
31 while ( ( moveItem > 0 ) && ( data[ moveItem - 1 ] > insert ) )
32 {
33 // shift element one slot to the right
34 data[ moveItem ] = data[ moveItem - 1 ];
35 moveItem--;
36 } // end while
37
38 data[ moveItem ] = insert; // place inserted element into the array
39 } // end for
40
41 cout << "
Sorted array:
";
42
43 // output sorted array
44 for ( int i = 0; i < arraySize; i++ )
45 cout << setw( 4 ) << data[ i ];
46
47 cout << endl;
48 return 0; // indicates successful termination
49 } // end main
Unsorted array:
34 56 4 10 77 51 93 30 5 52
Sorted array:
4 5 10 30 34 51 52 56 77 93
Line 13 of Fig. 7.20 declares and initializes array data with the following values:
34 56 4 10 77 51 93 30 5 52
The program first looks at data[ 0 ] and data[ 1 ], whose values are 34 and 56, respectively. These two elements are already in order, so the program continues—if they were out of order, the program would swap them.
In the second iteration, the program looks at the value of data[ 2 ], 4. This value is less than 56, so the program stores 4 in a temporary variable and moves 56 one element to the right. The program then checks and determines that 4 is less than 34, so it moves 34 one element to the right. The program has now reached the beginning of the array, so it places 4 in data[ 0 ]. The array now is
4 34 56 10 77 51 93 30 5 52
In the third iteration, the program stores the value of data[ 3 ], 10, in a temporary variable. Then the program compares 10 to 56 and moves 56 one element to the right because it is larger than 10. The program then compares 10 to 34, moving 34 right one element. When the program compares 10 to 4, it observes that 10 is larger than 4 and places 10 in data[ 1 ]. The array now is
4 10 34 56 77 51 93 30 5 52
Using this algorithm, at the ith iteration, the first i elements of the original array are sorted. They may not be in their final locations, however, because smaller values may be located later in the array.
The sorting is performed by the for statement in lines 24–39 that loops over the elements of the array. In each iteration, line 26 temporarily stores in variable insert (declared in line 14) the value of the element that will be inserted into the sorted portion of the array. Line 28 declares and initializes the variable moveItem, which keeps track of where to insert the element. Lines 31–36 loop to locate the correct position where the element should be inserted. The loop terminates either when the program reaches the front of the array or when it reaches an element that is less than the value to be inserted. Line 34 moves an element to the right, and line 35 decrements the position at which to insert the next element. After the while loop ends, line 38 inserts the element into place. When the for statement in lines 24–39 terminates, the elements of the array are sorted.
The chief virtue of the insertion sort is that it is easy to program; however, it runs slowly. This becomes apparent when sorting large arrays.
Arrays with two or more dimensions are known as multidimensional arrays. Arrays with two dimensions often represent tables of values consisting of information arranged in rows and columns. To identify a particular table element, we must specify two subscripts. By convention, the first identifies the element’s row and the second identifies the element’s column. Arrays that require two subscripts to identify a particular element are called two-dimensional arrays or 2-D arrays. Note that multidimensional arrays can have more than two dimensions (i.e., subscripts). Figure 7.21 illustrates a two-dimensional array, a. The array contains three rows and four columns, so it is said to be a 3-by-4 array. In general, an array with m rows and n columns is called an m-by-n array.

Every element in array a is identified in Fig. 7.21 by an element name of the form a[i][j], where a is the name of the array, and i and j are the subscripts that uniquely identify each element in a. Notice that the names of the elements in row 0 all have a first subscript of 0; the names of the elements in column 3 all have a second subscript of 3.
Common Programming Error 7.12
Referencing a two-dimensional array element a[ x ][y] incorrectly as a[ x, y] is an error. Actually, a[ x, y] is treated as a[ y ], because C++ evaluates the expression x, y (containing a comma operator) simply as y (the last of the comma-separated expressions).
A multidimensional array can be initialized in its declaration much like a one-dimensional array. For example, a two-dimensional array b with values 1 and 2 in its row 0 elements and values 3 and 4 in its row 1 elements could be declared and initialized with
int b[ 2 ][ 2 ] = { { 1, 2 }, { 3, 4 } };
The values are grouped by row in braces. So, 1 and 2 initialize b[0][ 0 ] and b[0][1], respectively, and 3 and 4 initialize b[1][0] and b[1][1], respectively. If there are not enough initializers for a given row, the remaining elements of that row are initialized to 0. Thus, the declaration
int b[ 2 ][ 2 ] = { { 1 }, { 3, 4 } };
initializes b[ 0 ][ 0 ] to 1, b[ 0 ][ 1 ] to 0, b[ 1 ][ 0 ] to 3 and b[ 1 ][ 1 ] to 4.
Figure 7.22 demonstrates initializing two-dimensional arrays in declarations. Lines 11–13 declare three arrays, each with two rows and three columns.
Fig. 7.22 Initializing multidimensional arrays.
1 // Fig. 7.22: fig07_22.cpp
2 // Initializing multidimensional arrays.
3 #include <iostream>
4 using std::cout;
5 using std::endl;
6
7 void printArray( const int [][ 3 ] ); // prototype
8
9 int main()
10 {
11 int array1[ 2 ][ 3 ] = { { 1, 2, 3 }, { 4, 5, 6 } };
12 int array2[ 2 ][ 3 ] = { 1, 2, 3, 4, 5 };
13 int array3[ 2 ][ 3 ] = { { 1, 2 }, { 4 } };
14
15 cout << "Values in array1 by row are:" << endl;
16 printArray( array1 );
17
18 cout << "
Values in array2 by row are:" << endl;
19 printArray( array2 );
20
21 cout << "
Values in array3 by row are:" << endl;
22 printArray( array3 );
23 return 0; // indicates successful termination
24 } // end main
25
26 // output array with two rows and three columns
27 void printArray( const int a[][ 3 ] )
28 {
29 // loop through array's rows
30 for ( int i = 0; i < 2; i++ )
31 {
32 // loop through columns of current row
33 for ( int j = 0; j < 3; j++ )
34 cout << a[ i ][ j ] << ' ';
35
36 cout << endl; // start new line of output
37 } // end outer for
38 } // end function printArray
Values in array1 by row are:
1 2 3
4 5 6
Values in array2 by row are:
1 2 3
4 5 0
Values in array3 by row are:
1 2 0
4 0 0
The declaration of array1 (line 11) provides six initializers in two sublists. The first sublist initializes row 0 of the array to the values 1, 2 and 3; and the second sublist initializes row 1 of the array to the values 4, 5 and 6. If the braces around each sublist are removed from the array1 initializer list, the compiler initializes the elements of row 0 followed by the elements of row 1, yielding the same result.
The declaration of array2 (line 12) provides only five initializers. The initializers are assigned to row 0, then row 1. Any elements that do not have an explicit initializer are initialized to zero, so array2[ 1 ][ 2 ] is initialized to zero.
The declaration of array3 (line 13) provides three initializers in two sublists. The sublist for row 0 explicitly initializes the first two elements of row 0 to 1 and 2; the third element is implicitly initialized to zero. The sublist for row 1 explicitly initializes the first element to 4 and implicitly initializes the last two elements to zero.
The program calls function printArray to output each array’s elements. Notice that the function definition (lines 27–38) specifies the parameter const int a[][ 3 ]. When a function receives a one-dimensional array as an argument, the array brackets are empty in the function’s parameter list. The size of the first dimension (i.e., the number of rows) of a two-dimensional array is not required either, but all subsequent dimension sizes are required. The compiler uses these sizes to determine the locations in memory of elements in multidimensional arrays. All array elements are stored consecutively in memory, regardless of the number of dimensions. In a two-dimensional array, row 0 is stored in memory followed by row 1. In a two-dimensional array, each row is a one-dimensional array. To locate an element in a particular row, the function must know exactly how many elements are in each row so it can skip the proper number of memory locations when accessing the array. Thus, when accessing a[1][2], the function knows to skip row 0’s three elements in memory to get to row 1. Then, the function accesses element 2 of that row.
Many common array manipulations use for repetition statements. For example, the following for statement sets all the elements in row 2 of array a in Fig. 7.21 to zero:
for ( column = 0; column < 4; column++ )
a[ 2 ][ column ] = 0;
The for statement varies only the second subscript (i.e., the column subscript). The preceding for statement is equivalent to the following assignment statements:
a[ 2 ][ 0 ] = 0;
a[ 2 ][ 1 ] = 0;
a[ 2 ][ 2 ] = 0;
a[ 2 ][ 3 ] = 0;
The following nested for statement determines the total of all the elements in array a:
total = 0;
for ( row = 0; row < 3; row++ )
for ( column = 0; column < 4; column++ )
total += a[ row ][ column ];
The for statement totals the elements of the array one row at a time. The outer for statement begins by setting row (i.e., the row subscript) to 0, so the elements of row 0 may be totaled by the inner for statement. The outer for statement then increments row to 1, so the elements of row 1 can be totaled. Then, the outer for statement increments row to 2, so the elements of row 2 can be totaled. When the nested for statement terminates, total contains the sum of all the array elements.
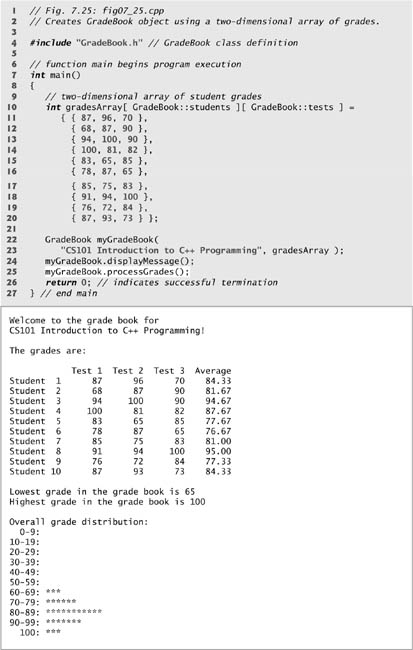
In Section 7.6, we presented class GradeBook (Figs. 7.16–7.17), which used a one-dimensional array to store student grades on a single exam. In most semesters, students take several exams. Professors are likely to want to analyze grades across the entire semester, both for a single student and for the class as a whole.
Figures 7.23–7.24 contain a version of class GradeBook that uses a two-dimensional array grades to store the grades of a number of students on multiple exams. Each row of the array represents a single student’s grades for the entire course, and each column represents all the grades the students earned for one particular exam. A client program, such as fig07_25.cpp, passes the array as an argument to the GradeBook constructor. In this example, we use a ten-by-three array containing ten students’ grades on three exams.
Fig. 7.23 Definition of class GradeBook with a two-dimensional array to store grades.
1 // Fig. 7.23: GradeBook.h
2 // Definition of class GradeBook that uses a
3 // two-dimensional array to store test grades.
4 // Member functions are defined in GradeBook.cpp
5 #include <string> // program uses C++ Standard Library string class
6 using std::string;
7
8 // GradeBook class definition
9 class GradeBook
10 {
11 public:
12 // constants
13 const static int students = 10; // number of students
14 const static int tests = 3; // number of tests
15
16 // constructor initializes course name and array of grades
17 GradeBook( string, const int [][ tests ] );
18
19 void setCourseName( string ); // function to set the course name
20 string getCourseName(); // function to retrieve the course name
21 void displayMessage(); // display a welcome message
22 void processGrades(); // perform various operations on the grade data
23 int getMinimum(); // find the minimum grade in the grade book
24 int getMaximum(); // find the maximum grade in the grade book
25 double getAverage( const int [], const int ); // get student's average
26 void outputBarChart(); // output bar chart of grade distribution
27 void outputGrades(); // output the contents of the grades array
28 private:
29 string courseName; // course name for this grade book
30 int grades[ students ][ tests ]; // two-dimensional array of grades
31 }; // end class GradeBook
Fig. 7.24 GradeBook class member-function definitions manipulating a two-dimensional array of grades.
1 // Fig. 7.24: GradeBook.cpp
2 // Member-function definitions for class GradeBook that
3 // uses a two-dimensional array to store grades.
4 #include <iostream>
5 using std::cout;
6 using std::cin;
7 using std::endl;
8 using std::fixed;
9
10 #include <iomanip> // parameterized stream manipulators
11 using std::setprecision; // sets numeric output precision
12 using std::setw; // sets field width
13
14 // include definition of class GradeBook from GradeBook.h
15 #include "GradeBook.h"
16
17 // two-argument constructor initializes courseName and grades array
18 GradeBook::GradeBook( string name, const int gradesArray[][ tests ] )
19 {
20 setCourseName( name ); // initialize courseName
21
22 // copy grades from gradeArray to grades
23 for ( int student = 0; student < students; student++ )
24
25 for ( int test = 0; test < tests; test++ )
26 grades[ student ][ test ] = gradesArray[ student ][ test ];
27 } // end two-argument GradeBook constructor
28
29 // function to set the course name
30 void GradeBook::setCourseName( string name )
31 {
32 courseName = name; // store the course name
33 } // end function setCourseName
34
35 // function to retrieve the course name
36 string GradeBook::getCourseName()
37 {
38 return courseName;
39 } // end function getCourseName
40
41 // display a welcome message to the GradeBook user
42 void GradeBook::displayMessage()
43 {
44 // this statement calls getCourseName to get the
45 // name of the course this GradeBook represents
46 cout << "Welcome to the grade book for
" << getCourseName() << "!"
47 << endl;
48 } // end function displayMessage
49
50 // perform various operations on the data
51 void GradeBook::processGrades()
52 {
53 // output grades array
54 outputGrades();
55
56 // call functions getMinimum and getMaximum
57 cout << "
Lowest grade in the grade book is " << getMinimum()
58 << "
Highest grade in the grade book is " << getMaximum() << endl;
59
60 // output grade distribution chart of all grades on all tests
61 outputBarChart();
62 } // end function processGrades
63
64 // find minimum grade in the entire gradebook
65 int GradeBook::getMinimum()
66 {
67 int lowGrade = 100; // assume lowest grade is 100
68
69 // loop through rows of grades array
70 for ( int student = 0; student < students; student++ )
71 {
72 // loop through columns of current row
73 for ( int test = 0; test < tests; test++ )
74 {
75 // if current grade less than lowGrade, assign it to lowGrade
76 if ( grades[ student ][ test ] < lowGrade )
77 lowGrade = grades[ student ][ test ]; // new lowest grade
78 } // end inner for
79 } // end outer for
80
81 return lowGrade; // return lowest grade
82 } // end function getMinimum
83
84 // find maximum grade in the entire gradebook
85 int GradeBook::getMaximum()
86 {
87 int highGrade = 0; // assume highest grade is 0
88
89 // loop through rows of grades array
90 for ( int student = 0; student < students; student++ )
91 {
92 // loop through columns of current row
93 for ( int test = 0; test < tests; test++ )
94 {
95 // if current grade greater than lowGrade, assign it to highGrade
96 if ( grades[ student ][ test ] > highGrade )
97 highGrade = grades[ student ][ test ]; // new highest grade
98 } // end inner for
99 } // end outer for
100
101 return highGrade; // return highest grade
102 } // end function getMaximum
103
104 // determine average grade for particular set of grades
105 double GradeBook::getAverage( const int setOfGrades[], const int grades )
106 {
107 int total = 0; // initialize total
108
109 // sum grades in array
110 for ( int grade = 0; grade < grades; grade++ )
111 total += setOfGrades[ grade ];
112
113 // return average of grades
114 return static_cast< double >( total ) / grades;
115 } // end function getAverage
116
117 // output bar chart displaying grade distribution
118 void GradeBook::outputBarChart()
119 {
120 cout << "
Overall grade distribution:" << endl;
121
122 // stores frequency of grades in each range of 10 grades
123 const int frequencySize = 11;
124 int frequency[ frequencySize ] = {}; // initialize elements to 0
125
126 // for each grade, increment the appropriate frequency
127 for ( int student = 0; student < students; student++ )
128
129 for ( int test = 0; test < tests; test++ )
130 ++frequency[ grades[ student ][ test ] / 10 ];
131
132 // for each grade frequency, print bar in chart
133 for ( int count = 0; count < frequencySize; count++ )
134 {
135 // output bar label ("0-9:", ..., "90-99:", "100:" )
136 if ( count == 0 )
137 cout << " 0-9: ";
138 else if ( count == 10 )
139 cout << " 100: ";
140 else
141 cout << count * 10 << "-" << ( count * 10 ) + 9 << ": ";
142
143 // print bar of asterisks
144 for ( int stars = 0; stars < frequency[ count ]; stars++ )
145 cout << '*';
146
147 cout << endl; // start a new line of output
148 } // end outer for
149 } // end function outputBarChart
150
151 // output the contents of the grades array
152 void GradeBook::outputGrades()
153 {
154 cout << "
The grades are:
";
155 cout << " "; // align column heads
156
157 // create a column heading for each of the tests
158 for ( int test = 0; test < tests; test++ )
159 cout << "Test " << test + 1 << " ";
160
161 cout << "Average" << endl; // student average column heading
162
163 // create rows/columns of text representing array grades
164 for ( int student = 0; student < students; student++ )
165 {
166 cout << "Student " << setw( 2 ) << student + 1;
167
168 // output student's grades
169 for ( int test = 0; test < tests; test++ )
170 cout << setw( 8 ) << grades[ student ][ test ];
171
172 // call member function getAverage to calculate student's average;
173 // pass row of grades and the value of tests as the arguments
174 double average = getAverage( grades[ student ], tests );
175 cout << setw( 9 ) << setprecision( 2 ) << fixed << average << endl;
176 } // end outer for
177 } // end function outputGrades
Five member functions (declared in lines 23–27 of Fig. 7.23) perform array manipulations to process the grades. Each of these member functions is similar to its counterpart in the earlier one-dimensional array version of class GradeBook (Figs. 7.16–7.17). Member function getMinimum (defined in lines 65–82 of Fig. 7.24) determines the lowest grade of any student for the semester. Member function getMaximum (defined in lines 85–102 of Fig. 7.24) determines the highest grade of any student for the semester. Member function getAverage (lines 105–115 of Fig. 7.24) determines a particular student’s semester average. Member function outputBarChart (lines 118–149 of Fig. 7.24) outputs a bar chart of the distribution of all student grades for the semester. Member function outputGrades (lines 152–177 of Fig. 7.24) outputs the two-dimensional array in a tabular format, along with each student’s semester average.
Member functions getMinimum, getMaximum, outputBarChart and outputGrades each loop through array grades by using nested for statements. For example, consider the nested for statement in member function getMinimum (lines 70–79). The outer for statement begins by setting student (i.e., the row subscript) to 0, so the elements of row 0 can be compared with variable lowGrade in the body of the inner for statement. The inner for statement loops through the grades of a particular row and compares each grade with lowGrade. If a grade is less than lowGrade, lowGrade is set to that grade. The outer for statement then increments the row subscript to 1. The elements of row 1 are compared with variable lowGrade. The outer for statement then increments the row subscript to 2, and the elements of row 2 are compared with variable lowGrade. This repeats until all rows of grades have been traversed. When execution of the nested statement is complete, lowGrade contains the smallest grade in the two-dimensional array. Member function getMaximum works similarly to member function getMinimum.
Member function outputBarChart in Fig. 7.24 is nearly identical to the one in Fig. 7.17. However, to output the overall grade distribution for a whole semester, the member function uses a nested for statement (lines 127–130) to create the one-dimensional array frequency based on all the grades in the two-dimensional array. The rest of the code in each of the two outputBarChart member functions that displays the chart is identical.
Member function outputGrades (lines 152–177) also uses nested for statements to output values of the array grades, in addition to each student’s semester average. The output in Fig. 7.25 shows the result, which resembles the tabular format of a professor’s physical grade book. Lines 158–159 print the column headings for each test. We use a counter-controlled for statement so that we can identify each test with a number. Similarly, the for statement in lines 164–176 first outputs a row label using a counter variable to identify each student (line 166). Although array indices start at 0, note that lines 159 and 166 output test + 1 and student + 1, respectively, to produce test and student numbers starting at 1 (see Fig. 7.25). The inner for statement in lines 169–170 uses the outer for statement’s counter variable student to loop through a specific row of array grades and output each student’s test grade. Finally, line 174 obtains each student’s semester average by passing the current row of grades (i.e., grades[ student ]) to member function getAverage.
Member function getAverage (lines 105–115) takes two arguments—a one-dimensional array of test results for a particular student and the number of test results in the array. When line 174 calls getAverage, the first argument is grades[ student ], which specifies that a particular row of the two-dimensional array grades should be passed to getAverage. For example, based on the array created in Fig. 7.25, the argument grades[ 1 ] represents the three values (a one-dimensional array of grades) stored in row 1 of the two-dimensional array grades. A two-dimensional array can be considered an array whose elements are one-dimensional arrays. Member function getAverage calculates the sum of the array elements, divides the total by the number of test results and returns the floating-point result as a double value (line 114).
The program in Fig. 7.25 creates an object of class GradeBook (Figs. 7.23–7.24) using the two-dimensional array of ints named gradesArray (declared and initialized in lines 10–20). Note that line 10 accesses class GradeBook’s static constants students and tests to indicate the size of each dimension of array gradesArray. Lines 22–23 pass a course name and gradesArray to the GradeBook constructor. Lines 24–25 then invoke myGradeBook’s displayMessage and processGrades member functions to display a welcome message and obtain a report summarizing the students’ grades for the semester, respectively.
We now introduce C++ Standard Library class template vector, which represents a more robust type of array featuring many additional capabilities. As you’ll see in later chapters, C-style pointer-based arrays (i.e., the type of arrays presented thus far) have great potential for errors. For example, as mentioned earlier, a program can easily “walk off” either end of an array, because C++ does not check whether subscripts fall outside the range of an array. Two arrays cannot be meaningfully compared with equality operators or relational operators. As you’ll see in Chapter 8, pointer variables (known more commonly as pointers) contain memory addresses as their values. Array names are simply pointers to where the arrays begin in memory, and, of course, two arrays will always be at different memory locations. When an array is passed to a general-purpose function designed to handle arrays of any size, the size of the array must be passed as an additional argument. Furthermore, one array cannot be assigned to another with the assignment operator(s)—array names are const pointers, and, as you’ll see in Chapter 8, a constant pointer cannot be used on the left side of an assignment operator. These and other capabilities certainly seem like “naturals” for dealing with arrays, but C++ does not provide such capabilities. However, the C++ Standard Library provides class template vector to allow programmers to create a more powerful and less error-prone alternative to arrays. In Chapter 11, Operator Overloading; String and Array Objects, we present the means to implement such array capabilities as those provided by vector. You’ll see how to customize operators for use with your own classes (a technique known as operator overloading).
The vector class template is available to anyone building applications with C++. The notations that the vector example uses might be unfamiliar to you, because vectors use template notation. Recall that Section 6.18 discussed function templates. In Chapter 14, we discuss class templates. For now, you should feel comfortable using class template vector by mimicking the syntax in the example we show in this section. You’ll deepen your understanding as we study class templates in Chapter 14. Chapter 20 presents class template vector (and several other standard C++ container classes) in detail.
The program of Fig. 7.26 demonstrates capabilities provided by C++ Standard Library class template vector that are not available for C-style pointer-based arrays. Standard class template vector provides many of the same features as the Array class that we construct in Chapter 11, Operator Overloading; String and Array Objects. Standard class template vector is defined in header <vector> (line 11) and belongs to namespace std (line 12). Chapter 20 discusses the full functionality of standard class template vector.
Fig. 7.26 C++ Standard Library class template vector.
1 // Fig. 7.26: fig07_26.cpp
2 // Demonstrating C++ Standard Library class template vector.
3 #include <iostream>
4 using std::cout;
5 using std::cin;
6 using std::endl;
7
8 #include <iomanip>
9 using std::setw;
10
11 #include <vector>
12 using std::vector;
13
14 void outputVector( const vector< int > & ); // display the vector
15 void inputVector( vector< int > & ); // input values into the vector
16
17 int main()
18 {
19 vector< int > integers1( 7 ); // 7-element vector< int >
20 vector< int > integers2( 10 ); // 10-element vector< int >
21
22 // print integers1 size and contents
23 cout << "Size of vector integers1 is " << integers1.size()
24 << "
vector after initialization:" << endl;
25 outputVector( integers1 );
26
27 // print integers2 size and contents
28 cout << "
Size of vector integers2 is " << integers2.size()
29 << "
vector after initialization:" << endl;
30 outputVector( integers2 );
31
32 // input and print integers1 and integers2
33 cout << "
Enter 17 integers:" << endl;
34 inputVector( integers1 );
35 inputVector( integers2 );
36
37 cout << "
After input, the vectors contain:
"
38 << "integers1:" << endl;
39 outputVector( integers1 );
40 cout << "integers2:" << endl;
41 outputVector( integers2 );
42
43 // use inequality (!=) operator with vector objects
44 cout << "
Evaluating: integers1 != integers2" << endl;
45
46 if ( integers1 != integers2 )
47 cout << "integers1 and integers2 are not equal" << endl;
48
49 // create vector integers3 using integers1 as an
50 // initializer; print size and contents
51 vector< int > integers3( integers1 ); // copy constructor
52
53 cout << "
Size of vector integers3 is " << integers3.size()
54 << "
vector after initialization:" << endl;
55 outputVector( integers3 );
56
57 // use overloaded assignment (=) operator
58 cout << "
Assigning integers2 to integers1:" << endl;
59 integers1 = integers2; // assign integers2 to integers1
60
61 cout << "integers1:" << endl;
62 outputVector( integers1 );


Lines 19–20 create two vector objects that store values of type int—integers1 contains seven elements, and integers2 contains 10 elements. By default, all the elements of each vector object are set to 0. Note that vectors can be defined to store any data type, by replacing int in vector< int > with the appropriate data type. This notation, which specifies the type stored in the vector, is similar to the template notation that Section 6.18 introduced with function templates. Again, Chapter 14 discusses this syntax in detail.
Line 23 uses vector member function size to obtain the size (i.e., the number of elements) of integers1. Line 25 passes integers1 to function outputVector (lines 88–102), which uses square brackets, [] (line 94), to obtain the value in each element of the vector for output. Note the resemblance of this notation to that used to access the value of an array element. Lines 28 and 30 perform the same tasks for integers2.
Member function size of class template vector returns the number of elements in a vector as a value of type size_t (which represents the type unsigned int on many systems). As a result, line 90 declares the control variable i to be of type size_t, too. On some compilers, declaring i as an int causes the compiler to issue a warning message, since the loop-continuation condition (line 92) would compare a signed value (i.e., int i) and an unsigned value (i.e., a value of type size_t returned by function size).
Lines 34–35 pass integers1 and integers2 to function inputVector (lines 105–109) to read values for each vector’s elements from the user. The function uses square brackets ([]) to form lvalues that are used to store the input values in each vector element.
Line 46 demonstrates that vector objects can be compared with one another using the != operator. If the contents of two vectors are not equal, the operator returns true; otherwise, it returns false.
The C++ Standard Library class template vector allows you to create a new vector object that is initialized with the contents of an existing vector. Line 51 creates a vector object integers3 and initializes it with a copy of integers1. This invokes vector’s so-called copy constructor to perform the copy operation. You’ll learn about copy constructors in detail in Chapter 11. Lines 53–55 output the size and contents of integers3 to demonstrate that it was initialized correctly.
Line 59 assigns integers2 to integers1, demonstrating that the assignment (=) operator can be used with vector objects. Lines 61–64 output the contents of both objects to show that they now contain identical values. Line 69 then compares integers1 to integers2 with the equality (==) operator to determine whether the contents of the two objects are equal after the assignment in line 59 (which they are).
Lines 73 and 77 demonstrate that a program can use square brackets ([]) to obtain a vector element as an rvalue and as an lvalue, respectively. Recall from Section 5.9 that an rvalue cannot be modified, but an lvalue can. As is the case with C-style pointer-based arrays, C++ does not perform any bounds checking when vector elements are accessed with square brackets. Therefore, you must ensure that operations using [] do not accidentally attempt to manipulate elements outside the bounds of the vector. Standard class template vector does, however, provide bounds checking in its member function at, which “throws an exception” (see Chapter 16, Exception Handling) if its argument is an invalid subscript. By default, this causes a C++ program to terminate. If the subscript is valid, function at returns the element at the specified location as a modifiable lvalue or an unmodifiable lvalue, depending on the context (non-const or const) in which the call appears. Line 83 demonstrates a call to function at with an invalid subscript. The resulting output varies by compiler.
In this section, we demonstrated the C++ Standard Library class template vector, a robust, reusable class that can replace C-style pointer-based arrays. In Chapter 11, you’ll see that vector achieves many of its capabilities by “overloading” C++’s built-in operators, and you’ll see how to customize operators for use with your own classes in similar ways. For example, we create an Array class that, like class template vector, improves upon basic array capabilities. Our Array class also provides additional features, such as the ability to input and output entire arrays with operators >> and <<, respectively.
In this section, we concentrate on the collaborations (interactions) among objects in our ATM system. When two objects communicate with each other to accomplish a task, they are said to collaborate—they do this by invoking one another’s operations. A collaboration consists of an object of one class sending a message to an object of another class. Messages are sent in C++ via member-function calls.
In Section 6.22, we determined many of the operations of the classes in our system. In this section, we concentrate on the messages that invoke these operations. To identify the collaborations in the system, we return to the requirements specification in Section 2.7. Recall that this document specifies the range of activities that occur during an ATM session (e.g., authenticating a user, performing transactions). The steps used to describe how the system must perform each of these tasks are our first indication of the collaborations in our system. As we proceed through this and the remaining Software Engineering Case Study sections, we may discover additional collaborations.
We identify the collaborations in the system by carefully reading the requirements specification sections that specify what the ATM should do to authenticate a user and to perform each transaction type. For each action or step described, we decide which objects in our system must interact to achieve the desired result. We identify one object as the sending object (i.e., the object that sends the message) and another as the receiving object (i.e., the object that offers that operation to clients of the class). We then select one of the receiving object’s operations (identified in Section 6.22) that must be invoked by the sending object to produce the proper behavior. For example, the ATM displays a welcome message when idle. We know that an object of class Screen displays a message to the user via its displayMessage operation. Thus, we decide that the system can display a welcome message by employing a collaboration between the ATM and the Screen in which the ATM sends a displayMessage message to the Screen by invoking the displayMessage operation of class Screen. [Note: To avoid repeating the phrase “an object of class. . .,” we refer to each object simply by using its class name preceded by an article (“a,” “an” or “the”)—for example, “the ATM” refers to an object of class ATM.]
Figure 7.27 lists the collaborations that can be derived from the requirements specification. For each sending object, we list the collaborations in the order in which they are discussed in the requirements specification. We list each collaboration involving a unique sender, message and recipient only once, even though the collaboration may occur several times during an ATM session. For example, the first row in Fig. 7.27 indicates that the ATM collaborates with the Screen whenever the ATM needs to display a message to the user.

Let’s consider the collaborations in Fig. 7.27. Before allowing a user to perform any transactions, the ATM must prompt the user to enter an account number, then to enter a PIN. It accomplishes each of these tasks by sending a displayMessage message to the Screen. Both of these actions refer to the same collaboration between the ATM and the Screen, which is already listed in Fig. 7.27. The ATM obtains input in response to a prompt by sending a getInput message to the Keypad. Next, the ATM must determine whether the user-specified account number and PIN match those of an account in the database. It does so by sending an authenticateUser message to the BankDatabase. Recall that the BankDatabase cannot authenticate a user directly—only the user’s Account (i.e., the Account that contains the account number specified by the user) can access the user’s PIN to authenticate the user. Figure 7.27 therefore lists a collaboration in which the BankDatabase sends a validatePIN message to an Account.
After the user is authenticated, the ATM displays the main menu by sending a series of displayMessage messages to the Screen and obtains input containing a menu selection by sending a getInput message to the Keypad. We have already accounted for these collaborations. After the user chooses a type of transaction to perform, the ATM executes the transaction by sending an execute message to an object of the appropriate transaction class (i.e., a BalanceInquiry, a Withdrawal or a Deposit). For example, if the user chooses to perform a balance inquiry, the ATM sends an execute message to a BalanceInquiry.
Further examination of the requirements specification reveals the collaborations involved in executing each transaction type. A BalanceInquiry retrieves the amount of money available in the user’s account by sending a getAvailableBalance message to the BankDatabase, which responds by sending a getAvailableBalance message to the user’s Account. Similarly, the BalanceInquiry retrieves the amount of money on deposit by sending a getTotalBalance message to the BankDatabase, which sends the same message to the user’s Account. To display both measures of the user’s balance at the same time, the BalanceInquiry sends a displayMessage message to the Screen.
A Withdrawal sends the Screen several displayMessage messages to display a menu of standard withdrawal amounts (i.e., $20, $40, $60, $100, $200). The Withdrawal sends the Keypad a getInput message to obtain the user’s menu selection, then determines whether the requested withdrawal amount is less than or equal to the user’s account balance. The Withdrawal can obtain the amount of money available in the account by sending the BankDatabase a getAvailableBalance message. The Withdrawal then tests whether the cash dispenser contains enough cash by sending the CashDispenser an isSufficientCashAvailable message. A Withdrawal sends the BankDatabase a debit message to decrease the user’s account balance. The BankDatabase sends the same message to the appropriate Account. Recall that debiting funds from an Account decreases both the totalBalance and the availableBalance. To dispense the requested amount of cash, the Withdrawal sends the CashDispenser a dispenseCash message. Finally, the Withdrawal sends a displayMessage message to the Screen, instructing the user to take the cash.
A Deposit responds to an execute message first by sending a displayMessage message to the Screen to prompt the user for a deposit amount. The Deposit sends a getInput message to the Keypad to obtain the user’s input. The Deposit then sends a displayMessage message to the Screen to tell the user to insert a deposit envelope. To determine whether the deposit slot received an incoming deposit envelope, the Deposit sends an isEnvelopeReceived message to the DepositSlot. The Deposit updates the user’s account by sending a credit message to the BankDatabase, which subsequently sends a credit message to the user’s Account. Recall that crediting funds to an Account increases the totalBalance but not the availableBalance.
Now that we have identified a set of possible collaborations between the objects in our ATM system, let us graphically model these interactions using the UML. The UML provides several types of interaction diagrams that model the behavior of a system by modeling how objects interact with one another. The communication diagram emphasizes which objects participate in collaborations. [Note: Communication diagrams were called collaboration diagrams in earlier versions of the UML.] Like the communication diagram, the sequence diagram shows collaborations among objects, but it emphasizes when messages are sent between objects over time.
Figure 7.28 shows a communication diagram that models the ATM executing a BalanceInquiry. Objects are modeled in the UML as rectangles containing names in the form objectName : ClassName. In this example, which involves only one object of each type, we disregard the object name and list only a colon followed by the class name. [Note: Specifying the name of each object in a communication diagram is recommended when modeling multiple objects of the same type.] Communicating objects are connected with solid lines, and messages are passed between objects along these lines in the direction shown by arrows. The name of the message, which appears next to the arrow, is the name of an operation (i.e., a member function) belonging to the receiving object—think of the name as a service that the receiving object provides to sending objects (its “clients”).
The solid filled arrow in Fig. 7.28 represents a message—or synchronous call—in the UML and a function call in C++. This arrow indicates that the flow of control is from the sending object (the ATM) to the receiving object (a BalanceInquiry). Since this is a synchronous call, the sending object may not send another message, or do anything at all, until the receiving object processes the message and returns control to the sending object—the sender just waits. For example, in Fig. 7.28, the ATM calls member function execute of a BalanceInquiry and may not send another message until execute has finished and returns control to the ATM. [Note: If this were an asynchronous call, represented by a stick arrowhead, the sending object would not have to wait for the receiving object to return control—it would continue sending additional messages immediately following the asynchronous call. Asynchronous calls often can be implemented in C++ using platform-specific libraries provided with your compiler. Such techniques are beyond the scope of this book.]
Figure 7.29 shows a communication diagram that models the interactions among objects in the system when an object of class BalanceInquiry executes. We assume that the object’s accountNumber attribute contains the account number of the current user. The collaborations in Fig. 7.29 begin after the ATM sends an execute message to a BalanceInquiry (i.e., the interaction modeled in Fig. 7.28). The number to the left of a message name indicates the order in which the message is passed. The sequence of messages in a communication diagram progresses in numerical order from least to greatest. In this diagram, the numbering starts with message 1 and ends with message 3. The BalanceInquiry first sends a getAvailableBalance message to the BankDatabase (message 1), then sends a getTotalBalance message to the BankDatabase (message 2). Within the parentheses following a message name, we can specify a comma-separated list of the names of the parameters sent with the message (i.e., arguments in a C++ function call)—the BalanceInquiry passes attribute accountNumber with its messages to the BankDatabase to indicate which Account’s balance information to retrieve. Recall from Fig. 6.35 that operations getAvailableBalance and getTotalBalance of class BankDatabase each require a parameter to identify an account. The BalanceInquiry next displays the availableBalance and the totalBalance to the user by passing a displayMessage message to the Screen (message 3) that includes a parameter indicating the message to be displayed.
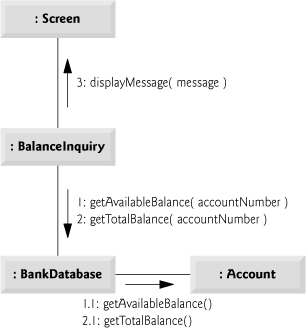
Figure 7.29 models two additional messages passing from the BankDatabase to an Account (message 1.1 and message 2.1). To provide the ATM with the two balances of the user’s Account (as requested by messages 1 and 2), the BankDatabase must pass a getAvailableBalance and a getTotalBalance message to the user’s Account. Messages passed within the handling of another message are called nested messages. The UML recommends using a decimal numbering scheme to indicate nested messages. For example, message 1.1 is the first message nested in message 1—the BankDatabase passes a getAvailableBalance message while processing BankDatabase’s message of the same name. [Note: If the BankDatabase needed to pass a second nested message while processing message 1, the second message would be numbered 1.2.] A message may be passed only when all the nested messages from the previous message have been passed—e.g., the BalanceInquiry passes message 3 only after messages 2 and 2.1 have been passed, in that order.
The nested numbering scheme used in communication diagrams helps clarify precisely when and in what context each message is passed. For example, if we numbered the messages in Fig. 7.29 using a flat numbering scheme (i.e., 1, 2, 3, 4, 5), someone looking at the diagram might not be able to determine that BankDatabase passes the getAvailableBalance message (message 1.1) to an Account during the BankDatabase’s processing of message 1, as opposed to after completing the processing of message 1. The nested decimal numbers make it clear that the second getAvailableBalance message (message 1.1) is passed to an Account within the handling of the first getAvailableBalance message (message 1) by the BankDatabase.
Communication diagrams emphasize the participants in collaborations but model their timing a bit awkwardly. A sequence diagram helps model the timing of collaborations more clearly. Figure 7.30 shows a sequence diagram modeling the sequence of interactions that occur when a Withdrawal executes. The dotted line extending down from an object’s rectangle is that object’s lifeline, which represents the progression of time. Actions typically occur along an object’s lifeline in chronological order from top to bottom—an action near the top typically happens before one near the bottom.

Message passing in sequence diagrams is similar to message passing in communication diagrams. A solid arrow with a filled arrowhead extending from the sending object to the receiving object represents a message between two objects. The arrowhead points to an activation on the receiving object’s lifeline. An activation, shown as a thin vertical rectangle, indicates that an object is executing. When an object returns control, a return message, represented as a dashed line with a stick arrowhead, extends from the activation of the object returning control to the activation of the object that initially sent the message. To eliminate clutter, we omit the return-message arrows—the UML allows this practice to make diagrams more readable. Like communication diagrams, sequence diagrams can indicate message parameters between the parentheses following a message name.
The sequence of messages in Fig. 7.30 begins when a Withdrawal prompts the user to choose a withdrawal amount by sending a displayMessage message to the Screen. The Withdrawal then sends a getInput message to the Keypad, which obtains input from the user. We have already modeled the control logic involved in a Withdrawal in the activity diagram of Fig. 5.22, so we do not show this logic in the sequence diagram of Fig. 7.30. Instead, we model the best-case scenario in which the balance of the user’s account is greater than or equal to the chosen withdrawal amount, and the cash dispenser contains a sufficient amount of cash to satisfy the request. For information on how to model control logic in a sequence diagram, please refer to the web resources and recommended readings listed at the end of Section 2.7.
After obtaining a withdrawal amount, the Withdrawal sends a getAvailableBalance message to the BankDatabase, which in turn sends a getAvailableBalance message to the user’s Account. Assuming that the user’s account has enough money available to permit the transaction, the Withdrawal next sends an isSufficientCashAvailable message to the CashDispenser. Assuming that there is enough cash available, the Withdrawal decreases the balance of the user’s account (i.e., both the totalBalance and the availableBalance) by sending a debit message to the BankDatabase. The BankDatabase responds by sending a debit message to the user’s Account. Finally, the Withdrawal sends a dispenseCash message to the CashDispenser and a displayMessage message to the Screen, telling the user to remove the cash from the machine.
We have identified the collaborations among objects in the ATM system and modeled some of these collaborations using UML interaction diagrams—both communication diagrams and sequence diagrams. In the next Software Engineering Case Study section (Section 9.11), we enhance the structure of our model to complete a preliminary object-oriented design, then we begin implementing the ATM system.
7.1 A(n)__________ consists of an object of one class sending a message to an object of another class.
a) association
b) aggregation
c) collaboration
d) composition
7.2 Which form of interaction diagram emphasizes what collaborations occur? Which form emphasizes when collaborations occur?
7.3 Create a sequence diagram that models the interactions among objects in the ATM system that occur when a Deposit executes successfully, and explain the sequence of messages modeled by the diagram.
7.1 c.
7.2 Communication diagrams emphasize what collaborations occur. Sequence diagrams emphasize when collaborations occur.
7.3 Figure 7.31 presents a sequence diagram that models the interactions between objects in the ATM system that occur when a Deposit executes successfully. Figure 7.31 indicates that a Deposit first sends a displayMessage message to the Screen to ask the user to enter a deposit amount. Next the Deposit sends a getInput message to the Keypad to receive input from the user. The Deposit then instructs the user to enter a deposit envelope by sending a displayMessage message to the Screen. The Deposit next sends an isEnvelopeReceived message to the DepositSlot to confirm that the deposit envelope has been received by the ATM. Finally, the Deposit increases the totalBalance attribute (but not the availableBalance attribute) of the user’s Account by sending a credit message to the BankDatabase. The BankDatabase responds by sending the same message to the user’s Account.

This chapter began our introduction to data structures, exploring the use of arrays and vectors to store data in and retrieve data from lists and tables of values. We showed how to declare, initialize and refer to individual elements of an array. We also illustrated how to pass arrays to functions and how to use the const qualifier. We presented basic searching and sorting techniques. You saw how to declare and manipulate multidimensional arrays. Finally, we demonstrated C++ Standard Library class template vector, which provides a more robust alternative to arrays.
We continue our coverage of data structures in Chapter 14, Templates, where we build a stack class template. Chapter 20, Standard Template Library (STL), introduces several of the C++ Standard Library’s predefined data structures, which you can use instead of building your own. Chapter 20 presents more of class template vector and discusses additional data structure classes, including list and deque—array-like data structures that can grow and shrink in response to a program’s changing storage requirements.
We have now introduced the basic concepts of classes, objects, control statements, functions and arrays. In Chapter 8, we present one of C++’s most powerful features—the pointer. Pointers keep track of where data and functions are stored in memory, which allows us to manipulate those items in interesting ways. After introducing basic pointer concepts, we examine in detail the close relationship among arrays, pointers and strings.