4
Environmental Setup and Traffic Interception

You’ll save yourself a lot of time and headache if you hunt for bugs within a well-oiled lab. In this chapter, I’ll guide you, step-by-step, through setting up your hacking environment. You’ll configure your browser to work with Burp Suite, a web proxy that lets you view and alter HTTP requests and responses sent between your browser and web servers. You’ll learn to use Burp’s features to intercept web traffic, send automated and repeated requests, decode encoded content, and compare requests. I will also talk about how to take good bug bounty notes.
This chapter focuses on setting up an environment for web hacking only. If your goal is to attack mobile apps, you’ll need additional setup and tools. We’ll cover these in Chapter 23, which discusses mobile hacking.
Choosing an Operating System
Before we go on, the first thing you need to do is to choose an operating system. Your operating system will limit the hacking tools available to you. I recommend using a Unix-based system, like Kali Linux or macOS, because many open source hacking tools are written for these systems. Kali Linux is a Linux distribution designed for digital forensics and hacking. It includes many useful bug bounty tools, such as Burp Suite, recon tools like DirBuster and Gobuster, and fuzzers like Wfuzz. You can download Kali Linux from https://www.kali.org/downloads/.
If these options are not available to you, feel free to use other operating systems for hacking. Just keep in mind that you might have to learn to use different tools than the ones mentioned in this book.
Setting Up the Essentials: A Browser and a Proxy
Next, you need a web browser and a web proxy. You’ll use the browser to examine the features of a target application. I recommend using Firefox, since it’s the simplest to set up with a proxy. You can also use two different browsers when hacking: one for browsing the target, and one for researching vulnerabilities on the internet. This way, you can easily isolate the traffic of your target application for further examination.
A proxy is software that sits between a client and a server; in this case, it sits between your browser and the web servers you interact with. It intercepts your requests before passing them to the server, and intercepts the server’s responses before passing them to you, like this:
- Browser <--------------> Proxy <--------------> Server
Using a proxy is essential in bug bounty hunting. Proxies enable you to view and modify the requests going out to the server and the responses coming into your browser, as I’ll explain later in this chapter. Without a proxy, the browser and the server would exchange messages automatically, without your knowledge, and the only thing you would see is the final resulting web page. A proxy will instead capture all messages before they travel to their intended recipient.
Proxies therefore allow you to perform recon by examining and analyzing the traffic going to and from the server. They also let you examine interesting requests to look for potential vulnerabilities and exploit these vulnerabilities by tampering with requests.
For example, let’s say that you visit your email inbox and intercept the request that will return your email with a proxy. It’s a GET request to a URL that contains your user ID. You also notice that a cookie with your user ID is included in the request:
GET /emails/USER_ID HTTP/1.1
Host: example.com
Cookie: user_id=USER_ID
In this case, you can try to change the USER_ID in the URL and the Cookie header to another user’s ID and see if you can access another user’s email.
Two proxies are particularly popular with bug bounty hunters: Burp Suite and the Zed Attack Proxy (ZAP). This section will show you how to set up Burp, but you’re free to use ZAP instead.
Opening the Embedded Browser
Both Burp Suite and ZAP come with embedded browsers. If you choose to use these embedded browsers for testing, you can skip the next two steps. To use Burp Suite’s embedded browser, click Open browser in Burp’s Proxy tab after it’s launched (Figure 4-1). This embedded browser’s traffic will be automatically routed through Burp without any additional setup.

Figure 4-1: You can use Burp’s embedded browser instead of your own external browser for testing.
Setting Up Firefox
Burp’s embedded browser offers a convenient way to start bug hunting with minimal setup. However, if you are like me and prefer to test with a browser you are used to, you can set up Burp to work with your browser. Let’s set up Burp to work with Firefox.
Start by downloading and installing your browser and proxy. You can download the Firefox browser from https://www.mozilla.org/firefox/new/ and Burp Suite from https://portswigger.net/burp/.
Bug bounty hunters use one of two versions of Burp Suite: Professional or Community. You have to purchase a license to use Burp Suite Professional, while the Community version is free of charge. Burp Suite Pro includes a vulnerability scanner and other convenient features like the option to save a work session to resume later. It also offers a full version of the Burp intruder, while the Community version includes only a limited version. In this book, I cover how to use the Community version to hunt for bugs.
Now you have to configure your browser to route traffic through your proxy. This section teaches you how to configure Firefox to work with Burp Suite. If you’re using another browser-proxy combination, please look up their official documentation for tutorials instead.
Launch Firefox. Then open the Connections Settings page by choosing Preferences▶General▶Network Settings. You can access the Preferences tab from the menu at Firefox’s top-right corner (Figure 4-2).
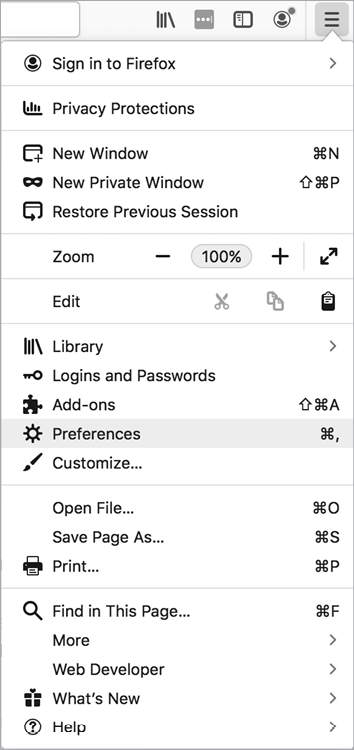
Figure 4-2: You can find the Preferences option at the top-right corner of Firefox.
The Connection Settings page should look like the one in Figure 4-3.
Select Manual proxy configuration and enter the IP address 127.0.0.1 and port 8080 for all the protocol types. This will tell Firefox to use the service running on port 8080 on your machine as a proxy for all of its traffic. 127.0.0.1 is the localhost IP address. It identifies your current computer, so you can use it to access the network services running on your machine. Since Burp runs on port 8080 by default, this setting tells Firefox to route all traffic through Burp. Click OK to finalize the setting. Now Firefox will route all traffic through Burp.

Figure 4-3: Configure Firefox’s proxy settings on the Connection Settings page.
Setting Up Burp
After downloading Burp Suite, open it and click Next, then Start Burp. You should see a window like Figure 4-4.
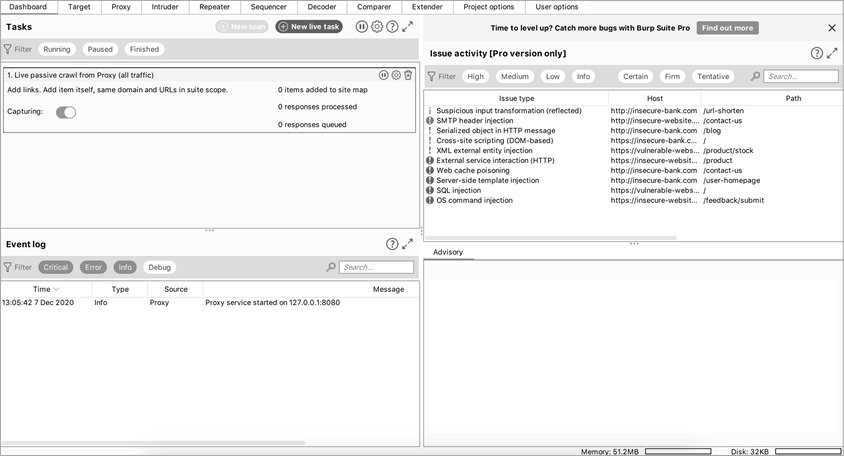
Figure 4-4: Burp Suite Community Edition startup window
Now let’s configure Burp so it can work with HTTPS traffic. HTTPS protects your data’s privacy by encrypting your traffic, making sure only the two parties in a communication (your browser and the server) can decrypt it. This also means your Burp proxy won’t be able to intercept HTTPS traffic going to and from your browser. To work around this issue, you need to show Firefox that your Burp proxy is a trusted party by installing its certificate authority (CA) certificate.
Let’s install Burp’s certificate on Firefox so you can work with HTTPS traffic. With Burp open and running, and your proxy settings set to 127.0.0.1:8080, go to http://burp/ in your browser. You should see a Burp welcome page (Figure 4-5). Click CA Certificate at the top right to download the certificate file; then click Save File to save it in a safe location.

Figure 4-5: Go to http://burp/ to download Burp’s CA certificate.
Next, in Firefox, click Preferences▶Privacy & Security▶Certificates▶View Certificates▶Authorities. Click Import and select the file you just saved, and then click Open. Follow the dialog’s instructions to trust the certificate to identify websites (Figure 4-6).
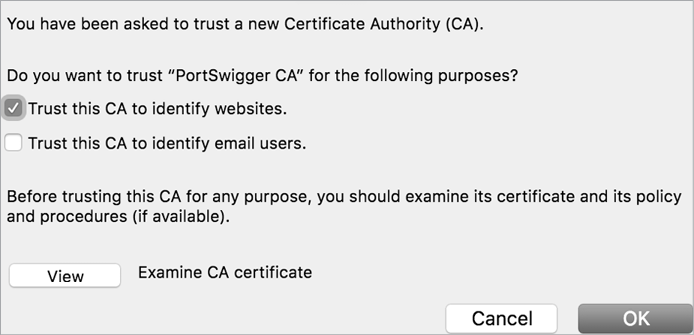
Figure 4-6: Select the Trust this CA to identify websites option in Firefox’s dialog.
Restart Firefox. Now you should be all set to intercept both HTTP and HTTPS traffic.
Let’s perform a test to make sure that Burp is working properly. Switch to the Proxy tab in Burp and turn on traffic interception by clicking Intercept is off. The button should now read Intercept is on (Figure 4-7). This means you’re now intercepting traffic from Firefox or the embedded browser.

Figure 4-7: Intercept is on means that you’re now intercepting traffic.
Then open Firefox and visit https://www.google.com/. In Burp’s proxy, you should see the main window starting to populate with individual requests. The Forward button in Burp Proxy will send the current request to the designated server. Click Forward until you see the request with the hostname www.google.com. If you see this request, Burp is correctly intercepting Firefox’s traffic. It should begin like this:
GET / HTTP/1.1
Host: www.google.com
Click Forward to send the request over to Google’s server. You should see Google’s home page appear in your Firefox window.
If you aren’t seeing requests in Burp’s window, you might not have installed Burp’s CA certificate properly. Follow the steps in this chapter to reinstall the certificate. In addition, check that you’ve set the correct proxy settings to 127.0.0.1:8080 in Firefox’s Connection Settings.
Using Burp
Burp Suite has a variety of useful features besides the web proxy. Burp Suite also includes an intruder for automating attacks, a repeater for manipulating individual requests, a decoder for decoding encoded content, and a comparer tool for comparing requests and responses. Of all Burp’s features, these are the most useful for bug bounty hunting, so we’ll explore them here.
The Proxy
Let’s see how you can use the Burp proxy to examine requests, modify them, and forward them to Burp’s other modules. Open Burp and switch to the Proxy tab, and start exploring what it does! To begin intercepting traffic, make sure the Intercept button reads Intercept is on (Figure 4-8).

Figure 4-8: The Burp Proxy tab shows Intercept is on.
When you browse to a site on Firefox or Burp’s embedded browser, you should see an HTTP/HTTPS request appear in the main window. When intercept is turned on, every request your browser sends will go through Burp, which won’t send them to the server unless you click Forward in the proxy window. You can use this opportunity to modify the request before sending it to the server or to forward it over to other modules in Burp. You can also use the search bar at the bottom of the window to search for strings in the requests or responses.
To forward the request to another Burp module, right-click the request and select Send to Module (Figure 4-9).
Let’s practice intercepting and modifying traffic by using Burp Proxy! Go to Burp Proxy and turn on traffic interception. Then open Firefox or Burp’s embedded browser and visit https://www.google.com/. As you did in the preceding section, click Forward until you see the request with the hostname www.google.com. You should see a request like this one:
GET / HTTP/1.1
Host: www.google.com
User-Agent: Mozilla/5.0
Accept-Language: en-US
Accept-Encoding: gzip, deflate
Connection: close
Figure 4-9: You can forward the request or response to different Burp modules by right-clicking it.
Let’s modify this request before sending it. Change the Accept-Language header value to de.
GET / HTTP/1.1
Host: www.google.com
User-Agent: Mozilla/5.0
Accept-Language: de
Accept-Encoding: gzip, deflate
Connection: close
Click Forward to send the request over to Google’s server. You should see Google’s home page in German appear in your browser’s window (Figure 4-10).

Figure 4-10: Google’s home page in German
If you’re a German speaker, you could do the test in reverse: switch the Accept-Language header value from de to en. You should see the Google home page in English. Congratulations! You’ve now successfully intercepted, modified, and forwarded an HTTP request via a proxy.
The Intruder
The Burp intruder tool automates request sending. If you are using the Community version of Burp, your intruder will be a limited, trial version. Still, it allows you to perform attacks like brute-forcing, whereby an attacker submits many requests to a server using a list of predetermined values and sees if the server responds differently. For example, a hacker who obtains a list of commonly used passwords can try to break into your account by repeatedly submitting login requests with all the common passwords. You can send requests over to the intruder by right-clicking a request in the proxy window and selecting Send to intruder.
The Target screen in the intruder tab lets you specify the host and port to attack (Figure 4-11). If you forward a request from the proxy, the host and port will be prefilled for you.

Figure 4-11: You can specify the host and port to attack on the Target screen.
The intruder gives several ways to customize your attack. For each request, you can choose the payloads and payloads positions to use. The payloads are the data that you want to insert into specific positions in the request. The payload positions specify which parts of the request will be replaced by the payloads you choose. For example, let’s say users log in to example.com by sending a POST request to example.com/login. In Burp, this request might look like this:
POST /login HTTP/1.1
Host: example.com
User-Agent: Mozilla/5.0
Accept: text/html,application/xhtml+xml,application/xml
Accept-Language: en-US
Accept-Encoding: gzip, deflate
Connection: close

username=vickie&password=abc123
The POST request body contains two parameters: username and password. If you were trying to brute-force a user’s account, you could switch up the password field of the request and keep everything else the same. To do that, specify the payload positions in the Positions screen (Figure 4-12). To add a portion of the request to the payload positions, highlight the text and click Add on the right.

Figure 4-12: You can specify the payload positions in the Positions screen.
Then, switch over to the Payloads screen (Figure 4-13). Here, you can choose payloads to insert into the request. To brute-force a login password, you can add a list of commonly used passwords here. You can also, for example, use a list of numbers with which to brute-force IDs in requests, or use an attack payload list you downloaded from the internet. Reusing attack payloads shared by others can help you find bugs faster. We will talk more about how to use reused payloads to hunt for vulnerabilities in Chapter 25.
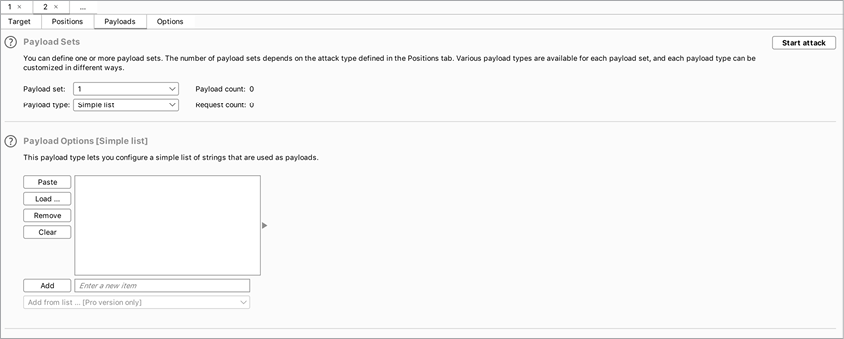
Figure 4-13: Choose your payload list on the Payloads screen.
Once you’ve specified those, click the Start attack button to start the automated test. The intruder will send a request for each payload you listed and record all responses. You can then review the responses and response codes and look for interesting results.
The Repeater
The repeater is probably the tool you’ll use the most often (Figure 4-14). You can use it to modify requests and examine server responses in detail. You could also use it to bookmark interesting requests to go back to later.
Although the repeater and intruder both allow you to manipulate requests, the two tools serve very different purposes. The intruder automates attacks by automatically sending programmatically modified requests. The repeater is meant for manual, detailed modifications of a single request.
Send requests to the repeater by right-clicking the request and selecting Send to repeater.
On the left of the repeater screen are requests. You can modify a request here and send the modified request to the server by clicking Send at the top. The corresponding response from the server will appear on the right.
The repeater is good for exploiting bugs manually, trying to bypass filters, and testing out different attack methods that target the same endpoint.

Figure 4-14: The repeater is good for close examination of requests and manual exploitation.
The Decoder
The Burp decoder is a convenient way to encode and decode data you find in requests and responses (Figure 4-15). Most often, I use it to decode, manipulate, and re-encode application data before forwarding it to applications.

Figure 4-15: You can use the decoder to decode application data to read or manipulate its plaintext.
Send data to the decoder by highlighting a block of text in any request or response, then right-clicking it and selecting Send to decoder. Use the drop-down menus on the right to specify the algorithm to use to encode or decode the message. If you’re not sure which algorithm the message is encoded with, try to Smart decode it. Burp will try to detect the encoding, and decode the message accordingly.
The Comparer
The comparer is a way to compare requests or responses (Figure 4-16). It highlights the differences between two blocks of text. You might use it to examine how a difference in parameters impacts the response you get from the server, for example.
Send data over to the comparer by highlighting a block of text in any request or response, then right-clicking it and selecting Send to comparer.

Figure 4-16: The comparer will highlight the differences between two blocks of text.
Saving Burp Requests
You can save requests and responses on Burp as well. Simply right-click any request and select Copy URL, Copy as curl command, or Copy to file to store these results into your note folder for that target. The Copy URL option copies the URL of the request. The Copy as curl command copies the entire request, including the request method, URL, headers, and body as a curl command. Copy to file saves the entire request to a separate file.
A Final Note on . . . Taking Notes
Before you get started looking for vulnerabilities in the next chapter, a quick word of advice: organizational skills are critical if you want to succeed in bug bounties. When you work on targets with large scopes or hack multiple targets at the same time, the information you gather from the targets could balloon and become hard to manage.
Often, you won’t be able to find bugs right away. Instead, you’ll spot a lot of weird behaviors and misconfigurations that aren’t exploitable at the moment but that you could combine with other behavior in an attack later on. You’ll need to take good notes about any new features, misconfigurations, minor bugs, and suspicious endpoints that you find so you can quickly go back and use them.
Notes also help you plan attacks. You can keep track of your hacking progress, the features you’ve tested, and those you still have to check. This prevents you from wasting time by testing the same features over and over again.
Another good use of notes is to jot down information about the vulnerabilities you learn about. Record details about each vulnerability, such as its theoretical concept, potential impact, exploitation steps, and sample proof-of-concept code. Over time, this will strengthen your technical skills and build up a technique repository that you can revisit if needed.
Since these notes tend to balloon in volume and become very disorganized, it’s good to keep them organized from the get-go. I like to take notes in plaintext files by using Sublime Text (https://www.sublimetext.com/) and organize them by sorting them into directories, with subdirectories for each target and topic.
For example, you can create a folder for each target you’re working on, like Facebook, Google, or Verizon. Then, within each of these folders, create files to document interesting endpoints, new and hidden features, reconnaissance results, draft reports, and POCs.
Find a note-taking and organizational strategy that works for you. For example, if you are like me and prefer to store notes in plaintext, you can search around for an integrated development environment (IDE) or text editor that you feel the most comfortable in. Some prefer to take notes using the Markdown format. In this case, Obsidian (https://obsidian.md/) is an excellent tool that displays your notes in an organized way. If you like to use mind maps to organize your ideas, you can try the mind-mapping tool XMind (https://www.xmind.net/).
Keep your bug bounty notes in a centralized place, such as an external hard drive or cloud storage service like Google Drive or Dropbox, and don’t forget to back up your notes regularly!
In summary, here are a few tips to help you take good notes:
- Take notes about any weird behaviors, new features, misconfigurations, minor bugs, and suspicious endpoints to keep track of potential vulnerabilities.
- Take notes to keep track of your hacking progress, the features you’ve tested, and those you still have to check.
- Take notes while you learn: jot down information about each vulnerability you learn about, like its theoretical concept, potential impact, exploitation steps, and sample POC code.
- Keep your notes organized from the get-go, so you can find them when you need to!
- Find a note-taking and organizational process that works for you. You can try out note-taking tools like Sublime Text, Obsidian, and XMind to find a tool that you prefer.