
In This Chapter
Getting set up with a digital camera and editing software
Using Picasa to edit your photos
Putting Flickr photos into your blog posts
It's a fact: People love photos! You can increase your readership and decrease your writing time by including photos in your blog posts or putting photo badges into your sidebar. Many bloggers have discovered that including a photo in a blog post, even if it's only tangentially related, ensures that the post is more likely to be read than entries without photos.
If you already have a digital camera and photo‐editing software, you have the tools at hand to start putting photos into your blog quickly. But if you're new to photography, this chapter also includes some information about choosing a digital camera or software.
Putting graphics on the Web doesn't have to be incredibly hard to do, and today's wonderful photo‐sharing Web sites make your life easy when it comes to getting photos online quickly. In fact, if you already have a Flickr account that you use to share your digital photos, you can jump right to the section in this chapter about integrating your Flickr photos into your blog posts — you'll be pleased as punch to find out how easy it is.
Today, digital cameras are quite inexpensive, and using one can expedite the process of putting your photos online. Most digital cameras can take photographs in file formats that can be used with no further processing on the Web, but as long as you're using a digital camera, you can pick up software that helps you convert your photos to the right format quite quickly.
The ingredients to getting photos onto your Web site are
A camera, preferably a digital camera
A way to get your photos from your camera onto your computer, like a USB cable or scanner
Image‐editing software to help you crop, resize, and touch up your photos
A photo sharing service or blog software with file upload tools
Digital cameras come in all kinds of price ranges and with tons of different features. When you take a photograph, the image is stored on a storage card or small hard drive, and many cameras have a nice preview screen that lets you see the results of your photography right away.
When you need your photos, you can remove the storage card from your camera and insert it into the card reader hooked to your computer, or even into a printer. Having a removable storage card is also helpful if you plan to take lots of pictures, because you can easily carry several with you, switching them out as you fill them. Some cameras can also connect directly to your computer.
Digital cameras usually come with several quality settings that determine the resolution of your image and the sizes that look good when you print your photograph. If you choose higher‐quality settings, you can fit fewer images on your storage card, but the resulting files will look better, print more sharply, and can be resized more easily.
Today, even relatively inexpensive digital cameras are capable of taking high‐quality images suitable for use in almost any medium, so the real challenge is to pick a camera that will suit your picture‐taking style.
Be realistic about how you plan to use the camera and how comfortable you are with it when you look at the options:
Digital SLRs: If you're a professional photographer or a dedicated amateur, the higher‐end dSLR cameras are likely want you want. But they are also quite large cameras, which makes them awkward to carry and use unobtrusively on a day‐to‐day basis.
Low‐end point‐and‐shoots: If you're a photography amateur, super lightweight cameras are great gadgets that get lots of admiring glances. But they might lack important features, and their tiny size might also make them hard to use and hold steady.
Mid‐range: If you're not a professional photographer but you want more than just the basics that low‐end cameras provide, look for a good mid‐range camera in size, style, and price.
Start your search by visiting CNET.com (www.cnet.com) and looking at the product reviews written by CNET editors and readers. Reading through the reviews can really help educate you on the options and features, and it can give you a feel for the price ranges that include the feature package you want.
With some CNET recommendations in mind, head for a camera or good electronics store and test drive some cameras. You need to feel physically comfortable handling and using any camera you purchase, no matter how well it was reviewed online.
If you're more comfortable using a film camera, you aren't out of luck! You can still use film photos by scanning the photos to create a digital file. Or ask your film processing shop to provide you with a CD of your photographs along with prints.
You also need to find a program to help you edit and organize your photos. You have loads of options, at all pricing levels. In fact, your computer might have come packaged with image‐editing software, or the digital camera you purchase might include software.
When you're looking for image‐editing software with the ultimate goal of getting your images online, consider these criteria:
File formats: You need to be able to create images in the right format for display on the Web. These formats are JPG, GIF, and PNG.
Standard editing tools: At a minimum, you need image‐editing software that allows you to resize, crop, rotate, and adjust brightness and contrast in your photos. These tools should be quick and easy to use.
Organizing tools: Software that helps you keep track of your images with thumbnail previews, naming schemes, and search are useful, especially if you take lots of photos.
Photo sharing: A program that integrates with the blogging tool you use or with a photo‐sharing service like Flickr isn't required, but it can really help you speed up the amount of time it takes you to get a photo online.
With these ideas in mind, don't forget to think about whether you want to be able to do more than just get photos into shape for online publication. If you plan to print photographs, be sure you look for photo‐editing software with good tools for printing.
I cover two software programs (Picasa and iPhoto) in the next sections. Other image‐editing programs also work well for touching up and formatting photographs:
Adobe Photoshop Elements: $99, Windows only, www.adobe.com/products/photoshopelwin. This program is suitable for users who have the patience to learn how to use a full‐featured program, but don't have the most exacting standards; it's a great compromise between basic software and high‐end software.
Adobe Photoshop Lightroom: $299, Mac and Windows, www.adobe.com/products/photoshoplightroom. This software is intended to be used specifically for photography, and serious amateur photographers and professionals find this program valuable for managing large collections of photographs.
Adobe Photoshop: $649, Mac and Windows, www.adobe.com/products/photoshop. For anyone who isn't a designer or very serious photographer, Adobe Photoshop can be overkill. But it's a great program.
Adobe Fireworks: $299, Mac and Windows, www.adobe.com/products/fireworks. Though you can use Fireworks to process photos, it's really intended to be a Web graphics production tool. If you have it already, go ahead and use it, but if you're looking over your options, I would recommend some of the others on this list for photo editing.
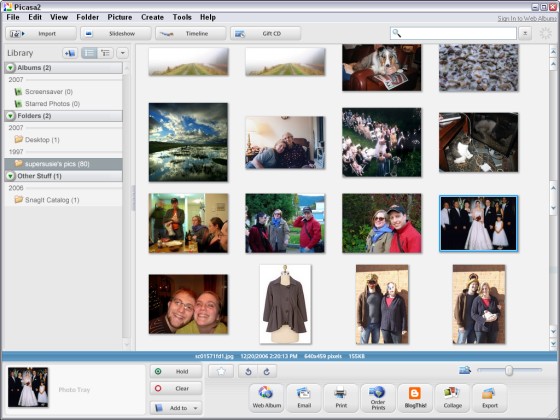
Picasa, from Google, is priced competitively (it's free) and works especially well for photographers who want to get their photos online. Its organizational tools are highly developed, allowing you to do everything from automatically import and name photos from your camera when you hook it up to your computer, quickly label and tag your photos, rate good photos, and create photo “albums.”
The editing tools are good, but they sacrifice some fine control in favor of being easy to use. You can crop, straighten horizons, fix red‐eye issues, adjust color and contrast, and make other edits to your photos easily.
However, it's the photo sharing tools that really set Picasa apart. You can use tools to e‐mail photos, get them onto the Web, create online slideshows, and put photo collections onto other devices. Printing photos is also quite easy to do.
Picasa (shown in Figure 13-1 ) is available for Windows only.
Later in this chapter, I walk you through using some simple editing tools in Picasa.
If you're a Mac user, you have a great image‐editing program in Apple's iPhoto (see Figure 13-2 ). You have all the basic tools for cropping, straightening, adjusting color and brightness, and resizing. Plus, you can dabble with fun effects and increase or decrease highlights and shadows in your photos.
The organizing tools are also excellent: You can categorize, tag, caption, and title your photos quickly and easily, and the simple search interface helps you find old photos.
If you don't want to publish photos only to your own blog, use iPhoto to publish to the .Mac Web service, put up slideshows and albums, and share your photos with groups of friends and family.
You can also use iPhoto to print a real photo album, calendar, cards and individual prints. iPhoto frequently comes packaged on new Macintosh computers, but if you don't have it, head to the Apple Store (http://store.apple.com) and buy a copy of iLife, which includes iPhoto and other digital applications.

When you're ready to put your photos online, regardless of whether you ultimately want to include images on your blog, you have plenty of options. Photo‐sharing Web sites have become full‐fledged members of the Web 2.0 movement, offering friend lists, tagging, and other sophisticated tools.
The media darling in this space is definitely Flickr (www.flickr.com). For avid photographers, Flickr has nearly replaced the need to have a blog at all, because many of the best blogging tools are integrated into the Flickr service.
On Flickr, you can
Create a list of friends whose photos you want to follow.
Upload and organize photos by using tags (keywords), sets, and collections.
Start groups around a visual theme and add your photos to other groups.
Set privacy controls to dictate who can see your photos.
Use your photos to create books, prints, calendars, business cards, DVDs, and stamps.
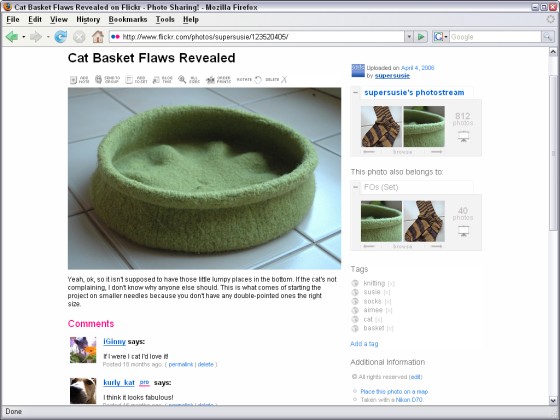
Post photos in your account and receive comments (see Figure 13-3 ).
Create slideshows of your photos.
Basic Flickr accounts are free for 100MB worth of photos each month — you can display only your most recent 200 photos though. Pro accounts cost $24.95 a year, and receive unlimited uploading and image display.
Later in this chapter, I show you how to put Flickr to work for you in adding images to blog posts.
Flickr isn't alone in this space; it just happens to be my favorite. You can also upload your photos to Photobucket (www.photobucket.com), Shutterfly (www.shutterfly.com), SmugMug (www.smugmug.com), Snapfish (www.snapfish.com), and Webshots (www.webshots.com), among others.
Whatever service you choose, look for tools that will make your life easier when it comes to putting your photos on your blog. For example:
Look for services that allow you to create a photo
badge(a bit of code that displays your photos) to put in your blog's sidebar. I talk more about using Flickr for this purpose in Chapter 13.Look for services that let you post a photo to your blog or give you code to put the photo in your blog post.
Far be it for me to tell you how to take photographs — I'm a rank amateur when it comes to photography. But I can give you some tips on taking photos that will be useful for a new blog post, and that's what the following sections are all about.
Posts with photos are more likely to be read than those that don't have them, and readers respond well to them. The real secret is that, most of the time, your photos and images don't have to have a strong relationship to what you're blogging about. In fact, they can go off on a tangential topic or idea.
This isn't always true. After all, if you're blogging about your new mobile phone, a picture of that phone really is the way to go. And if you're talking about your recent trip to Peru — well, you need some pictures from your trip. But if you're just pontificating or talking about a favorite book, think about adding a photograph as more of an accessory.
Bloggers often add pictures of their cats to posts that just need a little zing, as Claudia does in her blog (www.claudiasblog.net) in the post shown in Figure 13-4 . I don't really know why this is. Are bloggers more likely to be cat owners than the general public? Do they just like their cats more? At any rate, it's hard to object to looking at a cute picture of a cat.

Figure 13.4. Figure 13-4: When you're stuck for words or need a visual, why not use a picture of your cat?
If you want to take photographs to put on your blog, the trick is to keep your eyes open all the time for visuals you are inspired by or interested in. Finding such things isn't rocket science, but it does require you to be thinking about your blog and your camera more often than you might normally. In fact, some bloggers find that carrying a camera with them actually helps them find things to blog about and helps them illustrate regular blog posts.
Here are a few tips for taking photos for your blog:
Carry your camera with you when you leave the house, even if you're just running down to the grocery store.
Keep fresh batteries in your camera so that when you need to use it, it isn't dead. If possible, keep a second set of batteries in your camera pouch. (By the way, digital cameras quickly suck up battery juice, so you really should buy rechargeable batteries.)
Don't worry too much about taking the perfect picture. Just take the picture!
Take photos of the people you meet and talk to and your friends. Be sure to ask them whether you can use their photo on your blog. Then, when you blog about going to a movie with Sam, you'll have a photo of Sam to include.
One nice thing about the Web: There are tons and tons of photos, images, graphics, and visuals out there to inspire you. Some bloggers have taken advantage of this by including some of those great visuals in their blog posts. This is popular with readers and a great idea, as long as you have the rights to republish those images. (See the sidebar “A word on copyright” in this chapter.)
A word on copyright
If you see a photo on the Internet, you can bet you bottom dollar it is protected by copyright, even if the photographer hasn't explicitly said so. Copyright is literally “the right to copy” an original creation and protects the author by giving that right solely to him or her. Unless the creator of an image or photo specifically licenses his or her copyright to you, you may not reuse it, even if you give the author credit or link back to the original image. (This is true of all text, too, including books, news stories, and so on.)
So, when you see a photo or image that you think would look great on your blog, look to see whether the author has given permission for it to be used with a Creative Commons license (www.creativecommons.org) or ask for permission to republish the work. Don't just steal it.
Here are some tips when you need images other than your own:
Checking the public domain: Some materials are designated
public domainworks, which means they can be used for any purpose, by anyone, though you must still give the author credit. If you're interested in featuring public domain and licensed images on your blog, do a search for “public domain photos” in your Web browser. There are a number of good resources that you can investigate.In the United States, anything published before 1923 is considered to be public domain, but this isn't true in other countries.
Searching through Creative Commons: You can also look for works that have been specifically licensed for republication using the Creative Commons licensing tools. To find things you can use, visit http://search.creativecommons.org and do a search using keywords that describe the material you're looking for.
Asking for permission: If you see something you like and want to use that is protected by full copyright, consider just asking whether you can use it. Many photographers, especially those who don't make a living selling their work, are willing to let you use their work, especially if you give them credit!
Many of the photos on the Flickr (www.flickr.com) photo‐sharing site have actually been licensed for use on other Web sites and blogs. When you're looking at a photo on Flickr, check the copyright information on the right side of the page.
Now it's time to edit a photo! As long as you have the rights to do so, you can edit any photo. In general, you can do what you like to photos you acquire from a public domain Web site or a picture you take yourself. Photos that you obtain permission to use, or use under a special license, may have restrictions when it comes to making edits, so be sure you understand what you're allowed to do. In the following sections, I show you how to do some of the most common photo‐editing tasks by using Picasa.
Most of the edits you want to make most frequently are resizing, cropping, adjusting lighting and contrast, and adjusting the color of a photo. For each of the following tasks, you should have Picasa running and have a photo available to edit.
When you edit a photo in Picasa, no changes are saved until you choose Save from the File menu. When you do this, Picasa saves the changes. At the same time, it creates a copy of the original image, so that if you ever need to start fresh you can.
Before you can edit a photo, you need to get it into Picasa. Here's how:
With Picasa installed on your computer, connect your camera to your computer.
You can also put your card into a card reader or printer, if that's how you usually move photos from your camera to your computer.
Windows displays a pop‐up window asking what program you would like to use.
Choose Picasa from the available programs and click OK.
Photos begin to load in Picasa's Import Tray.
Click Import All to bring the photos into Picasa.
The Finish Importing pop‐up window opens.
Create a folder name for the photos.
You can use the Browse button to set a location for the photos to be saved. The default location is the My Pictures folder.
You can also add information about where the photos were taken, the date, and given them a description, but this information is option.
Click Finish.
Picasa finishes importing the photos, and returns you to the photo Library.
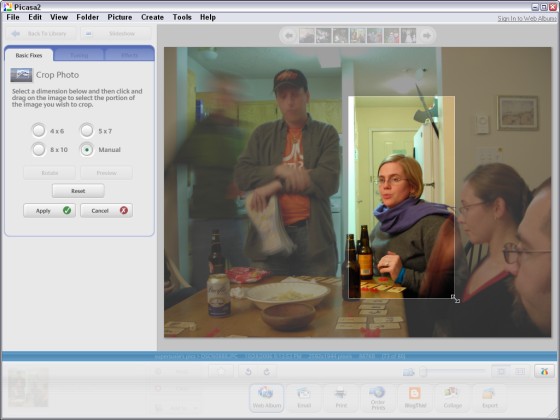
Cropping a photo allows you to remove unneeded or unattractive parts of an image. For example, if you take a picture of a group of friends and then want to include a photo of just one of the individuals in your blog post, you can crop out the other people in the image.
To crop a photo you've imported into Picasa, follow these steps:
Open Picasa and double‐click the photo you want to edit in the Library.
The Editing screen opens.
Click the Crop button at the top of the Basic Fixes tab.
Choose to crop to a preset size, or to crop manually.
If you're cropping to a preset size, simply click the size you want to use.
Use your mouse to click and drag over the area you want to retain in your photo, as shown in Figure 13-5 .
As you click and drag, the area that will be cropped out of your photo is slightly grayed out, leaving the portion that will be retained at the original brightness.
If you want to start over, click Reset, and the cropping box you created is removed. If you don't want to crop after all, click the Cancel button to exit the Crop tool.
Click the Preview button to see how the cropped photo will look.
Picasa displays the cropped photo.
Click the Apply button to crop your photo.
Picasa displays the cropped photo.
Sometimes, despite your best efforts, photos end up being too dark, or too light. With photo editing software like Picasa, you get a second chance, because you can make adjustments to brightness and contrast.
To adjust the brightness and contrast, follow these steps:
Open Picasa and double‐click the photo you want to edit in the Library.
The Editing screen opens.
Click the Tuning tab on the left side of the application.
On the Tuning tab, click and drag the slider bar under Highlights to adjust the brightness of the image.
Picasa adjusts the image being displayed as you move the bar.
If you are lightening the photo, watch the brightest parts of your photo to make sure they don't get too bright, losing information you want in the photo. If you are bringing down lightness, watch the darker areas of your photo so that you don't end up with too much black in your photo. Let your eyes be the judge of a well‐adjusted image.
You can have Picasa make an educated guess about the brightness settings you need by clicking the Auto Contrast button in the Basic Fixes tab. Click the Undo Auto Contrast button if you don't like the results.
Color is another area that frequently needs a little adjusting. I've taken too many greenish photos in fluorescent lights! With a little help from photo editing software like Picasa, I can turn my friends back to their normal skin colors.
To adjust the color of a photo, follow these steps:
Open Picasa and double‐click the photo you want to edit in the Library.
The Editing screen opens.
Click the Tuning tab on the left side of the application.
On the Tuning tab, click and drag the slider bar under Color Temperature to adjust the color tone of the picture.
Color can be tricky to adjust. As a good rule, look for an element in the photograph that you know should be a particular color, and adjust the overall color to make that element look right. Then look at the overall picture and adjust if necessary. Elements you can use for the purpose include eye color, skin color, sky, and other consistent elements.
You can have Picasa make an educated guess about the color settings you need by clicking the Auto Color button in the Basic Fixes tab. Click the Undo Auto Color button if you don't like the results.
Resizing a photo actually occurs when you export the image out of Picasa, so you don't need to resize until you've done all your other edits. When you export, you're creating a file you can upload to your blog, so don't skip this step!
You resize images in order to make them larger or smaller. Digital cameras common take larger images than you need for display on a blog or Web site, and it's not a great idea to make your blog visitors download a great big image when they don't need to. Usually, you resize your image to be smaller when you plan to put it on your blog.
To resize and export, select the photo in Picasa you want to export:
Click the Export button at the bottom right of the Picasa window.
The Export to Folder dialog box opens, as shown in Figure 13-6 .
Click the Browse button to choose the location where you want to save the file you're exporting.
To resize your image, click the Resize To button under Image Size Options.
Enter a pixel width you want to use for your new image.
You may need to experiment to find the right pixel width for your particular blog design, but a good rule is to choose a pixel width of 400 pixels.
You can also use the slider bar next to the pixel field to change the width.
Choose an Image Quality setting from the Image Quality drop‐down list.
For Web graphics, Normal is a good setting to choose.
Click OK.
Picasa exports your image to the folder you chose.

If you plan to upload your image to Flickr, don't worry about resizing the image when you export. Flickr can handle large files and will resize the photo for you.
With a photo prepared for use on your blog, you're ready to upload it to the Web. You can take two approaches here:
Uploading directly to your blog: If your blog software supports it, you might be able to upload your image directly into your blog post. In Blogger, for instance, you can use the Image Upload button in the New Post interface to upload an image. You can read more about how to do this in Blogger in Chapter 2.
Other online sharing sites: If your blog software doesn't include an image‐uploading tool, you can upload your photos to online sharing sites such as Flickr. You can then add your photo to your post.
Here's how you add photos to Flickr:
Log in to your Flickr account and choose Upload Photos from the home page, or click the arrow next to the You navigation button and choose Upload Photos from the menu that appears.
The Upload Photos to Flickr page appears.
A Select File dialog box opens, showing files on your computer.
Navigate to the location of the photo you want to upload, select the photo, and click Open.
Your photo goes into an upload queue on the Flickr page.
If you want to upload more photos, click the Add More link and add those photos to the queue as well.
Make sure that your Privacy setting is set to Public so that your photo can be viewed when you put it on your blog.
Click the Upload Photos button.
Flickr displays a progress bar and notifies you when your photo has been fully uploaded.
Click the Describe your photos link.
Give your photo a title, description, and tags that describe it.
Click the Save This Batch button.
Flickr adds your new photo(s) to your photo page.
Click the photo you just uploaded from your photo page.
Click the All Sizes icon above the photo, as shown in Figure 13-7 .
To post your photos directly from Flickr onto your blog and skip the rest of the steps, click the Blog This icon next to the All Sizes icon. Flickr shows you the starting point for configuring the connection between Flickr and your blog. Have the Web address for your blog's publishing interface, your username, and password ready.
Scroll down the page to find the HTML code for your photo, click in the code box, and copy that code into your Clipboard by pressing Ctrl+V (⌘+V on a Mac) or choosing Edit⇨Copy.
Go to your blogging software and start a new post.
Paste the code from Flickr into your post entry field.
Type your post as you normally would after the Flickr code.
Publish your post and be sure to check to see how it looks on the blog.

In Figure 13-8 , you can see a photo from Flickr posted in Gillian Gunson's blog Gillianic Tendencies (www.gunson.ca/blog).
Flickr uploading tools
You have five ways to upload your photos to Flickr. You can use the method described in this chapter, you can download the Flickr Uploadr tool and install it on your computer, use a plug‐in for iPhoto, or upload via e‐mail. If you upload via e‐mail, don't forget that you can use your mobile phone to e‐mail pictures directly onto your Flickr photostream.
To find out more about the Flickr uploading tools, go to www.flickr.com/tools.