
In This Chapter
Showing off some HTML code skills
Putting Flickr photos into your blog
Embedding YouTube videos in your posts
If you've ever thought about learning some geeky things or trying out some fancy new code on your blog, this chapter is for you. Knowing some HTML code lets you make your posts look better, and even do some nifty tricks like adding video to you blog. A few code basics can make you a better blogger, and it can do wonders for increasing your readership.
This chapter shows you that code isn't necessarily a digital monster just waiting to sneak up and bite you. If you follow some simple rules, you can make some great layout changes, so don't be afraid to experiment. Making a few small changes or tweaks to your blogging code can make all the difference to search engines, readers, and the overall quality of your blog.
On a blog, code can mean many things. It can refer to the complicated programming that makes up the software that runs your blog, or it can mean simple styles that make written words look cool when displayed on your blog. In this section, you find out how to make the text in your blog posts look like a million bucks. You can leave the blogging software code to the experts.
The first thing to know is that you're working with code inside a given blog post; it's the blog software itself that builds the blog pages. This means you don't have to know very many pieces of code — just those commonly used to format text and photos or to insert video files.
In fact, most of the code you need is actually HTML (HyperText Markup Language).
What is HTML?
HTML documents are really nothing but text, designed to be read and then displayed by your Internet browser. HTML tells your browser all kinds of things. For instance, it has instructions for all Internet browsers about where to find images that should be displayed, how the text on the screen is supposed to be aligned, and what text is linked to what Web page. It can also have instructions about how audio or video are to be displayed on the screen.
Using HTML is easy. Each bit of code, or tag, with few exceptions, has opening and closing tags to surround the element you want to affect. A few tags are standalone elements that are inserted in only one spot. The basic idea with HTML is that it is used to “mark up” text, photos, and other elements.
Long blocks of text generally benefit from being broken up, maybe even given labels here and there. Styling headers, adding line breaks, and making sure you use paragraphs can really improve the flow of your posts.
HTML has six levels of headings. H1 is the most important, H2 is slightly less important, and so on. The final heading is H6, and it's rarely used because it produces very small text. For most cases, first‐ and second‐level headers do the job, giving you text larger than the main body text, and they are also usually bold. You can implement header tags like this:
<h1>The most important heading ever</h1>
Like a light switch, the tag is turned on before the first letter of your header and turned off after the last character.
All headers are implemented the same way — just substitute the number 1 with a 2, 3, 4, 5 or 6:
<h2>The second most important heading ever</h2>
Figure 5-1 shows each of the header tags as the browser interprets and displays them.

Headers are interesting because they have more than just an effect on how your text looks: Search engines understand that text defined by a header tag is important, so words and phrases you enclose in a header will be marked as especially relevant to your site.
To create paragraph breaks, you need to start the new paragraph with a <p> tag. The closing </p> is placed at the end of the paragraph after the text, like this (see Figure 5-2 for how the browser displays this code):
<p>Paragraph one has amazing text in it.</p>
<p>Paragraph two has amazing text in it too.</p>
<p>Paragraph three is being neglected by the first and second paragraphs.</p>
Most blogging software makes provision for paragraph breaks automatically, but if you ever end up looking at the code, you'll be able to recognize these fundamentally important tags. On most Web sites, paragraph breaks actually produce the effect of two line breaks, so that paragraphs are spaced out from each other in the same way they are in this book.
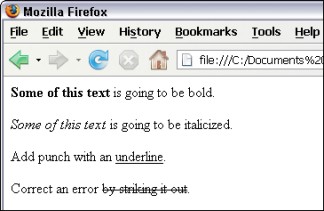
Dress up your text by using italics, underlining, bold, or even strikethrough code. These are on/off tags, so you place the first tag at the start of the text you want to affect, and follow the text with the closing tag. Figure 5-3 shows how each of the following code examples is displayed in the browser.
Here are the codes for each:
Bold:
<b>or<strong><b>Some of this text</b> is going to be bold.Italics:
<i>or<em><i>Some of this text</i> is going to be italicized.Underline:
<u>Add punch with an <u>underline</u>.Strikethrough:
<strike>Correct an error <strike>by striking it out</strike>.
Even though I just showed you how to create underlines in your blog posts, I don't actually recommend that you use this style. As you know, underlining is a common way of indicating links online, so it can be very confusing for your readers to see underlined text that isn't also a link.
As a blogger, you'll be doing all kinds of reading. A bunch of what you should be reading is other blogs. When reading other blogs, you're bound to want to comment on or quote other people's blog posts. You might also run across some news article that you want to tell other people about.
Links make the Web what it is — an interlocking canvas of information that bounces visitors from one Web site to another. Used judiciously, you can add enormous value to your blog posts with links by informing readers, linking to more detail, pointing out a great news article, or sending them to another page on your own blog or Web site.
In HTML, links are defined with the <a> tag (the a stands for anchor). But that's not all! This special tag gets what's called an attribute and a value to go along with the basic tag. The attribute is href, and it indicates to the browser that what comes next is a hypertext reference — in this case, a Web page. The value is the actual Web page that's being linked to, enclosed in quotation marks. Here's how all that looks in action:
This link goes to <a href="http://www.google.com">Google</a>.
When the preceding line is posted in a blog, the word Google is a clickable link that leads to the Google Web site.
Make sure you use the full URL when you create a link. That means you need to include the http://! Unless you include that prefix, the browser won't understand that it needs to find another Web site, but it will instead look for a document on your Web site called www.google.com.
Also note that when you turn off the tag, you need to turn off only the main tag, not the attribute or value. Those are turned off automatically simply by using the closing </a> tag.
You can also use this tag around an image to make the image clickable to a Web page. Simply place the tag around your image code, like so:
<a href="http://www.google.com"><img src="googlelogo.gif"></a>
Read more about putting an image into your blog posts later in this chapter, in the section Adding images
Lists are a great way to let people know about your favorite kinds of candy, music, or whatever. With a little help from your friendly HTML you can create three types of lists: unordered lists, ordered lists, and definition lists.
All lists, no matter the flavor, are created using a series of HTML tags. This makes them more complicated to implement, so pay close attention to those closing tags — they're easy to forget.
An unordered list is a series of bulleted items and is used for lists that do not require numbering. For example, if you want to create a list of cat breeds, you don't need to list them in any particular order. But if you were ranking the breeds from 1 through 5, you would want to make sure the number one breed is at the top. Unordered lists use the <ul> and <li> tags. Set up the code as I do in this list of kinds of chocolate:
<ul>
<li>Milk.</li>
<li>Dark.</li>
<li>White.</li>
</ul>
The <ul> tag stands for unordered list, and is turned on at the beginning of the list, and turned off following the last item in the list. The <li> tag stands for list item; it gets turned on at the beginning of each new item and turned off at the end of that item. Figure 5-4 shows an unordered list.

An ordered list contains items that are ranked, or must be listed in a particular order, like a list of ranks or preferences. It may also indicate a list of steps for the reader to follow. Format an ordered list just the way you format an unordered list, substituting the <ol> tag for the <ul> tag (see Figure 5-5 ):
<ol>
<li>Get a graham cracker.</li>
<li>Lay on a piece of chocolate.</li>
<li>Add a toasted marshmallow.</li>
<li>Add a second graham cracker on top, squish marshmallow, and eat.</li>
</ol>
Always make sure you're closing the lists with the appropriate closing tag.
Customizing bullets and numbers
With a little more code, you can customize the kind of bullets that are used in your unordered lists, or use Roman numerals or letters instead of numbers in your ordered lists. To do this, you need to add an attribute and value to the code you're already using. For example, you can change the bullets shown in your unordered lists to squares like this:
<ul type=”square”>
<li>Milk.</li>
<li>Dark.</li>
<li>White.</li>
</ul>
Experiment with setting the type to circle, as well.
To use letters instead of numbers in an ordered list:
<ol type=”a”>
<li>Get a graham cracker.</li>
<li>Lay on a piece of chocolate.</li>
<li>Add a toasted marshmallow.</li>
<li>Add a second graham cracker on top, squish marshmallow, and eat.</li>
</ol>
Using a capital A if you want your list to be shown with capital letters instead of lowercase. To use Roman numerals, set the type to be i or I.
The third type of HTML list is the definition list. This type of list gives a term and then its definition and has built‐in spacing to lay those elements out properly. Each list starts with a <dl> tag and closes with the </dl> tag. Each term starts with a <dt> tag and each definition starts with a <dd>. Sound confusing? Well, it is, a little. This is definitely one of the most complicated HTML tags:
<dl>
<dt>Milk chocolate.</dt>
<dd>Makes a standard smore; a workmanlike choice.</dd>
<dt>Dark chocolate.</dt>
<dd>Makes a designer smore; clearly the superior choice.</dd>
<dt>White chocolate.</dt>
<dd>Pretends to be chocolate, but isn't; a poor choice.</dd>
</dl>
Figure 5-6 shows how a definition list looks in a Web browser. Pretty neat, huh?
Make sure to close each of the tags with their matching tags. The end tags </dt> and </dd> shouldn't be left off.

You can embed a list inside another list. In fact, you can even embed a different kind of list into a list. Each time you embed a new list, additional indenting is creating, giving you a nice stair‐stepped look in your final page.
Here's how you should format the code for placing an unordered sublist inside an ordered list in a s'more recipe:
<ol>
<li>Get a graham cracker.</li>
<li>Lay on a piece of chocolate. It can be:
   <ul>
   <li> Milk</li>
   <li> Dark</li>
   <li> White</li>
   </ul>
</li>
<li>Add a toasted marshmallow.</li>
<li>Add a second graham cracker on top, squish marshmallow, and eat.</li>
</ol>
Figure 5-7 shows how this list looks in a Web browser.

In Chapter 13, I talk about using the popular photo service Flickr to store your images so you can insert them into your blog posts, and give you some tips for getting code for inserting those images in your blog. In this section, though, you see the straight HTML code for inserting photos or other graphics in your blog posts.
Images can be used to make your blog unique — they're such a great way to add value to your blog, and readers really respond to photos.
The HTML for inserting an image is the same no matter whether you're putting up a photograph, a graphic, or even an animated GIF. Assume, for a moment, that you have a photograph image file called mypugdog.jpg. Getting it onto your blog takes two steps:
Get the file onto a Web server somewhere so that it is online.
I recommend using Flickr, so check out Chapter 13 for more information on that.
Create the HTML the calls that file into your blog posts:
<img src="http://www.mywebsite.com/mypugdog.jpg" width="400px" height="250px" alt="My Pug Dog" />
The
srcattribute tells the browser that an image is available at that URL location and filename. Theheightandwidthattributes are the pixel measurements of the image, and thealtattribute sets up a text description of the image that can be seen by search engines.
You can find images in any number of ways. For example, use a digital camera to take your own photographs or use some of the great stock photography resources on the Web to find photos others have taken. iStockphoto (www.istockphoto.com) is one terrific and inexpensive source of stock photos and illustrations.
If you want to find out more about digital cameras and photos, check out the current edition of Digital Photography For Dummies, by Julie Adair King, published by Wiley.
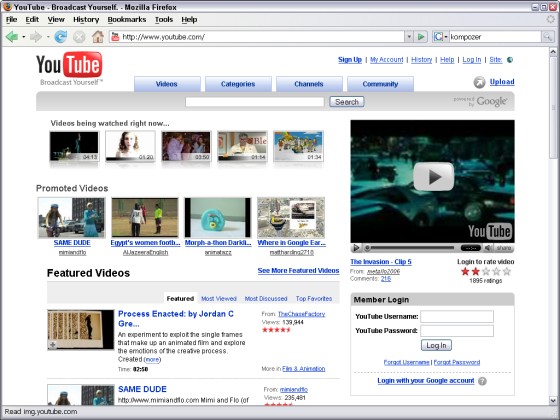
YouTube (www.youtube.com) is a video‐sharing service that provides users with the ability to share their home movies and other videos with other members of the community. Using social networking techniques like comments, ratings, and simple sharing, YouTube videos litter the Internet, especially blogs.
YouTube, shown in Figure 5-8 , went online at the beginning of 2005 and was a sensation within weeks. At the time, no one really understood the impact it would have, and now, some time later, bloggers everywhere are shooting video and posting video commentary on their blogs.
Video has proved to be a popular and dynamic Web format, and quite a few bloggers have moved from text to video: These video blogs are called vlogs, and the practice of video blogging is vlogging. Even bloggers who traditionally post text and photos sometimes indulge by posting a video they create themselves or one created by someone and shared via YouTube.
YouTube users can upload videos much in the way Flickr users can upload photos, and obtain similar sorts of results: Videos can be shared with friends, comments can be left, and the files can even be included in blog posts. When the video is uploaded, the YouTube system takes the video and formats it to stream through its video player technology. The format of your videos, after they're uploaded to YouTube, is accessible on most browsers without too many additional add‐ons to the browser.
YouTube gets its share of videos that are actually copyrighted material, and when those are removed by YouTube's staff, they won't be accessible from blog posts or Web pages in which they're embedded.
Video production is too big a topic to get into in detail in this chapter, but if you're interested in exploring this exciting format, check out Digital Video For Dummies, by Keith Underdahl (published by Wiley). And for more on videoblogging, jump to Chapter 14.
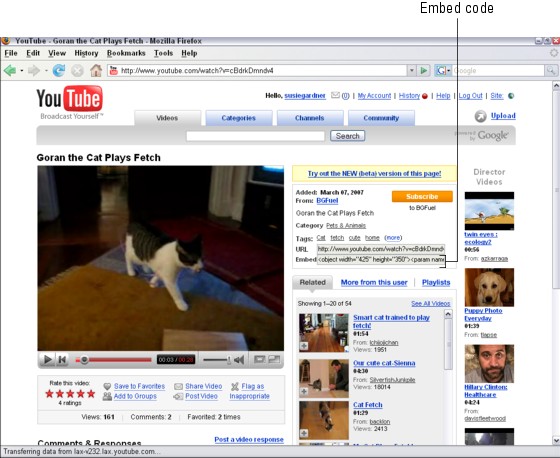
To add a YouTube video to your blog, here's what you do:
Find a video on YouTube you want to include in a post on your blog.
Find the Embed code on the video page, as shown in Figure 5-9 .
Highlight the Embed HTML code and copy it (press Ctrl+C or choose Edit⇨Copy).
Paste (press Ctrl+V or choose Edit⇨Paste) the code into your blog entry and publish your blog post.
Check your blog to make sure the video is displaying properly.
Every blog package treats text in its blog posts differently. Some protect blog posts by filtering out certain kinds of HTML code. If you paste the HTML embed tags into your blog software, it might remove them when you post the blog entry to the system. If this happens, look for a code view of your blog post interface, and refer to your blog software documentation.
Other video sharing Web sites
Don't like YouTube? Not a fan of Google Video? There are many different video solutions for bloggers.
Blip.tv: (www.blip.tv) Blip.tv says its goal is to take care of “the servers, the software, the advertising and the distribution” of putting video or a podcast online, so that you can spend your time being creative. Use blip.tv to share your videos using the online uploading process, and then post to your blog.
Revver: (www.revver.com) Revver is a video‐sharing Web site that offers free and unlimited media sharing, and handles the advertising and technology for you. In fact, Revver splits ad revenue earned by ads placed on your videos with you.
Daily Motion: (www.dailymotion.com) Like Revver and Blip.tv, you can use Daily Motion to upload and share your videos. You can share them publicly or keep them private to your friends and family, and post them to your blog.
Do some research on video sharing services as some of them add restrictions and requirements in their terms of service documents that you need to be aware of. Some claim copyright on your videos while others claim the rights to resell your home movies, some without asking for your permission. Read all of the fine print before choosing your video hosting service.