
This appendix provides the solutions for the end-of-chapter exercises located at the end of each chapter, except Chapter 1.
CHAPTER 2 EXERCISE SOLUTIONS
The minimum image size you should design is 57 × 57 pixels. It is all right to design a larger image because the iPhone automatically resizes it for you. In general, try to design a larger image because doing so prepares your application for the newer devices that Apple may roll out.
You should implement the shouldAutorotateToInterfaceOrientation: method and code the appropriate statements to support the orientation you want. To support all orientations, simply return a YES in this method, like this:
- (BOOL)shouldAutorotateToInterfaceOrientation:(UIInterfaceOrientation)
interfaceOrientation {
    // Return YES for supported orientations
    return YES;
}
CHAPTER 3 EXERCISE SOLUTIONS
In the .h file:
//---declare an outlet---IBOutlet UITextField *nameTextField;//... //... //---expose the outlet as a property---@property (nonatomic, retain) UITextField *nameTextField;
In the .m file:
@implementation BasicUIViewController
//---generate the getters and setters for the property---
@synthesize nameTextField;CHAPTER 4 EXERCISE SOLUTIONS
To connect a view to its View Controller, do the following within its .xib file:
In the File's Owner item, specify the class to the name of the View Controller.
Connect the File's Owner item to the view.
You use an alert view when displaying a message to the user. If you have several options to let the user choose from, you should use the action sheet.
- (void)loadView {

    //---create a UIView object---
    UIView *view =
        [[UIView alloc] initWithFrame:[UIScreen mainScreen].applicationFrame];
    view.backgroundColor = [UIColor lightGrayColor];

    //---create a Button view---
    frame = CGRectMake(10, 70, 300, 50);

    UIButton *button = [UIButton buttonWithType:UIButtonTypeRoundedRect];
    button.frame = frame;

    [button setTitle:@"Click Me, Please!" forState:UIControlStateNormal];
    button.backgroundColor = [UIColor clearColor];
    button.tag = 2000;
    [button addTarget:self action:@selector(buttonClicked:)
        forControlEvents:UIControlEventTouchUpInside];

    [view addSubview:button];

    self.view = view;

}
CHAPTER 5 EXERCISE SOLUTIONS
First, handle the Did End on Exit event (or implement the textFieldShouldReturn: method in the View Controller). Then call the resignFirstResponder method of the UITextField object to release its first-responder status.
Register for the two notificationsL UIKeyboardWillShowNotification and UIKeyboardWillHideNotification.
CHAPTER 6 EXERCISE SOLUTIONS
-(BOOL)shouldAutorotateToInterfaceOrientation:
(UIInterfaceOrientation)interfaceOrientation {

   return (interfaceOrientation == UIInterfaceOrientationLandscapeLeft ||
           interfaceOrientation == UIInterfaceOrientationLandscapeRight);

}The frame property defines the rectangle occupied by the view, with respect to its superview (the view that contains it). Using the frame property allows you to set the positioning and size of a view. Besides using the frame property, you can also use the center property, which sets the center of the view, also with respect to its superview. You usually use the center property when you are performing some animation and just want to change the position of a view.
CHAPTER 7 EXERCISE SOLUTIONS
mySecondViewController = [[MySecondViewController alloc]
                                 initWithNibName:nil
bundle:nil];- (void)viewDidLoad {
//---create a CGRect for the positioning---
CGRect frame = CGRectMake(10, 10, 300, 50);
//---create a Label view---
label = [[UILabel alloc] initWithFrame:frame];
label.textAlignment = UITextAlignmentCenter;
label.font = [UIFont fontWithName:@"Verdana" size:20];
label.text = @"This is a label";
//---create a Button view---
frame = CGRectMake(10, 250, 300, 50);
button = [[UIButton buttonWithType:UIButtonTypeRoundedRect]
initWithFrame:frame];[button setTitle:@"OK" forState:UIControlStateNormal];
button.backgroundColor = [UIColor clearColor];
[self.view addSubview:label];
[self.view addSubview:button];
[super viewDidLoad];
}CHAPTER 8 EXERCISE SOLUTIONS
Codefile [TabBarAndNav.zip]
Using Xcode, create a new Tab Bar Application project and name it
TabBarAndNav.Double-click
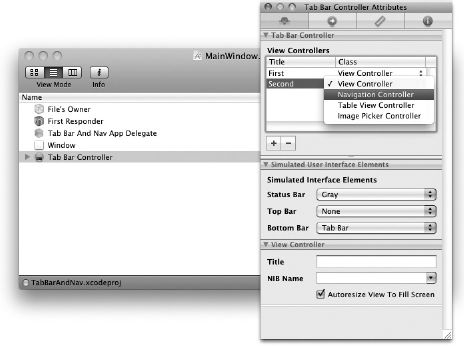
MainWindow.xibto edit it in Interface Builder.Select the Tab Bar Controller item and view its Attributes Inspector window (see Figure A-1). Set the Second view controller to
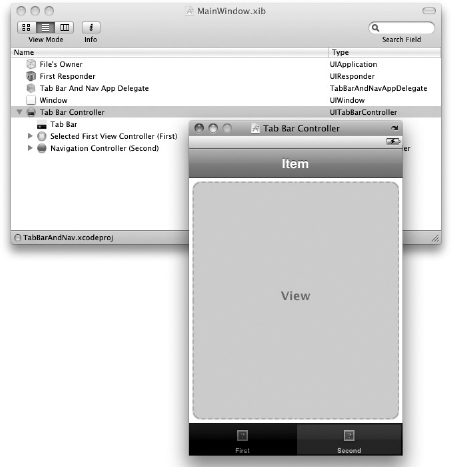
Navigation Controller.Double-click the Tab Bar Controller item (see Figure A-2) and click the second Tab Bar Item view located at the bottom of the view. You should now see a Navigation Bar at the top of the view.
Back in Xcode, right-click Classes and add a new
UITableViewControllersubclass item. Name itMoviesListViewController.m.Right-click the Resources group, add a new View
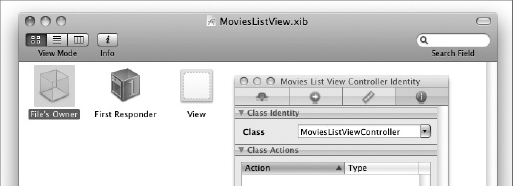
.xibfile, and name itMoviesListView.xib.Double-click the
MoviesListView.xibfile and set its Class name toMoviesListViewController(see Figure A-3).Drag and drop the Table View view from the Library onto the
MoviesListView.xibwindow (see Figure A-4). Remove the View item from the same window.Control-click and drag the File's Owner item to Table View and select
view.Control-click and drag the Table View to the File's Owner item and select
datasource.Control-click and drag the Table View to the File's Owner item and select
delegate.Verify the connections of the Table View by right-clicking it. Figure A-5 shows the required connection.
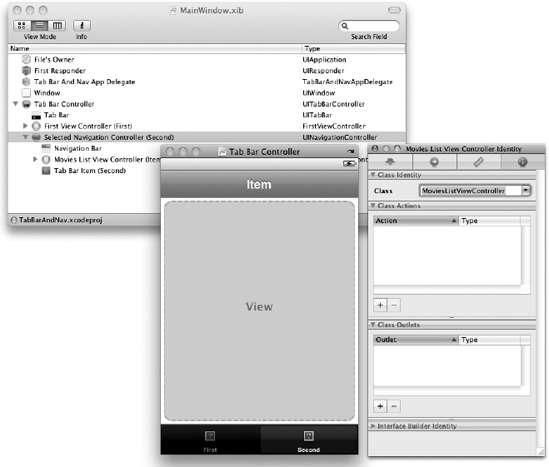
Back in the
MainWindow.xibwindow, expand the Tab Bar Controller item and select its second View Controller. Set its Class name toMoviesListViewController(see Figure A-6).Double-click the
SecondView.xibfile in Xcode to edit it in Interface Builder. Select the File's Owner item, and in the Identity Inspector window, change its Class toMovieListViewController.Save the project in Interface Builder.
Back in Xcode, insert the following code that appears in bold into the
MoviesListViewController.mfile:#import "MoviesListViewController.h" @implementation MoviesListViewController
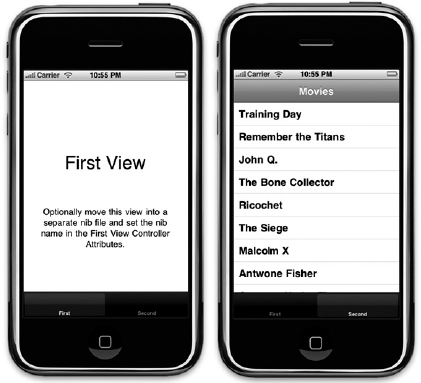
NSMutableArray *listOfMovies;- (void)viewDidLoad {//---initialize the array---listOfMovies = [[NSMutableArray alloc] init];//---add items---[listOfMovies addObject:@"Training Day"];[listOfMovies addObject:@"Remember the Titans"];[listOfMovies addObject:@"John Q."];[listOfMovies addObject:@"The Bone Collector"];[listOfMovies addObject:@"Ricochet"];[listOfMovies addObject:@"The Siege"];[listOfMovies addObject:@"Malcolm X"];[listOfMovies addObject:@"Antwone Fisher"];[listOfMovies addObject:@"Courage Under Fire"];[listOfMovies addObject:@"He Got Game"];[listOfMovies addObject:@"The Pelican Brief"];[listOfMovies addObject:@"Glory"];[listOfMovies addObject:@"The Preacher's Wife"];//---set the title---self.navigationItem.title = @"Movies";[super viewDidLoad]; } - (void)dealloc {[listOfMovies release];[super dealloc]; } // Customize the number of rows in the table view. - (NSInteger)tableView:(UITableView *)tableView numberOfRowsInSection:(NSInteger)section {return [listOfMovies count];} // Customize the appearance of table view cells. - (UITableViewCell *)tableView:(UITableView *)tableView cellForRowAtIndexPath:(NSIndexPath *)indexPath { static NSString *CellIdentifier = @"Cell"; UITableViewCell *cell = [tableView dequeueReusableCellWithIdentifier:CellIdentifier]; if (cell == nil) { cell = [[[UITableViewCell alloc] initWithStyle: UITableViewCellStyleDefault reuseIdentifier:CellIdentifier] autorelease]; }NSString *cellValue = [listOfMovies objectAtIndex:indexPath.row];cell.labelText. text = cellValue;return cell; }Press Command-R to test the application on the iPhone Simulator. Clicking the Second Tab Bar item should display a list of movies (see Figure A-7).
If you want to display the movie selected on a separate view, just add another
.xibfile and View Controller to it. This step is outlined in Chapter 8, in the section "Navigating to Another View."


CHAPTER 9 EXERCISE SOLUTIONS
You can turn off the highlighting effect by selecting the Info button in Interface Builder and viewing its attributes in the Attributes Inspector window. Deselect the option named "Show Touch On Highlight."
Assuming that you want to pass a string from the FlipsideViewController to the MainViewController, the following statements that appear in bold show how you can pass data from one view to another using a property:
FLIPSIDEVIEWCONTROLLER.H
#import "AddCountryViewController.h";

@protocol FlipsideViewControllerDelegate;

@interface FlipsideViewController : UIViewController
<AddCountryViewControllerDelegate> {
id <FlipsideViewControllerDelegate> delegate;

//---internal member---
    NSString *str;

}

@property (nonatomic, assign) id <FlipsideViewControllerDelegate> delegate;

//---expose the member as a property---
@property (nonatomic, retain) NSString *str;

- (IBAction)done;
- (IBAction)add;
@end

@protocol FlipsideViewControllerDelegate
- (void)flipsideViewControllerDidFinish:(FlipsideViewController *)controller;
@end
FLIPSIDEVIEWCONTROLLER.M
#import "FlipsideViewController.h" @implementation FlipsideViewController @synthesize delegate;//---generates the getter and setter for the property---@synthesize str;- (IBAction)done {//---set a value to the property---self.str = @"Some text";[self.delegate flipsideViewControllerDidFinish:self]; }
MAINVIEWCONTROLLER.M
- (void)flipsideViewControllerDidFinish:(FlipsideViewController *)controller {

    //---prints out the string obtained in the Debugger Console window---
    NSLog(controller.str);

    [self dismissModalViewControllerAnimated:YES];
}
CHAPTER 10 EXERCISE SOLUTIONs
The two protocols are UITableViewDataSource and UITableViewDelegate.
The UITableViewDataSource protocol contains events in which you can populate the Table view with various items.
The UITableViewDelegate protocol contains events in which you can handle the selection of rows in a Table view.
To add an index list to your Table view, you need to implement the sectionIndexTitlesForTableView: method.
The three disclosure and checkmark images are as follows:
UITableViewCellAccessoryDetailDisclosureButtonUITableViewCellAccessoryCheckmarkUITableViewCellAccessoryDisclosureIndicator
The UITableViewCellAccessoryDetailDisclosureButton image handles a user's tap event. The event name is tableView:accessoryButtonTappedForRowWithIndexPath:.
CHAPTER 11 EXERCISE SOLUTIONS
For retrieving preferences settings values, you use the objectForKey: method. For saving preferences settings values, you use the setObject:forKey: method.
You can either remove the application from the device or Simulator, or you can remove the file ending with application_name.plist in the application folder within the Simulator.
CHAPTER 12 EXERCISE SOLUTIONS
The sqlite3_exec() function is actually a wrapper for the three functions: sqlite3_prepare(); sqlite3_step(); and sqlite3_finalize(). For nonquery SQL statements (such as for creating tables, inserting rows, and so on), it is always better to use the sqlite3_exec() function.
To obtain a C-style string from an NSString object, use the UTF8String method from the NSString class.
NSString *qsql = @"SELECT * FROM CONTACTS";
sqlite3_stmt *statement;

if (sqlite3_prepare_v2( db, [qsql UTF8String], −1, &statement, nil) ==
    SQLITE_OK) {

        while (sqlite3_step(statement) == SQLITE_ROW)
        {
            char *field1 = (char *) sqlite3_column_text(statement, 0);
            NSString *field1Str = [[NSString alloc] initWithUTF8String: field1];

            char *field2 = (char *) sqlite3_column_text(statement, 1);
            NSString *field2Str = [[NSString    alloc] initWithUTF8String: field2];

            NSString *str = [[NSString alloc] initWithFormat:@"%@ - %@",
                                field1Str, field2Str];
            NSLog(str);

            [field1Str release];
[field2Str release];
[str release];
}
//---deletes the compiled statement from memory---
sqlite3_finalize(statement);
}CHAPTER 13 EXERCISE SOLUTIONS
The three folders are Documents, Library, and tmp. The Documents folder can be used by the developer to store application-related data. The Library stores application-specific settings, such as those used by the NSUserDefaults class. The tmp folder can be used to store temporary data that will not be backed up by iTunes.
The NSDictionary class creates a dictionary object whose items are immutable; that is, after it is populated, you can no longer add items to it. The NSMutableDictionary class, on the other hand, creates a mutable dictionary object that allows items to be added to it after it is loaded.
CHAPTER 14 EXERCISE SOLUTIONS
The four events are as follows:
touchesBegan:withEvent:touchesEnded:withEvent:touchesMoved:withEvent:touchesCancelled:withEvent:
When you multi-tap, you tap a single point in quick succession. This is similar to double-clicking in Mac OS X. When you multi-touch, on the other hand, you touch multiple contact points on the screen.
CHAPTER 15 EXERCISE SOLUTIONS
The only way to pause the NSTimer object is to call its invalidate method. To make it continue, you have to create a new NSTimer object.
CHAPTER 16 EXERCISE SOLUTIONS
For invoking Safari:
@"http://www.apple.com"
For invoking Mail:
@"mailto:[email protected]&subject=Hello&body=Content of email"
For invoking SMS:
@"sms:96924065"
For invoking Phone:
@"tel:1234567890"
CHAPTER 17 EXERCISE SOLUTIONS
For the first-generation iPhone, Core Location uses cell tower triangulation and Wi-Fi triangulation to determine its position. This is because first-generation iPhone does not have a built-in GPS receiver. For second- and third-generation devices, Core Location uses the three different methods. For iPod Touch, it uses only Wi-Fi triangulation because it has neither a GPS receiver nor cellular connectivity.