
WHAT YOU WILL LEARN IN THIS CHAPTER
How to create a Window-based Application and manually add a View Controller and a View window to it
How to create views dynamically during runtime
How to wire up events of views with event handlers via code
How to switch to another view during runtime
How to animate the switching of views
Until this point, you have been dealing with single view applications; that is, applications with a single View Controller. The previous chapters have all been using the View-based Application template available in the iPhone SDK because it is the simplest way to get started in iPhone programming. When you create a View-based application, there is by default one View Controller (named <project_name>ViewController by the iPhone SDK). In real-life applications, you often need more than one View Controller, with each controlling a different view displaying different information. A good example of a multiview application is the Weather application shipped with the iPhone. The main view shows the weather of a region you have selected, and you can swipe the screen to view the weather of other locations. You can also press the i icon to flip to another view and add locations.
This chapter teaches you how to create multiple views in your application and then programmatically switch among them during runtime. In addition, you learn how to animate the switching of views using the built-in animation methods available in the iPhone SDK.
In this section, you discover another type of application template you can create using the iPhone SDK: the Window-based Application template. Unlike the View-based Application template, the Window-based Application template does not include a View Controller by default. Instead, it provides only the skeleton of an iPhone application and leaves the rest to the developer — you need to add your own views and View Controllers. Because of this, a Window-based Application presents a very good way for you to understand how View Controllers work and appreciate all the work needed to connect the View Controllers and XIB files. When you understand how View Controllers work, you will be on your way to creating multiview applications.
To put first things first, execute the following Try it Out to write a Window-based Application and then progressively add a View Controller to it. You will need to download the project files as indicated here for this and other Try It Out features in this chapter.
TRY IT OUT: Adding a View Controller Using Interface Builder
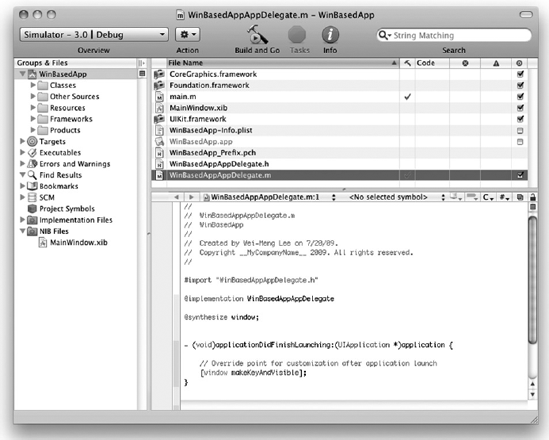
Codefile [WinBasedApp.zip] available for download on Wrox.comUsing Xcode, create a Window-based Application project and name it
WinBasedApp. Observe the files created for this project type (see Figure 7-1). Apart from the other, usual supporting file, note that there is only one XIB file (MainWindow.xib) and two delegate files (WinBasedAppAppDelegate.handWinBasedAppAppDelegate.m).Press Command-R to test the application, and you will realize that an empty screen is displayed on the iPhone Simulator. This is because the Window-based Application template provides only the skeleton structure for a simple iPhone application containing just a window and the application delegate.
Back in Xcode, double-click
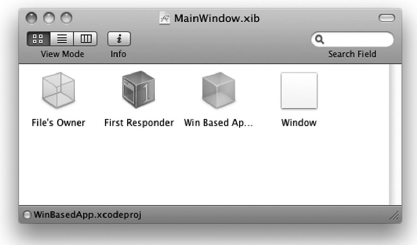
MainWindow.xibto edit it in Interface Builder. Observe that there are four items in theMainWindow.xibwindow (see Figure 7-2):File's Owner
First Responder
Win Based App App Delegate
Window
From the Library window, drag and drop a
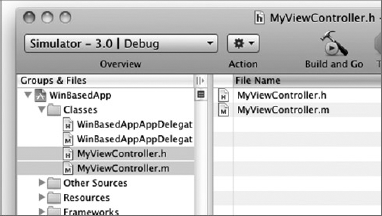
View Controlleritem onto theMainWindow.xibwindow (see Figure 7-3). You will connect thisView Controlleritem to a view that you will add to the project.Back in Xcode, right-click the Classes group in Xcode and add a new file. Select the
UIViewControllersubclass item and name itMyViewController. As you will be adding the XIB file manually in the later steps, uncheck the "With XIB for user interface" checkbox. Xcode should now look like Figure 7-4. The two files will serve as theView Controllerclass for theView Controlleritem you have added previously in Interface Builder.Right-click the Resources group in Xcode and add a new file. Select the View XIB item and name it
MyView.xib. Xcode should now look like Figure 7-5.Back in Interface Builder, select the
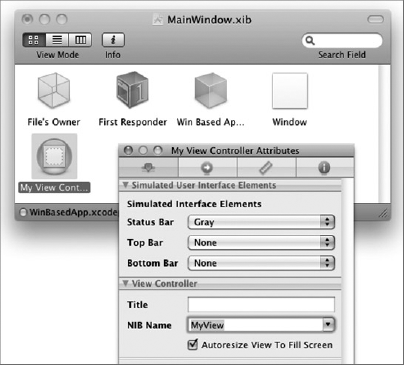
View Controlleritem in theMainWindow.xibwindow and view its Identity Inspector window. In the Class drop-down list, selectMyViewController(see Figure 7-6). The name of the View Controller will now change toMy View Controller.View the Attributes Inspector window for the
My View Controller, and for the NIB Name drop-down list, selectMyView(see Figure 7-7).Double-click
MyView.xibin Xcode to edit it in Interface Builder. In theMyView.xibwindow, select the File's Owner item and in its Identity Inspector window, select theMyViewControlleras its Class name (see Figure 7-8). This means that the XIB file will be controlled by theMyViewControllerclass.Control-click and drag the File's Owner item to the
Viewitem. Selectview.Note
The step is important as it indicates that MyViewController will be actually be controlling the View window. Failure to perform this step will result in a runtime error.
Double-click the
Viewitem in theMyView.xibwindow and add a Button view to the View window (see Figure 7-9).Back in Xcode, insert the bold lines in the following code into the
WinBasedAppAppDelegate.hfile:#import <UIKit/UIKit.h>
@class MyViewController;@interface WinBasedAppAppDelegate : NSObject <UIApplicationDelegate> { UIWindow *window;//---create an instance of the view controller---MyViewController *myViewController;} @property (nonatomic, retain) IBOutlet UIWindow *window;//---expose the view controller as a property---@property (nonatomic, retain) IBOutlet MyViewController *myViewController;@endIn the
WinBasedAppAppDelegate.mfile, insert the following code lines that appear in bold:#import "WinBasedAppAppDelegate.h"
#import "MyViewController.h"@implementation WinBasedAppAppDelegate @synthesize window;//---synthesize the property---@synthesize myViewController;- (void)applicationDidFinishLaunching:(UIApplication *)application { // Override point for customization after application launch//---add the new view to the current window---[window addSubview:myViewController.view];[window makeKeyAndVisible]; } - (void)dealloc {[myViewController release];[window release]; [super dealloc]; } @endIn the
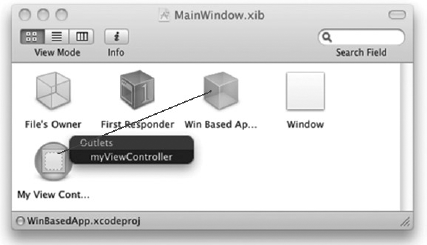
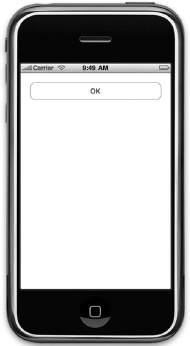
MainWindow.xibwindow, Control-click and drag theWin Based App App Delegateitem to theMy View Controlleritem (see Figure 7-10). SelectmyViewController. This will associate the window with the View Controller.That's it! Press Command-R to test the application on the iPhone Simulator. You should now see the button appearing on the main screen of the application (see Figure 7-11).
Note
As an exercise, you might want to create an action to display an alert view when the button is pressed.


How It Works
When you create an iPhone project using the Window-based Application template, Xcode provides you with only the bare minimum number of items in your project — a MainWindow.xib file and the application delegate. You are supposed to add your own View Controller and view.
In the preceding exercise, you first added a View Controller item to the MainWindow.xib window. You then added an instance of the UIViewController class (which you named MyViewController) so that it could be connected to the View Controller you just added. This controller class contains the code that you will write to handle the interactions between the view and the user.
You also added a XIB file to the project (MyView.xib) representing a View in Interface Builder. Take note of the various steps that you need to perform to connect the relevant classes to the correct XIB and View Controller items.
When the application has finished launching, you add the View represented by the myViewController object to the window so that it is visible using the addSubview: method of the UIWindow instance:
[window addSubview:myViewController.view];
Besides adding a View Controller and views using Interface Builder, a commonly used technique is to programmatically create the views during runtime. This provides a lot of flexibility, especially when you are writing games for which the UI of the application is constantly changing.
In the following Try It Out, you learn how you can create a View using an instance of the UIViewController class and then programmatically add views to it.
TRY IT OUT: Adding a View Controller Programmatically
Using the same project, right-click the Classes group in Xcode and add a new file. Select the
UIViewControllersubclass item and name itMySecondViewController. Xcode should now look like Figure 7-12.In the
WinBasedAppAppDelegate.hfile, add the following code that appears in bold:#import "WinBasedAppAppDelegate.h" #import "MyViewController.h"
#import "MySecondViewController.h"@implementation WinBasedAppAppDelegate @synthesize window; @synthesize myViewController;//---create an instance of the second view controller---MySecondViewController *mySecondViewController;- (void)applicationDidFinishLaunching:(UIApplication *)application {//---instantiate the second view controller---mySecondViewController = [[MySecondViewController alloc]initWithNibName:nilbundle:nil];//---add the view from the second view controller---[window addSubview:mySecondViewController.view];//---comment this out so that it doesn't load the myViewController---//[window addSubview:myViewController.view];[window makeKeyAndVisible]; } - (void)dealloc {[mySecondViewController release];[myViewController release]; [window release]; [super dealloc]; }In the
MySecondViewController.hfile, insert the following lines of code that appear in bold:#import <UIKit/UIKit.h> @interface MySecondViewController : UIViewController {//---create two outlets - label and button---UILabel *label;UIButton *button;} //---expose the outlets as properties---@property (nonatomic, retain) UILabel *label;@property (nonatomic, retain) UIButton *button;@endIn the
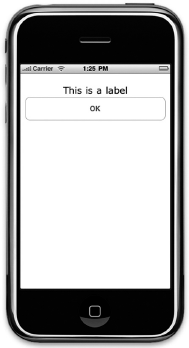
MySecondViewController.mfile, add theviewDidLoad()method://---synthesize the properties--- @synthesize label, button; - (void)viewDidLoad { //---create a CGRect for the positioning--- CGRect frame = CGRectMake(10, 10, 300, 50); //---create a Label view--- label = [[UILabel alloc] initWithFrame:frame]; label.textAlignment = UITextAlignmentCenter; label.font = [UIFont fontWithName:@"Verdana" size:20]; label.text = @"This is a label"; //---create a Button view--- frame = CGRectMake(10, 250, 300, 50); button = [UIButton buttonWithType:UIButtonTypeRoundedRect]; button.frame = frame; [button setTitle:@"OK" forState:UIControlStateNormal]; button.backgroundColor = [UIColor clearColor]; [self.view addSubview:label]; [self.view addSubview:button]; [super viewDidLoad]; }Press Command-R to test the application on the iPhone Simulator. You will now see the Label and Button views on the main screen of the application (see Figure 7-13).

How It Works
In contrast to the previous example, in which you added a View Controller item, an instance of the UIViewController class, and a XIB file to your project, this example simply creates an instance of the UIViewController class and adds the views programmatically to the main View window.
In the application delegate, after the application has finished launching, you create an instance of the UIViewController class that you have created:
//---instantiate the view controller---
mySecondViewController = [[MySecondViewController alloc]
                             initWithNibName:nil
                             bundle:nil];
You do not need an XIB file because the various views that you will be using will be added programmatically. Hence the initWithNibName: parameter can be set to nil.
To load the View window represented by the instance of the UIViewController class, you use the addSubview: method of the UIWindow instance:
//---add the view from the view controller---
    [window addSubview:mySecondViewController.view];
To programmatically create your views during runtime, you need to override the viewDidLoad() method of the UIViewController class. Here, you create instances of the Label and Button views manually, specifying their positions as well as their text captions. Finally, you add them to the main View window:
- (void)viewDidLoad {
    //---create a CGRect for the positioning---
    CGRect frame = CGRectMake(10, 10, 300, 50);

    //---create a Label view---
    label = [[UILabel alloc] initWithFrame:frame];
    label.textAlignment = UITextAlignmentCenter;
    label.font = [UIFont fontWithName:@"Verdana" size:20];
    label.text = @"This is a label";

    //---create a Button view---
    frame = CGRectMake(10, 250, 300, 50);
button = [UIButton buttonWithType:UIButtonTypeRoundedRect];
button.frame = frame;
[button setTitle:@"OK" forState:UIControlStateNormal];
button.backgroundColor = [UIColor clearColor];
//---add the views to the current View---
[self.view addSubview:label];
[self.view addSubview:button];
[super viewDidLoad];
}In the previous section, you saw that you can programmatically add views during runtime. Also, in the example, you saw how you can add a Label and Button view to the main View. However, you would need to handle the events raised by the Button view so that when the user presses it, you can perform some work. In Chapter 3, you learned about using outlets and actions and how you connect your code to them using Interface Builder. In the following Try it Out, the views are created using code, and hence you cannot use Interface Builder to connect the actions and outlets — you have to do it by code, too.
TRY IT OUT: Linking Actions to Views
Using the same project created in the previous section, declare the
buttonClicked:action (shown in bold) in theMySecondViewController.hfile as follows:#import <UIKit/UIKit.h> @interface MySecondViewController : UIViewController { UILabel *label; UIButton *button; } @property (nonatomic, retain) UILabel *label; @property (nonatomic, retain) UIButton *button;//---declaring the IBAction----(IBAction) buttonClicked: (id) sender;@endIn the
MySecondViewController.mfile, you provide the implementation for thebuttonClicked:action:-(IBAction) buttonClicked: (id) sender{ UIAlertView *alert = [[UIAlertView alloc] initWithTitle:@"Action invoked!" message:@"Button clicked!"delegate:self cancelButtonTitle:@"OK" otherButtonTitles:nil]; [alert show]; [alert release]; }To connect the relevant event (
Touch Up Inside) of the Button view with thebuttonClicked:action, add the following code that appears in bold to theloadView()method:- (void)viewDidLoad { CGRect frame = CGRectMake(10, 10, 300, 50); //---create a Label view--- label = [[UILabel alloc] initWithFrame:frame]; label.textAlignment = UITextAlignmentCenter; label.font = [UIFont fontWithName:@"Verdana" size:20]; label.text = @"This is a label"; //---create a Button view--- frame = CGRectMake(10, 50, 300, 50); button = [[UIButton buttonWithType:UIButtonTypeRoundedRect] initWithFrame:frame]; [button setTitle:@"OK" forState:UIControlStateNormal]; button.backgroundColor = [UIColor clearColor];//---add the action handler and set current class as target---[button addTarget:selfaction:@selector(buttonClicked:)forControlEvents:UIControlEventTouchUpInside];//---add the views to the current View--- [self.view addSubview:label]; [self.view addSubview:button]; [super viewDidLoad]; }That's it! Press Command-R to test the application on the iPhone Simulator. Pressing the OK button displays an alert view (see Figure 7-14).

So far, you have been learning about single-view applications. However, in real life, you often have a number of views, each representing different pieces of information. Depending on the selections made by the user, you then switch to different views to perform different tasks.
Hence, in this section you learn how you can switch to another view depending on the selection made by the user.
TRY IT OUT: Switching Views
Using the same project created in the previous section, add the following code that appears in bold to the
MySecondViewController.mfile:#import "MySecondViewController.h"
#import "MyViewController.h"@implementation MySecondViewController @synthesize label, button;//---create an instance of the view controller---MyViewController *myViewController;-(IBAction) buttonClicked: (id) sender{//---add the view of the view controller to the current View---myViewController = [[MyViewController alloc]initWithNibName:@"MyView" bundle:nil];[self.view addSubview:myViewController.view];//---comment out this section---/*UIAlertView *alert = [[UIAlertView alloc] initWithTitle:@"Action invoked!"message:@"Button clicked!"delegate:selfcancelButtonTitle:@"OK"otherButtonTitles:nil];[alert show];[alert release];*/} - (void)dealloc {[myViewController release];[label release]; [super dealloc]; }Declare a
btnClicked:action in theMyViewController.hfile:#import <UIKit/UIKit.h> @interface MyViewController : UIViewController { }-(IBAction) btnClicked:(id) sender;@endIn the
MyViewController.mfile, define thebtnClicked:action as follows:-(IBAction) btnClicked:(id) sender{ //---remove the current view; essentially hiding the view--- [self.view removeFromSuperview]; }Double-click the
MyView.xibfile to edit it in Interface Builder.Control-click and drag the OK button in the View window to the File's Owner item in the
MyView.xibwindow and selectbtnClicked:.Back in Xcode, press Command-R to test the application. When you now click the OK button in the main View, you are brought to the second View (see Figure 7-15). To close the second View, press the OK button.

How It Works
For this example, you simply add the View of the view controller (that you are switching to) to the current view using the addSubview: method:
//---add the view of the view controller to the current View---
    myViewController = [[MyViewController alloc]
                           initWithNibName:@"MyView" bundle:nil];
    [self.view addSubview:myViewController.view];
To dismiss a view, you use the removeFromSuperview: method:
//---remove the current view; essentially hiding the view---
[self.view removeFromSuperview];The switching of Views that you have just seen in the previous section happens instantaneously — the two Views change immediately without any visual cues. One of the key selling points of the iPhone is its animation capabilities. Therefore for the switching of views, you can make the display a little more interesting by performing some simple animations, such as flipping one View to reveal another. Here is how to do that.
TRY IT OUT: Animating the Transitions
Using the same project, add the following code that appears in bold to the
MySecondViewController.mfile:-(IBAction) buttonClicked: (id) sender{ myViewController = [[MyViewController alloc] initWithNibName:@"MyView" bundle:nil];[UIView beginAnimations:@"flipping view" context:nil];[UIView setAnimationDuration:1];[UIView setAnimationCurve:UIViewAnimationCurveEaseInOut];[UIView setAnimationTransition: UIViewAnimationTransitionFlipFromLeftforView:self.view cache:YES];[self.view addSubview:myViewController.view];[UIView commitAnimations];}In the
MyViewController.m file, add the following code that appears in bold:-(IBAction) btnClicked:(id) sender{[UIView beginAnimations:@"flipping view" context:nil];[UIView setAnimationDuration:1];[UIView setAnimationCurve:UIViewAnimationCurveEaseIn];[UIView setAnimationTransition: UIViewAnimationTransitionFlipFromRightforView:self.view.superview cache:YES];[self.view removeFromSuperview];[UIView commitAnimations];}Press Command-R to test the application on the iPhone Simulator. Click the OK buttons on both Views and notice the direction in which the two Views flipped to one another (see Figure 7-16).

How It Works
First, examine the animation that is applied to the MySecondViewController. You perform the animation by first calling the beginAnimations: method of the UIView class to start the animation block:
[UIView beginAnimations:@"flipping view" context:nil];
The setAnimationDuration: method specifies the duration of the animation in seconds. Here, you set it to one second:
[UIView setAnimationDuration:1];
The setAnimationCurve: method sets the curve of the animating property changes within an animation:
[UIView setAnimationCurve:UIViewAnimationCurveEaseInOut];
You can use the following constants for the curve of the animation:
UIViewAnimationCurveEaseInOut— causes the animation to begin slowly, accelerate through the middle of its duration, and then slow again before completingUIViewAnimationCurveEaseIn— causes the animation to begin slowly and then speed up as it progressesUIViewAnimationCurveEaseOut— causes the animation to begin quickly and then slow as it completesUIViewAnimationCurveLinear— causes an animation to occur evenly over its duration
The setAnimationTransition: method applies a transition type to be applied to a view during the animation duration.
[UIView setAnimationTransition: UIViewAnimationTransitionFlipFromLeft
            forView:self.view cache:YES];
The cache: parameter specifies whether the iPhone should cache the image of the view and use it during the transition. Caching the image speeds up the animation process. The following constants can be used for the animation transition:
UIViewAnimationTransitionNone— no transitionUIViewAnimationTransitionFlipFromLeft— flips a view around a vertical axis from left to rightUIViewAnimationTransitionFlipFromRight— flips a view around a vertical axis from right to leftUIViewAnimationTransitionCurlUp— curls a view up from the bottomUIViewAnimationTransitionCurlDown— curls a view down from the top
To end the animation, call the commitAnimations: method:
[UIView commitAnimations];
The animation performed on the MyViewController is similar to that of the MySecondViewController, except that the view to animate must be set to self.view.superview:
[UIView setAnimationTransition: UIViewAnimationTransitionFlipFromRight
forView:self.view.superview cache:YES];In this chapter, you had your first experience with Window-based Application projects. The Window-based Application template is a good starting point for you to really understand the nuts and bolts of the UI of an iPhone application. You also learned how to switch between two views and apply animations to the transition process. In the next chapter, you learn the next type of application template supported by the iPhone SDK: Tab Bar applications. A Tab Bar application is another type of multiview application that you can build, except that all the groundwork has already been done for you to make your life easy.
EXERCISES
Write the code snippet that allows you to create a View Controller programmatically.
Write the code snippet that creates a view dynamically during runtime.
Write the code snippet that wires up an event of a view with an event handler.
WHAT YOU HAVE LEARNED IN THIS CHAPTER
TOPIC | KEY CONCEPTS |
|---|---|
Adding a View Controller manually | Add an instance of the |
Creating a |
label = [[UILabel alloc] initWithFrame:frame]; label.textAlignment = UITextAlignmentCenter; label.font = [UIFont fontWithName:@"Verdana" size:20]; label.text = @"This is a label"; |
Creating a |
frame = CGRectMake(10, 250, 300, 50); button = [[UIButton buttonWithType:UIButtonTypeRoundedRect] initWithFrame:frame]; [button setTitle:@"OK" forState:UIControlStateNormal]; button.backgroundColor = [UIColor clearColor]; |
Wiring up an event with an event handler |
button addTarget:self action:@selector(buttonClicked:) forControlEvents: UIControlEventTouchUpInside]; |
Switching to another view |
myViewController = [[MyViewController alloc] initWithNibName:@"MyView" bundle:nil]; [self.view addSubview:myViewController.view]; |
Animating the view transition |
UIView beginAnimations:@"flipping view" context:nil]; [UIView setAnimationDuration:1]; [UIView setAnimationCurve: UIViewAnimationCurveEaseInOut]; [UIView setAnimationTransition: UIViewAnimationTransitionFlipFromLeft forView:self.view cache:YES]; [self.view addSubview:myViewController.view]; [UIView commitAnimations]; |