
WHAT YOU WILL LEARN IN THIS CHAPTER
How to use the
UIAlertViewto display an alert view to the userHow to use the
UIActionSheetto display some options to the userHow to use the
UIPageControlto control pagingHow to use the
UIImageViewto display imagesHow to use the
UISegmentedControlto display a set of buttons for the user to choose amongHow to use the
UIWebViewto display Web content in your applicationHow to add views dynamically to your application during runtime
How to wire a view to a View Controller
How to switch between views
Up to this point, you should already have some ideas of how to use Xcode and Interface Builder to build iPhone applications. In this chapter, you dive into the various views that you can use to spice up your applications. You learn how you can add views using Interface Builder, as well as how to create views dynamically during runtime.
So far, you have seen quite a number of views in action in the previous few chapters — Round Rect Button, TextField, and Label. All these views are quite straightforward, but they give you a good opportunity to understand how to apply the concepts behind outlets and actions.
To use more views, you can locate them from the Library window in Interface Builder (see Figure 4-1).
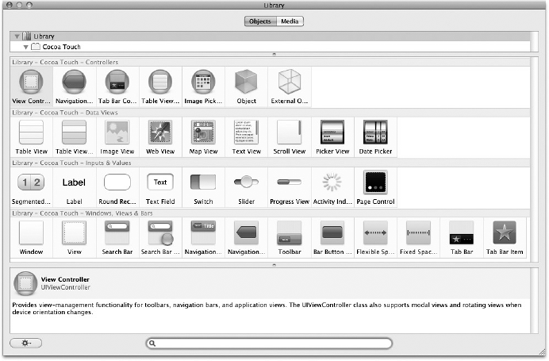
As you can see, the Library is divided into sections:
Controllers — contains views that control other views, such as the View Controller, Tab Bar Controller, Navigation Controller, and so on
Data Views — contains views that display data, such as the Image View, Table View, Data Picker, Picker View, and so on
Inputs and Values — contains views that accept inputs from users, such as the Label, Round Rect Button, Text Field, and so on
Windows, Views & Bars — contains views that display other, miscellaneous views, such as View, Search Bar, Toolbar, and so on
In the following sections, you learn how to use some of the views available in the Library. Although it is beyond the scope of this book to show the use of each view, you have the opportunity to see a number of views in action throughout the book. In this chapter, you learn some of the fundamental concepts of dealing with views so that you can use other views without problems.
One of the views that is not listed in the Library is the UIAlertView. The UIAlertView displays an alert view to the user and is usually created during runtime. Hence, to use it you have to create it using code.
Note
You have actually seen the UIAlertView in the previous chapter. In this section, you see how it actually works.
The UIAlertView is useful for cases in which you have to display a message to the user. In addition, it can serve as a quick debugging tool when you want to observe the value of a variable during runtime.
The following Try It Out explores the UIAlertView in more detail. You need to download the code as indicated here.
TRY IT OUT: Using the Alert View
Codefile [UsingViews.zip] available for download at Wrox.comUsing Xcode, create a new View-based Application project and name it
UsingViews.In the
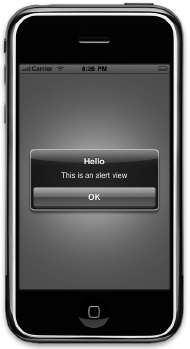
UsingViewsViewController.mfile, add the following code that appears in bold to theviewDidLoadmethod:- (void)viewDidLoad {UIAlertView *alert = [[UIAlertView alloc] initWithTitle:@"Hello"message:@"This is an alert view"delegate:selfcancelButtonTitle:@"OK"otherButtonTitles:nil];[alert show];[alert release];[super viewDidLoad]; }Press Command-R to test the application on the iPhone Simulator. When the application is loaded, you see the alert view as shown in Figure 4-2.
Back in Xcode, modify the
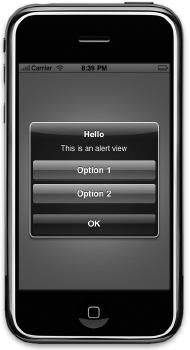
otherButtonTitlesparameter by setting it with the value shown in bold:UIAlertView *alert = [[UIAlertView alloc] initWithTitle:@"Hello" message:@"This is an alert view" delegate:self cancelButtonTitle:@"OK" otherButtonTitles:@"Option1",@"Option 2", nil];In the
UsingViewsViewController.hfile, add the following line that appears in bold:#import <UIKit/UIKit.h> @interface UsingViewsViewController : UIViewController<UIAlertViewDelegate> {} @endIn the
UsingViewsViewController.mfile, add the following method:- (void)alertView:(UIAlertView *)alertView clickedButtonAtIndex: (NSInteger)buttonIndex { NSLog([NSString stringWithFormat:@"%d", buttonIndex]); }Press Command-R to test the application in the iPhone Simulator. Notice that there are now two additional buttons besides the OK button (see Figure 4-3).
Click any one of the buttons — Option 1, Option 2, or OK.
In Xcode, press Command-Shift-R to view the Debugger Console window. Observe the values printed. You can rerun the application a number of times and click the different buttons to observe the values printed.
You should observe the values printed for each button clicked:
OK button — 0
Option 1 — 1
Option 2 — 2
How It Works
To use UIAlertView, you first instantiate it and initialize it with the various arguments:
UIAlertView *alert = [[UIAlertView alloc] initWithTitle:@"Hello"
message:@"This is an alert view"
delegate:self
cancelButtonTitle:@"OK"
otherButtonTitles:nil];The first parameter is the title of the alert view, which you set to "Hello". The second is the message, which you set to "This is an alert view". The third is the delegate, which you need to set to an object that will handle the events fired by the UIAlertView object. In this case, you set it to self, which means that the event handler will be implemented in the current class, that is, the View Controller. The cancelButtonTitle parameter displays a button to dismiss your alert view. Last, the otherButtonTitles parameter allows you to display additional buttons if needed. If no additional buttons are needed, simply set this to nil.
To show the alert view modally, use the show method:
[alert show];
For simple use of the alert view, you don't really need to handle the events fired by it. Tapping the OK button (as set in the cancelButtonTitle parameter) simply dismisses the alert view.
If you want more than one button, you need to set the otherButtonTitles parameter, like this:
UIAlertView *alert = [[UIAlertView alloc] initWithTitle:@"Hello"
message:@"This is an alert view"
delegate:self
cancelButtonTitle:@"OK"
otherButtonTitles:@"Option 1", @"Option 2", nil];Note that you need to end the otherButtonTitles parameter with a nil or a runtime error will occur.
Now that you have three buttons, you need to be able to know which button the user pressed —in particular, whether Option 1 or Option 2 was pressed. To do so, you need to handle the event raised by the UIAlertView class. You do so by ensuring that your View Controller conforms to the UIAlertViewDelegate protocol:
@interface UsingViewsViewController : UIViewController
<UIAlertViewDelegate> {
//...The UIAlertViewDelegate protocol contains several methods associated with the alert view. To know which button the user tapped, you need to implement the alertView:clickedButtonAtIndex: method:
- (void)alertView:(UIAlertView *)alertView clickedButtonAtIndex:
    (NSInteger)buttonIndex {

    NSLog([NSString stringWithFormat:@"%d", buttonIndex]);

}The index of the button clicked will be passed in via the clickedButtonAtIndex: parameter.
Note
Refer to Appendix D for a discussion of the concept of protocols in Objective-C.
Although the Alert view can display multiple buttons, its primary use is still as a tool to alert users when something happens. If you need to display a message with multiple choices for the user to select, you should use an action sheet rather than the Alert view. An action sheet displays a collection of buttons among which the user can select one. It always emerges from the bottom of the screen and is anchored to the sides of the screen, giving the cue to the user that the action sheet's details are connected to the current application. A good example of the use of an action sheet is when you tap on the "+" button in Safari. Tapping on the "+" button displays an action sheet where you add a bookmark, add the current page to the Home Screen, or mail the link of the current page. The following Try It Out puts you to work with an action sheet.
TRY IT OUT: Using an Action Sheet
Using the same project created in the previous section, modify the
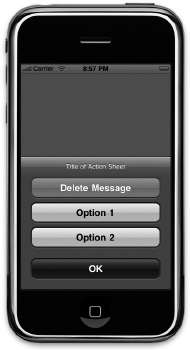
viewDidLoadmethod (in theUsingViewsViewController.mfile) as follows:- (void)viewDidLoad {UIActionSheet *action = [[UIActionSheet alloc]initWithTitle:@"Title of Action Sheet"delegate:selfcancelButtonTitle:@"OK"destructiveButtonTitle:@"Delete Message"otherButtonTitles:@"Option 1", @"Option 2", nil];[action showInView:self.view];[action release];[super viewDidLoad]; }In the
UsingViewsViewController.hfile, add the following statement that appears in bold:#import <UIKit/UIKit.h> @interface UsingViewsViewController : UIViewController<UIActionSheetDelegate> {} @endIn the
UsingViewsViewController.mfile, add the following statement that appears in bold:- (void)actionSheet:(UIActionSheet *)actionSheet clickedButtonAtIndex:(NSInteger)buttonIndex{NSLog([NSString stringWithFormat:@"%d", buttonIndex]);}Press Command-R to test the application using the iPhone Simulator. Figure 4-4 shows the action sheet in action.
Click any one of the buttons: Delete Message, Option 1, Option 2, or OK.
In Xcode, press Command-Shift-R to view the Debugger Console window. Observe the values printed. You can rerun the application a number of times and click the different buttons to observe the values printed.
You should observe the values that printed for each button clicked:
Delete Message — 0
Option 1 — 1
Option 2 — 2
OK — 3
How It Works
The action sheet works very similarly to the Alert view but is visually different. To show the action sheet, you need to specify the view that the action sheet is originating from:
UIActionSheet *action = [[UIActionSheet alloc]
initWithTitle:@"Title of Action Sheet"
delegate:self
cancelButtonTitle:@"OK"
destructiveButtonTitle:@"Delete Message"
otherButtonTitles:@"Option 1", @"Option 2", nil];
[action showInView:self.view];Note that the button as specified in the destructiveButtonTitle: parameter is displayed in red.
To handle the events fired by the action sheet, you need the View Controller to conform to the UIActionSheetDelegate protocol:
@interface UsingViewsViewController : UIViewController
<UIActionSheetDelegate> {
//...To know which button was tapped, you need to implement the actionSheet:clickedButtonAtIndex: method:
- (void)actionSheet:(UIActionSheet *)actionSheet
clickedButtonAtIndex:(NSInteger)buttonIndex{

    NSLog([NSString stringWithFormat:@"%d", buttonIndex]);

}The index of the button clicked will be passed in via the clickedButtonAtIndex: parameter.
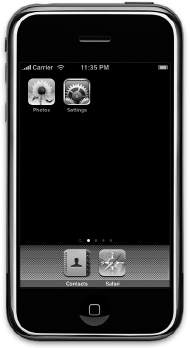
On the Home screen of the iPhone, you see a series of dots at the bottom of the screen. A lighted dot represents the currently selected page. As you swipe the page to the next page, the next dot will be lighted. In the iPhone SDK, the series of dots is represented by the UIPageControl class. Figure 4-5 shows the page control in action on the Home screen of the iPhone.
In the following exercise, you learn how to use the page control view within your own application to switch between images displayed in the ImageView view.
TRY IT OUT: Using the Page Control and the Image View
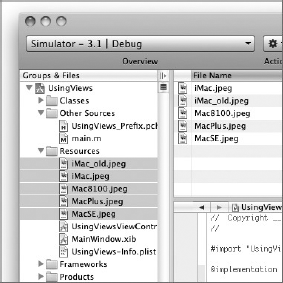
Using the same project created in the previous two sections, add five images to the Resources folder by dragging and dropping them from the Finder. Figure 4-6 shows the five images added to the project.
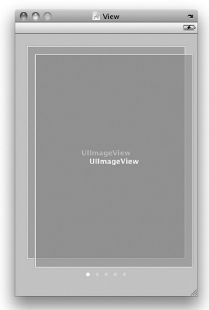
Double-click the
UsingViewsViewController.xib fileto edit it using Interface Builder.Drag and drop two ImageView views onto the View window. (see Figure 4-7). At this point, overlap them (but not entirely) as shown in the figure.
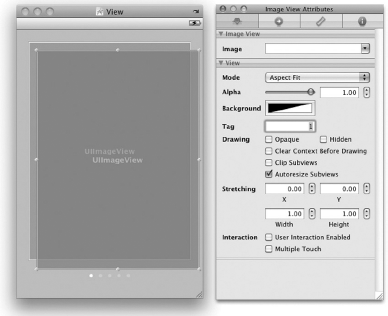
With one of the ImageView views selected, open the Attributes Inspector window and set the
Tagproperty to 0. Select the second ImageView and set theTagproperty to 1 (see Figure 4-8).Drag and drop the Page Control view onto the View window and set its number of pages to five (see Figure 4-9).
Note
Ensure that you increase the width of the Page Control view so that all five dots are now visible.
Back in Xcode, in the
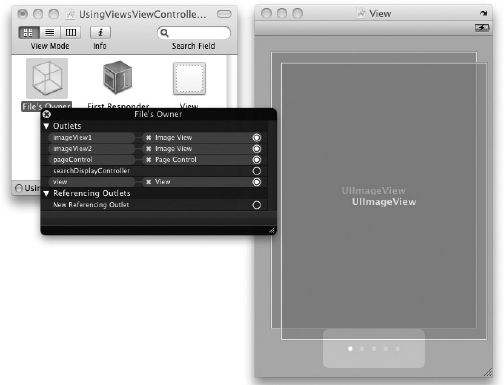
UsingViewsViewController.hfile, define three outlets and twoUIImageViewobjects:#import <UIKit/UIKit.h> @interface UsingViewsViewController : UIViewController {IBOutlet UIPageControl *pageControl;IBOutlet UIImageView *imageView1;IBOutlet UIImageView *imageView2;UIImageView *tempImageView, *bgImageView;}@property (nonatomic, retain) UIPageControl *pageControl;@property (nonatomic, retain) UIImageView *imageView1;@property (nonatomic, retain) UIImageView *imageView2;@endIn Interface Builder, connect the three outlets to the views on the View window. Figure 4-10 shows the connections made for the
imageView1, imageView2, andpageControloutlets.You can now rearrange the ImageView views on the View window so that they overlap each other.
In Xcode, add the following statements that appear in bold to the
UsingViewsViewController.mfile:#import "UsingViewsViewController.h" @implementation UsingViewsViewController
@synthesize pageControl;@synthesize imageView1, imageView2;- (void)viewDidLoad {//---initialize the first imageview to display an image---[imageView1 setImage:[UIImage imageNamed:@"iMac_old.jpeg"]];tempImageView = imageView2;//---make the first imageview visible and hide the second---[imageView1 setHidden:NO];[imageView2 setHidden:YES];//---add the event handler for the page control---[pageControl addTarget:self action:@selector(pageTurning:)forControlEvents:UIControlEventValueChanged];[super viewDidLoad]; } //---when the page control's value is changed---
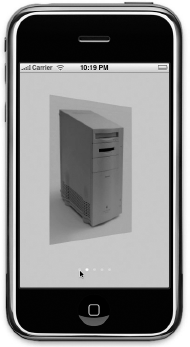
- (void) pageTurning: (UIPageControl *) pageController{//---get the page number you can turning to---NSInteger nextPage = [pageController currentPage];switch (nextPage) {case 0:[tempImageView setImage:[UIImage imageNamed:@"iMac_old.jpeg"]];break;case 1:[tempImageView setImage:[UIImage imageNamed:@"iMac.jpeg"]];break;case 2:[tempImageView setImage:[UIImage imageNamed:@"Mac8100.jpeg"]];break;case 3:[tempImageView setImage:[UIImage imageNamed:@"MacPlus.jpeg"]];break;case 4:[tempImageView setImage:[UIImage imageNamed:@"MacSE.jpeg"]];break;default:break;}//---switch the two imageview views---if (tempImageView.tag==0) { //---imageView1---tempImageView = imageView2;bgImageView = imageView1;}else { //---imageView2---tempImageView = imageView1;bgImageView = imageView2;}//---animate the two views flipping---[UIView beginAnimations:@"flipping view" context:nil];[UIView setAnimationDuration:0.5];[UIView setAnimationCurve:UIViewAnimationCurveEaseInOut];[UIView setAnimationTransition: UIViewAnimationTransitionFlipFromLeftforView:tempImageView cache:YES];[tempImageView setHidden:YES];[UIView commitAnimations];[UIView beginAnimations:@"flipping view" context:nil];[UIView setAnimationDuration:0.5];[UIView setAnimationCurve:UIViewAnimationCurveEaseInOut];[UIView setAnimationTransition: UIViewAnimationTransitionFlipFromRightforView:bgImageView cache:YES];[bgImageView setHidden:NO];[UIView commitAnimations];}- (void)dealloc {[pageControl release];[imageView1 release];[imageView2 release];[super dealloc]; } - (void)didReceiveMemoryWarning { // Releases the view if it doesn't have a superview. [super didReceiveMemoryWarning]; } - (void)viewDidUnload { } @endPress Command-R to test the application on the iPhone Simulator. When you tap the Page Control located at the bottom of the screen, the image view flips to display the next one (see Figure 4-11).

How It Works
When the View is first loaded, you get one of the ImageView views to display an image and then hide the other:
//---initialize the first imageview to display an image---
    [imageView1 setImage:[UIImage imageNamed:@"iMac_old.jpeg"]];
    tempImageView = imageView2;

    //---make the first imageview visible and hide the second---
    [imageView1 setHidden:NO];
    [imageView2 setHidden:YES];
You then wire the Page Control so that when the user taps it, an event is fired and triggers a method. In this case, the pageTurning: method is called:
//---add the event handler for the page control---
[pageControl addTarget:self action:@selector(pageTurning:)
     forControlEvents:UIControlEventValueChanged];
     [super viewDidLoad];
In the pageTurning: method, you determine which image you should load based on the value of the Page Control:
//---when the page control's value is changed---
- (void) pageTurning: (UIPageControl *) pageController
{
    //---get the page number you can turning to---
    NSInteger nextPage = [pageController currentPage];
switch (nextPage) {
case 0:
[tempImageView setImage:[UIImage imageNamed:@"iMac_old.jpeg"]];
break;
case 1:
[tempImageView setImage:[UIImage imageNamed:@"iMac.jpeg"]];
break;
case 2:
[tempImageView setImage:[UIImage imageNamed:@"Mac8100.jpeg"]];
break;
case 3:
[tempImageView setImage:[UIImage imageNamed:@"MacPlus.jpeg"]];
break;
case 4:
[tempImageView setImage:[UIImage imageNamed:@"MacSE.jpeg"]];
break;
default:
break;
}
//...
}You then switch the two ImageView views and animate them by using the various methods in the UIView class:
//---switch the two imageview views---
    if (tempImageView.tag==0) { //---imageView1---
        tempImageView = imageView2;
        bgImageView = imageView1;
    }
    else {    //---imageView2---
        tempImageView = imageView1;
        bgImageView = imageView2;
    }

    //---animate the two views flipping---
    [UIView beginAnimations:@"flipping view" context:nil];
    [UIView setAnimationDuration:0.5];
    [UIView setAnimationCurve:UIViewAnimationCurveEaseInOut];
    [UIView setAnimationTransition: UIViewAnimationTransitionFlipFromLeft
        forView:tempImageView cache:YES];
    [tempImageView setHidden:YES];
    [UIView commitAnimations];

    [UIView beginAnimations:@"flipping view" context:nil];
    [UIView setAnimationDuration:0.5];
    [UIView setAnimationCurve:UIViewAnimationCurveEaseInOut];
    [UIView setAnimationTransition: UIViewAnimationTransitionFlipFromRight
        forView:bgImageView cache:YES];
    [bgImageView setHidden:NO];
    [UIView commitAnimations];
Specifically, you apply the flipping transitions to the ImageView views:
[UIView setAnimationTransition: UIViewAnimationTransitionFlipFromLeft
forView:tempImageView cache:YES];A segmented control is a horizontal view that contains a series of buttons. Using a segmented control, users can tap any one of the buttons contained within it. Doing so deselects the button that was previously selected.
The following Try It Out shows how to use the segmented control to group several views together. It also shows how you can use this control to select a particular group of views.
TRY IT OUT: Using a Segmented Control
Codefile [UsingViews2.zip] available for download at Wrox.comUsing Xcode, create a new View-based Application project and name it
UsingViews2.Double-click the
UsingViews2ViewController.xibfile to edit it using Interface Builder.Add the following views to the View window (see Figure 4-12):
Segmented Control
View
Label (make sure it is embedded within View)
Add another View (from the Library) onto the View window and then add a Label view to it (see Figure 4-13). Be careful when you position the second view — make sure that the second view is not contained within the first view. This is because when you use the mouse and drag the second View over the first, Interface Builder will think that you are trying to make the second View a child of the first View. To prevent this from happening, use the cursor to move the second view over the first. The View window should now look like Figure 4-13.
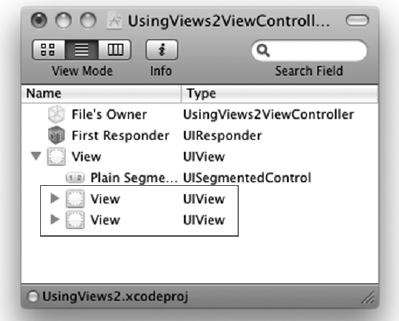
You can verify that the two Views are at the same level by viewing the
UsingViews2ViewController.xibwindow in List mode (see Figure 4-14).In the
UsingViews2ViewController.hfile, declare the following outlets:#import <UIKit/UIKit.h> @interface UsingViews2ViewController : UIViewController {IBOutlet UIView *view1;IBOutlet UIView *view2;IBOutlet UISegmentedControl *segmentedControl;}@property (nonatomic, retain) UIView *view1;@property (nonatomic, retain) UIView *view2;@property (nonatomic, retain) UISegmentedControl *segmentedControl;@endBack in Interface Builder, connect the outlets to the respective views in the View window. (You may have to move the two Views so that you can connect the two
UIViewoutlets to them.)In Xcode, add the following statements that appear in bold to the
UsingViews2ViewController.hfile:#import "UsingViews2ViewController.h" @implementation UsingViews2ViewController @synthesize segmentedControl; @synthesize view1, view2; - (void)viewDidLoad { //---add the event handler for the segmented control---[segmentedControl addTarget:self action:@selector(segmentChanged:)forControlEvents:UIControlEventValueChanged];[super viewDidLoad]; } //---when the segment has changed---- (IBAction)segmentChanged:(id)sender {NSInteger selectedSegment = segmentedControl.selectedSegmentIndex;if (selectedSegment == 0) {//---toggle the correct view to be visible---[self.view1 setHidden:NO];[self.view2 setHidden:YES];}else{//---toggle the correct view to be visible---[self.view1 setHidden:YES];[self.view2 setHidden:NO];}}- (void)dealloc {[segmentedControl release];[view1 release];[view2 release];[super dealloc]; }Press Command-R to test the application on the iPhone Simulator.
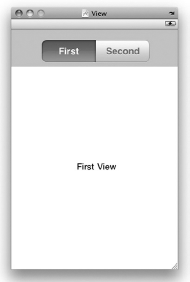
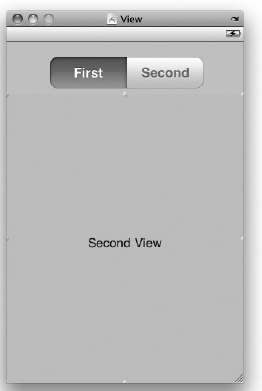
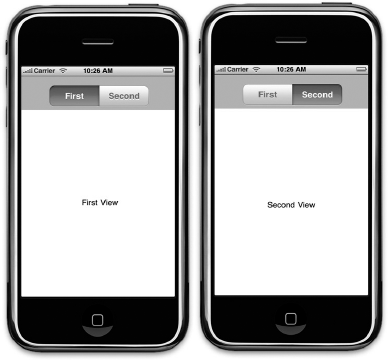
When you tap the First segment, the First View label appears. When you tap the Second segment, you see the Second View label (see Figure 4-15).
How It Works
When the View is loaded, you first wire it up so that when the user taps one of its buttons, it triggers a method. In this case, the method is segmentChanged:.
[segmentedControl addTarget:self action:@selector(segmentChanged:)
        forControlEvents:UIControlEventValueChanged];
In the segmentChanged: method, you determine which button was clicked (via the selectedSegmentIndex property of the segmented control) and show and hide the relevant views:
- (IBAction)segmentChanged:(id)sender {
    NSInteger selectedSegment = segmentedControl.selectedSegmentIndex;
    if (selectedSegment == 0) {
        //---toggle the correct view to be visible---
        [self.view1 setHidden:NO];
        [self.view2 setHidden:YES];
    }
    else{
        //---toggle the correct view to be visible---
        [self.view1 setHidden:YES];
        [self.view2 setHidden:NO];
    }
}If you want to load Web pages from within your application, you can embed a Web browser in your application through the use of the UIWebView. Using the Web view, you can send a request to load Web content, which is a very useful if you want to convert an existing Web application into a native application (such as those written using Dashcode). All you need to do is to embed all the HTML pages into your Resources folder in your Xcode project and load the HTML pages into the Web view during runtime.
Note
Of course, depending on how complex your Web applications are, you may have to do some additional work to port your Web application to a native application if it involves server-side technologies such as CGI, PHP, or others.
The following Try It Out shows how to use the Web view to load a Web page.
TRY IT OUT: Loading a Web Page Using the Web View
Codefile [UsingViews3.zip] available for download at Wrox.comUsing Xcode, create a new View-based Application project and name it
UsingViews3.Double-click the
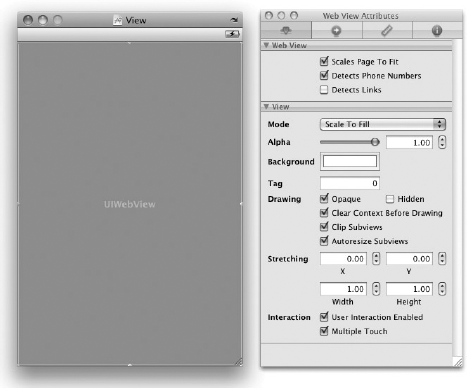
UsingViews3ViewController.xibfile to edit it using Interface Builder.In the View window, add a Web view from the Library (see Figure 4-16). In the Attributes Inspector window for the Web view, check the
Scales Page to Fitproperty.In the
UsingViews3ViewController.hfile, declare an outlet for the Web view:#import <UIKit/UIKit.h> @interface UsingViews3ViewController : UIViewController {IBOutlet UIWebView *webView;}@property (nonatomic, retain) UIWebView *webView;@endBack in Interface Builder, connect the
webViewoutlet to the Web view.In the
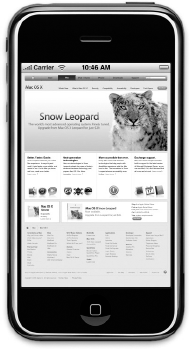
UsingViews3ViewController.mfile, add the following statements that appear in bold:#import "UsingViews3ViewController.h" @implementation UsingViews3ViewController @synthesize webView; - (void)viewDidLoad {NSURL *url = [NSURL URLWithString:@"http://www.apple.com"];NSURLRequest *req = [NSURLRequest requestWithURL:url];[webView loadRequest:req];[super viewDidLoad]; } - (void)dealloc { [webView release]; [super dealloc]; }Press Command-R to test the application on the iPhone Simulator. You should see the application loading the page from
Apple.com(see Figure 4-17).
How It Works
To load the Web view with a URL, you first instantiate an NSURL object with a URL via the URLWithString method:
NSURL *url = [NSURL URLWithString:@"http://www.apple.com"];
You then create an NSURLRequest object by passing the NSURL object to its requestWithURL: method:
NSURLRequest *req = [NSURLRequest requestWithURL:url];
Finally, you load the Web view with the NSURLRequest object via the loadRequest: method:
[webView loadRequest:req];
Up to this point, all the UIs of your application have been created visually using Interface Builder. Although Interface Builder makes it relatively easy to build your UI using drag-and-drop, sometimes you are better off creating the UI using code. One such instance is when you need to create a dynamic UI, such as for games.
Note
I know of developers who swear by creating their UI using code. Interface Builder may be easy to use, but it can be confusing to some people. Because you often have more than one way of doing things in Interface Builder, it can create unnecessary complications.
In the following Try It Out, you learn how to create views dynamically from code, which will help you understand how views are constructed and manipulated.
TRY IT OUT: Creating Views from Code
Codefile [UsingViews4.zip] available for download at Wrox.comUsing Xcode, create a View-based Application project and name it
UsingViews4.In the
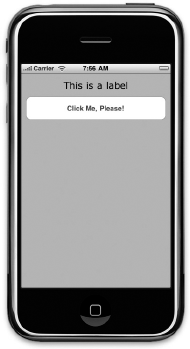
UsingViews4ViewController.mfile, add the following statements that appear in bold:#import "UsingViews4ViewController.h" @implementation UsingViews4ViewController - (void)loadView {//---create a UIView object---UIView *view =[[UIView alloc] initWithFrame:[UIScreen mainScreen].applicationFrame];view.backgroundColor = [UIColor lightGrayColor];//---create a Label view---CGRect frame = CGRectMake(10, 15, 300, 20);UILabel *label = [[UILabel alloc] initWithFrame:frame];label.textAlignment = UITextAlignmentCenter;label.backgroundColor = [UIColor clearColor];label.font = [UIFont fontWithName:@"Verdana" size:20];label.text = @"This is a label";label.tag = 1000;//---create a Button view---frame = CGRectMake(10, 70, 300, 50);UIButton *button = [UIButton buttonWithType:UIButtonTypeRoundedRect];button.frame = frame;[button setTitle:@"Click Me, Please!" forState:UIControlStateNormal];button.backgroundColor = [UIColor clearColor];button.tag = 2000;[button addTarget:self action:@selector(buttonClicked:)forControlEvents:UIControlEventTouchUpInside];[view addSubview:label];[view addSubview:button];self.view = view;[label release];}-(IBAction) buttonClicked: (id) sender{UIAlertView *alert = [[UIAlertView alloc] initWithTitle:@"Action invoked!"message:@"Button clicked!"delegate:selfcancelButtonTitle:@"OK"otherButtonTitles:nil];[alert show];[alert release];}@endPress Command-R to test the application in the iPhone Simulator. Figure 4-18 shows that the Label and Round Rect Button view is displayed on the view. When you click the button, you should see an alert view displaying a message.
How It Works
To programmatically create your views, you can use the loadView method defined in your View Controller. You implement this method only if you are generating your UI during runtime. This method is automatically called when the view property of your View Controller is called but its current value is nil.
The first view you create is the UIView object, which allows you to use it as a container for more views:
//---create a UIView object---
    UIView *view =
        [[UIView alloc] initWithFrame:[UIScreen mainScreen].applicationFrame];

    //---set the background color to lightgray---
    view.backgroundColor = [UIColor lightGrayColor];
Next, you create a Label view and set it to display a string:
//---create a Label view---
    CGRect frame = CGRectMake(10, 15, 300, 20);
    UILabel *label = [[UILabel alloc] initWithFrame:frame];
    label.textAlignment = UITextAlignmentCenter;
    label.backgroundColor = [UIColor clearColor];
    label.font = [UIFont fontWithName:@"Verdana" size:20];
    label.text = @"This is a label";
    label.tag = 1000;
Notice that you have also set the tag property, which is very useful for allowing you to search for particular views during runtime.
You also create a Button view by calling the buttonWithType: method with the UIButtonTypeRoundedRect constant. This method returns a UIRoundedRectButton object (which is a subclass of UIButton).
//---create a Button view---
    frame = CGRectMake(10, 70, 300, 50);

    UIButton *button = [UIButton buttonWithType:UIButtonTypeRoundedRect];
    button.frame = frame;

    [button setTitle:@"Click Me, Please!" forState:UIControlStateNormal];
    button.backgroundColor = [UIColor clearColor];
    button.tag = 2000;
You then wire an event handler for its Touch Up Inside event so that when the button is tapped, the buttonClicked: method is called:
[button AddTarget:Self action:@selector(buttonClicked:)
        forControlEvents:UIControlEventTouchUpInside];
Finally, you add the label and button views to the view you created earlier:
[view addSubview:label]; [view addSubview:button];
Finally, you assign the view object to the view property of the current View Controller:
self.view = view;
One important point to note here is that within the loadView method, you should not get the value of the view property (setting it is all right), like this:
[self.view addSubView: label];  //---this is not OK---
self.view = view;               //---this is OK---
Trying to get the value of the view property in this method will result in a circular reference and cause memory overflow.
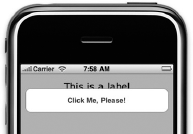
As views are created and added, they are added to a tree data structure. Views are displayed in the order that they are added. To verify this, modify the location of the UIButton object you created earlier by changing its location to CGRectMake(10, 30, 300, 50), as in the following:
//---create a Button view---
    frame = CGRectMake(10, 30, 300, 50);
    UIButton *button = [UIButton buttonWithType:UIButtonTypeRoundedRect];
    button.frame = frame;
    [button setTitle:@"Click Me, Please!" forState:UIControlStateNormal];
    button.backgroundColor = [UIColor clearColor];
    button.tag = 2000;
    [button addTarget:self action:@selector(buttonClicked:)
        forControlEvents:UIControlEventTouchUpInside];
When you now run the application again, you will notice that the button overlaps the label control (see Figure 4-19) since the button was added last:
[view addSubview:label];
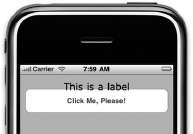
[view addSubview:button];If you want to switch the order in which the views are displayed after they have been added, you can use the exchangeSubviewAtIndex:withSubviewAtIndex: method, like this:
[self.view addSubview:label];
    [self.view addSubview:button];

    [self.view exchangeSubviewAtIndex:1 withSubviewAtIndex:0];

    [button release];
    [label release];
The preceding statement in bold swaps the order of the Label and Button views. When the application is run again, the Label view will now appear on top of the Button view (See Figure 4-20).
To know the order of the various views already added, you can use the following code segment to print the value of the tag property for each view:
[self.view addSubview:label];
    [self.view addSubview:button];
    [self.view exchangeSubviewAtIndex:1 withSubviewAtIndex:0];

    for (int i=0; i<[self.view.subviews count]; ++i) {
        UIView *view = [self.view.subviews objectAtIndex:i];
        NSLog([NSString stringWithFormat:@"%d", view.tag]);
    }
The following method recursively prints out all the views contained in a UIView object:
-(void) printViews: (UIView *) view {
    if ([view.subviews count] > 0){
        for (int i=0; i<[view.subviews count]; ++i) {
            UIView *v = [view.subviews objectAtIndex:i];
            NSLog([NSString stringWithFormat:@"View index: %d Tag: %d",i, v.tag]);
            [self printViews:v];
        }
    } else
        return;
}
To remove a view from the current view hierarchy, use the removeFromSuperview method of the view you want to remove. For example, the following statement removes the label view:
[label removeFromSuperview];
When you create a View-based Application project in Xcode, you get a project with a single view with a corresponding View Controller. This is what you see when you edit the .xib file in Interface Builder. However, sometimes you need more than one view. For example, you may get the user to enter some information in one view and then based on the information that user entered, switch to another view for some actions.
The following Try It Out shows you how to switch between two views and how to wire a new view to a corresponding View Controller.
TRY IT OUT: Switching between Two UIView Views
Codefile[VCExample.zip] available for download at Wrox.comUsing Xcode, create a new View-based Application project and name it
VCExample.Double-click the
VCExampleViewController.xibfile to edit it in Interface Builder.In the
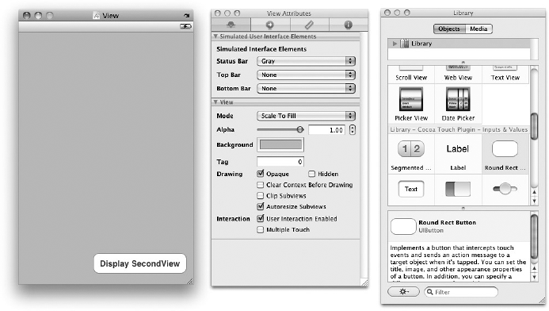
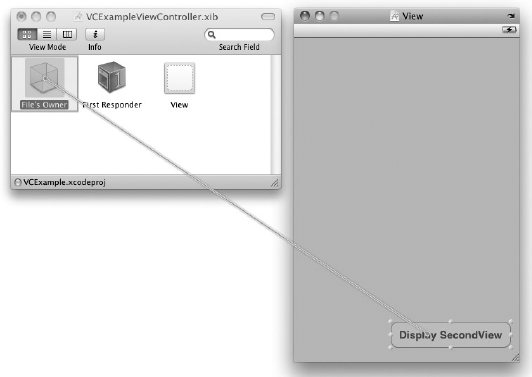
VCExampleViewController.xibwindow, double-click theViewitem and add a Button view to it (see Figure 4-21). Also set the background color of theViewto green.Back in Xcode, edit the
VCExampleViewController.hfile and add the following code that appears in bold:#import <UIKit/UIKit.h> @interface VCExampleViewController : UIViewController { }//---declare an action for the Button view----(IBAction) displayView:(id) sender;@endBack in Interface Builder, Control-click and drag the Button view to the File's Owner item and select
displayView:(see Figure 4-22).This connects the
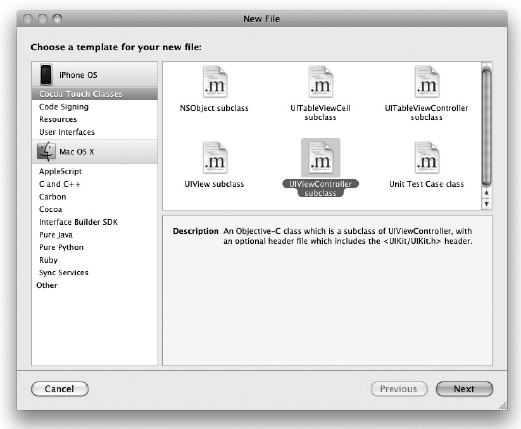
Touch Up Insideevent of the Button view with thedisplayView:action that you have just added.In Xcode, right-click the Classes group and add a new file. Choose the Cocoa Touch Classes group and then select the
UIViewControllersubclass template (see Figure 4-23).Name the View Controller
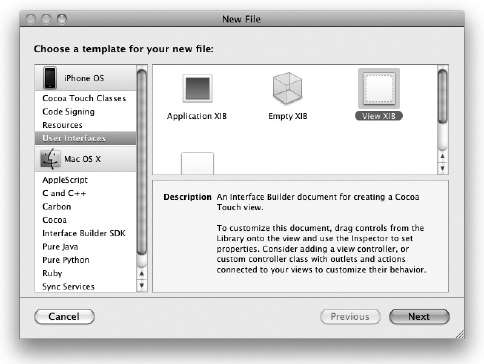
SecondViewController.m.Next, add a new view
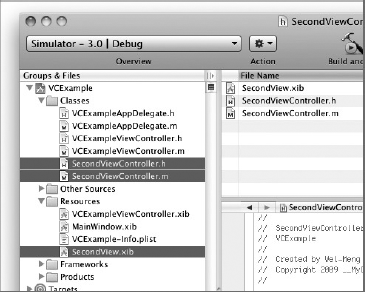
.xibfile so that the UI can be created using Interface Builder. Right-click the Resources group in Xcode and add a new file. Choose the User Interfaces group and then select the View XIB template (see Figure 4-24).Name the
.xibfileSecondView.xib. The Xcode should now contain the files that you have just added (see Figure 4-25).Take a look at the
SecondViewController.hfile and observe that theSecondViewControllerclass inherits from theUIViewControllerbase class:#import <UIKit/UIKit.h>
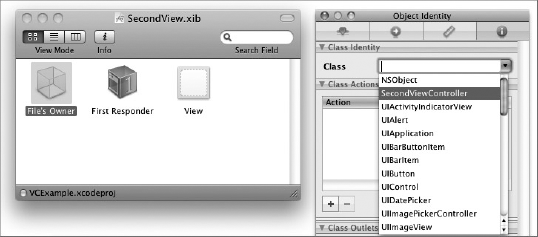
@interface SecondViewController : UIViewController {} @endDouble-click the
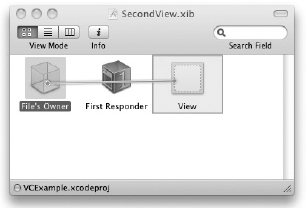
SecondView.xibfile to edit it in Interface Builder. In theSecondView.xibwindow, select the File's Owner item and view its Identity Inspector window (see Figure 4-26). Set its Class toSecondViewController.Connect the File's Owner item to the View item by Control-clicking and dragging it over the View item (see Figure 4-27). Select
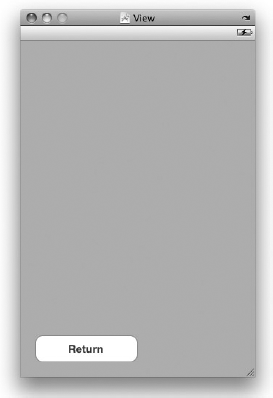
view.Double-click the View item and change its background color to orange and then add a Button view (see Figure 4-28).
In Xcode, add the following lines to the
SecondViewController.hfile:#import <UIKit/UIKit.h> @interface SecondViewController : UIViewController { }//---action for the Return button----(IBAction) btnReturn:(id) sender;@endBack in Interface Builder, connect the Return button to the File's Owner item and select
btnReturn:.In the
VCExampleViewController.mfile, add the following lines that appear in bold so that when the Display SecondView button is pressed, the view represented by the second View Controller is added to the current view, thereby making it appear:#import "VCExampleViewController.h" //---import the header file for the view controller--- #import "SecondViewController.h" @implementation VCExampleViewController
SecondViewController *secondViewController;//---add the view of the second view controller to the current view----(IBAction) displayView:(id) sender{secondViewController = [[SecondViewController alloc]initWithNibName:@"SecondView" bundle:nil];[self.view addSubview:secondViewController.view];}- (void)dealloc {//---release the memory used by the view controller---[secondViewController release];[super dealloc]; } @endIn the
SecondViewController.m, code thebtnReturn:method so that its view is removed from the current view. This results in having the view disappear and reveal the previous view:#import "SecondViewController.h" @implementation SecondViewController
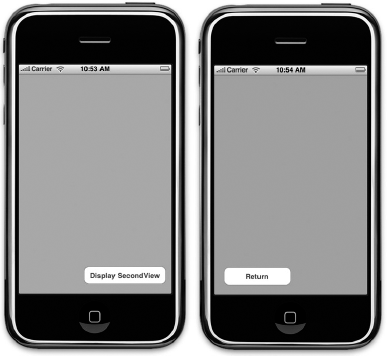
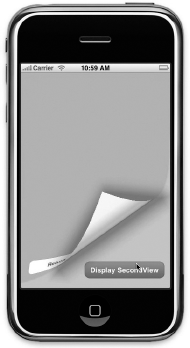
-(IBAction) btnReturn:(id) sender {[self.view removeFromSuperview];} @endThat's it! Press Command-R to test the application. You see that the second view is displayed when the Display SecondView button is pressed (see Figure 4-29). Likewise, when you press the Return button, the second view disappears.
How It Works
The first part of this Try It Out shows you how to add a new .xib file to your project. Next, you add a UIViewController subclass that will be used to control the .xib file that you have added. Notice the steps in which you connect the view in the .xib file to the View Controller:
In the File's Owner item, set the Class property to the name of the View Controller.
Connect the File's Owner item to the view.
The sequence of the preceding steps is important. If you do not specify the class name of the View Controller, you won't be able to connect the File's Owner item to the view.
To display the second view, you create an instance of the second View Controller and then add its view to the current view:
secondViewController = [[SecondViewController alloc]
    initWithNibName:@"SecondView" bundle:nil];
    [self.view addSubview:secondViewController.view];
To remove the second view, simply call the removeFromSuperview method of the second view:
[self.view removeFromSuperview];
In the previous section, you saw how to transition from one view to another. The transitioning happens very quickly and is not exciting visually. To live up to the high expectations expected by iPhone users, you need to add some animations to the transition. Fortunately, doing so is very easy using the APIs provided in the SDK, as the following Try It Out demonstrates.
TRY IT OUT: Displaying Animations During the Transitioning
In the
VCExampleViewController.m, add the following lines of code that appear in bold:-(IBAction) displayView:(id) sender{ secondViewController = [[SecondViewController alloc] initWithNibName:@"SecondView" bundle:nil];[UIView beginAnimations:@"flipping view" context:nil];[UIView setAnimationDuration:1];[UIView setAnimationCurve:UIViewAnimationCurveEaseInOut];[UIView setAnimationTransition: UIViewAnimationTransitionCurlDownforView:self.view cache:YES];[self.view addSubview:secondViewController.view];[UIView commitAnimations];}Press Command-R to test the application. Observe what happens when the Display SecondView button is clicked (see Figure 4-30).
Back in Xcode, add the following lines that appear in bold to the
SecondViewController.mfile:-(IBAction) btnReturn:(id) sender {[UIView beginAnimations:@"flipping view" context:nil];[UIView setAnimationDuration:1];[UIView setAnimationCurve:UIViewAnimationCurveEaseIn];[UIView setAnimationTransition:UIViewAnimationTransitionCurlUpforView:self.view.superview cache:YES];[self.view removeFromSuperview];[UIView commitAnimations];}Press Command-R to test the application. Notice that when you now press the Return button in the second view, the second view flips up (see Figure 4-31).

How It Works
Basically, you added some animation during the transitioning process via the various animations methods in the UIView class:
[UIView beginAnimations:@"flipping view" context:nil];
[UIView setAnimationDuration:1];
[UIView setAnimationCurve:UIViewAnimationCurveEaseInOut];
[UIView setAnimationTransition:
    UIViewAnimationTransitionCurlDown
        forView:self.view cache:YES];

    [self.view addSubview:secondViewController.view];

    [UIView commitAnimations];
Here's what you did with the various statements:
You set the animation duration to be one second.
The animation curve is
UIViewAnimationCurveEaseInOut. You can choose other animation types:UIViewAnimationCurveEaseIn, UIViewAnimationCurveEaseOut, andUIViewAnimationCurveLinear.The animation transitioning type is
UIViewAnimationTransitionCurlDown. You can choose other animation transitioning types:UIViewAnimationTransitionFlipFromLeft, UIViewAnimationTransitionFlipFromRight, andUIViewAnimationTransitionCurlUp.
Sometimes you need to pass data from one view to another. So how do you do that? The easiest way is to create a property on the target view and set the property on the calling view. The following Try It Out shows you how to do this.
TRY IT OUT: Passing Data from One View to Another
Double-click the
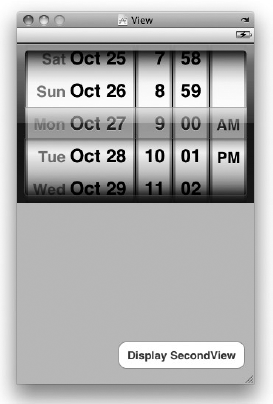
VCExampleViewController.xibfile and add aDatePickerview to the View window (see Figure 4-32).In the
VCExampleViewController.hfile, create an outlet for thisDatePickerview and then expose it as a property:#import <UIKit/UIKit.h> @interface VCExampleViewController : UIViewController { //---outlet for the DatePicker view---IBOutlet UIDatePicker *datePicker;}//---expose this outlet as a property---@property (nonatomic, retain) UIDatePicker *datePicker;-(IBAction) displayView:(id) sender; @endIn the
VCExampleViewController.xibwindow, Control-click and drag the File's Owner Item to theDatePickerview and then selectdatePicker.In the
SecondViewController.h, create an object of typeUIDatePickerand then expose it as a property:#import <UIKit/UIKit.h> @interface SecondViewController : UIViewController {//---object of type UIDatePicker---UIDatePicker *selectedDatePicker;}//---expose the object as a property---@property (nonatomic, retain) UIDatePicker *selectedDatePicker;-(IBAction) btnReturn:(id) sender; @endIn the
SecondViewController.mfile, add the following lines that appear in bold to theviewDidLoadmethod:#import "SecondViewController.h" @implementation SecondViewController @synthesize selectedDatePicker; - (void)viewDidLoad {//---display the date and time selected in the previous view---NSDateFormatter *formatter = [[[NSDateFormatter alloc] init] autorelease];[formatter setDateFormat:@"MMM dd, yyyy HH:mm"];UIAlertView *alert = [[UIAlertView alloc]initWithTitle:@"Date and time selected"message:[formatterstringFromDate:selectedDatePicker.date]delegate:selfcancelButtonTitle:@"OK"otherButtonTitles:nil];[alert show];[alert release];[super viewDidLoad]; } - (void)dealloc {//---release the memory used by the property---[selectedDatePicker release];[super dealloc]; }Finally, in the
VCExampleViewController.mfile, add the following lines that appear in bold:#import "VCExampleViewController.h" #import "SecondViewController.h" @implementation VCExampleViewController @synthesize datePicker; SecondViewController *secondViewController; -(IBAction) displayView:(id) sender{ secondViewController = [[SecondViewController alloc] initWithNibName:@"SecondView" bundle:nil];//---set the property of the second view with the DatePicker view in// the current view---secondViewController.selectedDatePicker = datePicker;[UIView beginAnimations:@"flipping view" context:nil]; [UIView setAnimationDuration:1]; [UIView setAnimationCurve:UIViewAnimationCurveEaseInOut]; [UIView setAnimationTransition: UIViewAnimationTransitionCurlDown forView:self.view cache:YES]; [self.view addSubview:secondViewController.view]; [UIView commitAnimations]; }Press Command-R to test the application on the iPhone Simulator. Select a date and time in the
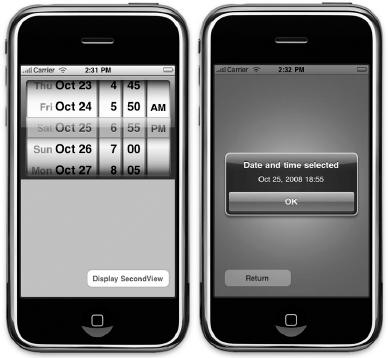
DatePickerview and press the Display SecondView button. The selected date and time are displayed when the second view is displayed (see Figure 4-33).
How It Works
To pass data from one view to another, the easiest way is expose a property on the receiving view and set the property value on the calling end.
The second view exposes the property named selectedDatePicker:
@interface SecondViewController : UIViewController {
   //---object of type UIDatePicker---
   UIDatePicker *selectedDatePicker;
}

//---expose the object as a property---
@property (nonatomic, retain) UIDatePicker *selectedDatePicker;
To pass a value from the first view to the second view, you simply set the property that you have defined:
//---set the property of the second view with the DatePicker view in
// the current view---
secondViewController.selectedDatePicker = datePicker;In this chapter, you have seen many views in action. You have also seen how views can be dynamically created during runtime. More important, you saw how to wire a view to a View Controller and how to switch between two views during runtime.
EXERCISES
Describe the steps to connect a view to a View Controller.
When do you use an Alert view and when do you use an action sheet?
Create a
UIButtonfrom code and wire itsTouch Up Insideevent to an event handler.