
WHAT YOU WILL LEARN IN THIS CHAPTER
One of the controversial aspects of the iPhone is the multitouch keyboard that allows users to input data into their iPhone. Critics of the iPhone have long lamented its lack of a physical keyboard for data entry, whereas ardent iPhone supporters swear by its ease of use. Although many mobile platforms have long experimented with virtual keyboards, none is as successful as the iPhone in its implementation.
What made the iPhone keyboard so powerful is its intelligence in tracking what you type, followed by suggestions for the word you are typing, and automatically correcting the spelling and inserting punctuation for you. What's more, the keyboard knows when to appear at the right time — it appears when you tap a TextField view, and it goes away automatically when you tap a non-input view. Also, it lets you input data in different languages.
For iPhone application programmers, the key concern is how to integrate the keyboard into your application. How do you make the keyboard go away when it is no longer needed? And how do you ensure that the view the user is currently interacting with is not blocked by the keyboard? In this chapter, you learn about various ways to deal with the keyboard programmatically.
In iPhone programming, the view that is most commonly associated with the keyboard is the TextField view. When a TextField view is tapped (or clicked, if you are using the Simulator), the keyboard is automatically displayed. The data that the user clicks on the keyboard is then inserted into the TextField view.
TRY IT OUT: Using a TextField for Inputs
Codefile [KeyboardInputs.zip] available for download at Wrox.comUsing Xcode, create a new View-based Application project and name it
KeyboardInputs.Double-click the
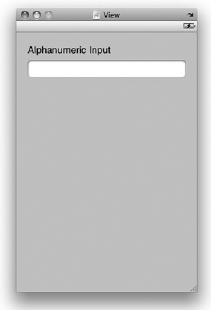
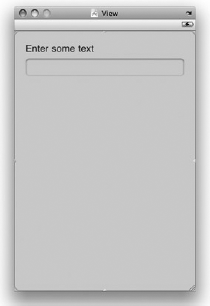
KeyboardInputsViewController.xibfile to edit it using Interface Builder.Populate the View with Label and TextField views (see Figure 5-1).
Save the
KeyboardInputsViewController.xibfile and press Command-R in Xcode to run the application on the iPhone Simulator. Figure 5-2 (left) shows that when the application is loaded, the keyboard is initially hidden, and when the user clicks the TextField view, the keyboard automatically appears (right).
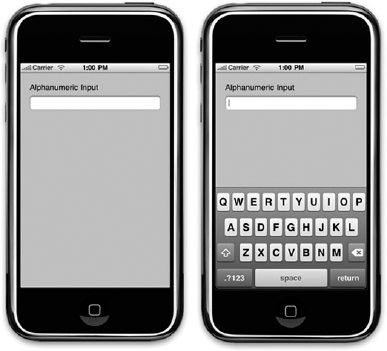
The beauty of the iPhone user interface is that when the system detects that the current active view is a TextField view, the keyboard automatically appears; you don't need to do anything to bring up the keyboard. Using the keyboard, you can enter alphanumeric data as well as numbers and special characters (such as symbols). The keyboard in iPhone also supports characters of languages other than English, such as Chinese, Hebrew, and others.
Unfortunately, making the keyboard go away is not as straightforward as making it appear. When you are done with the input, the keyboard does not go away automatically. This is because it does not know when you are done with the input; to do so you need to write some code. You will learn how to do this in the section "Making the Keyboard Go Away."
In the previous section, you saw how the TextField view was used for capturing user inputs. To understand more about the input behaviors, go to Interface Builder, select the TextField view, and view its Attributes Inspector window (choose Tools
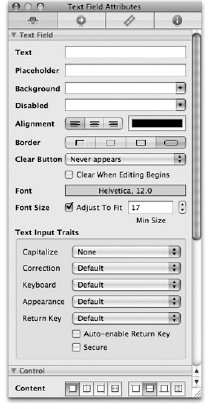
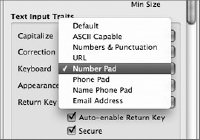
The Text Input Traits section contains several items for you to use to configure how the keyboard handles the text entered.
The Capitalize item allows you to capitalize the words, sentences, or all characters of the data entered via the keyboard.
The Correction item lets you indicate whether you want the keyboard to provide suggestions for words that are not spelled correctly. You can also choose the Default option so that it defaults to the user's global text correction settings.
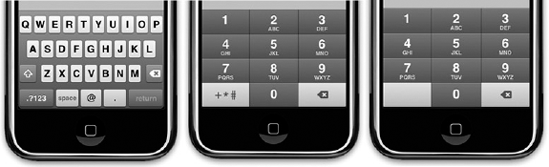
The Keyboard item allows you to choose the different types of keyboard for entering different types of data.
Figure 5-4 shows (from left to right) the keyboard configured with the following Keyboard types: Email Address, Phone Pad, and Number Pad.
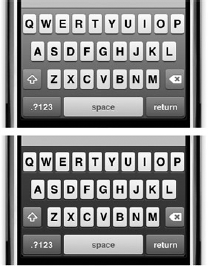
The Appearance item lets you choose how the keyboard should appear.
Figure 5-5 shows the keyboard in Default (top) and Alert (bottom) view.
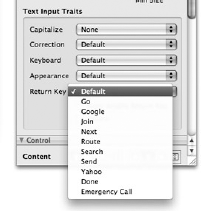
The Return Key item (see Figure 5-6) allows you to show different types of Return key in your keyboard.
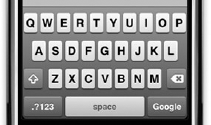
Figure 5-7 shows the keyboard set with the Google key serving as the Return key.
Finally, the Auto-Enable Return Key check box indicates that if no input is entered for a field, the Return key will be disabled (grayed out). It will be enabled again if at least one character is entered. The Secure check box indicates if the input will be masked (see Figure 5-8). This is usually used for password input.

In the earlier part of this chapter, you saw that the keyboard in the iPhone automatically appears when you select a TextField view. However, making the keyboard go away requires additional effort on the part of the programmer. In this section, you will see how you can programmatically dismiss the keyboard when you are done with the typing. The first technique is demonstrated in the following Try It Out.
TRY IT OUT: Dismissing the Keyboard (Technique 1)
Using the project you created earlier, double-click the
KeyboardInputsViewController.xibfile to edit it using Interface Builder.With the File's Owner item selected in the
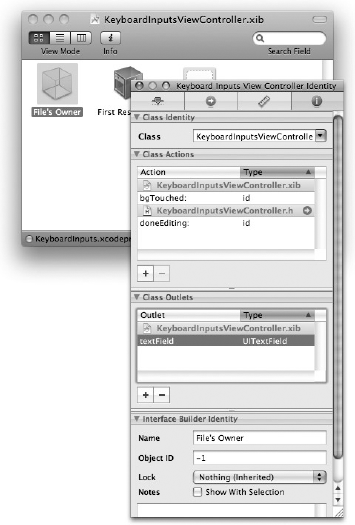
KeyboardInputsViewController.xibwindow, view its Identity Inspector window and create a new action calleddoneEditing:(see Figure 5-9).This creates an
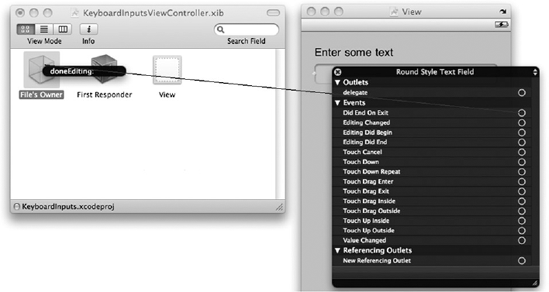
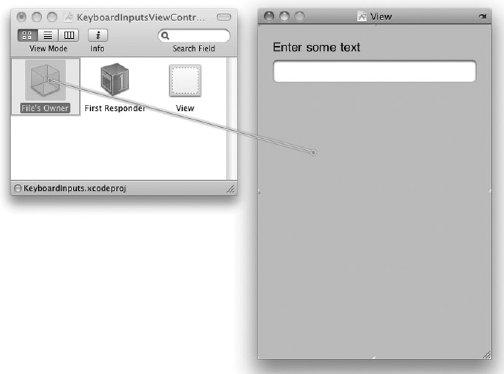
IBActionthat will allow you to connect to an event in the TextField view.Right-click the TextField view in the View window and then click the circle next to the
Did End on Exitevent and drag it to the File's Owner item (see Figure 5-10). ThedoneEditing:outlet you have just created should appear. Select it.Save the
KeyboardInputsViewController.xibfile.Back in Xcode, add the following code in the
KeyboardInputsViewController.hfile:#import <UIKit/UIKit.h> @interface KeyboardInputsViewController : UIViewController { }-(IBAction) doneEditing:(id) sender;@endIn the
KeyboardInputsViewController.mfile, provide the implementation for thedoneEditing:action:#import "KeyboardInputsViewController.h" @implementation KeyboardInputsViewController
-(IBAction) doneEditing:(id) sender{[sender resignFirstResponder]; }Save the project and press Command-R to run the application on the iPhone Simulator.
When the application appears on the iPhone Simulator, click the TextField view. The keyboard should appear. Using the keyboard, type some text into it and press the Return key when you are done. The keyboard now goes away.

How It Works
What you have just done is connect the Did End on Exit event of the TextField view with the doneEditing: action you have created. When you are editing the content of a TextField view using the keyboard, pressing the Return key on the keyboard fires the Did End on Edit event of the TextField view. In this case, it invokes the doneEditing: action, which contains the following statement:
[sender resignFirstResponder];
Basically, the sender in this case refers to the TextField view, and resignFirstResponder asks the TextField view to resign its First-Responder status. Essentially, it means that you do not want to interact with the TextField view anymore and that the keyboard is no longer needed. Hence, the keyboard should hide itself.
Note
The First Responder in a view always refers to the current view that the user is interacting with. In the example here, when you click the TextField view, it becomes the First Responder and activates the keyboard automatically.
So far, things have been pretty straightforward. You now know that you can dismiss a keyboard by simply making a TextField resign its First-Responder status. Doing so requires that you handle the Did End on Exit event, which is fired whenever the user clicks the Return key on the keyboard. However, the Return key is shown only when you display it using a non-numeric keyboard type. If you display a numeric keyboard, for example, the Return key is no longer available. In this case, you would have trouble getting the Did End On Exit event to fire.
Therefore, the following Try It Out teaches another technique for dismissing the keyboard, regardless of the type of keyboard displayed.
TRY IT OUT: Dismissing the Keyboard (Technique 2)
Using the same project, double-click the
KeyboardInputsViewController.xibfile to edit it using Interface Builder.Select the TextField view in the View window and view its Attributes Inspector window (choose Tools

Select the File's Owner item in the
KeyboardInputsViewController.xibwindow and view its Identity Inspector window (see Figure 5-12). Add an action calledbgTouched: and an outlet calledtextField.Control-drag the File's Owner item onto the TextField view (see Figure 5-13). The
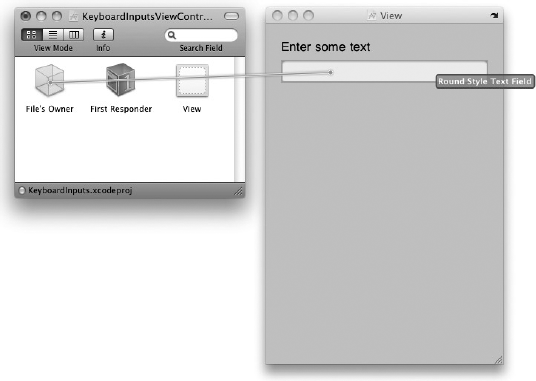
textFieldoutlet should appear. Select it.Add a Round Rect Button view to the View window (see Figure 5-14).
With the Round Rect Button view selected, choose Layout
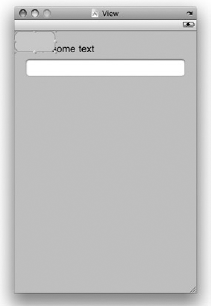
Resize the Round Rect Button view so that it now covers the entire screen (see Figure 5-15).
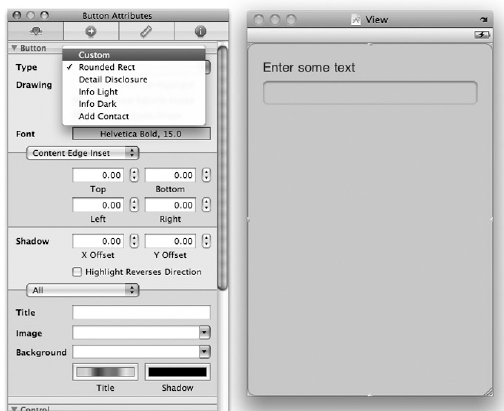
In the Attributes Inspector window, set the Type of the Round Rect Button view to Custom (see Figure 5-16).
Control-drag the Round Rect Button view onto the File's Owner item in the
KeyboardInputsViewController.xibwindow (see Figure 5-17). Select thebgTouched:action.Note
The
Touch Up Insideevent of the Round Rect Button view is wired to thebgTouched:action.Save the XIB file in Interface Builder.
Back in Xcode, edit the
KeyboardInputsViewController.hfile and add the following statements highlighted in bold:#import <UIKit/UIKit.h> @interface KeyboardInputsViewController : UIViewController {IBOutlet UITextField *textField;}@property (nonatomic, retain) UITextField *textField;-(IBAction) bgTouched:(id) sender;-(IBAction) doneEditing:(id) sender; @endIn the
KeyboardInputsViewController.mfile, add the following statements highlighted in bold:#import "KeyboardInputsViewController.h" @implementation KeyboardInputsViewController
@synthesize textField;-(IBAction) bgTouched:(id) sender{[textField resignFirstResponder];}-(IBAction) doneEditing:(id) sender{ [sender resignFirstResponder]; }That's it. Press Command-R in Xcode to deploy the application onto the iPhone Simulator. Then, try the following:
Click the TextField view to bring up the keyboard.
When you are done, you can click the Return key on the keyboard to dismiss it. Alternatively, you can click any of the empty spaces outside the TextField view to dismiss the keyboard.
How It Works
In this example, you added a Round Rect Button view to cover up all the empty spaces in the View window of your application. Essentially, the button acts as a net to trap all touches outside of the TextField view on the View window. So when the user clicks (or taps, on a real device) the screen outside the keyboard and the TextField view, the Round Rect Button fires the Touch Up Inside event, which is handled by the bgTouched: action. In the bgTouched: action, you explicitly asked textField to resign its First-Responder status, which causes the keyboard to disappear.
The technique used in this example applies even if you have multiple TextField views on your view. Suppose you have three TextField views, named textField, textField2, and textField3. In this case, the bgTouched: action looks like this:
-(IBAction) bgTouched:(id) sender{
    [textField resignFirstResponder];
    [textField2 resignFirstResponder];
    [textField3 resignFirstResponder];
}
So when the bgTouched: action is invoked, all three TextField views are asked to relinquish their First-Responder status. Calling the resignFirstResponder method on a view that is currently not the First Responder is harmless; hence, the preceding statements are safe and will not cause an exception during runtime.
Sometimes you might want to straightaway set a TextField view as the active view and display the keyboard without waiting for the user to do so. In such cases, you can use the becomeFirstResponder method of a view. The following code shows that the TextField view will be the First Responder as soon as the View is loaded:
- (void)viewDidLoad {

    [textField becomeFirstResponder];

    [super viewDidLoad];
}Up to this point, you have seen the various ways to hide the keyboard after you are done using it. However, there is one problem that you need to note. When the keyboard appears, it takes up a signification portion of the screen. If your TextField view is located at the bottom of the screen, it would be covered by the keyboard. As a programmer, it is your duty to ensure that the view is relocated to a visible portion of the screen. Surprisingly, this is not taken care of by the SDK; you have to do the hard work yourself.
Note
The current keyboard in the iPhone takes up 216 pixels in height.
Before you learn how to relocate the views on a screen when the keyboard appears, it is important for you to understand a few key concepts related to the keyboard:
You need to be able to programmatically know when a keyboard is visible or hidden. To do so, your application needs to register for the following notifications —
UIKeyboardWillShowNotificationandUIKeyboardWillHideNotification.You also need to know when and which TextField view is currently being edited so that you can relocate it to a visible portion of the screen. You can know these two pieces of information through the two delegate protocols —
textFieldDidBeginEditing:andtextFieldDidEndEditing:— available in theUITextFieldDelegatedelegate.
Confused? Worry not; the following Try It Out makes it all clear.
TRY IT OUT: Shifting Views
Codefile [ScrollingViews.zip] available for download at Wrox.comUsing Xcode, create a new View-based Application project and name it
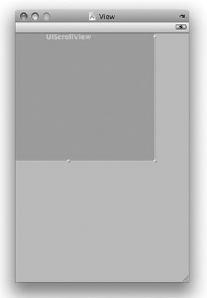
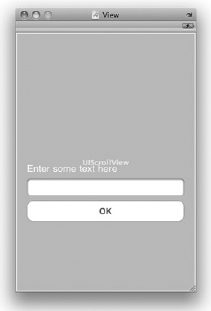
ScrollingViews.Populate the View with a ScrollView view (see Figure 5-18). Resize the ScrollView view so it covers the entire screen.
Add a TextField field and a Round Rect Button view onto the ScrollView view (see Figure 5-19).
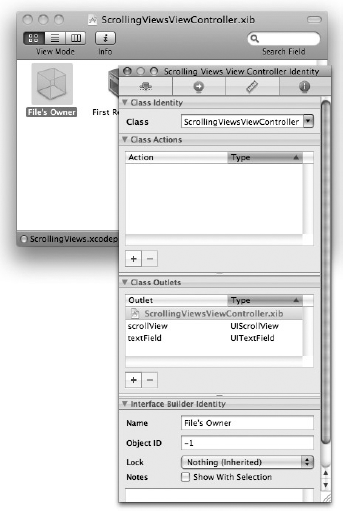
Select the
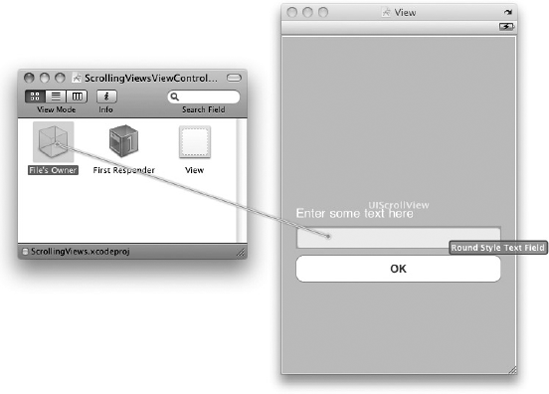
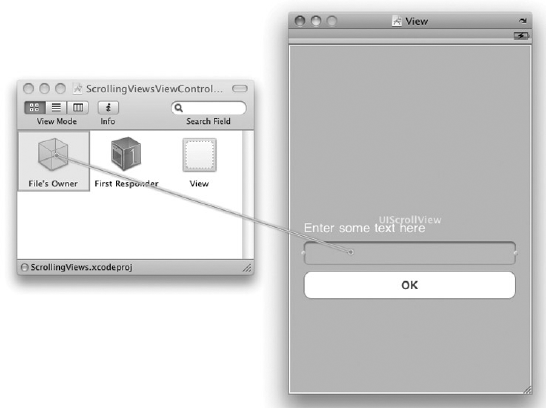
File's Owneritem in theScrollingViewsController.xibwindow and view itsIdentity Inspectorwindow (see Figure 5-20). Create two outlets:scrollViewandtextField.Control-drag the File's Owner item onto the TextField view (see Figure 5-21). Select
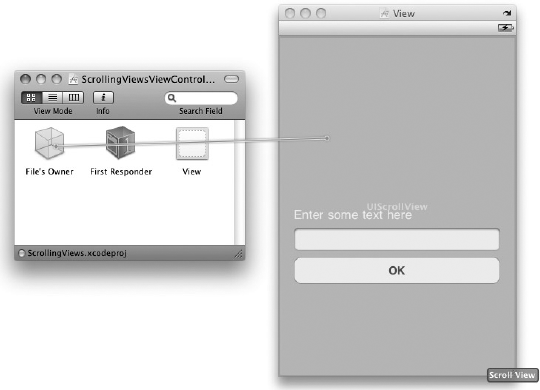
textField.Control-drag the File's Owner item onto the ScrollView view (see Figure 5-22). Select
scrollView.Control-drag the TextField view onto the File's Owner item (see Figure 5-23). Select
delegate.Note
This step is important because it enables the delegate protocols (
textFieldDidBeginEditing:andextFieldDidEndEditing:) to be handled by your View Controller.Save the
ScrollViewsViewController.xibin Interface Builder.Back in Xcode, type the following statements highlighted in bold into the
ScrollingViewsViewController.hfile:#import <UIKit/UIKit.h> @interface ScrollingViewsViewController :UIViewController <UITextFieldDelegate> {IBOutlet UITextField *textField;IBOutlet UIScrollView *scrollView;}@property (nonatomic, retain) UITextField *textField;@property (nonatomic, retain) UIScrollView *scrollView;@endType the following statements highlighted in bold in the
ScrollingViewsViewController.mfile:#import "ScrollingViewsViewController.h" @implementation ScrollingViewsViewController
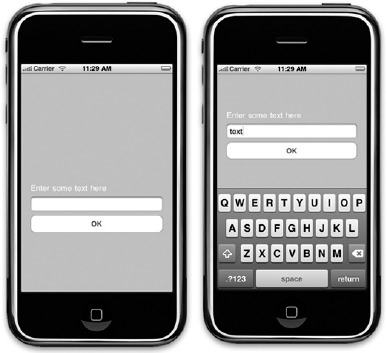
@synthesize textField;@synthesize scrollView;//---size of keyboard---CGRect keyboardBounds;//---size of application screen---CGRect applicationFrame;//---original size of ScrollView---CGSize scrollViewOriginalSize;-(void) moveScrollView:(UIView *) theView {//---get the y-coordinate of the view---CGFloat viewCenterY = theView.center.y;//---calculate how much visible space is left---CGFloat freeSpaceHeight = applicationFrame.size.height -keyboardBounds.size.height;//---calculate how much the scrollview must scroll---CGFloat scrollAmount = viewCenterY - freeSpaceHeight / 2.0;if (scrollAmount < 0) scrollAmount = 0;//---set the new scrollView contentSize---scrollView.contentSize = CGSizeMake(applicationFrame.size.width,applicationFrame.size.height +keyboardBounds.size.height);//---scroll the ScrollView---[scrollView setContentOffset:CGPointMake(0, scrollAmount) animated:YES];}//---when a TextField view begins editing----(void) textFieldDidBeginEditing:(UITextField *)textFieldView {[self moveScrollView:textFieldView];}//---when a TextField view is done editing----(void) textFieldDidEndEditing:(UITextField *) textFieldView {[UIView beginAnimations:@"back to original size" context:nil];scrollView.contentSize = scrollViewOriginalSize;[UIView commitAnimations];}//---when the keyboard appears----(void) keyboardWillShow:(NSNotification *) notification{//---gets the size of the keyboard---NSDictionary *userInfo = [notification userInfo];NSValue *keyboardValue = [userInfo objectForKey:UIKeyboardBoundsUserInfoKey];[keyboardValue getValue:&keyboardBounds];}//---when the keyboard disappears----(void) keyboardWillHide:(NSNotification *) notification{}-(void) viewWillAppear:(BOOL)animated{//---registers the notifications for keyboard---[[NSNotificationCenter defaultCenter]addObserver:selfselector:@selector(keyboardWillShow:)name:UIKeyboardWillShowNotificationobject:self.view.window];[[NSNotificationCenter defaultCenter]addObserver:selfselector:@selector(keyboardWillHide:)name:UIKeyboardWillHideNotificationobject:nil];}-(void) viewWillDisappear:(BOOL)animated{[[NSNotificationCenter defaultCenter]removeObserver:selfname:UIKeyboardWillShowNotificationobject:nil];[[NSNotificationCenter defaultCenter]removeObserver:selfname:UIKeyboardWillHideNotificationobject:nil];}-(void) viewDidLoad {scrollViewOriginalSize = scrollView.contentSize;applicationFrame = [[UIScreen mainScreen] applicationFrame];[super viewDidLoad];}-(BOOL) textFieldShouldReturn:(UITextField *) textFieldView {if (textFieldView == textField){[textField resignFirstResponder];}return NO;}-(void) dealloc {[textField release];[scrollView release];[super dealloc]; }Save the project in Xcode and press Command-R to deploy the application onto the iPhone Simulator. Figure 5-24 shows that when you click the TextField view, the keyboard appears and the TextField view (along with other views) is scrolled to the center of the screen. To hide the keyboard, simply press the Return key, and the views are restored to their original positions.
This example demonstrates the various ways in which you can detect the presence of a keyboard and how the view involved can be relocated so that it is not covered by the keyboard.
First, you declare three private variables:
//---size of keyboard---
CGRect keyboardBounds;

//---size of application screen---
CGRect applicationFrame;

//---original size of ScrollView---
CGSize scrollViewOriginalSize;
The keyboardBounds is used to store the size of the keyboard (in particular, to obtain the height of the keyboard). Although you can always hard-code the height of the keyboard to be 216, I don't recommend doing so because the size of the keyboard may change at a later time. A better practice is to dynamically obtain the size of the keyboard during runtime.
The applicationFrame is used to store the size of the screen. As with obtaining the size of the keyboard, it is always better to obtain this figure dynamically during runtime.
The scrollViewOriginalSize is used to save the original size of the ScrollView view. Doing so allows you to restore the ScrollView to its original size after the user is done with the editing (at which time all the views need to be moved back to their original positions).
When the View is loaded, you first save the size of the ScrollView view as well as obtain the size of the screen:
-(void) viewDidLoad {
    scrollViewOriginalSize = scrollView.contentSize;
    applicationFrame = [[UIScreen mainScreen] applicationFrame];
    [super viewDidLoad];
}
In the viewWillAppear: event (this method is invoked before the View appears on-screen), you register for the two notifications — UIKeyboardWillShowNotification and UIKeyboardWillHideNotification. When the keyboard appears (UIKeyboardWillShowNotification), the keyboardWillShow: method is invoked. When the keyboard disappears, the keyboardWillHide: method is invoked:
-(void) viewWillAppear:(BOOL)animated
{
    //---registers the notifications for keyboard---
    [[NSNotificationCenter defaultCenter]
         addObserver:self
         selector:@selector(keyboardWillShow:)
         name:UIKeyboardWillShowNotification
         object:self.view.window];

    [[NSNotificationCenter defaultCenter]
         addObserver:self
selector:@selector(keyboardWillHide:)
name:UIKeyboardWillHideNotification
object:nil];
}Before the view disappears, you remove the notifications you had previously set:
-(void) viewWillDisappear:(BOOL)animated
{
    //---removes the notifications for keyboard---
    [[NSNotificationCenter defaultCenter]
         removeObserver:self
         name:UIKeyboardWillShowNotification
         object:nil];

    [[NSNotificationCenter defaultCenter]
         removeObserver:self
         name:UIKeyboardWillHideNotification
         object:nil];
}
When you click a TextField view, the keyboardWillShow: method is invoked. With this method, you try to obtain the size of the keyboard by passing a reference to the keyboardBounds variable:
//---when the keyboard appears---
-(void) keyboardWillShow:(NSNotification *) notification
{
    //---gets the size of the keyboard---
    NSDictionary *userInfo = [notification userInfo];
    NSValue *keyboardValue = [userInfo objectForKey:UIKeyboardBoundsUserInfoKey];
    [keyboardValue getValue:&keyboardBounds];
}
After the keyboard is displayed, the textFieldDidBeginEditing: method is invoked. With this method, you know which TextField view is being edited and you are now ready to move the ScrollView view so that the TextField view can be centered in the remaining visible space not covered by the keyboard. You perform the scrolling by calling the moveScrollView: method, which you define next:
//---when a TextField view begins editing---
-(void) textFieldDidBeginEditing:(UITextField *)textFieldView {
    [self moveScrollView:textFieldView];
}
In the moveScrollView: method, you calculate the number of pixels to scroll and then get the ScrollView view to scroll the views contained within it until the TextField view currently being edited is at the center of the visible area of the screen:
-(void) moveScrollView:(UIView *) theView {

    //---get the y-coordinate of the view---
    CGFloat viewCenterY = theView.center.y;

    //---calculate how much visible space is left---
CGFloat freeSpaceHeight = applicationFrame.size.height -
keyboardBounds.size.height;
//---calculate how much the scrollview must scroll---
CGFloat scrollAmount = viewCenterY - freeSpaceHeight / 2.0;
if (scrollAmount < 0) scrollAmount = 0;
//---set the new scrollView contentSize---
scrollView.contentSize = CGSizeMake(
applicationFrame.size.width,
applicationFrame.size.height +
keyboardBounds.size.height);
//---scroll the ScrollView---
[scrollView setContentOffset:CGPointMake(0, scrollAmount) animated:YES];
}When the TextField view resigns its First Responder status, the textFieldDidEndEditing: method will be invoked. At this point, you restore the ScrollView view to its original content size:
//---when a TextField view is done editing---
-(void) textFieldDidEndEditing:(UITextField *) textFieldView {
    [UIView beginAnimations:@"back to original size" context:nil];
    scrollView.contentSize = scrollViewOriginalSize;
    [UIView commitAnimations];
}
A noteworthy point to highlight here is that you use the beginAnimations method of the UIView class to animate the ScrollView view in the process of restoring to its original size. If you do not use this method, the ScrollView will very abruptly restore to its original size, causing a flicker.
Just before the keyboard disappears, the keyboardWillHide: method is invoked. In this case, you don't have much to do:
//---when the keyboard disappears---
-(void)keyboardWillHide:(NSNotification *) notification
{
}
Finally, in the dealloc method, you release all the outlets you have created:
-(void) dealloc {
    [textField release];
    [scrollView release];
    [super dealloc];
}In this chapter, you learned the various techniques to deal with the keyboard in your iPhone application. In particular, you have seen:
How to make the keyboard go away when you are done with the data entry
How to detect the presence or absence of the keyboard
How to ensure that views are not blocked by the keyboard
EXERCISES
How do you hide the keyboard for a
UITextFieldobject?How do you detect whether the keyboard is visible or not?
How do you get the size of the keyboard?
WHAT YOU HAVE LEARNED IN THIS CHAPTER
TOPIC | KEY CONCEPTS |
|---|---|
Making the keyboard go away | Use the |
Display the different types of keyboard displayed | Modify the keyboard type by changing the Text Input Traits of a |
Handling the return key of the keyboard | You either handle the |
Detecting when the keyboard appears or hides | Register for the two notifications — UIKeyboardWillShowNotification and UIKeyboardWillHideNotification. |
Detecting which | Implement the |
Detecting which | Implement the |