
WHAT YOU WILL LEARN IN THIS CHAPTER
How to manually add a Table view to a View, and wire the data source and delegate to your View Controller
How to handle the various events in the table view to populate it with items
How to handle the various events in the Table view so that users can select the items contained within it
How to display text and images in the rows of the table view
How to display the items from a property list in a table view
How to group the items in a table view into sections
How to add indexing to the table view
How to add search capabilities to the table view
How to add disclosures and checkmarks to rows in the table view
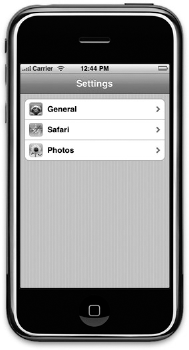
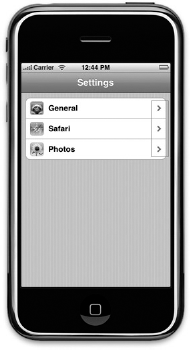
One of the most commonly used views in iPhone applications is the Table view. The Table view is used to display lists of items from which users can select, or they can tap it to display more information. Figure 10-1 shows a Table view in action in the Settings Application.
In Chapter 8, you had your first taste of the Table view when you developed a Navigation-based Application project. That chapter didn't fully dive into how the Table view works, and a lot of details were purposely left out. The Table view is such an important topic that it deserves a chapter on its own.
Hence, in this chapter, you examine the Table view in more details and understand the various building blocks that make it such a versatile view.
The best way to understand how to use a table view in your application is to create a new View-based Application project and then manually add a Table view to the view and wire it to a View Controller. That way, you understand the various building blocks of the Table view.
Without further ado, use the following Try It Out to create a new project and see how to put a Table view together!
TRY IT OUT: Using a Table View
Codefile [TableViewExample.zip] available for download at Wrox.comCreate a new View-based Application project and name it
TableViewExample.Double-click the
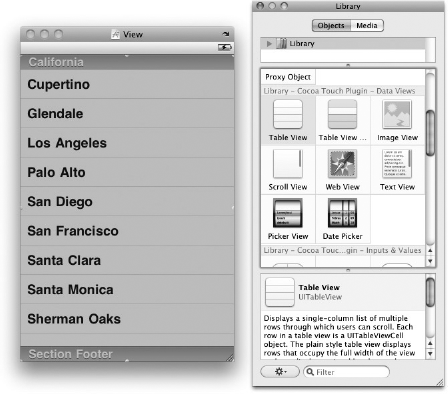
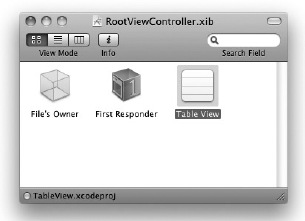
TableViewExampleViewController.xibfile to edit it in Interface Builder.Drag the
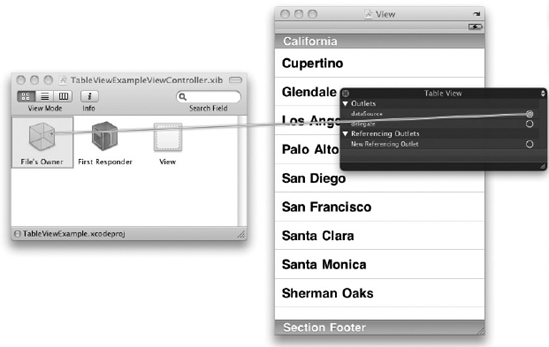
Table View Objectfrom the Library and drop it onto the View window (see Figure 10-2).Right-click the Table view and connect the
dataSourceoutlet to the File's Owner item (see Figure 10-3). Do the same for thedelegateoutlet.In the
TableViewExampleViewController.hfile, add the following statement that appears in bold:#import <UIKit/UIKit.h> @interface TableViewExampleViewController : UIViewController<UITableViewDataSource> {} @endNote
Strictly speaking, if you have connected the
dataSourceoutlet to the File's Owner item, you don't need to add the preceding statement. Either you write the preceding statement (UITableViewDataSource) or connect the outlet in Interface Builder. However, doing both doesn't hurt anything. There is one advantage to adding the <UITableViewDataSource> protocol, though — the compiler will warn you if you forget to implement any mandatory methods in your code, helping to prevent errors.In the
TableViewExampleViewController.mfile, add the following statements that appear in bold:#import "TableViewExampleViewController.h" @implementation TableViewExampleViewController
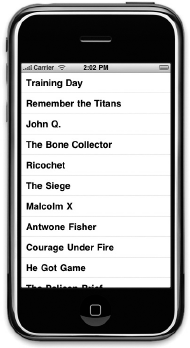
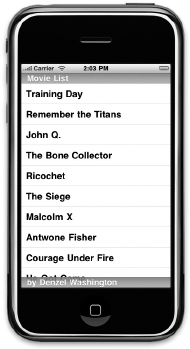
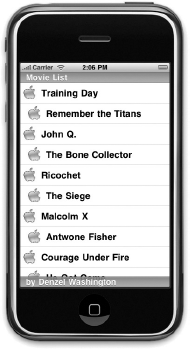
NSMutableArray *listOfMovies;//---insert individual row into the table view---- (UITableViewCell *)tableView:(UITableView *)tableViewcellForRowAtIndexPath:(NSIndexPath *)indexPath {static NSString *CellIdentifier = @"Cell";//---try to get a reusable cell---UITableViewCell *cell = [tableViewdequeueReusableCellWithIdentifier:CellIdentifier];//---create new cell if no reusable cell is available---if (cell == nil) {cell = [[[UITableViewCell alloc] initWithStyle:UITableViewCellStyleDefaultreuseIdentifier:CellIdentifier] autorelease];}//---set the text to display for the cell---NSString *cellValue = [listOfMovies objectAtIndex:indexPath.row];cell.textLabel.text = cellValue;return cell;}//---set the number of rows in the table view---- (NSInteger)tableView:(UITableView *)tableViewnumberOfRowsInSection:(NSInteger)section {return [listOfMovies count];}- (void)viewDidLoad {//---initialize the array---listOfMovies = [[NSMutableArray alloc] init];//---add items---[listOfMovies addObject:@"Training Day"];[listOfMovies addObject:@"Remember the Titans"];[listOfMovies addObject:@"John Q."];[listOfMovies addObject:@"The Bone Collector"];[listOfMovies addObject:@"Ricochet"];[listOfMovies addObject:@"The Siege"];[listOfMovies addObject:@"Malcolm X"];[listOfMovies addObject:@"Antwone Fisher"];[listOfMovies addObject:@"Courage Under Fire"];[listOfMovies addObject:@"He Got Game"];[listOfMovies addObject:@"The Pelican Brief"];[listOfMovies addObject:@"Glory"];[listOfMovies addObject:@"The Preacher's Wife"];[super viewDidLoad]; } - (void)dealloc {[listOfMovies release];[super dealloc]; }Press Command-R to test the application on the iPhone Simulator. Figure 10-4 shows the Table view displaying the list of movies.
How It Works
You first start the application by creating an NSMutableArray object called listOfMovies containing a list of movies names. The items stored in this array will be displayed by the Table view.
- (void)viewDidLoad {
    //---initialize the array---
    listOfMovies = [[NSMutableArray alloc] init];

    //---add items---
    [listOfMovies addObject:@"Training Day"];
    [listOfMovies addObject:@"Remember the Titans"];
    [listOfMovies addObject:@"John Q."];
    [listOfMovies addObject:@"The Bone Collector"];
    [listOfMovies addObject:@"Ricochet"];
    [listOfMovies addObject:@"The Siege"];
    [listOfMovies addObject:@"Malcolm X"];
    [listOfMovies addObject:@"Antwone Fisher"];
    [listOfMovies addObject:@"Courage Under Fire"];
    [listOfMovies addObject:@"He Got Game"];
    [listOfMovies addObject:@"The Pelican Brief"];
    [listOfMovies addObject:@"Glory"];
    [listOfMovies addObject:@"The Preacher's Wife"];

    [super viewDidLoad];
}
To populate the Table view with items, you need to handle several events contained in the UITableViewDataSource protocol. Hence, you need to ensure that your view controller conforms to this protocol:
@interface TableViewExampleViewController : UIViewController
   <UITableViewDataSource> {
}
The UITableViewDataSource protocol contains several events that you can implement to supply data to the Table view. Two events that you have handled in this example are:
tableView:numberOfRowsInSection:tableView:cellForRowAtIndexPath:
The tableView:numberOfRowsInSection: event indicates how many rows you want the Table view to display. In this case, you set it to the number of items in the listOfMovies array.
//---insert individual row into the table view---
- (NSInteger)tableView:(UITableView *)tableView
   numberOfRowsInSection:(NSInteger)section {

   return [listOfMovies count];

}
The tableView:cellForRowAtIndexPath: event inserts a cell in a particular location of the Table view. This event is fired once for each row of the Table view.
Note
The tableView:cellForRowAtIndexPath: event is not fired continuously from start to finish. For example, if the Table view has 100 rows to be displayed, the event is fired continuously for the first, say, 10 rows that are visible. When the user scrolls down the Table view, the tableView:cellForRowAtIndexPath: event is fired for the next couple of visible rows.
Here, you retrieve the individual item from the array and insert it into the Table view:
- (UITableViewCell *)tableView:(UITableView *)tableView
   cellForRowAtIndexPath:(NSIndexPath *)indexPath {

    static NSString *CellIdentifier = @"Cell";

    //---try to get a reusable cell---
    UITableViewCell *cell = [tableView
        dequeueReusableCellWithIdentifier:CellIdentifier];

    //---create new cell if no reusable cell is available---
    if (cell == nil) {
        cell = [[[UITableViewCell alloc] initWithStyle:UITableViewCellStyleDefault
                   reuseIdentifier:CellIdentifier] autorelease];
    }

    //---set the text to display for the cell---
    NSString *cellValue = [listOfMovies objectAtIndex:indexPath.row];
    cell.textLabel.text = cellValue;

    return cell;
}
Specifically, you use the dequeueReusableCellWithIdentifier: method of the UITableView class to obtain an instance of the UITableViewCell class. The dequeueReusableCellWithIdentifier: method returns a reusable Table view cell object. This is important because if you have a large table (say, with 10,000 rows) and you create a single UITableViewCell object for each row, you would generate a great performance and memory hit. Also, because a Table view displays only a fixed number of rows at any one time, reusing the cells that have been scrolled out of view would make sense. This is exactly what the dequeueReusableCellWithIdentifier: method does. So, for example, if 10 rows are visible in the Table view, only 10 UITableViewCell objects are ever created — they always get reused when the user scrolls through the Table view.
You can display a header and footer for the Table view by simply implementing the following two methods in your View Controller:
- (NSString *)tableView:(UITableView *)tableView
   titleForHeaderInSection:(NSInteger)section{
    //---display "Movie List" as the header---return @"Movie List";

}

- (NSString *)tableView:(UITableView *)tableView
   titleForFooterInSection:(NSInteger)section {
    //---display "by Denzel Washington" as the footer---return @"by Denzel Washington";

}
If you insert the preceding statements in the TableViewExampleViewController.m file and rerun the application, you see the header and footer of the Table view as shown in Figure 10-5.
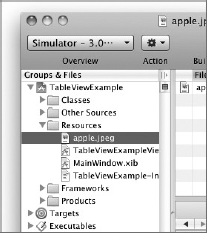
In addition to text, you can display an image next to the text of a cell in a Table view. Suppose you have an image named apple.jpeg in the Resources folder of your project (see Figure 10-6).
Note
You can simply drag and drop an image to the Resources folder of Xcode. When prompted, ensure that you save a copy of the image in your project.
To display an image next to the text of a cell, insert the following statements that appear in bold into the tableView:cellForRowAtIndexPath: method:
- (UITableViewCell *)tableView:(UITableView *)tableView
   cellForRowAtIndexPath:(NSIndexPath *)indexPath {

    static NSString *CellIdentifier = @"Cell";

    //---try to get a reusable cell---
    UITableViewCell *cell = [tableView
        dequeueReusableCellWithIdentifier:CellIdentifier];


//---create new cell if no reusable cell is available---
    if (cell == nil) {
        cell = [[[UITableViewCell alloc] initWithStyle:UITableViewCellStyleDefault
                   reuseIdentifier:CellIdentifier] autorelease];
    }

    //---set the text to display for the cell---
    NSString *cellValue = [listOfMovies objectAtIndex:indexPath.row];
    cell.text = cellValue;

    UIImage *image = [UIImage imageNamed:@"apple.jpeg"];
    cell.imageView.image = image;

    return cell;
}
Press Command-R to test the application and you see that the image is displayed next to each row (see Figure 10-7).
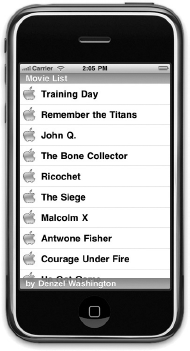
Notice that the UITableViewCell object already has the imageView property. All you need to do is to create an instance of the UIImage class and then load the image from the Resources folder of your project.
So far, you have seen how to populate the Table view with items by ensuring that your View Controller conforms to the UITableViewDataSource protocol. This protocol takes care of populating the Table view, but if you want to select the items in a Table view, you need to conform to another protocol, UITableViewDelegate.
The UITableViewDelegate protocol contains events that allow you to manage selections, edit and delete rows, and display a header and footer.
To use the UITableViewDelegate protocol, modify the TableViewExampleViewController.h file by adding the statement in bold as follows:
#import <UIKit/UIKit.h>

@interface TableViewExampleViewController : UIViewController
     <UITableViewDataSource,
     UITableViewDelegate>{

}

@end
Strictly speaking, if you have connected the delegate outlet to the File's Owner item previously (see Figure 10-8), you don't need to add the preceding statement (UITableViewDelegate). Either you write the preceding statement or connect the outlet in Interface Builder. However, doing both doesn't hurt.

The following Try It Out shows how you can allow users to make selections in a Table view.
TRY IT OUT: Making a Selection in a Table View
Using the same project created earlier, add the following statements that appear in bold to the
TableViewExampleViewController.mfile:#import "TableViewExampleViewController.h" @implementation TableViewExampleViewController NSMutableArray *listOfMovies;
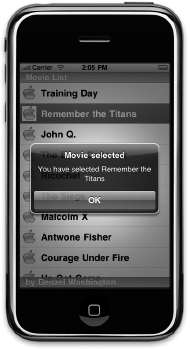
- (void)tableView:(UITableView *)tableViewdidSelectRowAtIndexPath:(NSIndexPath *)indexPath {NSString *movieSelected = [listOfMovies objectAtIndex:[indexPath row]];NSString *msg = [[NSString alloc] initWithFormat:@"You have selected %@",movieSelected];UIAlertView *alert = [[UIAlertView alloc] initWithTitle:@"Movie selected"message:msgdelegate:selfcancelButtonTitle: @"OK"otherButtonTitles:nil];[alert show];[alert release];[movieSelected release];[msg release];}Press Command-R to test the application on the iPhone Simulator.
Select a row by tapping it. When a row is selected, you see an alert view displaying the row you have selected (see Figure 10-9).
How It Works
One of the events in the UITableViewDelegate protocol is tableView:didSelectRowAtIndexPath:, which is fired when the user selects a row in the Table view. One of the parameters contained in tableView:didSelectRowAtIndexPath: event is of the type NSIndexPath. The NSIndexPath class represents the path of a specific item in a nested array collection.
For this event, to know which row has been selected, you simply call the row property of the NSIndexPath object (indexPath) and then use the row number to reference against the listOfMovies array:
NSString *movieSelected = [listOfMovies objectAtIndex:[indexPath row]];
Note
The row property of the NSIndexPath class is one of the additions made by the UIKit framework to enable the identi. cation of rows and sections in a Table view. So be aware that the original class de. nition of the NSIndexPath class does not contain the row property.
After the selected movie is retrieved, you simply display it using the UIAlertView class:
NSString *msg = [[NSString alloc] initWithFormat:@"You have selected %@",
                    movieSelected];

UIAlertView *alert = [[UIAlertView alloc] initWithTitle:@"Movie selected"
                             message:msg
                             delegate:self
                             cancelButtonTitle: @"OK"
otherButtonTitles:nil];Another event in the UITableViewDelegate protocol is tableView:indentationLevelForRowAtIndexPath:. When you handle this event, it is fired for every row that is visible on the screen. To set an indentation for a particular row, simply return an integer indicating the level of indentation:
- (NSInteger)tableView:(UITableView *)tableView
   indentationLevelForRowAtIndexPath:(NSIndexPath *)indexPath {

  return [indexPath row] % 2;

}
In the preceding example, the indentation alternates between 0 and 1, depending on the current row number. Figure 10-10 shows how the Table view looks if you insert the preceding code in the TableViewExampleViewController.m file.
In the previous sections, you create a View-based Application project and then manually add a Table view to the View window and connect the data source and delegate to the File's Owner item. You then handle all the relevant events defined in the two protocols, UITableViewDelegate and UITableViewDataSource, so that you can populate the Table view with items as well as make them selectable.
In real life, the Table view is often used with a Navigation-based Application because it is very common for users to select an item from a Table view and then navigate to another screen showing the details of the item selected. For this reason, the Navigation-based Application template in the iPhone SDK by default uses the TableView class instead of the View class.
In addition, you can group items in a Table view into sections so that you can group related items with a header for each section. In the following Try It Out, you learn how to use the Table view from within a Navigation-based Application project. At the same time, you learn how to display items stored in a property list, as opposed to an array.
TRY IT OUT: Displaying Sections in a Table View
Create a new Navigation-based Application project and name it
TableView.Double-click the
RootViewController.xibfile to edit it in Interface Builder.Notice that in the
RootViewController.xibwindow you now have aTableViewitem instead of the usualViewitem (see Figure 10-11).Double-click the
TableViewitem and observe that you have a Table view within it (see Figure 10-12).Examine
RootViewController.hfile and notice that theRootViewControllerclass now extends theUITableViewControllerbase class:@interface RootViewController : UITableViewController { } @endAlso examine the
RootViewController.mfile and observe that it includes a number of event stubs that you can use by removing the comment statements.Right-click the Resources folder and choose Add

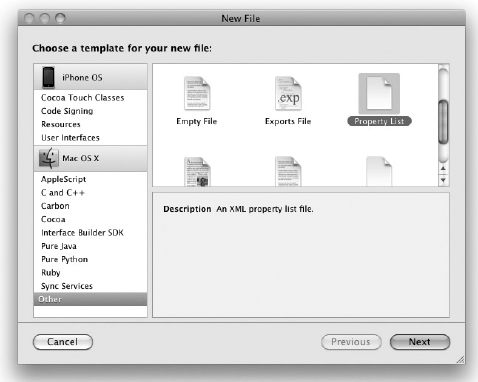
Select the Other category on the left of the New File dialog and select the Property List template on the right of the dialog (see Figure 10-13).
Note
The .PLIST template is moved in XCode3.2 to the Mac OS X
Name the property list
Movies.plist. The property list is now saved in the Resources folder of your project. Select it and create the list of items as shown in Figure 10-14.In the
RootViewController.hfile, add the following statements that appear in bold:@interface RootViewController : UITableViewController {NSDictionary *movieTitles;NSArray *years;}@property (nonatomic, retain) NSDictionary *movieTitles;@property (nonatomic, retain) NSArray *years;@endIn the
RootViewController.mfile, add the following statements that appear in bold:#import "RootViewController.h" @implementation RootViewController
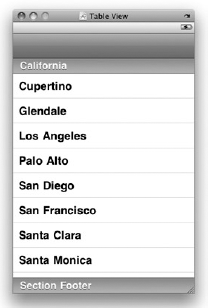
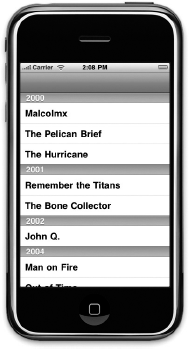
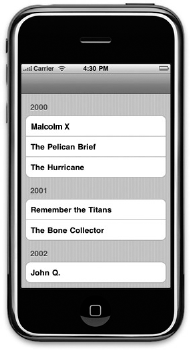
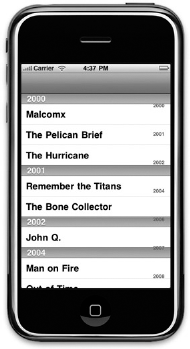
@synthesize movieTitles, years;- (void)viewDidLoad {//---path to the property list file---NSString *path = [[NSBundle mainBundle] pathForResource:@"Movies"ofType:@"plist"];//---load the list into the dictionary---NSDictionary *dic = [[NSDictionary alloc] initWithContentsOfFile:path];//---save the dictionary object to the property---self.movieTitles = dic;[dic release];//---get all the keys in the dictionary object and sort them---NSArray *array = [[movieTitles allKeys]sortedArrayUsingSelector:@selector(compare:)];//---save the keys in the years property---self.years = array;[super viewDidLoad];}- (NSInteger)numberOfSectionsInTableView:(UITableView *)tableView {//---returns the number of years as the number of sections you want to see---return [years count];}// Customize the number of rows in the table view.- (NSInteger)tableView:(UITableView *)tableViewnumberOfRowsInSection:(NSInteger)section {//---check the current year based on the section index---NSString *year = [years objectAtIndex:section];//---returns the movies in that year as an array---NSArray *movieSection = [movieTitles objectForKey:year];//---return the number of movies for that year as the number of rows in that// section ---return [movieSection count];}// Customize the appearance of table view cells.- (UITableViewCell *)tableView:(UITableView *)tableViewcellForRowAtIndexPath:(NSIndexPath *)indexPath {static NSString *CellIdentifier = @"Cell";UITableViewCell *cell = [tableViewdequeueReusableCellWithIdentifier:CellIdentifier];if (cell == nil) {cell = [[[UITableViewCell alloc] initWithStyle:UITableViewCellStyleDefaultreuseIdentifier:CellIdentifier] autorelease];}// Configure the cell.//---get the year---NSString *year = [years objectAtIndex:[indexPath section]];//---get the list of movies for that year---NSArray *movieSection = [movieTitles objectForKey:year];//---get the particular movie based on that row---cell.textLabel.text = [movieSection objectAtIndex:[indexPath row]];return cell;}- (NSString *)tableView:(UITableView *)tableViewtitleForHeaderInSection:(NSInteger)section {//---get the year as the section header---NSString *year = [years objectAtIndex:section];return year;}- (void)dealloc {[years release];[movieTitles release];[super dealloc]; } @endPress Command-R to test the application. You can now see the movies grouped into sections organized by year (see Figure 10-15).
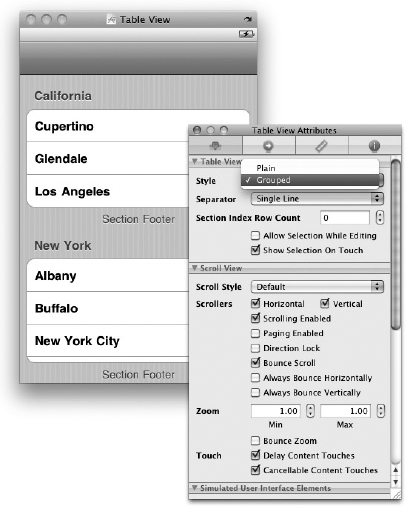
You can also change the style of the Table view by clicking the
TableViewitem in Interface Builder and then changing theStyleproperty in the Attributes Inspector window toGrouped(see Figure 10-16).If you rerun the application, you see that the look of the Table view is now different (see Figure 10-17).
Codefi le [TableView.zip] available for download atWrox.com

How It Works
The exercise covers quite a number of concepts, and you will need some time to understand them all.
First, you created a property list in your project. You populated the property list with several key/value pairs. Essentially, you can visualize the key/value pairs stored in the property list as shown in Figure 10-18.
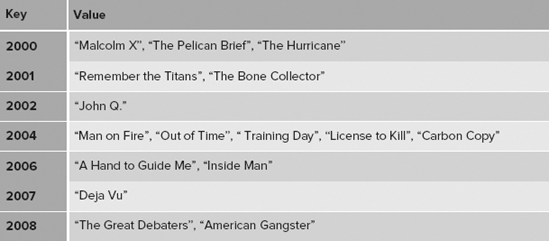
Each key represents a year, and the value for each key represents the movies released in that particular year. You will use the values stored in the property list and display them in the Table view.
Within the RootViewController class, you create two properties: movieTitles (an NSDictionary object) and years (an NSArray object).
When the view is loaded, you first locate the property list and load the list into the NSDictionary object, followed by retrieving all the years into the NSArray object:
- (void)viewDidLoad {
    //---path to the property list file---
    NSString *path = [[NSBundle mainBundle] pathForResource:@"Movies"
                               ofType:@"plist"];

    //---load the list into the dictionary---
    NSDictionary *dic = [[NSDictionary alloc] initWithContentsOfFile:path];

    //---save the dictionary object to the property---
    self.movieTitles = dic;
    [dic release];

    //---get all the keys in the dictionary object and sort them---
    NSArray *array = [[movieTitles allKeys]
                     sortedArrayUsingSelector:@selector(compare:)];

    //---save the keys in the years property---
    self.years = array;

    [super viewDidLoad];
}
Because the Table view now displays the list of movies in sections, with each section representing a year, you need to tell the Table view how many sections are there. You do so by implementing the numberOfSectionsInTableView: method:
- (NSInteger)numberOfSectionsInTableView:(UITableView *)tableView {

    //---returns the number of years as the number of sections you want to see---
    return [years count];
}
After the Table view knows how many sections to display, it must also know how many rows to display in each section. You tell it that information by implementing the tableView:numberOfRowsInSection: method:
// Customize the number of rows in the table view.
- (NSInteger)tableView:(UITableView *)tableView
   numberOfRowsInSection:(NSInteger)section {

    //---check the current year based on the section index---
    NSString *year = [years objectAtIndex:section];

    //---returns the movies in that year as an array---
    NSArray *movieSection = [movieTitles objectForKey:year];

    //---return the number of movies for that year as the number of rows in that
    // section ---
    return [movieSection count];

}
To display the movies for each section, you implement the tableView:cellForRowAtIndexPath: method and extract the relevant movie titles from the NSDictionary object:
// Customize the appearance of table view cells.
- (UITableViewCell *)tableView:(UITableView *)tableView
   cellForRowAtIndexPath:(NSIndexPath *)indexPath {

    static NSString *CellIdentifier = @"Cell";

    UITableViewCell *cell = [tableView
        dequeueReusableCellWithIdentifier:CellIdentifier];

    if (cell == nil) {
        cell = [[[UITableViewCell alloc] initWithStyle:UITableViewCellStyleDefault
                   reuseIdentifier:CellIdentifier] autorelease];
    }

    // Configure the cell.
    //---get the year---
    NSString *year = [years objectAtIndex:[indexPath section]];

    //---get the list of movies for that year---
NSArray *movieSection = [movieTitles objectForKey:year];
//---get the particular movie based on that row---
cell.text = [movieSection objectAtIndex:[indexPath row]];
return cell;
}Finally, you implement the tableView:titleForHeaderInSection: method to retrieve the year as the header for each section:
- (NSString *)tableView:(UITableView *)tableView
   titleForHeaderInSection:(NSInteger)section {

    //---get the year as the section header---
    NSString *year = [years objectAtIndex:section];

    return year;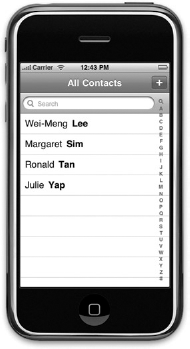
}The list of movies is pretty short, so scrolling through the list is not too much of a hassle. However, imagine that the list contains 10,000 titles spanning 100 years. In this case, scrolling from the top of the list to the bottom of the list can take a long time. A very useful feature of the Table view is its ability to display an index on the right side of the view. An example is the A–Z index list available in your Contacts list (see Figure 10-19).
To add an index list to your Table view, you just need to implement the sectionIndexTitlesForTableView: method and return the array containing the section headers, which is the years array in this case:
- (NSArray *)sectionIndexTitlesForTableView:(UITableView *)tableView {
    return years;
}
Note
Before you run the application, be sure to change the style of the Table view back to Plain. If you set it to Grouped style, the index will overlap with the layout of the Table view.
Figure 10-20 shows the index displayed on the right side of the Table view.
One very common function associated with the Table view is the ability to search the items contained within a Table view. For example, the Contacts application has the Search Bar at the top (see Figure 10-21) for easy searching of contacts.
In the following Try It Out, you will learn how to add search functionality to the Table view.
TRY IT OUT: Adding a Search Bar to the Table View
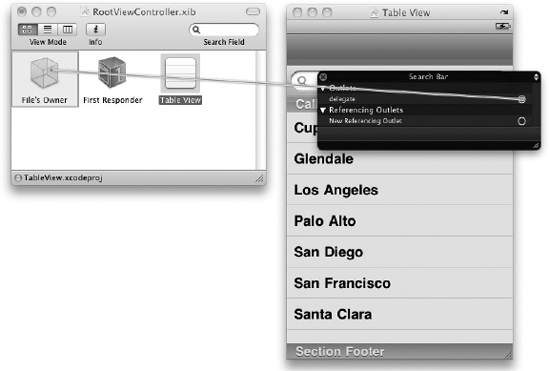
Using the same project created in the previous section, in Interface Builder drag a Search Bar from the Library and drop it onto the Table view (see Figure 10-22).
Right-click the Search Bar and connect the
delegateto the File's Owner item (see Figure 10-23).In the
RootViewController.hfile, add the following statements that appear in bold:@interface RootViewController : UITableViewController
<UISearchBarDelegate>{NSDictionary *movieTitles; NSArray *years;//---search---IBOutlet UISearchBar *searchBar;BOOL isSearchOn;BOOL canSelectRow;NSMutableArray *listOfMovies;NSMutableArray *searchResult;} @property (nonatomic, retain) NSDictionary *movieTitles; @property (nonatomic, retain) NSArray *years;//---search---@property (nonatomic, retain) UISearchBar *searchBar;- (void) doneSearching: (id)sender;- (void) searchMoviesTableView;@endNote
As before, the addition of the preceding statement is not absolutely necessary after you have connected the delegate to the File's Owner item in Interface Builder.
In Interface Builder, Control-click and drag the File's Owner item to the Search Bar and select
searchBar.In the
RootViewController.mfile, add the following statements that appear in bold:#import "RootViewController.h" @implementation RootViewController @synthesize movieTitles, years;
@synthesize searchBar;- (void)viewDidLoad { NSString *path = [[NSBundle mainBundle] pathForResource:@"Movies" ofType:@"plist"]; NSDictionary *dic = [[NSDictionary alloc] initWithContentsOfFile:path]; self.movieTitles = dic; NSArray *array = [[movieTitles allKeys] sortedArrayUsingSelector:@selector(compare:)]; self.years = array; [dic release];//---display the searchbar---self.tableView.tableHeaderView = searchBar;searchBar.autocorrectionType = UITextAutocorrectionTypeYes;//---copy all the movie titles in the dictionary into the listOfMovies array---listOfMovies = [[NSMutableArray alloc] init];for (NSString *year in array) //---get all the years---{//---get all the movies for a particular year---NSArray *movies = [movieTitles objectForKey:year];for (NSString *title in movies){[listOfMovies addObject:title];}}//---used for storing the search result---searchResult = [[NSMutableArray alloc] init];isSearchOn = NO;canSelectRow = YES;[super viewDidLoad]; }//---fired when the user taps on the searchbar---- (void)searchBarTextDidBeginEditing:(UISearchBar *)searchBar {isSearchOn = YES;canSelectRow = NO;self.tableView.scrollEnabled = NO;//---add the Done button at the top---self.navigationItem.rightBarButtonItem = [[[UIBarButtonItem alloc]initWithBarButtonSystemItem:UIBarButtonSystemItemDonetarget:self action:@selector(doneSearching:)] autorelease];}//---done with the searching---- (void) doneSearching:(id)sender {isSearchOn = NO;canSelectRow = YES;self.tableView.scrollEnabled = YES;self.navigationItem.rightBarButtonItem = nil;//---hides the keyboard---[searchBar resignFirstResponder];//---refresh the TableView---[self.tableView reloadData];}//---fired when the user types something into the searchbar---- (void)searchBar:(UISearchBar *)searchBar textDidChange:(NSString *)searchText {//---if there is something to search for---if ([searchText length] > 0) {isSearchOn = YES;canSelectRow = YES;self.tableView.scrollEnabled = YES;[self searchMoviesTableView];}else {//---nothing to search---isSearchOn = NO;canSelectRow = NO;self.tableView.scrollEnabled = NO;}[self.tableView reloadData];}//---performs the searching using the array of movies---- (void) searchMoviesTableView {//---clears the search result---[searchResult removeAllObjects];for (NSString *str in listOfMovies){NSRange titleResultsRange = [str rangeOfString:searchBar.textoptions:NSCaseInsensitiveSearch];if (titleResultsRange.length > 0)[searchResult addObject:str];}}//---fired when the user taps the Search button on the keyboard---- (void)searchBarSearchButtonClicked:(UISearchBar *)searchBar {[self searchMoviesTableView];}- (NSInteger)numberOfSectionsInTableView:(UITableView *)tableView {if (isSearchOn)return 1;elsereturn [years count];}// Customize the number of rows in the table view.- (NSInteger)tableView:(UITableView *)tableViewnumberOfRowsInSection:(NSInteger)section {if (isSearchOn) {return [searchResult count];} else{NSString *year = [years objectAtIndex:section];NSArray *movieSection = [movieTitles objectForKey:year];return [movieSection count];}}// Customize the appearance of table view cells. - (UITableViewCell *)tableView:(UITableView *)tableView cellForRowAtIndexPath:(NSIndexPath *)indexPath { static NSString *CellIdentifier = @"Cell"; UITableViewCell *cell = [tableViewdequeueReusableCellWithIdentifier:CellIdentifier]; if (cell == nil) { cell = [[[UITableViewCell alloc] initWithStyle:UITableViewCellStyleDefault reuseIdentifier:CellIdentifier] autorelease]; } // Configure the cell.if (isSearchOn) {NSString *cellValue = [searchResult objectAtIndex:indexPath.row];cell.textLabel.text = cellValue;} else {NSString *year = [years objectAtIndex:[indexPath section]]; NSArray *movieSection = [movieTitles objectForKey:year]; cell.textLabel.text = [movieSection objectAtIndex:[indexPath row]];}return cell; } - (NSString *)tableView:(UITableView *)tableView titleForHeaderInSection:(NSInteger)section { NSString *year = [years objectAtIndex:section];if (isSearchOn)return nil;elsereturn year; } - (NSArray *)sectionIndexTitlesForTableView:(UITableView *)tableView {if (isSearchOn)return nil;elsereturn years; } //---fired before a row is selected--- - (NSIndexPath *)tableView :(UITableView *)theTableView willSelectRowAtIndexPath:(NSIndexPath *)indexPath {if (canSelectRow)return indexPath;elsereturn nil;} - (void)didReceiveMemoryWarning { // Releases the view if it doesn't have a superview.[super didReceiveMemoryWarning]; // Release any cached data, images, etc that aren't in use. } - (void)viewDidUnload { // Release anything that can be recreated in viewDidLoad or on demand. // e.g. self.myOutlet = nil; } - (void)dealloc { [years release]; [movieTitles release];[searchBar release];[super dealloc]; } @endPress Command-R to test the application on the iPhone Simulator.
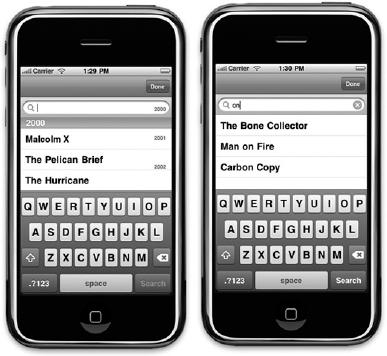
Tap the Search Bar and the keyboard will appear (see Figure 10-24). Observe the following:
As you type, the Table view displays the movies whose title contains the characters that you are typing. You can select the search result by tapping them.
When the keyboard appears and the Search Bar has no text in it, the Table view contains the original list and the rows are not searchable.
When you click the Done button, the keyboard disappears and the original list appears.
That is quite a lot of work, isn't it? But not to worry: It is actually quite easy to follow. Go ahead and dive in into the details.
First, you add an outlet to connect to the Search Bar:
IBOutlet UISearchBar *searchBar;
You then define two Boolean variables so that you can track whether the search process is ongoing and whether the user can select the rows in the Table view:
BOOL isSearchOn;
    BOOL canSelectRow;
You then define two
NSMutableArrayobjects so that you can use one to store the list of movies and use another to temporarily store the result of the search:NSMutableArray *listOfMovies; NSMutableArray *searchResult;When the view is first loaded, you first associate the Search Bar with the Table view and then copy the entire list of movie titles from the
NSDictionaryobject into theNSMutableArray://---display the searchbar--- self.tableView.tableHeaderView = searchBar; searchBar.autocorrectionType = UITextAutocorrectionTypeYes; //---copy all the movie titles in the dictionary into the listOfMovies array--- listOfMovies = [[NSMutableArray alloc] init]; for (NSString *year in array) //---get all the years--- { //---get all the movies for a particular year--- NSArray *movies = [movieTitles objectForKey:year]; for (NSString *title in movies) { [listOfMovies addObject:title]; } } //---used for storing the search result--- searchResult = [[NSMutableArray alloc] init]; isSearchOn = NO; canSelectRow = YES;When the user taps the Search Bar, the
searchBarTextDidBeginEditing:event (one of the methods defined in theUISearchBarDelegateprotocol) fires. In this method, you add a Done button to the top-right corner of the screen. When the Done button is clicked, thedoneSearching:method is called (which you define next).//---fired when the user taps on the searchbar--- - (void)searchBarTextDidBeginEditing:(UISearchBar *)searchBar {isSearchOn = YES; canSelectRow = NO; self.tableView.scrollEnabled = NO; //---add the Done button at the top--- self.navigationItem.rightBarButtonItem = [[[UIBarButtonItem alloc] initWithBarButtonSystemItem:UIBarButtonSystemItemDone target:self action:@selector(doneSearching:)] autorelease]; }The
doneSearching:method makes the Search Bar resign its First Responder status (thereby hiding the keyboard). At the same time, you reload the Table view by calling thereloadDatamethod of the Table view. This causes the various events associated with the Table view to be fired again.//---done with the searching--- - (void) doneSearching:(id)sender { isSearchOn = NO; canSelectRow = YES; self.tableView.scrollEnabled = YES; self.navigationItem.rightBarButtonItem = nil; //---hides the keyboard--- [searchBar resignFirstResponder]; //---refresh the TableView--- [self.tableView reloadData]; }As the user types into the Search Bar, the
searchBar:textDidChange:event is fired for each character entered. In this case, if the Search Bar has at least one character, you call thesearchMoviesTableViewmethod (which you define next)://---fired when the user types something into the searchbar--- - (void)searchBar:(UISearchBar *)searchBar textDidChange:(NSString *)searchText { //---if there is something to search for--- if ([searchText length] > 0) { isSearchOn = YES; canSelectRow = YES; self.tableView.scrollEnabled = YES; [self searchMoviesTableView]; } else { //---nothing to search--- isSearchOn = NO; canSelectRow = NO; self.tableView.scrollEnabled = NO; } [self.tableView reloadData]; }The
searchMoviesTableViewmethod performs the searching on thelistOfMoviesarray. You use therangeOfString:options:method of theNSStringclass to perform a case-insensitive search of each movie title using the specified string. The returning result is anNSRangeobject, which contains the location and length of the search string in the string being searched. If the length is more than zero, this means that a match has been found, and hence you add it to thesearchResultarray://---performs the searching using the array of movies--- - (void) searchMoviesTableView { //---clears the search result--- [searchResult removeAllObjects]; for (NSString *str in listOfMovies) { NSRange titleResultsRange = [str rangeOfString:searchBar.text options:NSCaseInsensitiveSearch]; if (titleResultsRange.length > 0) [searchResult addObject:str]; } }When the user taps the Search button (on the keyboard), you make a call to the
searchMoviesTableViewmethod://---fired when the user taps the Search button on the keyboard--- - (void)searchBarSearchButtonClicked:(UISearchBar *)searchBar { [self searchMoviesTableView]; }The rest of the methods are straightforward. If the search is currently active (as determined by the
isSearchOnvariable), you display the list of titles contained in thesearchResultarray. If not, you display the entire list of movies.
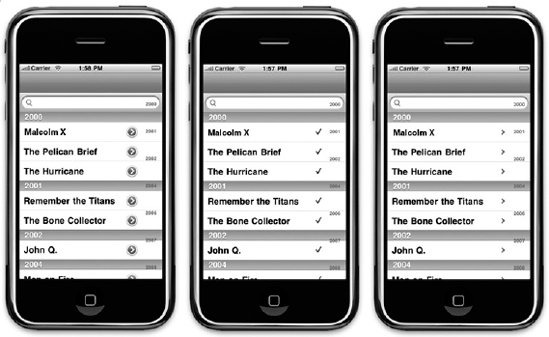
Because users often select rows in a Table view to view more detailed information, rows in a Table view often spot images containing an arrow or a checkmark. Figure 10-25 shows an example of such arrows.
There are three types of images that you can display:
To display a disclosure or checkmark, insert the following statement that appears in bold in the tableView:cellForRowAtIndexPath: event:
- (UITableViewCell *)tableView:(UITableView *)tableView
   cellForRowAtIndexPath:(NSIndexPath *)indexPath {

    static NSString *CellIdentifier = @"Cell";

    UITableViewCell *cell = [tableView
        dequeueReusableCellWithIdentifier:CellIdentifier];

    if (cell == nil) {
        cell = [[[UITableViewCell alloc] initWithStyle:UITableViewCellStyleDefault
                   reuseIdentifier:CellIdentifier] autorelease];
    }

    // Configure the cell.
    if (isSearchOn) {
        NSString *cellValue = [searchResult objectAtIndex:indexPath.row];
        cell.text = cellValue;
    } else {
        NSString *year = [years objectAtIndex:[indexPath section]];
        NSArray *movieSection = [movieTitles objectForKey:year];
        cell.text = [movieSection objectAtIndex:[indexPath row]];
    }
    cell.accessoryType = UITableViewCellAccessoryDetailDisclosureButton;

    return cell;
}
You can use the following constants for the accessoryType property:
UITableViewCellAccessoryDetailDisclosureButtonUITableViewCellAccessoryCheckmarkUITableViewCellAccessoryDisclosureIndicator
Figure 10-26 shows the different types of images corresponding to the three preceding constants.
Of the three image types, only the UITableViewCellAccessoryDetailDisclosureButton can handle a user's tap event. (The other two images are used only for display purposes.) To handle the event when the user taps the Disclosure button, you need to implement the tableView:accessoryButtonTappedForRowWithIndexPath: method:
- (void)tableView:(UITableView *)tableView
   accessoryButtonTappedForRowWithIndexPath:(NSIndexPath *)indexPath {

    //---insert code here---
    // e.g. navigate to another view to display detailed information, etc
}
Figure 10-27 shows the two different events fired when a user taps the content of the cell as well as the Disclosure button.
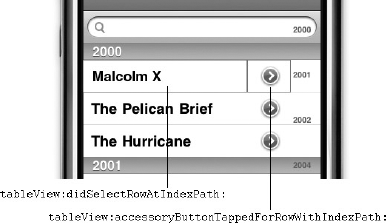
Commonly, you use the Disclosure button to display detailed information about the selected row.
In this chapter, you had a good look at the Table view and how to customize it to display items in the various forms. You also learned how to implement search functionality in the Table view, which is an essential function in real-world applications.
EXERCISES
Name the two protocols that your View Controller must conform to when using the Table view in your view. Briefly describe their uses.
Which is the method to implement if you want to add an index in a Table view?
Name the three disclosure and checkmark images that you can use. Which one of them handles user taps?
WHAT YOU HAVE LEARNED IN THIS CHAPTER
TOPIC | KEY CONCEPTS |
|---|---|
Add items to a Table view | Handle the various events in the |
Allow users to select rows in a Table view | Handle the various events in the |
Add images to rows in a Table view | Use the image property of the |
Use a property list with a Table view | Use the following code snippet to locate the property list:
Then use a combination of |
Group items in a Table view in sections | Implement the following methods:
|
Add an index to a Table view | Implement the |
Add disclosure and checkmark images to a row in a Table view | Set the
|
Implement a search in a Table view | Use the Search Bar view and handle the various events in the |