P A R T 3
![]()
The No-Nonsense Getting Started Guide
C H A P T E R 6
![]()
Booting Ubuntu for the First Time
Now that Ubuntu is installed, you'll no doubt want to get started immediately, and that's what Part 3 of this book is all about. In later chapters, we'll present specific details of using Ubuntu and getting essential hardware up and running. We'll also show you how to personalize the desktop so it works in a way that's best for you on a day-to-day basis. But right now, the goal of this chapter is to get you doing the same things you did under Windows as quickly as possible.
This chapter explains how to start up Ubuntu for the first time and work with the desktop. It also shows how some familiar aspects of your computer, such as using the mouse, are slightly enhanced under Ubuntu.
Starting Up
If you've chosen to dual-boot with Windows, the first Ubuntu screen you'll see is the boot loader menu, which appears shortly after you switch on your PC. If Ubuntu is the only operating system on your hard disk, you need to hold the Shift key during system startup to access this boot menu, but you won't need to do so unless you want to access the recovery mode boot settings. In fact, if Ubuntu is the only operating system on your computer, you can skip to the next section of this chapter.
![]() Note The boot loader is actually a separate program called Grub, which has been updated to version 2 since Ubuntu 9.10. This program kicks off everything and starts Ubuntu.
Note The boot loader is actually a separate program called Grub, which has been updated to version 2 since Ubuntu 9.10. This program kicks off everything and starts Ubuntu.
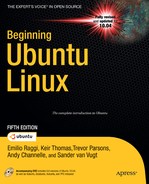
The boot loader menu you see when your PC is set to dual-boot has three or four choices, as shown in Figure 6-1. The top one is what you need to boot Ubuntu. The Ubuntu option will be selected automatically within 10 seconds, but you can press Enter to start immediately.
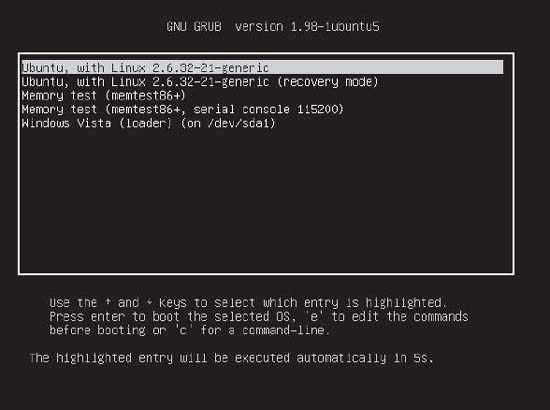
Figure 6-1. The default choice is fine on the boot menu, so press Enter to start Ubuntu.
You should find that you also have an entry for Windows, located at the bottom of the list and labeled with whichever version of the OS you have installed. To boot into Windows, simply use the cursor keys to move the selection to the appropriate option and then press Enter.
You should also see an entry ending in “(recovery mode).” This is a little like Safe Mode within Windows. If you select recovery mode, Ubuntu will boot to a text mode menu with six options:
resume—Resume normal boot: This option allows you to boot normally, as if you didn't need to fix anything at all. However, the big difference with this option compared to a graphical boot is that Ubuntu boots in text mode, in which system messages scroll past as Ubuntu is starting up. If you have problems with booting Ubuntu, you can run in recovery mode and choose this option to find error messages in the boot process.
clean—Try to make free space: This option forces the boot loader to try to make free space on the disk.
dpkg—Repair broken packages: This option tries to repair the software installed on your computer.
Grub—Update Grub loader: Forces Grub (the program that presents you this boot menu) to query the operating systems installed in your hard disks and to recreate the list it presents at startup.
netroot—Drop to shell prompt with networking: Like the option “root” but with the networking features fully functional.
root—Drop to root shell prompt: This option boots with conservative system settings and then presents you with a command-line prompt in administrator mode (you run as the root user—a special user account that has absolute power over the entire system, so try to avoid booting to this option if you can do so, and be very careful when you don't have any other option but to use the root shell prompt). The typical usage for this prompt is to change the passwords of users if they forget their passwords, to free up disk space to run normally, and to uninstall buggy software to bring back system stability. The system commands that can be used for recovery are
passwd(to change passwords),mv(to move files and folders),rm(to delete files and folders),cp(to copy files and folders),mkdir(to create a new folder), anddpkg(to install or remove software). These and other commands are discussed further in Appendix A.
When you update your system software, you might find that new entries are added to the boot menu list. This is because the kernel has been updated. The kernel is the central system file that Ubuntu relies on, and essentially, the boot menu exists to let you choose between different kernels. Almost without exception, the first (topmost) entry is the one you'll want each time to boot Ubuntu, because this will always use the most recent version of the kernel, along with the latest versions of other system software. The other entries will start the system with older versions of the kernel and are provided in the unlikely situation that the latest kernel causes problems.
![]() Note All operating systems need a boot loader, even Windows. However, the Windows boot loader is hidden and simply starts the OS. Under Ubuntu, the boot loader usually has a menu so you can select Linux or perhaps an option that lets you access your PC for troubleshooting problems. When you gain some experience with Ubuntu, you might choose to install two or more versions of Linux on the same hard disk, and you'll be able to select among them by using the boot menu.
Note All operating systems need a boot loader, even Windows. However, the Windows boot loader is hidden and simply starts the OS. Under Ubuntu, the boot loader usually has a menu so you can select Linux or perhaps an option that lets you access your PC for troubleshooting problems. When you gain some experience with Ubuntu, you might choose to install two or more versions of Linux on the same hard disk, and you'll be able to select among them by using the boot menu.
Logging In
After Ubuntu has booted (and much effort has been put into reducing the time Lucid Lynx takes to do it), you should see the login screen, as shown in Figure 6-2. Here you enter the username and the password you created during the installation process. If during installation you selected to be automatically logged in at startup, then you will not see this screen and will be presented with the desktop right away.
Clicking the Shutdown Options button in the bottom-right corner of the screen brings up a menu from which you can opt to reboot the system or shut it down. Next to this button are the clock and the Universal Access Preferences button, which allows you to enable accessibility features such as the on-screen keyboard and the magnifier.
The user account you created during installation is similar to what Windows refers to as an administrator account. This means that the within the account you use on a day-to-day basis you can also change important system settings and reconfigure the system. However, the main difference between Ubuntu and Windows is that you'll need to enter your password to make any serious changes, rather than clicking in a confirmation dialog box, as with Windows Vista or Windows 7 (of course, Windows XP doesn't have any kind of confirmation requirement at all!).
Don't worry about damaging anything accidentally; trying to reconfigure the system or access a serious system setting will invariably bring up a password prompt. You can simply click the Cancel button if you don't want to continue.
![]() Note Unlike some versions of Linux, Ubuntu doesn't encourage the user to use an actual root (administrator) account. This is even disabled by default. Instead, it operates on the principle of certain ordinary users adopting superuser privileges that allow them to administer the system when they need to. Those are called sudoers. In UNIX terms, sudo is short for superuser do, meaning to perform a task as the superuser. A sudoer is a user account enabled to execute sudo for certain tasks, as defined in the sudoers file. The user account you create during setup has these privileges.
Note Unlike some versions of Linux, Ubuntu doesn't encourage the user to use an actual root (administrator) account. This is even disabled by default. Instead, it operates on the principle of certain ordinary users adopting superuser privileges that allow them to administer the system when they need to. Those are called sudoers. In UNIX terms, sudo is short for superuser do, meaning to perform a task as the superuser. A sudoer is a user account enabled to execute sudo for certain tasks, as defined in the sudoers file. The user account you create during setup has these privileges.
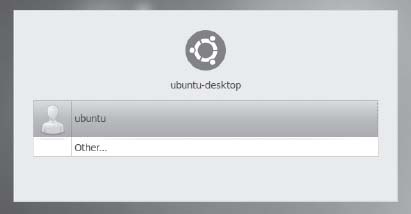
Figure 6-2. Select or type your username, enter your password, and then press Enter to log in.
Exploring the Desktop
After you've logged in, you'll see the welcoming theme of the Ubuntu desktop, as shown in Figure 6-3. Feel free to click around and see what you can discover. There's little chance of your doing serious damage, so let yourself go wild and play around with your new OS! However, be careful if any dialog boxes ask you to type your password—this indicates that you've clicked an action that has the potential to change the system in a fundamental way.
Figure 6-3. A clean Ubuntu desktop—this is your first view of the new OS.
First Impressions
The first thing you'll notice is that the desktop is clean compared to Windows. You don't have a lot of icons littering the screen.
Of course, you can fill the desktop with all the icons you want. As with Windows, you can save files to the desktop for easy access. In addition, you can click and drag icons from any of the menus onto the desktop in order to create shortcuts.
![]() Note If you're dual-booting with Windows, you might see an icon at the top left of the Ubuntu desktop that will let you access your Windows files. On one system, it was identified as sda1. Double-click the icon to view the Windows file system. Similarly, if you have a memory card reader or digital camera plugged in your PC, you might see desktop icons for them too, and any inserted CD/DVD discs will also be represented by desktop icons.
Note If you're dual-booting with Windows, you might see an icon at the top left of the Ubuntu desktop that will let you access your Windows files. On one system, it was identified as sda1. Double-click the icon to view the Windows file system. Similarly, if you have a memory card reader or digital camera plugged in your PC, you might see desktop icons for them too, and any inserted CD/DVD discs will also be represented by desktop icons.
Along the top of the desktop, you see three menus:
Applications: This menu is the equivalent of the Windows Start
All Programs menu. Here you'll find access to all the software available under Ubuntu, categorized for easy finding.
Places: This menu is somewhat like My Computer in Windows, in that it gives quick access to locations within the file system. The Places menu also provides access to network locations, such as file servers (this is probably be important only if you use Ubuntu in a business context). You can add and remove folders and files here for quick access to your favorite places, and also search for files.
System: This menu is a little like the Windows Control Panel, in that it allows you to change various system settings. The Preferences submenu lets you change trivial system settings, such as the screen saver, or start new system services, such as the remote desktop service that lets you view your desktop across a network connection. The Administration submenu lets you change underlying system settings, such as configuring new hardware (like printers) and installing software.
The mouse works mostly as it does in Windows, in that you can move it around and click on things. For the most part, single- and double-clicking work exactly as they do in Windows. You can also right-click virtually everything and everywhere to bring up context menus, which usually let you alter settings. And you should find that the scroll wheel in between the mouse buttons lets you scroll windows.
Something that might catch your attention the first time you open a window in Lucid Lynx is the placement of the familiar Maximize, Minimize, and Close buttons. They are placed to the left of the top bar, instead of to the right as is customary in Windows and OS X. Clicking the Close button ends each program, as in Windows.
Whenever Ubuntu is busy, an animated, circular icon appears that is similar in principle to the hourglass icon used in Windows. It also appears when programs are being launched.
![]() Caution Bear in mind that Ubuntu isn't a clone of Windows and doesn't try to be. Although it works in a similar way—by providing menus and icons and containing programs within windows—there are differences and refinements that may trip you up as you explore.
Caution Bear in mind that Ubuntu isn't a clone of Windows and doesn't try to be. Although it works in a similar way—by providing menus and icons and containing programs within windows—there are differences and refinements that may trip you up as you explore.
WRONG RESOLUTION!
You might find when you boot up that Ubuntu has defaulted to the wrong resolution—in other words, everything might be a little too large or too small. You might have trouble reading text, for example, or you might find that program windows fill the screen to the extent that their contents partially disappear off the edges.
Changing the resolution is simple. Choose System ![]() Preferences
Preferences ![]() Monitors from the menu (at the top of the screen). In the Resolution drop-down list, select the appropriate setting for your monitor. For a 17-inch CRT monitor, the standard resolution is 1024×768. Most 17-inch TFT screens run at 1280×1024 resolution. A 15-inch TFT screen will usually run at 1024×768 resolution. For laptops, 13-inch to 15-inch LCD panels typically run at 1280×800 resolution. If you have a 15-inch CRT monitor (common on PCs made before 2000), you'll probably find 800×600 a maximum setting; others prefer 640×480. More recent wide-screen monitors can be pushed up to 1920×1080 resolution, but this is likely to demand a higher-end graphics card to work well. If you're in doubt about your monitor's resolution, consult its manual for more information.
Monitors from the menu (at the top of the screen). In the Resolution drop-down list, select the appropriate setting for your monitor. For a 17-inch CRT monitor, the standard resolution is 1024×768. Most 17-inch TFT screens run at 1280×1024 resolution. A 15-inch TFT screen will usually run at 1024×768 resolution. For laptops, 13-inch to 15-inch LCD panels typically run at 1280×800 resolution. If you have a 15-inch CRT monitor (common on PCs made before 2000), you'll probably find 800×600 a maximum setting; others prefer 640×480. More recent wide-screen monitors can be pushed up to 1920×1080 resolution, but this is likely to demand a higher-end graphics card to work well. If you're in doubt about your monitor's resolution, consult its manual for more information.
If the resolution you want isn't available, Ubuntu might have incorrectly set up your graphics card and monitor. See the “Graphical Problems” section in Chapter 5 to learn how to reconfigure the graphical subsystem.
Exploring the Panels
Central pieces of the Ubuntu desktop are the panels. Those are the strips that you find at the top and at the bottom of your desktop. They are extremely useful and highly customizable. Most of the operations you will ever need to access on Ubuntu are available through those panels, so mastering them early on is of great help (to read more about personalizing panels, refer to Chapter 9). You will encounter the following default elements in the panels:
Main menus: The three menus at the top left of the screen provide access to most of Ubuntu's functionality. As noted earlier, the Applications menu provides access to programs; the Places menu provides access to the file system; and the System menu provides access to configuration settings. You can click and drag practically every menu entry onto the desktop in order to create a shortcut.
Application launchers: Beside the main menus you'll find icons that represent applications. By default the Firefox web browser and the Ubuntu help find their home here. Some applications add a launcher here when you install them, or you can create your own launchers for existing applications. When you click one of those icons, the corresponding application starts.
Off button: The right-most item in the top panel is the Off button, about which more details are given later in this chapter. You will notice sometimes that the Off button changes its color to red. This is an indication that a change has been made to the system that requires you to reboot the computer. This can happen, for example, when you install the latest updates to Ubuntu.
Me menu: A new element introduced with Lucid Lynx—the Me Menu, indicated by your username on the panel and located to the left of the Off button—allows you to easily set your status for various IM clients and post to social network sites like Facebook or Twitter without having to log in to them. Its functionality is explained in depth in Chapter 15.
Clock: The clock is located at the top right of the screen. Clicking it brings up a handy monthly calendar and a drop-down panel that contains a miniature world map, regional time, and weather for several locations. Click it again to hide this display. Right-clicking the clock brings up a context menu. On this menu, the Preferences option lets you alter the way the date and time are displayed and enables you to define a default location for weather information (displayed in the system tray to the left of the clock). The Adjust Date & Time option lets you change the time and/or date if they're incorrect.
Indicator applet: The Indicator applet, represented by an envelope icon next to the clock, allows you to configure instant message (IM) and mail accounts, and is used by those same accounts to inform you when a change has occurred, such as new incoming mail or an IM from one of your contacts.
Notification area: This is similar to the Windows system tray. Programs that like to hang around in memory, such as the Rhythmbox media player or Skype, add icons in this top-right area to allow quick access to their functions. The Software Update Notifier appears in this area to let you know that software updates are available (similar to Windows Update). Network Manager displays an icon here when you are connected to the network. The Volume Control applet is here too. Usually, you simply need to click (or right-click) their icons to access the program features.
Tip The small bar marks the leftmost boundary of the notification area. To resize the notification area, right-click this bar and remove the check from the Lock to Panel menu entry. Then you can click and drag the bar to a different size. This might be handy if the notification area starts to fill up with icons!
Notifications: In addition to the notification area, Ubuntu also has a pop-up, short-term notification system that is used to keep you informed of changes to your system's volume, screen brightness, network availability, IM friend status, and other useful things. You might want to disable some notifications if they start to annoy you.
Hide Windows button: At the bottom left is the Hide Windows button that instantly minimizes all open windows to give access to the desktop underneath.
Window List: The largest portion of the panel at the bottom of the screen is occupied by the Window List, which shows the programs that are currently running (if any). As with Windows, you can simply click the button for any program to bring that window “to the top.” Alternatively, you can right-click each entry to instantly minimize or maximize that particular window. It's also possible to switch between running applications on the Window List by pressing Alt+Tab.
Trash: To the extreme right of the bottom panel is the Trash icon. Dragging files or folders into this icon causes them to be moved to the trash. From here you can also empty the trash or view its contents.
Workspace switcher: Beside the Trash icon is the Workspace switcher, used to move between virtual desktops, described later in this chapter.
Shutting Down or Restarting Ubuntu
You can shut down or reboot your PC by clicking the Off button in the top-right corner of the screen. On many laptops and desktops, you can also briefly press the on/off button on the computer. The former method presents you with a selection of options in a drop-down list, while the latter launches a dialog box showing icons for various options, as shown in Figure 6-4.
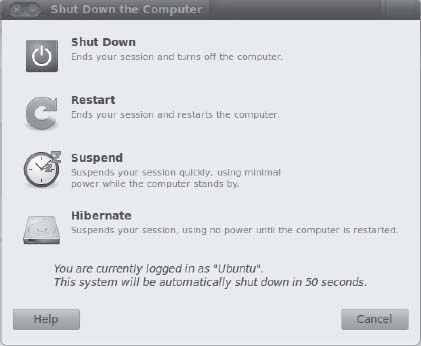
Figure 6-4. A variety of shutdown operations are available, some allowing for a quick resumption later on.
Note that not all the options appear if you use the hardware method to close down. The options in the drop-down list are as follows:
Lock Screen: This enables the screen saver and password-protects the system. The only way to leave Lock Screen mode is to enter the user's password into the dialog box that appears whenever you move the mouse or press a key.
Guest Session: This launches a new guest session of the desktop. It is ideal for employees who are temporarily using a company's PC, for example, or for friends who visit and want to check their e-mail or Facebook without leaving any trace on your PC. Any files downloaded on a guest account are deleted when the user logs out.
Switch User…: If multiple users are defined on the system (Chapter 21 discusses how to add user accounts), this option allows others to log in without closing down the original user's account. To switch back to the original user, choose Switch User again or log out the second user. The original user will need to enter their password to regain access.
Log Out: This option logs you out of the current user account and returns you to the Ubuntu login screen. Any open programs will be shut down automatically.
Sleep: This uses your computer's suspend mode, in which most of the PC's systems are powered down except for the computer's memory. Suspend mode is designed to save power and allow a quick reactivation of the PC. Not all computers support suspend mode, however, so you should experiment to see if your computer works correctly. Ensure that you save any open files before doing so. If your PC goes into suspend mode but fails to wake up when you shake the mouse or push keys, you may need to reboot. This can often be done by holding down the power button for about five seconds.
Hibernate: This saves the contents of the computer's memory to the hard disk and then completely powers down the computer. When the computer is reactivated, the user chooses to start Ubuntu as normal, and the memory contents are read in from disk. This allows a faster startup and allows users to resume from where they were last working. For the hibernate feature to work, the swap file needs to be as large as or larger than the main memory. Ubuntu's installation program should have automatically done that, but if you didn't dedicate enough disk space to Ubuntu when repartitioning, it might not have been able to do so. The only way to find out is to attempt to hibernate your system and see whether it works.
Restart: This option shuts down Ubuntu and then restarts the computer.
Shut Down: This shuts down Ubuntu and then powers off your computer, provided its BIOS is compatible with the standard shutdown commands. (All computers bought within the past five years or so are compatible; if you find that the computer hangs at the end of the Ubuntu shutdown procedure, simply turn it off manually via the power switch.)
Only the last four of these options are available in the Shut Down the Computer dialog box, opened via the hardware shutdown button or by pressing the Ctrl+Alt+Del combination of keys. If you leave the computer after pushing this button, it will pause for 60 seconds and then shut down.
Quick Desktop Guides
Refer to Figure 6-5 for an annotated diagram of the desktop. The figure includes an open menu, browser window, and program window, so you can get a sense of what it's like working from the desktop.
As another handy reference, Table 6-1 compares standard Windows desktop features to similar functionality on the Ubuntu desktop.

Figure 6-5. The Ubuntu desktop is broadly similar to the Windows desktop, with a few minor differences.
Table 6-1. Ubuntu Equivalents of Windows Desktop Features
It takes some time to get used to the look and feel of Ubuntu; everything may initially seem a little unusual. You'll find that the onscreen fonts look a little different from those in Windows, for example. The icons also aren't the same as you're used to in Windows. This can be a little disconcerting, but that feeling will quickly pass, and everything will become second nature. You'll look at how to personalize the desktop in Chapter 9.
UBUNTU FOR MAC OS X USERS
Migrating to Ubuntu from Mac OS X shouldn't present too many surprises. In some ways, Ubuntu has more in common with OS X than it does with Windows. After all, both Linux and OS X are versions of UNIX. Here is a list of OS X functions alongside details of where they can be found within Ubuntu:
- Finder (file browsing): Finder under OS X offers access to files, applications, and much more and is represented on the Dock by the Mac smiley face icon. In terms of file browsing functionality, clicking Places Home in Ubuntu is all that's needed for similar behavior.
- Finder (applications): The Applications option within Finder shows a list of all installed programs. Exactly the same thing can be found by clicking the Applications button in Ubuntu, although the programs are arranged into submenus to make finding what you're looking for easier.
- Finder (network locations): Clicking the Network button in Finder enables the user to browse the local area network or access remote file servers. This functionality can be found on the Places menu: click Places Network Servers to browse the local network and Places Connect to Server to access a remote server, such as FTP (this function also allows the user to connect to local servers by specifying their addresses).
- Macintosh HD: Double-clicking this icon on the desktop allows the user to access the root of the Macintosh file system. To access the root file system under Ubuntu, click Places Computer, and then click the File System link in the left pane of the file browsing window.
- Dock: There is no direct analogy to the Mac OS X Dock under Ubuntu, but the Quick Launch icons to the right of the Applications/Places/System menus offer quick access to the web browser, e-mail client, and help system. You can add more programs to the Quick Launch toolbar by clicking and dragging them from the Applications menu. The Window List controls the active window. Additional software can be used to mimic the look and feel of the Dock if you're a big fan.
- Trash: Located on the Dock, the Trash icon lets OS X users salvage deleted files. The same functionality is offered by the Ubuntu Trash folder icon, which is located at the bottom-right corner of the screen.
- System Preferences: Located on the Dock and in the Applications menu, the System Preferences icon offers access to all of OS X's configuration utilities. Similar functionality can be found on the System Preferences and System Administration menus.
- Spaces (version 10.5 and above): Spaces allow you to unclutter your desktop by arranging your applications into separate workspaces. Similar functionality is available by using virtual desktops, which are located at the right side of the Window List.
- Spotlight (version 10.4 and above): Spotlight allows users to search their hard disk for files. To access Ubuntu's search function, click Places Search for Files. You can also click the Deskbar applet, located to the left of the notification area, or the Tracker search tool icon, located in the notification area, to search for files.
Running Programs
Starting a new program is easy. Just click the Applications menu and then choose a program from the list, just as you would in Windows using the Start ![]() Programs menu. The Applications menu, shown in Figure 6-6, is split into various subcategories of programs, such as office tools, graphics programs, and even games!
Programs menu. The Applications menu, shown in Figure 6-6, is split into various subcategories of programs, such as office tools, graphics programs, and even games!
If you want to start the web browser or e-mail client (arguably two of the most popular programs offered by Ubuntu), you can click their icons on the top panel bar, just to the right of the menus at the top of the screen (see Figure 6-6).

Figure 6-6. The programs on the Applications menu are split into various categories.
Working with Virtual Desktops
Windows works on the premise of everything taking place on top of a single desktop. When you start a new program, it runs on top of the desktop, effectively covering up the desktop. In fact, all programs are run on this desktop, so it can get a bit confusing when you have more than a couple of programs running at the same time. Which Microsoft Word window contains the document you're working on, rather than the one you've opened to take notes from? Where is that My Computer window you were using to copy files?
Ubuntu overcomes this problem by having more than one desktop area. By using the Workspace Switcher tool, located at the bottom right of the desktop, you can switch between two or more virtual desktops. This is best explained by a demonstration:
- Make sure you're currently on the first virtual desktop (click the leftmost square on the Workspace Switcher), and start up the web browser by clicking its icon at the top of the screen (the globe icon located to the right of the menus).
- Click the second square on the Workspace Switcher. This switches you to a clean desktop, where no programs are visible—desktop number two.
- Start up the file browser by selecting the Places Home menu option. A file browser window appears.
- Click the first square in the Workspace Switcher again. You should switch back to the desktop that is running the web browser.
- Click the second square, and you switch back to the other desktop, which is running the file browser.
![]() Tip Right-clicking any of the program entries in the Window List brings up a menu where you can move a program from one virtual desktop to another. Just select Move to Another Workspace.
Tip Right-clicking any of the program entries in the Window List brings up a menu where you can move a program from one virtual desktop to another. Just select Move to Another Workspace.
See how it works? You can create up to 36 virtual desktops, in fact! To set the number of workspaces, right-click the Workspace Switcher and select Preferences. In the window that appears, select the number of workspaces and the number of rows in which they will be arranged (see Figure 6-7). You can even label the different workspaces and make Ubuntu show the name in the Workspace Switcher to better identification. The default is four workspaces arranged in a single row, but you can increase the number of workspaces and the number of rows.

Figure 6-7. Four virtual desktops are set up by default, but you can have as many as 36.
![]() Tip Putting your mouse over the Workspace Switcher and scrolling the mouse wheel switches among the various virtual desktops instantly. Or you can hold down Ctrl+Alt and press the left and right cursor keys to switch between virtual desktops.
Tip Putting your mouse over the Workspace Switcher and scrolling the mouse wheel switches among the various virtual desktops instantly. Or you can hold down Ctrl+Alt and press the left and right cursor keys to switch between virtual desktops.
If you want to keep one application—for example, a web browser—instantly available regardless of the workspace you happen to be on, you can right-click it in the Window List and click the Always on Visible Workspace button. Now as you navigate your various workspaces, that particular button will follow you.
You can also click and drag the small representations of an application window from one workspace to another in the Switcher itself, though this is quite fiddly. The Workspace Switcher provides a way of organizing your programs and also reducing the clutter. You can experiment with virtual desktops to see whether you want to organize your work this way. Some people swear by them. Experienced Ubuntu users may have more than ten virtual desktops, although clearly this will appeal only to organizational geniuses! Other users think multiple desktops are a waste of time. We thnk they're certainly worth trying out to see whether they suit the way you work.
Using the Mouse
As noted earlier, the mouse works mostly the same under Ubuntu as it does under Windows: a left-click selects things, and a right-click usually brings up a context menu. Try right-clicking various items, such as icons on the desktop or even the desktop itself.
![]() Tip Right-clicking a blank spot on the desktop and selecting Create Launcher lets you create shortcuts to applications. Clicking Create Folder lets you create new empty folders.
Tip Right-clicking a blank spot on the desktop and selecting Create Launcher lets you create shortcuts to applications. Clicking Create Folder lets you create new empty folders.
You can use the mouse to drag icons on top of other icons. For example, you can drag a file onto a program icon in order to run it. You can also click and drag in certain areas to create an “elastic band” and, as in Windows, this lets you select more than one icon at once.
You can resize windows by using the mouse in much the same way as in Windows. Just click and drag the edges and corners of the windows. In addition, you can double-click the title bar to maximize and subsequently restore windows.
Ubuntu also makes use of the third mouse button for middle-clicking. You might not think your mouse has one of these but, actually, if it's relatively modern, it probably does. Such mice have a scroll wheel between the buttons, and this can act as a third button when pressed.
In Ubuntu, the main use of the middle mouse button is in copying and pasting, as described in the next section. Middle-clicking also has a handful of other functions; for example, middle-clicking the title bar of any open window will switch to the window underneath.
![]() Tip If your mouse doesn't have a scroll wheel, or if it has one that doesn't click, you can still middle-click. Simply press the left and right mouse buttons at the same time. This emulates a middle-click, although it takes a little skill to get right. Generally speaking, you need to press one button a fraction of a second before you press the other button.
Tip If your mouse doesn't have a scroll wheel, or if it has one that doesn't click, you can still middle-click. Simply press the left and right mouse buttons at the same time. This emulates a middle-click, although it takes a little skill to get right. Generally speaking, you need to press one button a fraction of a second before you press the other button.
Cutting and Pasting Text
Ubuntu offers two separate methods of cutting and pasting text. The first is identical to Windows. In a word processor or another application that deals with text, you can click and drag (or double-click) the mouse to highlight text, right-click anywhere on it, and then choose to copy or cut the text. In many programs, you can also use the keyboard shortcuts of Ctrl+X to cut, Ctrl+C to copy, and Ctrl+V to paste.
However, there's a quicker method of copying and pasting. Simply click and drag to highlight some text and then immediately click the middle mouse button where you want the text to appear. This copies and pastes the highlighted text automatically, as shown in Figure 6-8.
This special method of cutting and pasting bypasses the usual clipboard, so you should find that any text you've copied or cut previously should still be there. The downside is that it doesn't work across all applications within Ubuntu, although it does work with the majority of them.

Figure 6-8. Highlight the text and then middle-click to paste it instantly.
Summary
This chapter covered booting into Ubuntu for the first time and discovering the desktop. We looked at starting programs, working with virtual desktops, using the mouse on the Ubuntu desktop, and much more. You should be confident in some basic Ubuntu skills and ready to learn more!
In the next chapter, you'll look at getting your system up and running, focusing on items of hardware that you may encounter in day-to-day use.