Incorporating animation of objects in a web application can really enhance the UI. In the past, to implement this type of animation in a web site, you would most likely turn to Adobe Flash. The cool thing for Microsoft .NET developers is that now you can do it all within the technologies that you know, and, better yet, you can code it using .NET. Personally, I consider this the most exciting aspect of Silverlight. For years, I have been struggling with the desire to put animations into my applications, but not doing so because I did not want to jump over to Flash. But that's no longer necessary. You can now do it all within .NET, my friends! This chapter will show you just how that's done.
The term animation usually brings to mind cartoons or animated features like those that Disney has brought to life on the big screen. Artists create a number of images with slight variations that, when shown in rapid sequence, appear as fluid movement. Fundamental to any type of animation is the changing of some attribute of an object over time.
For Silverlight, the implementation of an animation is very straightforward. You change a property of an object gradually over time, such that you have the appearance of that object moving smoothly from one point to the next.
As an example, Figure 13-1 shows an icon bar that I created for one of my Silverlight applications. As your mouse rolls over an icon in the bar, the icon grows; as the mouse leaves the icon, it shrinks back to its initial size. When you click one of the icons, the icon bounces, just as it does on the Mac OS X Dock.

In the example in Figure 13-1, for one of the icons, the animation that was created when the mouse was placed over the icon had two basic positions: at timestamp 0.00, the icon's Width and Height properties were set to 50 pixels; at timestamp 0.25, the Width and Height properties were set to 75 pixels. To make the transition smooth from timestamp 0.00 to 0.25, Silverlight creates a spline, which will generate all of the "frames" along the way to make the movement appear fluid to the human eye.
In movies or cartoon animations, a storyboard is a sequence of sketches that depict changes of action over the duration of the film or cartoon. So, essentially, a storyboard is a timeline. In the same way, storyboards in Silverlight are timelines. As an example, Figure 13-2 shows a storyboard for an application that animates the transformation of a circle and two rectangles.

In the storyboard in Figure 13-2, three objects are represented: a circle, a small rectangle, and a large rectangle. At the start of the storyboard's timeline, all three objects are on the left side of the document. After 2 seconds, the circle and smaller rectangle start to move toward the right side of the document. The larger rectangle starts to change its background from white to black. At 4 seconds into the timeline, the circle and the smaller rectangle will have reached the right side of the document. At that time, the smaller rectangle will begin to turn into a square. At 8 seconds, the smaller rectangle will have turned into a square, and the larger rectangle will have turned fully black.
If you translate this storyboard into Silverlight animations, you will have four animations:
Two animations that will cause the circle and the smaller square to move from the left to the right side of the document.
An animation that will change the background of the larger rectangle from white to black.
An animation to change the smaller rectangle into a square.
Next, you will look at the different types of animations in Silverlight.
There are two basic types of animations in Silverlight:
- Linear interpolation animation:
This type of animation smoothly and continuously varies property values over time.
- Keyframe animation:
With this type of animation, values change based on keyframes that have been added to a given point in the timeline.
Most commonly, keyframe animations are used in conjunction with a form of interpolation to smooth animations.
All types of animation in Silverlight are derived from the Timeline class found in the System.Windows.Media.Animation namespace. The following types of animations are available:
ColorAnimationColorAnimationUsingKeyFramesDoubleAnimationDoubleAnimationUsingKeyFramesObjectAnimationUsingKeyFramesPointAnimationPointAnimationUsingKeyFrames
Each of these animates a different type of object. For example, ColorAnimation animates the value of a Color property between two target values. Similarly, DoubleAnimation animates the value of a Double property, PointAnimation animates the value of a Point property, and ObjectAnimation animates the value of an Object property. Developers determine which animation type to use based on what they want to animate.
As an example, let's look at a very simple animation where you will increase the size of a rectangle over time, as shown in Figure 13-3. This example will allow us to dissect some of the properties involved with the animation.

To perform this animation, you need to use a DoubleAnimationUsingKeyFrames animation, since you are modifying the Width and Height properties of the rectangle, both of which are properties of type Double. Let's look at the XAML used to perform this animation:
<UserControl.Resyources>
    <Storyboard x:Name="Storyboard1">
        <DoubleAnimationUsingKeyFrames
            BeginTime="00:00:00"
            Storyboard.TargetName="rectangle"
            Storyboard.TargetProperty="Width">
            <SplineDoubleKeyFrame KeyTime="00:00:02" Value="400"/>
        </DoubleAnimationUsingKeyFrames>
        <DoubleAnimationUsingKeyFrames
            BeginTime="00:00:00"
            Storyboard.TargetName="rectangle"
            Storyboard.TargetProperty="Height">
            <SplineDoubleKeyFrame KeyTime="00:00:02" Value="240"/>
        </DoubleAnimationUsingKeyFrames>
    </Storyboard>
</UserControl.Resyources>

<Grid x:Name="LayoutRoot" Background="White" >
    <Rectangle
        Height="120"
        Width="200"
        HorizontalAlignment="Left"
        VerticalAlignment="Top"
        Stroke="#FF000000"
        x:Name="rectangle"/>
</Grid>
A number of elements are required. First, the rectangle itself has a name defined. This is required, as the animation needs to be able to refer to the rectangle by its name.
Next, in the storyboard, you have two animations: one to animate the width and one to animate the height.
The BeginTime property tells Silverlight at what time during the storyboard the animation should begin. In both cases, you are starting the animations as soon as the storyboard is initiated (BeginTime="00:00:00").
The TargetName property tells the animation which control is being animated. In this case, both animations are targeting the rectangle.
The final property set is TargetProperty. This is an attached property that refers to the property that is being animated. In the case of the first animation, TargetProperty is set to the rectangle's Width property. As the animation's value is changed, the value will be set to the Width property of the rectangle.
Finally, since this is a keyframe animation, keyframes are defined within the animation. In your case, only one keyframe is defined, 2 seconds (KeyTime="00:00:02") into the storyboard. In the first animation, 2 seconds into the storyboard's timeline, the value of the Width property will be changed to 400:
<SplineDoubleKeyFrame KeyTime="00:00:02" Value="400"/>
Once your animations have been created, Silverlight needs to know when to trigger a given animation or storyboard. Silverlight provides a number of functions that allow you to programmatically control your storyboard animations. Table 13-1 lists some common storyboard methods.
Table 13.1. Common Storyboard Animation Methods
Method | Description |
|---|---|
| Initiates the storyboard |
| Pauses the storyboard |
| Resumes a paused storyboard |
| Stops the storyboard |
| Skips to a specific part of the storyboard animation |
As an example, consider a simple animation where a rectangle grows and shrinks, repeating forever. You want to allow the user to control the animation through a simple UI. Clicking the Start button starts the animation, and clicking the Stop button stops it. In addition, if the user clicks the rectangle, it will pause and resume the animation. Here's the XAML to set up the application:
<UserControl.Resyources>
  <Storyboard x:Name="MoveRect" RepeatBehavior="Forever">
    <DoubleAnimationUsingKeyFrames BeginTime="00:00:00"
        Storyboard.TargetName="rectangle" Storyboard.TargetProperty="Width">
      <SplineDoubleKeyFrame KeyTime="00:00:00" Value="200"/>
      <SplineDoubleKeyFrame KeyTime="00:00:03" Value="600"/>
      <SplineDoubleK
eyFrame KeyTime="00:00:06" Value="200"/>
    </DoubleAnimationUsingKeyFrames>
    <DoubleAnimationUsingKeyFrames BeginTime="00:00:00"
        Storyboard.TargetName="rectangle" Storyboard.TargetProperty="Height">
      <SplineDoubleKeyFrame KeyTime="00:00:00" Value="100"/>
<SplineDoubleKeyFrame KeyTime="00:00:03" Value="300"/>
<SplineDoubleKeyFrame KeyTime="00:00:06" Value="100"/>
</DoubleAnimationUsingKeyFrames>
</Storyboard>
</UserControl.Resyources>
<Grid x:Name="LayoutRoot" Background="White" >
<Rectangle Height="100" Width="200" Fill="#FF000AFF"
Stroke="#FF000000" StrokeThickness="3" x:Name="rectangle" />
<Button Height="24" Margin="200,416,340,40"
Content="Start" Width="100" x:Name="btnStart" />
<Button Height="24" Margin="340,416,200,40"
Content="Stop" Width="100" x:Name="btnStop" />
</Grid>The UI is shown in Figure 13-4.
To implement the desired behavior, you will wire up three event handlers in the Page constructor.

To start the animation when the user clicks the Start button, you use the storyboard's Begin() method. To stop the animation, you use the storyboard's Stop() method. The pause/resume behavior is a bit trickier, but still not complicated. You include a private Boolean property called Paused, which you use to tell the code behind whether or not the animation is paused. To pause and resume the animation, you use the Pause() and Resume() methods. The code looks like this:
private bool Paused;
public Page()
{
    // Required to initialize variables
    InitializeComponent();
    this.btnStart.Click += new RoutedEventHandler(btnStart_Click);
    this.btnStop.Click += new RoutedEventHandler(btnStop_Click);
    this.rectangle.MouseLeftButtonUp +=
        new MouseButtonEventHandler(rectangle_MouseLeftButtonUp);
}

void rectangle_MouseLeftButtonUp(object sender, MouseButtonEventArgs e)
{
    if (Paused)
    {
        this.MoveRect.Resume();
        Paused = false;
    }
    else
    {
        this.MoveRect.Pause();
        Paused = true;
    }
}

void btnStop_Click(object sender, RoutedEventArgs e)
{
    this.MoveRect.Stop();
}

void btnStart_Click(object sender, RoutedEventArgs e)
{
    this.MoveRect.Begin();
}So far in this chapter, you have looked at some very simple animations. Of course, in reality, animations can get much more complex. One of the key advantages you have as a developer is that there are tools to assist you with these animations. Expression Blend is the tool to use when designing your Silverlight animations.
Although you can use Visual Studio 2008 to create your animations in Silverlight, Visual Studio does not include designer tools to assist you. If you are going to build animations programmatically, Visual Studio is the way to go. But if you are creating your animations in design mode, Expression Blend has the tools that allow you to do this easily.
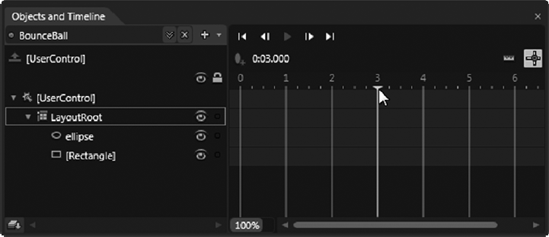
The primary asset within Expression Blend for animations is the Objects and Timeline panel. Up to this point, you have focused on the object side of the Objects and Timeline panel. With animations, it is all about the timeline. With a storyboard selected, the timeline appears, as shown in Figure 13-5.

The timeline in Figure 13-5 is actually the implemented timeline for the storyboard shown earlier in Figure 13-2. The three objects in the storyboard are listed in the Objects and Timeline panel. To the right of each of these objects, you see the timeline with just over 10 seconds showing horizontally. At time zero, there are three keyframes added, indicating that some animation action is taking place at that time. Then, at 4 seconds into the timeline, you see two keyframes providing the end point of the circle and smaller rectangle's movement from left to right. At 8 seconds through the timeline, there are two final keyframes: one providing an end point for the smaller rectangle turning into a square and one changing the larger rectangle to black.
To better understand how Expression Blend can help you build your animations, let's run through an exercise.
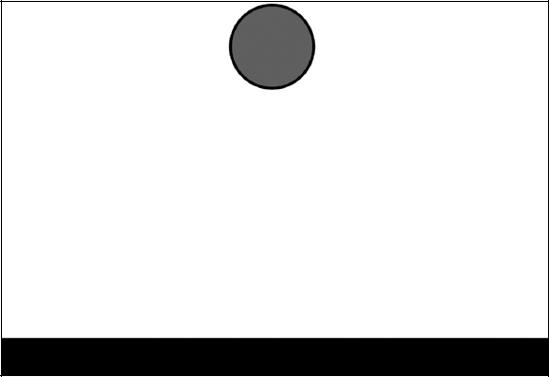
In this exercise, you'll create the classic bouncing ball animation using Expression Blend. You'll create an animation that will make a red ball drop and bounce on a black rectangle until it comes to rest. You'll start off with a very simple animation, and then add to it to make it progressively more realistic.
Create a new Silverlight application in Expression Blend named
Ch13_BlendAnimations.Add an
Ellipsecontrol with red fill and a black border near the top center of the grid. Next, add aRectanglecontrol to the very bottom of the grid and have it stretch all the way from left to right. Set the fill color and border color to black. Your application should appear similar to Figure 13-6.The first step in creating an animation is to create a new storyboard. On the Objects and Timeline panel, click the button with the plus sign, to the right of the text "(No Storyboard open)," as shown in Figure 13-7. This opens the Create Storyboard Resource dialog box.
In the Create Storyboard Resource dialog box, enter
BounceBallin the Name (Key) text box, as shown in Figure 13-8. This will be the name of your storyboard.When the storyboard is created, the timeline will be visible on the right side of the Objects and Timeline panel. To better see this, switch to the Animation workspace in Expression Blend by selecting Window

Your animation will have many keyframes, as the ball will be moving up and down as it "bounces" on the rectangle. To simplify things, every change of direction will cause the need for a new keyframe. For your first keyframe, you will simply take the ball and drop it onto the top of the rectangle. To do this, you need to add a new keyframe and move the ball to its new position on the grid.
Make sure the artboard is surrounded in a red border with "Timeline recording is on" in the upper-right corner. If this is not the case, make certain that
BounceBallis selected for the storyboard in the Object and Timeline panel, and you can click the red circle in the top-left corner to toggle between recording and not recording.Move the playhead (the yellow vertical line on the timeline with the down arrow at the top) to position 3 (3 seconds), as shown in Figure 13-10.
With the playhead at 3 seconds, select the ellipse and move it down so that it is positioned directly below its starting point, but touching the black rectangle, as shown in Figure 13-11.
If you look carefully at the timeline, you'll notice that a red circle has shown up at the left of the
Ellipsecontrol in the Objects and Timeline panel, with a white arrow indicating that the object contains an animation. In addition, in the timeline, at position 3 seconds, a white ellipse has appeared to the right of theEllipsecontrol. This is how Expression Blend visually represents a keyframe.At the top of the timeline, you will see buttons for navigating forward and backward between the frames in the animation. In addition, there is a play button that lets you view the animation.
Click the play button to view the animation. If you followed the steps properly, you will see the ball start at the top of the grid and slowly move to the top of the rectangle.
You just created your first animation! However, it isn't very realistic. In a real environment, the ball would accelerate as it fell toward the rectangle. So its movement would start out slow and speed up. You can mimic this behavior by modifying your keyframe and adding a spline.
Select the newly added keyframe in the timeline. (When the keyframe is selected, it will turn gray instead of white.)
Once the keyframe is selected, in the Properties panel, you will see a section titled Easing. This section allows you to adjust the
KeySplineproperty. By default, the interpolation between the two keyframes is linear. However, for this example, you want to speed up the ball as it gets closer to the second keyframe.Click and drag the dot in the upper-right corner of the
KeySplinegrid (the end point of the right side of the line), and drag it down so it appears as shown in Figure 13-12.Click the play button at the top of the timeline. This time, you will see that the circle starts to drop slowly and then speeds up the closer it gets to the rectangle. This makes for a much more realistic animation.
Next, the circle is going to bounce back up after impacting the rectangle. With recording still on, move the playhead to 6 seconds on the timeline, and then move the circle directly up from its current position to about three-fourths its initial starting point.
Select the new keyframe that is created, and navigate to the Easing section of the Properties panel. This time, you want the movement to start out fast and slow down as the circle reaches its apex. To get this effect, move the bottom-left dot up so the
KeySplinecurve appears as shown in Figure 13-13.Click the play button above the timeline to see the animation you have so far. The circle will fall with increasing speed, and then bounce back up with decreasing speed. So far so good, but what goes up must come down.
Move the playhead to 8 seconds, and move the circle up about one-fourth its initial position and adjust the
KeySplineproperty to match Figure 13-12. Sticking with the pattern, move the playhead to 10 seconds, and move the circle down to the top of the rectangle. TheKeySplinecurve should match Figure 13-13. Repeat this pattern at 11 seconds, and then 11.5 seconds.Click the play button. You should see the circle bounce on the rectangle as you would expect. The final timeline will appear as shown in Figure 13-14.
Next, you need to tell Silverlight when the animation should take place. You will keep it simple and have the animation start when the page is loaded.
Navigate to the code behind for the
MainPage.xamlfile. In thePage()constructor, add the event handler for theLoadedevent, as follows:public MainPage() { // Required to initialize variables InitializeComponent();this.Loaded += new RoutedEventHandler(Page_Loaded);} void Page_Loaded(object sender, RoutedEventArgs e) {this.BounceBall.Begin();}Run the application. At this point, you should see the ball bounce on the rectangle. You might see something like what is shown in Figure 13-15.


In this section, you discussed animations in Silverlight. You should be comfortable creating new animations for your application in Expression Blend, and modifying and programming against those animations in Visual Studio 2008. The next section addresses transformations in Silverlight.
Silverlight includes a number of 2D transforms, which are used to change the appearance of objects. Transforms in Silverlight are defined using a transformation matrix, which is a mathematical construct for mapping points from one coordinate space to another. If this sounds a bit confusing, do not fear, Silverlight abstracts this matrix.
Silverlight supports four transformation types: rotation, scaling, skewing, and translation.
Note
You can also define your own transformation matrix, if you need to modify or combine the four transformation types. See Pro Silverlight 3 by Matthew MacDonald (Apress, 2009) for details on how to do this.
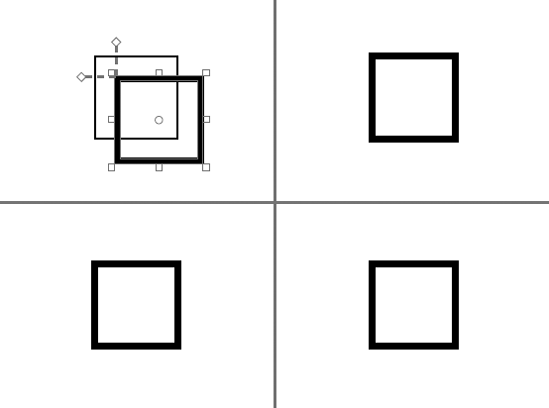
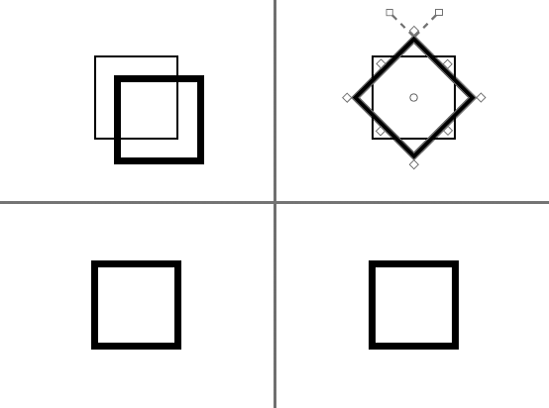
Figure 13-16 shows a Silverlight application that has been divided into four grid cells. Each cell contains two rectangles that have their width and height set to 100 pixels. One of the rectangles in each cell has a border with its width set to 1 pixel, and the other has a border with its width set to 5 pixels. The rectangle with the thicker border was then transformed, so you can see the result of the transformation.

The ScaleTransform type allows you to transform the size of a Silverlight object. The ScaleX property is used to scale the object on the horizontal axis, and the ScaleY property is used to scale the object on the vertical axis. The values of these properties are multiples of the object's original size. For example, setting the ScaleX property to 2 will double the size of the object on the horizontal axis. The following XAML was used to create the ScaleTransform in Figure 13-16:
<Rectangle Height="100" Width="100" Stroke="#FF000000" Grid.Row="1" Grid.Column="0"
    StrokeThickness="5" RenderTransformOrigin="0.5,0.5">
  <Rectangle.RenderTransform>
    <TransformGroup>
      <ScaleTransform ScaleX="1.25" ScaleY="1.25"/>
    </TransformGroup>
  </Rectangle.RenderTransform>
</Rectangle>The SkewTransform type allows you to skew a Silverlight object horizontally and vertically. The SkewTransform is used most commonly to create a 3D effect for an object. The AngleX property is used to skew the object horizontally, and AngleY is used to skew the object vertically. The following XAML was used to create the SkewTransform in Figure 13-16:
<Rectangle Height="100" Width="100" Stroke="#FF000000" Grid.Row="1" Grid.Column="1"
    StrokeThickness="5" RenderTransformOrigin="0.5,0.5">
  <Rectangle.RenderTransform>
    <TransformGroup>
      <SkewTransform AngleX="20" AngleY="15"/>
    </TransformGroup>
  </Rectangle.RenderTransform>
</Rectangle>The RotateTransform type allows you to rotate a Silverlight object by a specified angle around a specified center point. The angle is specified by the Angle property, and the center point is specified by the RenderTransformOrigin property. When you create a RotateTransform for a rectangle in Expression Blend, by default it will set RenderTransformOrigin to 0.5, 0.5, which is the center of the object. You can also specify the center point using the CenterX and CenterY properties on the RotateTransform element. The following is the XAML to produce the RotateTransform in Figure 13-16:
<Rectangle Height="100" Width="100" Stroke="#FF000000" Grid.Row="0" Grid.Column="1"
    StrokeThickness="5" RenderTransformOrigin="0.5,0.5">
  <Rectangle.RenderTransform>
    <TransformGroup>
      <RotateTransform Angle="45"/>
    </TransformGroup>
  </Rectangle.RenderTransform>
</Rectangle>The TranslateTransform type allows you to change the position of a Silverlight object, both horizontally and vertically. The X property controls the position change on the horizontal axis, and the Y property controls the change to the vertical axis. The following XAML was used to create the TranslateTransform in Figure 13-16:
<Rectangle Height="100" Width="100" Stroke="#FF000000" Grid.Row="0" Grid.Column="0"
    StrokeThickness="5" RenderTransformOrigin="0.5,0.5">
  <Rectangle.RenderTransform>
    <TransformGroup>
      <TranslateTransform X="10" Y="10"/>
    </TransformGroup>
  </Rectangle.RenderTransform>
</Rectangle>
Now that you have covered the basics of transforms in Silverlight, let's run through a quick exercise that will give you a chance to try them out for yourself.
In this exercise, you'll use Expression Blend to add and animate transformations.
Create a new Silverlight application in Expression Blend called
Ch13_BlendTransforms. Add twoColumnDefinitionelements and twoRowDefinitionelements so the rootGridis equally divided into four cells, as follows:<Grid x:Name="LayoutRoot" Background="White" > <Grid.RowDefinitions> <RowDefinition/> <RowDefinition/> </Grid.RowDefinitions> <Grid.ColumnDefinitions> <ColumnDefinition/> <ColumnDefinition/> </Grid.ColumnDefinitions> </Grid>Next, add two rectangles to each of the cells that you just created. Create two sets of rectangles: one set with
StrokeThickness="1"and another withStrokeThickness="5". Also, name the second set of rectanglesrecTrans. Add the following code:<Grid x:Name="LayoutRoot" Background="White" > <Grid.RowDefinitions> <RowDefinition/> <RowDefinition/> </Grid.RowDefinitions> <Grid.ColumnDefinitions> <ColumnDefinition/> <ColumnDefinition/> </Grid.ColumnDefinitions><Rectangle Grid.Row="0" Grid.Column="0" Height="100"Width="100" Stroke="#FF000000" StrokeThickness="1" /><Rectangle Grid.Row="0" Grid.Column="1" Height="100"Width="100" Stroke="#FF000000" StrokeThickness="1" /><Rectangle Grid.Row="1" Grid.Column="0" Height="100"Width="100" Stroke="#FF000000" StrokeThickness="1" /><Rectangle Grid.Row="1" Grid.Column="1" Height="100"Width="100" Stroke="#FF000000" StrokeThickness="1" /><Rectangle Grid.Row="0" Grid.Column="0" Height="100"Width="100" Stroke="#FF000000" StrokeThickness="5" x:Name="recTrans" /><Rectangle Grid.Row="0" Grid.Column="1" Height="100"Width="100" Stroke="#FF000000" StrokeThickness="5" x:Name="recRotate" /><Rectangle Grid.Row="1" Grid.Column="0" Height="100"Width="100" Stroke="#FF000000" StrokeThickness="5" x:Name="rectScale" /><Rectangle Grid.Row="1" Grid.Column="1" Height="100"Width="100" Stroke="#FF000000" StrokeThickness="5" x:Name="rectSkew" /></Grid>At this point, your application should have four squares equally spaced in the four cells of your application. The next step will be to introduce your transforms, but instead of just adding the transforms, you are going to animate the transformation taking place.
Using the techniques discussed earlier in this chapter, create a new storyboard called
TransformElements.You will perform the transformations over 2 seconds, so move the playhead on the timeline to 2 seconds. Select the rectangle named
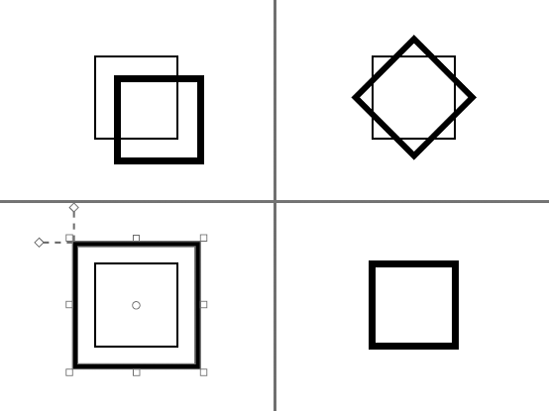
recTrans. In the Properties panel, find the Transform section. Select the Translate tab. SetXandYto25. This will cause the top-left square to move down and to the right, as shown in Figure 13-17.Highlight the rectangle named
recRotate. In the Transform section of the Properties panel, select the Rotate tab. Set theAngleproperty to45. The top-right square will rotate 45 degrees, as shown in Figure 13-18.Select the rectangle named
rectScale. In the Transform section of the Properties panel, select the Scale tab. Set the values of theXandYproperties to1.5, which will scale the bottom-left square 1.5x, or 150%, as shown in Figure 13-19.Select the rectangle named
rectSkew. In the Transform section of the Properties panel, select the Skew tab. Set the values of theXandYproperties to20. This will cause the square to skew into a diamond shape, as shown in Figure 13-20.Click the play button at the top of the timeline and watch the objects transform from their original shapes and locations.

As you've seen in this exercise, applying transformations is pretty straightforward.
This chapter covered creating animations in Silverlight. You looked at animations from a high level, explored the different elements that make up an animation in Silverlight, and learned how to programmatically control animations in the code behind. You also looked at how Expression Blend helps you create complex animations. Then you shifted your focus to transformations in Silverlight. You looked at each of the four transform types and then created a simple Silverlight application utilizing transforms.
In the following chapter, you will look at the more advanced topic of creating your own Silverlight custom controls. Custom controls allow you to create Silverlight functionality that can be easily reused in different Silverlight applications.