In this section, we'll try to insert CRUD functionality in our Contacts application.
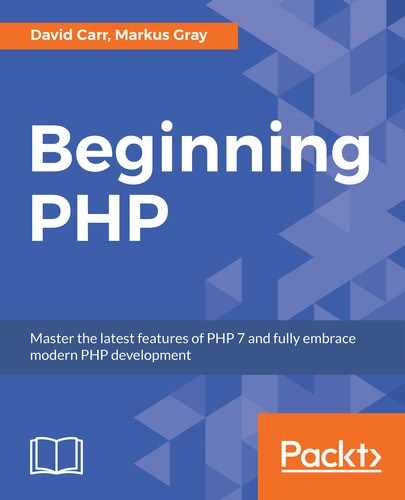
Have a look at the following screenshot:

The outcome of this section
Here are the steps to insert CRUD functionality in our Contacts application:
- In the database, we need a
contactstable (remove one if you have it from earlier chapters):CREATE TABLE `contacts` ( `id` int(11) unsigned NOT NULL AUTO_INCREMENT, `name` varchar(255) DEFAULT NULL, `email` varchar(255) DEFAULT NULL, `tel` varchar(255) DEFAULT NULL, PRIMARY KEY (`id`) ) ENGINE=InnoDB AUTO_INCREMENT=4 DEFAULT CHARSET=utf8;
- The
contactstable stores a uniqueIDof each contact, the contact's name, email address, and telephone number. - Next, we need a
commentstable:CREATE TABLE `comments` ( `id` int(11) unsigned NOT NULL AUTO_INCREMENT, `contact_id` int(11) DEFAULT NULL, `user_id` int(11) DEFAULT NULL, `body` text, `created_at` timestamp NULL DEFAULT CURRENT_TIMESTAMP, PRIMARY KEY (`id`) ) ENGINE=InnoDB AUTO_INCREMENT=3 DEFAULT CHARSET=utf8;
The comments must have the
contact_idanduser_idfields. These are foreign keys to link a comment back to a contact and a user who posted the comment.The comment will be added to the body field, and a
created_atcolumn is used to note when a record was created. This column is set with a timestamp with a defaultCURRENT_TIMESTAMP. This means the date and time will automatically be inserted when a new record is added: - Since we've experimented with contacts in earlier chapters, let's start by doing some cleanups. Delete the
app/views/contactsfolder. - Open
app/views/layouts/nav.phpand add a contacts menu item that points to/contacts:<nav class="navbar navbar-default"> <div class="container-fluid"> ……. </div><!--/.container-fluid --> </nav> - Open
app/Models/Contacts.php. - Remove this code:
public function getContacts()
{
    return $this->db->select('* FROM contacts');
}
Then, replace it with this:
public function get_contacts() { return $this->db->select('* from contacts order by name'); } - Next, we need a method to load a single contact, where the
IDbelongs to the contact:public function get_contact($id) { $data = $this->db->select('* from contacts where id = :id', [':id' => $id]); return (isset($data[0]) ? $data[0] : null); } - We will also need
insert,update, anddeletemethods:public function insert($data) { $this->db->insert('contacts', $data); } public function update($data, $where) { $this->db->update('contacts', $data, $where); } public function delete($where) { $this->db->delete('contacts', $where); }The full model looks like this:
<?php namespace AppModels; use SystemBaseModel; class Contact extends BaseModel …… } } - Next, open
app/Controllers/Contacts.php. - Import the
Sessionand URL helpers:Use AppHelpersSession; Use AppHelpersUrl;
- Replace the following code:
public function index()
{
  $contacts = new Contact();
    $records = $contacts->getContacts();
    return $this->view->render('contacts/index', compact('records'));
}
With this:
protected $contact; public function __construct() { parent::__construct(); if (! Session::get('logged_in')) { Url::redirect('/admin/login'); } $this->contact = new Contact(); } public function index() { $contacts = $this->contact->get_contacts(); $title = 'Contacts'; return $this->view->render('admin/contacts/index', compact('contacts', 'title')); } - If the form has been submitted, collect the form data, perform validation, and providing there are no errors, insert it into the database, set a message, and redirect:
public function add() { …… Session::set('success', 'Contact deleted'); Url::redirect('/contacts'); } - Next, we need to create the views for these methods. Create a
contactsfolder insideapp/views/adminand create these views:index.php <?php include(APPDIR.'views/layouts/header.php'); include(APPDIR.'views/layouts/nav.php'); ……. </form> <?php include(APPDIR.'views/layouts/footer.php');?>
We have implemented the CRUD functionality into our contacts application. Let's try it out by executing our application.
The aim of this activity is to verify that the CRUD functionality works properly with our application.
At this point, we can list, add, edit, and delete contacts:
- To show this, open your application:
php – S localhost:8000 –t webroot
- Load up
http://localhost:8000/contacts. - All contacts in the database will be listed. You can add a new one by clicking on
Add Contact. After submitting the form, you will be taken back to the user list where you can see the new contact, and a confirmation message will be displayed. - The same thing will happen for editing. Deleting will confirm the action to then delete the contact.