1 The lighting team
In the beginning there was darkness.
When asked what he did for a living, a lighting director once said I paint with light’. This concept of using light to create the visual effect required by the camera is so simple that it is often overlooked.
Much as a painter knows the materials available and makes choices about what to use, and when, so must anyone concerned with lighting for video.
The team
Television is made up of pictures and sound. The pictures come from the cameras, but the cameras need light to see. Whilst on location there is often plenty of light around accidentally’, from ambient daylight, room lights, etc. It is the lighting team’s job to use, supplement or eliminate this natural light. In the totally controlled environment of a studio all the light has to be provided for the cameras. This is the job of the studio lighting team.
The lighting team consists of a lighting director, lighting operator and sparks led by a gaffer. Often in small studios this is all done by one person. Sometimes, particularly on location video or film shoots, the role is combined with camera operator to become lighting camera operator.
If we look at the full team in the studio the lighting director is the person with overall responsibility for designing the lighting, and for supervising its installation and operation. The lighting operator is the person who controls the lighting system during the programme. With modern lighting and control systems this can be quite a complex job.
The sparks are the people who actually rig the lights, and the gaffer is their supervisor. In the past sparks have had an unjustified reputation for being basic, and perhaps insensitive souls, with no understanding of the niceties of television aesthetics, but it is worth remembering that their understanding of how to place lanterns, despite dealing with extreme heat, dangerous voltages and perilous heights, has turned the lighting director’s vision into the reality that every director needs for his creative shots.
In reality, most small studios cannot sustain a large lighting team, so we will try to help you learn how to do everything!
It is vital that the lighting director understands the two requirements of lighting so that she or he can harmonize their solutions. The very basic requirement is the need for enough illumination so that the camera can see useful images, and the second is a need for some kind of atmospheric interpretation, so that the image powerfully conveys the required message.
On location this simple definition of what the lighting director does will have the added complexity of, possibly, a large amount of light that already exists, provided by many sources. This ambient light’, will almost certainly be in the wrong place, from the wrong angle, of the wrong quantity, and probably of the wrong colour! To compound this problem the lighting team’s tools are reduced to the items that can be transported, supported and provided with power. If the lighting designer paints with light, he finds that on location somebody has already scrawled on his canvas, and he only has one brush and a few tubes of paint.
But, despair not, because, sometimes the previously scrawling artist is a Turner or a Rembrandt, who has laid the most exquisite foundation to build on.
Types of light
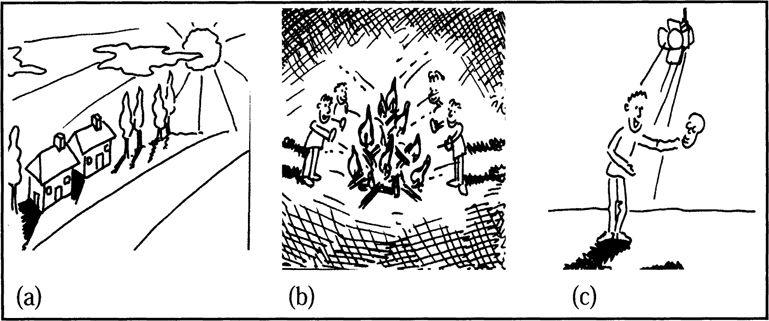
There are two types of light (Figure 1.1), natural light (originating from the sun) and artificial light (originating from a man made source). You will notice that artificial light does not have to be a spot light’. Long before electricity man was using fire as light. Fire and light must be considered together because most light sources are extremely hot and wherever there is light there is a risk of, at best, burnt fingers and at worst, an unwanted fire.
Figure 1.1 (a) Natural light comes from the sun. (b) Where there is fire, there will be artificial, or man made, light. (c) A spotlight is a specially made, controllable, artificial light source
There are two other factors about light that we know, but seem to forget. One is shown in Figure 1.2 where a light is obstructed (the sun by cloud, or a spot behind a curtain) the result is darker and more diffuse. With any light source it is possible to reduce its intensity, but not increase it or increase its diffusion, only to decrease the diffusion with the aid of lenses. This results in a vast selection of lights that are designed for specific purposes.
Figure 1.2 (a) Here our sun is obscured by the cloud. The result is less light, but also less shadow. (b) If we put the spotlight behind a translucent curtain we get the same effect, less light but more diffuse

The other is that not all light burns with the same colour. An electric fire that is designed to last for years will be deliberately ‘under run’ and will only heat up to ‘red’ hot, radiating invisible infra-red light. A light bulb is ‘over run’ to produce the effect of ‘white’ hot to produce light with a visible yellow radiation (with a by-product of heat), but has a much shorter life. In fact, as we will explain later, our eyes deceive us into believing that the bulb is producing white light.
It is very important that the lighting team realize that there is no such thing as white light. As with selecting a particular colour-sensitive film, the video camera has to be told what colour the light actually is in order that it can ‘think’ the light is white and thus reproduce all the other colours accurately. This means that an understanding of ‘colour temperature’ is needed.
Thinking of the fire (red) through to daylight, Figure 1.3 gives some figures for common light sources. A fuller explanation of where these figures come from can be found in more technical books, but from the beginner’s point of view it is only necessary to know that the video camera must be set to react to the light source as if it were white. This is done using the ‘white balance’ on the camera when the camera is ‘shown’ a pure white card in the light being used and adjusted to make the card appear white on screen. Film cameras are adjusted by altering the film stock, or using coloured gels to correct the light.
Figure 1.3 The Kelvin temperature scale is used to measure the colour quality of light sources. Note that the temperature (and, therefore, the colour) of the sun changes throughout the day and that an overcast sky is not the same temperature as a clear blue sky
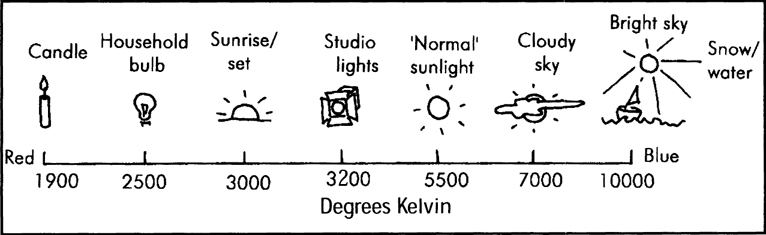
The colour temperature of a light is measured in a scale using degrees Kelvin (°K). Manufactured artificial lights are normally made to produce light of 3,200°K, which is the ‘standard’ figure for artificial light, but there are some which produce 5,500°K, which is the ‘standard’ figure for daylight. The video camera will have a ‘white balance’ switch fitted which will allow it to be adjusted to rough approximations of these figures. To ensure an absolutely correct white balance you must carry out a manual adjustment procedure. An increasing number of less professional cameras are now offered with an ‘auto white’ function, this is designed to give reasonable colour balance under predefined standard conditions. It cannot, and must not, be relied upon. If there isn’t an alternative manual white adjustment you will have to make choices between putting up with odd looking colours or altering the light temperature (see later how to do this).
Never be tempted to alter the colour on the video monitor to make it look right. The picture may look right on your monitor but the tape will still show the incorrect colour on any other machine.
Mixed lighting
Major complications will occur if mixed lighting is involved, for instance if daylight is coming through a window and the interior is lit with artificial light.
It should be understood that different colour temperatures cannot be added up to get a resultant overall temperature. The colour temperature in a particular area is dependent on the source lighting it. This will lead to pools of daylight around a window being at a different colour temperature to areas further into the room.
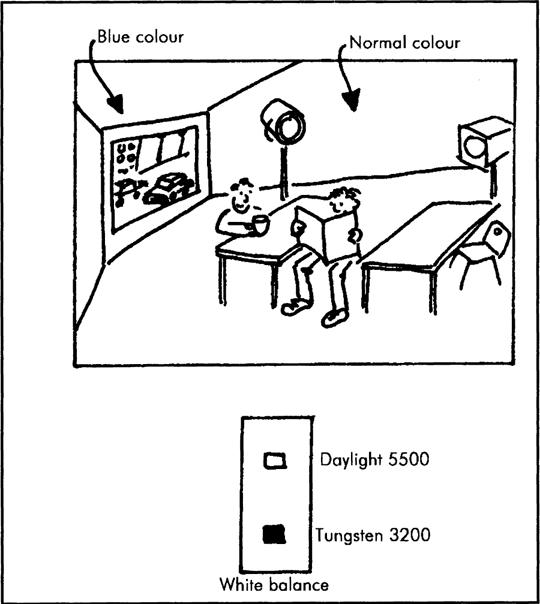
In the example above if the camera is set to react to daylight as white, anything seen outside, and immediately inside, the window will have the correct colour, but anything seen in the interior will be recorded as the colour it really is; in this case orange to red (Figure 1.4).
Figure 1.4 Because the white balance is set to daylight (5500°K) this scene will appear to the camera as normal colour reproduction outside the window, but the interior will appear more orange than it really is
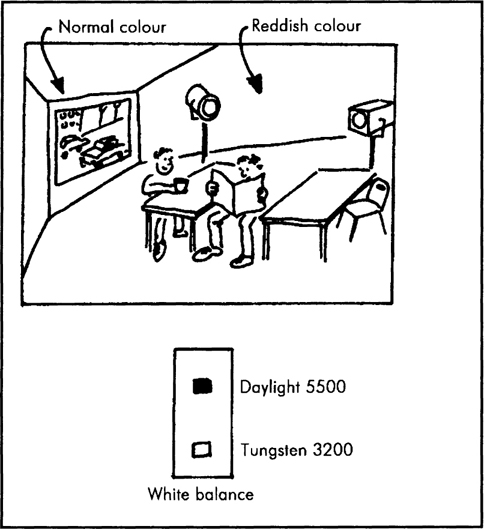
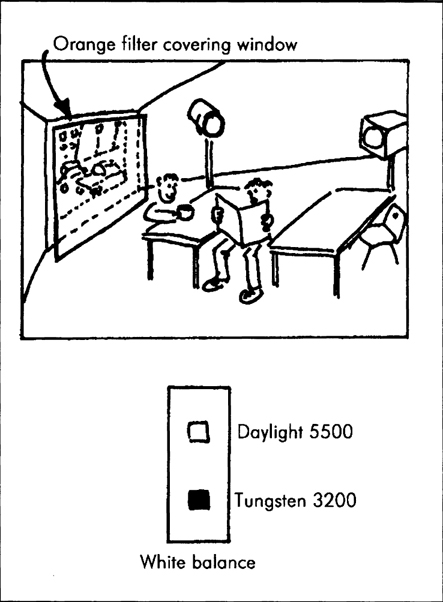
If the white balance is set to artificial light to render the interior colours correct, then anything seen through the window will be blue (its real colour) (Figure 1.5).
Figure 1.5 Now the white balance is set to artificial light (3200°K), the same scene has the correct colour rendition inside, but the scene outside appears very blue
Mixed lighting situations are most common during location shoots where the ambient light is the base from which we start to build enough light for the cameras to get good clear images of our scene. Taking our example of daylight coming through the window with artificial light inside we have several options for balancing the light so that it is all one colour.
One is to use an orange/red filtering sheet over the window (to turn the blue sunlight into the darker, redder, colour of our artificial lights supplying the interior colour) and then do a white balance for artificial light. An alternative is perhaps more simple, we simply cover the artificial lights with a blue filter (to make them the bluer light of daylight) and white balance for daylight (Figure 1.6).
Figure 1.6(a) With the camera set to daylight, we have corrected the interior light with blue filters over the interior lights
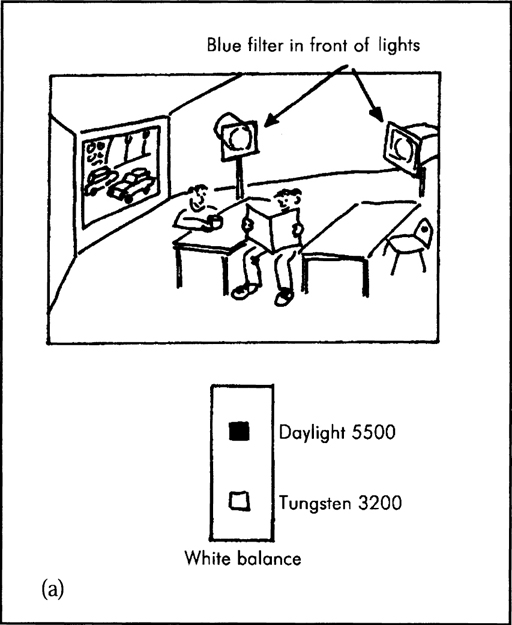
Figure 1.6 (b) With the camera set to artificial light, we have corrected the daylight with an orange filter over the window. Both solutions will produce the correct rendition of all the colours in the scene, both indoors and outdoors
There are two other possibilities. Taking the sunlight as being the natural source of light you could use special location artificial lights which use ‘daylight’ colour temperature bulbs, doing away with the need for any filters.
The final option will involve a decision from the director, but it is worth asking. Does the camera really need to see what is going on outside the window? It may distract from the action inside or be totally irrelevant. If the camera doesn’t need to see outside the window, can the action be moved to a different part of the room or shot from a different angle to eliminate the window, and the light coming through it, from the scene?
It is unhelpful to think of white balance as having settings for ‘indoors’ or ‘outdoors’ because, realistically, any work done outside a studio will involve mixed lighting. What is helpful is an understanding of the artistic possibilities of a deliberately incorrect balance for effects to show, for instance, a warmer glow to an interior or a bluer, colder, outside in winter.
Electrical lights will usually use incandescent tungsten filaments (hence tungsten lighting), although some light sources can use gasses. Not all of these will burn at a colour temperature of either daylight or tungsten and should be avoided unless required for specific effects. The most often encountered in location video are fluorescent lights, which may appear white but actually have a tendency towards green. They are very difficult to correct and are best switched off. Outside at night the biggest problem is with streetlights, which are now usually sodium or mercury lights and could show up as anything from brown to purple. Once again this is a decision for the director, you cannot correct them. If the director is happy – everyone is happy!
Bulbs with tungsten wires in the envelope are known as filament lights and will have a colour temperature of between 2,700 and 3,200°K. There are also ‘discharge’ lamps which have several advantages over tungsten, or filament, lights. Discharge lamps produce about four times the light output per watt of filament lights. This means they are brighter watt for watt, or, alternatively, they run 75% cooler for the same brightness. Discharge lamps (such as the HMI, CSI, carbon arc and xenon) also run at a colour temperature of around 5,500°K, the same as daylight, and may be preferred for large interiors when mixed lighting is involved.
Light and distance
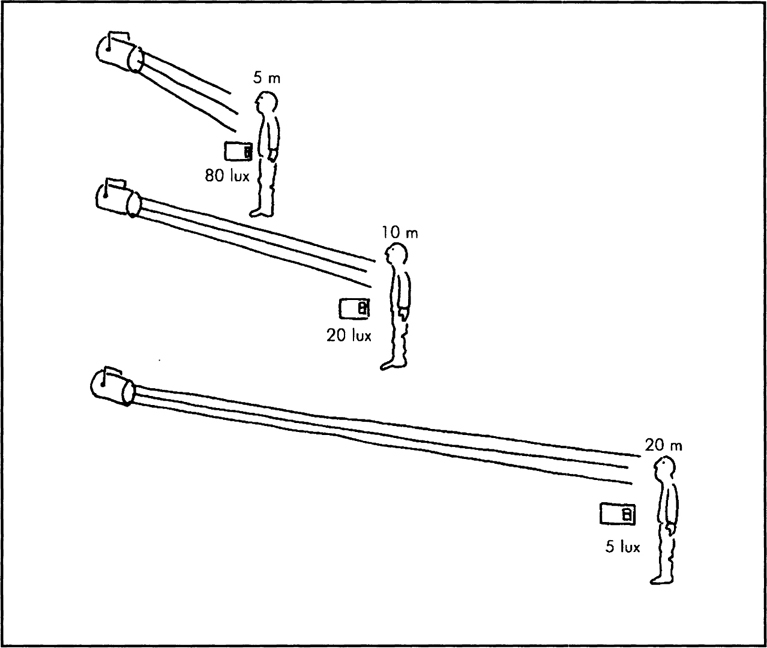
As with the sun, all artificial lights become less bright with distance. The simplest way of thinking about this is to realize that light spreads out over distance and, therefore, there is less light for a given area as distance increases. This is defined by the inverse square law which states that the fall off in light level is equal to the increase in the distance squared (Figure 1.7). In practical terms this can be used to control amounts of light by remembering that if the distance between light and subject is doubled, for instance from two metres to four metres, the light intensity (at the subject) is reduced to a quarter. If you have a shortage of light it is equally true that if the distance between light and subject is halved, the light intensity is four times greater.
Figure 1.7(a) As the distance from a point source of light increases, so will the spread. At twice the distance, it has spread out enough to cover four times the original area. This same amount of light can, therefore, only illuminate this larger area with a quarter of the original intensity. It is equally true that if you take the amount of light falling on the larger area and halve the distance from the light source, four times the amount of light intensity will fall on this smaller area. Moving the distance of a light within a scene will give us control over how much light falls on the area to be illuminated
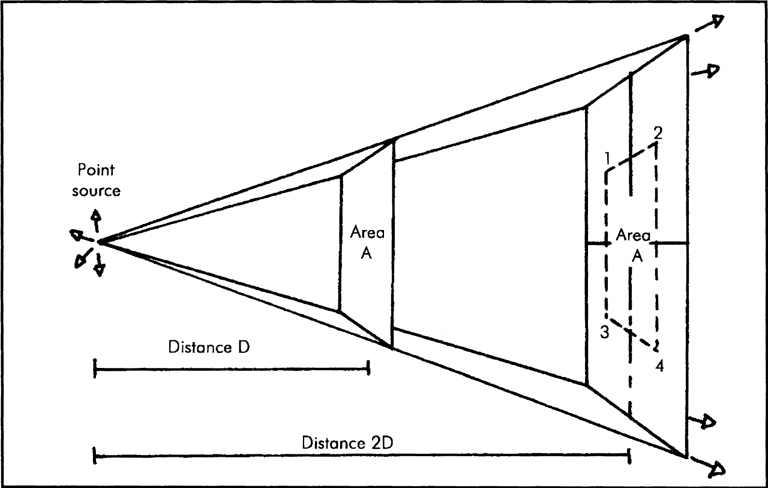
Figure 1.7(b) Inverse square law. The change in light level will vary at the inverse square of changes in distance: Double distance = ¼ Lux; Half distance = 4 Lux