C H A P T E R
Digitally Outstanding
You’ve crafted the perfect show, you’re happy, the client’s happy. You have two choices, have everyone over to your edit room to watch it, or learn to output and share those files. Your Avid has lots of options for sharing with others, and learning to take advantage of them will make your job easier.
We’ll tackle going to the Web and making DVDs, and you’ll learn how to export still images for print and the Web. We’ll cover numerous strategies to share and distribute you work. Plus, we’ll show you how to build templates to streamline the process.
When you want to export a portion of a sequence, it’s just a matter of setting In and Out marks in the Timeline and selecting Use Marks in your Export Settings. If Use Marks is not selected, Xpress Pro will export your entire sequence, so make sure you have this set correctly before you export.

You can export selected tracks from your sequence by making sure they’re the only ones turned on and selecting Use Enabled Tracks in your Export Settings. Turning Use Enabled Tracks off will export all of the tracks in your sequence.
Squeeze It!
Xpress Pro has the ability to export directly to QuickTime with the Sorensen 3 codec. Sorenson 3 is by far the best QuickTime codec to use for web streaming, but you’ll get much better results if you use Sorenson Squeeze, which is included with Xpress Pro. Squeeze can accept a QuickTime Reference movie from Xpress Pro and has advanced features such as 2-Pass VBR encoding and numerous pre-processing filters. You can also use it to batch-encode for multiple bit-rates. If you’re on Windows, then Squeeze can also encode MPEG-2 files for DVDs. In a pinch, Squeeze can even encode directly from a tape in your DV deck or camcorder via FireWire.

When you need to export a QuickTime movie from Xpress Pro for use in a QuickTime-compliant third-party application, save yourself some time and disk space by exporting a QuickTime Reference file. QuickTime Reference files don’t contain the actual media. They’re just pointers that allow QuickTime to read your Avid OMF media. Since QuickTime Reference files need to access the original OMF media, you can use them only on the same computer or network as your Xpress Pro media drives. Here’s how to create an Export Setting for QuickTime Reference files:

![]() In the Project window, click on the Settings tab.
In the Project window, click on the Settings tab.
![]() Scroll down to Export (you may have more than one Export setting).
Scroll down to Export (you may have more than one Export setting).
![]() Click on any Export setting to highlight it.
Click on any Export setting to highlight it.
![]() Select Edit>Duplicate, or use the keyboard shortcut Ctrl+D (Cmd+D).
Select Edit>Duplicate, or use the keyboard shortcut Ctrl+D (Cmd+D).
![]() Rename the new setting by clicking in the field to the right of it so a cursor appears. Type “QuickTime Reference” and press Return.
Rename the new setting by clicking in the field to the right of it so a cursor appears. Type “QuickTime Reference” and press Return.
![]() Double-click on your new QuickTime Reference export setting. The Export Settings dialog appears.
Double-click on your new QuickTime Reference export setting. The Export Settings dialog appears.
![]() From the Export As pulldown menu, select QuickTime Reference.
From the Export As pulldown menu, select QuickTime Reference.
![]() From the Defaults menu, select Digital Mastering.
From the Defaults menu, select Digital Mastering.
![]() If you will be using the reference file on another computer on your network, click in the box next to Use Network Media References so a checkmark appears.
If you will be using the reference file on another computer on your network, click in the box next to Use Network Media References so a checkmark appears.
![]() Make sure there’s a checkmark in the box next to Use Avid DV Codec. If not, click in the box so a checkmark appears.
Make sure there’s a checkmark in the box next to Use Avid DV Codec. If not, click in the box so a checkmark appears.
![]() Click OK.
Click OK.
When you are ready to export your QuickTime reference, make sure that your new QuickTime Reference Export Setting is active by clicking to the left of it in the Project window so a checkmark appears.
QuickTime Reference files are great if you’ll be using them on the same computer or network as your Xpress Pro system, but if you’ll be moving the file somewhere else you’ll need to export a self-contained QuickTime Movie. Self-contained QuickTime Movies can be played back on any system that has QuickTime and the appropriate Avid codec installed. Here’s how to create an export setting for self-contained QuickTime movies:
![]() In the Project window, click on the Settings tab.
In the Project window, click on the Settings tab.
![]() Scroll down to Export (you may have more than one Export setting).
Scroll down to Export (you may have more than one Export setting).
![]() Click on any Export setting to highlight it.
Click on any Export setting to highlight it.
![]() Select Edit>Duplicate, or use the keyboard shortcut Ctrl+D (Cmd+D).
Select Edit>Duplicate, or use the keyboard shortcut Ctrl+D (Cmd+D).
![]() Rename the new setting by clicking in the field to the right of it so a cursor appears. Type “QuickTime Movie” and press Return.
Rename the new setting by clicking in the field to the right of it so a cursor appears. Type “QuickTime Movie” and press Return.
![]() Double-click on your new QuickTime Movie export setting. The Export Settings dialog appears.
Double-click on your new QuickTime Movie export setting. The Export Settings dialog appears.
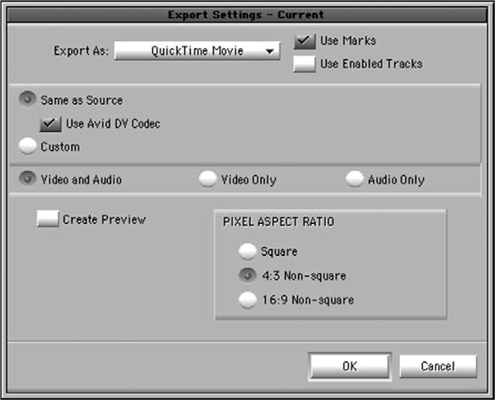
![]() From the Export As pulldown menu, select QuickTime Movie.
From the Export As pulldown menu, select QuickTime Movie.
![]() Click in the oval to the left of Same As Source so it turns purple.
Click in the oval to the left of Same As Source so it turns purple.
![]() Click in the box next to Use Avid DV Codec so a checkmark appears.
Click in the box next to Use Avid DV Codec so a checkmark appears.
![]() Under Pixel Aspect Ratio click the oval to the left of 4:3 Non-square so it turns purple.
Under Pixel Aspect Ratio click the oval to the left of 4:3 Non-square so it turns purple.
Before you click OK to close the Export Settings dialog, select Video and Audio, Video Only, or Audio Only. Depending on what you’re exporting, you might need to modify this before the export.
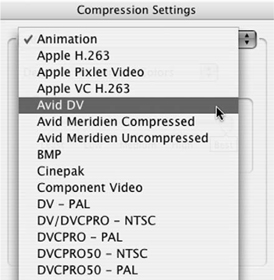
A computer needs to have the Avid DV QuickTime codec installed on it in order to play back QuickTime movies exported with the Avid DV codec. Avid allows you to freely copy the Avid QuickTime codecs to as many computers as you like. The Xpress Pro installer puts the Avid DV, Avid Meridien Compressed, and Avid Meridien Uncompressed QuickTime codecs in the following location:
On a PC (Windows/system32):
- “AvidAVdvCodec” is the Avid DV codec.
- “AvidQTAVUI” is the Avid Meridien Uncompressed codec.
- “AvidQTAVJI” is the Avid Meridien Compressed codec.
On a Mac (Library/QuickTime):
- “AvidAVdvCodec.component” is the Avid DV codec.
- “AvidAVUICodec.component” is the Avid Meridien Uncompressed codec.
- “AvidAVDJCodec.component” is the Avid Meridien Compressed codec.
Simply copy the required codecs from your Xpress Pro system to the same directory on the computers that you want to be able to play back your exported QuickTime movies. This will also allow that computer to save and render QuickTime movies to these codecs.
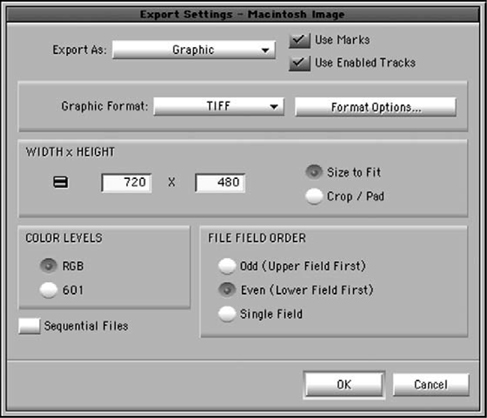
You can export stills from Xpress Pro for use in storyboards, on web sites, in DVD menus, or even for the package design of your finished videotape or DVD. We recommend exporting at Xpress Pro’s native frame size and resizing the image, if necessary, in an image editing application such as Adobe Photoshop. Here’s how to create an Export Setting for still images:
![]() In the Project window, click on the Settings tab.
In the Project window, click on the Settings tab.
![]() Scroll down to Export (you may have more than one Export setting).
Scroll down to Export (you may have more than one Export setting).
![]() Click on any Export setting to highlight it.
Click on any Export setting to highlight it.
![]() Select Edit>Duplicate, or use the keyboard shortcut Ctrl+D (Cmd+D).
Select Edit>Duplicate, or use the keyboard shortcut Ctrl+D (Cmd+D).
![]() Rename the new setting by clicking in the field to the right of it so a cursor appears. Type “Still Image” and press Return.
Rename the new setting by clicking in the field to the right of it so a cursor appears. Type “Still Image” and press Return.
![]() Double-click on your new Still Image export setting. The Export Settings dialog appears.
Double-click on your new Still Image export setting. The Export Settings dialog appears.
![]() From the Export As pulldown menu, select Graphic.
From the Export As pulldown menu, select Graphic.
![]() From the Graphic Format pulldown, select your still file format of choice. We like to use TIFF because it’s lossless and virtually all image editing applications can read it. Make sure to click the Format Options button and set Compression to None.
From the Graphic Format pulldown, select your still file format of choice. We like to use TIFF because it’s lossless and virtually all image editing applications can read it. Make sure to click the Format Options button and set Compression to None.
![]() Set the width and height by typing your corresponding frame size into the text fields
Set the width and height by typing your corresponding frame size into the text fields
- If you are exporting from NTSC DV, use 720 480
- If you are exporting from NTSC 1:1 or 15:1, use 720 486
- If you are exporting from PAL use 720 576
![]() Click the oval next to Size to Fit so it turns purple, and click OK.
Click the oval next to Size to Fit so it turns purple, and click OK.
Always put a slate at the beginning of your finished show. It’s essential if you’re making a master to make dupes from, or if your show is heading to broadcast. It also lets people know who to contact (or yell at) should any issues arise. Things that you should include in your slate are:

- The title of the show
- The length of the show (total running time, or TRT)
- How the audio is mixed (e.g. mono, stereo, discreet tracks, multiple languages)
- Date and/or version
- Director’s name
- Editor’s name
- Production company
- Contact info
Drop It!
Skip the File>Export command and export by dragging a clip or sequence from its bin to your desktop, to any folder in Windows Explorer on a PC, or the Finder on a Mac. When you do this, the currently active Export Settings apply. Make sure the setting you want is active by clicking to the left of its name in the Project window so a checkmark appears. This is one of the reasons why we recommend creating different Export Settings for different types of file exports. Dragging and dropping is much faster than having to repeatedly select File>Export.

When it comes time to get your show on the web, there are several directions you can go in. There are three major streaming media formats (Real, Windows Media, and QuickTime), and your viewers might be watching on anything from a dial-up connection to a corporate LAN. Knowing the characteristics of your viewer’s computer and Internet connection speed is ideal, but this sort of information is not always available. To make your show viewable by the widest possible audience, encode it to at least two of the popular streaming formats, and to two bitrates—one for dial-up users and one for users with broadband connections. This way you’ll avoid shutting out a viewer if they don’t have the appropriate player installed or don’t have a fast enough connection to the Internet.

You have several options when it comes to encoding for the web:
- Sorenson Squeeze, included with Xpress Pro, can encode QuickTime movies with the Sorenson 3 codec (the best codec by far for QuickTime on the web).
- The Windows Media 9 Encoder can be downloaded for free at www.microsoft.com/downloads. It runs on Windows only.
- Helix Producer Basic encodes Real files and is also free. Download it at www.realnetworks.com/products/producer/index.html.
- Cleaner, available from Discreet (www.discreet.com), can encode Real, Windows Media, and QuickTime, as well as several other formats. QuickTime Pro can also encode.
If you find yourself having to encode large amounts of video for the web on a regular basis, you might want to consider an industrial-strength multi-format encoder such as Agility from Anystream (www.anystream.com/agility.asp) or Telestream’s Flip Factory (www.telestream.net/products/flipfactory.htm).
When you decide on your tools of choice for web encoding, here are some recommended encoder settings:
For broadband (cable/DSL) delivery
- Video data rate: 252Kbps
- Frame rate: 15fps
- Frame size: 320 240
- Audio data rate: 48Kbps
- Audio sample rate: 44.1kHz stereo

For dialup delivery
- Video data rate: 24Kbps
- Frame rate: 7.5fps
- Frame size: 160 120
- Audio data rate: 16Kbps
- Audio sample rate: 22.050kHz mono
Encoding is always a balancing act between data rate and quality. Higher data rates give better quality, but the higher you go the more risk there is of shutting out viewers with slower connection speeds. You should keep the total data rate (video + audio) to 300kbps or less for broadband and 40kbps or less for dialup. If you’re encoding for a corporate LAN you can go much higher (600–800kbps) but we recommend checking with a network administrator to make sure.
Traditional video is watched on a television, but streaming video is watched on a computer screen. TVs and computer screens display video in very different ways:
- TVs display interlaced frames, while computers display progressive frames.
- TVs play video at a frame rate of 29.97fps (NTSC) or 25fps (PAL), while computers can theoretically play back video at any frame rate.
- TVs overscan the picture, cropping out about 10 percent of the outer edge of the frame, while computers show the entire frame.
- TVs display colors in the YUV gamut, while computers use RGB.
Since video for the web is watched on a computer screen, as opposed to a TV, pre-processing the video before it is encoded optimizes it for viewing on a computer. If your encoding tool has pre-processing capabilities (also called prefiltering), then make the following adjustments:
- De-interlace the video.
- Crop the video to remove any black areas (blanking) at the edges of the frame.
- Color-expand the video from YUV colorspace to RGB colorspace.

Outputting to DVD and CD is pretty standard these days for client delivery, and is a great way to archive your Xpress Pro projects. Like videotape, however, DVD and CD disks don’t last forever. Here are a few tips to help give your disks maximum longevity:
- Don’t use peel-and-stick labels. The glue will eventually damage the disk, and the label itself can easily jam a CD or DVD player.
- Label your disks with a permanent marker, but don’t overdo it. The ink can damage a disk over time, so keep it to a minimum. Several inkjet printers also can print right on discs.
- Store your disks in jewel cases in a cool, dark place.
- Keep disks out of direct sunlight, which will destroy them very quickly.
- Make backup copies of all disks that contain important data.
Xpress Pro is a fine tool for offline editing because its project files are compatible with high-end Avid systems. You can move an Xpress Pro project to a Media Composer or Symphony for online finishing. Another common practice is to online with a traditional tape-to-tape system. If you’re going to do this, then you’ll need to export an EDL (Edit Decision List) from Xpress Pro. This is a text document containing all the details of your sequence. When you import your EDL into the online system, it’ll allow the online editor to easily recreate your offline edit. First, you need to install the Avid EDL Manager from the Other Installers folder on your Xpress Pro installer CD. Once EDL manager is installed:

![]() Highlight the sequence you want to create an EDL for by clicking on it in its bin.
Highlight the sequence you want to create an EDL for by clicking on it in its bin.
![]() Select Tools>EDL. The EDL Manager opens.
Select Tools>EDL. The EDL Manager opens.
![]() Open the EDL Manager Options Dialog by selecting Window>Options.
Open the EDL Manager Options Dialog by selecting Window>Options.
![]() Set the output options based on the online system you will be using. If you’re not sure, now would be a good time to drop a phone call or e-mail to the online editor. When finished, click the Apply button and close the window.
Set the output options based on the online system you will be using. If you’re not sure, now would be a good time to drop a phone call or e-mail to the online editor. When finished, click the Apply button and close the window.
![]() To create your EDL, click on the arrow pointing to the Update icon. The EDL displays in the text field.
To create your EDL, click on the arrow pointing to the Update icon. The EDL displays in the text field.
![]() Save your EDL by selecting File>Save As.
Save your EDL by selecting File>Save As.
Make sure you communicate with the online editor and get the appropriate EDL specs for the system on which they will be creating your online edit. Otherwise you could find yourself with a bunch of useless text and a very unhappy client!
Sometimes you’ve just gotta get a rough cut out to a client right away. In this case, take the low-tech approach and lay your sequence off to VHS. It may not always be pretty, but it’s real-time, and it always works. You’ll need a FireWire deck/camcorder with passthrough capability (most of them have it), or a DV-to-analog converter, or a Mojo. Here’s how to do it without a Mojo:

![]() Attach your FireWire deck/camcorder, or a DV-to-analog converter, to the FireWire port on your Xpress Pro system.
Attach your FireWire deck/camcorder, or a DV-to-analog converter, to the FireWire port on your Xpress Pro system.
![]() Connect the analog outputs of your FireWire deck/camcorder or DV-to-analog converter to the inputs of your VHS deck.
Connect the analog outputs of your FireWire deck/camcorder or DV-to-analog converter to the inputs of your VHS deck.
![]() Click the Toggle Digital Video Out button in the Timeline so it turns from green to blue. This button is in the upper-right corner of the Timeline window next to the Avid logo.
Click the Toggle Digital Video Out button in the Timeline so it turns from green to blue. This button is in the upper-right corner of the Timeline window next to the Avid logo.
![]() Press record on your VHS deck and play your Xpress Pro sequence.
Press record on your VHS deck and play your Xpress Pro sequence.
Remember that real-time effects are disabled when you output with this method.
If you’ve got a Mojo, connect Mojo’s analog outputs to the inputs of your VHS deck and play your sequence as your deck records. With Mojo your real-time effects will still play as you output your sequence. If you find yourself having to output to VHS on a regular basis, it’s definitely worth investing in a Mojo for this reason alone.
When you need to export your sequence (or a portion thereof) to a third-party application on your Xpress Pro system, take advantage of the Send To command. Send To performs a QuickTime Reference export, launches the third-party application, and in some cases can load the exported material into that application. Here’s how to use it:

![]() In your Timeline, set In and Out marks for the portion of your sequence you wish to export. If you want to export the entire sequence, clear any In and Out marks.
In your Timeline, set In and Out marks for the portion of your sequence you wish to export. If you want to export the entire sequence, clear any In and Out marks.
![]() Select the tracks you wish to export by turning them on, and turning all other tracks off.
Select the tracks you wish to export by turning them on, and turning all other tracks off.
![]() Highlight the sequence in its bin by clicking on it.
Highlight the sequence in its bin by clicking on it.
![]() Select File>Send To. The Send To dialog appears.
Select File>Send To. The Send To dialog appears.
![]() Click on the Send To: pulldown menu and select Add Item.
Click on the Send To: pulldown menu and select Add Item.
![]() Navigate to your third-party application and click OK.
Navigate to your third-party application and click OK.
![]() Click the box next to Auto Launch Application so a checkmark appears.
Click the box next to Auto Launch Application so a checkmark appears.
You can create scripts to load the exported QuickTime Reference into the third-party app. Sample scripts are included on the Xpress Pro installer CD in the Goodies folder. Load them into the Send To dialog by using the Add Item command as described above.
Television networks usually place a bug on the screen to protect their content (it’d be hard to tape a movie off of HBO and not notice the HBO logo sitting there in the corner). You can protect your own content just like the big guys by creating a watermark in Xpress Pro’s Title Tool. It’s a good idea to watermark review and approve copies of an edit to identify them as such, and we never send out a demo reel without a watermark (so prospective clients know who to call!).

![]() In your sequence, create a new video track by selecting Clip>New Video Track or pressing Ctrl+Y (Cmd+Y).
In your sequence, create a new video track by selecting Clip>New Video Track or pressing Ctrl+Y (Cmd+Y).
![]() Open the Title Tool by selecting Tools>Title Tool.
Open the Title Tool by selecting Tools>Title Tool.
![]() Create a title with your desired text.
Create a title with your desired text.
![]() Set your title’s transparency to 85 percent by clicking-and-holding on the Fill Transparency Selection box and moving the transparency slider to 85.
Set your title’s transparency to 85 percent by clicking-and-holding on the Fill Transparency Selection box and moving the transparency slider to 85.
![]() Select File>Save Title or press Ctrl+S (Cmd+S). Give your title a name, select a target Bin, Drive, and Resolution, and click Save.
Select File>Save Title or press Ctrl+S (Cmd+S). Give your title a name, select a target Bin, Drive, and Resolution, and click Save.
![]() Edit the watermark title onto your new video track.
Edit the watermark title onto your new video track.
Sooner or later you’ll have to deliver a show on DVD. MPEG-2 is the file format you’ll need to encode your edit to in order to put it on a DVD. Knowing how to adjust your MPEG-2 encoder to get best results is key. Here’s the low-down:

- The data rate (bitrate) of MPEG-2 is measured in Mbps (megabits per second). The higher the bitrate, the better the quality.
- Variable bitrate (VBR) encoding usually gives better quality than constant bitrate (CBR) so use it whenever possible. One exception to this is if you plan to create a multi-angle DVD. In this case encode your video at CBR.
- The total bitrate (video + audio) cannot exceed 9.8Mbps. More than 6Mbps chokes most computers.
- MPEG-2 frames are stored as GOPs (Groups of Pictures).
- A DVD chapter marker can only be set at the first frame of a GOP (GOP Header). Many DVD encoding and authoring tools let you force a GOP header on a specific frame. Check the manual for your specific software.
If you’re running Windows XP, use Sorenson Squeeze (included with Xpress Pro) to encode your MPEG-2 files. It’s got the Main Concept MPEG-2 encoder built-in, which produces excellent quality output. If you’re on a Mac, you’ll need to get your own MPEG-2 encoder. We like Apple’s Compressor, which comes bundled with DVD Studio Pro.
To delve deeper into the world of DVD, check out the DVD FAQ by Jim Taylor, the guru of all things DVD at www.dvddemystified.com/dvdfax.html.
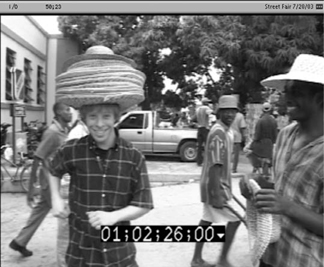
It’s useful to put burned in timecode (timecode that’s visible on the screen) on review and approval copies of your show. That way your client can match up his or her notes with timecode locations.
![]() In your sequence, create a new video track by selecting Clip>New Video Track or press Ctrl+Y (Cmd+Y).
In your sequence, create a new video track by selecting Clip>New Video Track or press Ctrl+Y (Cmd+Y).
![]() In the Project window, click on the Effect Palette tab to reveal the Effect Palette.
In the Project window, click on the Effect Palette tab to reveal the Effect Palette.
![]() In the left-hand column, click on Illusion FX.
In the left-hand column, click on Illusion FX.
![]() In the right-hand column, scroll down until you see the Timecode effect.
In the right-hand column, scroll down until you see the Timecode effect.
![]() Drag the Timecode effect to your new video track.
Drag the Timecode effect to your new video track.
You can make adjustments to the timecode effect in the Effects Editor.
If you have a Mojo, then the timecode effect will play in real time without rendering. If you’ve got no Mojo, then you’ll have to render. This effect can take quite a while to render, especially if you have a very long show. In this case, consider rendering it overnight or on your lunch break.
