C H A P T E R
The Timeline Is Your Friend
A large percentage of your work is performed in the Timeline. It serves as the primary tool for interacting with your virtual film or videotape. So learning how to master all of its features will help to make your job a lot easier. How can you control the behavior of the audio sample plot? Is there a way to preview your frames in segment mode? How can you restore its default snapping behavior? Why do your track monitors change when you patch to other tracks? How can you label your segments with different colors? Can you zoom in and out of the Timeline with the keyboard? How can you mark In and Out points based on a source clip’s sample plot? These questions and more will be answered in this chapter.

No matter how many keyboard shortcuts you know, you may learn that the most efficient way to work is to find the right balance between the mouse and keyboard. So, if you want more space for buttons, it pays to have a computer monitor that’s at least 1,280 pixels in width. If you resize your Timeline window to make it as wide as possible, you’ll get more blank buttons in the Timeline toolbar, which you can map to be whichever commands your want. Unfortunately, regardless of your monitor resolution, the Timeline toolbar can hold only up to 24 buttons. If your monitor’s width isn’t at least 1,280 pixels, you can reveal more buttons by hiding the audio meters from the Meter Menu button.

Don’t Leave Your Marked Region on Me
When you mark In and Out points in the Timeline, Avid’s default behavior is to highlight that area. This is usually very useful, because you immediately know where In and Out points are set. But, what if you’ve got lots of clip text in your Timeline, such as Clip Duration, Clip Comments, Audio Auto Gain, or Sample Plot? Depending on your track or clip colors, you might not be able to read the text in the Timeline because the In-to-Out highlight color is in your way. So, turn it off! Go to the Settings tab in the Project window, and double-click Timeline Settings. In the Display tab of the Timeline Settings, turn off Show Marked Region, and the In-to-Out highlight is gone. You will still see the In and Out marks in the timecode track in the Timeline, so you won’t be completely lost without the highlight.
Tired of waiting for the sample plot to draw and update in the Timeline? If so, you can always interrupt it by pressing Ctrl+period (Cmd+period). Or, you can set up Avid to display the sample plot only between In and Out points.

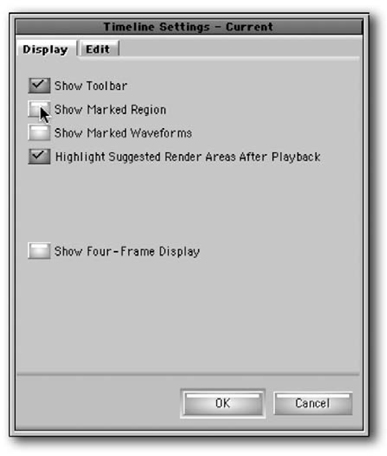
![]() Go to the Settings tab in the Project window and double-click the Timeline Settings.
Go to the Settings tab in the Project window and double-click the Timeline Settings.
![]() In the Display tab of the Timeline Settings, turn on Show Marked Waveforms.
In the Display tab of the Timeline Settings, turn on Show Marked Waveforms.
![]() Now, mark In and Out points in the Timeline, turn on the sample plot from the Timeline Fast Menu, and the waveforms will draw only between the In and Out points. (Note: Even the most experienced Avid editor may forget that this setting is on. So, he or she will spend hours trying to figure out why the sample plot won’t show up, when it’s because he or she forgot to mark In and Out points.)
Now, mark In and Out points in the Timeline, turn on the sample plot from the Timeline Fast Menu, and the waveforms will draw only between the In and Out points. (Note: Even the most experienced Avid editor may forget that this setting is on. So, he or she will spend hours trying to figure out why the sample plot won’t show up, when it’s because he or she forgot to mark In and Out points.)
Do You Want 2 or 4?
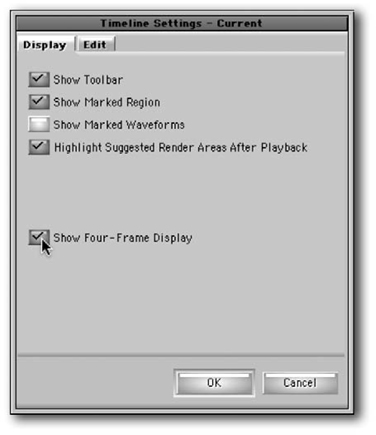
By default, when you drag segments in Segment Mode, the Avid doesn’t preview the frames that you will be changing. If you want a preview, go to the Settings tab in the Project window, and double-click the Timeline Settings. In the Display tab of the Timeline Settings, turn on Show Four-Frame Display. Although you’ll be sacrificing system performance, this can help you determine where to drop segments in Segment Mode. If the Composer window is showing both the Source and Record monitors, the Avid will display the frame that will precede the dragged segment, the head and tail frames of the dragged segment, and the frame that will follow the dragged segment. If the Composer window is showing only the Record Monitor (as it is in the Basic Toolset), then the Avid will display only the preceding and following frames.
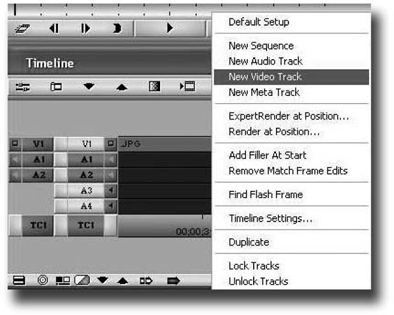
Normally when adding tracks, Xpress Pro goes in order. For example, if you already have A1 and A2 in your sequence, the next track to be added would be A3. But what if you have already designed assignments for the tracks and want to make an edit on A6? One option would be to continue adding tracks until A6 was reached, but this makes for an unnecessary amount of space in the Timeline. If you want to add a higher track by name, Alt+click (Opt+click) Clip>New Audio Track will present a menu where you can select the name of the new track. It's easier than managing empty tracks in your Timeline and it takes up a lot less space.
Auto-Monitoring for the People
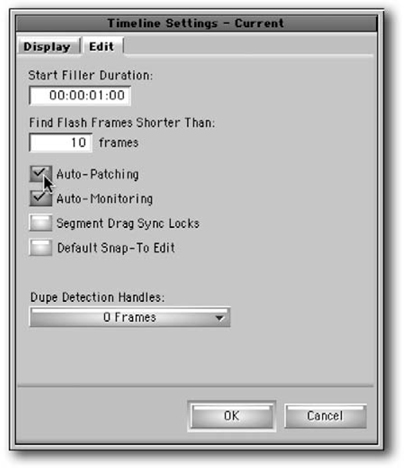
When you patch video tracks, the Avid assumes you want to monitor the track to which you patch. If you’re working with different layers of video, this default behavior may be annoying, because if you need to replace a clip in a lower track, the monitor changes so that you are no longer monitoring the entire composite. To turn off this behavior, go to the Settings tab in the Project window and double-click the Timeline Settings. In the Edit tab in the Timeline Settings, turn off Auto-Monitoring. Now, you can always monitor the topmost track while editing the tracks below.

An editor is constantly patching and repatching and selecting and deselecting source and record tracks, and most often the patched and selected tracks are the same. So, save yourself a few seconds, and set up Avid for auto-patching. Go to the Settings tab in the Project window, and double-click the Timeline Settings. In the Edit tab in the Timeline Settings, turn on Auto-Patching. Now, whenever you select an audio or video record track, the corresponding source track will automatically patch to it. Speed up the processes by selecting the V1-2 and A1-4 tracks with the 7, 8, 9, 0, -, and = keys.
Do You Care to Comment?
Clip comments allow you to type text in selected segments without altering the original master clips. This is useful for leaving notes to yourself in the Timeline, such as lines or page numbers from a script, shot descriptions, instructions for effects work, or simply reminders about edit decisions.
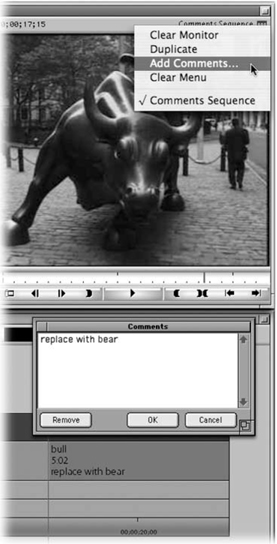
![]() To add clip comments, enter Segment Mode and select the segment(s) for which you want to add a comment.
To add clip comments, enter Segment Mode and select the segment(s) for which you want to add a comment.
![]() Then, go to the Clip Name Menu above the record monitor and choose Add Comments.
Then, go to the Clip Name Menu above the record monitor and choose Add Comments.
![]() To see your comments in the sequence, go to the Timeline Fast Menu in the lower left corner and choose Clip Comments.
To see your comments in the sequence, go to the Timeline Fast Menu in the lower left corner and choose Clip Comments.
Another way to be able to find parts of your show with a quick glance at the Timeline is to use Local Clip Color.
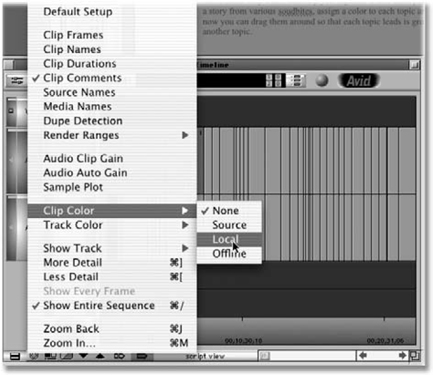
![]() Go to the Timeline Fast Menu and choose Clip Color>Local. You may want to save this Timeline view so that you can call it up quickly.
Go to the Timeline Fast Menu and choose Clip Color>Local. You may want to save this Timeline view so that you can call it up quickly.
![]() Select a clip or clips using the Segment Mode arrows and choose Set Local Clip Color from the Edit Menu and pick a color from the pulldown menu.
Select a clip or clips using the Segment Mode arrows and choose Set Local Clip Color from the Edit Menu and pick a color from the pulldown menu.
![]() Repeat these steps for any additional clips you want to identify.
Repeat these steps for any additional clips you want to identify.
You could make the opening title sequence one color and all of the commercial breaks a different color and the bumpers another color. Or make each show segment a different color.
Local Color
Local clip colors allow you to tag a specific instance of a segment without affecting other instances of the same clip. This proves to be particularly useful for reference purposes. Let’s say you’re using archival footage and you’ve already got the low-quality VHS version but you don’t have the DV or D1 version yet. While you wait for the high-quality tape to arrive, just edit in the low-quality clip, and tag it with a local clip color. Then, when you finally receive the high-quality footage, the local clip color will tell you exactly which clip to replace. Also, Local Clip Color can help you organize a free-form piece. If you are trying to make a story from various sound bites, assign a color to each topic and color-code the segments. Now you can drag them around so that each topic is grouped together or plays off of another topic.

Track of a Different Color
Not too fond of the default colors of your tracks? If you like, you can customize your track colors to mean something more significant to the content of the individual tracks. For example, in audio tracks you may want to use different colors to distinguish soundon-tape, music, sound effects, room tone, etc. Just select the appropriate tracks, go to the Timeline Fast Menu in the lower-left corner, and choose a track color. You can change the color of any selected track, including the timecode track. If you want a color that’s not in the palette, hold Alt (Option), choose any track color, and your operating system’s color picker will open to allow you to choose any color your computer can display. Note: To avoid confusion, don’t choose a color that is similar to the highlight color of Show Marked Region or Segment Mode.

Zoom Me Up, Zoom Me Down
The scale bar at the bottom of the Timeline window is great for zooming in and out of your sequence, but that involves using the mouse. There’s got to be a better way, right? As an Avid power user, you’ll want to be able to zoom in and out by using the keyboard: The down arrow will zoom in and the up arrow will zoom out of your sequence, and both commands keep the blue bar position indicator centered in the window. Ctrl+[ and ] (Cmd+[ and ]) work the same way. Also, Ctrl+/ (Cmd+/) will fit the sequence in the Timeline window regardless of your current zoom level.
Ready … Set … Zoom!
What if you are viewing the segments in your sequence at a comfortable zoom level, and you want to zoom in a little further but eventually return to your previous zoom level? Zoom In and Zoom Back allow you to do just that. Press Ctrl+M (Cmd+M) to activate the Zoom In command. Think “M” as in “magnify.” When Zoom In is active, you can lasso a region of your sequence to zoom into that region. To return to your previous zoom level, activate the Zoom Back command. Press Ctrl+J (Cmd+J). Think “J” as in “jump back.” You can even magnify multiple times in a row and jump back to each previous zoom level.
From the Fast Menu in the lower-left corner of the Timeline, enable Clip Color>Offline so that any offline segments in your sequence will be a bright red color. This way, whenever you open a sequence, the Avid will immediately indicate that you have offline media, and you’ll know which clips to relink or recapture. Note: To avoid confusion, don’t tag any source or local colors with red. Perhaps most importantly, however, if you’re working on a shared system and all of your segments are showing up as bright red, then you’ve got some detective work to do, because it’s possible that somebody else deleted all of your media! Save this setting with all of your Timeline views, and you’ll always know.

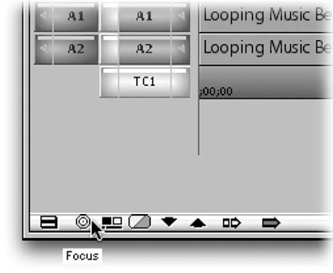
Hocus Focus
For zooming in and out the sequence, we love the scale bar at the bottom of the Timeline window, as well as using the up and down arrows or Ctrl+[ and ] (Cmd+[ and ]), but wouldn’t it be nice to zoom in and out at very far levels by toggling only one button? You can quickly zoom in and out of the sequence by clicking the Focus button in the lower-left corner of the Timeline. The Focus button, a prime candidate for keyboard mapping, zooms in at a scale of 90 pixels per second (or 3 pixels per frame); press it again to return to your previous level.
What’s the point of displaying clip information in the Timeline if the tracks are too small to read it? Enlarging your video and audio tracks creates space to display additional data, such as Clip Durations, Audio Auto Gain, or Sample Plot. To resize the height of individual tracks, move your mouse below each track until it changes into arrows, and then drag. To enlarge multiple tracks, select them, and press Ctrl+L (Cmd+L). Think “L” as in “enLarge.” To shrink multiple tracks, select them, and press Ctrl+K (Cmd+K). Think “K” as in “shrinK.”

A Room with a Timeline View
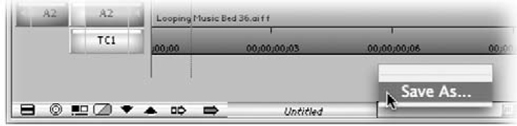
You can customize and save different Timeline views to use for different editing purposes. For example, you may want to save a Timeline view for audio editing that will display tall audio tracks, audio auto gain, and sample plot. Also, you may want to save a Timeline view for video editing with source, local, and offline clip colors, and a larger Timeline font. (Change the default font by activating the Timeline, and choosing Edit>Set Font.) To save a Timeline view, click on the View Menu at the bottom of the Timeline, choose “Save As,” and name it appropriately. Once a view is saved, you can click on the View Menu to toggle to different views. Alt+ or Option+click to replace existing Timeline views.
Consider the Source
Have you ever wanted to see the sample plot of a clip in the Source Monitor in order to mark In and Out points? Just click the Toggle Source/Record in Timeline button in the lower left to view the source material in the Timeline. Turn on the sample plot, and you’re in business. This feature can also be especially useful if you have another sequence loaded in the Source Monitor, and you need to see its edits in order to mark In and Out points at specific head and tail frames. The Toggle Source/Record in Timeline button works with footage in pop-up monitors, too.

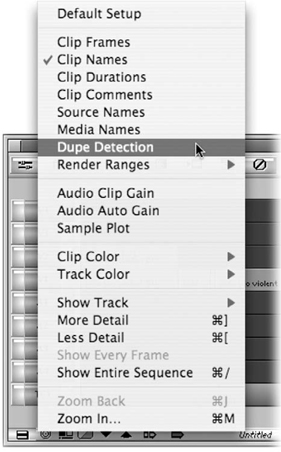
Have you already used that footage on your Timeline? Choosing the Fast Menu in the lower-left corner of the Timeline and selecting Dupe Detection will draw little colored lines on the tops of the frames that you’ve already used. Dupe Detection was originally designed for editing film because it can be expensive to duplicate the same frame of film. You can also use this feature to your benefit to double-check that you haven’t used those frames somewhere else. Note, however, that Dupe Detection only works in the V1 track.
Back in Black
Need to add black at the end of your Timeline? By default, you can only add black at the end of your sequence during a Digital Cut, but there are ways to fool the system into doing it in your Timeline:
![]() Add a title with no words.
Add a title with no words.
![]() Add an audio clip with its gain turned all the way down.
Add an audio clip with its gain turned all the way down.
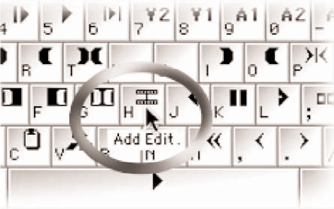
![]() On an empty track at the end of the Timeline, click Add Edit. Then, enter Trim Mode, and add frames to the existing filler on the A side.
On an empty track at the end of the Timeline, click Add Edit. Then, enter Trim Mode, and add frames to the existing filler on the A side.
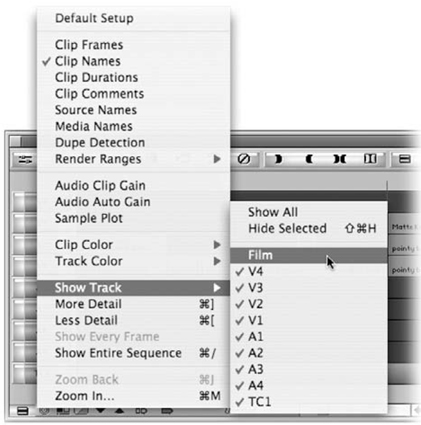
Like to see exactly what the Timeline frames are? Go to the Fast Menu in the lower-left corner of the Timeline and choose Show Track>Film Track. This feature is normally off to save valuable Timeline height, but now you have a view to see the actual frames on your Timeline.
Wrap-Around Blues
When you have few or short tracks, you may find that zooming into your sequence causes it to wrap around the Timeline window, which can be quite annoying. Just make sure your tracks are tall enough, and it will defeat this wrap-around feature.
