C H A P T E R
Getting It In
An Avid without any footage is not a particularly useful thing. You need to get your footage into the system so your creativity can be unleashed. But loading footage is about as much fun as watching chocolate chip cookies bake. All you can do is think about what you’d rather be eating (we mean doing).

The faster you can get the footage loaded, the sooner you can start editing. Learn powerful timesavers like batch recording, which can shave hours off your edit prep. In fact batch recording can give you the time you need to work in Photoshop or After Effects (or to keep reading this fine book).
You’ll also learn the best way to import graphics and audio into your system. Consistency and speed are our goals, and we mean to deliver. Let’s go!
The end of the edit is in sight (thank goodness), and you need to capture an extra clip to put the finishing touches on. The quickest route is always a straight line— in this case that means capturing it right to the desired point in your Timeline.

![]() In the Project window, click on the Settings tab.
In the Project window, click on the Settings tab.
![]() Scroll down to Capture and double-click it. The Capture Settings dialog appears.
Scroll down to Capture and double-click it. The Capture Settings dialog appears.
![]() Click on the Edit tab.
Click on the Edit tab.
![]() Click on the box next to “Enable edit to timeline” so a checkmark appears.
Click on the box next to “Enable edit to timeline” so a checkmark appears.
![]() Enter a handle length (we recommend 3 seconds, i.e. 00:00:03:00), and click OK.
Enter a handle length (we recommend 3 seconds, i.e. 00:00:03:00), and click OK.
![]() Turn on the track(s) in your sequence where you want your new clip to go.
Turn on the track(s) in your sequence where you want your new clip to go.
![]() Set an In mark in your sequence where you’d like the new clip to be placed.
Set an In mark in your sequence where you’d like the new clip to be placed.
![]() Open the Capture Tool by selecting Tools>Capture or by using the keyboard shortcut Ctrl+7 (Cmd+7).
Open the Capture Tool by selecting Tools>Capture or by using the keyboard shortcut Ctrl+7 (Cmd+7).
![]() Click and hold on the Capture Tool’s track buttons for each track you wish to capture. A pop-up menu will appears in which you can select which Timeline track will be the destination for each input.
Click and hold on the Capture Tool’s track buttons for each track you wish to capture. A pop-up menu will appears in which you can select which Timeline track will be the destination for each input.
![]() Using the Capture Tool, set In and Out marks for your source clip.
Using the Capture Tool, set In and Out marks for your source clip.
![]() Click on either the Splice Edit or Overwrite Edit button to tell Avid how to cut the new clip into your sequence.
Click on either the Splice Edit or Overwrite Edit button to tell Avid how to cut the new clip into your sequence.
![]() Click the Record button.
Click the Record button.
The Avid technology captures your new clip directly to the desired place in your Timeline. You’ll also find a new master clip in your bin.

Playing with a Stacked Deck (Part 1)
The Xpress Pro Capture Tool doesn’t always recognize what type of camcorder or deck you have attached to it—quite often it will see it as a “Generic DV Device.” It’s very important that Xpress Pro knows what model of camcorder or deck you’re using, as they all have their own unique characteristics. Xpress Pro’s ability to capture from and record to your device depends on it knowing exactly what it’s looking at. To manually select your model:
![]() Open the Capture Tool by selecting Tools>Capture or by using the keyboard shortcut Ctrl+7 (Cmd+7).
Open the Capture Tool by selecting Tools>Capture or by using the keyboard shortcut Ctrl+7 (Cmd+7).
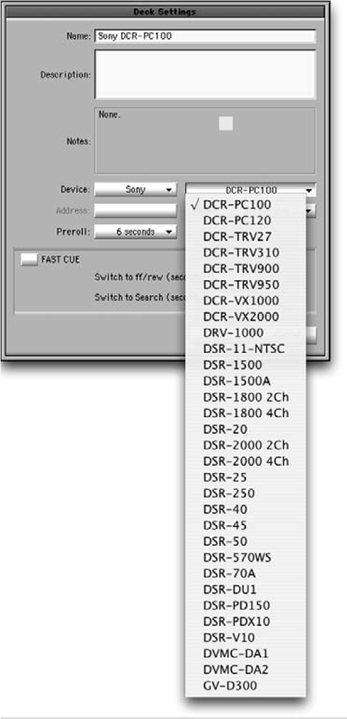
![]() Click on the pulldown menu directly below the Play button and select Adjust Deck. The Deck Settings dialog appears.
Click on the pulldown menu directly below the Play button and select Adjust Deck. The Deck Settings dialog appears.
![]() From the Device pulldown menus, select your brand and model of deck.
From the Device pulldown menus, select your brand and model of deck.
You might find that your particular deck isn’t listed. In that case, keep the Generic DV Device setting, and customize it to get more reliable performance. This might take some experimentation, but you can often get good results this way.
The current list of DV devices supported in Xpress Pro can be downloaded at www.avid.com/products/dvdevicequal.pdf.
Playing with a Stacked Deck (Part 2)
So you went ahead and made sure your deck was correctly selected, but you’re still getting error messages and failures when you capture or perform a Digital Cut. Well, all decks are not created equal—the cheaper ones tend to have lower-quality mechanisms which limit the ability of Xpress Pro’s deck control to operate successfully. The fine engineers at Avid HQ have tested most popular camcorders and decks and have made their findings available to you. To see what the limitations (if any) of your deck are, check the notes for your device contained within the Deck Settings dialog. In some cases, you might need to capture or perform a Digital Cut without deck control.

You’re logging a tape and notice that it has timecode breaks. Let’s say it has three timecode breaks, so three different parts of the tape have identical timecode. It might not be a big deal to capture this, but what will happen if you need to recapture the footage at some point in the future? Xpress Pro won’t know which of the three different sections of timecode to look at. An easy solution to this is to give each section of timecode its own tape name. For example, on a tape called “Tape_10” that has two timecode breaks, call the first section of timecode “Tape_10 _A,” the second section “Tape_10_ B,” and the third section “Tape_10_C.” Make sure to include a note of this in the tape box, or on its label, to help anyone who might need to recapture down the line.
![]()
Drive Away
You’ll get optimal system performance if you capture footage to drives other than those that contain your operating system and Xpress Pro program files. Your computer is constantly accessing system and application data from these drives, which leaves less bandwidth for your media. Unfortunately, Xpress Pro can’t automatically tell which drives these are. To keep from accidentally capturing to those drives,
![]() In the Project window, click on the Settings tab.
In the Project window, click on the Settings tab.
![]() Scroll down to Media Creation and double-click it. The Media Creation dialog opens with the Drive Filtering tab already selected.
Scroll down to Media Creation and double-click it. The Media Creation dialog opens with the Drive Filtering tab already selected.
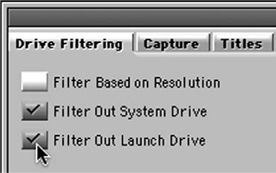
![]() Click the boxes next to Filter Out System Drive and Filter Out Launch Drive so they both have check-marks in them, and click OK.
Click the boxes next to Filter Out System Drive and Filter Out Launch Drive so they both have check-marks in them, and click OK.
If you have a Mojo, you can capture to Avid’s 1:1 (uncompressed) OMF format. You’ll generally need a fast RAID array of drives to sustain the read/write speed necessary for uncompressed, but sometimes you can get away with using standard drives to capture short clips. The problem is that Xpress Pro automatically filters out all drives it thinks are not capable of capturing uncompressed. To override this filtering:
![]() In the Project window, click on the Settings tab.
In the Project window, click on the Settings tab.
![]() Scroll down to Media Creation and double-click it. The Media Creation dialog opens with the Drive Filtering tab already selected.
Scroll down to Media Creation and double-click it. The Media Creation dialog opens with the Drive Filtering tab already selected.
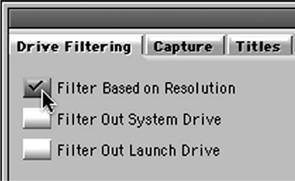
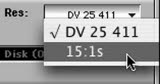
![]() Click the box next to Filter Based On Resolution so the checkmark disappears, and click OK.
Click the box next to Filter Based On Resolution so the checkmark disappears, and click OK.
Bear in mind that you might get capture errors and failures if you attempt to capture uncompressed to drives that can’t handle it, but this way you’ll be able to decide what works and what doesn’t without having the software make the decision for you.
Tapes Can Be Flaky
The mini-DV tape format has become popular for many reasons—it’s small, it’s cheap, and it’s widely available. What it isn’t is durable, especially when it goes through the constant shuttling back-and-forth that occurs during capturing. For this reason, we strongly advise you to make backup copies of your master mini-DV tapes before you begin capturing into Xpress Pro. That way you’ll avoid the heartbreak of losing important footage should your master tapes develop dropouts (all too common) or become completely destroyed altogether. The simplest method is to connect two camcorders or decks with a FireWire cable and do a straight dub.
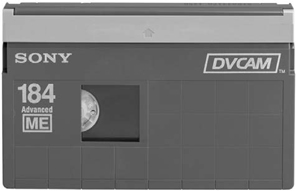
Make sure to use the highest quality tape stock you can afford—the extra few bucks will be worth it in the long run. We like to use DVCAM master tapes, even in our mini-DV camcorders, because they’re much more durable.
After a long capture session, we like to take a nice long coffee break. We love our coffee breaks so much that we often forget that we’ve left a tape in the deck. Even if we’ve quit out of Xpress Pro, that tape may very well still be threaded around our deck’s playback heads. Not only will this wear down our heads, but it can also cause damage to the tape. To keep this from happening,
![]() In the Project window, click on the Settings tab.
In the Project window, click on the Settings tab.
![]() Scroll down to Deck Preferences and double-click it. The Deck Preferences dialog appears.
Scroll down to Deck Preferences and double-click it. The Deck Preferences dialog appears.
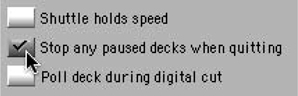
![]() Click on the box next to “Stop any paused decks when quitting” so a checkmark appears, and click OK.
Click on the box next to “Stop any paused decks when quitting” so a checkmark appears, and click OK.
Build a Better Mojo ![]()
Mojo needs breakout cable in order to capture or play out a component video signal. Component video is of much higher quality than composite, so we consider having this cable a necessity. You can buy one from Avid for $75, but it’s really easy to make your own with about $15 worth of parts from your local RadioShack. Avid’s Knowledge Center website has instructions on how to do it (as well as loads of other great information).

![]() Open your web browser and type in the URL support01.avid.com.
Open your web browser and type in the URL support01.avid.com.
![]() In the Search field on the upper-right-hand corner of the page, type “Mojo Component Cable” and click Go.
In the Search field on the upper-right-hand corner of the page, type “Mojo Component Cable” and click Go.
![]() A link to the Avid Mojo Component Cable Wiring Diagram appears. Click on it to download (it’s a PDF file, so you’ll need to have Adobe Reader installed to read it).
A link to the Avid Mojo Component Cable Wiring Diagram appears. Click on it to download (it’s a PDF file, so you’ll need to have Adobe Reader installed to read it).
The document even includes a detailed list of the parts you’ll need.
On high-end Avids, the standard workflow is to capture source material at a lower-quality offline resolution and then up-rez the final sequence to a high-quality online resolution. The main reason for this is to conserve drive space. With Xpress Pro’s 15:1s resolution, you can use this very same workflow to get around 10 times more footage on your drives!
One gigabyte of drive space can store:
- 48.5 minutes of 15:1s footage
- 5 minutes of DV25 footage
- 0.8 minutes of 1:1 footage
Bear in mind that you’ll need to have access to your source tapes when it comes time to up-rez your sequence to DV25.
Can You Handle It?
It’s always a good idea to capture source clips with handles. This means that you capture a few extra seconds at the beginning and end of each clip to give you some extra leeway in your edits. Quite often, you’ll need more frames than you thought you would to get a transition exactly the way you want it. A handle length of 3 seconds (90 frames for NTSC, 75 frames for PAL) is a safe amount.

- When performing a batch capture, select Extend Handles Beyond Master Clip Edges in the Batch Capture dialog.
- When capturing clip by clip, manually capture handles by setting your In and Out marks to include extra footage at the beginning and end of the clip.
It’s happened to us way too often—we log a tape with tons of clips on it, tell Xpress Pro to perform a batch capture, go off to lunch, and come back to find the batch capture has failed. Usually the culprit is a single clip—why let one bad apple spoil the whole batch?

![]() In the Project window, click on the Settings tab.
In the Project window, click on the Settings tab.
![]() Scroll down to Capture and double-click it. The Capture Settings dialog appears.
Scroll down to Capture and double-click it. The Capture Settings dialog appears.
![]() Click on the Batch tab.
Click on the Batch tab.
![]() Click the box next to “Log errors to the console and continue capturing” so a checkmark appears, and click OK.
Click the box next to “Log errors to the console and continue capturing” so a checkmark appears, and click OK.
Once your batch capture is complete, you’ll get an error message if any clips failed to capture. You can then open the console to see all the gory details by selecting Tools>Console or by using the keyboard shortcut Ctrl+6 (Cmd+6).
We Don’t Need No Stinking Tapes!
A shot log has been faxed to you . . . but the tapes still haven’t arrived. Not to worry— you can still log your shots in the Capture Tool, even without having a tape in the deck. You’ll need to manually enter In and Out marks in the Capture Tool, but before you do this Xpress Pro needs to know if the forthcoming tape has drop or non-drop timecode.

![]() In the Project window, click on the Settings tab.
In the Project window, click on the Settings tab.
![]() Scroll down to Deck Preferences and double-click it. The Deck Preferences dialog appears.
Scroll down to Deck Preferences and double-click it. The Deck Preferences dialog appears.
![]() From the “When the deck contains no tape, Log As:” pulldown menu, select “Drop Frame” or “Non-drop Frame” and click OK.
From the “When the deck contains no tape, Log As:” pulldown menu, select “Drop Frame” or “Non-drop Frame” and click OK.
The DV format isn’t kind to titles and graphics. They tend to fall apart when subjected to DV’s 5:1 compression. If you have a Mojo, you can steer clear of all that by importing titles and graphics to Avid’s uncompressed format. In fact, this is one of the key benefits of owning a Mojo in the first place.
![]() In the Project window, click on the Settings tab.
In the Project window, click on the Settings tab.
![]() Scroll down to Media Creation and double-click it. The Media Creation dialog appears.
Scroll down to Media Creation and double-click it. The Media Creation dialog appears.
![]() Click on the Import tab.
Click on the Import tab.
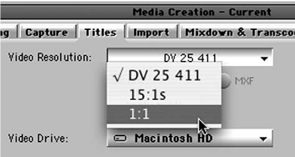
![]() In the Video Resolution pulldown, select 1:1, and click OK.
In the Video Resolution pulldown, select 1:1, and click OK.
You can also set 1:1 in the Titles and Render tabs of the Media Creation tool to keep your Avid titles and effects renders uncompressed. If you’ll be outputting to an analog format via Mojo or to MPEG-2 for DVD, your graphics, titles, and effects renders will never suffer that ugly DV 5:1 compression hit.
Yo, Shorty!
If you’re short on drive space, why not import still files at a short duration? You can then cut the still into your sequence multiple times to create the desired length. This is especially useful if you’re importing your stills 1:1 which eats up tons of drive space.

![]() In the Project window, click on the Settings tab.
In the Project window, click on the Settings tab.
![]() Scroll down to Import and double-click it (if you have multiple Import settings, make sure you select the one you wish to modify).
Scroll down to Import and double-click it (if you have multiple Import settings, make sure you select the one you wish to modify).
![]() In the Single Frame Import field, enter your desired duration.
In the Single Frame Import field, enter your desired duration.
We like to use a duration of 10 seconds, which is easy to multiply.
Your Virtual Animation Stand
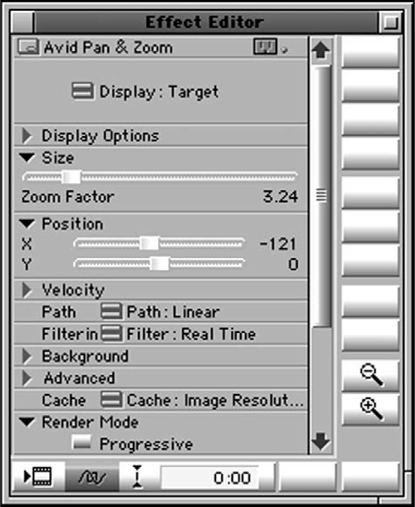
It’s common to “pan and scan” still photos to zoom in on points of interest. It’s also more interesting to watch than a still photo just sitting there doing nothing. Don’t use the standard File>Import for this, as Xpress Pro will reduce your beautiful high-res image to DV frame size. Import it with the Avid Pan & Zoom effect instead.
![]() Access the Effects Palette by clicking on the Project window’s Effects tab.
Access the Effects Palette by clicking on the Project window’s Effects tab.
![]() In the left-hand column, scroll down to Image and click it. The Avid Pan & Zoom effect appears at the top of the right-hand column.
In the left-hand column, scroll down to Image and click it. The Avid Pan & Zoom effect appears at the top of the right-hand column.
![]() Drag the Avid Pan & Zoom effect to an empty area in the desired video track in your sequence. Filler is created with the effect applied to it.
Drag the Avid Pan & Zoom effect to an empty area in the desired video track in your sequence. Filler is created with the effect applied to it.
![]() Park the position marker over the filler containing the Pan & Zoom effect.
Park the position marker over the filler containing the Pan & Zoom effect.
![]() Open the Effect Editor by selecting Tools>Effect Editor.
Open the Effect Editor by selecting Tools>Effect Editor.
![]() Click on the box in the upper-left corner of the Effect Editor window, directly to the left of the words “Avid Pan & Zoom.” In the dialog that appears, select the image file you wish to import, and click OK.
Click on the box in the upper-left corner of the Effect Editor window, directly to the left of the words “Avid Pan & Zoom.” In the dialog that appears, select the image file you wish to import, and click OK.
![]() Click on the Avid Pan & Zoom effect’s Display pulldown menu, and select Display:Target.
Click on the Avid Pan & Zoom effect’s Display pulldown menu, and select Display:Target.
Set keyframes to animate Size and Position over time, and you can create a visually stimulating pan and scan, while zooming in on the finest detail.
Note that Xpress Pro doesn’t create media for your still as it would if you used the standard File>Import command. OMF media for the effect will be created when you render, but if you want to be able to make changes, make sure to keep your original image file handy. Your photo needs to be bigger than screen size if you inted to pan and zoom. The television screen is 720 pixels wide, so if you want to do a four-time zoom or pan just do the math (4 720 = 2880 pixels wide).
Your Xpress Pro project will almost always have an audio sample rate of 48kHz or 32kHz, but audio tracks on CDs have a sample rate of 44.1kHz. You can import them at 44.1kHz and they’ll play back just fine in your sequence, but when it comes time to output you’ll have to convert them to your project sample rate. When importing tracks from CDs, always click Yes when Xpress Pro asks you if you want to perform the sample rate conversion. The sample rate conversion makes the import slower, but it’ll save you from having to do it later on.
On the other hand, you might have an impatient client sitting next to you, and taking the time to convert a big batch of tracks might not be realistic. In this case, click No to the sample rate conversion and do it later on when things aren’t so hectic.

Mojo’s Stealth Multitasking ![]()
Mojo outputs your After Effects composition window to a broadcast monitor! When you launch After Effects on Windows it will display your comp window through Mojo’s analog and FireWire outputs. Just hook your monitor up to Mojo and you’re all set.
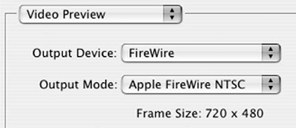
Mac users need not despair. You can also get After Effects comp window output to a broadcast monitor by setting the Output Device to FireWire in the Video Preview section of After Effects Preferences dialog. In order to connect an analog monitor, you’ll need to have a FireWire-to-analog converter attached to your FireWire port.
In general, it’s a good idea to preview your After Effects comp on a broadcast monitor as what you see on your computer screen is never an accurate representation of what it’s going to look like on a television.
Be Still, My Beating Heart
If you need to incorporate still photos or graphics into your Xpress Pro or Xpress DV edit, then Adobe Photoshop is a must-have. One thing you need to be aware of is that Avid uses non-square pixels, while Photoshop and other graphics tools usually use square pixels.

When you create a still or graphic in Photoshop and import it into an Avid system, the pixels will be reinterpreted. If you build the graphic at the same size of your video frame (720 486 or 720 480), you will see a slight distortion. There are several approaches to solving this problem (and a lot of misinformation floating around). Here’s a workflow that works well for NTSC.
![]() Create your still graphic using the following sizes
Create your still graphic using the following sizes
- 640 486 pixels for Standard D1 video
- 640 480 pixels for DV projects
![]() While the Avid can resize the graphic, it better to do this in Photoshop.
While the Avid can resize the graphic, it better to do this in Photoshop.
![]() Choose Image>Image Size.
Choose Image>Image Size.
![]() Uncheck the Constrain Proportions box.
Uncheck the Constrain Proportions box.
![]() Resize your image to the finished video size:
Resize your image to the finished video size:
- 720 486 pixels for Standard D1 video
- 720 480 pixels for DV projects
![]() Choose File>Save As and save your file as a PICT or TARGA if you don’t need layers to import. Save a layered PSD file as well.
Choose File>Save As and save your file as a PICT or TARGA if you don’t need layers to import. Save a layered PSD file as well.
Be sure to work in the RGB colorspace. The good news if you’ve upgraded to Photoshop CS, you don’t need to go through these steps because it’s the first version of Photoshop that lets you create images with nonsquare pixels. Just use the built in templates.
![]() Create your still graphic using the following size (PAL uses the same frame size for both Standard and Digital Video).
Create your still graphic using the following size (PAL uses the same frame size for both Standard and Digital Video).
- 768 576 pixels
![]() While the Avid can resize the graphic, it better to do this in Photoshop.
While the Avid can resize the graphic, it better to do this in Photoshop.
![]() Choose Image>Image Size.
Choose Image>Image Size.
![]() Uncheck the Constrain Proportions box.
Uncheck the Constrain Proportions box.
![]() Resize your image to the finished video size to 720 576 pixels
Resize your image to the finished video size to 720 576 pixels
![]() Choose File>Save As and save your file as a PICT or TARGA if you don’t need layers to import. Save a layered PSD file as well.
Choose File>Save As and save your file as a PICT or TARGA if you don’t need layers to import. Save a layered PSD file as well.
Rules of Capture
If you choose to turn the Deck button off while you are recording, you can still get video into the system (but not much more).

![]() You cannot uprez from a lower resolution because there is no way for Xpress Pro to find the original source.
You cannot uprez from a lower resolution because there is no way for Xpress Pro to find the original source.
![]() If a clip becomes damaged, you’ll have no way to reload it and have it sync up in the timeline. Without a timecode reference any data acquired could easily become lost.
If a clip becomes damaged, you’ll have no way to reload it and have it sync up in the timeline. Without a timecode reference any data acquired could easily become lost.
![]() Without timecode, it’ll be hard to properly search through your bins.
Without timecode, it’ll be hard to properly search through your bins.
![]() Perhaps more importantly, any capturing errors that occurs could prove devastating.
Perhaps more importantly, any capturing errors that occurs could prove devastating.
As you log your clips in the Capture Tool, take advantage of Avid technology’s ability to add comments.
- Enter notes on the type of shot (e.g. interior, exterior, b-roll).
- For sound bites, enter the first and last bits of dialogue for easily locating later on.
- Enter the name of the person on camera in case you need to create lower-thirds (titles with the subject’s name).
- Enter comments a producer is throwing at you as you’re capturing.
Drop It!
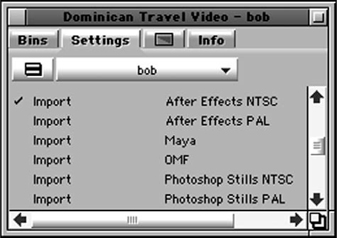
You can import material into Xpress Pro by dragging it from a folder to any open bin. Before you do this, you need to make sure the Import settings are properly set for the type of material you are importing. Instead of having to modify the settings each time you import, set up a different Import setting for each type of material.
![]() In the Project window click on the Settings tab.
In the Project window click on the Settings tab.
![]() Click on Import to highlight it.
Click on Import to highlight it.
![]() Select Edit>Duplicate, or use the keyboard shortcut Ctrl+D (Cmd+D). A new Import setting appears in the Settings window.
Select Edit>Duplicate, or use the keyboard shortcut Ctrl+D (Cmd+D). A new Import setting appears in the Settings window.
![]() Double-click on the new Import setting. The Import Settings dialog appears.
Double-click on the new Import setting. The Import Settings dialog appears.
![]() Set the parameters for the type of material this setting will apply to and click OK.
Set the parameters for the type of material this setting will apply to and click OK.
![]() Click in the column to the right of the new Import setting. A cursor appears. Type in a meaningful name for this setting and press Return.
Click in the column to the right of the new Import setting. A cursor appears. Type in a meaningful name for this setting and press Return.
To activate your Import setting of choice, click in the column to the left of that setting. A checkmark appears, indicating that it’s now the active setting.
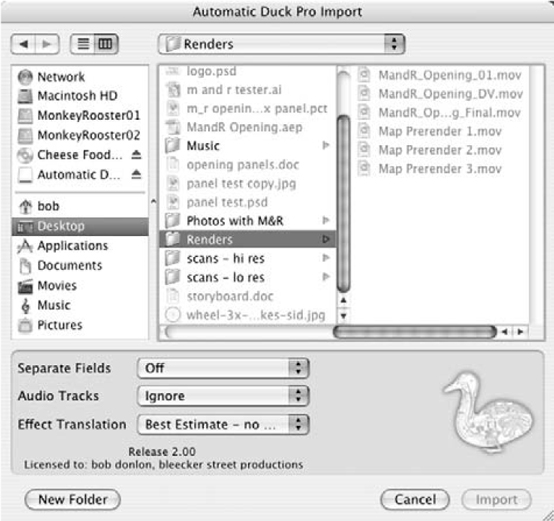
One of the things we love about Xpress Pro is its project compatibility with high-end Avid systems. But what if you need to import a Final Cut Pro project into Xpress Pro? The project files are incompatible. It might seem like you’re out of luck, but you can always reach for the duck—Automatic Duck, that is. This neat utility can convert a Final Cut Pro project to Xpress Pro and vice versa. It can also be used to import projects to After Effects and Boris RED. We’d be lost without our duck. Check it out at www.automaticduck.com.
A Fresh New Batch
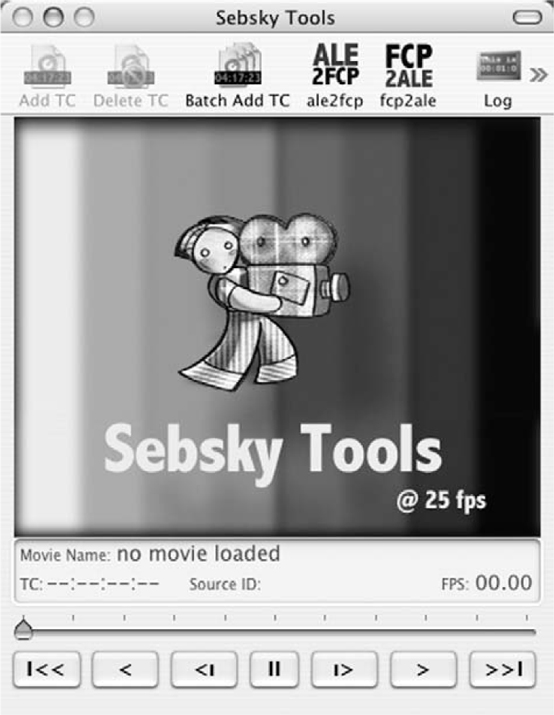
Even though Xpress Pro and Final Cut Pro have many incompatibilities, solutions keep appearing that help editors transition projects from one to the other. For example, if someone gives you a Final Cut Pro batch list for a tape, you won’t be able to import it into Xpress Pro because Avid uses a different log format (Avid Log Exchange, or ALE). You can, however, convert your FCP batch list to an ALE file by using a utility called Sebsky Tools. Not only does it work like a charm, but it’s also free! Download your copy at www.dharmafilm.com/sebskytools and add it to your digital toolbox.
It’s great that Xpress Pro and DV lets you use your DV camcorder as if it were a deck— you can capture from it and you can record to it. The only problem is that camcorders aren’t designed to be used as decks. The constant shuttling that’s required during the capture process wears down the components of the camcorder rather quickly, decreasing its lifespan. If you plan on doing a considerable amount of capturing, we strongly recommend investing in a tape deck. Not only will it capture more reliably than a camcorder, it will save you from having to run out and buy a new camera sooner than you’d planned on!

A decent mini-DV tape deck can be bought for around $700, and for $1,200-$1,500 you can get something really nice that handles both mini-DV and DVCAM tapes. One of the most costly components of a camcorder is the lens—with that out of the equation you get good bang for the buck.
An Ounce of Prevention
It’s always important to remain aware of where your project is heading. If you’re using Xpress Pro for offline editing, chances are you’ll be exporting an EDL (Edit Decision List) for the system that will be used in the online edit. Much online work is still done with traditional tape-to-tape editing systems, and these systems often have stiff requirements for how the EDL is set up. Why are we telling you this in a chapter about capturing and importing? Well, one common EDL “gotcha” is that many online systems have a naming convention for tape and clip names. If you log your footage in Xpress Pro and you’re not following the online system’s naming convention, you’ll find yourself with a lot of extra work down the line. Pick up the phone and talk to your online facility to see how their system likes tapes and clips to be named.

The More, the Merrier
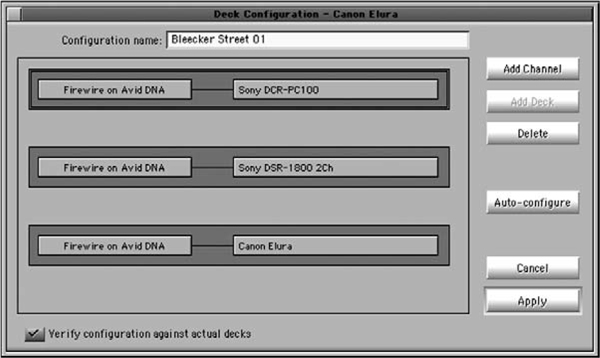
If you’ve got multiple tape decks attached to your Xpress Pro system, use the Deck Configuration setting to create a site configuration. That way, you’ll be able to toggle between your decks by making a single menu pick in the Capture tool.
![]() In the Project window, click on the Settings tab.
In the Project window, click on the Settings tab.
![]() Scroll down to Deck Configuration and double-click it.
Scroll down to Deck Configuration and double-click it.
![]() Click the Add Channel button. The Channel selection dialog appears.
Click the Add Channel button. The Channel selection dialog appears.
![]() Select the deck’s input Channel Type and Port by using the pulldown menus, and click OK. A dialog appears asking if you want to autoconfigure the channel. Click No.
Select the deck’s input Channel Type and Port by using the pulldown menus, and click OK. A dialog appears asking if you want to autoconfigure the channel. Click No.
![]() Click the Add Deck button. The Deck Settings dialog appears.
Click the Add Deck button. The Deck Settings dialog appears.
![]() Select the deck type by using the Device pulldown menus, and click OK.
Select the deck type by using the Device pulldown menus, and click OK.
![]() Repeat steps 3 thru 6 for each additional deck.
Repeat steps 3 thru 6 for each additional deck.
![]() If you’d like Xpress Pro to test your new configuration, click the box next to “Verify configuration against actual decks” so a checkmark appears.
If you’d like Xpress Pro to test your new configuration, click the box next to “Verify configuration against actual decks” so a checkmark appears.
![]() Click Apply.
Click Apply.
Now when you open the Capture tool, all of your decks will appear in the pulldown menu directly beneath the Play button.
Too Much Togetherness
It’s very common to use similar names when naming your graphic files. However, when Autodetect Sequential Files is turned on during an import, and if there are two files with sequential numbers, they will be imported as a clip together, with each graphic represented by only a single frame. The lesson here is to always check your import options.
Adobe After Effects is an ideal compositing tool to use in conjunction with Xpress Pro. This tip provides you with the basic info you need to create and render your After Effects compositions for optimal importing into Xpress Pro. The three things you need to set correctly within After Effects are Composition Settings, Render Settings, and Output Module.
Composition Settings
- If you’re working in NTSC, and your Xpress Pro project is DV, set your comps to NTSC DV, 720 480 with a pixel aspect ratio of D1/DV NTSC (0.9).
- If you’re working in NTSC with a Mojo and wish to keep your After Effects renders uncompressed (which we highly recommend), set your comps to NTSC D1, 720 486 with a pixel aspect ratio of D1/DV NTSC (0.9).
- If you’re working in PAL, set your comps to PAL D1/DV, 720 576 with a pixel aspect ratio of D1/DV PAL (1.07).
- Set your frame rate to 29.97fps for NTSC or 25fps for PAL.
- All of these settings are available by choosing your fotrmat from the Preset list.

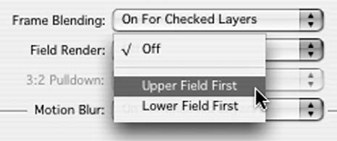
- Set Field Render to Lower Field First for NTSC.
- Set Field Render to Upper Field First for PAL (or Lower Field First for PAL DV).
You can save these settings as a template by clicking on the triangle next to the setting name in the render queue
Output Module
- Set Format to QuickTime Movie.
- Set Channels to RGB if you don’t need to include an alpha channel, or RGB + Alpha if you do.
- Set depth to Millions of Colors if you’re not including an alpha channel, or Millions of Colors+ if you are.
- If you’re including an alpha channel, set Color to Straight (Unmatted).
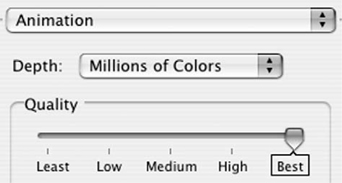
- Click Format Options to open the Compression Settings dialog, and set the output codec to Animation with Depth set to Millions of Colors and Quality set to Best. If you’re including an alpha channel set Depth to Millions of Colors+.
- Don’t change the frame rate in the Compression Settings dialog.
We recommend rendering to the Animation codec as it provides noticeably better image quality than the Avid DV or Avid Meridien Uncompressed codecs (especially if your comp includes gradients). You can save these settings as a template by clicking on the triangle next to the setting name in the render queue.
Now that you know how to set up and render your After Effects compositions, here’s what you need to know to import them into Xpress Pro:
![]() In the Project window, click on the Settings tab.
In the Project window, click on the Settings tab.
![]() Scroll down to the currently active (checkmarked) Import setting and duplicate it by clicking on it once to highlight it, then selecting Edit>Duplicate.
Scroll down to the currently active (checkmarked) Import setting and duplicate it by clicking on it once to highlight it, then selecting Edit>Duplicate.
![]() Give your new Import setting a meaningful name, like “After Effects Import” by clicking in the field to the right of it and typing in a name.
Give your new Import setting a meaningful name, like “After Effects Import” by clicking in the field to the right of it and typing in a name.
![]() Double-click on your new After Effects Import setting to open its Import Settings dialog.
Double-click on your new After Effects Import setting to open its Import Settings dialog.
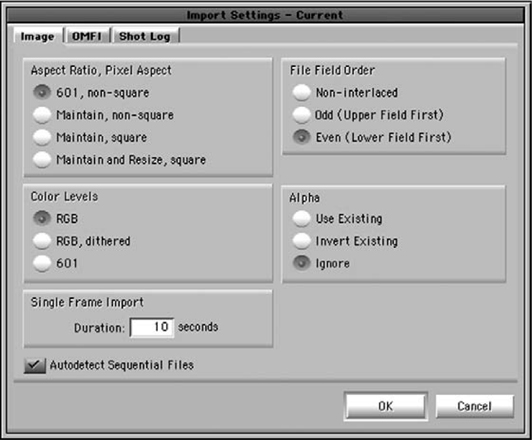
![]() Apply the following settings by clicking on the circle next to the name of the setting:
Apply the following settings by clicking on the circle next to the name of the setting:
- Set Aspect Ratio, Pixel Aspect to 601, non-square.
- Set Color Levels to RGB unless your After Effects comp has gradients in which case set it to RGB, dithered.
- Set File Field Order to match the field order you set in your After Effects Render Settings.
- Set Alpha to Ignore if your After Effects output doesn’t contain an alpha channel, or to Invert Existing if it does.
![]() Click OK to close the Import Settings dialog.
Click OK to close the Import Settings dialog.
When you are ready to import your After Effects rendered files, make sure your new Import setting is selected by clicking to the left of it in the Project window Settings tab so a checkmark appears. You can then use the File>Import command or drag and drop your After Effects renders into a bin.
Turn Xpress Pro into a virtual voiceover studio by using the Audio Punch-In tool to record directly to your Timeline. If you’re recording voiceover to sync with picture, there’s really no better way. First you need to connect a microphone to your Xpress Pro system and set its input channel and level.

![]() Connect your microphone to your Xpress Pro system in one of three ways:
Connect your microphone to your Xpress Pro system in one of three ways:
- Via Mojo’s analog audio input.
- Via FireWire through your DV deck/camcorder or an analog-to-firewire converter.
- To your computer’s sound card.
![]() In the Project window, click on the Settings tab.
In the Project window, click on the Settings tab.
![]() Double-click on Audio Project. The Audio Project Settings dialog appears.
Double-click on Audio Project. The Audio Project Settings dialog appears.
![]() Click on the Input tab.
Click on the Input tab.
![]() Use the Input Source pulldown to select your microphone’s input channel.
Use the Input Source pulldown to select your microphone’s input channel.
- If it’s connected via Mojo’s analog input, select RCA (-10dBu).
- If it’s connected via FireWire, select OHCI.
- If it’s connected to your computer’s sound card, select Line In.
![]() Open the Audio Tool by selecting Tools>Audio Tool, or use the keyboard shortcut Ctrl+1 (Cmd+1).
Open the Audio Tool by selecting Tools>Audio Tool, or use the keyboard shortcut Ctrl+1 (Cmd+1).
![]() Set your Audio Tool to monitor your microphone’s input by clicking on its In/Out buttons so they read I (for input).
Set your Audio Tool to monitor your microphone’s input by clicking on its In/Out buttons so they read I (for input).
![]() As your voiceover talent speaks into the microphone, adjust the input level while monitoring the meters in your Audio Tool. They should peak around –12db.
As your voiceover talent speaks into the microphone, adjust the input level while monitoring the meters in your Audio Tool. They should peak around –12db.
- If you’re using Mojo, click the Passthrough Mix Tool button and adjust the input level in the Passthrough Mix Tool.
- If you’re not using Mojo, use the Input Gain slider to adjust the input level.
Now you’re ready to begin recording your voiceover. The next part of this tip tells you how.

With your microphone connected and your input channel and level set (as described in Part 1 above):

![]() Set In and Out marks to select the portion of your sequence that you’ll be recording voiceover for.
Set In and Out marks to select the portion of your sequence that you’ll be recording voiceover for.
![]() Open the Audio Punch-In Tool by selecting Tools>Audio Punch-In.
Open the Audio Punch-In Tool by selecting Tools>Audio Punch-In.
![]() In the Audio Punch-In Tool, select the input channel for your microphone by clicking on its Input Channel button so it turns purple.
In the Audio Punch-In Tool, select the input channel for your microphone by clicking on its Input Channel button so it turns purple.
- If your mic is attached to the left channel, select CH1.
- If it’s attached to the right channel, select CH2.
- If it’s a stereo mic, select both channels.
![]() Assign the Timeline track(s) your voiceover will be recorded to by using the pulldown menus to the right of each Input Channel button.
Assign the Timeline track(s) your voiceover will be recorded to by using the pulldown menus to the right of each Input Channel button.
![]() Select a destination drive and bin for your incoming audio clip by using the pulldown menus at the bottom of the Audio Punch-In Tool.
Select a destination drive and bin for your incoming audio clip by using the pulldown menus at the bottom of the Audio Punch-In Tool.
![]() Click the Audio Punch-In Tool’s Record button, and away you go.
Click the Audio Punch-In Tool’s Record button, and away you go.
Avid plays the section of your sequence within the In and Out marks as it records in real-time from your microphone.
It’s a good idea to have a lead-in so your sequence starts playing a few seconds before the audio punch-in takes place. This gives your talent some time to get oriented before recording starts. To specify a lead-in duration, enter it (in seconds) in the Audio Punch-In Tool Preroll field, which is the left-hand box directly above the Handles field. You can use the Postroll field to the right to enter a lead-out duration as well.
Your Virtual Logging Assistant (Part 1)
Most DV camcorders time-stamp your tape whenever the record button is pushed. Xpress Pro’s DV Scene Extraction feature can use this time-stamp information to automatically create subclips and add locators for you. It creates a new subclip and/or locator wherever the record button was pushed, so in many instances it can save you from having to manually log and capture each clip.
![]() In the Project window, click on the Settings tab.
In the Project window, click on the Settings tab.
![]() Scroll down to Capture and double-click it. The Capture Settings dialog appears.
Scroll down to Capture and double-click it. The Capture Settings dialog appears.
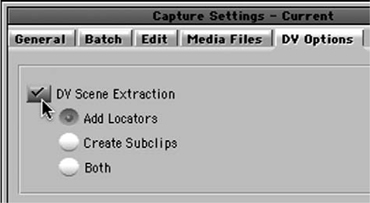
![]() Click on the DV Options tab.
Click on the DV Options tab.
![]() Click on the box next to DV Scene Extraction so a checkmark appears.
Click on the box next to DV Scene Extraction so a checkmark appears.
![]() Click to select Add Locators, Create Subclips, or Both, and click OK.
Click to select Add Locators, Create Subclips, or Both, and click OK.
You’ll get maximum efficiency by capturing entire tapes (or large sections thereof) in a single pass. Your resulting subclips will appear in the same bin that you capture your master clip to.
Your Virtual Logging Assistant (Part 2)
If your footage is already captured, don’t despair. You can also use DV Scene Extraction on clips already captured to a bin.

![]() Select your clip in its bin.
Select your clip in its bin.
![]() Select Bin>DV Scene Extraction. The DV Scene Extraction dialog appears.
Select Bin>DV Scene Extraction. The DV Scene Extraction dialog appears.
![]() Click to select Add Locators, Create Subclips, or Both.
Click to select Add Locators, Create Subclips, or Both.
![]() If you have Create Subclips or Both selected, select the target bin for your subclips in the “Create subclips in” pulldown menu and click OK.
If you have Create Subclips or Both selected, select the target bin for your subclips in the “Create subclips in” pulldown menu and click OK.
Locators (if selected) are added to your master clip, and subclips (if selected) are placed in your specified bin.
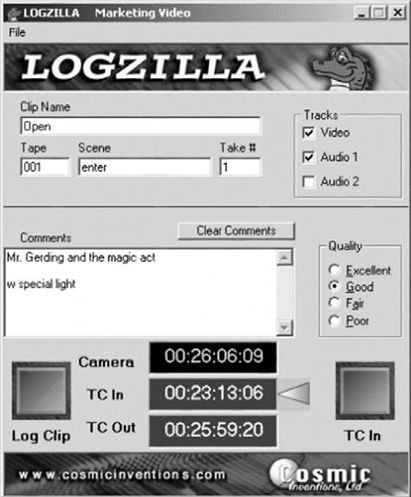
If called on to attend a shoot in the field (or if you’re the one doing the shooting), get a head start on editing by logging the tapes on the set. If it’s not feasible to do it at the shoot, take advantage of any time you might have while sitting in your hotel room, on the plane ride home, or waiting for the plane ride home. We bring a laptop with Xpress Pro loaded on it to every shoot, along with a small, cheap DV camcorder and log our tapes that way. You can also log with any ALE-compliant logging software, such as Avid Medialog (www.avid.com), Logzilla (www.logzilla.com), or DV Log (www.imagineproducts.com).
Spreadsheet software, such as Microsoft Excel, can also work in a pinch. You can use it to manually type in clip names, start and end timecodes, and any other info you wish. Just make sure the columns in the spreadsheet are ALE compliant. Not sure how? Export an ALE file from Xpress Pro and open it in your spreadsheet to see how it looks:
![]() In Xpress Pro, highlight any bin which contains master clips, and select File>Export.
In Xpress Pro, highlight any bin which contains master clips, and select File>Export.
![]() In the Export Bin As dialog, set a name and destination for your ALE file and click OK.
In the Export Bin As dialog, set a name and destination for your ALE file and click OK.
![]() Launch your spreadsheet application and select File>Open.
Launch your spreadsheet application and select File>Open.
![]() Navigate to your ALE file and open it. Pay attention to any dialogs that ask how you want the file opened, and make sure to select “tab delimited” or “delimited.”
Navigate to your ALE file and open it. Pay attention to any dialogs that ask how you want the file opened, and make sure to select “tab delimited” or “delimited.”
Once you see how the file is formatted, delete the data from each column and save the spreadsheet as a template.

When you click the Mark Out or Mark Out & Log button in the Capture tool, your camcorder/deck continues playing your tape. It’s often necessary to enter a clip name and comments after setting an Out mark. While you’re doing this the tape keeps on playing, and you usually need to rewind to set the In mark on the next clip. On a tape with lots of short clips, this could amount to a whole lot of rewinding, which wears down both tape and deck. Tell Xpress Pro to pause your deck when you set your Out Mark and avoid all that rewinding:

![]() In the Project window, click on the Settings tab.
In the Project window, click on the Settings tab.
![]() Scroll down to Capture and double-click it. The Capture Settings dialog appears.
Scroll down to Capture and double-click it. The Capture Settings dialog appears.
![]() Click in the box next to Pause deck while logging so a checkmark appears, and click OK.
Click in the box next to Pause deck while logging so a checkmark appears, and click OK.
Next time you log using the Capture tool, you’ll notice that the Mark Out & Log button has been replaced with a Mark Out button.
Don’t Fill ‘Er Up
Just like it’s a bad idea to top off the tank on your car, it’s a bad idea to fill your drives completely. We recommend keeping at least 5-10 percent of the drive empty. Failure to do so could negatively affect the performance of the drive and even lead to data loss. Xpress Pro can keep you from topping off your drives by automatically switching to another drive when the drive you’re capturing to is nearing its limit.

![]() In the Project window, click on the Settings tab.
In the Project window, click on the Settings tab.
![]() Scroll down to Capture and double-click it. The Capture Settings dialog appears.
Scroll down to Capture and double-click it. The Capture Settings dialog appears.
![]() Click on the Media Files tab.
Click on the Media Files tab.
![]() Click in the box next to “Switch to emptiest drive when:” so a checkmark appears.
Click in the box next to “Switch to emptiest drive when:” so a checkmark appears.
![]() From the pulldown menu, select “10 minutes left.”
From the pulldown menu, select “10 minutes left.”
Ten minutes is really too little, but it’s the highest value Xpress Pro allows. It’s better to keep an eye on your drives yourself, but at least now you won’t go too far into the danger zone when your attention is focused elsewhere.