C H A P T E R
Picture Perfect
Color correction is not just correcting colors. If that’s all it was, it would still be one impressive tool! But, color correction offers you the power to grab your audience from the very first frame and hold them riveted on your story until the last frame.

Color correction can drive the emotions of your story. They can actually help you tell your story and it can help keep your audience in your story. Often, color correction is discussed as some black art that the uninitiated had best not attempt, but this chapter will reveal the secrets and shed light on a powerful tool that can deliver much more than you ever expected. Plus the interface is really cool, and pushing pixels around can be just plain fun.
The “S” Curve Instant Makeover!
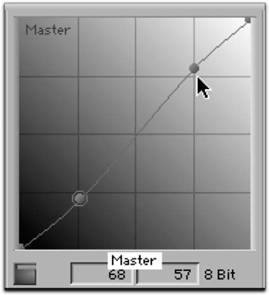
One of the fastest ways to make almost any picture look better is to add a very mild S curve in the Master Curve in color correction mode. This simulates the gamma curve of film. It slightly darkens the deep blacks and makes the highlights sparkle.
![]() Choose Toolset>Color Correction to go to the Color Correction Toolset. Click on the Curves tab with a typical video image in the current monitor.
Choose Toolset>Color Correction to go to the Color Correction Toolset. Click on the Curves tab with a typical video image in the current monitor.
![]() Click about a quarter of the way up from the bottom of the diagonal line and drag the point slightly downward.
Click about a quarter of the way up from the bottom of the diagonal line and drag the point slightly downward.
![]() Click about a quarter of the way down from the top of the diagonal line and drag the point slightly upward.
Click about a quarter of the way down from the top of the diagonal line and drag the point slightly upward.
![]() If it looks better, you’re done. If not, then experiment a bit or undo by Alt+clicking (Option+clicking) on the small button under the left corner of the master tab. This resets it to the factory defaults. You can also toggle back and forth between seeing your correction and seeing the unaffected video by clicking on this button.
If it looks better, you’re done. If not, then experiment a bit or undo by Alt+clicking (Option+clicking) on the small button under the left corner of the master tab. This resets it to the factory defaults. You can also toggle back and forth between seeing your correction and seeing the unaffected video by clicking on this button.
You can match an on-screen video color to your computer’s color picker, for example matching a logo in a shot to a Pantone color. You should note that there are three different color correction tabs where this match can be made and they will all give you slightly different results based on your video image. Try your match in each tab.
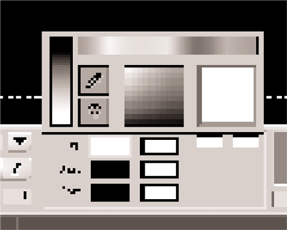
![]() In the Color Correction Toolset, in either the HSL Controls or Hue Offsets tab or in the Curves tab, there are two color swatches to the far right of the tab. If you hover your mouse over this button for a few seconds it will call up an identifier that says, “Select a Color to be Changed in the Current Monitor.” Click on this color swatch and drag up to the spot on your current monitor that you want to match.
In the Color Correction Toolset, in either the HSL Controls or Hue Offsets tab or in the Curves tab, there are two color swatches to the far right of the tab. If you hover your mouse over this button for a few seconds it will call up an identifier that says, “Select a Color to be Changed in the Current Monitor.” Click on this color swatch and drag up to the spot on your current monitor that you want to match.
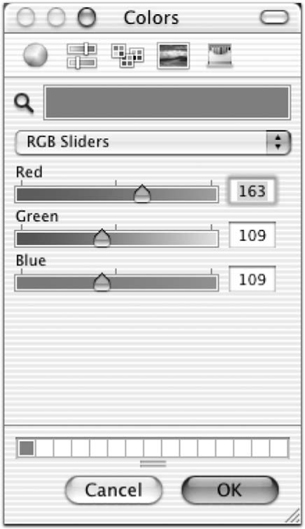
![]() Now, double-click on the color swatch to the right. This calls up the color picker. The color pickers on PCs and Macs look quite different but basically do the same thing. Type in either the HSL numbers, the RGB numbers, or even the CMYK numbers that you want to match and click OK.
Now, double-click on the color swatch to the right. This calls up the color picker. The color pickers on PCs and Macs look quite different but basically do the same thing. Type in either the HSL numbers, the RGB numbers, or even the CMYK numbers that you want to match and click OK.
All of these color spaces—YUV, RGB, CMYK—map colors a little differently, so the color may be shifted slightly and some colors that exist in one color space do not exist in the others.
If you have created the perfect color correction and want to apply it to other shots, Color Buckets are the answer. Color Buckets are the four buttons in the bottom-right corner of all of the Color Correction tabs.

![]() To save a finished color correction to a color bucket, Alt-click (Opt-click) on the empty button above C1. This saves the correction to that button.
To save a finished color correction to a color bucket, Alt-click (Opt-click) on the empty button above C1. This saves the correction to that button.
![]() Now, to apply the correction to another shot, make sure the shot is in the current monitor (typically the center one) and click on the C1 button (not the little diagonal color bars button above it).
Now, to apply the correction to another shot, make sure the shot is in the current monitor (typically the center one) and click on the C1 button (not the little diagonal color bars button above it).
Second Sight
While Avid Xpress Pro does not appear to include any secondary color correction tools, you can fake it by using the RGBKeyer.

![]() Edit the same clip on top of itself in V1 and V2.
Edit the same clip on top of itself in V1 and V2.
![]() On the V2 clip, apply an RGBKeyer from the Key category.
On the V2 clip, apply an RGBKeyer from the Key category.
![]() For your key color, select the color you want to isolate, and adjust the Gain, Soft, Blur, and Erode parameters appropriately. Hint: Toggle the Show Alpha button to get a better sense of your selection.
For your key color, select the color you want to isolate, and adjust the Gain, Soft, Blur, and Erode parameters appropriately. Hint: Toggle the Show Alpha button to get a better sense of your selection.
![]() Enable the Color Correction controls to adjust the areas outside of your selection. Alternatively, click the Reverse button to adjust only the selection.
Enable the Color Correction controls to adjust the areas outside of your selection. Alternatively, click the Reverse button to adjust only the selection.
Mapping Buckets to Your Keyboard
The fastest way to apply the corrections that are saved in your Color Buckets is if you map them to your keyboard.
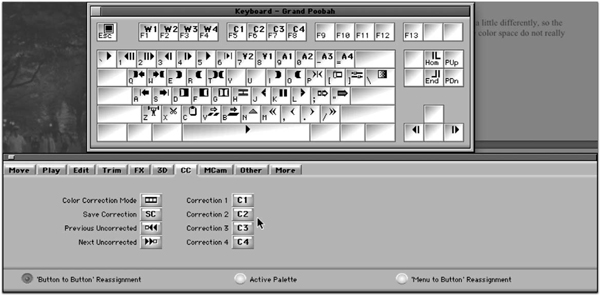
![]() In the Settings tab of your Project window double-click on the Keyboard setting. This calls up a representation of your keyboard.
In the Settings tab of your Project window double-click on the Keyboard setting. This calls up a representation of your keyboard.
![]() Call up the Command Palette from Tools>Command Palette or by using Ctrl+3 (Cmd+3).
Call up the Command Palette from Tools>Command Palette or by using Ctrl+3 (Cmd+3).
![]() With the “Button to Button Reassignment” button active (at the bottom left of the Command Palette) go to the CC tab of the Command Palette and drag all four color bucket buttons (the ones labeled C1-C4) to keys on your keyboard.
With the “Button to Button Reassignment” button active (at the bottom left of the Command Palette) go to the CC tab of the Command Palette and drag all four color bucket buttons (the ones labeled C1-C4) to keys on your keyboard.
![]() Close the Keyboard setting window and the Command Palette. Now when you are in Color Correction mode, you will be able to apply whatever corrections are saved to those buckets by pressing the corresponding keys that you just mapped.
Close the Keyboard setting window and the Command Palette. Now when you are in Color Correction mode, you will be able to apply whatever corrections are saved to those buckets by pressing the corresponding keys that you just mapped.
You may want to show your client several different color correction options for a single shot. Or you may just want to experiment a little and compare several different correction approaches yourself. It’s easiest to judge these corrections by looking at them in fairly quick succession. Color buckets is a great way to run these comparisons. When you are satisfied with each of your color correction experiments, save them to the color buckets (as explained in Saving and Applying Color Buckets) and then toggle through your choices (possibly using the tip in Mapping Buckets to your Keyboard) to see which one is best.

Saving Corrections to a Bin
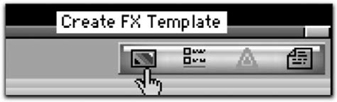
If you run out of buckets, you can save corrections by dragging them to your bins where they will be saved just like a clip. You can either drag corrections from your buckets or, in the upper-right corner of the color correction tool, there is a small color correction effect button. In either instance, you drag the rectangular button with the diagonal color bars directly to a bin. When it’s in the bin, you can name it something descriptive to help you remember where to apply it. This could be a simple description of what you did to it, like “lowered gamma,” or a description of the shot it’s designed for, like “Jones’ interview in office.”
Checking Your Color Correction Work
All of the tabs and parameters of the Color Correction tool interact with each other. In order to see if the corrections you are making in your current tab or parameter are helping or hurting, you can toggle off the effect that just that parameter is producing without undoing the rest of the color correction work in the other parameters. To the left of each parameter or under each Hue Offset wheel or Curve are small, square buttons; toggling these off removes that parameter from the color correction mix. Each tab and subtab of the Color Correction tool also has one of these buttons so you can toggle off all the parameters in a given tab.

Clients Want the Strangest Things
So you’re doing a correction and the client says “That’s the color I want! I want the color of the grass to be the same color as the audio track in your Timeline! It’s perfect!” Once you’ve put aside thoughts of murder, try this:

![]() In the Settings tab of your Project window, double-click the Correction setting.
In the Settings tab of your Project window, double-click the Correction setting.
![]() In the Correction Setting window, enable the “Eyedropper picks from anywhere in the application” button and click OK.
In the Correction Setting window, enable the “Eyedropper picks from anywhere in the application” button and click OK.
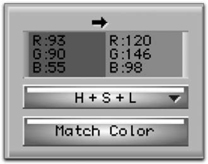
![]() Back in the Correction Tool, click on the left color swatch and drag to the grass in the current monitor and release. Then click on the right color swatch and drag down to the green audio tracks in your Timeline and release.
Back in the Correction Tool, click on the left color swatch and drag to the grass in the current monitor and release. Then click on the right color swatch and drag down to the green audio tracks in your Timeline and release.
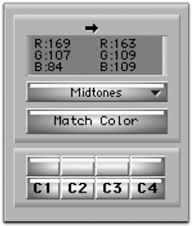
![]() Now click on the Match Color button under the color swatches. These color matches can work quite differently depending on the options selected in the matching menu above the Match Color button.
Now click on the Match Color button under the color swatches. These color matches can work quite differently depending on the options selected in the matching menu above the Match Color button.
This tip can even let you sample a color from media in another application. For example, a photograph or graphic in Photoshop can be sampled with this method.
Sometimes, due to the amount of noise in video and the size of the monitor from which you are eyedroppering, the single pixel that the eyedropper analyzes is not truly representative of the color around it. Instead it is often better to display the average of a 3x3 grid of pixels instead of a single pixel. Here’s how:

![]() In the Settings tab of your Project window double click on the Correction setting.
In the Settings tab of your Project window double click on the Correction setting.
![]() In the Correction Setting window, enable the “Eyedropper 3 3 averaging” button and click OK.
In the Correction Setting window, enable the “Eyedropper 3 3 averaging” button and click OK.
![]() Now you’ll be looking at a representative average using your eyedropper.
Now you’ll be looking at a representative average using your eyedropper.
Zoom I Zoom Do
If you want to gain even more control with your eyedropper when trying to pick colors, there are two great tips. One is that you can zoom in to your color correction monitors by clicking on them, then using Ctrl+L (Cmd+L) to zoom in, and Ctrl+K (Cmd+K) zoom back out.

On the Mac, you can also double-click on a color swatch and use the Magnifying Glass in the color picker to pick the right pixel. Just click on the magnifying glass icon in the picker and move it over your image, and click. Then, when you’re done, choose Enter (OK).
The Color Picker can be used to share colors that you pick in color correction mode when you’re in the Title Tool or other effects modes, or even outside of Xpress Pro and DV.

![]() In the Color Correction Tool, click on a color swatch in the Color Match Control area and pick a color from any monitor. (You can also pick colors directly with the Color Picker using the Magnifying Glass icon on a Mac.)
In the Color Correction Tool, click on a color swatch in the Color Match Control area and pick a color from any monitor. (You can also pick colors directly with the Color Picker using the Magnifying Glass icon on a Mac.)
![]() Open the color picker by double-clicking on the color swatch.
Open the color picker by double-clicking on the color swatch.
![]() In the color picker, click on the large color swatch at the top and drag it to a palette button at the bottom of the color picker, then click OK.
In the color picker, click on the large color swatch at the top and drag it to a palette button at the bottom of the color picker, then click OK.
![]() In the Title Tool, if you click and hold on a color swatch you get the Title Tool’s color picker. Drag to the small bulls-eye icon to call up the main color picker and choose a color from the palette by clicking on it.
In the Title Tool, if you click and hold on a color swatch you get the Title Tool’s color picker. Drag to the small bulls-eye icon to call up the main color picker and choose a color from the palette by clicking on it.
Even cooler, you can use these same colors in the Effect Editor.
![]() Add an effect, like an Edge Wipe, to a clip in your Timeline.
Add an effect, like an Edge Wipe, to a clip in your Timeline.
![]() Go into Effect mode and click on the small “options” button next to the color swatch button for the Border color. This calls up the color picker.
Go into Effect mode and click on the small “options” button next to the color swatch button for the Border color. This calls up the color picker.
![]() Pick your color from the palette at the bottom and click “OK” to assign that color to the border.
Pick your color from the palette at the bottom and click “OK” to assign that color to the border.

The color picker can be used to share colors that you pick in Color Correction mode when you’re in the Title Tool or other effects modes, or even outside of Xpress Pro.

![]() In the Color Correction Toolset, click on a color swatch in the Color Match Control area and pick a color from any monitor.
In the Color Correction Toolset, click on a color swatch in the Color Match Control area and pick a color from any monitor.
![]() Open the color picker by double clicking on the color swatch.
Open the color picker by double clicking on the color swatch.
![]() In the color picker, you can save the color you picked, which is in the Color|Solid swatch, by clicking the Add To Custom Colors button, then click OK. This adds the color to the Custom Color palette.
In the color picker, you can save the color you picked, which is in the Color|Solid swatch, by clicking the Add To Custom Colors button, then click OK. This adds the color to the Custom Color palette.
![]() In the Title Tool, if you click and hold on a color swatch you get the Title Tool’s Color Picker. Drag to the small bulls-eye icon to call up the main color picker and choose a color from the palette by clicking on it.
In the Title Tool, if you click and hold on a color swatch you get the Title Tool’s Color Picker. Drag to the small bulls-eye icon to call up the main color picker and choose a color from the palette by clicking on it.

Even cooler, you can use these same colors in the Effect Editor.
![]() Add an effect, like an Edge Wipe, to a clip in your Timeline.
Add an effect, like an Edge Wipe, to a clip in your Timeline.
![]() Go into Effect mode and click on the small “options” button next to the color swatch button for the Border color. This calls up the color picker.
Go into Effect mode and click on the small “options” button next to the color swatch button for the Border color. This calls up the color picker.
![]() Pick your color from the palette at the bottom and click OK to assign that color to the border.
Pick your color from the palette at the bottom and click OK to assign that color to the border.
You really need scopes to do color correction. To call up the software scopes built into the Avid technology:
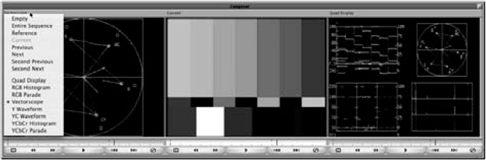
![]() In the Color Correction tool, in the Monitors window, at the top, each Monitor name (usually labeled Previous, Current and Next) is actually a pulldown menu called the Source Monitor Menu.
In the Color Correction tool, in the Monitors window, at the top, each Monitor name (usually labeled Previous, Current and Next) is actually a pulldown menu called the Source Monitor Menu.
![]() Click on the name of one of these monitors to reveal the menu and pick a scope from the list. Quad display shows four of the most popular tools for video analysis in a single monitor.
Click on the name of one of these monitors to reveal the menu and pick a scope from the list. Quad display shows four of the most popular tools for video analysis in a single monitor.
![]() Usually, the Y waveform is good for determining proper luminance and the vectorscope can help with saturation and hue issues. Most serious colorists dismiss the effectiveness of some of the other tools presented here, with the exception of the RGB waveform, which can help with color casts and many other issues.
Usually, the Y waveform is good for determining proper luminance and the vectorscope can help with saturation and hue issues. Most serious colorists dismiss the effectiveness of some of the other tools presented here, with the exception of the RGB waveform, which can help with color casts and many other issues.
Good vs. Evil
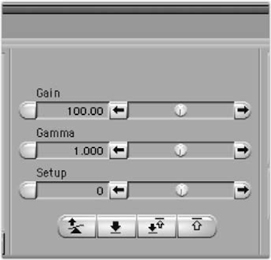
There are good ways to affect the brightness and contrast of an image and there are bad ways. As you look through the parameters of your Color Correction Toolset, you may wonder what the difference is between brightness and gain. Our opinion is that one of these is good and one is evil. In color correction, control is the most important thing. Yet when you use the brightness slider, it raises the entire video signal equally, from blacks through highlights. Gain, however, mostly operates on the highlights and leaves the black level alone, for the most part. That makes gain good and brightness bad.
Similarly, contrast does not give you individual control over the blacks and highlights. If you increase contrast, it raises the highlights by the same amount that it lowers setup, or black. The best way to increase contrast is to lower setup and raise gain individually.
When you have eyedroppered a color using the color swatches in the Color Correction Toolset’s Color Match Controls, you can save those colors to a Bin. Once they are saved to a bin, you can recall them from the bin and use that color to match another color.

![]() Eyedropper a color using the Color Match Controls in the Color Correction Toolset.
Eyedropper a color using the Color Match Controls in the Color Correction Toolset.
![]() Alt+drag the color swatch (Opt+drag) into a bin.
Alt+drag the color swatch (Opt+drag) into a bin.
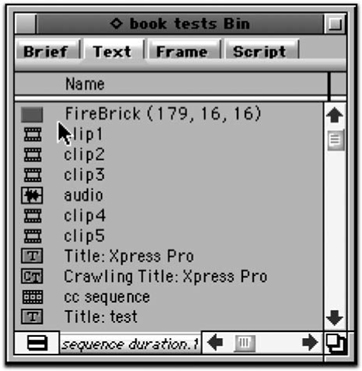
![]() The color swatch appears in the bin, much like a regular clip. If you are using the standard Correction setting defaults, the color has a cute name, like “Firebrick Red” and its associated RGB color. (We sampled this from color bars.) You can also provide a descriptive name for the color in the bin.
The color swatch appears in the bin, much like a regular clip. If you are using the standard Correction setting defaults, the color has a cute name, like “Firebrick Red” and its associated RGB color. (We sampled this from color bars.) You can also provide a descriptive name for the color in the bin.
![]() To use this color to match to another color, drag the color back to the right-hand swatch (the output swatch) then use the input color swatch to pick the color from the current monitor that you want to match.
To use this color to match to another color, drag the color back to the right-hand swatch (the output swatch) then use the input color swatch to pick the color from the current monitor that you want to match.
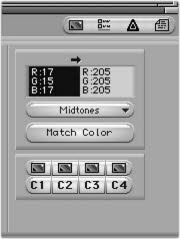
![]() Click Match. The Color Match controls provide results that vary depending on which tab you are in (Controls, Hue Offset or Curves). The results also depend on the options you choose from the Color Match Type menu, which is the small pulldown above the Match Color button.
Click Match. The Color Match controls provide results that vary depending on which tab you are in (Controls, Hue Offset or Curves). The results also depend on the options you choose from the Color Match Type menu, which is the small pulldown above the Match Color button.
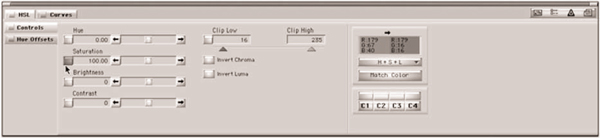
Sometimes, when attempting a color correction that is more of an effect, like a sepia tone, it is very difficult to achieve the look you want because the actual colors from the original video pollute the color that you are trying to create. To avoid this, lower the chroma of your image using the Saturation slider in the Controls tab of the Color Correction Toolset. Sometimes, leaving a little of the original color is nice, and with other images you will want to reduce the Saturation to zero. It will take some experience to know whether you should lower the chroma before or after you attempt to do the correction. The stronger you want the color to be affected, the greater the chance that you will want to do this before you start the correction.
By the Numbers
If you are trying to determine the color casts in the various tonal ranges of your image (shadows, midtones, highlights) you can use the color swatches in the Color Match Controls of the Color Correction Toolset.
- If you sample a color that you believe should be pure white, or pure black, or even a pure shade of gray, then the RGB numbers in the color swatch should all be close to identical.
- If a single color channel dominates the other two, then the color cast is toward that color.
- If one color is lower than the other two, it’s a little more complicated: If red is lower than green and blue, then there is a cyan cast. If green is lower than red and blue, then there is a magenta cast, and if blue is lower than red and green, then there is a yellow cast.
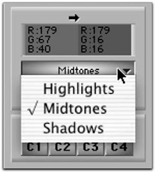
The Hue Offset wheels are excellent for fixing color casts. Each wheel represents a different tonal range—shadows, midtones, highlights. If you detect a color cast in one of these tonal ranges it is very simple to eliminate this color cast with the Hue Offset wheels. Whichever direction the color cast goes in one of the tonal ranges, drag the center cursor on the wheel for that range away from the color of the cast. So if you detect a blue cast in the midtones, drag the center of the Midtone wheel away from blue, towards yellow.
If you are unsure of the exact color cast, you can use the eyedroppers below each wheel to sample the color and eliminate the cast automatically.
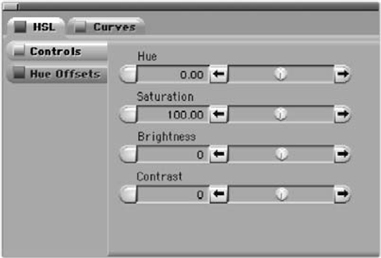
![]() Open the Color Correction Toolset and the HSL tab and the Hue Offsets subtab.
Open the Color Correction Toolset and the HSL tab and the Hue Offsets subtab.
![]() Select the problem shot in the Timeline so that it is in the current monitor.
Select the problem shot in the Timeline so that it is in the current monitor.
![]() Find an area of the shot that you believe is pure white. Click on the eyedropper under the Highlight Hue Offset wheel (the one on the right), then click on the spot that should be white. The color cast is removed.
Find an area of the shot that you believe is pure white. Click on the eyedropper under the Highlight Hue Offset wheel (the one on the right), then click on the spot that should be white. The color cast is removed.
Color casts in the midranges and shadows can be removed by using the eyedropper under the appropriate Hue Offset wheels. If you don’t like the affect it has on the color, you can Alt-click (Opt-click) on the button under the wheel to the left of the eyedropper.

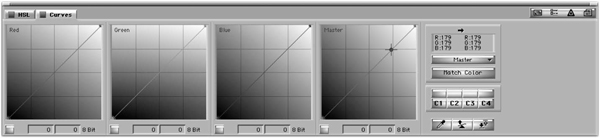
Curves is a way to make very fine tonal range adjustments to the RGB levels—and the master level.
The master curve determines levels in a similar way to adjusting the setup, gamma and gain levels, but instead of only having those three tonal ranges to adjust, you can select up to 16 different points on the curve to adjust. This is very helpful if you want to leave the very darkest blacks where they are but move the pretty dark blacks up a bit. You do not have that kind of fine control over specific tonal ranges with sliders.
The R, G, and B curves allow you that same fine level of tonal range control in each of the color channels. The color schemes in each Curves graph represent the color cast that occurs if you drag the curve toward that color. In other words, if you drag the blue curve downward or forward, the cast in that tonal range will become yellow.
To make a correction using Curves, click on a point in the curve. Highlights are represented by the top-right corner of the curve, and shadows are represented by the bottom-left corner. Pick the tonal range you want to affect on the color channel you want to affect, and drag it up or down or forward or back.
You can do spot color correction—a color correction where the correction is limited to some geographic area of the image—using any matte key and the standard color correction tools. You can create these mattes in Photoshop if you want, or if you’re not a big Photoshop geek, you can make them in the Title tool.

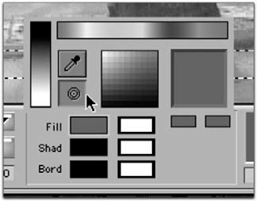
![]() Create a circle by dragging the circle tool from one corner of the screen to the other and add a slight shadow to it. Change the fill opacity to 0 and the shadow to white, so you can see it, then soften the shadow to 39.
Create a circle by dragging the circle tool from one corner of the screen to the other and add a slight shadow to it. Change the fill opacity to 0 and the shadow to white, so you can see it, then soften the shadow to 39.
![]() From the File menu, Export the title. This will create a TIFF file with a soft, circular alpha channel.
From the File menu, Export the title. This will create a TIFF file with a soft, circular alpha channel.
![]() Import that file into a bin.
Import that file into a bin.
![]() Cut the imported matte onto v2 over the section of the sequence where you want your spot color correction.
Cut the imported matte onto v2 over the section of the sequence where you want your spot color correction.
![]() Use Mark Clip to mark the matte clip’s in and out, but select v1 and copy that exact section of video by using Ctrl+C (Cmd+C).
Use Mark Clip to mark the matte clip’s in and out, but select v1 and copy that exact section of video by using Ctrl+C (Cmd+C).
![]() Step into your matte key using the Step In button and cut the copied video onto the fill track (should be v2) of the matte.
Step into your matte key using the Step In button and cut the copied video onto the fill track (should be v2) of the matte.
![]() Now if you want the correction to be inside the circle, go into color correction mode on the footage inside the matte. If you want the outside of the circle to have the correction, then go into color correction mode on v1. Or correct both tracks.
Now if you want the correction to be inside the circle, go into color correction mode on the footage inside the matte. If you want the outside of the circle to have the correction, then go into color correction mode on v1. Or correct both tracks.
