
Before we start going deeper into this section, you need to know this: you are already an inventor, so you have the power to build all the sensors you want in the world! However, as Spidey's uncle Ben said, with great power comes great responsibility; as an inventor you always follow a process or an approach to solving problems. Remember the notebook you maintain, that's the one!
Write down the following three questions in your notebook:
- Why?
- What?
- How?
Every time you see a problem, ask yourself these questions:
- Why am I doing this?-Find out the answer to this by constantly observing and identifying the problem statements around you. Asking WHY helps you define the problem statement and gives you the reason to stick to the problem statement even when you are in self-doubt. For example, my observation is that the temperature in my city is increasing. Why is it increasing?-It is increasing because of pollution.
- What are you going to do about the problem you found out by asking WHY? In my case, I think by planting a tree and monitoring its health, I could make a very small but significant impact on the environment.
- How are you going to do WHAT you just decided to do? I am going to make a simple moisture indicator to make sure I have optimum amount of water in the pot.
Once you have answered the preceding three important questions, you can start being creative and ideate your HOW. Mind you, answering these questions is not easy; sometimes it takes days or weeks or even months to identify these questions; so don't worry if it's taking you time. Remember, slow and steady wins the race. It is very important to be consistent.
The next important part of this process is feedback. Always ask for feedback from your peers, parents, teachers, and the people who are affected by the problem statement. Everyone has something important to add.
Everyone. in fact. knows about something that you don't, so there is always a huge opportunity to learn from them.
I take constant feedback from my peers and colleagues. While writing the book, I am taking constant feedback from the editor and my co-author to make this book better.
The final and the most important part of this process of inventing is to be iterative. Fake it till you make it! Take small steps, correct them, and move on. With every step, you make your solution better, stronger, and long-lasting.
So now that we know what the process of becoming a successful inventor is, let's dive right into it.
Aim: To build a soil moisture-level indicator
Requirement: A pot, a plant, two pieces of wire, scissors, scale, two nails, Arduino Uno, breadboard, resistor (10KΩ), jumpers, and so on.
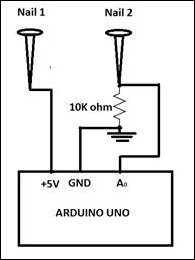
Circuit diagram: The circuit diagram is shown here:
Procedure: The procedure to build a soil moisture-level indicator is as follows:
- Take a pot and plant a plant in it.
- Make moisture sensors in the following way:
- Cut two pieces of wire, each around two inches long, and strip off about half inch on one side of each of the wires. I would recommend you to do this with the help of an adult.
- Wrap each of the wires around two nails.
Note
The physics behind this sensor is simple. There is an existing resistance between the two nails when they are inserted in the soil. As the moisture in the soil increases, the resistance decreases. Water conducts the charge, the more the water, the more the conductivity and hence resistance to movement of charge decreases.
We should also note that we are not performing any calculation in the sensor, hence there is no block two in this sensor. Now we come to block three.
- Connect the sensors to Arduino.
- We make a connection between the ground of the Arduino and the (-) column of the breadboard using a wire.
- We now connect a wire between the +5V of the Arduino and the (+) column of the breadboard.
- We connect one sensor to the positive column of the breadboard.
- We then connect the other sensor to a new row on the breadboard.
- We connect a 10K Ohm (10 kilo Ohm) resistor to the same row as the moisture sensor and to another new row. This is to restrict the flow of excessive current.
- Connect a wire from Analog input 0 of your Arduino to the same row as the sensor and the resistor; this will enable us to read input values from pin number A0.
- Connect the other end of the resistor (in the new row) to the ground. Please refer to the following diagram for a better understanding of the circuit.
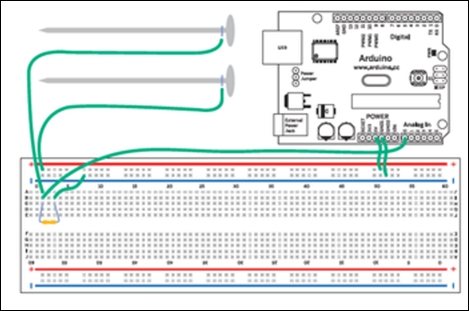
Connection diagram:
Now, before we start writing the code, since we are inventors here, here is another rule we should always remember: never reinvent the wheel. If you can find a piece of technology or a code about something you are trying to work on, just build on top of that. Here, I am going to introduce one of the best ways to use the example code. You already know how to navigate to them, right? If you need a refresher, go back to Chapter 2, Systems and Logic.
Here is what we know:
- The sensor we have built will give us some kind of variable resistor values.
This means we have to read the values from the Analog pins.
- Examples from your Arduino software have the sample code of Analog Input.
This means if we open this example, we will be able to directly upload the code to the Arduino and just start reading the values being sent by the sensor.
Always remember that when you start with a project and you don't know how to exactly go about it, break the problem statement down into pieces and start solving for each of the pieces. Hereon, look at an example that you think is the closest to what you are trying to solve.
Next you will see the code that is inspired from the Analog Input example. I made a few changes to make it look much simpler:
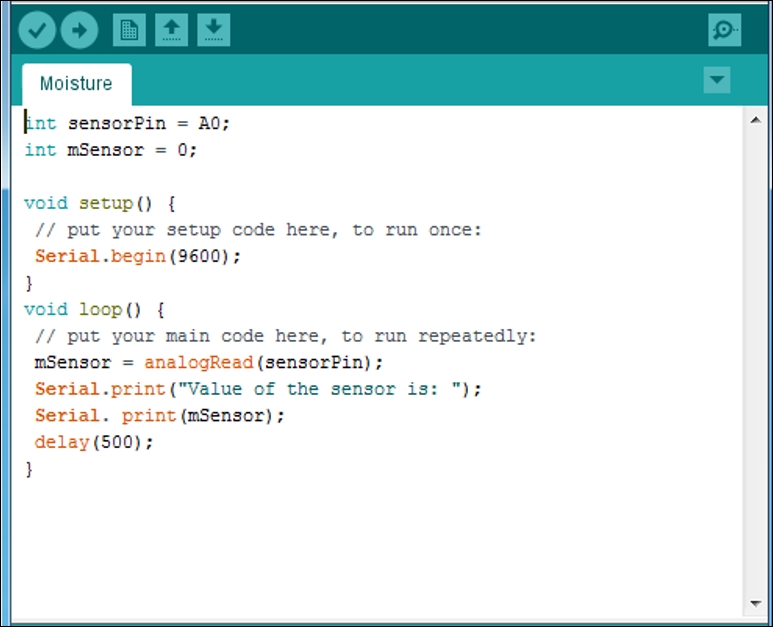
Code:
int sensorPin = A0;
int mSensor = 0;

void setup() {
 // put your setup code here, to run once:
 Serial.begin(9600);
}
void loop() {
 // put your main code here, to run repeatedly:
 mSensor = analogRead(sensorPin);
 Serial.print("Value of the sensor is: ");
 Serial.print(mSensor);
 delay(500);
}
The preceding code is going to continuously read values from the sensor and print it on the serial monitor every half second. Serial monitor is part of the Arduino Software is used for all communications between Arduino boards and computer and other devices.
We will learn about how to start writing our own programs in the coming chapters.