
Lesson 8. Using Audio
Lesson Files
Motion5_Book_Files > Lessons > Lesson_08
Media
Motion5_Book_Files > Media > Rockumentary
Time
This lesson takes approximately 45 minutes to complete.
Goals
Work with audio in the Audio list and Audio Timeline
Automate audio levels using behaviors
Create and edit markers
Assemble a project from saved Motion groups
Edit to the beat of an audio track
Sync animation to audio with the Audio parameter behavior
Audio doesn’t get the respect it deserves. Good-quality audio, used creatively, can turn a motion graphics spot from decent to spectacular. On the other hand, low-quality audio—or audio that’s poorly selected, edited, or mixed—can kill a good animation.
With more and more media being watched on portable devices and heard through tiny speakers, making your audio memorable is more important than ever.
In Motion, you have a host of tools for importing, adjusting, and automating your audio—and for tightly integrating it with your motion graphics.
In this lesson, you will assemble the final Rockumentary title project and use a music track to time edits and create animation. You will explore the Motion audio interface, use markers to identify edit points, and apply behaviors that change audio levels over time. You’ll finish by working with the powerful Audio parameter behavior.
Importing Audio
You can import audio into Motion just as you would import a video clip or image.
1. Navigate to Motion5_Book_Files > Lessons > Lesson_08, and open Rockumentary Audio Start. Choose File > Save As, and save the project to the Lesson_08 > Student_Saves folder.
2. In the Layers list, select the Background group, and then Option-click its disclosure triangle to open the group and all the elements inside it.
Holding down the Option key while opening or closing a group in the Layers list or the Timeline will open or close not just that group, but all the groups and/or layers it contains.
This group contains the Rockumentary project background image with the Colorize filter and a Fade In/Fade Out behavior applied. Because you selected it, you can see in the mini-Timeline that it lasts for the full project. If you play the project, you’ll see the now-familiar gradient.
3. Choose Edit > Project Properties, or press Command-J, and if necessary, set the Duration pop-up menu to Timecode.

The project preset, Broadcast HD 720, matches the other Rockumentary projects you created. The duration is 37;14, just long enough for the audio you’ll add momentarily. The Background Color is set to the default black, but the Background setting was changed to Solid to ensure that any transparency in the final project appears with a black background.
4. In the Layers list, close the Background group and make sure that the playhead is at Home. Let’s start building the project by importing the audio track.
5. Press Command-1 to open the File Browser. Then navigate to Motion5_Book_Files > Media > Rockumentary, and select burn.00.aif. The audio file plays, and in the preview area you can see that its duration is 37.5 seconds. You can also see that this is a stereo audio file.

6. In the preview area, click Import to add this audio file to the project. A green bar appears in the mini-Timeline to represent the file duration, and the HUD indicates that an audio track is selected. However, the Layers list is still empty because in the Project pane, audio tracks appear in an Audio list.

7. Click the Audio list to open it, or press Command-6.

In the Audio list, you can view and modify the file, including adjusting the level, pan, and output channels. If you had more than one audio track, you could also modify all the tracks at once using the Master controls at the bottom of the list.
Motion supports 5.1-channel audio with Left, Right, Center, LFE, Left Surround, and Right Surround channels. However, to hear all six channels, you need hardware (and speakers) that support multichannel surround sound.
8. In the transport controls at the bottom of the Canvas, make sure that the Play/Mute audio button is enabled, and play the project to hear the audio. This is the audio from the final Rockumentary QuickTime movie you watched in an earlier lesson.

You can also mute and solo individual tracks in the Audio list. But because you have only one track of audio in this project, you’ll focus on level and panning adjustments.
9. In the Audio list, or the HUD, drag the Level slider as the project plays to change the audio volume. Watch the audio meters in the Master control strip at the bottom of the Audio list to make sure the audio doesn’t trigger the peaking indicators—the red dots—at the top of the meters.

10. Adjust the Pan using either the control in the Audio list or the slider in the HUD. Listen to hear the audio move between the left and right speakers, and then return the Pan value to 0 and stop playback.
You’ll leave the audio panned to the center position for now.
Working in the Audio Timeline
While you can adjust the level and panning of audio tracks in the Audio list, you must use the Audio Timeline and adjust the way the audio changes over time. The Audio Timeline displays a layer for each of a project’s audio tracks and allows you to see waveforms, add markers, and apply audio behaviors to each track. In the Audio Timeline, you will fade up the volume with a behavior and set markers that help you edit to the beat of the music.
1. Choose Window > Audio Timeline, or press Command-9.

The Audio Timeline slides open in the Timing pane, underneath the Timeline, so that you can see both. Changing how audio plays back over time is called automation. You can use two audio behaviors to automate an audio track.
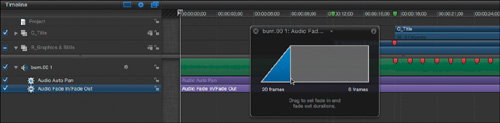
2. If necessary, select the burn.00 layer. In the Toolbar, from the Add Behavior pop-up menu, choose Audio > Audio Fade In/Fade Out. In the HUD, set the Fade Out to 0 frames. Play the project.
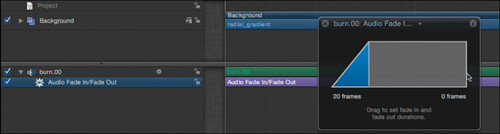
The audio now fades in over the first 20 frames. You can also automate the track panning.
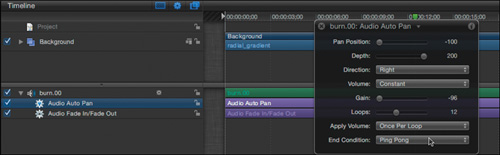
3. Click the Add Behavior pop-up menu, and choose Audio > Audio Auto Pan. While playing the audio, in the HUD change Loops to 12 and End Condition to Ping Pong. The audio now bounces back and forth between the left and right speakers, creating a spacey effect that matches the feel of the music.
You can also use keyframes to automate level and panning changes in the Keyframe Editor. (Choose Window > Keyframe Editor, or press Command-8.) Double-click the level or pan line to add a keyframe and then drag it to the value you want.
In the Audio Timeline, you can also display an image, called a waveform, that you can use to see how the volume of a track changes over time.
4. Move the pointer just below the name of the audio track and when it changes to the resize pointer, drag down to increase the height of the audio bar and reveal the waveform inside it.

5. Move the playhead to the frame where the waveform suddenly gets taller and stays that way for the rest of the project—at about 17:34.

This is the frame where the drums kick in—a great place to bring the final title slam onto the screen. Being able to identify this frame so you could find it more easily when you add graphics to the project would be great.
A marker is visible in the ruler area to the left of the playhead. Markers are a great way to flag and locate individual frames or a range of frames. They’re particularly useful when you want to add a layer, record a keyframe, or synchronize an action across multiple layers at a specific point in time. You can create markers on layers, groups, and in the ruler of the Timeline. Markers in the ruler are called project markers; the others are called object markers.
6. With the playhead at 17:34, press Shift-M to add a project marker at the playhead. Then choose Mark > Markers > Edit Marker, or press Command-Option-M, to open the Edit Marker dialog.
Pressing M alone adds a marker to a selected layer or group. If nothing is selected, pressing M adds a project marker. Pressing Shift-M will always add a project marker—even when a layer or group is selected.
You can also double-click a marker to open the Edit Marker dialog, but you’ll first need to move the playhead away from the marker to be able to double-click it.
7. In the Edit Marker dialog, in the Name field, type C_Title. This is the frame where the main title will start.

8. Feel free to change the color of the marker, and click OK. The marker appears in the Timeline ruler.
9. Move the pointer over either of the markers in the ruler. A pop-up shows the name of the marker.

At this point, you can use object markers to identify other key edit points for the project.
Editing to the Beat
One way to more tightly integrate audio into your project is to time your edits to match audio cues, such as the beats of a music track. Because Motion lets you set markers as the project plays, or “on the fly,” you can quickly identify key audio cues for your edit points.
In the following steps, you will set a play range and add markers to the audio track, tapping out the beats as the music plays. In the next exercise, you’ll add photos and trim each photo layer to a marker.
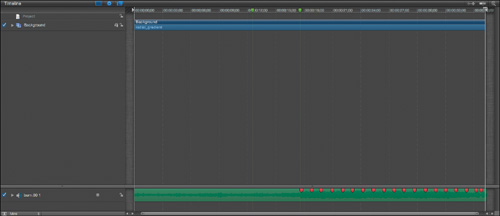
1. With the playhead placed anywhere to the right of the C_Title marker, Control-click in the ruler. From the shortcut menu, choose Previous Marker, and press Command-Option-I to set a play range In point. You will set markers on the audio track in this play range.
2. Now move the playhead to the B_Graphics project marker, and if necessary, select the burn.00 audio layer.
You can press Command-Option-Left Arrow to move the playhead to the previous marker or press Command-Option-Right Arrow to move the playhead to the next marker.
You are going to add markers to the audio layer as the project is playing, so it’s helpful to start a few frames early to get ready to start placing markers right after the C_Title marker.
3. Start playback. As the playhead hits the C_Title marker, start tapping the M key on every other beat to lay down markers on the audio layer.
To help you do this most effectively, here are a few tips:
• The music is in 4/4 time, or four beats to a measure. Try to place markers when you hear the drum hit on beats 1 and 3—not on beats 2 and 4.
• If you want to start over, choose Mark > Markers > Delete All Markers.
• Add markers for the last beats 3 and 4 (the beats with the drum hits).

• Drag the zoom slider to zoom in on the play range.
• You should end up with about 19 markers.
• Play the project. If some of your markers are a bit late, simply drag them to the left to more precisely match the beat.
• To remove a marker, drag it up off the bar, where it will disappear in a puff of smoke.
4. Save your work.
Next, you will assemble all the visual elements of the project using the markers as guides.
Working with Audio and Video
Previously, you created three sections for the Rockumentary title. In Lesson 2, you built the ending composite and added a sequence of images. In Lesson 3, you used behaviors to animate the opening dates and pictures to fall through space. And in Lesson 4, you used keyframes to create the middle section, in which the title graphics animate into position.
Now you will assemble the full project by importing each of those completed projects as groups, and use markers to line them up. Then you’ll edit the photos to sync with the markers on the audio track.
1. Close the burn.00 layer to hide the behaviors applied to it. Drag up on the top of the Timing pane to make the window much larger, and drag down on the top of the Audio Timeline to make more room for video layers.
2. Press Shift-Z to fit the Timeline to the window, press Option-X to reset the play range, and then click in the Canvas and press Shift-Z to fit the Canvas to the smaller window.
3. In the File Browser, navigate to the Lesson_08 folder, and select the A_Opening file. With the playhead placed at the start of the project, drag the file above the Background group in the Timeline and release the mouse button.

This file consists of groups and layers that contain the animated photos and dates you created earlier.
4. Move the playhead to the B_Graphics marker, and then drag the B_Graphics & Stills project file from the File Browser to the Timeline, above the A_Opening group. Wait for a pop-up menu to appear, and choose Composite.
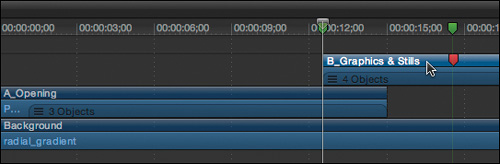
This group contains all the title graphics. It overlaps the A_Behaviors group as the elements animate into place. Notice the red object marker that indicates where all the elements “land” in place—it should line up with the C_Title project marker.
If the B_Graphics & Stills group imports inside the A_Behaviors group, undo your work and try again.
5. Move the playhead to the C_Title marker, and then drag the C_Title file from the File Browser to the C_Title marker in the Timeline, above the B_Graphics & Stills group. Once again, perform a composite edit.
This group contains the actual title and graphic that appear on top of everything else at the first drum hit.

6. Play the project.
The music plays, the photos and dates fall back in space, and the title elements animate into position. However, the photos in the upper-right corner of the screen don’t change at all.
Depending on your hardware, playback may appear jumpy. When audio is enabled in the transport controls, by default Motion skips video frames as necessary to sync the audio with the video and play in real time. If you turn off the audio, Motion will revert to what you are probably used to seeing. It will play every frame, taking as long as necessary to do so, with the result that the frame rate may vary. You can change this default behavior in the Time pane of Motion preferences. Choose Motion > Preferences, click the Time pane and in the Playback Control section, select Pause Audio Playback.
Another option is to create a RAM preview by choosing Mark > RAM Preview > Play Range, or pressing Command-R. Doing so will load as many frames as possible into your available memory. You can then play those frames in real time.
You can now trim each photo layer to a marker.
7. In the Timeline, open the B_Graphics & Stills group.
8. Open the Stills group and scroll down so that you can see the bottom layer in the group vid_pix_001.
Because some layers reference the same media, you may see an additional number in a layer name, such as vid_pix_001 1. You can delete or ignore the extra digit.
9. Drag the zoom slider to fit the vid_pix layers to the window.

The In point for the vid_pix_001 layer is already at the first marker on the audio layer.
10. Starting with the vid_pix_002 layer, move the playhead over the next marker in the audio track, select the vid_pix_002 layer, and press I to trim its In point to the playhead.
11. Continue moving to the next marker and up to the next layer, trimming the In point of each layer in the group to create a stair-step pattern.
Because you have more images than markers, the vid_pix_20 layer is extra, and you can turn it off. It is good practice to include extra graphics in case they are needed.

12. Close the Stills and the B_Graphics & Stills groups. Drag down on the top of the Timeline to make the Canvas larger. Press Shift-Z while the Timeline is active to fit it back to the window, and play the project. The pictures now change to the beat of the music.
13. Save your work.
Great job! For the final task in this lesson, you’ll use the powerful Audio parameter behavior to automatically animate layers to the music.
Animating with Audio
In addition to editing to audio cues, animating to audio is a powerful way to combine audio and video. Although you can turn on recording and set keyframes to animate a layer to an audio track, Motion automates this process via the Audio parameter behavior.
This powerful behavior lets you animate any keyframeable parameter of any layer, group, or effect based on an audio track. (A keyframeable parameter is one that contains an Animation menu—the small downward facing arrow that appears when you move the pointer over the far right of a parameter.)
To apply the Audio parameter behavior, you select a layer and choose the parameter you want to animate. For this project, you will animate the scale of the One layers so that they pulsate to the music.
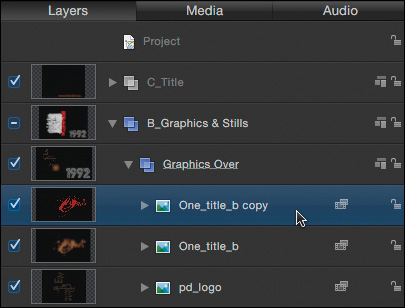
1. In the Layers list, open the B_Graphics & Stills and Graphics Over groups, and select the top layer, One_title_b copy. Press Shift-I to move the playhead to the In point of the layer, and then press Command-Option-I to set a play range In point.
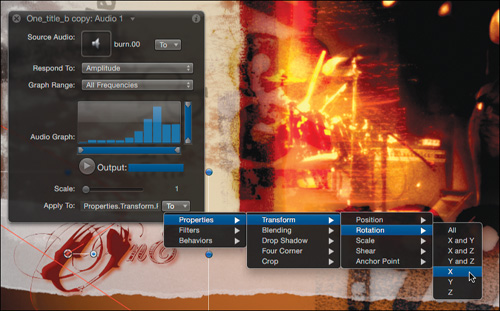
2. Press F1 to open the Properties Inspector. From the Animation menu for the Scale parameter, choose Add Parameter Behavior > Audio.

The Audio parameter behavior appears under the selected layer. The Behaviors pane comes forward, displaying the parameters for the Audio parameter behavior. Now you need to indicate which audio track to use to generate the animation.
3. In the Behaviors pane, from the To pop-up menu, choose burn.00.

Motion analyzes the audio, and in the Audio Graph window a bar graph appears, representing the levels of different frequencies in the audio track. The low frequencies are on the left, and the high frequencies are on the right.
You can drag the sliders underneath and to the right of the Audio Graph to limit the animation to a specific frequency and level range—–the very loud notes of a low-frequency bass drum, for example.
4. Drag the sliders to set a range that uses the middle-to-lower frequencies at all but the lowest volumes.

5. Press the Spacebar to play the project and see the animation.
The One_title_b copy layer animates, but it gets much too large. To make the animation subtler, you can change the Scale parameter—not the Scale parameter of the layer, but the Scale parameter for the behavior, which controls how dramatically the selected parameter changes as it animates.
6. In the Behaviors pane, Option-drag in the Scale value field to set a value of about 0.05. The layer now pulses nicely to the music, but it appears to animate just a tiny bit late, which is most noticeable on the last two beats.

7. In the Behaviors pane, set the Delay value to –1. The animation now plays one frame sooner and more closely matches the music.

8. Experiment using different volume and frequency ranges in the Audio Graph to see how the animation changes. Play around with other parameters as well, such as Smoothness, Peaks, and Apply Mode.
For better playback performance, turn off the groups that don’t contain the layer you are working on.
9. When you are satisfied with the results, in the Layers list, Option-drag the Audio behavior from the One_title_b copy layer to the One_title_b layer beneath it so that both layers animate together.
The Audio parameter behavior is very powerful because it can be applied to any keyframeable parameter of a layer, filter, or behavior.
10. At the bottom of the Behaviors pane or the HUD, click the To pop-up menu to view a list of all available parameters, and try applying the behavior to a few different parameters.
11. When you finish experimenting, save your work.
Congratulations—you’ve learned many different approaches to manipulating and editing audio in this lesson. Audio is a crucial component for enhancing motion graphics, and you now have some powerful tools at your disposal for molding it to your needs.
Lesson Review
1. Can Motion be used with 5.1-channel surround sound audio files?
2. Name two locations in the Motion interface where you can work with audio.
3. In what two ways can you adjust audio with behaviors?
4. What is the difference between project markers and object markers?
5. You are adding audio markers on the fly and realize that your timing was off. How can you remove all markers to start over?
6. If you can’t remember the keyboard shortcuts to create, edit, jump to, and delete markers, what is the menu containing all these commands?
7. You enabled audio in the transport controls and now Motion is skipping video frames as necessary to sync the audio with the video and play in real time. How would you turn off the audio to play every frame?
8. True or false: The Audio parameter behavior lets you animate any keyframeable parameter of any group, layer, or effect to an audio track’s specific frequency range and volume range.
Answers
1. Yes, but you can hear all six channels only when your hardware supports 5.1-channel surround sound.
2. The Audio list in the Project pane and the Audio Timeline in the Timing pane
3. You can automate the audio level with the Audio Fade In/Fade Out behavior, and you can automate panning with the Audio Auto Pan behavior.
4. Project markers appear over the ruler area of the Timeline, whereas object markers are applied directly to a selected layer, group, or effect.
5. Choose Mark > Markers > Delete All Markers.
6. The Mark menu
7. Disable audio in the transport controls, or choose Motion > Preferences. Click the Time pane, and in the Playback Control section, select Pause Audio Playback.
8. True
Keyboard Shortcuts
