Lesson 2. Building a Composite
Lesson Files
Motion5_Book_Files > Lessons > Lesson_02
Media
Motion5_Book_Files > Media > Rockumentary
Time
This lesson takes approximately 90 minutes to complete.
Goals
Apply blend modes and combine with filters
Import layered Photoshop files
Copy layers and filters
Work with image sequences
Perform Timeline edits
Change preferences
Make clone layers
Transform and add masks to groups
Creating motion graphics involves both compositing and animating. Before diving into animation, it’s useful to have a good grasp of compositing.
To build a composite image, you combine often disparate elements to create a visually striking, integrated look that makes the final result much greater than the sum of its parts.
In this lesson, you’ll build part of an opening title sequence. You’ll work in the Layers list to organize your composite and in the Timeline to edit an image sequence. Finally, you’ll combine blend modes, opacity changes, and filters to build textures from multiple graphical elements into a cohesive design.

Setting Up the Project
The rock group Pale Divine has asked you to create an opening title sequence for their new rockumentary project, One—to Document the Years. They have provided you with a handful of publicity and performance shots of the band, as well as their logo. You’ll combine these images with some ink and paper graphics to create an organic, gritty look. First, let’s preview the completed project.
1. In the Finder, open Motion5_Book_Files > Lessons > Lesson_02 > Rockumentary_Open.mov, and play the movie file.
The movie has two distinct sections: the opening animation, with the photos and other graphics appearing to fall through space; and the rest of the movie, which contains only subtle movements.
In this lesson, you’ll focus on compositing the elements that constitute the second half of the title animation.
2. Close the QuickTime Player and open Motion; or, if Motion is already open, choose File > New. In the Project Browser, make sure Blank is selected in the left column, and then click the Motion Project icon.
3. If necessary, from the Preset pop-up menu, choose Broadcast HD 720.
This HD setting matches the footage that was shot for the documentary so your title project will integrate easily into the final show.
4. Change the Duration field to 20 seconds, and press Return to open a new project.

A project duration of 20 seconds will provide enough time for the photos to animate, and to play the audio that we’ll add later.
Pressing Return after entering a duration value will immediately open the new project. If you want to keep the Project Browser open, press Tab.
Right now, the new project’s Canvas is empty. Although it appears black, Motion is just displaying that color to show that the workspace is empty. The background is actually transparent.
At the upper right of the Canvas are a series of pop-up menus: Zoom Level, Channels, Render, View and Overlay, and View Layouts. You can use these menus to change the appearance of the Canvas.
5. From the Zoom Level pop-up menu, choose Fit In Window or press Shift-Z. Now you can see the entire Canvas area.
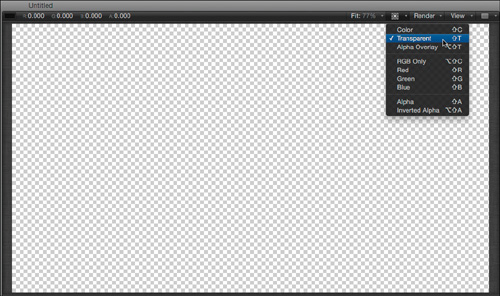
6. From the Channels pop-up menu, choose Transparent. A gray and white checkerboard pattern appears, indicating that the background is transparent.
You won’t want any transparency in this project. Therefore, it’s a good idea to fill your background with a solid color. You can do this in the Project Properties window.
7. Choose Edit > Project Properties, or press Command-J.

The project is selected in the Layers list, and the Properties pane is displayed in the Inspector. In the Inspector, you can see project properties such as resolution, pixel aspect ratio, and frame rate. These reflect the settings you chose when you selected a project preset in the Project Browser. In this pane, you can customize that preset, or change the background.
8. From the Background pop-up menu, choose Solid. The description under the menu explains that the background will create a solid alpha channel. In other words, a black layer will exist under all the layers you add to your project.

Notice that the Canvas turns black, even though the Channels menu is still set to Transparent.
9. To save your work. choose File > Save, or press Command-S, and navigate to Motion5_Book_Files > Lessons > Lesson_02 > Student_Saves. Name the project My Rockumentary Open, and click Save.
With these initial technical considerations addressed, you can now turn your attention to the creative process of building your composition.
Creating a Background Using the Inspector
You’ll composite layers for this project, and use blend modes to make them interact. To see the interactions between shapes and colors, it can be helpful to start from the bottom layer and build up. Therefore, your first step should be to create a background. You’ll use a single graphic and place it in its own group to keep the project organized, and then you’ll apply a filter to modify that graphic.
1. In the Layers list, rename the default group to Background.
2. In the File Browser, navigate to Motion5_Book_Files > Media > Rockumentary, and select radial_gradient.png.

In the preview area, notice that the white blurred circle has no background and that the bit depth is described as “Millions of Colors+”. The + (plus) symbol indicates that this graphic file includes an alpha channel, or transparency information. In other words, the graphic is composited over a transparent background.
3. Near the top of the File Browser, click Import to import radial_gradient.png into the Background group. The blurred circle appears in the Canvas over a black background. By previously setting the background to Solid, you ensured that no transparent areas will appear in the final project.

Notice that the layer’s bounding box touches the top and bottom of the Canvas. By default, Motion scales down large images to fit the Canvas. This resizing can be helpful, but in this case, you will make the graphic larger to create a soft vignette effect.
To change the scaling behavior, choose Motion > Preferences, and click the Project icon. Then from the Large Stills pop-up menu, choose “Scale to Canvas Size” or “Do Nothing.”
While you could directly transform the layer’s scale in the Canvas, there’s a better option to use when you want to make precise adjustments, or when you want to change parameters that aren’t available in the Canvas or the HUD (heads-up display). For those situations, you’ll use the Inspector.
4. Click the Inspector pane, and if necessary, select the Properties pane.

As discussed in the previous lesson, the Inspector includes four panes of its own: Properties, Behaviors, Filters, and Object—a contextual pane that changes depending on the type of layer selected. Currently, the Object pane is named Image.
The Properties pane contains all the layer parameters you can change directly in the Canvas—such as position, rotation, and scale—as well as parameters such as anchor point, blend mode, drop shadow, and crop. The parameters in the Properties pane apply to almost any type of layer: graphic, video, text, or other Motion objects. Changes made in the Canvas are reflected in the Properties pane and vice versa.
5. In the Canvas, drag the radial_gradient layer to change its position. Notice that the Inspector’s Position parameter changes as you drag the layer.
6. Restore the layer to its previous position by choosing Edit > Undo Move, or pressing Command-Z.
You can change values in the Inspector using the sliders, dials, and value fields.
7. To try the multiple ways to change the Scale parameter, drag the Scale slider, click the value field and drag left and right or up and down, and type a numerical value into the value field. After each change, press Command-Z to undo the change.
Dragging directly in the value field is often the quickest way to make a change, and frequently allows you to set a value that can’t be achieved using the slider. For example, the Scale slider goes only to 400%, but you can drag or type a higher value in the value field.
Shift-dragging in a value field changes the parameter ten times faster than just dragging, which is great when you want to make an extreme change in the layer scale or quickly move the layer far away. Option-dragging changes the parameter 100 times more slowly and is great for fine-tuning values.
Sometimes you’ll want to reset all the basic properties of a layer at once. Rather than typing a value in several value fields, you can click the Reset buttons—the hooked arrows along the right side of the Inspector—to quickly reset groups of parameters.
8. Notice that the Scale value for the layer is currently 70.31%. Next to the Transform group of parameters, click the Reset button. All the Transform parameters are reset to their default values, so Scale is now 100%.

However, it’s still not large enough for the vignette effect.
9. In the Scale value field, type 140 and press Return. Now the gradient fills most of the screen, leaving dark edges.
A filter can give the layer some color. In Lesson 1, you previewed filters in the Library before applying them to a layer, but you can also use a shortcut method to apply filters.
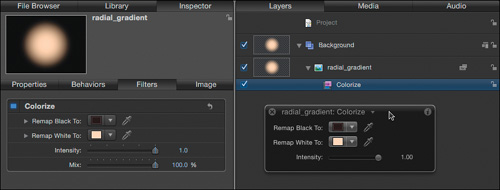
10. In the toolbar below the Canvas, click the Add Filter pop-up menu and choose Color Correction > Colorize. The filter appears underneath the layer it is applied to, and the white color in the Canvas changes to a pale off-white.

In the Inspector, the Filters pane automatically comes forward. The HUD contains some of the parameters that can be found in the Inspector. (If the HUD is not visible, press F7.)
While the HUD usually contains just a subset of the parameters for a selected layer or effect, the Inspector contains every adjustable parameter. In this case, you can use the Inspector to input specific RGB values.
The Colorize filter changes the dark and light areas of an image or video clip to colors that you specify by using the Remap Black To and Remap White To color swatches.
11. In the Inspector, next to the Remap White To parameter, click the disclosure triangle. In the data fields, type 0.63 for Red, 0.35 for Green, and 0.06 for Blue.

Motion employs an RGB scale of 0 to 1, with 0 using none of the color channel and 1 using its full value. You may have seen a range of 0 to 255 used in other applications. That range is based on an 8-bit color space, in which each color channel has 256 possible values. Because Motion works in either 16- or 32-bit space, its 0 to 1 scale works for any bit depth.
The background group is now complete. Next, you’ll add the title elements, which will appear on top of the composition.
Using Photoshop Files
Instead of building this project strictly from the bottom up, you’ll now add the very top elements. Why? Because the elements that sit on top of all the other layers are the titles and graphics, which can serve as guides as you composite the elements beneath them. You can think of this top group as a template that helps you align the entire composition.
The title elements were created in Photoshop using multiple layers and blend modes. Motion provides several options for using these Photoshop elements.
1. With the Colorize filter selected, from the Object menu, choose New Group.

Notice that the new group is created inside the Background group. Groups are always added just above the selected layer or effect. However, in this case, you want the new group to be placed outside and above the Background group.
2. Drag the new group above the Background group, wait for the position indicator and the + (plus sign) symbol to appear, and then release the mouse button.

The new group is now located above the Background group. Make sure that the position indicator is visible before releasing the mouse button. If the Background group has a white outline, it means you’ll be dragging the selected group back inside the Background group.
If nothing is selected when you create a new group, it is automatically placed at the top of the Layers list.
3. Rename the new group Title. Immediately naming new groups based on their intended contents will help keep your project organized.
4. Click the Background group disclosure triangle to collapse the group. Closing groups you aren’t currently working with reduces Layers list clutter and helps focus your attention.

5. Press Command-1 to reveal the File Browser, and select One_title_a.psd.
The preview description tells you that this is a Photoshop file. The + (plus) next to “Millions of Colors” tells you that it has transparency. This Photoshop file has a few other properties that aren’t listed: It comprises three layers, each with a blend mode applied.
6. With the Title group selected, click the Import button in the File Browser. The file appears as a single layer in the Layers list, and all its elements appear in the Canvas.

Motion’s default behavior is to combine all Photoshop layers into a single image. Although this result is often useful, it has two disadvantages. First, any applied blend modes won’t pass through to other layers in Motion; second, you cannot transform or animate the individual Photoshop layers. While you won’t animate layers in this lesson, you will want to keep the blend modes intact. Fortunately, Motion provides an alternative to combining Photoshop layers.
7. Press Command-Z to undo the media import.
8. From the File Browser, drag One_title_a.psd to the Title group, but don’t release the mouse button.
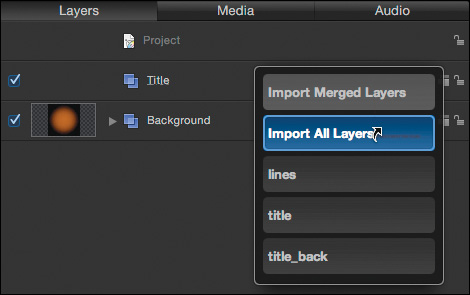
A drop menu appears. You can choose Import Merged Layers (the default), or Import All Layers; or you can select a specific layer to import. The layer names in the drop menu match the layer names in the Photoshop file.
9. Move the hooked arrow over Import All Layers and release the mouse button. A new group with the name of the Photoshop file appears within the Title group, and each Photoshop layer appears as a separate layer within that group.
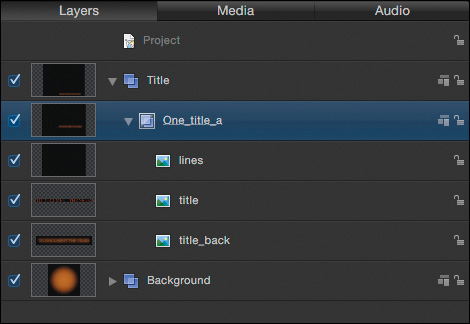
Because you already created a group for these layers, you don’t need the One_title_a group. In fact, this group is not allowing the blend modes applied to its layers to pass through to the background layer. Therefore, let’s move all the layers out of that group and delete the group.
When you import a layered .psd file into Motion, the group containing all the layers is set to “fixed resolution” by default. When a group is set to fixed resolution, blend modes applied to layers within the group aren’t passed through to the groups beneath it. You can turn off this default in the Group pane of the Inspector.
10. To select all the layers, click the uppermost lines layer, and then Shift-click the lowest layer, title_back.
11. Drag all the layers from the One_title_a group into the Title group, and release the mouse button when a white outline appears around the target group.

12. Select and delete the now-empty One_title_a group.
These elements are too small for this HD project. To scale them up, you can scale the group containing them.
13. Select the Title group, press F1 to reveal the Properties Inspector, and change the Scale value to 180%.

The text in the Canvas now has a red glow because the blend modes are enabled. How can you see the blend modes applied to each layer? One method is to use the HUD.
14. Select the uppermost lines layer, and if the HUD is not already visible, press F7. The HUD indicates a blend mode of Linear Light.

Blend modes for an individual layer can also be seen (and changed) in a shortcut menu by Control-clicking (or right-clicking) the layer in the Layers list.
You could click each layer to inspect its blend mode, but there is a way to see the blend modes of all layers at once.
15. Choose View > Layers Columns > Blend Mode. The blend mode for each layer now appears on the layer itself.
To see the full blend mode names, you may need to adjust the Project pane width by dragging the small vertical line along the right edge of the pane.

Certain Photoshop effects and elements—such as layer effects, layer masks, adjustment layers, paths, and shapes—will not appear in Motion unless the layers are first rasterized or converted to Smart Objects in Photoshop.
You’ve completed the two outer layers of your composition “sandwich”—a background and the title. You’ll now turn your attention to the “meat” of the project, the graphics, to give your composition mood and texture.
Compositing with Blend Modes and Filters
With the top elements in place, let’s return to the bottom-up construction process and add graphics that will give your composition texture, color variation, and depth.
For source material, you’ll use still images of ink and ripped paper. You’ll scale, rotate, and position these images to complement or frame the title elements and the photographs that will appear on top. Finally, you’ll employ duplicates, blend modes, and filters to make these layers work together with the other layers in the project.
This is a creative, interpretive process, so feel free to deviate from the recommendations in this exercise and come up with your own unique look.
1. Close the Title group. You are finished with this group.
2. Select the Background group, and press Command-Shift-N to create a new group, which is placed above the selected group and sandwiched between the two current groups.
3. Name the new group, Graphics Under. This group will contain all the graphics underneath the band pictures that you will add later.

4. From the File Browser, drag brayer_03a.png to the Graphics Under group. The image appears in the Canvas.

A brayer is a hand roller used to spread ink for making prints. This image, like several others in the File Browser, is derived from the extra ink that is rolled onto a backing sheet after the print has been removed. It’s organic, grungy, and real—a nice design element.
5. In the Canvas, drag the handle extending from the anchor point in the center of the bounding box to rotate the image 90 degrees counterclockwise, Shift-drag a bounding box handle to scale it up to about 125%, and position it at the bottom right of the frame underneath the title text.

Because exact values aren’t necessary here, manipulating the layer directly in the Canvas is faster than using the Inspector. Holding down the Shift key while rotating a layer will constrain the rotation to 45-degree increments, and will constrain scale changes to remain proportional to the original size.
6. Drag brayer_03b.png directly onto the Graphics Under group. When dragged onto a group, layers are added above any existing layers.
7. Keep its current rotation and scale, and position the layer at the top left of the frame.
8. Choose Edit > Duplicate, or press Command-D, to make a copy of this layer. Then scale down, rotate, and reposition the copy near the red vertical line.
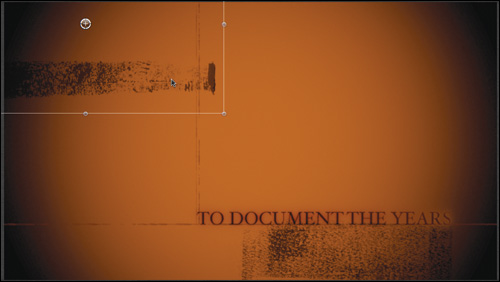
9. Add brayer_06a.png, to the Graphics Under group, rotate it 90 degrees clockwise, and then scale and reposition it to roughly fill the upper-right square formed by the red lines. It’s OK if it obscures the text. You’ll fix that in the next few steps.

10. Click the Blend Mode pop-up menu for the brayer_06a layer to display all the available blend modes.

As you learned in Lesson 1, each blend mode performs a mathematical operation that combines the pixels of the selected layer or group with the pixels of the underlying layer. The default blend mode, Normal, displays just the pixels of the selected layer and obscures anything underneath.
The best way to determine a blend mode’s impact is to try it out. Blend modes are organized into logical groups delineated by separator bars, and there are some general rules that often (but not always) apply to the groups:
• The first group of five blend modes, starting with Subtract, will generally darken the resulting image. Of these, Multiply is probably the most commonly used mode.
• The second group of five modes, starting with Add, will generally lighten the resulting image. Of these, Add and Screen are probably the most commonly used modes.
• The third group of seven modes will generally do both: make the light pixels lighter and the dark pixels darker to increase overall contrast. The first of these modes, Overlay, is probably the most commonly used.
The rest of the blend modes have more specialized functions.
Sometimes a blend mode’s effect is too strong, too weak, or not quite what you expected. You can apply a filter to change the impact of a blend mode, and you can adjust the opacity of a layer to moderate the intensity of a blend mode.
11. Choose the Linear Light blend mode. The image stays black because this blend mode affects only those pixels that aren’t completely black or white. To see the effect of this blend mode, you’ll add a filter.
12. In the toolbar, click the Add Filter pop-up menu and choose Color Correction > Colorize.
This is the same filter you previously applied to the background gradient.
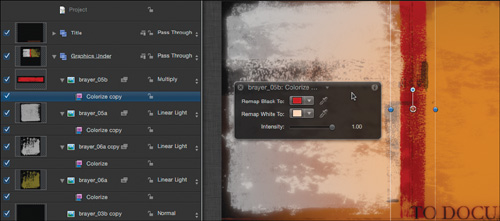
13. In the HUD, click the disclosure triangle next to the “Remap Black To” color well and sample a dark yellow to give the graphic a brownish-orange tint. Then select the brayer_06a layer, and in the HUD, lower Opacity to about 20%.

The combination of a blend mode and the Colorize filter allows a great deal of creative control. You’ll use this same blend mode and filter combination, with a few adjustments, in another part of the composition.
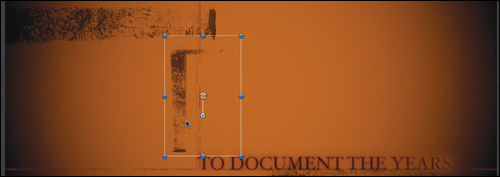
14. Select the brayer_06a layer. Press Command-D to duplicate the layer, and then in the Canvas, rotate it 180 degrees and reposition it to cover the leftmost rectangle. Feel free to scale it non-proportionally (without holding down the Shift key) to fit the rectangle.
When you duplicate a layer with effects applied, the effects are duplicated as well.
15. On the copied layer, select the Colorize filter and remap black to a light gray. Select the layer and increase its Opacity to about 50%. Save your work.

By transforming a layer and changing the filter parameters, you can reuse elements multiple times in the same composition.
Completing the Underlying Graphics
To finish the graphics that will display underneath the images and text, you’ll add a few more layers and apply both blend modes and filters.
As you complete these steps, feel free to experiment with the transformations, blend modes, and filter adjustments to create your own look.
1. From the File Browser, drag the brayer_05a.png file to the Graphics Under group.
2. Change the scale and position of the layer so that it covers the brayer_06a copy layer at the upper left of the Canvas.
This layer will add more texture to the composition. You’ll apply a blend mode to brighten it and make the title you place on it stand out. Rather than applying the Colorize filter from the Add Filter pop-up menu, you can copy one of the existing filters.
3. Option-drag the Colorize filter from the brayer_06a copy layer onto the brayer_05a layer. Option-dragging any selected layer, group, or effect copies it to the new location.
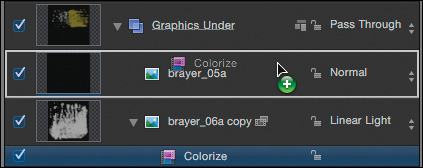
4. In the HUD, change the blend mode of the brayer_05a layer to Linear Light, and change the Colorize filter’s Remap Black To parameter to a darker gray so that the image doesn’t appear too bright.

To accent the vertical line separating the brayer graphics, you’ll use another graphic.
5. Drag the brayer_05b.png file to the same group.
6. Rotate, scale, and position the layer to cover the vertical red line. You can see how the title elements you’ve already added allow you to position these underlying graphics.
7. Option-drag a Colorize filter from any other layer to this new layer.
8. Change the layer’s blend mode to Multiply to darken the combined graphics.
9. In the HUD, remap black to a red so that the graphic is a dark reddish brown. The Multiply blend mode in combination with the filter blends the graphic with the elements beneath it.
To finish, you’ll add a graphic to highlight the title.
10. Drag torn_vellum_strip.psd to the Graphics Under group, wait a moment for the drop menu to appear, and choose Import Merged Layers. This is a multilayered Photoshop file, but it has no blend modes applied, so you can bring it into the composition as a single file.
If you know you want to import a layered .psd file as a single merged layer, you don’t need to wait for the drop menu to appear as it will be imported as merged by default.
11. Press F1 to reveal the Properties Inspector, and next to the Transform group, click the Reset button (hooked arrow) to reset the scale of the graphic to 100%. Because the graphic is larger than the Canvas, it was automatically scaled down, but it will work better at full size.
12. Reposition the graphic underneath the line of text, and lower its Opacity in the HUD to about 25%. The lower opacity reveals the black brayer graphic underneath but makes the torn strip look a bit dingy.
13. Choose Edit > Duplicate, or press Command-D, to copy the layer.
14. Change the blend mode of the copy to Overlay, and decrease the Opacity to about 20%. These changes brighten the strip but still allow the lower graphics to show through.

Good work! You’ve built a richly textured background that creates a mood, leads the eye to the title element, and leaves open spaces for the band pictures and logo.
Editing in Motion
So far, you have built a static composite that does not change over time. Every layer lasts for the full project duration. In the next exercise, you’ll add a series of photographs that will change as the project plays.
To add layers that start and stop at specific points in a project, let’s explore the editing options in Motion, including composite edits, overwrite edits, and sequential edits.
Working with Image Sequences
First, you’ll look at the photos that you’ll edit into the composition.
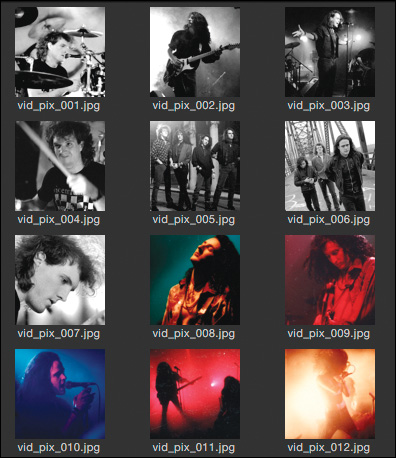
1. Press Command-1 to open the File Browser. Select vid_pix_[###].jpg:1:20, and play it in the preview area.

This file appears as a single icon in the stack and plays like a movie that contains a series of one-frame images. It is described as a JPEG sequence. A collection of still images with sequentially numbered filenames will appear in the File Browser by default as a single image sequence. You can use this image sequence as you would use any other QuickTime movie in Motion.
Sometimes you’ll want to work with a series of images as an image sequence, but at other times you’ll want to work with the images individually. Motion lets you do both.

2. At the bottom of the File Browser, the “Show image sequences as collapsed” button toggles how image sequences are viewed. By default, the button is enabled. Click the button to expand the image sequence. The individual images now appear in the stack. There are 20 images, which is why 1:20 appeared at the end of the sequence name.
Digital cameras frequently save files with sequential numbers, so if you are looking for digital photos in the File Browser and see only one image, it may actually represent multiple images collapsed as an image sequence.
For this project, you want to work with the individual images. Before adding those images to the project, you will create a group to contain them.
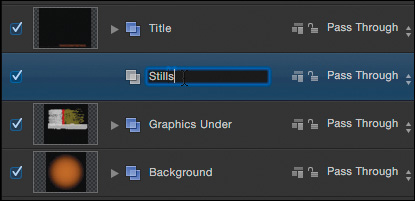
3. Close the Graphics Under group. Then select that group, create a new group above it, and name the new group, Stills.
You’ll composite the photos on top of everything you’ve created so far except for the title graphics.
There are 20 photos, and the project is 20 seconds long. So let’s keep things simple and have each photo play one after the other for one second each. You have several options for editing the photos into the project.
4. With the Stills group selected and the playhead still at the beginning of the composition, select vid_pix_001.jpg and click the Import button.

The layer appears in the Layers list; the graphic appears in the Canvas; and in the mini-Timeline, the blue bar representing the graphic extends for the length of the project.
By default, elements that you add to a composition will start at the playhead position and end at the end of the composition (except for video clips, which will end based on their durations). This behavior was effective for all the background elements you previously used, but in this case, you want each picture to last just one second. One way to achieve this is to trim each layer to the correct duration and location in time. For the first photo, you want to set the Out point of the clip at one second.
5. In the mini-Timeline, position the pointer over the very end of the vid_pix_001 bar so that it changes to a trim pointer.
6. Drag left until the tooltip indicates a duration of 1:00. The layer now lasts only one second, starting at the beginning of the project.

If the timing display at the bottom of the Canvas is showing frames, click the arrow to the right of the frame counter, and choose Timecode.
You can also trim a clip’s Out point by moving the playhead to the point at which you want to make the trim (at one second, in this case) and choosing Mark > Mark Out, or pressing O.
Normally, when you import an element into a project, it is composited on top of the existing layers without changing those layers in any way. But you can choose other editing options when you are working in the Timeline.
Editing in the Timeline
You can perform many editing operations in the mini-Timeline: trimming In and Out points, moving layers in time, and even slipping video clips. But when you want to see how layers and effects relate to each other over time—or to access to additional editing options—you’ll want to work in the Timeline.
1. Press Command-Z to undo the previous trimming operation.
2. If necessary, press F6 to open the Timing pane. In the left side of the Timeline, close all open groups except for the Stills group.

In the Timeline, you can simultaneously see the duration of multiple layers. The left side shows the groups and layers, exactly like the Layers list in the Project pane. The right section contains bars to indicate the duration of each layer. Currently, every layer lasts for the full duration of the project, including the vid_pix_001 layer.
To perform editing, you can drag clips directly into the Timeline.
3. From the File Browser, drag vid_pix_002.jpg to just above the vid_pix_001 layer in the Timeline. Watch the tooltip and move the image horizontally until the tooltip reads 1:00, and then hold the pointer in place but don’t release the mouse button.

It is critical to position the pointer just above the layer, not below. If you position the pointer below the layer, different options will appear in the drop menu.
The tooltip indicates that the clip will start at 1:00. The horizontal black line above the vid_pix_001 layer indicates that the clip will be placed above this layer.
The drop menu offers three edit choices: Composite (the default), Insert, and Overwrite.
4. Position the pointer over Overwrite and release the mouse button. The new layer overwrites the existing layer, trimming it to one second.

An insert edit would split the vid_pix_001 layer into two layers, with the second half on a new layer and its In point pushed forward in the Timeline to start after the Out point of the vid_pix_002 layer.
This overwrite edit is clearly more efficient than manually trimming each layer. You could add all the images this way, dragging the next image to 2:00, overwriting the next photo, and so on. But because you know that you want every photo to last for one second, you can tell Motion to automatically set their durations.
5. Choose Motion > Preferences, or press Command-, (comma), and click the Project button at the top of the window.
You use the Preferences window to change the Motion default settings.
6. In the Still Images & Layers section, set Default Layer Duration to “Use custom duration.” From the pop-up menu, choose Seconds, and in the value field enter 1.0.

You may later want to restore the Default Layer Duration to “Use project duration”, but for now this option will make the editing process much more efficient.
Changes you make to preferences remain in effect for all projects, so it’s a good habit to review them before you create a new project or update an older project.
7. Close the Preferences window.
8. From the File Browser, drag vid_pix_003.jpg to 2:00 in the Timeline, just above the vid_pix_002 layer, and in the drop menu, choose Overwrite.

The new layer comes in already trimmed to 1:00. The overwrite edit divided the lower vid_pix_002 layer into two sections, and you don’t need the second section.
9. Select and delete the vid_pix_002 1 layer.
With all layers set to last just one second, you could now drag each photo to the end of the previous photo layer and use the default composite edit to edit the rest of the pictures into the sequence. But another edit type is perfect for adding a sequential set of images: the sequential edit.
10. At the bottom of the File Browser, click the List View button to see the files displayed as a list. This view will make it easier to select all the files in order.
11. If necessary, click the Name column header to sort the files in ascending order by name; then Shift-click vid_pix_004.jpg and Shift-click vid_pix_020.jpg to select the remaining 17 photos (or drag to select them).
12. Drag the photos from the File Browser to the Timeline, and snap them above the Out point of the vid_pix_003 layer at 3:00. When the drop menu appears, notice that a new option is available: Sequential.

If you have trouble snapping to the Out point of the layer, make sure you chose View > Snap to enable snapping.
13. Choose Sequential. All the selected images are laid into the Timeline one after the other, creating a staircase of clips that will play sequentially.

The files will be added in the order in which you selected them in the File Browser. If you want to play them in a different order, you can Command-click each file to select them in the order you desire.
14. Click in the Timeline to make it active, then choose Edit > Deselect All. Save your work, and then play the project.
The photos now play in order, each lasting for one second. With the editing complete, you’ll turn your attention to making the images blend with the other elements.
Applying Masks and Using Clones
The series of photographs look like they have been slapped on top of the other layers, with some in color and some in black and white. You will now combine masks, clones, and blend modes to integrate the images into the composition.
1. Stop playback. Return the playhead to the first frame, and close the Stills group in the Timeline.
2. Close the Stills group in the Layers list and then select it. By transforming and applying effects to the group, you’ll affect all the layers within the group at once.
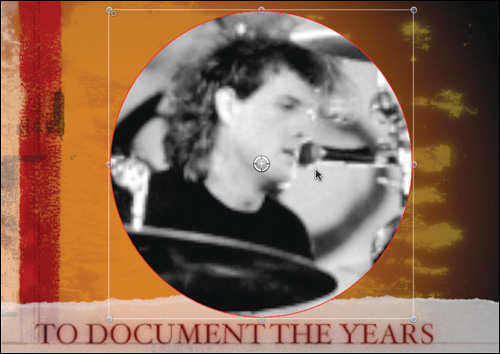
3. In the Canvas, scale the group to about 110%, and reposition it to fit roughly in the upper-right rectangle. Make sure to hold down Shift as you scale to maintain the image proportions. You will use a mask to blend the edges of the images into the background.
4. In the toolbar, place your pointer over the Rectangle Mask tool and hold down the mouse button to display a list of tools. Then, choose the Circle Mask tool.

5. With the Stills group still selected, Shift-Option-drag a mask from the center of the photo in the Canvas and make it large enough to encompass the drummer.
The same modifier keys that work when transforming layers—Shift to constrain proportions and Option to scale around the anchor point—also work with masks.
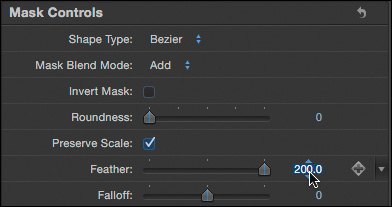
6. In the HUD, increase the Feather amount all the way to 100. That’s still not enough feathering. Remember, if you can’t get the value you want within the HUD, try the Inspector.
7. Press F4 to reveal the fourth pane of the Inspector. This is the context-sensitive pane that changes its name depending on the selected element. It is currently called Mask.
8. Increase the Feather value to about 200. The increased feathering may reveal the original edges of the photo.
Not all parameters can be increased beyond the values available in the HUD or using the slider in the Inspector.
9. In the Canvas, adjust the scale and position of the mask as necessary.

To further integrate the photos into the overall look of the project, you’ll copy them and add some filters to the copies.
Previously you copied layers by duplicating them. Motion provides an alternative to duplicating called cloning. By cloning a layer or a group, you use less memory. In addition, changes made to certain properties of the source layers will be passed to the clones.
10. Close and select the Stills group.
11. Choose Object > Make Clone Layer, or press K. A clone layer appears in a new group above the Stills group. The clone, an exact copy of the Stills group, sits on top of the group and covers it.
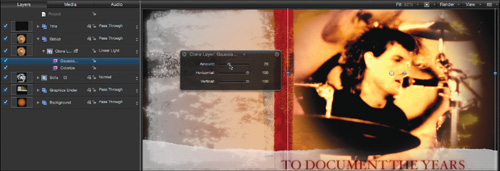
12. Change the blend mode of the clone layer to Linear Light. The result doesn’t quite match the look of the rest of the composition. You’ll colorize the clone and blur it to blend it in.

13. Click the Add Filter pop-up menu and choose Color Correction > Colorize.
14. Remap black to a dark gray, and white to a light brown.
15. Click the Add Filter pop-up menu and choose Blur > Gaussian Blur. A Gaussian Blur filter softens an image by averaging each pixel with its neighboring pixels.
16. Increase the Amount parameter to about 20.
17. Save your work, and then play through the project. You can reposition the clone layer or individual photos in the Stills group within the circle mask to suit yourself.
When using photos in which people face the edge of the Canvas, consider adding a Flop filter from the Distortion category. Just make sure that there isn’t any text in the image, as it will be reversed.
Excellent! Your last step is to add the graphics on top of the photos.
Importing Motion Projects
The graphics that you’ll add on top of the photos include the band’s logo, an additional title element (“One”), graphics that represent the years covered in the rockumentary (1984 to 1992), and one more ink-based element to add a bit more grunge and tie everything together. Blend modes, colorize filters, and blur filters will help integrate these elements.
Because you have already worked with the techniques that created these elements, we’ve “prebaked” them for your convenience. That is, they have been saved as a Motion project that you can just drop into the current project. But first, as usual, you will need to organize the Layers list to make room for the new guests.
1. Rename the group containing the clone layer to Graphics and Stills. This group will contain all the elements that are not in the Title group on the very top or in the Background group on the very bottom.
2. Drag the Stills group on top of the Graphics and Stills group.

The Stills group is now on top of the Clone Layer, but it needs to be underneath for the clone to blend with it.
3. Choose Object > Send to Back, or press Command-Shift-[ (left bracket). The Stills group moves to the bottom of the Graphics and Stills group, and the composition once more looks correct in the Canvas.
Choosing a menu command or pressing a keyboard shortcut to move layers or groups within a group can be easier than dragging them. For example, when dragging, it’s possible to accidentally drag one group into another group.
4. Close the Clone Layer layer to hide the filters, and drag the Graphics Under group on top of the Graphics and Stills group. Then press Command-Shift-[ (left bracket) to move the Graphics Under group to the bottom of the Graphics and Stills group.

5. Open the File Browser, and switch to icon view. Click the “Show image sequences as collapsed” button to consolidate the images (so you can see the other files in this folder), and locate Graphics Over.

This file has a Motion application icon because it represents a group of layers from a Motion project that was saved by dragging the group from a project to the File Browser.
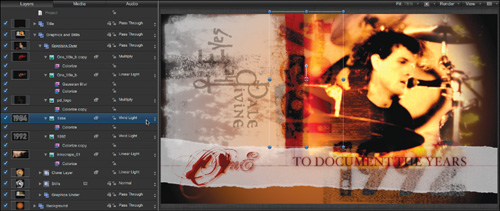
6. With the playhead located at the first frame of the project, drag the Graphics Over file to the Graphics and Stills group. A new group, Graphics Over, appears at the top of the Graphics and Stills group.
7. Open the Graphics Over group and all its layers. The layers in this group have blend modes and filters applied to help composite them into the project.
Depending on your screen size and resolution, you may not be able to see all the layers without scrolling the Layers list. You can change the height of layers and groups in the Layers list by positioning the pointer between any two layers, waiting for it to change to a resize pointer, and dragging upward or downward.
8. Select and deselect the activation checkboxes next to the layers and filters in the Graphics Over group to see how they have been composited in the Canvas. Once again, feel free to change the position, scale, and rotation of layers, and to try different blend modes and filter settings to customize the look.
9. Play through the project, and make any final adjustments to individual photos.
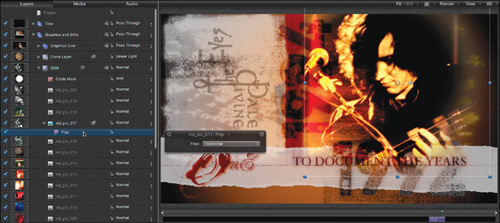
Applying a Flop filter makes the musician face the center of the Canvas instead of looking offscreen.
10. Press Command-, (comma) to open Motion Preferences. In the Project pane, change the Default Layer Duration back to “Use project duration.”
11. Close all open groups in the Timeline and the Layers list, and save your work.
Congratulations. You now have a solid grasp of many of the compositing options in Motion using transformations, blend modes, opacity adjustments, and filters to create an integrated look. Along the way, you’ve learned how to edit in the Timeline, use clones and masks, and work with the Layers list—all critical skills for compositing motion graphics.
Lesson Review
1. How can you ensure that transparent areas of your project will appear black?
2. You are using the HUD to change the brightness of a filter, but even at the maximum setting, it’s not bright enough. Where can you enter a higher value?
3. Name two blend modes that will generally result in a lighter image.
4. Identify two ways to modify the impact of a blend mode.
5. When you want to make a copy of a layer or group, what is an alternative to duplicating?
6. Identify the three options for importing a multilayered Photoshop file.
7. A client gives you 50 digital photos to use in a Motion project. You put them in a folder on your desktop, but when you look in that folder using the File Browser in Motion, all you see is a single icon. What’s going on, and what can you do to see all the photos?
8. Name three types of edits you can perform in Motion.
Answers
1. Choose Edit > Project Properties and set Background to Solid.
2. In the Inspector
3. Add, Lighten, Screen, Color Dodge, or Linear Dodge
4. Lower the opacity of the layer, duplicate the layer, or add a colorize filter.
5. Use Make Clone Layer, which is similar to duplicating, but uses less memory, and the clone layer inherits certain properties of the original.
6. As merged layers, as all layers, or by selecting an individual layer
7. The photos are numbered sequentially and appear by default in the File Browser as a collapsed image sequence. Click the “Show image sequences as collapsed” button to see the individual files.
8. Composite, overwrite, insert, sequential
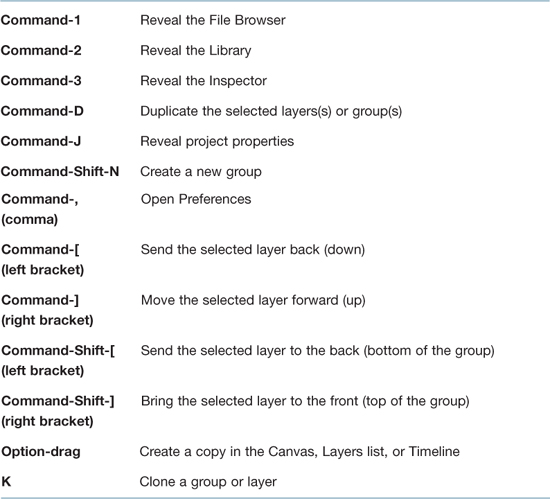
Keyboard Shortcuts