Lesson 5. Creating Content with Shapes, Generators, and Paint Strokes
Lesson Files
Motion5_Book_Files > Lessons > Lesson_05
Media
Motion5_Book_Files > Media > Mountain Gorilla > gorilla face.ai
Time
This lesson takes approximately 90 minutes to complete.
Goals
Draw shapes
Create and modify gradients
Apply generators
Search the Library
Mask with images
Use Shape behaviors
Import vector graphics
Work with paint strokes
Often in a motion graphics project, you have little or no content in hand, so you need to create almost everything from scratch. This is where Motion shines. In addition to the massive amount of material in the Content folder of the Library, Motion allows you to create an amazing variety of graphic design elements using shapes, generators, and paint strokes.
Shapes are open or closed splines you create using several different tools and animate with their own special behaviors. Generators are elements that create patterns—some very simple, some quite intricate. And paint strokes are a type of shape to which you can apply a dizzying array of shape styles to create beautiful effects.
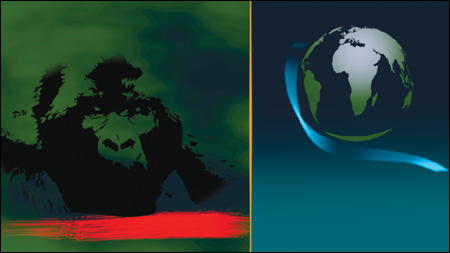
In this lesson you’ll use a wide range of Motion tools and elements to design an opening graphic to a documentary. You’ll import graphics from other applications and optimize them for improved performance or higher quality.
Drawing Shapes
Shapes are diverse and versatile elements in Motion, and they can range from rectangles, circles, and lines to free-form shapes and free-hand paint strokes. The Library also contains dozens of shape styles.
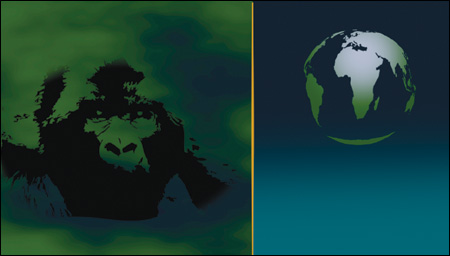
You are going to build the opening graphics to a documentary on the plight of the critically endangered mountain gorilla. You’ll start by creating a simple shape with a gradient color fill.
1. If you have an open project, close it. Then create a new project using the Broadcast HD 720 preset.
2. Press Shift-Z to view the entire Canvas. Then in the toolbar, choose the Rectangle tool.
3. From the upper-right corner of the Canvas, drag down to the left to create a rectangle that covers a third of the entire screen.

Notice that when the pointer is located over the Canvas, it changes to a crosshair, which indicates that the Rectangle tool is still selected. To manipulate the rectangle you’ve just drawn, you need to return to the Select/Transform tool.
4. Press the Esc key to exit the Rectangle tool.
On the Canvas, you can move layers in small increments by holding down Command and repeatedly pressing the Arrow keys.
The default white fill looks a little bland, so let’s fill it with a gradient.
5. Press F4 to open the Shape pane of the Inspector. Change the Fill Mode to Gradient, and click the disclosure triangle next to the Gradient parameter.

This action opens the gradient editor. The small squares at either end of the colored bar are color tags you can use to set the colors of the gradient. You can add an unlimited number of color tags here, move and delete them, and adjust the opacity of the gradient in the top white bar, the opacity bar.
6. Click the light blue color tag on the left to select it, and then click the disclosure triangle next to the color well and select a medium to dark teal color.

You can add additional color tags anywhere along the gradient bar by clicking where you want to add the tag. To remove a color tag, drag it off the gradient bar and it will disappear in a puff of smoke.
7. Click the dark blue color tag on the right to select it. Then click the disclosure triangle next to the color well and select a dark navy blue color.
On the right side of the gradient bar, you’ll find identical icon groups for the gradient’s opacity and color. The top buttons in both groups reverse the direction of the gradient. The bottom button in both groups evenly distributes any tags you add between the start and ending tags. Let’s reverse the colors so the darker navy blue appears at the top of the rectangle.
8. Click the Reverse Tags icon next to the color gradient bar. The gradient colors reverse direction in the bar and in the Canvas.

You can also assign colors to gradients and other modifications in the Canvas.
9. In the Canvas, Control-click (or right-click) the rectangle, and from the shortcut menu, choose Edit Gradient. A vertical line appears to indicate the gradient’s direction and spread length. The color tags to the left of the line display the gradient colors, and the single white box on the right shows its opacity.
10. To increase the spread of colors, drag the bottom triangle down to the bottom of the Canvas. The range of colors in the gradient is now widened.

11. To return to the Select/Transform tool, Control-click the rectangle in the Canvas, and from the shortcut menu, choose Transform.
There is now a nice gradient rectangle on the right and an empty area on the left, so let’s create a moody background there worthy of our mountain gorilla story.
Creating a Background with a Generator
Using the generators in Motion, you can create something out of nothing. Some generators animate by default, while you can animate others using keyframes or behaviors.
In this exercise, you use an animated generator to create a cloudy background for your project.
1. Move the playhead to the start of the project, if necessary.
2. In the Layers list, double-click Group and name it Sidebar. Then close the Sidebar group and click beneath it to deselect everything. Click the Add (+) button to create a new group.
3. Choose Object > Send to Back, or press Command-[ (left bracket) to move the new group below the Sidebar group, and then rename the group to Background.

If an element in the Sidebar group is selected when you create a new group, the new group is created above the selected element inside the Sidebar group. If this happens, drag the new group down and to the left to move it out of the group; or press Command-Z to undo, and try again with no element selected in the Sidebar group.
4. Press Command-2 to open the Library, and select the Generators category. The Library contains 24 generators, four of which are text generators.
5. Select a few generators to inspect them in the preview area. Then select the Clouds generator, and click Apply to place the generator in the Background group and centered in the Canvas.
6. Click in the empty gray area of the Layers list to deselect everything. Then press the Spacebar to play the animation.
The clouds are self-animated, but let’s change some things.
7. Select the Clouds layer, and press F4 to open the Generator Inspector, if necessary.
8. Drag the Horizontal scale all the way to the right, and then drag the Speed slider to about 0.20. This gives the clouds a softer, less stormy look.

Remember, you’re building an opening graphic for a documentary about mountain gorillas, so let’s give the clouds a jungle-like appearance by changing their colors.
9. Click the Gradient arrow to open the gradient controls. This time you’ll select the gradient colors using a different method.
10. To the left of the gradient bar, click the black color tag.
11. Click the eyedropper next to the color well, and then click the dark navy blue color at the top of the gradient rectangle you created earlier in the Canvas.

The clouds now have a nice blue tone. For the next color, you’ll apply a more precise color selection technique.
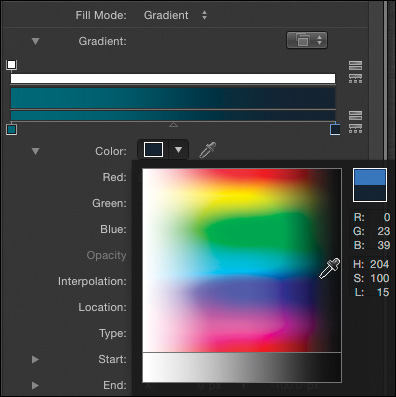
12. Click the white color tag on the right of the gradient bar, and then click the color well to open the Mac OS X Colors window.
13. Click the Sliders button at the top of the Colors window, and from the pop-up menu, choose RGB Sliders.
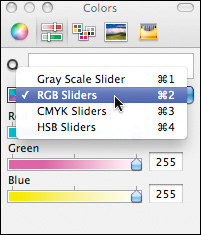
14. Drag the sliders to set Red to 60, Green to 90, and Blue to 20. Then close the Colors window, and press the Spacebar to stop playback.

You now have a smoldering, murky background animation that is perfect for our mysterious and endangered mountain gorillas.
15. This is a great point to save your work. Choose File > Save. Name the project Murky Gorillas and save your work in the Lesson_05 > Student_Saves folder. You now have a saved project to use to if you make a major mistake.
Searching for Content
Generators are just one type of content that Motion allows you to add to your projects. The Motion Library is full of content types, but can you really find something in the Library that is suitable for a project about mountain gorillas? The easiest way to answer that question is to search the Library.
1. Press Command-2 to open the Library pane.
2. Select the Content > All category.
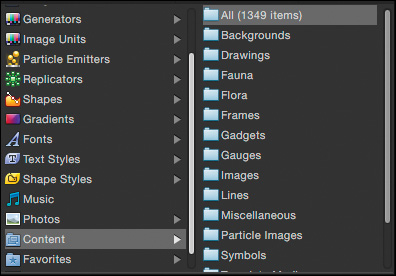
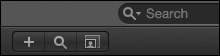
3. At the bottom of the Library pane, click the Search button (the magnifying glass icon) to open the Search field. You’ll search for a graphic of the Earth to help you point out where these gorillas live.
4. In the Search field, type earth.
The Library includes a few Earth-related graphics. You’ll add the black-and-white Earth image because it will more easily allow you to change its colors.
5. Position the playhead at the start of the project, if necessary.
6. In the Library, click the Earth Transparent element.
7. You want to add the element to the Sidebar group. So, first select the Sidebar group in the Layers list, and then click Apply at the top of the Library.
8. Press the Spacebar to watch the Earth spin in your project.
The Earth is already animated, which is both good and bad. It’s good because you don’t have to figure out how to animate it, but it’s bad because you now have to figure out how to make it stop on Africa.
Modifying Animated Content
Sometimes you can easily modify animated content in Motion, and at other times animation changes can be complex and take a long time to figure out. Are you ready for a moderate challenge?
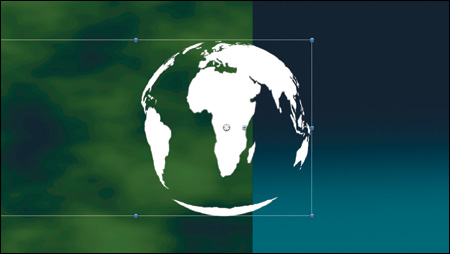
1. Press the Spacebar to stop playback. First, position the Earth in your project.
2. Shift-drag one of the bounding box handles on the Earth to scale it to roughly 65%. Remember to watch the Scale display in the upper-left corner of the Canvas to help set the scale precisely.
3. Position the Earth element in the upper half of the gradient rectangle. Don’t place it right up against the top edge. Leave a little room at the top because you’ll add text there in the next lesson.
Now you’re ready to tackle the animation. Let’s locate the keyframes by selecting the elements inside the Earth Transparent group to see if keyframes appear in the Keyframe Editor.
4. Choose Window > Keyframe Editor, or press Command-8, to open the Keyframe Editor. Then, choose Window > Video Timeline, or press Command-7, to hide the Video Timeline.
Nothing is displayed in the Keyframe Editor because no keyframes are placed on the Earth Transparent group. Let’s drill down into the group to find those keyframes.
5. In the Layers list, click the Earth Transparent group’s disclosure triangle to reveal its contents, and then reveal the contents of the Earth Transparent image.

6. Click the Earth Transparent image, click the Sphere, and finally click the Rotate Earth behavior until you see keyframes in the Keyframe Editor.

There, you found keyframes on the Rotate Earth behavior. Two keyframed parameters appear in the parameter list to the left. These parameters also have two keyframes, which somehow repeat through the entire project, indicated by the dotted saw tooth lines. This is achieved using a Repeat function in Motion. Using this function, you can place the initial keyframes and then Motion will repeat that animation for the length of the layer. In this case, you want to stop that repetitive animation and have the Earth stop on Africa.
7. To stop the repetitive Position X animation, from the Animation menu located in the far-right column of the parameter list, choose After Last Keyframe > Constant

Now the Position X graph ramps to the first keyframe and remains constant. A straight line in the graph indicates that the parameter value is not changing.
8. To stop the repetitive Center X animation, from the Animation menu, once again choose After Last Keyframe > Constant
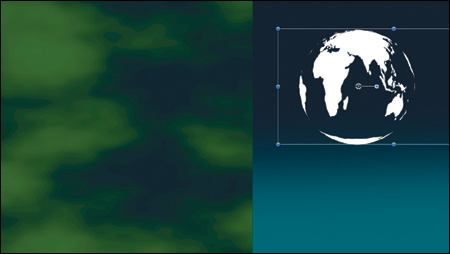
9. In the transport controls under the Canvas, click the “Play from Start” button to review the animation. Press the Spacebar to stop playback.
The Earth now rotates once and stops. That is near perfect. The spinning Earth even stops exactly on Africa. Still, the animation could be improved by smoothly slowing to its final position, rather than making an abrupt stop.
10. In the Keyframe Editor, Control-click the Position X keyframe, and from the shortcut menu, choose Ease In. Then, do the same for the Center X keyframe.

11. In the transport controls under the Canvas, click the “Play from Start” button to review the animation. Press the Spacebar to stop playback.
Now you have a nice smooth Earth animation that slows to a stop with Africa showing. You will now turn your attention to the Earth’s appearance.
You got lucky on this animation. The rotation just happens to stop correctly on Africa. If this project were about Gibbons in Indonesia then you wouldn’t be so lucky. In that case, you would adjust the Center X and Position X keyframes so that the earth landed correctly.
Masking with Images
In previous lessons, you masked elements using the Mask tool in the toolbar. However, you have other ways to mask images using the alpha, luminance, or color channels of a video clip, photo, or graphic. The technique of using image channels as a mask is called an image mask, which can be added to any element or group in a project. You’ll use an image mask here to change the color on the white Earth graphic.
1. Press Command-7 to open the Timing pane, and then press Command-8 to close the Keyframe Editor.
2. Press the Home key, or drag the playhead to the start of the project.
3. In the Layers list, select the Sidebar group to make sure the new shape you draw is created at the top level of that group.
4. Make sure the Line tool is chosen, and from the pop-up menu, choose Rectangle.

You are going to draw a rectangle to cover the Earth. You’ll then set the color of the rectangle to recolor the white areas of the globe.
5. In the Canvas, draw a rectangle to cover the Earth.

6. Press the Esc key to switch from the Rectangle tool to the Select/Transform tool.
7. Press Command-3 to open the Inspector.
8. Click the eyedropper next to the Fill Color, and in the Canvas, click a green area of the clouds.

The rectangle now matches the green color used in the Clouds generator. Next, you’ll create an image mask on the rectangle and fill it with the Earth element.
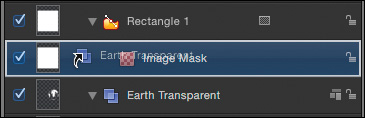
9. In the Layers list, Control-click the Rectangle 1 layer, and from the shortcut menu, choose Add Image Mask.

A new Image Mask layer is created directly under the Rectangle 1 layer. In the Inspector, the image mask includes a drop well for a mask source. To assign the source used as the mask, you can either drag an image into the Mask Source drop well, or you can drag the image directly on top of the Image Mask layer in the Layers list.
10. Drag the Earth Transparent group onto the Image Mask layer in the Layers list.
The green rectangle is now masked based on the transparency or the alpha channel of the Earth Transparent layer. But it looks very flat. You can easily give this a more spherical appearance by applying a gradient to the rectangle.
If the mask image you use does not have an alpha channel, in the Source Channel menu in the Inspector, you can choose to use the Luminance channel or a color channel.
11. In the Layers list, select the Rectangle 1 layer.
12. In the Inspector, change the Fill mode pop-up to Gradient. Then open the gradient editor and select the blue color tag to the right.
13. Click the eyedropper next to the color well, and in the Canvas, click a green area of the clouds in the Canvas.
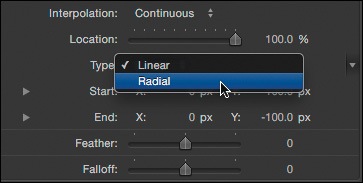
This gradient is linear from top to bottom, but to get a rounder appearance on the Earth, the white color should act more like a highlight. You can do that in the Inspector by switching from a linear gradient to a radial gradient.
14. From the Type pop-up menu in the Inspector, choose Radial.
Our Earth is now in place and has a great three-dimensional appearance. You can now focus on filling up the right side of your project with a gorilla graphic.

Importing Vector Graphics
At some point in your motion graphics career, you will need to use artwork created in a vector-based drawing application such as Adobe Illustrator and saved in a format such as AI (Illustrator) or PDF (Portable Document Format). The vector nature of this artwork means that you can scale it as large as you like without losing its resolution. You’ll import a vector drawing of a gorilla to add to your project.
1. Close the Sidebar and Background groups. Click in an empty area of the Layers list to deselect everything. Then click the Add (+) button to create a new group above the two existing groups, and rename it Gorilla.
2. Make sure the playhead is at the start of the project.
After the gorilla graphic that you create fades up, it will last the entire length of the project.
3. Press Command-1 to open the File Browser. Navigate to Motion5_Book_Files > Media > Mountain Gorilla, and select gorilla face.ai.

4. Click Import to place the file into the Gorilla group at the playhead location, and then roughly center it over the cloudy green background.

At 100% size, the logo is very small. This is a mountain gorilla, the largest of the apes! You need to dramatically increase the size of this layer.
5. Shift-Option-drag a control handle on the Gorilla layer’s bounding box and increase the scale until the sides of the bounding box reach the edges of the cloudy green background.
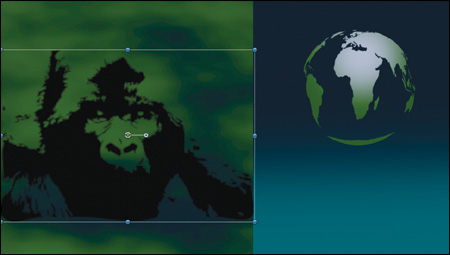
The face appears blurry, as if this layer were a bitmap rather than a vector image. This is because, by default, imported vector files are set to fixed resolution to maximize performance. You can change this setting by selecting the underlying media for the layer instead of the layer itself.
6. In the Project pane, click the Media list to see all the files you imported into a project.

7. Select the gorilla face.ai file, and then press F4 to open the context-sensitive Object pane in the Inspector, which now is also named Media. The Media pane of the Inspector contains settings for the source media file.
8. Deselect the Fixed Resolution checkbox. The gorilla face layer now looks crisp and clear, even at this very large scale.
If you are not scaling imported vector files over 100%, you needn’t deselect the Fixed Resolution checkbox. Leaving it selected will optimize playback performance and render speed.
9. Press Command-4 to open the Layers list, and select the gorilla face layer.
The graphic is sharp, but you can see the edges of the graphic document. You’ll create an oval-shaped mask to obscure the sharp edges of the gorilla graphic.
10. In the toolbar, from the mask tools pop-up menu, choose Circle Mask.

11. Option-drag out from the center of the gorilla’s face to the left edge of the frame, and then drag down until the oval shape just meets the top and bottom of the gorilla graphic.

12. In the Inspector, adjust the Feather parameter to 15 to soften the edges of the oval mask.
Finally, you’ll add a simple Fade behavior to fade in the gorilla graphic at the start of the project.
13. Press Command-2 to open the Library, and select the Behaviors category.
Hey! Nothing shows up. Where did all the behaviors go? You didn’t clear the Search field after you added the Earth content. This can happen often and it’s a good situation to be aware of.
14. To the right of the Search field, click the Clear button (X) to clear the earth search. Suddenly, all your behaviors are back.

15. Select the Basic Motion behavior category, and drag the Fade In/Out behavior onto the gorilla face layer in the Layers list.

16. In the toolbar, click the HUD button, or press F7. Drag the right edge of the fade graphic until it reads 0 frames, and then close the HUD.

17. In the transport controls, click the “Play from Start” button to view the entire project. Click the Pause button to stop.
Occasionally, pressing the Spacebar to start and stop playback may not work because the window focus is in the Library. Click an empty space in the Layers list to reactivate the Spacebar for the Canvas.
This project is really shaping up. It needs more dramatic impact, which you can add by using a bit more color and animation.
Working with Paint Strokes
Almost any shape that has an outline but no fill is a paint stroke. However, paint strokes have much, much more to offer, including a Paint Stroke tool and a huge variety of presets, called shape styles, with which to paint.
In this exercise, you’ll create paint stroke elements in two ways: a simple airbrush line that better defines the two halves of the layout, and a freehand paint stroke to bring a more organic touch.
1. In the Layers list, select the Sidebar group because this is the group you want to contain the first paint stroke. Make sure the playhead is at the start of the project.
2. With the pointer over the Rectangle tool in the toolbar, click and hold down the mouse button. From the shape tools pop-up menu, choose the Line tool.
3. To draw a line, drag from the upper-left corner of the rectangle to the lower-left corner. The result is a white line that acts as a border between the two sides of your design.
Holding down Shift while drawing with the Line tool constrains the line horizontally and vertically.

4. Press Esc, and then press Command-3 to open the Inspector.
The Inspector now shows the controls for the line, which are the same shape controls used for the rectangle. The rectangle also used the fill controls, but the line uses only the outline controls as noted by the blue box next the Outline heading.
5. Click the Outline’s color well disclosure triangle and select a mustard yellow color for the line.

Shapes have other advanced controls in the Inspector, but most of them are available only when you change the Brush Type to Airbrush or use an image as a brush.
6. From the Brush Type pop-up menu, choose Airbrush.
In the Canvas, the line gets a bit softer when you choose the Airbrush type. A few other subtle changes also happen. Two additional active panes, Stroke and Advanced, appear in the Inspector. Let’s taper the line a bit more using the stroke controls.
7. At the top of the Inspector, click the Stroke pane.
We could spend an entire book exploring these shape tools, but for now let’s just vary the width of the airbrush over the length of the stroke.
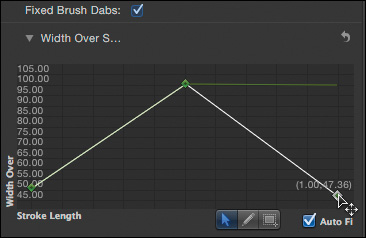
8. Click the disclosure arrow next to Width Over Stroke to reveal the graph control.

A green line is flat across the graph, indicating that the width of the line is constant from start to end. By adding control points and changing their vertical positions, you can vary the width of the airbrush line.
9. Drag down the control point on the left edge of the green line to a width of approximately 50.00 as shown by the numbers to the left of the graph.

Notice that the line in the Canvas is now thinner at the top and thicker down the bottom. By adding new points on the graph line you can alter the thickness anywhere along a stroke’s length.
10. Double-click, or Option-click, in the center of the line to add a control point and drag it up to a width of roughly 100.00, using the numbers to the left of the graph as your guide.

11. Drag down the control point on the right edge of the green line to match the value of the first control point to create a tapered paint stroke line.
You can make the transition between points smoother by Control-clicking a point, and from the shortcut menu, choosing Interpolation > Continuous.
The airbrush is the simplest paint stroke. You’ll animate it in the next section, but let’s first draw a more advanced paint stroke using the more flexible Paint Stroke tool.
12. Close all the open groups in the Layers list, and select the Background group so the new paint stroke will be placed in that group.
13. Position the playhead at 3:19 (or 200 frames) because you want this paint stroke to appear onscreen one-third of the way into the project.
14. In the toolbar, choose the Paint Stroke tool.
The Paint Stroke tool works much like a brush, pen, or pencil because it allows you to draw in a free-form manner (although you can change its shape at any time.) Before using the tool, you can choose what media you will paint with, much as you would choose a color from a palette. But instead of choosing a color, you can choose an image or even a movie as your paint medium.
15. Open the HUD and click the Shape Style pop-up menu to browse through the categories.
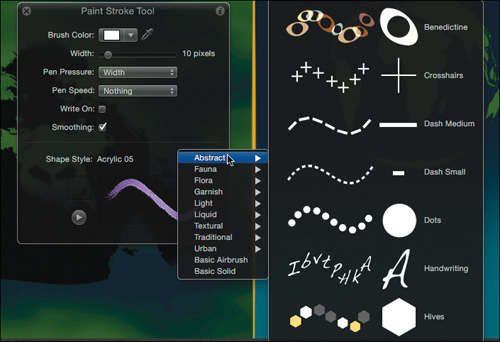
Each shape style is an image or a short movie. When you paint, you create a trail consisting of many copies of the image or movie. Each of those copies is called a dab. When the dabs are sufficiently close together, they form a continuous stroke. To try this out, you will use a shape style from the Traditional category.
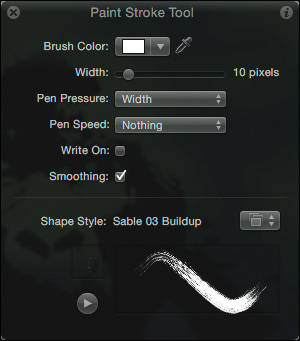
16. Choose Traditional > Sable 03 Buildup.
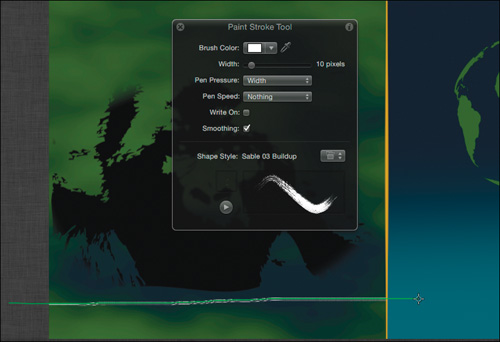
17. Draw a paint stroke that starts at the left edge of the Canvas just below the gorilla and extends to the gradient rectangle. This paint stroke reveals text you will create and animate in the next lesson.
Don’t worry about being too exact with paint strokes. Although they look like fixed strokes, they are still Bezier-based paths that can be edited by Control-clicking and choosing Edit Points from the shortcut menu.
18. Close the HUD. In the transport controls, click the “Play from Start” button to watch the project. Press the Spacebar to stop.
The paint stroke is a bit small, and it just pops on. Let’s fix the color of the stroke and then the width.
19. Position the playhead toward the end of the project where you can see the entire paint stroke in the Canvas.
20. Click the disclosure triangle next to the brush color and select a vibrant crimson red.

You can change a shape style after you have drawn it by choosing a new style from the Shape Style pop-up menu in the Inspector.
21. Drag the width slider to 75 to create a much thicker paint stroke.

Using Shape Behaviors
Shapes and paint strokes can be animated by applying any of the keyframing techniques or behaviors you’ve already used, but Motion also has a special category of behaviors just for animating shapes.
1. Press Command-2 to open the Library. Select Behaviors, and then select the Shape folder.
2. Drag the Write On behavior from the Library to the Line layer in the Sidebar group of the Layers list.

3. Click in the gray empty space at the bottom of the Layers list to deselect the line, and then click the “Play from Start” button in the transport controls. Do not stop the playback.
The Write On behavior animates the line from top to bottom, but it does so too slowly. You can increase the behavior’s speed by changing its Duration in the Timing pane or the mini-Timeline.
4. In the Layers list, select the Write On behavior.
5. In the mini-Timeline, drag the right end of the Write On behavior to 3:19, just to where the paint stroke appears onscreen.

The line now moves at a much brisker pace. Now add the Write On behavior to the paint stroke.
6. Drag the Write On behavior from the Library to the Sable 03 Buildup layer in the Layers list.

7. This animation is also too slow, so in the mini-Timeline drag the right end of the Write On behavior until its Duration is at 1:40. Use the tooltip as a guide.

That’s peppy! In the next lesson, however, you’ll use this paint stroke to reveal text, so you not only need it to paint on, you also need it to paint off the screen.
8. Press Command-3 to open the Inspector for the Sable 03 Buildup Write On behavior.
9. From the Shape Outline menu, choose Draw and Erase.

The paint stroke now paints on and off the screen. You have one more method to create a painterly effect that offers a lot more control using a standard Bezier tool.
Using the Bezier Tool
Unlike the Paint Stroke tool, which automatically places a lot of control points along a freehand-drawn path, the Bezier tool lets you place each control point manually to create a very precise path. Using the Bezier tool, you can create a more refined path for drawing shapes or paint strokes.
1. Make sure playback is stopped, select the Sidebar group, and position the playhead at 4:59.
2. In the toolbar, choose the Bezier tool.
The B-Spline tool, located underneath the Bezier tool, is sometimes a better option for creating totally smooth paths. You’ll use the B-Spline tool later in this lesson.
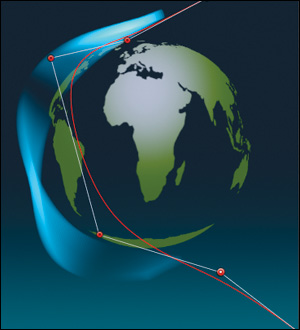
3. In the Canvas, click to create an arcing path that starts at the top of the Earth and goes around its left side. End the path off the screen to the right.
If you drag as you click, the path will curve through the control point rather than making a sharp turn. At the moment, you are just roughing in the arc to establish the timing. You’ll fix the path later in this exercise.

4. After setting the last control point, press Return to finish the shape. The shape is created as a closed, filled shape, but for the purpose of this project you need to display it as an outline.
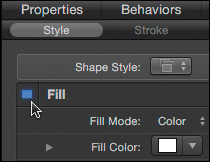
5. In the Shape pane of the Inspector, disable the fill by clicking the blue icon next to the Fill name. When it is disabled, the color fill disappears and leaves just the outline.
You now have a Bezier-shaped path you can easily turn into a paint stroke. Instead of choosing the shape style from a list as you did when using the Paint Stroke tool, you’ll apply the shape style by dragging it from the Library.
6. Press Command-2 to open the Library pane. Choose Shape Styles > Light > Light Tail 07. Drag it over the Bezier layer in the Layers list, and wait briefly to and drop it on “Copy Style to Shape” in the pop-up menu.

7. Press the Spacebar to play the new Light Tail paint stroke, and then stop playback.
The Light Tail paint stroke is a shape style that is automatically animated. You didn’t need to add a Write On behavior. It still needs some adjustments, but you can make those adjustments more quickly if you just play back the part of the project containing the light tail and not the entire project.
To determine if a shape style is animated before you apply it, select it in the Library and watch the preview. If it animates in the Library preview window, then it will autoanimate when you apply it.
8. Position the playhead toward the end of the project, where the light tail has gone off the Canvas (roughly at 8:00). Press Command-Option-O to set a play range Out point at the playhead.
9. Press Shift-I to move the playhead to the Bezier layer’s In point, and then press Command-Option-I to set a play range In point at the playhead.
10. Press the Spacebar to begin playback.
As you learned earlier, paint strokes have an incredible number of parameters you can adjust. Let’s try a few.
11. In the Inspector adjust the Width to around 40, and then click the Geometry pane.
The paint stroke is a little less smooth than you might like. In the Geometry pane, you can smooth the shape and more easily adjust the points.
12. Change the Shape Type to B-Spline.
With just that small menu change, the paint stroke already looks much improved. That’s because B-Splines are sweet! B-Splines should be your preferred drawing tools for masks and paint strokes because they are much easier to modify than Bezier shapes and the results are always smooth.
B-Splines are also easier to manipulate because they don’t use tangent handles like Bezier shapes. Instead, the control point influences the curve by pulling it in any direction. By default the curve is always smooth, although you can create sharp angles if you need to.
Command-dragging a control point on any B-Spline shape will produce a sharper angle at that point.
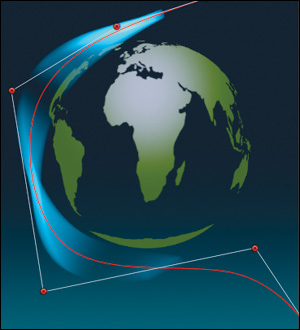
13. Stop playback, and double-click the shape to reveal the control points. Drag the control points of the B-Spline to create an arc that goes along the left edge of the Earth graphic.
14. Press Option-X to reset the play range. Review the project and save your work.
You covered a large amount of ground in this lesson, learning the essential design tools found in Motion and how to import design elements created elsewhere. The relative benefits of creating all your elements in Motion versus importing vector graphics created in other programs is for you to decide. You can increase performance by using imported elements, but as you’ll learn in the next lesson, a wealth of animation features accompanies the Motion design tools. In the end, a healthy combination of imported graphics and Motion-designed elements work best.
Lesson Review
1. How many color tags can you add to a shape’s gradient in the Inspector?
2. How do you reverse the direction of a gradient?
3. Where do you change the fill for a shape such as a rectangle?
4. How do you create an image mask?
5. True or false: A source image for an image mask must contain an alpha channel.
6. You’ve added a vector graphic in the Illustrator or PDF format but when you resize it, it looks blurry. How can you fix this?
7. How do you create a generator?
8. If you select a category in the Library and it is empty, what might be the first thing to check?
9. How does the Paint Stroke tool differ from the Bezier tool?
10. How can you increase the speed of a Shape behavior?
11. Describe two ways to apply a shape style preset to a paint stroke.
12. What behavior can you use to animate the appearance and/or disappearance of a paint stroke from the first control point to the last?
Answers
1. There is no limit.
2. Click the Reverse Tags icon next to the color gradient bar.
3. With the layer selected, press F4 to open the Shape pane of the Inspector, and choose the appropriate option from the Fill Mode pop-up menu.
4. In the Layers list, Control-click the appropriate layer, and choose Add Image Mask from the shortcut menu. Drag an image into the Mask Source drop well.
5. False. An image mask can use an alpha channel, luminance channel, or a color channel.
6. Switch to the Media List in the Project pane to select the AI or PDF file. Then view the Media pane in the Inspector and deselect the Fixed Resolution checkbox.
7. Press Command-2 to open the Library, and select the Generators category. Select a generator, and click Apply.
8. Check to make sure the Search field is empty at the bottom of the Library.
9. The Paint Stroke tool is a freehand tool. The Bezier tool lets you place each control point as you draw by clicking in the Canvas.
10. You can increase a behavior’s speed by shortening its duration in the Timing pane or the mini-Timeline.
11. Choose a shape style from the HUD pop-up menu, or drag it from the Shape Style category in the Library onto the paint stroke layer.
12. The Write On behavior
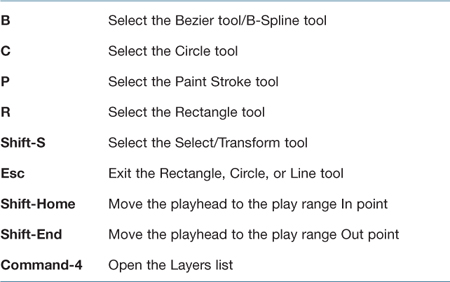
Keyboard Shortcuts