
Now that we've successfully created the first part of the Event app, it is time to make it more functional. In this chapter, we will build onto our Event app by adding code that will enable guests to respond to the invitation by sending an RSVP (répondez s'il vous plaît—please reply, in French). The app will aggregate all the data and display a guest list so that both guests and party organizers can see who is attending.
In order for the app to collect all the RSVP data from individuals in a central repository, we will have to use an online database. App Inventor has built-in support for three online databases, TinyWebDB, and Google Fusion Tables (which we will use).
Both, TinyWebDB and Google Fusion Tables have their limitations in aggregating data. TinyWebDB, while easy to use, is not secure. This means that anyone has access to the database, could by mistake (or on purpose), delete or change the data that is collected. On the other hand, Google Fusion Tables is secure, but is more complicated to use. In order to integrate Fusion Tables into our app, while keeping the design of the app relatively simple, we had to make some tradeoffs. The learning objective is to introduce you to the process of building a database with a relatively simple app. But, as you will discover, the resulting app is challenging to disseminate to a broad public audience. At the time of publication for this book, another App Inventor database alternative, FirebaseDB was under development. We will offer updates about the adoption of FirebaseDB as it becomes available. You can check the supplementary materials on both the Packt Publishing and MIT App Inventor websites for new information about FirebaseDB.
In this chapter you will learn:
- How to create a Google Fusion Table
- How to establish Google API credentials
- How to set up an RSVP form
- How to push data from an App Inventor app into a Google Fusions Table
- How to request and receive data from a Google Fusion Table into an App Inventor app
- How to display a guest list
In this app, invitees will send an RSVP to let the party organizer (and other guests) know whether or not they can attend an event. So, naturally, we will have to include a mechanism to collate all of that distributed information into one central place. To achieve this, we will create an online database using a Google Fusion Table. In professional programming, this aspect is often referred to as creating the backend.
To create a Google Fusion Table, go to the https://drive.google.com website on your computer and click on the big red button on the top-left side of the screen labeled NEW. Scroll down the list of options and select More and select Google Fusion Tables:

If you have never used Google Fusion Tables before, chances are, when you click on More, you will not see the Google Fusion Tables option listed. If this is the case, select the last option with the plus sign, Connect more apps. A pop-up window will appear with a lot of apps that you can connect to your Google Drive. You should see a view similar to the following screenshot. At the top left of this pop-up window you will see a button that by default shows the word All. This button lets you filter the apps into various categories. Click on it and select the second option, By Google, from the drop-down menu, as shown in the following screenshot:

Now, you will see a list of all Google-created apps as shown on the right-hand side of the preceding screenshot. Find the Google Fusion Tables app in the list and click on it. After doing so, the next time you click the red NEW button in https://drive.google.com and select More, Google Fusion Tables will appear as an option.
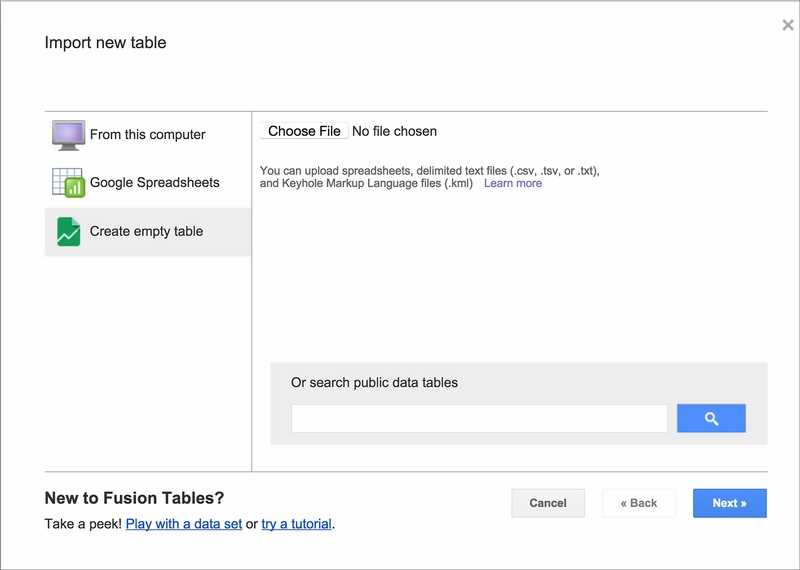
When you create a new Fusion Table, you will be given the option to create an empty table (along with some other options). For our purpose, select Create empty table.
Next, we will make the format of the table suitable for our app. First, rename the table to give it a meaningful name. Click on the current table name, which is New Table, in the top left corner. This will open a Table information window. Give your table a descriptive name such as EventApp Table and hit the Save button:

We will need to make further modifications to the table before it is ready to be used as the backend of our Event app. By default, a blank row is inserted in Fusion Tables. We want our table to be completely empty. To clear out the table, select the Edit tab on the top left corner of the screen, below the table name. You will see a Delete all rows option; click on it and confirm that you want to delete all rows:


Now that we have a clean table, we need to decide what columns to use. For this Event app, we want to know who is coming (the name of the guest), how many people that person is bringing (the number of guests), and what items that guest is bringing to the party (potluck). This information is going to be used by the organizer to plan the party.
Each of these three pieces of information will be saved in a column on the Fusion Table. Four columns are automatically included when a Fusion Table is created. Since we only need three columns, we are going to delete one of the four default columns and modify the other three.
The Edit tab that you clicked to delete all the rows and clean up the table also contains another option called Change columns. We will use that options several times now to make all the changes to the columns. The default column names are Text, Number, Location, and Date. We will change them to Guest Names, NumGuests, and ItemsBringing.
To change the first column to Guest Names, click on the Edit tab and select the Change columns option and you will see the following screenshot. The first column is selected by default (the gray background on the left panel indicates it is active). Change the Column name to Guest Names. This column is already configured to save Text data (the Type option), hence we do not need to make any changes here:

Now that we have changed the first column, we will do the same to the second column. Select the second column (currently called Number). Once you click on it, the background will become gray. Now change the Column name to NumGuests. Since, this column is already configured to store numbers, we do not need to make any changes here:

Next, we need to rename the third column (currently called Location). Just like the previous examples, select that column and change the name to ItemsBringing. By default this column is preconfigured to store Location data. We actually want to store Text data (items that guests will bring). So we need to change the datatype. When you click on Location (the Type option), a drop-down menu will appear as shown in the following screenshot. Select the Text option.

Finally, since we need only three columns, we will delete the fourth column by hovering over the fourth column to make it active (gray) and clicking on the x next to it (as shown in the following screenshot) and confirming the deletion in the pop-up box:


Now that the table is ready to be used, click on the File tab in the upper left corner and select About this table from the drop-down menu.

Another page will open with various details of the table. Note the information given in the very last piece of information, the Id, as shown in the following screenshot. Double-click on the alphanumeric string to highlight it, copy/paste it in another place on your computer, such as a Notepad file or an empty document. (You may have to use your browser's copy/paste feature to do this, as keyboard shortcuts may not work. You can find copy/paste under the Edit menu heading at the top of your browser window.) You will use this Id in the App Inventor app to push/pull data to/from this table:

We will make one small final change to the Fusion Table (to its Sharing settings) but, we are not ready to do that just yet. So keep the Fusion Table window open and start working with App Inventor in the separate browser window.