
To switch to the Blocks editor, click on the Blocks button in the upper-right corner of the menu bar.

The Blocks window has a Blocks panel (left), a Viewer (the large white workspace), and a Media panel (in the lower-left corner). The Media panel operates in the same manner as the designer, although we won't be using it for this app.

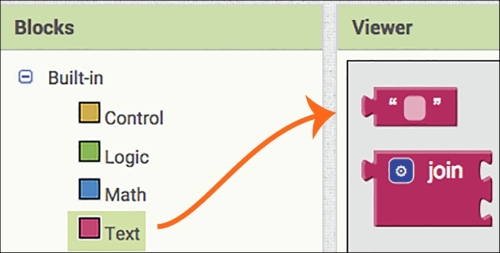
All the tools you need to program your app are in the Blocks panel on the left-hand side of the window. The first set of Blocks shown with small colored boxes is called Built-in (you will learn about these as we build our app). Below the Built-in blocks are the blocks relating to the Components you just added in the Designer. Below the Component blocks is a list of Any Component blocks. We will not be using these in this chapter.
Navigating the Blocks editor is similar to the Designer. When you click on a block in the Blocks panel, a pop-up drawer will appear to reveal many colored puzzle-like blocks. The block you click on will automatically appear in the white workspace called the Viewer. To program your app, you need to drag one block into another, and hear and see it snap into place.
Once you start filling up the Viewer with blocks, it can get crowded. There are two ways to use more of the workspace: by using the bottom and side gray scroll bars or by clicking and dragging on the white space itself. This will become evident once the blocks are in place.
When you click on any of the blocks' categories in the Blocks panel, a pop-up drawer of available blocks will appear. The following screenshot shows some of the available blocks for the Play_Button component (the gray scroll bar indicates that there are more blocks than what is shown on the screen. You can see the rest of the blocks by scrolling down):

Component Blocks are made up of different kinds of blocks. For this app, we will be using three kinds of blocks: event, setters, and getters.
- Event Blocks: They are gold, and if they exist for a certain component, they will appear at the top of any pop-up Blocks drawer. They launch an event, such as when Play_Button.Click. To program what happens when the Play button is clicked, you can snap together other puzzle piece blocks called setters and getters.
- Setters: They are dark green or orange puzzle piece blocks that say set because they set a property's value. Notice that setters have an opening at the end. Another type of block, a getter, fits into that space and so the setter can get a value.
- Getters: They are colored puzzle piece blocks that fit at the end of the setters. They give a property value to the setters.
Built-in blocks have a variety of different colors and purposes. We will explain them as we use them.
We will now begin using blocks to code our app.
Click on Play_Button in the Blocks panel to open its drawer. Then, click on the top gold when Play_Button.Click event block as shown in the next screenshot. It will now appear in the Viewer.

When a user clicks on the app's Play button, we want the game to begin and the ball to start moving. So, we need to program these steps.
First of all, we are going to position the ball at the top of the screen and have it move down toward the bottom of the screen. But we don't want to set it all the way at the top of the screen because, in the next chapter, we are going to program our app, so that, every time the ball hits the top edge, the user will score a point. To avoid scoring points by merely pressing Play or Reset, we must position the ball a little below the top edge. To do this, we need to set a pair of the (x, y) values for the Canvas. The x value is where the ball will be horizontally on the screen and the y value will be the ball's vertical position. The x value is defined as the number of pixels from the left edge of the Canvas and y is defined as the number of pixels from the top edge of the Canvas. We decided that we don't want y to be 0, as the ball would be touching the edge, so we can set the y value to something close to 0, such as 2. We can set the x value to any value along the width of the Canvas. To make the game more unpredictable, we will program the app to pick a random value for x. Then, each time the user hits Play or Reset, the ball will start at a different location horizontally on the screen (although it will always start 2 pixels from the top, since we are setting y = 2). To set the ball's starting location, we will select a block from the Ball1 drawer.
Click on Ball1 in the Blocks panel. A drawer will open with all the available blocks for Ball1. Use the gray scroll bar to the right of the pop-up drawer to scroll down past the gold event blocks. Click on the purple procedure block: call Ball1.MoveTo x, y, as shown in the next screenshot:

The purple procedure block will now appear next to the when Play_Button.Click gold event block in the Viewer. Notice how the shape of this purple block fits inside the gold block. Go ahead and place it into the gold block (by clicking on it with your mouse and dragging it). The gold block will expand to accommodate the purple block. You will hear and see it snap into place, as shown in the following screenshot on the right-hand side:

We know that we want the value of y to be equal to 2, so we will find a block (a getter) to get this value. Click on the Math block in the Built-in section. The Built-in Math blocks have a little blue box next to it. A drawer will open up with the available blue Math getter blocks. Click on the first one with the value of 0, as shown in the next screenshot:

The 0 block will appear in the Viewer, and you can drag it and snap it to the y value. Click on 0 to highlight it. You can type in the number 2 to change the value to 2, as shown in the following screenshot. Next, we are going to set the x value to a random integer. Go back to the Math blocks and click on the last block shown in the preceding screenshot: random integer from 1 to 100. Drag this block to the x value, as shown next:

Since users will have mobile devices with different screen sizes, we won't know whether the width will be 100 pixels or 350 pixels. So, to enable the game to be played on different size screens, we can remove the Math block with the value of 100 and insert a getter block instead that will get the screen width of the mobile device the user is using. To delete the blue 100 block, click on it to outline it in yellow. A little hand icon will appear. This indicates that you can drag the block out of the slot, as shown in the following screenshot:

Note that if you don't see the hand icon, it just means that you clicked on the actual number instead of the block. This will be indicated by a cursor and a little bit of white space to the right of the number. Click again on the actual blue part of the number puzzle piece and you will see the hand icon, which will allow you to drag the block out.
To delete this block (or any unwanted block), click on it (if it is not already highlighted in yellow) and hit Delete on your computer's keyboard. Or, you can drag the block to the lower-right corner of the Viewer to throw it in the trash. Hover the block over the trash can and the lid will open. When you release the block, it will disappear. You will see it fade away and hear a crumple sound.
To add the a block indicating the user's screen width block, click on Screen1 in the Blocks palette and choose Screen1.Width from the drawer. It will be near the bottom, so you can use the gray scroll bar to scroll down and find it.

Note that to drop this block inside another block (whether an equation or a single block), align the little puzzle piece nib on the left-hand side of the block with the nib space on the left-hand side of the block's opening and it will easily snap into place. Your blocks should look as follows:

Every time a user presses Play, the ball will be positioned at a different place along the width of the screen and 2 pixels from the top of the screen.
Now that we have positioned the ball, we will now program it to move.
Since we've programmed the ball to start at the top of the screen, we want the ball to move downward. Instead of it just dropping straight down or at the same angle each time, we can set the degrees to be random. There are 360 degrees in a circle, but we only want the ball to fall between certain degrees, those represented as downward that fit between the width of the screen, but not along the edges of the screen. The figure below shows that the right edge is 0 degrees and the left edge is 180 degrees. The actual space that we are interested in is the lower half or the degrees between 180 and 360. Since we don't want the ball to just travel down the edges, we will eliminate the two extremes when choosing some numbers. We decided to choose degrees between 200 and 340. We will code the app so that the program will choose a random number between those degrees for the angle at which the ball will move.

You already learned how to program a random integer from our previous blocks, so let's repeat those steps. Go to the Math blocks and choose the blue random integer from to block. You also know how to fill in these numbers. To review, choose the topmost blue block in the Math blocks: the one with 0. You can enter 200 in it and then copy and paste the block by clicking on it to highlight it (make sure it has a yellow outline). If you don't want to copy and paste, you can always drag out another Math 0 block. Click on the number in the copied block and type 340. Then, place the 200 block into the from spot and the 340 block into the to spot.
Our random integer from to block needs to fit someplace, to which block will it be giving this information? Another way to ask this question is: which block will be getting this information? If you guessed Ball, you are correct! The ball will need this information to know the angle at which it has to move. So, we need to find the ball block that represents the ball's direction. This block is called Ball1.Heading, and it represents the degrees the ball will move. Click on the Ball1 Blocks drawer to find the dark green Ball1.Heading block (you will need to scroll down past the gold and purple blocks to find it). Once this is on your Viewer, snap it together with the blue random integer from to block that you just created. Then, take these connected pieces and insert them at the bottom of the gold when Play_Button.Click. Your blocks should now look like the following screenshot:

Now that we have the location of the ball and the direction it is heading in degrees, we need to program it to actually move. To do this, we will first set the ball to enabled. From the Ball1 blocks drawer, choose the dark green set Ball1.Enabled to block. Then, from the Logic blocks drawer, choose the lime green true block at the top, as shown in the next screenshot:

Insert the true block into the set Ball1.Enabled to block and add them to the bottom of the when Play_Button.Click event, as shown in the following screenshot:

Now that the ball is ready to move, we can actually move it by setting the speed and the interval. Go back to the Ball1 Blocks drawer and select the dark green setter block, set Ball1.Speed. Next, from the same drawer, select set Ball1.Interval.
The interval is the amount of time, in milliseconds (1000 milliseconds = 1 second), the ball will travel, and the speed is the number of pixels the ball will move in that timeframe. It's fun to play around with these numbers to see how fast or slow you can make the ball move. We've decided to have the ball move 10 pixels every 50 milliseconds, so we will program our blocks to look as follows:

Insert these blocks at the bottom of the when Play_Button.Click event. Your blocks will look like the following screenshot:

So far, this is what our app does: when the Play button is clicked, it will move the ball to position it 2 pixels away from the top edge of the screen and to a random number between 1 pixel from the left edge of the screen and the right edge of the screen. It will set the ball rolling downward in a random direction (between the degrees 200 to 340) at a speed of 10 pixels every 50 milliseconds!
The object of the game is to fling the downward moving ball away from the bottom edge, because if the ball drops down to the bottom edge of the screen, the game will end. Next, we need to code these events.
First, let's program the app to fling the ball.
How will the ball know when a finger touches it and how to move in another direction (not downward)? We can program these events by using a block from the Ball1 Blocks drawer called when Ball1.Flung. Click on this gold event block to add it to the Viewer. You can make the ball move at any speed you like, but we are going to keep it going at the same speed, just in a different direction. To do this, you can copy and paste the set Ball1.Speed to and set Ball1.Interval to blocks from the when Play_Button.Click event (note that when you click on the dark green set block and copy and paste it, the blue getter block attached to it will also copy and paste). Add these blocks to the when Ball1.Flung event to resemble the following screenshot:

Next, we will reposition the direction of the ball to go upward (when it is flung by a finger). We could set the heading to a degree between 10 and 170 (see image #39) or we could make the ball go in the upward direction with an equation. Let's practice equations more. Copy and paste the set Ball1.Heading block from the when Play_Button.Click event (remember the heading block determines the angle at which the ball will move). Drag it to the bottom of the when Ball1.Flung event. We want the ball to go in the opposite direction than the direction in which it was heading, not to a random integer, so you can delete the attached blue block by highlighting it and pressing delete on your keyboard or by clicking on the blue block and dragging it to trash. To get the ball to go in the opposite direction, we are going to subtract the current ball's heading (direction) from 360 degrees (the total number of degrees possible). To code this, choose the minus block from the Math Blocks drawer. In the first open space, add the number 360. Copy and paste the 50 blue block from the when Ball1.Flung event and change the number to 360. Insert it into the open space to the left of the minus sign.
Next, from the Ball1 Blocks drawer, select the light green getter block, Ball1.Heading. Insert it in the open space to the right of the minus sign (line up the block nib with the open nib). Here is what we have coded: when the ball is touched and flung, the program will move the ball's direction (or heading) to 360 degrees minus the old direction (or heading). Your blocks will look like the next screenshot:

Now that the Play Button starts the ball moving downward and the user can fling it in a different direction, we want to program the following actions:
- Ending the game when the ball touches the bottom edge
- Bouncing the ball off the left, top, and right edges
We can program these actions with the if/then blocks. If the ball touches the bottom edge, then the ball will stop and the game will end. If the ball touches the other edges, then the ball will bounce back and the game will continue.
Let's first program the app to stop and end the game when the ball hits the bottom edge. App Inventor makes this easy. Go to the Ball1 Blocks drawer and click on the when Ball1.EdgeReached event. Once the event block is in the Viewer, hover (don't click) on the light orange word edge on the left-hand side of the block and you will get a popup, as shown in the next screenshot. Choose the top dark orange get edge block. This is a variable. Set it aside; we will use it in a minute.

We will add an if then event to the inside of the when Ball1.EdgeReached event. But first we will configure it. Go to the topmost Blocks drawer called Control and click on the first gold if then block.

When the block first appears on your Viewer, it will look like Step 1 in the following image. If you click on the blue color square in the upper-left corner, a popup will appear. Move your cursor over the bottom else block on the left-hand side of the popup, click on it, and drag it into the if opening on the right-hand side of the popup, as shown in Step 2 and Step 3. Once the else block is in place, you will see the original if then event block change into an if then else block. You will see that else is now added to the bottom of the block, as shown in Step 3 and Step 4:

Add this if then else block to the inside of the when Ball1.EdgeReached block, as shown in the following screenshot:

To program, if the ball touches the bottom edge, then the ball will stop and the game will end. We will use a math equals block. It is the second one from the top in the Math Blocks drawer, as shown in the next screenshot:

Inside the first opening to the left of the equal sign, add the dark orange get edge block that we had set aside. You will notice that the alert will remain on this block until we snap the math block in place with the if block, which we will do shortly.
In the next image, you will see that each edge is represented by a number:

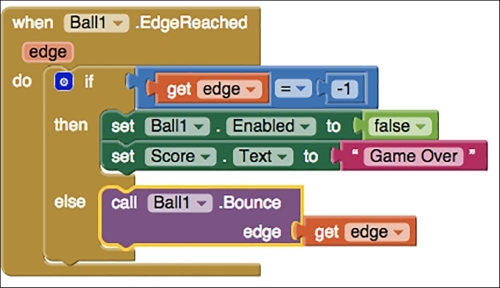
Since the bottom edge is equal to -1, add a number Math block to this equal block and enter the number -1. Snap the blue math block into the if block, as shown below (and you will see the alert disappear).

When the bottom edge is reached, we want the ball to stop, the game to end, and the app to display the text Game Over. We already know how to enable the ball to move: we set the property enabled to true. So, now that we want the ball to stop or not move, we must set the enabled property to false. In the Ball1 blocks drawer, select set Ball1.Enabled to and then in the Logic blocks drawer select the false block. Slide that set of blocks into the then space of the if then else block, as shown below.

Next, we will program the app to display some text indicating that the game is over. We will use the Label that we named Score (in the next chapter, we will also use this Label to display the score). Go to the Score blocks drawer and select the dark green set Score.Text to block, as shown in the following screenshot:

This setter block needs to get some text, so we will add a getter text block. Go to the pink Text block drawer and choose the first block, which is an empty space with quotes around it, as shown in the next screenshot:
You will add this pink text block to the set Score.Text to block and insert it below the set Ball1.Enabled to block in the then event. Click on the pink text block and type the words Game Over, as follows:

We have programmed the app so that if the ball hits the bottom edge, it will stop moving and the Label will display the text: Game Over.
The last step, the else block, is for when the ball hits an edge other than -1 (the bottom). If the ball hits any of the other edges, we want the ball to bounce off them and the gameplay to continue. To program this, we'll use the purple call Ball1.Bounce block. We will attach the same orange get edge block we used previously, but this time, we won't specify a certain edge. Any edge that the ball touches, other than the bottom edge, will cause the ball to bounce. Copy and paste the get edge block, add it to the purple call Ball1.Bounce block, and insert the blocks into the else slot, as follows:
Think of else as meaning otherwise. If the ball hits an edge equal to -1, then execute the then code, otherwise execute the else code. In other words, if the if option is not met (if the ball doesn't hit the -1 edge), then the program will skip then and jump to else.
Following is a screenshot of our app when the ball hits the bottom edge, stops, and displays Game Over.

The last thing we will do in this chapter is configure the Reset button. The Reset button gets pressed after the game has ended due to the ball hitting the bottom edge. It doesn't start the gameplay like the Play button does; it merely repositions the ball back at the top of the screen and makes the Game Over text disappear from the screen (Label).
Go into the Reset Button Blocks and choose the gold event when Reset_Button.Click. We want to move the ball from the bottom of the screen to the top of the screen. We already know how to do this because we did it for the Play Button. You can copy and paste the call Ball1.MoveTo purple block (when you click on the purple block and copy and paste it, it will automatically copy and paste the blue x, y, getter blocks attached to it). Add your blocks to the when Reset_Button.Click event, and your blocks will look like the following screenshot:

These blocks reposition the ball back up to the top of the screen (to a random x location), but the Game Over text will still be displayed. To have the Reset Button erase this, we will simply set the Score Text to blank text instead of Game Over. Copy and paste the dark green set Score.Text to block from the when Ball1.EdgeReached event block (copying and pasting the green Setter block will also copy and paste the pink text block). Click on the Game Over text and press Delete, so the text area is empty. Add this set of blocks to the bottom of the when Reset_Button.Click event block, as follows:

The following is a screenshot of our app after the Reset button is pressed. It shows the ball up at the top of the screen and a blank area where the Game Over text previously appeared.

Our first version of the Fling app is now complete! We have designed and coded the Fling app, so when the Play Button is clicked, it will randomly position the ball at the top of the screen and start the ball rolling downward. Flinging the ball with a finger causes the ball to move in the opposite direction to than was going. The ball bounces of all the edges, except for the bottom one. When the ball hits the bottom edge, it stops and the app displays Game Over. The Reset button repositions the ball to a random position at the top of the screen. At this point, you may or may not have discovered that we have a bug! It has something to do with the Play and Reset buttons. We will reveal and fix this bug in the next chapter.