
Now that you have been introduced to MIT App Inventor 2 and you have learned about your new role as an app developer and designer, let's get started with the technical setup! MIT App Inventor is a free web-based application that runs on a web browser and saves your projects on the cloud. The magical part about MIT App Inventor is that you can live test your app during each stage of development. In order to do this, you will need to set up connectivity that includes downloading software to connect your computer to your Android mobile device or between the onscreen emulator.
This chapter covers the following topics:
- System requirements
- Setting up a Google account
- Connecting your computer to your mobile device using wireless Internet (WiFi)
- Connecting your computer to your mobile device using a USB cable
- Connecting your computer to the onscreen emulator
To use MIT App Inventor, you will need a computer connected to the Internet, a web browser, a Google account, an Android phone or tablet (but if you don't have one, you can use the onscreen emulator), and a way to connect your computer to your phone (either with WiFi or a USB cable). Setting up MIT App Inventor for the first time can be a little daunting, but if you follow the steps based on your operating system and how you will be connecting (via WiFi, a USB cable, or an emulator), it can be a straightforward process. And remember, once you complete the technical setup, you can start building mobile apps!
In this section, we will cover the recommended software requirements that your system (PC, browser, and Android device) must have in order to run MIT App Inventor without any hassles.
Computer and operating system requirements:
- Macintosh (with an Intel processor): Mac OS X 10.5 or higher
- Windows: Windows XP, Windows Vista, Windows 7, Windows 8, or Windows 10
- GNU/Linux: Ubuntu 8 or higher, or Debian 5 or higher (note: GNU/Linux IDE is only supported for WiFi connections between computers and Android devices)
Browser requirements:
- Mozilla Firefox 3.6 or higher (if you are using Firefox and have the NoScript extension installed, you will have to disable it by turning the extension off)
- Apple Safari 5.0 or higher
- Google Chrome 4.0 or higher
- Note: Microsoft Internet Explorer is not supported
Android device (phone or tablet) requirements:
- Android Operating System 2.3 (Gingerbread) or higher
If you already have a Google Account (or a Google Gmail account), please skip to the section: Logging into MIT App Inventor.
The login authentication and storage for MIT App Inventor projects are linked to a Google account. Thus, you need to set one up. It is free! You will also need this Google account when you are ready to upload your completed apps onto the Google Play marketplace. There is an option to create an online profile, which you can make public or private.
The minimum age to set up a Google account in the Netherlands is 16, in Spain and South Korea, it is 14, and in the US and all the other countries, it is 13.
Sign up for a Google account at https://accounts.google.com/signup. The form asks you to create a username and password; you will need these to use MIT App Inventor. While there is a field to enter a mobile phone number, it is not a required field. However, you will need to enter an e-mail address to complete the setup. If you don't have an e-mail ID, please ask a parent, guardian, or teacher to fill one in. It is used for security purposes, for example, to help recover a forgotten password.
Once you have set up your Google account, you can log into MIT App Inventor for the first time at http://ai2.appinventor.mit.edu/ (or by clicking the Create Apps! button on the home page http://appinventor.mit.edu/). Either method directs you to the Google Sign-in screen.
If you are not signed into your Google account, a login screen will appear, asking for your username and password. If you are already signed into your Google account from a previous session, you will see the following message:
The application MIT App Inventor Version 2 is requesting permission to access your Google Account. Please select an account that you would like to use.
Your Google account will appear with a radio button next to it. Click on the Allow button or you can choose another account, if you have one. The choices will look as follows:
Once signed in, you will be directed back to MIT App Inventor, where new users will need to agree to the MIT App Inventor privacy policy and terms of use by clicking on the button at the bottom of the page, which will look as follows:
Next, you will be taken to the projects page. A pop-up window will ask you to take a short survey. The information you provide is confidential and it will assist with research and help the MIT App Inventor team to improve its service for users around the world. The survey is optional; click on one of the three options, as shown in the following screenshot:

Then, you will see a pop-up window that looks similar to the following screenshot:

This type of information windows will appear regularly when logging into the MIT App Inventor (unless you opt out by clicking on the Do Not Show Again checkbox) to give you latest information from our developers about updates and releases. They also provide links to help you get connected. Be sure to read these when they appear, so you can get the relevant information on MIT App Inventor updates. Then, click on the Continue button.
To create your first MIT App Inventor project, click on the Start new project button in the upper-left corner of the screen, as shown in the following screenshot:

A pop-up window (as shown in the following screenshot) will ask you to name your project. No spaces are allowed in project names:

Once you type a name, click on the OK button. The project you just named will exist under both Projects and My Projects in the top menu bar (as shown in the following screenshot):

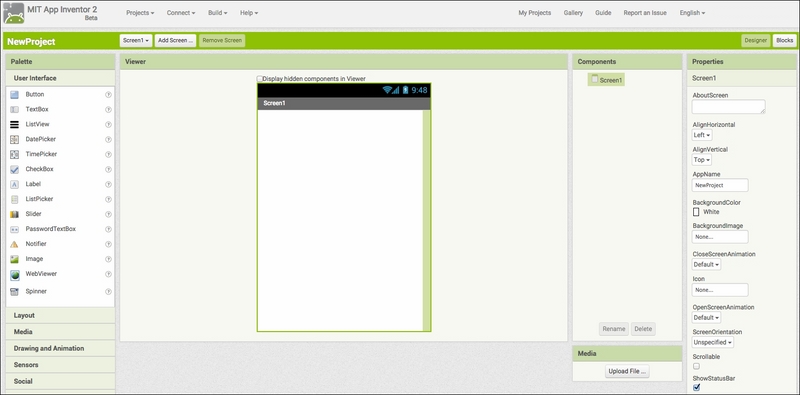
Congratulations! You are now in the Designer window (as shown in the following screenshot); it is the Graphical User Interface (GUI) where you will create the look and feel of your app:
You are now ready to establish connectivity!
If at any point during the connectivity setup process, you need additional help, click on Guide in the upper-right corner of the top menu bar of the Designer window (as shown in the following screenshot):
