
This first set of instructions is for all the users with an Android mobile device regardless of how you will be connecting this device to your computer (WiFi or USB cable) and regardless of your computer's operating system (Mac, Windows, or GNU/Linux). If you will be using the onscreen emulator, skip to section: Connecting the emulator or connecting using a USB Cabl e.
Now that you have completed the initial setup to create a project in MIT App Inventor, you are almost ready to create apps. But first, you need to connect your computer to your Android mobile device so that you can see your app take shape as you build it. To do this, you will need the free AI2 Companion App.
There are two ways you can get the AI2 Companion app onto your Android device: through the Google Play Store or through direct download. Following are instructions for both methods:
- Google Play (recommended for automatic updates): If your device has a QR code reader app installed, you can scan this QR code (see the following image). It will take you to the Google Play Store where you can download the AI2 Companion app to your device. (If you don't have a QR code reader, you can find one for free by doing a search in the Google Play Store.)

Alternatively, you can access the Google Play Store to download the AI2 Companion app by typing the following URL in a web browser on your device:
https://play.google.com/store/apps/details?id=edu.mit.appinventor.aicompanion3
- Direct APK download (requires manual updates): If for some reason you cannot access the Google Play Store, you can download the app directly on your phone by scanning this QR code (see the following image):

Alternatively, you can download the app by typing the following URL in a web browser on your device: http://appinv.us/companion.
Note that when downloading the app directly (also known as side-loading), you will need to do as follows:
- Change your device's settings to allow the installation of apps from unknown sources. To find this setting on versions of Android prior to 4.0, go to Settings | Applications and then check the box next to Unknown Sources. For devices running Android 4.0 or later, go to Settings | Security or Settings | Security & Screen Lock and then check the box next to Unknown Sources and confirm your choice.
- Manually update the MIT AI2 Companion app. Since you will not receive automatic updates from the Google Play Store, whenever you log in to App Inventor and see an information window popup indicating that the MIT AI2 Companion app has been upgraded, you will need to install the new version by repeating the direct downloading (side-loading) steps. But first, you must uninstall the previous version of the MIT AI2 Companion app. To uninstall, locate the MIT AI2 Companion app's icon on your phone and tap and hold it until you see a message with an uninstall option. Click on uninstall.
These instructions are for Android device users, who will be connecting to their computer via wireless Internet (WiFi).

The fun part about building apps with the MIT App Inventor is live testing, that is, seeing your progress appear on your mobile device in real time. For the IDE to function properly and automatically update your app on your device; you must ensure that your computer (running MIT App Inventor) and your Android device (running the AI2 Companion app) are connected to the same WiFi network. Please ensure that this is the case before you continue.
On your computer, in the Designer window, click on the top menu item, Connect, and choose AI Companion from the drop-down list, as shown in the following screenshot:

A pop-up window with a QR code and a six-character code will appear on your computer screen.
On your mobile device, launch the AI2 Companion by clicking on the app's icon. A screen will appear with the following options: type in the six-character code or scan QR code:
- To connect with QR code: Click on the blue button on your mobile device that says scan QR code. This will launch the QR code reader in the AI2 Companion app. Hold the mobile device up to the QR code on the computer screen to automatically scan.
- To connect with six-character code: Simply type in the six-character code shown on your computer screen into the white text box on your mobile device that says Six Character Code (do not click return or enter on your keyboard). Then, click on the orange button connect with code.
The following screenshot summarizes the connectivity steps:

The code on your computer and your mobile device
Within a few seconds, you will see Screen1 from the designer window appear on your mobile device.
If not, try the following troubleshooting options:
These instructions (Steps1-4) are for emulator users or for those connecting a computer to a mobile device via USB cable.

If you do not have a mobile device, don't worry; you can still test the apps you build with MIT App Inventor by using the onscreen emulator. It simulates an Android mobile device (although there are some functions that cannot be tested, such as the accelerometer). You can use the emulator to share apps with others, even through the Google Play Store. Many people build apps this way.
On the other hand, you may have an Android device, but your school or organization may have firewalls preventing the use of WiFi. In this case, you can still use live testing by connecting your computer to your mobile device using a USB cable.
The same software and setup is needed whether you are connecting to the emulator or connecting your mobile device via a USB cable.
Follow the instructions for your computer's operating system.
Use the following steps to install the App Inventor setup software on your Mac OS X:
- Download the installer via http://appinv.us/aisetup_mac.
- Double-click on the downloaded file (most probably located in the
Downloadsfolder) to start the installerAppInventor_Setup_v_X.X.dmg(whereX.Xis the version number). - Depending on your settings, you may see a pop-up window informing you that the file cannot be opened (as shown in the following screenshot):

- If the MIT App Inventor setup software cannot be opened, go to System Preferences | Security & Privacy | General and click on the Open Anyway button, as shown in the following screenshot:

- If your settings are locked, you may have to enter your administrator password in order to make changes.
- You will see a welcome message, as shown in the following screenshot. Then, click on the Continue button.

- Read and accept the software license agreement (not shown).
On the Standard Install screen (as shown in the following screenshot), click on Install:

- Enter your computer's password to confirm that you want to install the software (not shown). Click on Ok.
- The installer confirms that the App Inventor Setup package was installed (as shown in the following screenshot):

Depending on how you will be connecting your computer to your device, Mac users can proceed to Step 3 – opening a project and connecting to the emulator or Step 4 - setting up your device with a USB cable.
This set of instructions consists of part A and part B.
- Type the following URL in a web browser on your computer to download the installer: http://appinv.us/aisetup_windows.
- Locate the
MIT_App_Inventor_Tools_2.3.0_win_setup.exe(~80 MB) file in yourDownloadsfolder or on your desktop. The location of the downloaded file on your computer will depend on how your browser is configured. - Open the file by double-clicking on it.
- You may be asked if you want to allow a program from an unknown publisher to make changes to this computer (as shown in the following screenshot). Then, click on the Run button.

- You will see a Welcome to the MIT App Inventor Tools 2.3.0 Setup window (as shown in the following screenshot). Then, click on the Next button.

- Read and accept the software license agreement (as shown in the following screenshot). Then, click on the I Agree button.

- Choose among the installation options. You can select whether you want to install the setup tools for all users or a single user. Note that you will need administrative privileges if you choose all users (as shown in the following screenshot). Then, click on the Next button.

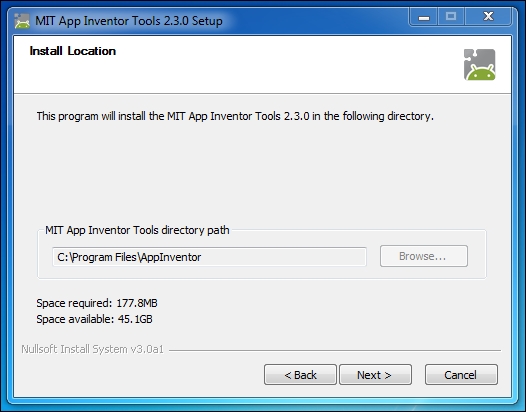
- Install Location is set to the default location depending on whether you are running a 32-bit or 64-bit machine as a single user or for all users (as shown in the following screenshot). Then, click on the Next button.
- Choose installation components. By default the installer will install the setup tools but gives you the option to add a desktop icon (as shown in the following screenshot). Then, click on the Next button.

- Choose a Start Menu folder. By default, it is set to MIT App Inventor Tools (as shown in the following screenshot). Then, click on the Install button.

- You will now see a progress bar that shows which files are being installed along with the status (the percentage of completion) of the installation. Wait for a few minutes for this process to finish.

- After the MIT App Inventor Tools is installed, the last screen will by default automatically launch the
aiStarterprogram for you. Deselect this option if you don't want it to be started at this point (as shown in the following screenshot). Click on Finish.
If you choose to connect your Android device using a USB cable to a Windows machine, then you will need to install special Windows driver software. Different devices may require different drivers. Manufacturers often create and supply the drivers. You may need to search the Web to find the appropriate driver for your Android device.
Note
More information and installation instructions can be found at http://developer.android.com/sdk/win-usb.html and http://appinventor.mit.edu/explore/content/windows-drivers.html.
Windows users, proceed to Step 2- Launch aiStarter.
You'll need sudo (super-user do) privileges to do the installation.
Note that the setup programs are 32-bit software. If you have a 64-bit system, you may need to install libraries that let your machine run 32-bit software. One way to do this is to run the following command:
> sudo apt-get install lib32z1
But, this might not work on all the GNU/Linux distributions, and you may need to do some investigation on this topic for your particular system.
- Download the file by typing the following URL in a web browser on your computer: http://commondatastorage.googleapis.com/appinventordownloads/appinventor2-setup_1.1_all.deb. The Debian file name is
appinventor2-setup_1.1_all.deb. The location of the downloaded file on your computer depends on how your browser is configured. Typically, it will go into yourDownloadsfolder. - If your system can install packages simply by clicking on the package file, then do so.
- If your system doesn't support clickable package installers, then navigate to the directory where the file is located and run the following command:
> sudo dpkg --install appinventor2-setup_1.1_all.deb - With either method, you might need to ensure that the Debian file and the directory it's located in are world-readable and world-executable. On some systems,
sudodoes not have default privileges to read and execute all the files. The software will be installed under/usr/google/appinventor. - You might also need to configure your system to detect your device. See the Android developer instructions at the following link: http://developer.android.com/guide/developing/device.html#setting-up. Find the instructions under (#3) Set up your system to detect your device. Go to the third bullet starting with If you're developing on Ubuntu Linux….
- Download the file from the following link: http://commondatastorage.googleapis.com/appinventordownloads/appinventor2-setup_1.1.tar.gz. The file is named
appinventor2-setup_1.1.tar.gzand it is a GZIP compressed tar file. The location of the downloaded file on your computer will depend on how your browser is configured. Typically, it will go into yourDownloadsfolder. - Install the files by first decompressing the file and then copying the
appinventordirectory and its contents to the location/usr/google/appinventorusing a method appropriate for your operating system.
GNU/Linux users proceed to the next step.
This step is for Windows and GNU/Linux users connecting with the emulator or with a USB cable. Mac users connecting with the emulator can skip to Step 3 – opening a project and connecting to the emulator. Mac users connecting with a USB cable can skip to Step 4 – setting up your device with a USB cable.
The aiStarter program manages communication between the web browser and the Android device (note that on the Mac platform, the aiStarter program automatically starts at login). Whenever you log in to use MIT App Inventor with the emulator or a USB cable on a GNU/Linux or Windows machine, you will need to start the aiStarter program.
GNU/Linux users can do this with the following command:
> /usr/google/appinventor/commands-for-Appinventor/aiStarter &
Windows users can locate the aiStarter program from Start Menu or by double-clicking on the aiStarter shortcut located on the desktop if you installed it during the MIT App Inventor Setup tools installation process.
For convenience, you may want to arrange for this command to run automatically whenever you log in or when the system starts. The precise way to do this depends on which GNU/Linux distribution you are using. If this is unfamiliar to you, please consult the documentation that comes with your distribution.
This step is for all users connecting with the emulator regardless of the operating system. All the users connecting with a USB can skip to Step 4 – setting up your device with a USB cable.
Since you have already created your first project and named it, we now will connect the emulator to display it.
On your computer, in the designer window, click on Connect located at the top menu bar and choose Emulator from the drop-down list.

A popup will inform you that the emulator is connecting. This can take a few minutes.

The emulator will initially appear with an empty black screen (#1). Wait until the emulator is ready with a colored screen background (#2). After the background appears, you should continue waiting until the emulator has finished preparing its SD card; there will be a notice at the top of the phone screen while the card is being prepared (#3). When connected, the emulator will launch and display the app you, open in MIT App Inventor (#4 is empty, because for now, the new project is empty).

This step is for all users connecting with a USB cable regardless of the operating system.
On your Android device, go to Settings | Developer options, turn it on, and ensure that USB debugging is turned on.
On most devices running Android 3.2 or older, you can find this option under Settings | Applications | Development.
On Android 4.0 and newer, you can find it in Settings | Developer options.
Note
On Android 4.2 and newer, Developer options is hidden by default. To make it available, go to Settings | About phone | Build number and tap on Build number seven times. Return to the previous screen, go to Settings | Developer options | USB debugging and tap on it to enable it (on some devices, it may be listed as Android debugging).
These instructions continue from Step 4 – setting up your device with a USB cable for all users connecting with a USB cable regardless of the operating system.
Connect your Android device to the computer using a USB cable. Ensure that the device connects as a mass storage device (not as a media device) and that it is not mounted as a drive on your computer.
There are three ways to un-mount any drive(s) that were mounted when you connected your Android device by USB cable. They are as follows:
- Right-click to eject it
- Click on it and drag it to the trash
- Use Finder (on Mac) or My Computer (on Windows) and click on the arrow next to the name
The first time you connect your Android device (4.2.2 and newer) to the computer, a pop-up screen will appear on your device with the message: Allow USB Debugging? Press OK. This will authenticate the computer to the device, allowing the computer to communicate with it. You'll need to do this for each computer you want to connect to the device, but only once per computer.

These instructions continue from Step 5 – connecting your computer and device (authenticating if necessary) for all users connecting with a USB cable regardless of the operating system.
With your mobile device still connected to your computer, go to http://appinventor.mit.edu/test (this will open in a new tab on your browser) and see whether you have gotten a confirmation that your computer can detect the device. If the test fails, go to http://appinventor.mit.edu/explore/ai2/connection-help.html and look at USB help for your computer (Windows or Mac). You won't be able to use App Inventor with a USB cable until you resolve the connection issue.