
1.9.1. Running the Doodlz App in the Nexus 4 Smartphone AVD
To test-drive the Doodlz app, perform the following steps:
1. Checking your setup. If you have not done so already, perform the steps specified in the Before You Begin section located after the Preface.
2. Opening Eclipse. Open the eclipse subfolder of the Android SDK/ADT bundle’s installation folder, then double click the Eclipse icon (![]() or
or ![]() , depending on your platform).
, depending on your platform).
3. Specifying your workspace location. When the Workspace Launcher window appears, specify where you’d like the apps that you create to be stored, then click OK. We used the default location—a folder named workspace in your user directory. A workspace is a collection of projects, and each project is typically an app or a library that can be shared among apps. Each workspace also has its own settings, such as where various Eclipse subwindows are displayed. You can have many workspaces and switch between them for different development tasks—for example, you could have separate workspaces for Android app development, Java app development and web app development, each with its own custom settings. If this is your first time opening Eclipse, the Welcome page (Fig. 1.14) is displayed.

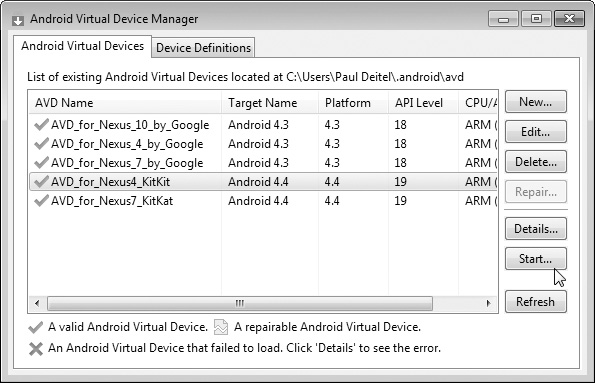
4. Launching the Nexus 4 AVD. For this test-drive, we’ll use the Nexus 4 smartphone AVD that you configured for Android 4.4 (KitKat) in the Before You Begin section—in Section 1.9.2, we’ll show the app running in a tablet AVD. An AVD can take several minutes to load, so you should launch it in advance of when you intend to use it and keep it running in the background while you’re building and testing your apps. To launch the Nexus 4 AVD, select Window > Android Virtual Device Manager to display the Android Virtual Device Manager dialog (Fig. 1.15). Select the Nexus 4 AVD for Android KitKat and click Start..., then click the Launch button in the Launch Options dialog that appears. You should not attempt to execute the app until the AVD finishes loading. Once the AVD appears as shown in Fig. 1.16, unlock the AVD by dragging the mouse pointer from the lock icon to the edge of the screen.

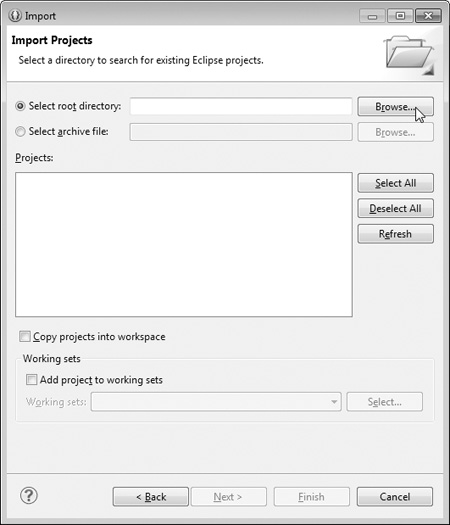
5. Importing the Doodlz app’s project. Select File > Import... to open the Import dialog (Fig. 1.17(a)). Expand the General node and select Existing Projects into Workspace, then click Next > to proceed to the Import Projects step (Fig. 1.17(b)). Click the Browse... button to the right of the Select root directory textbox. In the Browse For Folder dialog, locate the Doodlz folder in the book’s examples folder, select it and click Open. Click Finish to import the project into Eclipse. The project now appears in the Package Explorer window (Fig. 1.18) at the left side of Eclipse. If the Package Explorer window is not visible, you can view it by selecting Window > Show View > Package Explorer.


6. Launching the Doodlz app. In Eclipse, right click the Doodlz project in the Package Explorer window, then select Run As > Android Application (Fig. 1.19). This will execute Doodlz in the AVD that you launched in Step 4 (Fig. 1.20).

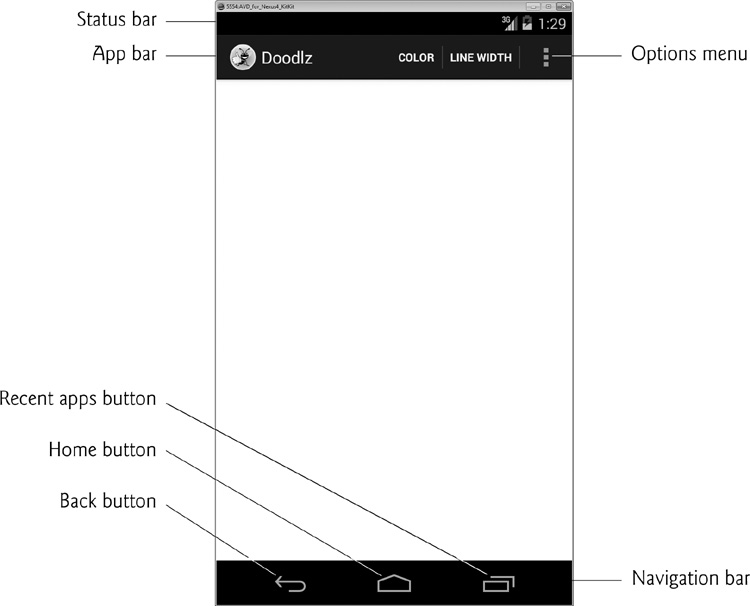
7. Exploring the AVD and immersive mode. At the AVD screen’s bottom are various soft buttons that appear on the device’s touch screen. You touch these (by using the mouse in an AVD) to interact with apps and the Android OS. The back button goes back to the app’s prior screen, or back to a prior app if you’re in the current app’s initial screen. The home button returns you to the device’s home screen. The recent apps button allows you to view the recently used apps list, so that you can switch back to them quickly. At the screen’s top is the app’s app bar, which displays the app’s icon and name and may contain other app-specific soft buttons—some appear on the app bar (COLOR and LINE WIDTH in Fig. 1.20) and the rest appear in the app’s options menu (![]() ). The number of options on the app bar depends on the size of the device—we discuss this in Chapter 7. Android 4.4 supports a new immersive mode that enables apps to use the entire screen. In this app, you can tap once in the white drawing area to hide the device’s status and navigation bars as well as the app’s action bar. You can redisplay these by tapping the drawing area again or by swiping from the top edge of the screen.
). The number of options on the app bar depends on the size of the device—we discuss this in Chapter 7. Android 4.4 supports a new immersive mode that enables apps to use the entire screen. In this app, you can tap once in the white drawing area to hide the device’s status and navigation bars as well as the app’s action bar. You can redisplay these by tapping the drawing area again or by swiping from the top edge of the screen.
8. Understanding the app’s options. To display the options that do not appear on the app bar, touch (i.e., click) the options menu (![]() ) icon. Figure 1.21(a) shows the action bar and options menu on the Nexus 4 AVD and Fig. 1.21(b) shows them on a Nexus 7 AVD—options shown on the action bar appear in small capital letters. Touching COLOR displays a GUI for changing the line color. Touching LINE WIDTH displays a GUI for changing the thickness of the line that will be drawn. Touching Eraser sets the drawing color to white so that as you draw over colored areas, the color is erased. Touching Clear first confirms whether you wish to erase the entire image, then clears the drawing area if you do not cancel the action. Touching Save Image saves the image into the device’s Gallery of images. On Android 4.4, touching Print displays a GUI for selecting an available printer so can print your image or save it as a PDF document (the default). You’ll explore each of these options momentarily.
) icon. Figure 1.21(a) shows the action bar and options menu on the Nexus 4 AVD and Fig. 1.21(b) shows them on a Nexus 7 AVD—options shown on the action bar appear in small capital letters. Touching COLOR displays a GUI for changing the line color. Touching LINE WIDTH displays a GUI for changing the thickness of the line that will be drawn. Touching Eraser sets the drawing color to white so that as you draw over colored areas, the color is erased. Touching Clear first confirms whether you wish to erase the entire image, then clears the drawing area if you do not cancel the action. Touching Save Image saves the image into the device’s Gallery of images. On Android 4.4, touching Print displays a GUI for selecting an available printer so can print your image or save it as a PDF document (the default). You’ll explore each of these options momentarily.

a) Action bar and expanded options menu on a Nexus 4 AVD

b) Action bar and expanded options menu on a Nexus 7 AVD
Fig. 1.21 | Doodlz options menu expanded.
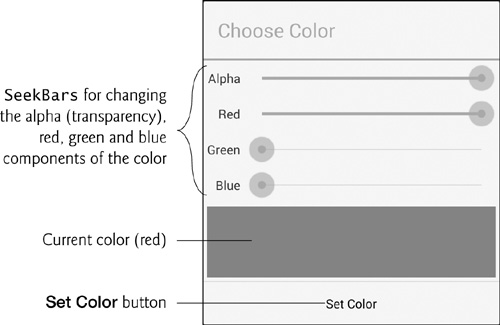
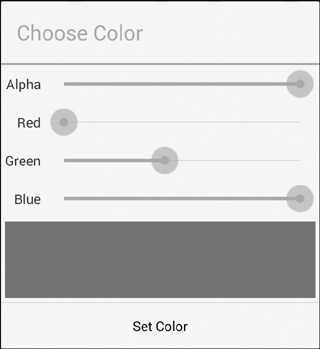
9. Changing the brush color to red. To change the brush color, first touch COLOR on the action bar to display the Choose Color dialog (Fig. 1.22). Colors are defined using the ARGB color scheme in which the alpha (i.e., transparency), red, green and blue components are specified by integers in the range 0–255. For alpha, 0 means completely transparent and 255 means completely opaque. For red, green and blue, 0 means none of that color and 255 means the maximum amount of that color. The GUI consists of Alpha, Red, Green and Blue SeekBars that allow you to select the amount of alpha, red, green and blue in the drawing color. You drag the SeekBars to change the color. As you do, the app displays the new color below the SeekBars. Select a red color now by dragging the Red SeekBar to the right as in Fig. 1.22. Touch the Set Color button to return to the drawing area.
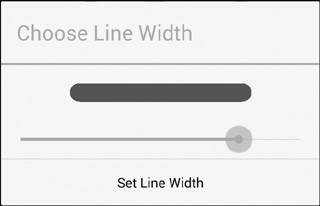
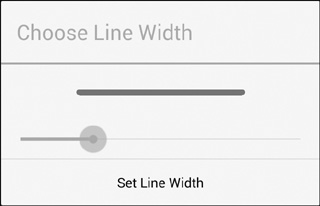
10. Changing the line width. To change the line width, touch LINE WIDTH on the action bar to display the Choose Line Width dialog. Drag the SeekBar for the line width to the right to thicken the line (Fig. 1.23). Touch the Set Line Width button to return to the drawing area.

11. Drawing the flower petals. Tap the screen to enter immersive mode, then drag your “finger”—the mouse when using the emulator—on the drawing area to draw flower petals (Fig. 1.24).

12. Changing the brush color to dark green. Tap the screen to leave immersive mode then touch COLOR to display the Choose Color dialog. Select a dark green color by dragging the Green SeekBar to the right and ensuring that the Red and Blue SeekBars are at the far left (Fig. 1.25(a)).

a) Selecting dark green as the drawing color
b) Selecting a thicker line
Fig. 1.25 | Changing the color to dark green and making the line thicker.
13. Changing the line width and drawing the stem and leaves. Touch LINE WIDTH to display the Choose Line Width dialog. Drag the SeekBar for the line width to the right to thicken the line (Fig. 1.25(b)). Tap the screen to re-enter immersive mode, then draw the flower stem and leaves. Repeat Steps 12 and 13 for a lighter green color and thinner line, then draw the grass (Fig. 1.26).

14. Finishing the drawing. Tap the screen to exit immersive mode. Next, change the drawing color to blue (Fig. 1.27(a)) and select a narrower line (Fig. 1.27(b)). Then tap the screen to enter immersive mode and draw the raindrops (Fig. 1.28).
a) Selecting blue as the drawing color
b) Selecting a thinner line
Fig. 1.27 | Changing the line color to blue and narrowing the line.

15. Saving the image. You can save your image to the device’s Gallery app by selecting Save from the options menu ![]() . You can then view this image and others stored on the device by opening the Gallery app.
. You can then view this image and others stored on the device by opening the Gallery app.
16. Printing the image. To print the image, select Print from the options menu. This displays the print dialog, which allows you to save the image as a PDF document by default. To select a printer, tap Save as PDF and select from the available printers. If no printers appear in the list, you may need to configure Google Cloud Print for your printer. For information on this, visit
17. Returning to the home screen. You can return to the AVD’s home screen by tapping the home (![]() ) button on the AVD. To view the drawing in the Gallery app touch
) button on the AVD. To view the drawing in the Gallery app touch ![]() to display the list of apps installed on the AVD. You can then open the Gallery app to view the drawing.
to display the list of apps installed on the AVD. You can then open the Gallery app to view the drawing.