
2.5.1. Adding Images to the Project
For this app, you’ll need to add the Deitel bug image (bug.png) and the Android logo image (android.png) to the project. These are located with the book’s examples in the images folder’s Welcome subfolder. File names for image resources—and all the other resources you’ll learn about in later chapters—must be in all lowercase letters.
Because Android devices have various screen sizes, resolutions and pixel densities (that is, dots per inch or DPI), you typically provide images in varying resolutions that the operating system chooses based on a device’s pixel density. For this reason your project’s res folder contains several subfolders that begin with the name drawable. These folders store images with different pixel densities (Fig. 2.13).
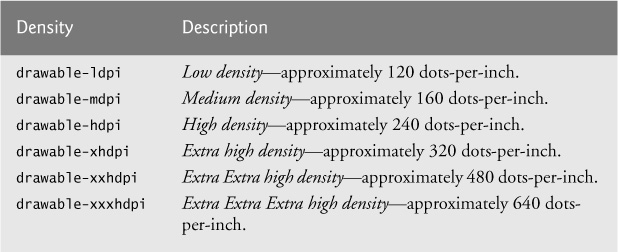
Images for devices that are similar in pixel density to the Google Nexus 4 phone we use in our phone AVD are placed in the folder drawable-hdpi. Images for devices with higher pixel densities (such as those on some phones and tablets) are placed in the drawable-xhdpi or drawable-xxhdpi folders. Images for the medium- and low-density screens of older Android devices are placed in the folders drawable-mdpi and drawable-ldpi, respectively.
For this app, we’re providing only one version of each image. If Android cannot find an image in the appropriate drawable folder, it will scale the version from another drawable folder up or down to different densities as necessary.
Low-resolution images do not scale well. For images to render nicely, a high-pixel-density device needs higher resolution images than a low-pixel-density device.
 Look-and-Feel Observation 2.2
For detailed information on supporting multiple screens and screen sizes in Android, visit http://developer.android.com/guide/practices/screens_support.html.
Perform the following steps to add the images to this project:
1. In the Package Explorer window, expand the project’s res folder.
2. Locate and open images folder’s Welcome subfolder on your file system, then drag the images onto the res folder’s drawable-hdpi subfolder. In the File Operation dialog that appears, ensure that Copy Files is selected, then click OK. In general, you should use PNG images, but JPG and GIF images are also supported.
These images can now be used in the app.