2. Creating and Viewing a Document
Introduction
You can either open an existing document or create a new one to work on in Illustrator. When you create a new document, you can create one from scratch or use one of the built-in profiles, such as print, web, film, video, or for use on a mobile device. The built-in profiles make it easy to create documents for specific purposes without the hassle of specifying individual settings. However, if you know the individual settings you want, you can create a new document from scratch.
At the same time you create a new document, you can also create multiple artboards. Artboards are regions of a document that contain printable artwork. Multiple artboards are useful for creating documents with different sizes, creating and organizing artwork elements in different places within the same document, and creating multiple page PDFs.
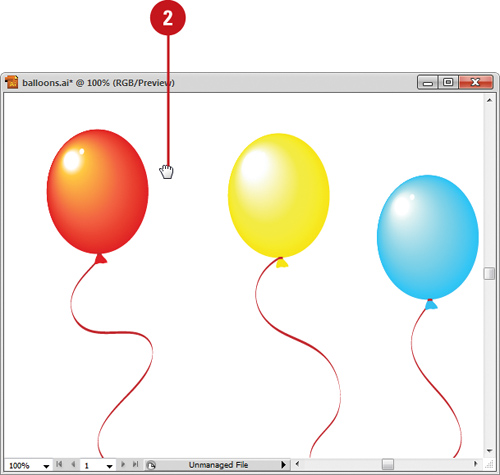
Having problems squinting at the small details of an image? Using the Navigator panel or Zoom tool is a great way to get you focused where you need to be. Zooming into a specific section of a document makes touching up the fine details just that much easier.
Illustrator’s navigation and measurement systems—rulers, grid, guides, smart guides—are more than just information; they represent control of the document and control of the creative process. In addition, the Info panel gives you up-to-date information on the exact position of the cursor inside the document, as well as detailed color information that can be indispensable in preparing your designs.
Creating a New Document
Creating a new Illustrator document requires more thought than creating a new word processing document. For example, there are bleed, color mode, and raster effect considerations to keep in mind. You can create as many new documents as you need. However, since opening more than one document takes more processing power, it’s probably best to work on only one new document at a time. Once a new document is created, you have access to all of Illustrator’s design and manipulation tools to create anything you can imagine.
Create a New Document
![]() Click the File menu, and then click New.
Click the File menu, and then click New.
![]() Type a name for the document.
Type a name for the document.
![]() Click the New Document Profile list arrow, and then select a preset, or choose your own options to create a custom document.
Click the New Document Profile list arrow, and then select a preset, or choose your own options to create a custom document.
• Number of Artboards. Specify a number, and then select options for arrangement and spacing.
• Size. Select from the various sizes, such as Letter or Legal.
• Width and Height. Select from various measurements, such as points, centimeters, or inches.
![]() Click the Advanced button (if necessary), and then select the advanced options you want:
Click the Advanced button (if necessary), and then select the advanced options you want:
• Color Mode. Select a color mode, such as RGB or CMYK for color and Grayscale for black/white.
• Raster Effects. Select the resolution for raster effects.
• Preview Mode. Default displays artwork in vector view; Pixel displays artwork with a rasterized look, and Overprint displays an ink preview.
• Align New Objects to Pixel Grid. Sets an object to have its vertical and horizontal paths aligned to the pixel grid (New!).
![]() Click OK.
Click OK.
Creating a New Document Using Presets
When you create documents for specific purposes, such as print, web, film, video, or for use on a mobile device, you know the importance of creating documents that will perfectly match the output requirements of the intended file destination. The preset file sizes available in the New Document Profile menu let you create images at a size and pixel aspect ratio that compensate for scaling when you incorporate them into various output modes. When you work with the New Document Profile menu, the guesswork involved in creating compatible photo, web, mobile device, film and video, or Adobe Flash Catalyst (New!) documents in Illustrator is a thing of the past.
Create a New Document Using Presets
![]() Click the File menu, and then click New.
Click the File menu, and then click New.
• You can also click a preset from the Welcome screen.
![]() Click the New Document Profile list arrow, and then select a preset:
Click the New Document Profile list arrow, and then select a preset:
• Web
• Mobile and Devices
• Video and Film
• Basic CMYK
• Basic RGB
• Flash Catalyst. An Adobe interactive design tool (New!).
• Custom

![]() Click the Size list arrow, and then select the preset you want; options vary depending on the document type.
Click the Size list arrow, and then select the preset you want; options vary depending on the document type.
• Print. For example, Letter or Legal.
• Web. For example, 640 × 480.
• Mobile & Devices. For example, 176 × 208.
• Video & Film. For example, HDTV 1080.
![]() If you want, adjust the available options.
If you want, adjust the available options.
![]() Click OK.
Click OK.
Creating a New Document from a Template
A template is a special document that makes it easier to create a new document. If you frequently use an existing document, such as Stationery, to start a new document, then you should create a template, which uses the Illustrator Template (AIT) file format. You can create your own template or use one provided by Illustrator. Illustrator comes with a variety of templates, such as Banner Ads, Boxes, Brochures, Business Cards, CD Cases, and Stationery. When you create a new document from a template, the document appears as untitled with the extension AI, so you don’t mistakenly make and save changes over the template file.
Create a New Document from a Template
![]() Click the File menu, and then click New From Template.
Click the File menu, and then click New From Template.
• You can also click Templates in the New dialog box.
The Templates folder appears, displaying different types of templates available for Illustrator.
![]() Click the Files of Type (Win) or Enable (Mac) list arrow, and then click All Formats or a specific one.
Click the Files of Type (Win) or Enable (Mac) list arrow, and then click All Formats or a specific one.

![]() Navigate to the location where the template you want to use is stored.
Navigate to the location where the template you want to use is stored.
![]() Click the template file you want to use.
Click the template file you want to use.
![]() Click New.
Click New.
Did You Know?
You can create a new document using a template from the Welcome Screen. Start Illustrator or click the Help menu, and then click Welcome Screen. Click the From Template icon.
See Also
See “Chapter 3, “Working with Objects,” on page 61 for information on selecting and changing objects.
Create a Template Document
![]() Open a new or existing document.
Open a new or existing document.

![]() Create a custom document.
Create a custom document.
![]() Click the File menu, and then click Save As Template.
Click the File menu, and then click Save As Template.
The Templates folder appears, displaying different types of templates available for Illustrator.
![]() Type a name for the new template.
Type a name for the new template.
![]() Click the Save as Type (Win) or Format (Mac) list arrow, and then click Illustrator Template (*.AIT), if necessary.
Click the Save as Type (Win) or Format (Mac) list arrow, and then click Illustrator Template (*.AIT), if necessary.
![]() Navigate to the location where you want to store the template.
Navigate to the location where you want to store the template.
![]() Click Save.
Click Save.
Setting Up a Document
After you create a document, you can use the Document Setup command on the File menu to change your document’s default options. In the Document Setup dialog box, you can change options for bleed and view, transparency, and type. For Bleed and View, you can change the units of measure and bleed size, view images in Outline mode and highlight substituted fonts and glyphs. For Transparency, you can change the transparency grid size and color. For Type, you can change the document language, double and single quotes styles, superscript and subscript settings, and export options.
Change Document Options
![]() Click the File menu, and then click Document Setup.
Click the File menu, and then click Document Setup.
![]() Select from the following Bleed and View Options settings:
Select from the following Bleed and View Options settings:
• Edit Artboards. Click to close the dialog box and use the Artboard tools to edit artboards.
• Units. Specify measurement units for the document.
• Bleed. Specify the amount of bleed around the edges of the document.
• Show Images in Outline Mode. Select to show image in Outline mode.
• Highlight Substituted Fonts. Select to highlight unavailable fonts that are substituted for existing fonts on your computer.
• Highlight Substituted Glyphs. Select to highlight unavailable type glyphs that are substituted for existing glyphs on your computer.
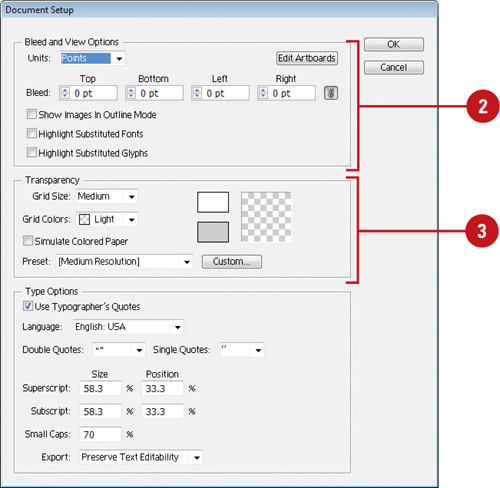
![]() Select from the following Transparency settings:
Select from the following Transparency settings:
• Grid Size. Specify a size (Small, Medium or Large) for the transparency grid.
• Grid Colors. Specify an intensity and color (Light, Medium, Dark, Red, Orange, Green, Blue, or Purple) for the transparency grid.
• Simulate Colored Paper. Select if you plan to print on colored paper. This option replicates the effect of colored paper. This is shown when the transparency grid is not visible.
• Preset. Specify a resolution preset (High, Medium, or Low) or select a custom setting. The resolution depends on your output device.
![]() Select from the following Type Options settings:
Select from the following Type Options settings:
• Use Typographer’s Quotes. Select to use curly quotes instead of straight ones.
• Language. Specify the language for the document.
• Double Quotes. Specify the character for double quotes.
• Single Quotes. Specify the character for single quotes.
• Superscript. Specify the size and position (as a percentage) for text that appears higher than the text line.
• Subscript. Specify the size and position (as a percentage) for text that appears lower than the text line.
• Small Caps. Specify the size (as a percentage) for small cap text.
• Export. Specify an option to preserve text editability or appearance.
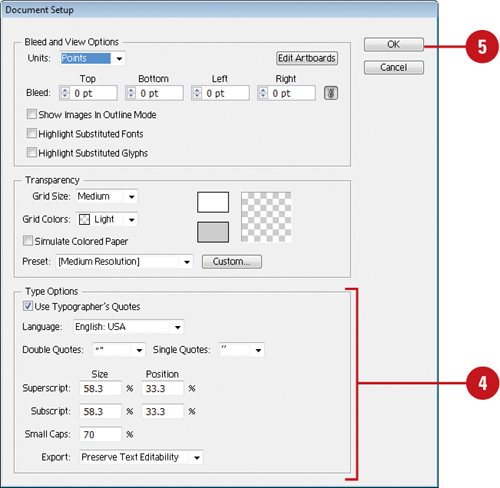
![]() Click OK.
Click OK.
Using Multiple Artboards
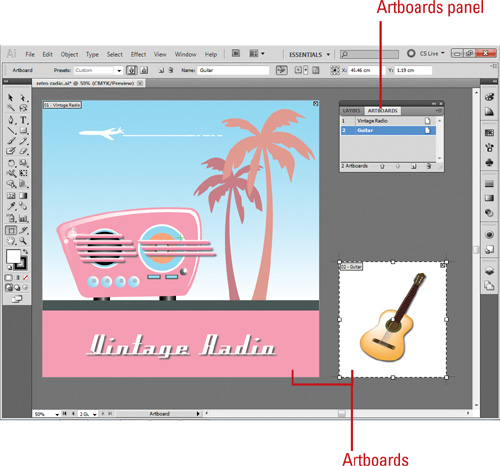
Artboards are regions of a document that contain printable artwork. You can use artboards as crop areas for printing or placement. They are useful for working with multiple artwork elements. You can create multiple artboards (1 to 100) at different sizes and position them anywhere on the screen. You can create multiple artboards by using the New dialog box, the Artboard tools in the Tools panel, or the Artboards panel (New!). Multiple artboards are useful for creating documents at different sizes, creating and organizing artwork in different places within the same document, and creating multiple page PDFs. You can also specify custom names for artboards (New!), rearrange the artboard layout (New!), reorder artboards (New!), and duplicate artboards.
Create an Artboard
![]() Select the Artboard tool on the Tools panel.
Select the Artboard tool on the Tools panel.
![]() To use a preset dimension, click the Preset list arrow on the Control panel, and then select a preset.
To use a preset dimension, click the Preset list arrow on the Control panel, and then select a preset.
![]() Drag in the workspace (outside an artboard) to create an artboard.
Drag in the workspace (outside an artboard) to create an artboard.
• To create an artboard within an artboard, hold down Shift and then drag.
![]() To duplicate an existing artboard, click to select the artboard, click the New Artboard button on the Control or Artboards (New!) panel, and then click to place it.
To duplicate an existing artboard, click to select the artboard, click the New Artboard button on the Control or Artboards (New!) panel, and then click to place it.
• To create multiple duplicates, Alt-click instead as many times as you want.
• To open the Artboards panel, click the Window menu, and then click Artboards.
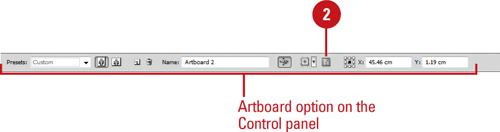
![]() Enter a name in the Name box on the Control Panel (New!).
Enter a name in the Name box on the Control Panel (New!).
![]() To navigate between artboards, use the Navigation buttons on the Status bar or on the Artboards panel (New!).
To navigate between artboards, use the Navigation buttons on the Status bar or on the Artboards panel (New!).
![]() To exit the artboard editing mode, press Esc or click a different tool.
To exit the artboard editing mode, press Esc or click a different tool.
Change Artboard Options
![]() Select the Artboard tool on the Tools panel.
Select the Artboard tool on the Tools panel.
![]() Select from the options below in Step 3 on the Control panel, or click the Artboard Options button on the Control panel to open the Artboard Options dialog box.
Select from the options below in Step 3 on the Control panel, or click the Artboard Options button on the Control panel to open the Artboard Options dialog box.
![]() Select from the following options:
Select from the following options:
• Artboard Name. Specify a name for an artboard (New!).
• Preset. Specify artboard dimensions using predefined measurements.
• Width and Height. Specify the size of the artboard.
• Orientation. Specify a portrait or landscape orientation.
• Constrain Proportions. Keeps the artboard size proportional.
• X and Y Position. Specifies the position of the artboard.
• Show Center Mark. Displays the center point in the artboard.
• Show Cross Hairs. Displays cross hair lines through the center of each artboard side.
• Show Video Safe Areas. Displays guides inside the video viewable area.
• Video Ruler Pixel Aspect Ratio. Specify the aspect ratio for artboard rulers.
• Fade Region Outside Artboard. Displays the area outside the artboard in a darker shade.
• Update While Dragging. Displays the area outside the artboard darker as you drag to resize the artboard.
• Artboards. Displays the current number of artboards.

![]() Click OK.
Click OK.
Working with Multiple Artboards
After you create one or more artboards, you can edit and work with them to display your artwork. You can view all of your artboards by using Artboard Navigation on the Status bar or in the Artboards panel (New!). Each artboard is numbered and named so you can quickly switch between them or reorder them (New!). In order to work with an artboard, you need to activate it first. You can only active one artboard at a time. After you activate an artboard, you can perform the following artboard operations: change the view (outline or preview), resize, move the artboard with or without its contents, rotate, and delete. In addition, you can also change the artboard layout (New!), display for artboard rulers, center mark, cross hairs, and video safe areas.
Work with Multiple Artboards
• Artboards Panel. Click the Window menu, and then click Artboards or click the Artboards button (New!).
• Activate. Select the Artboard tool on the Tools panel, and then click an artboard or click an artboard in the Artboards panel.
• Show or Hide Artboards. Click the View menu, and then click Show Artboards or Hide Artboards. You can also press Shift+Ctrl+H (Win) or Shift+![]() +H (Mac), and then press an arrow key.
+H (Mac), and then press an arrow key.
• Resize. Select the Artboard tool on the Tools panel, point to the edge or corner (cursor changes to a double-arrow), and then drag to resize the artboard.
• Move with or without Contents. Select the Artboard tool on the Tools panel, click to select or deselect the Move/Copy Artwork With Artboard button on the Control panel, and then drag the artboard.
• Delete. Select the Artboard tool on the Tools panel, click the artboard to activate it or select it in the Artboards panel, and then click the Delete button on the Control or Artboards panel or press Delete.
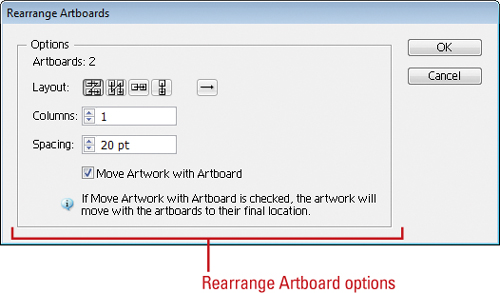
• Rearrange Artboard Layout. Open the Artboards panel, click the Options button, click Rearrange Artboards, select layout, columns, and spacing options, and then click OK (New!).
Switch Between Artboards
• Switch to a Specific Artboard. Click the Artboard Navigation list arrow on the Status bar, and then select an artboard or click an artboard in the Artboards panel (New!). You can also press Alt (Win) or Option (Mac), and then press an arrow key.

• First and Last Artboard. Click the First or Last button on the Status bar.
• Previous and Next Artboard. Click the Previous or Next button on the Status bar.
• Reorder Artboards. Open the Artboards panel, select an artboard, and then click the Move Up or Move Down button (New!).
Change the Artboard Display
• Rulers. Click the View menu, point to Rulers, and then click Change to Artboard Rulers (New!).

• Center Mark. Select the Artboard tool on the Tools panel, click the Display Options list arrow on the Control panel, and then click Show Center Mark.
• Cross Hairs. Select the Artboard tool on the Tools panel, click the Display Options list arrow on the Control panel, and then click Show Cross Hairs.
• Safe Area. Select the Artboard tool on the Tools panel, click the Display Options list arrow on the Control panel, and then click Show Video Safe Areas.
• View as Outline. Right-click the artboard, and then click Outline.
To preview the artboard, right-click the artboard, and then click Preview.
Changing the Display View
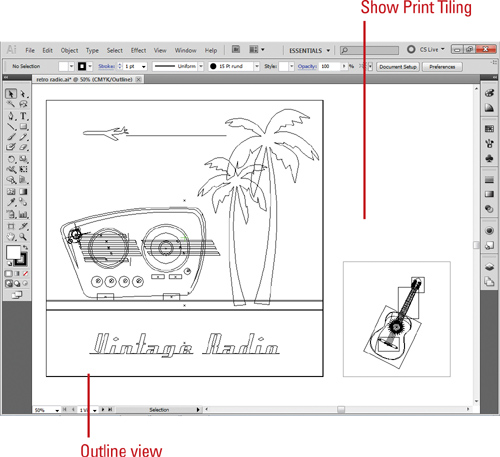
Illustrator uses two main views: Preview and Outline. Preview displays your artwork in color as it appears on the screen, while Outline displays your artwork as an outline, or paths. Outline view speeds redraws for complex artwork. If your artwork doesn’t fit on a printed page, you can use tiling options in the Print dialog box to print it. If you want to see how it will print, you can change the view to show print tiling. You can also view your artwork as it will appear in final output, either printed or viewed on the Web or a mobile device. If you like a certain view with different options than the Preview or Outline views, you can also create and work with custom views.
Change the Display View
• Preview View. Click the View menu, and then click Preview.
• Outline View. Click the View menu, and then click Outline.
To view all artwork in a layer as outlines, Ctrl-click (Win) or Command-click (Mac) the eye icon for the layer in the Layers panel.
To view all items in unselected layers as outlines, Alt-Ctrl-click (Win) or Option-Command-click (Mac) the eye icon for the layer in the Layers panel.
• Show Print Tiling. Click the View menu, and then click Show Print Tiling. To hide print tiling, click the Show Print Tiling command again.
• Create a New View. Set up the view the way you want, click the View menu, click New View, enter a name, and then click OK.

• Rename or Delete a View. Click the View menu, click Edit View, select a view, rename it or click Delete, and then click OK.
• Switch Between Custom Views. Click the View menu, and then select a view by name.
Display Output Views
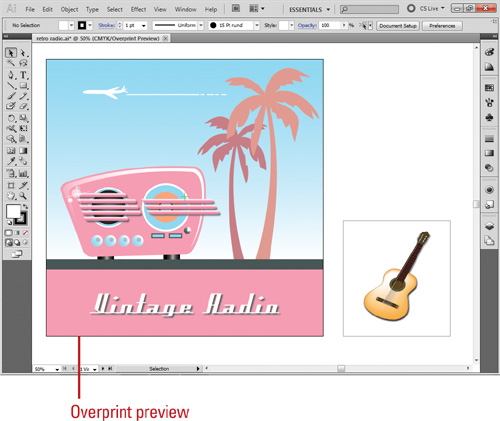
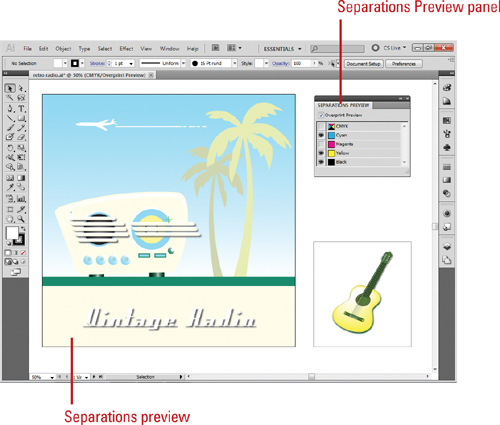
• Overprint Preview Mode. Displays an ink preview with blending, transparency, and overprinting in color separated output. Click the View menu, and then click Overprint Preview.
• Separations Preview Mode. Displays separations as they print. Click the Window menu, and then click Separations Preview.
• Pixel Preview Mode. Displays the artwork as it’s rasterized and viewed on the web. Click the View menu, and then click Pixel Preview.
• To view the pixel grid, zoom to 600% or higher in Pixel Preview mode (New!). To set preferences for viewing pixel grid, click the Illustrator (Mac) or Edit (Win) menu, point to Preferences, click Guides & Grid, select the Show Pixel Grid (Above 600% Zoom) check box, and then click OK (New!).
• Flattener Preview Mode. Displays and highlights artwork areas that are flattened when saved or printed. Click the Window menu, and then click Flattener Preview.
• Soft Proofs. Displays your artwork as it will appear on a monitor or output device. Click the View menu, point to Proof Setup, and then select a proof.
• Device Central. Click the File menu, and then click Device Central. Displays your artwork as it will appear on a mobile device.
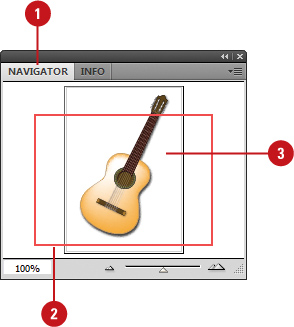
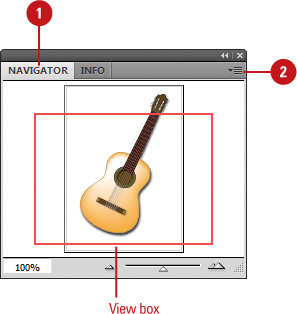
Changing the View with the Navigator Panel
Illustrator’s Navigator panel gives you an overall view of the image and the ability to navigate through the document or change the zoom size. Viewing images at different sizes gives you the ability to focus on small elements of the design without actually changing the image in any way. Once small areas of an image are enlarged, it’s easier for you to make minute changes. The Navigator panel contains a thumbnail view of the image, and under the thumbnail are easy-to-use controls that let you adjust the zoom of the image. In addition, changes made in the Navigator panel are immediately viewable in the active document window (what you see is what you get). The Navigator panel gives you a visible approach to changing the viewable area of the image. The view box in the Navigator panel represents the visible boundaries of the active document window, which is the viewable area of the image.
Change the View Size with the Navigator Panel
![]() Select the Navigator panel.
Select the Navigator panel.

![]() Use one of the following methods to change the view size:
Use one of the following methods to change the view size:
• Drag the triangular slider to the right to increase the zoom or to the left to decrease the zoom.
• Click the small and large mountain icons, located to the left and right of the triangular slider, to decrease or increase the zoom.
• Enter a value from .33% to 1600% into the Zoom box.
Did You Know?
There are additional ways to zoom in using the Navigator panel. In the View box, hold down the Ctrl (Win) or Command (Mac) key, and then drag to resize the active document.
You can constrain the view box to drag horizontally or vertically. Hold down the Shift key, and then drag the view box horizontally or vertically.
Change the View Area with the Navigator Panel
![]() Select the Navigator panel.
Select the Navigator panel.
![]() Drag the view box in the thumbnail of the active image.
Drag the view box in the thumbnail of the active image.
![]() Click within the thumbnail.
Click within the thumbnail.
The position of the view box changes, which also changes the viewable area of the image in the document window.
Did You Know?
You can change the Zoom size of an image using the Navigator thumbnail. Hold down the Ctrl key (Win) or the ![]() key (Mac), and then drag in the thumbnail. When you release your mouse, the selected area expands. It’s just like using the Zoom tool, except you’re dragging in the Navigator’s thumbnail. Conversely, if you drag a second time (this time using a larger rectangle), the image zooms out.
key (Mac), and then drag in the thumbnail. When you release your mouse, the selected area expands. It’s just like using the Zoom tool, except you’re dragging in the Navigator’s thumbnail. Conversely, if you drag a second time (this time using a larger rectangle), the image zooms out.
Customizing the Navigator Panel
The colored box in the Navigator panel (proxy preview area) defines the viewable area of the image. It’s important for the colored lines of the view box to stand out clearly against the image. The default color of the view box is a light red; however, some documents contain elements that are predominantly the same color as the colored lines of the viewable area, making the viewing area difficult to identify. By changing the color of the lines, you can make sure they stand out against the image. This may seem like a small thing, but choosing a color that contrasts with my image significantly cuts down on my frustration level when I’m attempting to identify the viewable area.
Change the View Box Color
![]() Select the Navigator panel.
Select the Navigator panel.
![]() Click the Navigator Options button, and then click Panel Options.
Click the Navigator Options button, and then click Panel Options.
![]() Click the Color list arrow, and then click a predefined color, or click Custom to select a color from the Color Picker dialog box.
Click the Color list arrow, and then click a predefined color, or click Custom to select a color from the Color Picker dialog box.

![]() Specify a Greeking value (in point) to set a size approximation for text characters on the screen.
Specify a Greeking value (in point) to set a size approximation for text characters on the screen.
![]() Select the Draw dashed lines as solid lines check box to display dashed lines as solid to make them easier to view.
Select the Draw dashed lines as solid lines check box to display dashed lines as solid to make them easier to view.
![]() Click OK.
Click OK.
Did You Know?
You can increase the size of the Navigator panel’s thumbnail. Drag the lower right corner of the Navigator panel to expand the size of the panel. As the Navigator panel increases in size, so does the thumbnail.
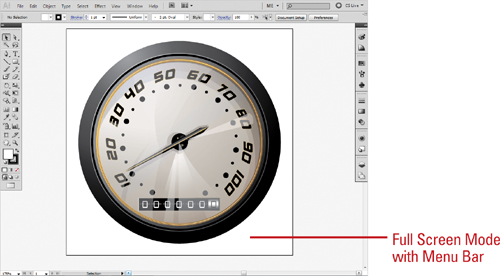
Changing the Screen Display Mode
In Illustrator, the Screen Display mode determines the background displayed behind the active image. For example, you can choose a Screen Mode that hides all the panels, title bar, or menu bar. Since monitor backgrounds, combined with Illustrator’s panels, add distracting colors to your workspace, changing the Screen Mode gives you a chance to isolate your image against a solid color background. Viewing your images against a gray background helps your eyes identify the true colors within an image.
Change the Screen Mode
![]() Click Change Screen Mode button to toggle between screen modes, and then select the mode you want:
Click Change Screen Mode button to toggle between screen modes, and then select the mode you want:
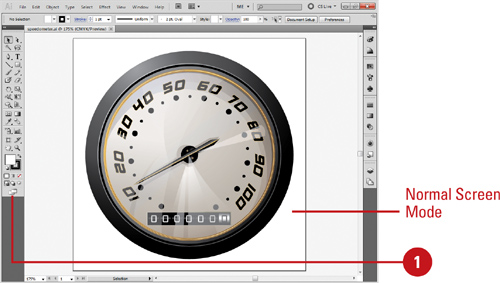
• Normal Screen Mode. Displays the artwork in a standard window. All menus, panels, and scroll bars are visible.
• Full Screen Mode with Menu Bar. Displays the artwork full screen. All menus, panels, and scroll bars are visible.
• Full Screen Mode. Displays the artwork full screen. No title bar, menus, or panels are visible.

Timesaver
Press F to toggle between the screen modes.
Did You Know?
You can temporarily hide all of Illustrator’s panels and Tools panel. Press the Tab key to hide the panels. Press the Tab key a second time to display the hidden panels. Hold down the Shift key, and then press the Tab key to hide the panels, but not the Tools and Control panels.
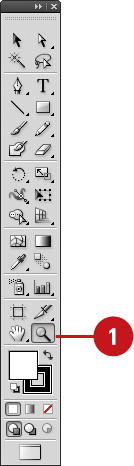
Changing the View with the Zoom Tool
Working with the Zoom tool gives you one more way to control exactly what you see in Illustrator. Just like the Navigator panel, the Zoom tool does not change the active image, but allows you to view the image at different magnifications. The Zoom tool is located towards the bottom of Illustrator’s Tools panel, and resembles a magnifying glass. The maximum magnification of an Illustrator document is 6400%, and the minimum size is 3.13%. Increasing the magnification of an image gives you control over what you see and gives you control over how you work. Large documents are difficult to work with and difficult to view. Many large documents, when viewed at 100%, are larger than the maximum size of the document window, requiring you to reduce the zoom in order to view the entire image.
Zoom In the View of an Image
![]() Select the Zoom tool on the Tools panel.
Select the Zoom tool on the Tools panel.

![]() Use one of the following methods:
Use one of the following methods:
• Click on the document. The image increases in magnification centered on where you clicked.
• Drag to define an area with the Zoom tool. The image increases in magnification based on the boundaries of the area you dragged.
• Set a specific view size. Click the View Size on the Status bar, and then select a specific percentage size magnification.
• Fit in Window. Click the View menu, and then click Fit All In Window or Fit Artboard In Window.

Zoom Out the View of an Image
![]() Select the Zoom tool on the Tools panel.
Select the Zoom tool on the Tools panel.
![]() Hold down the Alt (Win) or Option (Mac) key, and then click on the screen to reduce the zoom of the active document.
Hold down the Alt (Win) or Option (Mac) key, and then click on the screen to reduce the zoom of the active document.

The zoom reduction centers on where you click on the active document.
Important
The best way to really see what the printed results of your artwork will look like is to view the image (even if it is too big for the screen) at 100%.
Did You Know?
You can zoom in or out using shortcut keys regardless of what tool you’re currently using. To zoom in, press Ctrl+Spacebar (Win) or ![]() +Spacebar (Mac) and click or drag to define an area. To zoom out, press Ctrl+Space-bar+Alt (Win) or
+Spacebar (Mac) and click or drag to define an area. To zoom out, press Ctrl+Space-bar+Alt (Win) or ![]() +Spacebar+Option (Mac) and click or drag to define an area.
+Spacebar+Option (Mac) and click or drag to define an area.
Viewing and Using Rulers
Carpenters know that precise measurements are essential to making things fit, so they have a rule: Measure Twice, Cut Once. The designers of Illustrator also know that measurements are essential and give you several measuring systems—among them are the rulers. Rulers are located on the horizontal and vertical sides of the active document window, and serve several purposes. They let you measure the width and height of the active image, they let you place guides on the screen to control placement of other image elements, and they create markers that follow your cursor as you move. Illustrator displays rulers for documents (known as global) and artboards (New!) at the top and left side of the document window; you can only show and use one at a time. If you want to show a ruler around an individual artboard, you can display the video ruler (New!) (which is the same as the Artboard ruler in Illustrator CS4). The point where 0 (zero) appears on each ruler is called the ruler origin. The origin appears in the upper-left corner where the rulers intersect. For artboards, the origin is oriented from the upper left-corner and changes based on the active artboard. The coordinates of a ruler is also saved with the document. The default measurement for a ruler is in points, which you can change in preferences.
Change Ruler Options
![]() Click the Edit (Win) or Illustrator (Mac) menu, point to Preferences, and then click Units.
Click the Edit (Win) or Illustrator (Mac) menu, point to Preferences, and then click Units.
![]() Click the General list arrow, and then select a measurement from the available options.
Click the General list arrow, and then select a measurement from the available options.
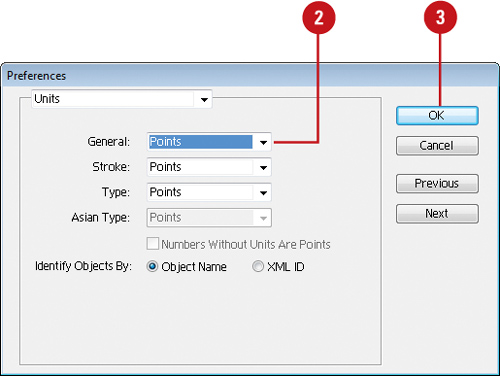
![]() Click OK.
Click OK.
Important
If the Rulers are not visible in the active document, click the View menu, point to Rulers, and then click Show Rulers.
Work with Rulers
• Show or Hide Rulers. Click the View menu, point to Rulers, and then click Show Rulers or Hide Rulers.
Timesaver
Press ![]() +R (Mac) or Ctrl+R (Win).
+R (Mac) or Ctrl+R (Win).
• Change to Artboard Rulers or Global Rulers. Click the View menu, point to Rulers, and then click Change to Artboard Rulers or Change to Global Rulers (New!).
Timesaver
Press Option+![]() +R (Mac) or Alt+Ctrl+R (Win).
+R (Mac) or Alt+Ctrl+R (Win).
• Show or Hide Video Rulers. Click the View menu, point to Rulers, and then click Show Video Rulers or Hide Video Rulers (New!).
• Change Measurement Units. Right-click (Win) or Option-click (Mac) a ruler, and then select a unit of measure.
• Change Ruler Origin. Point to the upper-left corner where the rulers intersect, and then drag the pointer to where you want the new ruler origin.
• Reset Ruler Origin. Double-click the upper-left corner where the rulers intersect.
Did You Know?
You can switch guides on the fly. If you’re dragging a vertical or horizontal guide onto the document window, when in fact you wanted the opposite guide, press the Alt (Win) or Option (Mac) key, while still dragging the guide. Vertical guides become horizontal, and horizontal guides become vertical.
Using the Guides
A guide is a vertical or horizontal line that helps you align text and graphic objects. With the Snap to Guide command, you can align an object to a guide. When the object’s edge comes within 2 pixels of a gridline, it snaps to the guide point. You can use Guides & Grid preferences to set guides settings, such as color and style. To create and use guides, the rulers must first be visible.
Change Guides Preferences
![]() Click the Edit (Win) or Illustrator (Mac) menu, point to Preferences, and then click Guides & Grid.
Click the Edit (Win) or Illustrator (Mac) menu, point to Preferences, and then click Guides & Grid.
![]() Select from the following options:
Select from the following options:
• Color. Specify a grid color.
• Style. Specify a grid style, either Lines or Dots.
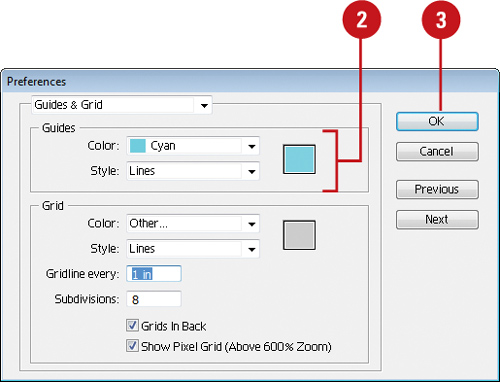
![]() Click OK.
Click OK.
Work with Guides
• Show or Hide Guides. Click the View menu, point to Guides, and then click Show Guides or Hide Guides.

• Lock Guides. Click the View menu, point to Guides, and then click Lock Guides.
• Snap an Object to Guides. Click the View menu, and then click Snap To Point.
When you drag an object near a guide or anchor point, the object snaps to it.
Create and Move Guides
![]() Click the View menu, point to Rulers, and then click Show Rulers to display the ruler bars within the document window.
Click the View menu, point to Rulers, and then click Show Rulers to display the ruler bars within the document window.
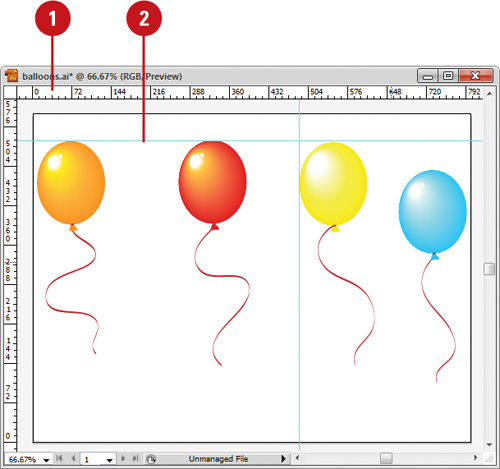
![]() Move to the vertical or horizontal Ruler bar, and then click and drag into the document.
Move to the vertical or horizontal Ruler bar, and then click and drag into the document.
![]() Return to the Ruler bar and continue to drag until you have all your guides properly set.
Return to the Ruler bar and continue to drag until you have all your guides properly set.
![]() Click the View menu, point to Guides, and then click Lock Guides to lock the existing guides in place, or click Clear Guides to remove all guides.
Click the View menu, point to Guides, and then click Lock Guides to lock the existing guides in place, or click Clear Guides to remove all guides.
![]() Click the Selection tool on the Tools panel to drag existing guides to a new position (make sure Lock Guides is not selected).
Click the Selection tool on the Tools panel to drag existing guides to a new position (make sure Lock Guides is not selected).

Did You Know?
You can convert a vector object to a guide. Select the object, click the View menu, point to Guides, and then click Make Guides. To convert it back, click the View menu, point to Guides, and then click Release Guides.
You can remove one guide at a time. Make sure Lock Guides is clear, select the guide, and then press Backspace (Win) or Delete (Mac), or choose Edit/Cut or Edit/Clear.
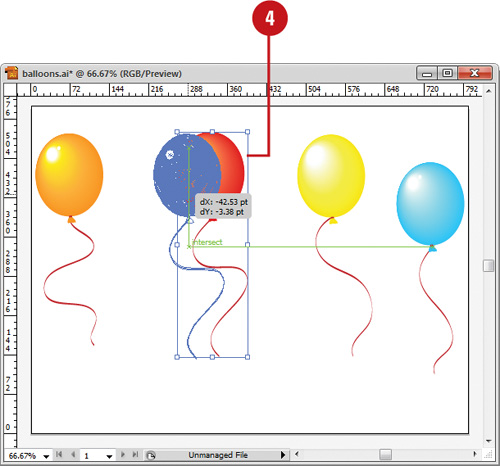
Using Smart Guides
Illustrator gives you the ability to use Smart Guides to help align shapes, slices, and selections as you draw. They appear automatically as you draw a shape or create a selection or slice, and then disappear after the shape is drawn. They enable you to visually align one object to another with a minimum of effort. Smart Guides also display alignment and measurement information, such as distances between objects and angles of rotation, to make alignment even easier. Smart Guides are automatically turned on by default. You can use Smart Guide preferences to set color and information display options to customize your Smart Guides.
Use Smart Guides
![]() Open or create a multi-layered document.
Open or create a multi-layered document.
![]() To turn Smart Guides on and off, click the View menu, and then click Smart Guides.
To turn Smart Guides on and off, click the View menu, and then click Smart Guides.
Timesaver
Press ![]() +U (Mac) or Ctrl+U to show or hide Smart Guides.
+U (Mac) or Ctrl+U to show or hide Smart Guides.
![]() Select the Selection or Direct Selection tool, and drag the object.
Select the Selection or Direct Selection tool, and drag the object.
• Press Ctrl (Win) or Command (Mac) to use the center point or edge of one object or artboard.
As you move the object, Smart Guides appear to help you align the objects.
![]() Release the mouse and the guides disappear.
Release the mouse and the guides disappear.
Did You Know?
You can snap symbol instances to smart guides. In normal mode, you can snap the contents of a symbols instance (not to the bounding box like previous versions) (New!). Symbols instances now behave like groups for snapping.
Change Smart Guide Preferences
![]() Click the Edit (Win) or Illustrator (Mac) menu, point to Preferences, and then click Smart Guides.
Click the Edit (Win) or Illustrator (Mac) menu, point to Preferences, and then click Smart Guides.
![]() Select from the following options:
Select from the following options:
• Color. Specify a guide color.
• Alignment Guides. Select to display guides along the center and edges of objects, artboard, and bleeds.
• Anchor/Path Labels. Select to display path intersection and anchor point information.
• Object Highlighting. Select to highlight objects below the pointer as you drag.
• Measurement Labels. Select to display tool or object location information.
• Transform Tools. Select to display information when you scale, rotate, and shear objects.
• Construction Guides. Select to display guides as you draw new objects. Specify guide angles for anchor points.
• Snapping Tolerance. Specify how close the object must be (measured in number of points) before it snaps to the guide.
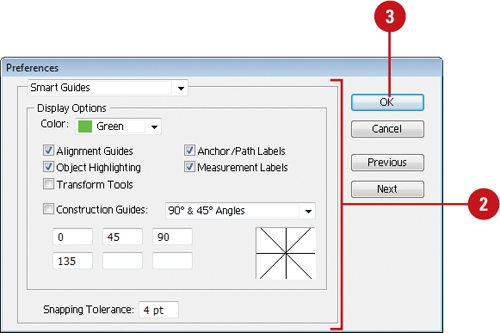
![]() Click OK.
Click OK.
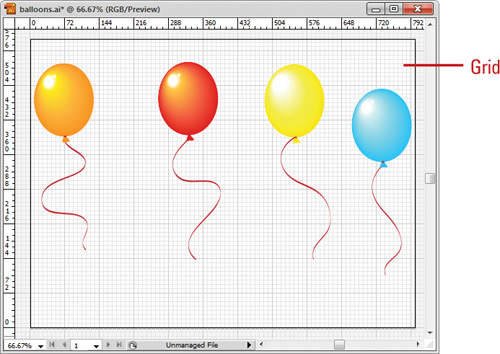
Using the Grid
A grid is a checkerboard display that you can use to help you align text and graphic objects. The grid appears behind your artwork, so it doesn’t get in the way. With the Snap to Grid command, you can align an object to a grid line. When the object’s edge comes within 2 pixels of a gridline, it snaps to the gridline point. You can use Guides & Grid preferences to set grid settings, such as color, style, and spacing.
Change Grid Preferences
![]() Click the Edit (Win) or Illustrator (Mac) menu, point to Preferences, and then click Guides & Grid.
Click the Edit (Win) or Illustrator (Mac) menu, point to Preferences, and then click Guides & Grid.
![]() Select from the following options:
Select from the following options:
• Color. Specify a grid color.
• Style. Specify a grid style, either Lines or Dots.
• Gridline Every. Specify a measurement for the interval of gridlines (default 72 points).
• Subdivisions. Specify the number of grid subdivisions.
• Grids In Back. Select to display grids in back of your artwork.
• Show Pixel Grid (Above 600% Zoom). Select to display pixel grids above 600% view (New!).
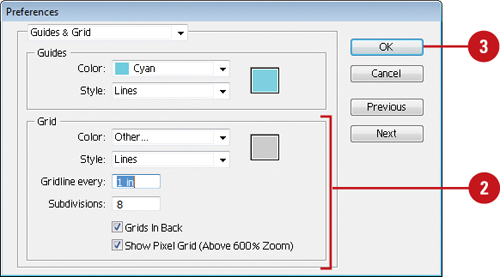
![]() Click OK.
Click OK.
Work with the Grid
• Show or Hide Grid. Click the View menu, and then click Show Grid or Hide Grid.
• Snap Object to Gridline. Click the View menu, and then click Snap To Grid.
• If the current view is set to Pixel Preview, the Snap To Grid command changes to Snap To Pixel.
When you drag an object near a gridline, it snaps to the gridline.
Moving Around with the Hand Tool
One of those little used, but handy, tools is Illustrator’s Hand tool. The Hand tool (so named because it resembles an open hand) lets you quickly move the active image within the document window without ever using the scroll bars. For example, you’ve zoomed the image beyond the size that fits within the document window and you need to change the visible portion of the document. It’s a simple operation, but a handy one to know.
Move an Element Around in the Document Window
![]() Select the Hand tool on the Tools panel.
Select the Hand tool on the Tools panel.
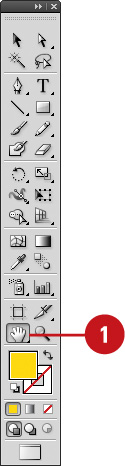
![]() Drag in the active document to move the image.
Drag in the active document to move the image.
Did You Know?
You can quickly access the Hand tool whenever you need it. Hold down the Spacebar to temporarily change to the Hand tool. Drag in the active document to the desired position, and then release the Spacebar. You’re instantly returned to the last-used tool. It’s important to note that you cannot use the Spacebar to access the Hand tool if you are currently using the Type tool.
You can move more quickly between tools using Spring-loaded keys. Rather than go back to the Tools panel when you want to switch tools, just hold down the shortcut letter key for the new tool, use the tool, and then let go of the shortcut key and you’ll be back using the first tool.
Using Crop Marks
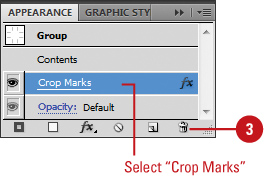
Crop marks (also known as trim marks) indicate where you want a printer to cut the printed page. They are printed with black registration lines so when separations are printed, the printer can align the pages. You can create and display multiple crop marks, which are also useful for trimming or aligning objects on an artboard or exporting them to another program. You can create crop marks as noneditable live effects or editable (New!) ones you can adjust and format. If you no longer need or want crop marks, you can delete them. For crop marks as live effect, you can delete them by selecting Crop Marks in the Appearance panel and using the Delete Selected Item button at the bottom of the panel. For editable crop marks, you can delete them by using the crop marks with the Selection tool and pressing the Delete key (New!). Crop marks do not replace trim marks created with the Marks & Bleed options in the Print dialog box.
Create and Delete Crop Marks as Live Effects Around an Object
![]() Select one or more objects.
Select one or more objects.

![]() Click the Effect menu, and then click Crop Marks.
Click the Effect menu, and then click Crop Marks.
![]() To delete crop marks, select Crop Marks in the Appearance Panel, and then click the Delete Selected Item button.
To delete crop marks, select Crop Marks in the Appearance Panel, and then click the Delete Selected Item button.
Did You Know?
You can change the registration color. The registration color is used for crop marks and other marks used by commercial printers to align printing plates. If you need to change the registration color so it stands out from the colors used in your document, you can click the Registration swatch in the Swatches panel, and then move the Tint slider on the Color panel.
Create and Delete Editable Trim Marks Around an Object
![]() Select one or more objects.
Select one or more objects.
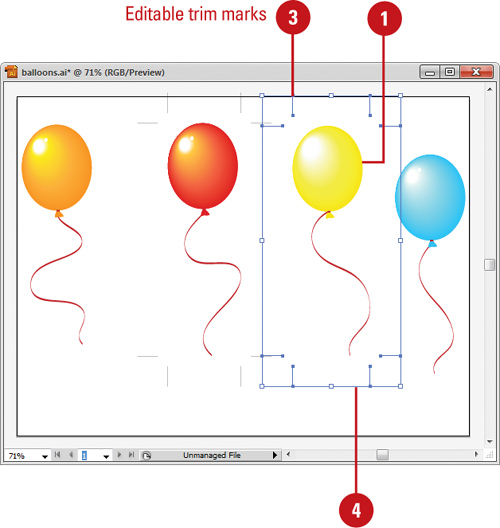
![]() Click the Object menu, and then click Create Trim Marks. (New!)
Click the Object menu, and then click Create Trim Marks. (New!)
![]() To adjust trim marks, select the trim marks with the Selection tool on the Tools panel, and then drag an anchor point or segment.
To adjust trim marks, select the trim marks with the Selection tool on the Tools panel, and then drag an anchor point or segment.
![]() To delete trim marks, select the trim marks with the Selection tool on the Tools panel, and then press Delete.
To delete trim marks, select the trim marks with the Selection tool on the Tools panel, and then press Delete.
![]() To change the color of trim marks, select the trim marks with the Selection tool on the Tools panel, and then change the stroke color using the Control, Color, or Tools panel.
To change the color of trim marks, select the trim marks with the Selection tool on the Tools panel, and then change the stroke color using the Control, Color, or Tools panel.
Working with the Info Panel
Illustrator’s Info panel gives you a wealth of data on the current document. The Info panel displays information on the x and y (horizontal/vertical) position of your mouse cursor within the active document window. In addition, when you’re using one of Illustrator’s drawing, measuring, or transformation tools, the Info panel gives you up-to-date information on the size of the object you’re creating. When an object is selected, the Info panel display the x and y position, width (w) and height (h). If you select multiple objects, only information that is the same for all selected objects appears in the Info panel. When you’re using the Zoom tool, the Info panel displays the magnification factor and the x and y position. The Info panel also displays color information when you choose to show options.
Create a Specific Size Object
![]() Select the Info panel.
Select the Info panel.

![]() Select a drawing tool on the Tools panel.
Select a drawing tool on the Tools panel.
![]() Drag in the document window to create a shape.
Drag in the document window to create a shape.
![]() Release the mouse when the Info panel displays the correct dimensions.
Release the mouse when the Info panel displays the correct dimensions.
![]() To display color fill and stroke information and the name of any pattern gradient or tint for a selected object, click the Options menu, and then click Show Options.
To display color fill and stroke information and the name of any pattern gradient or tint for a selected object, click the Options menu, and then click Show Options.
Did You Know?
You can measure the distance between objects. Select the Measure tool in the Tools panel, and then click two points, or click the first point and drag to the second point. Use Shift-drag to constrain the tool to multiples of 45 degrees. The Info panel displays the distances from the x and y axes, the absolute horizontal and vertical distances, the total distances, and the angle measured.
Using Undo and Redo
Probably one of the greatest inventions of the computer industry is the ability to Undo, and Redo. Now, if we could just figure out how to give real life an undo feature... that would be something. Illustrator gives us the ability to undo our past mistakes, and redo something we wished we had not undone.
Undo or Redo One Action at a Time
• Click the Edit menu, and then click Undo to reverse your most recent action, such as typing a word or formatting a paragraph.

Timesaver
Press Ctrl+Z (Win) or ![]() +Z (Mac) to undo.
+Z (Mac) to undo.
• Click the Edit menu, and then click Redo to restore the last action you reversed.
Timesaver
Press Shift+Ctrl+Z (Win) or Shift+![]() +Z (Mac) to redo your undo.
+Z (Mac) to redo your undo.
Creating and Selecting Workspaces
As you work with Illustrator, you’ll open, close, and move around windows and panels to meet your individual needs. After you customize the Illustrator workspace, you can save the location of windows and panels as a workspace, which you can display by using the Workspace menu on the Applications bar or the Workspaces submenu on the Window menu. You can create custom workspaces, or use one of the workspaces provided by Illustrator, which are designed for space and workflow efficiency. The built-in workspaces include Essentials, Automation, or Like Photoshop. If you no longer use a custom workspace, you can remove it at any time. You can also rename a custom workspace to improve recognition.
Create a Workspace
![]() Open and position the panels you want to include in a panel set.
Open and position the panels you want to include in a panel set.
![]() Click the Workspace menu on the Application bar (the menu name displays the current workspace), and then click Save Workspace.
Click the Workspace menu on the Application bar (the menu name displays the current workspace), and then click Save Workspace.
• You can also click the Window menu, point to Workspace, and then click Save Workspace.

![]() Type a name in the Name box.
Type a name in the Name box.
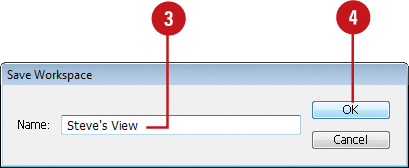
![]() Click OK.
Click OK.
The panel set and its location is now saved.
Display a Workspace
![]() Click the Workspace menu on the Application bar (the menu name displays the current workspace), and then select a panel option:
Click the Workspace menu on the Application bar (the menu name displays the current workspace), and then select a panel option:
• Custom panel name. Displays a custom panel layout that you created.
• Automation, Essentials, Like Freehand, Like InDesign, Like Photoshop, Painting, Printing and Proofing, Typography, or Web. Displays panel layouts created by Adobe for specific purposes in Illustrator.

Delete a Workspace
![]() Click the Window menu, point to Workspace, and then click Manage Workspaces.
Click the Window menu, point to Workspace, and then click Manage Workspaces.
The Manage Workspaces dialog box opens.
![]() Select the workspace you want to delete.
Select the workspace you want to delete.
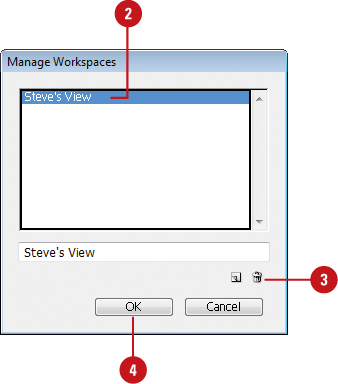
![]() Click the Delete button.
Click the Delete button.
![]() Click OK.
Click OK.
The workspace is now deleted.
Did You Know?
You can hide a panel. Click the Window menu, and then click a panel to remove the check mark.
Rename a Workspace
![]() Click the Window menu, point to Workspace, and then click Manage Workspaces.
Click the Window menu, point to Workspace, and then click Manage Workspaces.
The Manage Workspaces dialog box opens.
![]() Select the workspace you want to rename.
Select the workspace you want to rename.

![]() Type a new name.
Type a new name.
The workspace is now renamed.
![]() Click OK.
Click OK.