1. Getting Started with Illustrator CS5
Introduction
Adobe Illustrator CS5 is a graphics design and drawing program that runs seamlessly on both Windows and Macintosh platforms. Adobe Illustrator CS5 is a stand-alone program, but it’s also part of Adobe’s Creative Suite of professional programs that work together to help you create designs in print, on the Web, or on mobile devices. Many of the Creative Suite 5 programs also include additional Adobe programs and services—Bridge, CS Live, ConnectNow, Device Central, Extension Manager, and ExtendScript Toolkit—to help you manage and work with files.
Creative artists from Hollywood, brochure designers, as well as casual users turn to Illustrator for its proven ability to create top-of-the-line vector artwork and complex graphic designs. Illustrator’s ability to manipulate illustrations for use in books, brochures, multimedia presentations, or on the Web, has made Illustrator the undisputed leader in the graphics industry. When it comes to vector illustration, Illustrator is literally the best software the computer industry has to offer.
With Illustrator, you can create anything from simple icons to multilayered illustrations, as well as manipulate text. And Illustrator’s ability to work with other programs allows you to import Excel data for graph building, export Illustrator files directly to QuarkXPress and Adobe InDesign, as well as open layered Illustrator files in Photoshop, making it a snap to move back and forth between programs as you design.
Installing Illustrator
The process of installing the Illustrator application is fairly straightforward; you insert the Illustrator CS5 install disc into your DVD drive or download the software online to your computer, double-click the setup program and simply follow the on-screen instructions. The first thing that will happen is that the installer will check to see if you have the minimum system requirements. If you meet the minimums, the installer will guide you through the steps to complete the installation. The whole process takes about ten minutes, and at the end of the process you can launch Illustrator for the first time. Remember to have your serial number handy, because you will have to type it in during the installation process. It’s a good idea to have that serial number in a safe place, just in case you would need to reinstall Illustrator.
Install Illustrator CS5 in Windows
![]() Insert the Illustrator CS5 DVD into your DVD ROM drive, or download the software online to your hard disk.
Insert the Illustrator CS5 DVD into your DVD ROM drive, or download the software online to your hard disk.

![]() If necessary, double-click the DVD icon or open the folder with the downloaded software, and then double-click the setup icon.
If necessary, double-click the DVD icon or open the folder with the downloaded software, and then double-click the setup icon.
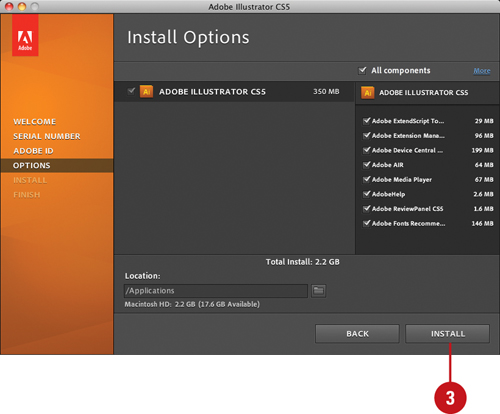
![]() Follow the on-screen instructions to install the product; the installer asks you to read and accept a licensing agreement, enter a serial number, indicate the language you want, enter or create an Adobe ID or skip the step, and specify where you want to install the software.
Follow the on-screen instructions to install the product; the installer asks you to read and accept a licensing agreement, enter a serial number, indicate the language you want, enter or create an Adobe ID or skip the step, and specify where you want to install the software.

Did You Know?
The DVD comes with bonus content. The Resources and Extras DVD included with Adobe CS5 products includes bonus content and files in the Goodies folder. Check it out! For more free online resources, go to www.adobe.com and visit Adobe Exchange.
Install Illustrator CS5 in Macintosh
![]() Insert the Illustrator CS5 DVD into your DVD ROM drive, or download the software online to your hard disk.
Insert the Illustrator CS5 DVD into your DVD ROM drive, or download the software online to your hard disk.
![]() If necessary, double-click the DVD icon or open the folder with the downloaded software, and then double-click the Install icon.
If necessary, double-click the DVD icon or open the folder with the downloaded software, and then double-click the Install icon.
![]() Follow the on-screen instructions to install the product; the installer asks you to read and accept a licensing agreement, enter a serial number, indicate the language you want, enter or create an Adobe ID or skip the step, and specify where you want to install the software.
Follow the on-screen instructions to install the product; the installer asks you to read and accept a licensing agreement, enter a serial number, indicate the language you want, enter or create an Adobe ID or skip the step, and specify where you want to install the software.
Did You Know?
Most Adobe applications can be downloaded. It’s all very simple, you go to www.adobe.com, click the Products menu item, and then select the application you want to purchase. You will need a credit card (of course), and a lot of bandwidth.
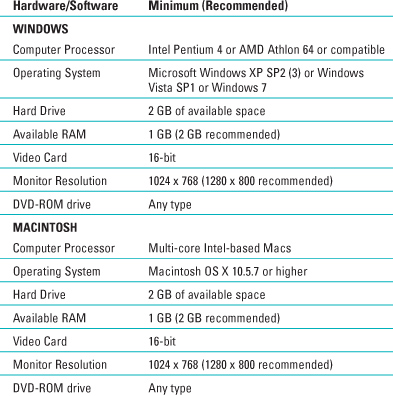
Illustrator CS5 System Requirements
Getting Started
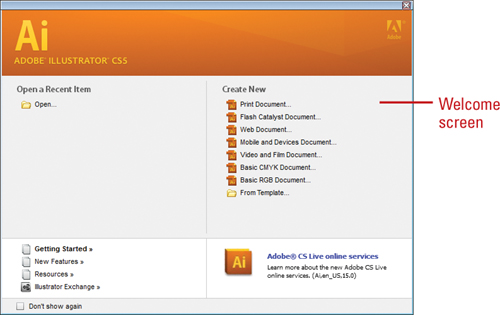
You can start Illustrator in several ways, depending on the platform you are using. When you start Illustrator, the software displays a Welcome screen and then the Illustrator window. When you start a new Illustrator session or close all documents, a Welcome screen appears in the Illustrator window, providing easy access links to open a file, open a recent file, create a new file, and create a new file from a template. You can also use the Extend links to access help information, such as Getting Started, New Features, and online resources, such as the Adobe Illustrator Exchange web site, where you can download additional applications and information and Adobe CS Live online services (New!).
Start Illustrator CS5 in Windows
![]() Click Start on the taskbar.
Click Start on the taskbar.

![]() Point to All Programs (which changes to Back).
Point to All Programs (which changes to Back).
![]() Point to an Adobe Collection CS5 menu, if needed.
Point to an Adobe Collection CS5 menu, if needed.
![]() Click Adobe Illustrator CS5.
Click Adobe Illustrator CS5.
![]() If you’re starting Illustrator CS5 for the first time, you might be prompted to specify the following:
If you’re starting Illustrator CS5 for the first time, you might be prompted to specify the following:
• Enter or create an Adobe ID to register the product, click Submit, and then click Done.
The Illustrator window opens, displaying the Welcome screen.
Did You Know?
You can create and use a shortcut icon on your desktop to start Illustrator (Win). Click Start on the taskbar, point to All Programs, right-click Adobe Illustrator CS5, point to Send To, and then click Desktop (Create Shortcut). Double-click the shortcut icon on your desktop to start Illustrator.
Start Illustrator CS5 in Macintosh
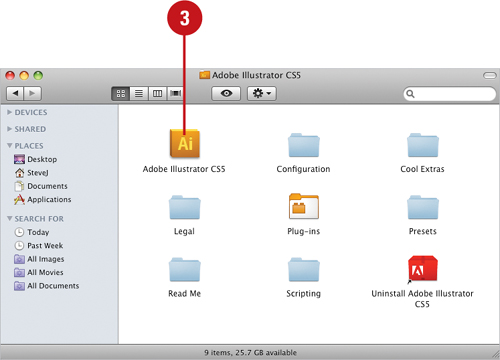
![]() Open the Applications folder (located on the main hard drive).
Open the Applications folder (located on the main hard drive).
![]() Double-click the Adobe Illustrator CS5 folder.
Double-click the Adobe Illustrator CS5 folder.
![]() Double-click the Adobe Illustrator CS5 program icon.
Double-click the Adobe Illustrator CS5 program icon.

![]() If you’re starting Illustrator CS5 for the first time, you might be prompted to specify the following:
If you’re starting Illustrator CS5 for the first time, you might be prompted to specify the following:
• Enter or create an Adobe ID to register the product, click Submit, and then click Done.
The Illustrator window opens, displaying the Welcome screen.
Did You Know?
You can create a shortcut on the Macintosh. Drag and drop the Illustrator application to the bottom of the monitor screen, and then add it to the dock.
You can create and use a keyboard shortcut to start Illustrator (Win). Click Start on the taskbar, point to All Programs, right-click Adobe Illustrator CS5, and then click Properties. In the Shortcut Key box, type or press any letter, number, or function key, such as P, to which Windows adds Ctrl+Alt. Click OK to create the keyboard shortcut. From anywhere in Windows, press the keyboard shortcut you defined (Ctrl+Alt+P) to start Illustrator.
You can open the Welcome screen on the Help menu. Click the Help menu, and then click Welcome Screen.
Viewing the Illustrator Window
When you start Illustrator, the program window displays several windows of varying types you can use to work with graphics and illustrations. In Illustrator, windows appear in the workspace in panels. A panel is a window you can collapse, expand, and group with other panels, known as a panel group, to improve accessibility and workflow. A panel group consists of either individual panels stacked one on top of the other or related panels organized together with tabs to navigate from one panel to another.
The Tools panel contains a set of tools you can use to create shapes, such as lines, rectangles, rounded rectangles, and ellipses. You can fill shapes and text with a color, pattern, or custom tile. When you select a tool, additional options appear on the Control panel.
A menu is a list of commands that you use to accomplish specific tasks. A command is a directive that accesses a feature of a program. Illustrator has its own set of menus, which are located on the Application bar along the top of the Illustrator window. Next to the menu options on the Application bar, are options for changing the document layout.
The Document window displays open Illustrator documents. Illustrator includes tabs to make it easier to switch back and forth between documents and a close button to quickly close a document.

Showing and Hiding Panels
Panels give you easy access to many task-specific commands and operations from color control to vector path information. By default, the main panel display is located along the right side of your window. You can use the Window menu or click a panel tab within a group to display it, and then select options on the panel or choose panel-specific commands from the Panel Options menu to perform actions. Instead of continually moving, resizing, or opening and closing windows, you can use the header bar with the panel tabs to collapse or expand individual panels within a window to save space.
Open and Close a Panel
![]() Click the Window menu.
Click the Window menu.

![]() Point to a submenu (if needed), such as Type, Extensions, or a library (Brush, Swatch, etc.).
Point to a submenu (if needed), such as Type, Extensions, or a library (Brush, Swatch, etc.).
![]() Click a panel name, such as Color, Layers, or Navigator.
Click a panel name, such as Color, Layers, or Navigator.
A panel name with a check mark indicates the panel is open.
Timesaver
To close a panel, or a single tab, right-click (Win) or control-click (Mac) a panel tab, and then click Close Tab Group or Close (for a single tab). On the Mac, you can also click the Close button on the panel.
Collapse or Expand a Panel
![]() To collapse or expand an open panel, click the dark gray area or double-click a title tab on the header bar of the panel.
To collapse or expand an open panel, click the dark gray area or double-click a title tab on the header bar of the panel.

If the panel is in icon mode, click on the icon to expand or collapse it. To reduce the panel back to icon mode, click on the double right-facing arrows in the dark gray area. To expand from icons to panels, click on the double left facing arrows.
Working with Panels
The movable panels are organized into groups, such as Color/Color Guide and Actions/Links, to save screen space and help with workflow. You can also dock (add) or undock (subtract) specific panels within a group to customize your workspace. A panel appears with a header, which includes the tab titles and three options: the Collapse to Icons or Expand Panels button, the Close button, and an Options menu. The Options menu provides you with panel commands. The entire set of panels includes a double arrow at the top you can use to collapse and expand the entire panel back and forth between icons and full panels.
Dock a Panel
![]() Select a panel; click on a named panel, or click the Window menu, and then click a panel name.
Select a panel; click on a named panel, or click the Window menu, and then click a panel name.

![]() Drag the window away from the panel to a panel.
Drag the window away from the panel to a panel.
• Add to Panel. Drag to a panel until a blue rectangle appears around the panel.
• Append to Panel. Drag to a panel until a blue line appears along the side of the panel.
Undock a Panel
![]() Select a panel; click on a named panel, or click the Window menu, and then click a panel name.
Select a panel; click on a named panel, or click the Window menu, and then click a panel name.

![]() Drag the panel out of the group.
Drag the panel out of the group.
![]() Drop it onto the Illustrator window.
Drop it onto the Illustrator window.
Did You Know?
You can dock and undock panels to a docking channel. You can dock and undock, panels or panel groups in docking channels. A docking channel is a region located on the left and right side of the Illustrator window to which you can attach and detach panels. When you drag a panel over a dockable area, a blue line appears.
Collapse and Expand the Panel Set Between Icons and Panels
• To collapse the panel set to icons with text, click the double arrow pointing right (Collapse to Icons) at the top of the panels.
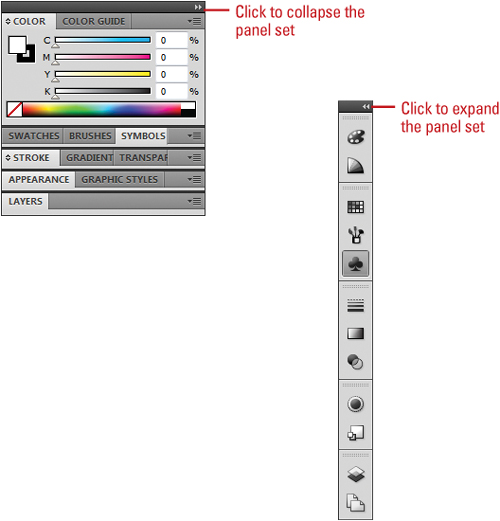
• To expand the panel set from icons with text to full panels, click the double arrow pointing left (Expand Panels) at the top of the panels.
• To have an expanded panel icon automatically collapse or hide when you click away, right-click (Win) or Control-click (Mac) a panel, and then click Auto-Collapse Iconic Panels or Auto-Show Hidden Panels.
Use the Panel Options Menu
![]() Open or expand a panel.
Open or expand a panel.

![]() Click the Options button on the right side of the panel header bar.
Click the Options button on the right side of the panel header bar.
![]() Click a command from the list (commands vary).
Click a command from the list (commands vary).
Using the Tools and Control Panel
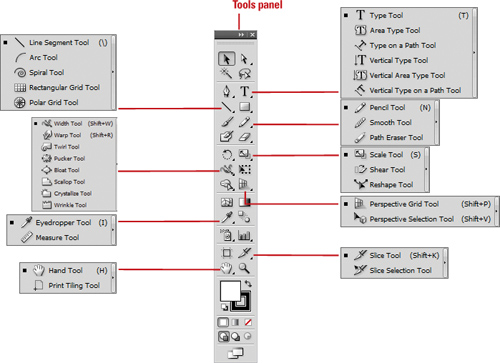
Illustrator has an abundance of tools that give an Illustrator designer tremendous control over any creative designing problems that may crop up. For example, the Illustrator tool-box contains a variety of different tools: selection tools (you can never have enough selection tools), painting or shape tools, type tools, and other tools dedicated to creating artboards, working with slices and transforming and viewing illustrations. Add to that collection, slicing, sampling, and viewing tools and you have all the tools you need to do any job.
When you work on a document, it’s important to know what tools are available, and how they can help in achieving your design goals. Illustrator likes to save space, so it consolidates similar tools under one button. To access multiple tools, click and hold on any Tools panel button that contains a small black triangle, located in the lower right corner of the tool button. Take a moment to explore the Illustrator toolbox and get to know the tools.

The Illustrator Tools panel contains the tools needed to work through any Illustrator job, but it’s not necessary to click on a tool to access it. Simply using a letter of the alphabet can access all of Illustrator’s tools. For example, pressing the P key switches to the Pen tool, and pressing the T key switches to the Type tool. In addition, if a button has more than one tool available, clicking the arrow on the right side of the tool menu displays all the tools in a small panel for easy access. When you display the small panel, you can click the arrow on the right edge to change the menu to a panel, which stays open. You can click the Close button to dismiss it. You can refer to Adobe Illustrator CS5 Keyboard Shortcuts (available for download on the Web at www.perspection.com) for more information on all the letter assignments for the various tools. To really get efficient in Illustrator, you need to learn to use both hands. Use one hand for your mouse or drawing tablet, and the other on the keyboard to make quick changes of tools and options. Think of playing Illustrator like playing a piano—you need to use both hands.
Using the Control Panel
The Control panel displays the options for the currently selected tool. For most tools, your options include Selection, Stroke Width, Brush panel, Graphic Style panel, Opacity, Document Setup, Preferences, and Select Similar Objects. When working with the Text tool, additional options include Character panel, Paragraph panel, Align Left, Align Center, and Align Right. The important thing to remember is that the Control panel is customized based on the tool you have selected.
![]()
Opening a Document
Illustrator lets you open image files created in different formats, such as TIFF, JPEG, GIF, PNG and Adobe FXG, as well as Illustrator documents in the AI format. If you want to simply open an image or Illustrator document, the Welcome Screen or Open dialog box are the most efficient way. However, if you need to manage, organize, or process files, Adobe Bridge is the way to go. You open an existing Illustrator document or image file the same way you open documents in other programs. In Windows Explorer (Win) or Finder (Mac), you can double-click an Illustrator document to open the Illustrator program and the document. When you open a document, a tab appears across the top of the Document window, with the document title. You can click the tab at any time to display that particular document.
Open an Existing Document
![]() Click the File menu, and then click Open to display all file types in the file list of the Open dialog box.
Click the File menu, and then click Open to display all file types in the file list of the Open dialog box.
![]() Click the Files of Type (Win) or Enable (Mac) list arrow, and then select a format.
Click the Files of Type (Win) or Enable (Mac) list arrow, and then select a format.
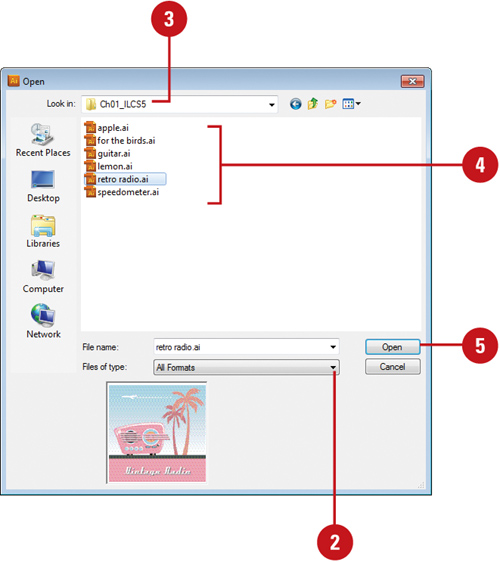
![]() Navigate to the location with the document you want to open.
Navigate to the location with the document you want to open.
![]() Click the image file you want to open.
Click the image file you want to open.
Timesaver
Press and hold the Shift key to select multiple contiguous files to open while in the Open dialog box.
![]() Click Open.
Click Open.

Did You Know?
You can delete a file in a dialog box (Win). In the Open or Save As dialog box, right click the file you want to delete, and then click Delete.
Open a Recently Opened Document
![]() Click the File menu, and then point to Open Recent Files.
Click the File menu, and then point to Open Recent Files.
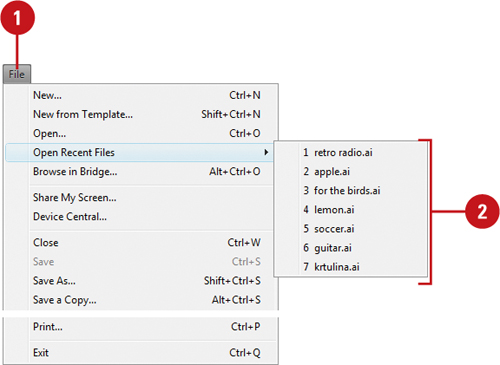
![]() Click the document you want to open.
Click the document you want to open.
Did You Know?
You can open a recent file quickly from the Start menu (Win). Click the Start button, point to Adobe Illustrator CS5 (7), Recent Items (Vista) or My Recent Documents (XP), and then click the file name you want to open.
Open a Document from the Welcome Screen
![]() Start Adobe Illustrator or click the Help menu, and then click Welcome Screen.
Start Adobe Illustrator or click the Help menu, and then click Welcome Screen.
![]() Click a document from the Open a Recent Item list.
Click a document from the Open a Recent Item list.

![]() To open a document not in the list, click Open, select a document, and then click Open.
To open a document not in the list, click Open, select a document, and then click Open.
Did You Know?
You can access Adobe CS Live services from the Welcome Screen. Adobe CS Live (New!) is an online service that allows you to set up or manage an Adobe account, and access an Adobe Web site with CS Live online services. You can access these options directly from the CS Live menu on the right side of the menu bar next to the Search bar.
Opening a Document with Adobe Bridge
With Adobe Bridge, you can drag assets into your layouts as needed, preview them, and add metadata to them. Bridge allows you to search, sort, filter, manage, and process files one at a time or in batches. You can also use Bridge to create new folders; rename, move, delete and group files (known as stacking); edit metadata; rotate images; and run batch commands. You can also view information about files and data imported from your digital camera.
Browse and Open Documents with Adobe Bridge
![]() Click the Go to Bridge button on the Application bar or click the File menu, and then click Browse in Bridge.
Click the Go to Bridge button on the Application bar or click the File menu, and then click Browse in Bridge.

![]() In Bridge, select a specific workspace to view your files the way you want.
In Bridge, select a specific workspace to view your files the way you want.
![]() Navigate to the location where the file is located.
Navigate to the location where the file is located.
![]() To open an image in Illustrator, use any of the following:
To open an image in Illustrator, use any of the following:
• Double-click on a thumbnail to open it in the default program.
• Drag the thumbnail from the Bridge into an open Adobe application.
• Select a thumbnail, click the File menu, point to Open With, and then click Adobe Illustrator CS5.
• Select a thumbnail, click the File menu, point to Place, and then click In Illustrator.
![]() To return to Illustrator, click the File menu, and then click Return to Adobe Illustrator.
To return to Illustrator, click the File menu, and then click Return to Adobe Illustrator.
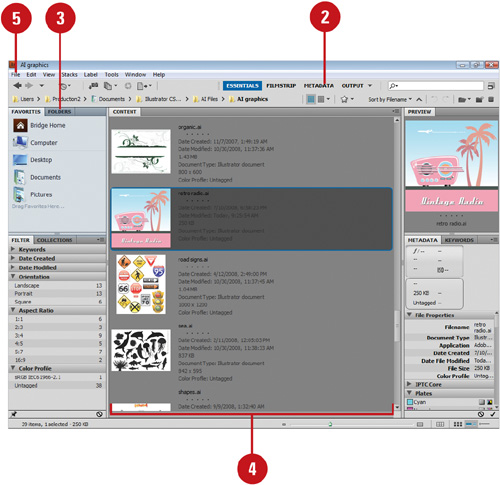
Work with Files Using Bridge
![]() Click the Go to Bridge button on the Application bar or click the File menu, and then click Browse in Bridge.
Click the Go to Bridge button on the Application bar or click the File menu, and then click Browse in Bridge.

![]() Click the Folders tab and choose a folder from the scrolling list.
Click the Folders tab and choose a folder from the scrolling list.
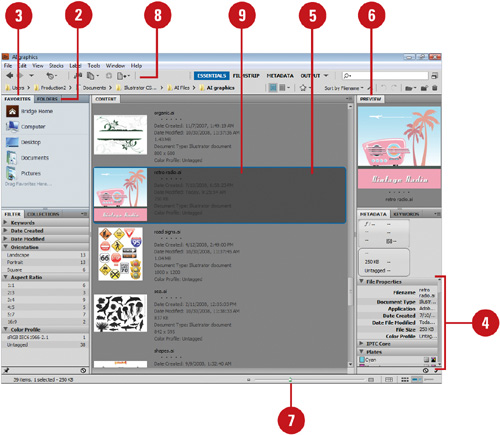
![]() Click the Favorites tab to choose from a listing of user-defined items, such as Pictures.
Click the Favorites tab to choose from a listing of user-defined items, such as Pictures.
![]() To narrow down the list of images using a filter, click the criteria you want to use in the Filter panel.
To narrow down the list of images using a filter, click the criteria you want to use in the Filter panel.
![]() Click an image within the preview window to select it.
Click an image within the preview window to select it.
![]() Click the Preview tab to view a larger thumbnail of the selected image. Multiple images appear when you select them.
Click the Preview tab to view a larger thumbnail of the selected image. Multiple images appear when you select them.
![]() Drag the Zoom slider to increase or decrease the thumbnail views.
Drag the Zoom slider to increase or decrease the thumbnail views.
![]() Use the file management buttons to rotate or delete images, or create a new folder.
Use the file management buttons to rotate or delete images, or create a new folder.
![]() Double-click on a thumbnail to open it in the default program, or drag the thumbnail from the Bridge into an open Adobe application.
Double-click on a thumbnail to open it in the default program, or drag the thumbnail from the Bridge into an open Adobe application.
Did You Know?
You can reveal a document in Adobe Bridge from Illustrator. Open a document in Illustrator, click the black triangle on the Status Bar, and then click Reveal in Bridge.
Inserting Images in a Document
You can use Illustrator’s Place command to insert artwork into an open document. To increase your control of the new image information, Illustrator places the new image into a separate layer. Illustrator lets you place files saved in Illustrator AI, Adobe PDF, Photoshop PSD, BMP, JPEG, EPS, PNG, TIFF, and TXT, DOC, or RTF formats to name a few. When you first place a vector-based image into Illustrator, you have the ability to modify the width, height, and rotation while retaining the vector format of the file.
Insert an Image in a Document Using the Place Command
![]() Open an Illustrator document.
Open an Illustrator document.
![]() Click the File menu, and then click Place.
Click the File menu, and then click Place.
![]() Navigate to the location with the image, and then select the image you want to place into the active document.
Navigate to the location with the image, and then select the image you want to place into the active document.


![]() Select any of the following options:
Select any of the following options:
• Link. Places a screen version of the image and links the document to the image file. Deselect to embed a copy of the image in the document.
• Template. Places a dimmed version of the image on a template layer.
• Replace. Replaces the current image.
![]() Click Place.
Click Place.
![]() If an additional dialog box appears, specify the Place options that you want, and then click OK.
If an additional dialog box appears, specify the Place options that you want, and then click OK.
Illustrator places the image in the active layer, and then encloses it within a transformable bounding box.
![]() Control the shape by manipulating the corner and side nodes of the freeform bounding box.
Control the shape by manipulating the corner and side nodes of the freeform bounding box.

Using the Status Bar
To work efficiently in Illustrator you need information about the active document. Details about the document’s color profile can help in the design and preparation of the final document. You can display the current artboard name (New!), current tool, date and time, and the number of undoes. Illustrator displays current information about the active document through the Status Bar, located at the bottom of the document window. From the Status Bar, you can also switch between artboards and change the view size percentage.
Use the Status Bar
![]() Click the black triangle near the Status bar info box, point to Show, and then select from the following options:
Click the black triangle near the Status bar info box, point to Show, and then select from the following options:
• Artboard Name. Displays the current artboard name (New!).
• Current Tool. Displays the current tool.
• Date and Time. Displays the current date and time.
• Number of undoes. Displays the current number of undoes.
• Document Color Profile. Displays the current document color profile.
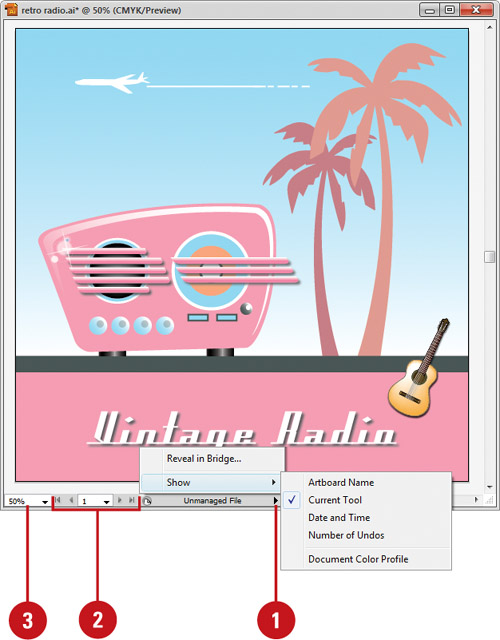
![]() To switch between artboards, use any of the following:
To switch between artboards, use any of the following:
• First or Last. Displays the first or last artboard.
• Previous or Next. Displays the previous or next artboard.
• Artboard Navigation. Displays the specified artboard.
![]() To change the view size, click the View Size list arrow, and then select a view percentage or Fit On Screen.
To change the view size, click the View Size list arrow, and then select a view percentage or Fit On Screen.
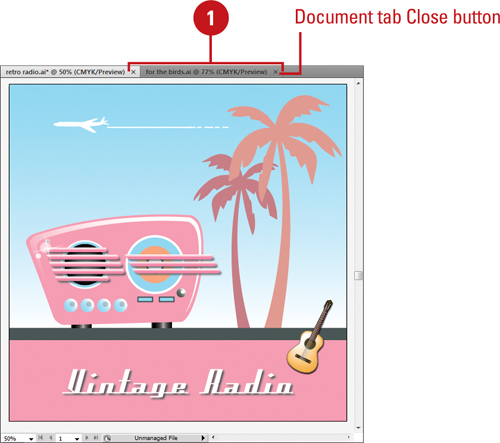
Working with Document Windows
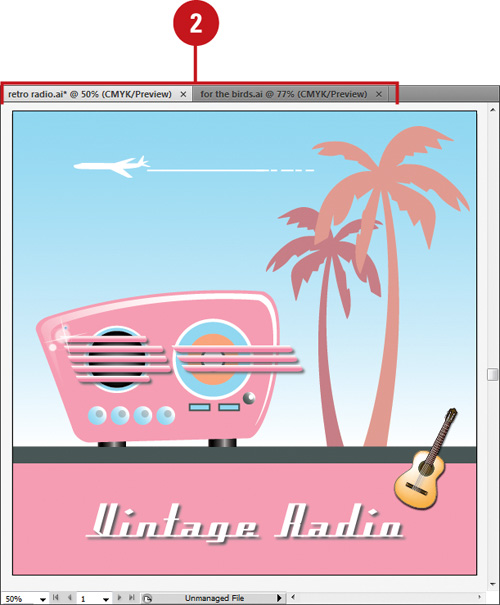
When you open multiple documents, you can use the Arrange Documents or Window menu or tabs at the top of the Document window to switch between them. You can click a tab name to switch to and activate the document. By default, tabs are displayed in the order in which you open or create documents. When you want to move or copy information between documents, it’s easier to display several document windows on the screen at the same time and move them around. However, you must make the window active to work in it. Each tab also includes a Close button to quickly close a document. If the document view is too small or large, you can change it to suit your needs.
Work with Multiple Documents
![]() Open more than one document.
Open more than one document.
![]() Click a tab name to switch to the document.
Click a tab name to switch to the document.
Timesaver
Press Ctrl+Tab or Ctrl+Shift+Tab to cycle to the tab you want.
• You can also click the Window menu, and then click a document name at the bottom of the menu.
![]() To move a document window around, do any of the following:
To move a document window around, do any of the following:
• To rearrange the order of tabbed documents drag a window’s tab to a new location.
• To switch to another document when dragging a selection, drag the selection over the document’s tab.
Arrange Multiple Documents
![]() Open more than one document.
Open more than one document.

![]() Click the Arrange Documents menu on the Application bar.
Click the Arrange Documents menu on the Application bar.
![]() On the menu, select an arrangement button icon:
On the menu, select an arrangement button icon:
• Consolidate All. Displays all active documents as tabs.
• Tile All In Grid. Displays all open documents in a grid pattern on the screen.
• Tile All Vertically. Displays all open documents vertically on the screen.
• Tile All Horizontally. Displays all open documents horizontally on the screen.
• 2-Up, 3-Up, 4-Up, 5-Up, or 6-Up. Displays the number of documents in the selected pattern (in the menu icon) on the screen.
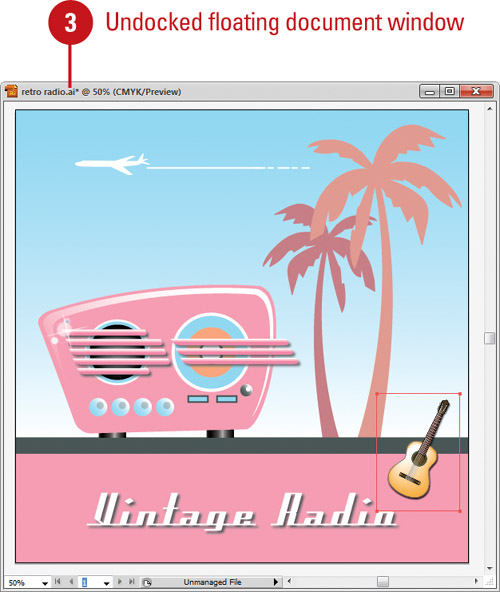
![]() To dock or undock a document window, drag the window’s tab out of the group or into the group.
To dock or undock a document window, drag the window’s tab out of the group or into the group.
Checking for Updates Online
As time passes, Illustrator—like any other program—will change. There are two types of changes to a program: updates and patches. Updates are improvements to a program such as a new feature, option, or command. Patches are software fixes for problems discovered after the public release of the program. The good news is that both updates and patches are free, and once downloaded, are self-installing. Adobe gives you two ways to check for changes. You can check manually by going to the Adobe web site, or automatically through the Adobe Updater. The Adobe Updater Preferences dialog box allows you to set update options for Illustrator and other installed Adobe products, such as Bridge. You can also set an option to have Adobe notify you of updates in the menu bar (New!).
Check for Updates Directly from the Internet
![]() Open your Internet browser.
Open your Internet browser.
![]() Go to the following Web address: www.adobe.com/downloads/updates/
Go to the following Web address: www.adobe.com/downloads/updates/
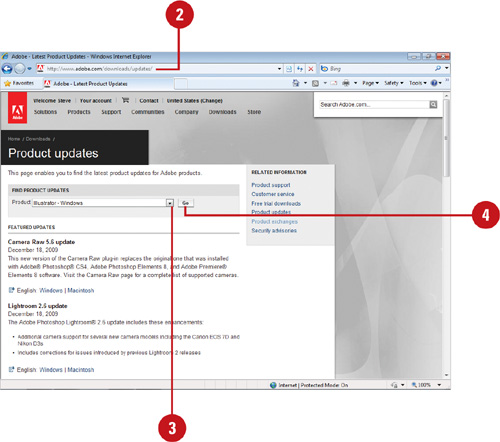
![]() Click the list arrow, and then click the Illustrator - Macintosh or Illustrator - Windows.
Click the list arrow, and then click the Illustrator - Macintosh or Illustrator - Windows.
![]() Click Go.
Click Go.
Any updates or patches appear in a list.
![]() Based on your operating system, follow the onscreen instructions to download and install the software.
Based on your operating system, follow the onscreen instructions to download and install the software.
Important
Checking on your own requires a computer with a connection to the Internet. Since some of the updates can be rather large, it’s recommended you have high-speed access.
Check for Updates from the Illustrator Help Menu
![]() Click the Help menu, and then click Updates.
Click the Help menu, and then click Updates.

Adobe checks your software with the latest available version and automatically updates it.
![]() To manually check, click the Check For New Updates button.
To manually check, click the Check For New Updates button.

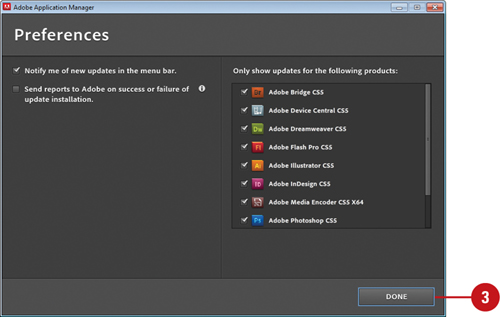
![]() To change preferences, click Preferences, select the update options you want, and then click Done.
To change preferences, click Preferences, select the update options you want, and then click Done.
![]() Click Quit.
Click Quit.
Did You Know?
You can deactivate or activate Illustrator to use on another computer. You can use your serial number on only one computer at a time. If you’re moving from one computer to another, you can deactivate your serial number on one computer and then activate it another one. Click the Help menu, click Deactivate, click Suspend Activation (saves serial number) or Deactivate Permanently (removes serial number), and then click Done. To activate it, click the Help menu, click Activate, and then follow the instructions.
You can complete or update your Adobe ID profile. An Adobe ID allows you to access Adobe online services. To complete or update your Adobe ID profiles, click the Help menu, click Complete/Update Adobe ID Profile, and then follow the online instructions.
Getting Help While You Work
At some time, everyone has a question or two about using a program. When you start Illustrator Help, the Adobe Community Help window opens (New!), displaying help categories and topics. You can search product help from Local Help, Community Help, or Adobe.com by using keywords or phrases or browsing through a list of categories and topics to locate specific information. Local Help accesses product help on your local computer, Community Help accesses product help online, and Adobe.com accesses related help information on Adobe.com. When you perform a search using keywords or phrases, a list of possible answers is shown from the search location with the most likely responses at the top. Along with help text, some help topics include links to text and video tutorials. In addition, comments and ratings from users are available to help guide you to an answer. You can add feedback and suggestions by signing in to Adobe.com using an Adobe ID.
Get Help Information
![]() Click the Help menu, and then click Illustrator Help.
Click the Help menu, and then click Illustrator Help.

Timesaver
Press F1 (Win) or ![]() +/ (Mac).
+/ (Mac).
The Adobe Community Help window opens.
![]() Click Help categories (plus sign icons) until you display the topic you want.
Click Help categories (plus sign icons) until you display the topic you want.

![]() Click the topic you want.
Click the topic you want.
![]() Read the topic, and if you want, click any links to get information on related topics or definitions.
Read the topic, and if you want, click any links to get information on related topics or definitions.
![]() When you’re done, click the Close button (Win) or click the Adobe Help menu (Mac), and then click Quit Adobe Help.
When you’re done, click the Close button (Win) or click the Adobe Help menu (Mac), and then click Quit Adobe Help.
Did You Know?
You can get resource help with Illustrator on the Web. Click the Help menu, click Welcome Screen, and then click Resources or Illustrator Exchange to display Illustrator help resources from all over the Web. You can also click the Help menu, and then click Illustrator Support Center.
Search for Help Information
![]() In Illustrator, on the Application bar, type one or more keywords in the Search box, and then press Enter (Win) or Return (Mac).
In Illustrator, on the Application bar, type one or more keywords in the Search box, and then press Enter (Win) or Return (Mac).
• You can also click the Help menu, and then click Illustrator Help to open Help and use the Search box.

The Adobe Community Help window opens, displaying a list of topics that match the keywords you entered in the Search box.
![]() To search another CS product, click the Select Product list arrow, and then select a CS product.
To search another CS product, click the Select Product list arrow, and then select a CS product.
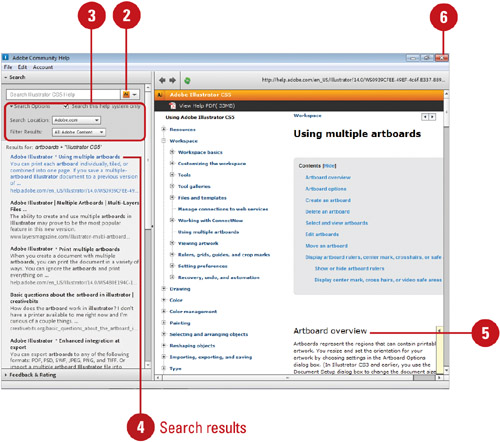
![]() To refine a search, click Search Options to expand it, and then select any of the following options:
To refine a search, click Search Options to expand it, and then select any of the following options:
• Search This Help System Only. Select to constrain the search to the selected product.
• Search Location. Select Local Help, Community Help, or Adobe.com.
• Filter Results. For Adobe.com, select a filter option.
![]() Click the link to the topic you want from the search list of results.
Click the link to the topic you want from the search list of results.
• What’s New. Click the plus sign (+) next to Resources, and then click What’s New.
![]() Read the topic, and if you want, click any links to get information on related topics or definitions.
Read the topic, and if you want, click any links to get information on related topics or definitions.
• Next and Previous Topics. Click the Previous or Next button on the right side of the Help web page.
![]() When you’re done, click the Close button (Win) or click the Adobe Help menu (Mac), and then click Quit Adobe Help.
When you’re done, click the Close button (Win) or click the Adobe Help menu (Mac), and then click Quit Adobe Help.
Saving a Document
When you finish working on your Illustrator document, you need to save it before you close the document or exit Illustrator. While this may seem like a simple task, there are questions that must be asked before saving a file, like What is the intended final output of the image? Each output device, whether monitor or paper-based, requires a specific format. Knowing the eventual destination of an image helps you create the design with the output in mind. A file type specifies the document format (for example, a template) as well as the program in which the file was created (for example, Illustrator). You might want to change the type if you’re creating a custom template or sharing files with someone who doesn’t have the Adobe Illustrator program. If you have multiple artboards, you can save them in separate files (New!).
Save an Illustrator Document
![]() Click the File menu, and then click Save As.
Click the File menu, and then click Save As.
![]() Enter a name for the file.
Enter a name for the file.
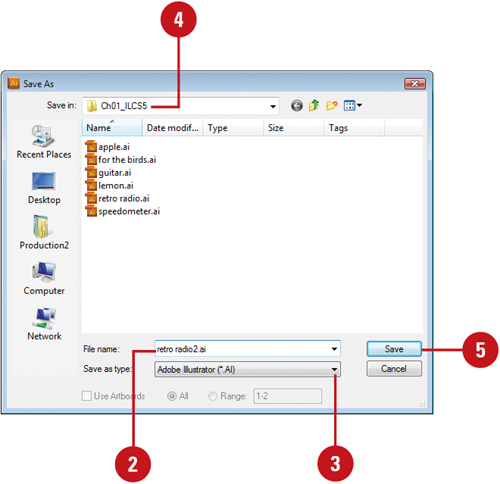
![]() Click the Save as Type list arrow (Win) or Format popup (Mac), and then click Adobe Illustrator (*.AI).
Click the Save as Type list arrow (Win) or Format popup (Mac), and then click Adobe Illustrator (*.AI).
![]() Navigate to the location where you want to save the document.
Navigate to the location where you want to save the document.
![]() Click Save.
Click Save.
![]() Select from the available options:
Select from the available options:
• Version. Specify an Illustrator version in which to save.
• Fonts. Specify when to embed the entire font or characters.
• Create PDF Compatible. Select to save a PDF in the file.
• Include Linked Files. Select to include linked files.
• Embed ICC Profiles. Select to embed the color profiles.
• Use Compression. Select to compress the file.
• Save Each Artboard To A Separate File. Select to save artboards in a file (New!).
• Transparency. Specify options for transparent objects.

![]() Click OK.
Click OK.
Save a Document in Other Formats
![]() Click the File menu, and then click Save As.
Click the File menu, and then click Save As.
![]() Click the Save as Type list arrow (Win) or Format popup (Mac), and then select a format.
Click the Save as Type list arrow (Win) or Format popup (Mac), and then select a format.
• Adobe FXG. Creates a FXG (Adobe Flex) graphics file.
• Adobe PDF. Creates a PDF (Portable Document Format) document.
• Illustrator EPS. Creates an Illustrator- based EPS image file.
• SVG or SVG Compressed. Creates a SVG (Scalable Vector Graphics) image file.

![]() Enter a name for the file.
Enter a name for the file.
![]() Navigate to the location where you want to save the document.
Navigate to the location where you want to save the document.
![]() Click Save.
Click Save.
![]() Specify the options that you want for the file type (options vary), and then click OK.
Specify the options that you want for the file type (options vary), and then click OK.
• For help, point to an option to display a description at the bottom of the dialog box.

Did You Know?
You can save a copy of an Illustrator document. Open the document that you want to save as a copy, click the File menu, click Save a Copy, specify a name and location, click Save, specify Illustrator options, and then click OK.
You can revert to the last saved version. Click the File menu, and then click Revert.
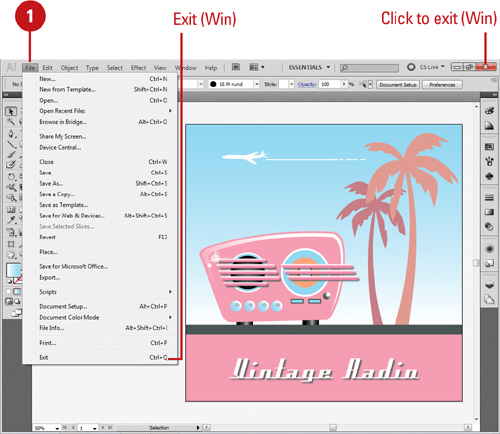
Finishing Up
After you work on a document, you can finish up by closing the document or by exiting Illustrator. You should save the document before closing it. Exiting Illustrator closes the current document and the Illustrator program and returns you to the desktop. You can use the Exit command on the File menu (Win) or Quit Illustrator command on the Illustrator menu (Mac) to close a document and exit Illustrator, or you can use the Close button on the Illustrator Document tab. If you try to close a document without saving your final changes, a dialog box opens, asking if you want to do so.
Close a Document
![]() Click the Close button on the Document tab, or click the File menu, and then click Close.
Click the Close button on the Document tab, or click the File menu, and then click Close.
Timesaver
Press Ctrl+W (Win) or ![]() +W (Mac) to close a document.
+W (Mac) to close a document.
![]() If necessary, click Yes to save any changes you made to your open documents before the program quits.
If necessary, click Yes to save any changes you made to your open documents before the program quits.
Exit Illustrator
![]() Choose one of the following:
Choose one of the following:
• Click the Close button, or click the File menu, and then click Exit (Win).
• Click the Illustrator menu, and then click Quit Illustrator (Mac).
Timesaver
Press Ctrl+Q (Win) or ![]() +Q (Mac) to exit Illustrator.
+Q (Mac) to exit Illustrator.
![]() If necessary, click Yes to save any changes you made to your open documents before the program quits.
If necessary, click Yes to save any changes you made to your open documents before the program quits.