8. Working with Type
Introduction
Illustrator comes with 6 different type tools: Type, Area Type, Type on a Path, Vertical Type, Vertical Area Type, and Vertical Type on a Path. Three of the tools are used for horizontal type and the other three are used for vertical type. The functionality between the two types is the same; only the direction of the type differs.
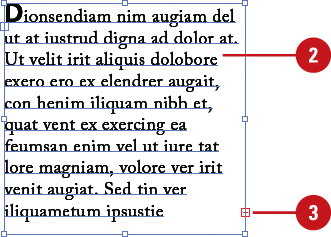
Before you can work with type in Illustrator, you need to select it. You can select the entire type object or the characters in the type object. The Selection tool allows you to select both characters and its object, while the Direct Selection tool allows you to select just the characters in the type object or both characters and its object. You can also use the type tools to select only the characters in the type object, not the object itself. If you type, paste, or import more text than a type object can hold, an overflow symbol (a tiny red plus sign in a square) appears on the edge of the type object. You can reshape the type object to display the text or create a thread (link) to another type object. You can thread overflow text from one type object to a new or existing type object.
Illustrator provides two panels to modify characters and paragraphs. With the Character panel, you can change the font family (Arial or Times New Roman) and style (Italic, Bold, or Condensed), as well as change other type attributes, such as size, kerning, scale, tracking, leading, and language. With the Paragraphs panel, you can change type alignment, indenting, and before and after spacing.
When integrating artwork and graphics with your type, you can wrap the text in a type object around another object, such as a graphic. Another type effect, Create Outlines, allows you to convert characters in a type object into a separate object with a path, which you can use as a mask object.
Using Type Tools
Illustrator comes with 6 different type tools: Type, Area Type, Type on a Path, Vertical Type, Vertical Area Type, and Vertical Type on a Path. Three of the tools are used for horizontal type and the other three are used for vertical type. The functionality between the two types is the same; only the direction of the type differs.
Use Type Tools
![]() Click the Type tool slot on the Tools panel.
Click the Type tool slot on the Tools panel.
• Click the arrow on the right of the Type tools menu to create a detachable panel.

![]() Click one of the following Type tools:
Click one of the following Type tools:
• Type. Creates type that is not associated with a path. You can use it to enter type along the edge of an open path or inside a closed path.
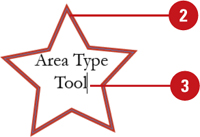
• Area Type. Creates type inside an open or closed path.
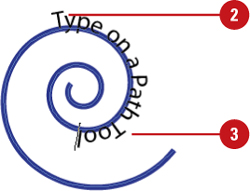
• Type on a Path. Creates type along the outer edge of an open or closed path.
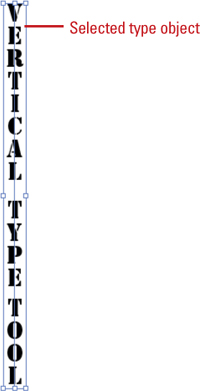
• Vertical Type. Creates vertical text and works like the Type tool.
• Vertical Area Type. Creates vertical type inside an open or closed path.
• Vertical Type on a Path. Creates vertical type along the outer edge of an open or closed path.
![]() Click a blank area of the artboard, and then type some text.
Click a blank area of the artboard, and then type some text.
• For some Type tools, you can also draw a text box to create the size you want.

Creating Type
Illustrator comes with 6 different type tools: Type, Area Type, Type on a Path, Vertical Type, Vertical Area Type, and Vertical Type on a Path. Three of the tools are used for horizontal type and the other three are used for vertical type. The functionality between the two types is the same; only the direction of the type differs. The Type and Type Vertical tools create type known as point type, that is not associated with a path. However, you can also use these tools to enter type along the edge of an open path or inside a closed path.
Create Type
![]() Select the Type or Vertical Type tool on the Tools panel.
Select the Type or Vertical Type tool on the Tools panel.
• Click the arrow on the right of the Type tools menu to create a detachable panel.
![]() Click a blank area of the artboard to create a type object.
Click a blank area of the artboard to create a type object.

A flashing insertion point appears in the type object.
![]() Type some text. Press Enter (Win) or Return (Mac) to start a new line.
Type some text. Press Enter (Win) or Return (Mac) to start a new line.
• To keep the type tool selected so you can create more type objects, hold down Ctrl (Win) or ![]() (Mac), click outside the current type object, release the key, and then type more text.
(Mac), click outside the current type object, release the key, and then type more text.
![]() Select a selection tool or select the type tool again.
Select a selection tool or select the type tool again.
Did You Know?
You can create vertical type with the regular Type tool and horizontal type with the Vertical Type tool. Select the type tool you want, hold down the Shift key, click or drag a rectangle, and then type some text.
Creating Type in a Text Box
With the Type and Vertical Type tools, you can create a rectangle text box any size that you want. When you type text in the type object, it automatically wraps to the size of the box. If you type more text than the box can hold, an overflow symbol (a tiny red plus sign in a square) appears on the edge of the rectangle box. You can reshape the type object to display the text or create a thread (link) to another type object.
Create Type in a Text Box
![]() Select the Type or Vertical Type tool on the Tools panels.
Select the Type or Vertical Type tool on the Tools panels.
• Click the arrow on the right of the Type tools menu to create a detachable panel.
![]() Drag to create a rectangle text box the size that you want.
Drag to create a rectangle text box the size that you want.

A flashing insertion point appears in the type object.
![]() Type some text. The text automatically wraps to the shape of the type object. Press Enter (Win) or Return (Mac) to start a new line.
Type some text. The text automatically wraps to the shape of the type object. Press Enter (Win) or Return (Mac) to start a new line.
• To keep the type tool selected so you can create more type objects, hold down Ctrl (Win) or ![]() (Mac), click outside the current type object, release the key, and then type more text.
(Mac), click outside the current type object, release the key, and then type more text.
• If the overflow symbol appears, deselect the type object, select the Direct Selection tool on the Tools panel, and then drag a corner to reshape the type object.
![]() Select a selection tool or select the type tool again.
Select a selection tool or select the type tool again.
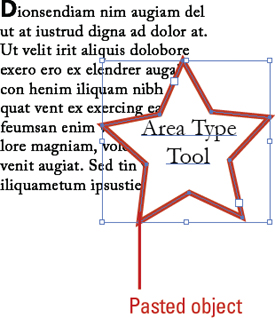
Creating Area Type
With the Area Type and Vertical Area Type Vertical tools, you can add type inside the path of any object or inside an open path. When you add type with these type tools, the object is converted to a type object. So, if you want to preserve the original object, you need to make a copy of it before you add type.
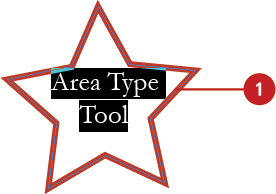
Create Area Type Inside an Object
![]() Select the Area Type or Vertical Area Type tool on the Tools panels.
Select the Area Type or Vertical Area Type tool on the Tools panels.
• Click the arrow on the right of the Type tools menu to create a detachable panel (optional).
• If you want to add type to a closed path, you can also use the Type or Vertical Type tools.
![]() Click on the edge of the path (closed or open) to which you want to add type.
Click on the edge of the path (closed or open) to which you want to add type.
A flashing insertion point appears in the type object. Any fill or stroke on the object is removed.
![]() Type some text. The text automatically wraps to the shape of the type object. Press Enter (Win) or Return (Mac) to start a new line.
Type some text. The text automatically wraps to the shape of the type object. Press Enter (Win) or Return (Mac) to start a new line.
The type appears inside the object and conforms to its shape.
• To keep the type tool selected so you can create more type objects, hold down Ctrl (Win) or ![]() (Mac), click outside the current type object, release the key, and then type more text.
(Mac), click outside the current type object, release the key, and then type more text.
• If the overflow symbol appears, deselect the type object, select the Direct Selection tool on the Tools panel, and then drag a corner to reshape the type object.

![]() Select a selection tool or select the type tool again.
Select a selection tool or select the type tool again.
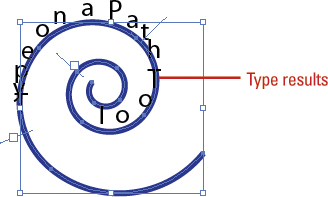
Creating Path Type
With the Type on a Path and Vertical Type on a Path tools, you can add type along the inner or outer edge of a path. You can place the text on either side of the path, but not on both. If you initially place it on the inner part of the path, you can always move it to the outer part of the path later.
Create Type on a Path
![]() Select the Type on a Path or Vertical Type on a Path tool on the Tools panel.
Select the Type on a Path or Vertical Type on a Path tool on the Tools panel.
• Click the arrow on the right of the Type tools menu to create a detachable panel (optional).
• If you want to add type to a open path, you can also use the Type or Vertical Type tools.

![]() Click on the edge of the path (closed or open) to which you want to add type.
Click on the edge of the path (closed or open) to which you want to add type.
A flashing insertion point appears in the type object. Any fill or stroke on the object is removed.
![]() Type some text. The text automatically wraps to the shape of the type object. Don’t press Enter (Win) or Return (Mac).
Type some text. The text automatically wraps to the shape of the type object. Don’t press Enter (Win) or Return (Mac).
The type appears along the edge of the object, conforms to its shape, and removes the fill and stroke.
• To keep the type tool selected so you can create more type objects, hold down Ctrl (Win) or ![]() (Mac), click outside the current type object, release the key, and then type more text.
(Mac), click outside the current type object, release the key, and then type more text.
• If the overflow symbol appears, deselect the type object, select the Direct Selection tool on the Tools panel, and then drag a corner to reshape the type object.
![]() Select a selection tool or select the type tool again.
Select a selection tool or select the type tool again.
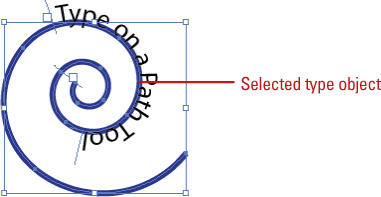
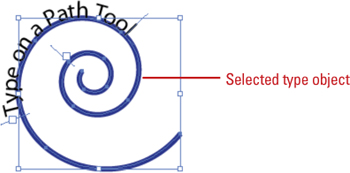
Move Type on a Path
![]() Select the Selection tool or Direct Selection tool on the Tools panel.
Select the Selection tool or Direct Selection tool on the Tools panel.
![]() Click on the type.
Click on the type.

Center, left, and right brackets appear around the type.
![]() Drag the bracket (not the square) to adjust the position of the type on a path.
Drag the bracket (not the square) to adjust the position of the type on a path.
• Swap Sides. Drag the Center bracket to the other side to change the inner/outer position of the type along the path.
• Left. Drag to position the left side (or starting point) of the type along the path.
• Center. Drag left or right to position the type along the path.
• Right. Drag to position the right side (or ending point) of the type along the path.
If the overflow symbol appears, deselect the type object, select the Direct Selection tool on the Tools panel, and then drag a corner to reshape the type object.

![]() Select a selection tool or select the type tool again.
Select a selection tool or select the type tool again.
Did You Know?
You can change type case. To help you format sentences correctly and change capitalization, you can change text case. Select the type that you want to change, click the Type menu, point to Change Case, and then click UPPERCASE, lowercase, Title Case, or Sentence case.
Modifying Type on a Path
After you create type on a path, you can change the alignment, shape, and orientation of the type with the Type on a Path dialog box. You can apply type effects, which include Rainbow, Skew, 3D Ribbon, Stair Step, or Gravity, as well as change alignment and spacing. You can even flip the type on the path. Experiment with the effects and alignment options to create some unique type.
Modify Type on a Path
![]() Select the Selection tool or Direct Selection tool on the Tools panel.
Select the Selection tool or Direct Selection tool on the Tools panel.

![]() Click on the type along the path.
Click on the type along the path.
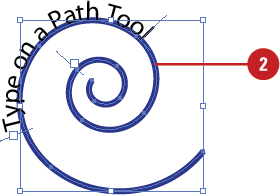
Center, left, and right brackets appear around the type.
![]() Click the Type menu, point to Type on a Path, and then click Type on a Path Options.
Click the Type menu, point to Type on a Path, and then click Type on a Path Options.
![]() Select the Preview check box to view your changes in the document window.
Select the Preview check box to view your changes in the document window.
![]() Click the Effect list arrow, and then select an effect: Rainbow, Skew, 3D Ribbon, Stair Step, or Gravity.
Click the Effect list arrow, and then select an effect: Rainbow, Skew, 3D Ribbon, Stair Step, or Gravity.
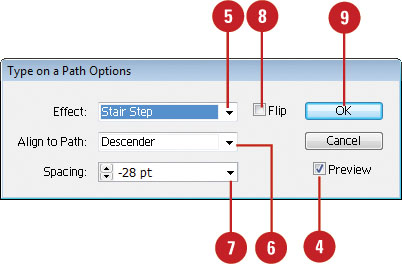
![]() Click the Align to Path list arrow, and then select an alignment option: Baseline, Ascender, Descender, or Center.
Click the Align to Path list arrow, and then select an alignment option: Baseline, Ascender, Descender, or Center.
![]() Specify a spacing value (-36 to 36). The default is Auto.
Specify a spacing value (-36 to 36). The default is Auto.
![]() Select or deselect the Flip check box to position the type.
Select or deselect the Flip check box to position the type.
![]() Click OK.
Click OK.
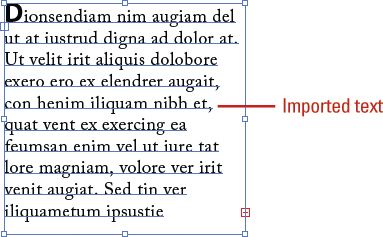
Importing Text
If you have text in a document that you want to use in your artwork, you can use the Place command to import it into your document. You can import text from the following text formats: plain text (TXT), Rich Text Format (RTF), or Microsoft Word (DOC or DOCX). When you import text using the Place command, Illustrator creates a new type object and places the text in it.
Import Text
![]() Click the File menu, and then click Place.
Click the File menu, and then click Place.
![]() Click the Files of Type (Win) or Enable (Mac) list arrow, and then click All Formats or select a text format:
Click the Files of Type (Win) or Enable (Mac) list arrow, and then click All Formats or select a text format:
• Text (TXT). Plain text.
• Microsoft Word (DOC). Microsoft Word 2003 or earlier.
• Microsoft Word (DOCX). Microsoft Word 2007 or later.
• Microsoft RTF (RTF). Rich Text Format.

![]() Navigate to the drive or folder location with the text file you want to import.
Navigate to the drive or folder location with the text file you want to import.
![]() Click the text file you want to place.
Click the text file you want to place.
![]() Click Place.
Click Place.
For some imported files, a dialog box appears, asking for placement options.
![]() Select the options you want.
Select the options you want.

![]() Click OK.
Click OK.
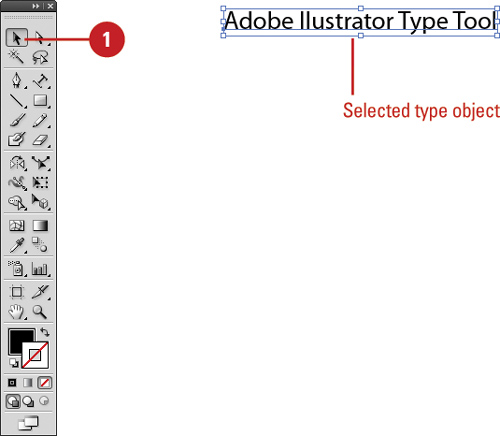
Selecting Type
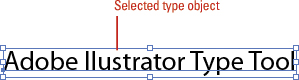
Before you can work with type in Illustrator, you need to select it. You can select the entire type object or the characters in the type object. The Selection tool allows you to select both characters and its object, while the Direct Selection tool allows you to select just the characters in the type object or both characters and its object. You can also use the type tools to select only the characters in the type object, not the object itself.
Select Type and its Object
![]() Select the Selection tool on the Tools panel.
Select the Selection tool on the Tools panel.
![]() Use the appropriate selection method:
Use the appropriate selection method:
• Point Type. Click on the type.
• Path Type. Click on the path.
• Area Type. Click on the type. For a type object with a fill, click the fill, a character, the baseline, or outer path.
Select a Type Object and Not the Type
![]() Select the Direct Selection tool on the Tools panel.
Select the Direct Selection tool on the Tools panel.
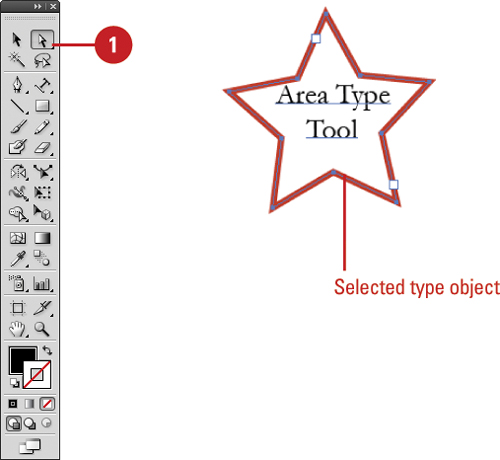
![]() Click the edge of a path or area type object.
Click the edge of a path or area type object.
Did You Know?
You can show hidden characters. If it’s hard to see spaces and paragraphs, you can show hidden characters to make them easier to see. Click the Type menu, and then click Show Hidden Characters.
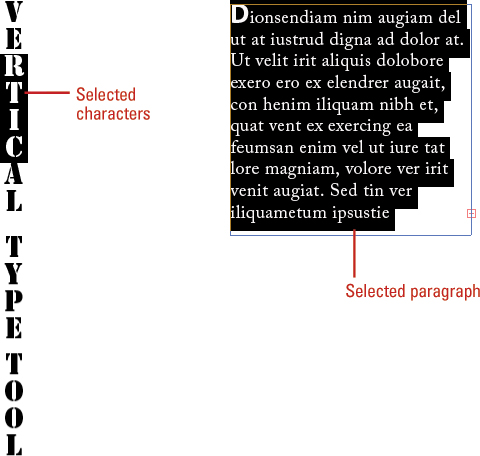
Select and Deselect Type and Not its Object
![]() Select any of the Type tools on the Tools panel.
Select any of the Type tools on the Tools panel.
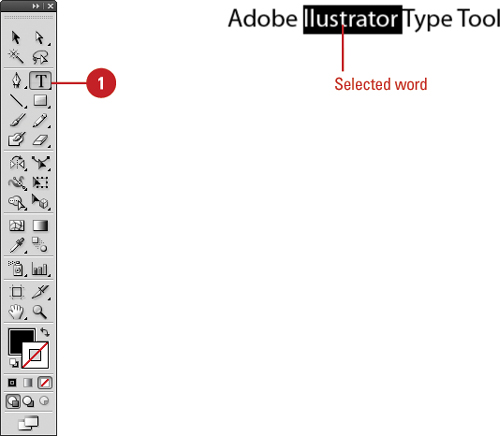
![]() Do any of the following to select:
Do any of the following to select:
• Text. Drag the I-beam cursor to select and highlight a word or line of type.
• Word. Double-click a word of type.
• Paragraph. Triple-click a paragraph of type.
• All Text. Click to place the insertion point, click the Select menu, and then click All.
Timesaver
Click in a type object, press Ctrl+A (Win) or ![]() +A (Mac) to select all the text.
+A (Mac) to select all the text.
![]() To deselect the type, Ctrl+click (Win) or Command+click (Mac) outside the type object.
To deselect the type, Ctrl+click (Win) or Command+click (Mac) outside the type object.
Did You Know?
You can use Smart Guides to help you select text. Click the View menu, and then click Smart Guides to turn the feature on. Click the Edit (Win) or Illustrator (Mac), point to Preferences, click Smart Guides, select the Object Highlighting check box, and then click OK.
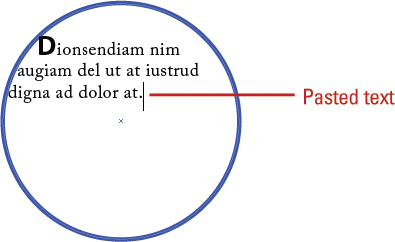
Copying or Moving Type
If you have text in a document that you want to use in your artwork, you can copy and paste it into your Illustrator document. You can place the text into an existing type object or have Illustrator create one for you. In Illustrator, you can copy type in a type object or copy individual characters, and then paste them into another Illustrator artboard or document, or into another program, such as Flash, Photoshop, or a word processing program.
Copy or Move Text from Another Program
![]() Open the other program, such as Microsoft Word.
Open the other program, such as Microsoft Word.
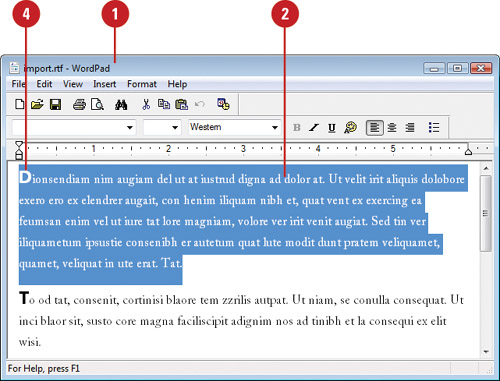
![]() Select the text that you want to copy or move, and then use commands to copy or cut (move) the text.
Select the text that you want to copy or move, and then use commands to copy or cut (move) the text.
![]() Switch back to Illustrator.
Switch back to Illustrator.
![]() To place the text into an existing type object, click in a type object to place the insertion point.
To place the text into an existing type object, click in a type object to place the insertion point.
![]() Click the Edit menu, and then click Paste.
Click the Edit menu, and then click Paste.

Timesaver
Ctrl+V (Win) or ![]() +V (Mac).
+V (Mac).
Did You Know?
You can delete empty type objects from a document. Click the Object menu, point to Path, click Clean Up, select the Empty Text Paths check box, and then click OK.
Copy Type and its Object
![]() Select the Selection tool on the Tools panel.
Select the Selection tool on the Tools panel.

![]() Select the type that you want to copy.
Select the type that you want to copy.

![]() Click the Edit menu, and then click Copy.
Click the Edit menu, and then click Copy.
Timesaver
Ctrl+C (Win) or ![]() +C (Mac).
+C (Mac).
![]() Click in another Illustrator artboard or document.
Click in another Illustrator artboard or document.
• You can also switch to another program and paste the text.
![]() Click the Edit menu, and then click Paste, Paste in Front, or Paste in Back.
Click the Edit menu, and then click Paste, Paste in Front, or Paste in Back.
Timesaver
Ctrl+V (Win) or ![]() +V (Mac).
+V (Mac).
Copy or Move Type from One Object to Another
![]() Select the Type or Vertical Type tool on the Tools panel.
Select the Type or Vertical Type tool on the Tools panel.

![]() Select the type that you want to copy or move.
Select the type that you want to copy or move.

![]() Click the Edit menu, and then click Copy or Cut (move).
Click the Edit menu, and then click Copy or Cut (move).
Timesaver
Ctrl+C (Win) or ![]() +C (Mac) to copy or Ctrl+X (Win) or
+C (Mac) to copy or Ctrl+X (Win) or ![]() +X (Mac) to cut.
+X (Mac) to cut.
![]() To place the text into an existing type object, click in a type object to place the insertion point.
To place the text into an existing type object, click in a type object to place the insertion point.
![]() Click the Edit menu, and then click Paste.
Click the Edit menu, and then click Paste.
Timesaver
Ctrl+V (Win) or ![]() +V (Mac).
+V (Mac).
Working with Overflow Type
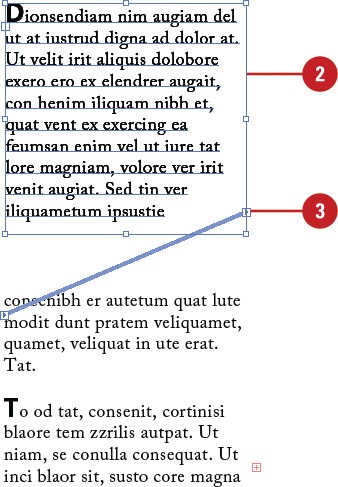
If you type, paste, or import more text than a type object can hold, an overflow symbol (a tiny red plus sign in a square) appears on the edge of the type object. You can reshape the type object to display the text or create a thread (link) to another type object. You can thread overflow text from one type object to a new or existing type object. After you create a thread between two or more type objects, you can use the Show Text Threads command on the View menu to display the thread connection. If you no longer want to want to thread two or more type objects, you can unthread or disconnect them. When you unthread type objects, the text in the type object remains in the first type object (it may still overflow). When you disconnect type objects, the text in the type objects remains where it is.
Thread Overflow Type to Another Object and Show Text Threads
![]() Select the Selection tool on the Tools panel.
Select the Selection tool on the Tools panel.
![]() Select the type object with the overflow type.
Select the type object with the overflow type.
![]() Click the Out Port icon on the selected object.
Click the Out Port icon on the selected object.
Timesaver
Double-click an Out Port icon with the Selection tool to create a linked copy of the type object.
The pointer changes to the Loaded Text pointer.
![]() To create a new type object for the overflow text, click a blank area or drag to create a type object.
To create a new type object for the overflow text, click a blank area or drag to create a type object.
To use an existing type object, position the pointer over an existing type object, and then click the object’s path. A fill and stroke of None is applied to the path.
Overflow text from the first type object threads to the second type object.
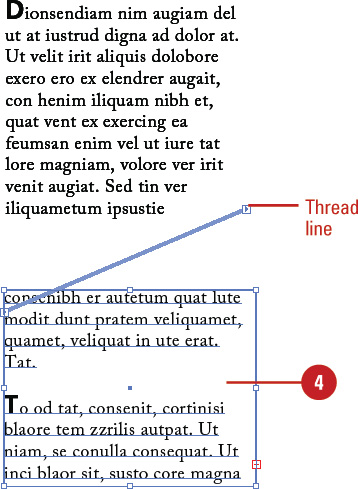
![]() To display a text thread between type objects, select a threaded type object, click the View menu, and then click Show Text Threads.
To display a text thread between type objects, select a threaded type object, click the View menu, and then click Show Text Threads.
Unthread Type Objects
![]() Select the Selection tool on the Tools panel.
Select the Selection tool on the Tools panel.
![]() Select a threaded type object.
Select a threaded type object.
![]() Double-click the In Port or Out Port icon on the selected object.
Double-click the In Port or Out Port icon on the selected object.
Unthread or Disconnect a Type Object
![]() Select the Selection tool on the Tools panel.
Select the Selection tool on the Tools panel.
![]() Select a threaded type object that you want to release or disconnect.
Select a threaded type object that you want to release or disconnect.
![]() Do one of the following:
Do one of the following:
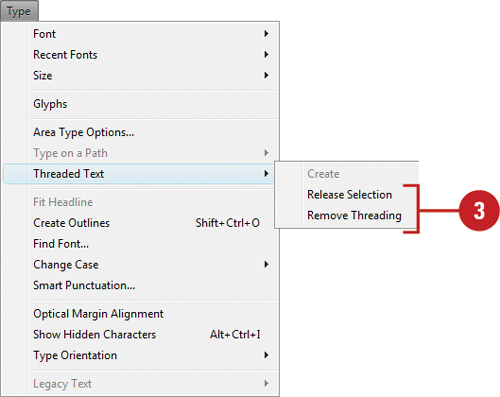
• Unthread. Click the Type menu, point to Threaded Text, and then click Remove Threading.
• Disconnect. Click the Type menu, point to Threaded Text, and then click Release Selection.
Changing Fonts
A font is a collection of alphanumeric characters that share the same typeface, or design, and have similar characteristics. With the Character panel, you can change the font family (Arial or Times New Roman) and style (Italic, Bold, or Condensed), as well as change other type attributes, such as size, kerning, scale, tracking, leading, and language. You can also change these and other attributes by using the Type menu and Control panel. You can access the Character panel from the Window menu and the Control panel. After you select the type that you want to change, you can click Character on the Control panel to display the Character panel. As you can see, there are several ways to change font attributes. You can use any one of them. We’ll focus on the Character panel. If you want to know which fonts are currently being used in your document or find/change a font in your document, the Find Font dialog box can help you do the job.
Change Font Family and Style
![]() Select any type tool, and then select the type that you want to change.
Select any type tool, and then select the type that you want to change.
• You can also select the Selection tool, and then click the type object.

![]() Select the Character panel.
Select the Character panel.
• Click the Window menu, point to Type, and then click Character.
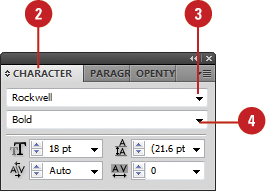
![]() Click the Font Family list arrow, and then select a font.
Click the Font Family list arrow, and then select a font.
• To see the font family in the style of the font, click the Type menu, point to Font, and then select a font.

Timesaver
To reuse a recent font, click the Type menu, point to Recent Font, and then select a font.
![]() Click the Font Style list arrow, and then select a font style, such as Italic, Bold, or Condensed.
Click the Font Style list arrow, and then select a font style, such as Italic, Bold, or Condensed.
Find or Change a Font
![]() Click the Type menu, and then click Find Font.
Click the Type menu, and then click Find Font.
The fonts in the top list are the ones currently used in your document. The list at the bottom displays fonts in your document or fonts on your computer, depending on your setting.
![]() To find a specific font in your document, select it in the top list.
To find a specific font in your document, select it in the top list.

![]() Select the check boxes at the bottom to specify the font attributes that you want to find.
Select the check boxes at the bottom to specify the font attributes that you want to find.
![]() To replace the font in the top list, select a font in the bottom list. Click the Replace With Font From list arrow, and then click System to show all the fonts on your computer.
To replace the font in the top list, select a font in the bottom list. Click the Replace With Font From list arrow, and then click System to show all the fonts on your computer.
![]() Click Find to display the first instance of the font, and then click Change to replace it, or click Change All to replace all uses of the font in your document.
Click Find to display the first instance of the font, and then click Change to replace it, or click Change All to replace all uses of the font in your document.
![]() When you’re done, click Done.
When you’re done, click Done.
Did You Know?
You can change the type language. Select the Character panel, click the Language list arrow, and then select the language that you want to use. You can also select type using any type tool, and then change the type language to something else.
Changing Font Size
After setting the font family and style, the next attribute to set is the font size. The font size can range from 6 points to 72 points and beyond with the right type of font. Open or TrueType fonts can be scaled to any size and still look and print well. Bitmap (screen fonts), fonts, on the other hand, cannot be scaled and you need to use the available sizes to print well. However, bitmap fonts are the best choice for commercial print jobs. An “O” appears next to an OpenType font, a “TT” appears next to a TrueType font, and an “a” appears next to a bitmap font on the Font submenu.
Change Font Size
![]() Select any type tool, and then select the type that you want to change.
Select any type tool, and then select the type that you want to change.
• You can also select the Selection tool, and then click the type object.

![]() Select the Character panel.
Select the Character panel.

![]() Enter a font point size, or click the Font Size list arrow, and then select a font size. Press Enter (Win) or Return (Mac) to apply the value.
Enter a font point size, or click the Font Size list arrow, and then select a font size. Press Enter (Win) or Return (Mac) to apply the value.
• You can also hold down Ctrl+Shift (Win) or Command+Shift (Mac), and then press > to increase the point size or press < to decrease the point size.
The type increases or decreases by the Size/Leading value set in Type preferences.
Use Ctrl+Alt-Shift (Win) or Command+Option+Shift to change the point size 5 sizes at a time.

Did You Know?
What is a point? The size of each font character is measured in points (a point is approximately 1/72 of an inch). You can use any font that is installed on your computer on a document, but the default is 10-point Arial.
Leading Type
Leading is the distance from the baseline of one line to the baseline of the next line and is measured in points. Each line of type can have a different leading. You can specify a specific setting or use Auto, which is a percentage of the largest type size on each line. Leading is applied to horizontal type. If you want to change vertical spacing in type, you need to adjust horizontal tracking.
Change Type Leading
![]() Select any horizontal type tool, and then select the type that you want to change.
Select any horizontal type tool, and then select the type that you want to change.
• You can also select the Selection tool, and then click the type object.
![]() Select the Character panel.
Select the Character panel.
• Click the Window menu, point to Type, and then click Character.

![]() Enter a leading point size, or click the Leading list arrow, and then select a leading size. Press Enter (Win) or Return (Mac) to apply the value.
Enter a leading point size, or click the Leading list arrow, and then select a leading size. Press Enter (Win) or Return (Mac) to apply the value.
• You can also hold down Alt (Win) or Option (Mac), and then press the down arrow to increase the point size or press the up arrow to decrease the point size.
The type increases or decreases by the Size/Leading value set in the Type preferences.
![]() To shift characters up or down from the baseline, enter a baseline value, or click the Baseline list arrow, and then select a baseline value. A positive size adds space while a negative number removes space. Press Enter (Win) or Return (Mac) to apply the value.
To shift characters up or down from the baseline, enter a baseline value, or click the Baseline list arrow, and then select a baseline value. A positive size adds space while a negative number removes space. Press Enter (Win) or Return (Mac) to apply the value.

Kerning Type
Kerning is the amount of space between each individual character that you type. Sometimes the space between two characters is larger than others, which makes the word look uneven. You can use the Character panel to change the kerning setting for selected characters. You can expand or condense character spacing to create a special effect for a title, or realign the position of characters to the bottom edge of the text—this is helpful for positioning copyright or trademark symbols.
Change Type Kerning
![]() Select any type tool, and then click between the two characters of type that you want to change the distance between.
Select any type tool, and then click between the two characters of type that you want to change the distance between.
• You can also select the Selection tool, and then click the type object.

![]() Select the Character panel.
Select the Character panel.
• Click the Window menu, point to Type, and then click Character.

![]() Enter a kerning size, or click the Kerning list arrow, and then select a kerning size. A positive size adds space while a negative number removes space. Press Enter (Win) or Return (Mac) to apply the value.
Enter a kerning size, or click the Kerning list arrow, and then select a kerning size. A positive size adds space while a negative number removes space. Press Enter (Win) or Return (Mac) to apply the value.
• You can also hold down Alt (Win) or Option (Mac), and then press the right arrow to increase the point size or press the left arrow to decrease the point size.
The type increases or decreases by the Tracking value set in the Type preferences.

Did You Know?
You can fit headline type to its object. Select any type tool, select or click in a single-line paragraph of area type, click the Type menu, and then click Fit Headline.
Tracking Type
Tracking is the adjustment of space between three or more characters. Typically, you’ll track a line of type or a few words depending on the length and design application. This is useful for creating specialize type for a caption or short heading. To adjust space between two characters, kerning is the best choice. To track characters, you need to select them first and then set the Tracking option in the Character panel.
Change Type Tracking
![]() Select any type tool, and then select the type that you want to change.
Select any type tool, and then select the type that you want to change.
• You can also select the Selection tool, and then click the type object.
![]()
![]() Select the Character panel.
Select the Character panel.
• Click the Window menu, point to Type, and then click Character.
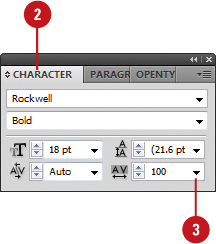
![]() Enter a tracking size, or click the Tracking list arrow, and then select a tracking size. A positive size adds space while a negative number removes space. Press Enter (Win) or Return (Mac) to apply the value.
Enter a tracking size, or click the Tracking list arrow, and then select a tracking size. A positive size adds space while a negative number removes space. Press Enter (Win) or Return (Mac) to apply the value.
• You can also hold down Alt (Win) or Option (Mac), and then press the right arrow to increase the point size or press the left arrow to decrease the point size.
The type increases or decreases by the Tracking value set in the Type preferences.
![]()
Scaling Type
Scaling allows you to make type wider or narrower for horizontal type and taller or shorter for vertical type. You can use the Horizontal Scale and Vertical Scale options in the Character panel to modify type. If the scaling doesn’t look quite right, you can always use the Undo command to reverse the command.
Change Type Scaling Horizontally or Vertically
![]() Select any type tool, and then select the type that you want to change.
Select any type tool, and then select the type that you want to change.
• You can also select the Selection tool, and then click the type object.

![]() Select the Character panel.
Select the Character panel.
• Click the Window menu, point to Type, and then click Character.

![]() Enter a horizontal or vertical percentage, or click the Horizontal Scale or Vertical Scale list arrow, and then select a percentage. Press Enter (Win) or Return (Mac) to apply the value. Other ways of scaling text include:
Enter a horizontal or vertical percentage, or click the Horizontal Scale or Vertical Scale list arrow, and then select a percentage. Press Enter (Win) or Return (Mac) to apply the value. Other ways of scaling text include:
• To scale a type object, select the object, double-click the Scale tool on the Tools panel, select the Non-Uniform option, specify a Horizontal and Vertical percentage, and then click OK.
• To scale a type object, select the object, select the Free Transform tool on the Tools panel, and then drag a side handle on the bounding box.

Rotating Type
After you create type, you can rotate text characters or the entire text block to a custom angle. You change the custom angle in the Character panel, which is available on the Type submenu on the Window menu. For text blocks, you can also rotate them horizontally or vertically by using the Horizontal or Vertical command on the Type Orientation sub-menu on the Type menu.
Rotate Type
![]() Select the Selection tool or Direct Selection tool on the Tools panel.
Select the Selection tool or Direct Selection tool on the Tools panel.

![]() Click the type on the path or select characters in the type.
Click the type on the path or select characters in the type.
Center, left, and right brackets appear around the type.
![]() Select the Character panel.
Select the Character panel.
• Click the Window menu, point to Type, and then click Character.

![]() Enter a rotation value, or click the Character Rotation list arrow, and then select a rotation value. Press Enter (Win) or Return (Mac) to apply the value.
Enter a rotation value, or click the Character Rotation list arrow, and then select a rotation value. Press Enter (Win) or Return (Mac) to apply the value.
• Rotate Horizontal or Vertical. Click the Type menu, point to Type Orientation, and then click Horizontal or Vertical.
![]() Drag the bracket (not the square) to adjust the position of the type on the path.
Drag the bracket (not the square) to adjust the position of the type on the path.

Aligning Paragraphs
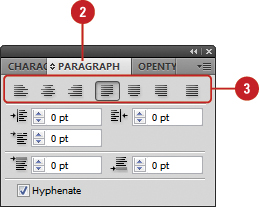
When you press the Enter (Win) or Return (Mac) in a type object, Illustrator creates a paragraph. You can use the Paragraph panel to align and indent paragraphs in your document. At the top of the Paragraph panel is a set of buttons that you can use to align text in one or more paragraphs. The panel includes the typical options to align: left, center, right and justify. However, it also includes options to justify with only the last line aligned left, center, or right.
Align Paragraphs
![]() Select any type tool, and then click in a paragraph or select multiple paragraphs that you want to align.
Select any type tool, and then click in a paragraph or select multiple paragraphs that you want to align.
• You can also select the Selection tool, and then click the paragraph.
![]() Select the Paragraph panel.
Select the Paragraph panel.
• Click the Window menu, point to Type, and then click Paragraph.
![]() Use any of the following alignment buttons on the panel:
Use any of the following alignment buttons on the panel:
• Align Left, Align Center, or Align Right. Click these buttons to align paragraph type left, center, or right.
• Justify Left, Center, or Right. Click these buttons to justify the paragraph text with only the last line aligned left, center, or right.
• Justify. Click to justify all lines.

Indenting and Spacing Paragraphs
Quickly indent lines of text to precise locations from the left or right margin with the horizontal ruler. Indent the first line of a paragraph (called a first-line indent) as books do to distinguish paragraphs. Indent the second and subsequent lines of a paragraph from the left margin (called a hanging indent) to create a properly formatted bibliography. Indent the entire paragraph any amount from the left and right margins (called left indents and right indents) to separate quoted passages. In addition to indenting paragraphs, you can also set the spacing you want before or after a paragraph.
Indent and Space Paragraphs
![]() Select any type tool, and then click in a paragraph or select multiple paragraphs that you want to change.
Select any type tool, and then click in a paragraph or select multiple paragraphs that you want to change.
• You can also select the Selection tool, and then click the paragraph.
![]() Select the Paragraph panel.
Select the Paragraph panel.
• Click the Window menu, point to Type, and then click Paragraph.
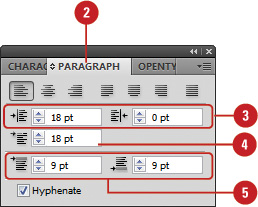
![]() Enter a Left Indent and/or Right Indent value or use the up and down arrows to specify one. Press Enter (Win) or Return (Mac) to apply the value.
Enter a Left Indent and/or Right Indent value or use the up and down arrows to specify one. Press Enter (Win) or Return (Mac) to apply the value.
![]() To create a first-line indent, enter a First-Line Indent value or use the up and down arrows to specify one. Press Enter (Win) or Return (Mac) to apply the value.
To create a first-line indent, enter a First-Line Indent value or use the up and down arrows to specify one. Press Enter (Win) or Return (Mac) to apply the value.
• To create a hanging indent, enter a negative value in the First-line Left Indent box.
![]() To add spacing between paragraphs, enter a Space Before Paragraph and/or Space After Paragraph value or use the up and down arrows to specify one. Press Enter (Win) or Return (Mac) to apply the value.
To add spacing between paragraphs, enter a Space Before Paragraph and/or Space After Paragraph value or use the up and down arrows to specify one. Press Enter (Win) or Return (Mac) to apply the value.

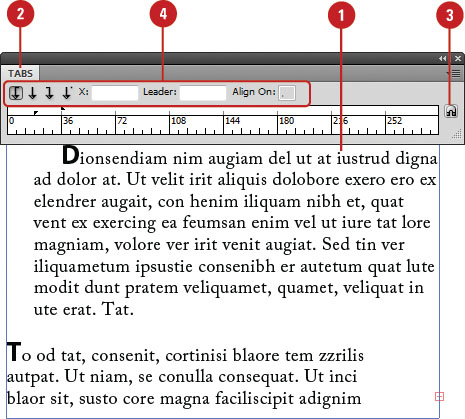
Setting Tabs
In your document, tabs set how text or numerical data is aligned in relation to the document margins. A tab stop is a predefined stopping point along the document’s typing line. Default tab stops are set every half-inch, but you can set multiple tabs per paragraph at any location. Choose from four types of text tab stops: left, right, center, and decimal (for numerical data). In the Tabs panel, you can view a ruler with the current tab setting for the selected type and add, move, or delete tab stops. When you press the Tab key with the insertion point, the text shifts to the next tab stop.
Set Tabs
![]() Select any type tool, and then click to place the insertion point in a type object.
Select any type tool, and then click to place the insertion point in a type object.
![]() Select the Tabs panel.
Select the Tabs panel.
• Click the Window menu, point to Type, and then click Tabs.
• To use the default tabs, press the tab key to shift the text to the next default tab stop.
![]() To move the panel next to the text, click the Position Panel Above Text button on the panel.
To move the panel next to the text, click the Position Panel Above Text button on the panel.
![]() Do any of the following:
Do any of the following:
• Insert. Click one of the tab stop buttons, and then click in the ruler where you want to place it. You can also enter a number in the X box to insert a tab at an exact position.
• Move. Drag the tab stop left or right or enter an exact position in the X box.
• Delete. Drag a tab stop down off the ruler.
• Leader. Enter a character that repeats in the tabbed space, such as a period.
• Align On. Enter a character that is used with the Decimal tab, such as a decimal point.
Working with Hyphenation
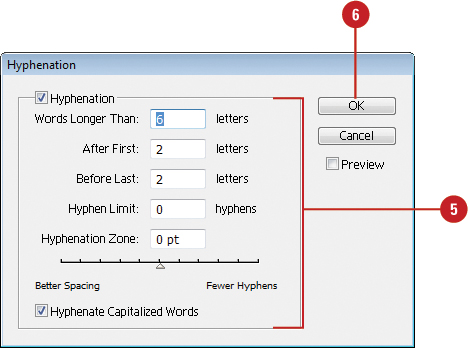
When you select the Hyphenate check box in the Paragraph panel, Illustrator automatically adds hyphenation as you need it in your document based on the options set in the Hyphenation dialog box. If the Hyphenate check box is not checked, you need to select any existing type to apply hyphenation. The Hyphenation options allow you to specify how long a word needs to be before hyphenation takes place, the maximum number of hyphens you can use, and what balance you want between better spacing and fewer hyphens.
Change Hyphenation Options
![]() Select any type tool, and then select the type that you want to hyphenate.
Select any type tool, and then select the type that you want to hyphenate.
![]() Select the Paragraph panel.
Select the Paragraph panel.
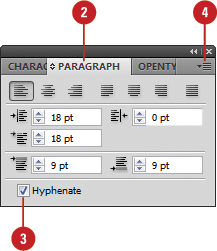
![]() To enable hyphenation, select the Hyphenate check box.
To enable hyphenation, select the Hyphenate check box.
![]() Click the Options menu, and then click Hyphenation.
Click the Options menu, and then click Hyphenation.
![]() Specify the following options:
Specify the following options:
• Words Longer Than. Enter the minimum number of characters a word must have before hyphens are added.
• After First. Enter the minimum number of characters that can be inserted before a hyphen.
• Before Last. Enter the minimum number of characters that can be inserted after a hyphen on the next line.
• Hyphen Limit. Enter the maximum number of hyphens in a row (0-25).
• Hyphenation Zone. Drag the slider to adjust the balance of hyphenation between better spacing and fewer hyphens.
• Hyphenate Capitalized Words. Select to hyphenate capitalized words.
![]() Click OK.
Click OK.
Working with Type Styles
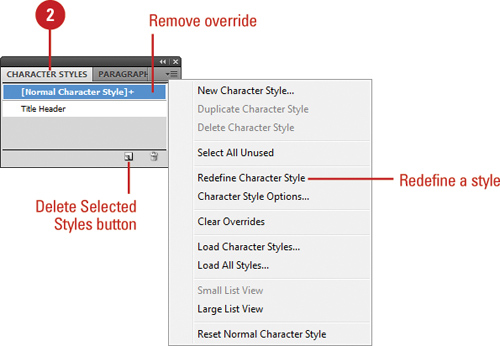
A style is a group of format settings that you can create or modify to get the exact look you want. When you create a new style, you can specify if it applies to paragraphs or characters, and give the style a short name that describes its purpose so you and others know when to use that style. A paragraph style is a group of format settings that can be applied only to all of the text within a paragraph (even if it is a one-line paragraph), while a character style is a group of format settings that is applied to any block of text at the user’s discretion. To modify a style, adjust the formatting settings of an existing style. If you see a style with a plus sign (+) after the name, it means that the type with the applied style also contains other formatting, which you can remove or redefine the style.
Create or Edit Styles
![]() Select any type tool, and then select the type that you want to use as the style.
Select any type tool, and then select the type that you want to use as the style.
• You can also select the Selection tool, and then click the type object.
![]() Select the Character Styles or Paragraph Styles panel.
Select the Character Styles or Paragraph Styles panel.
• Click the Window menu, point to Type, and then click Character Styles or Paragraph Styles.

![]() Use any of the following options:
Use any of the following options:
• Create. Alt+click (Win) or Option+click (Mac) the Create New Style button on the Character Styles or Paragraph Styles panel, and then enter a name for the style.
• Edit. Deselect any styles, and then double-click the style that you want to edit.
![]() Select a category, such as General, Indents and Spacing, Justification, or Character Color.
Select a category, such as General, Indents and Spacing, Justification, or Character Color.

![]() View the current settings and make any changes that you want.
View the current settings and make any changes that you want.
![]() Click OK.
Click OK.
Apply Styles
![]() Select any type tool, and then select the type that you want to change.
Select any type tool, and then select the type that you want to change.
For paragraph styling, select a type object or select paragraphs. For character styling, select text, not a type object.
• You can also select the Selection tool, and then click the type object.
![]() Select the Character Styles or Paragraph Styles panel.
Select the Character Styles or Paragraph Styles panel.

![]() Click a style name in one of the panels.
Click a style name in one of the panels.

Work with Styles
![]() Select any type tool, and then select the type with the style that you want to change.
Select any type tool, and then select the type with the style that you want to change.
• You can also select the Selection tool, and then click the type object.
![]() Select the Character Styles or Paragraph Styles panel.
Select the Character Styles or Paragraph Styles panel.
![]() Do any of the following:
Do any of the following:
• Delete a Style. Select a style, and then click the Delete Selected Styles button.
• Remove Overrides. Alt+click (Win) or Option+click (Mac), the style name to remove the plus sign (+).
• Redefine a Style. Click the appropriate Options menu, and then click Redefine Character Style or Redefine Paragraph Style.
Using Smart Punctuation
Smart Punctuation turns your text into professional looking type. Instead of using straight quotes, you can use smart quotes. Instead of using hyphen as dashes, you can use En or Em dashes. You would not want to make these changes manually, but you don’t have to. Illustrator can do it for you with the Smart Punctuation command. You can change the entire document all at one time or you can select the type that you want to change.
Use Smart Punctuation
![]() Select any type tool, and then select the type that you want to change, or deselect all to convert the entire document.
Select any type tool, and then select the type that you want to change, or deselect all to convert the entire document.
![]() Click the Type menu, and then click Smart Punctuation.
Click the Type menu, and then click Smart Punctuation.
![]() Select the check boxes with the Smart Punctuation options that you want to use.
Select the check boxes with the Smart Punctuation options that you want to use.
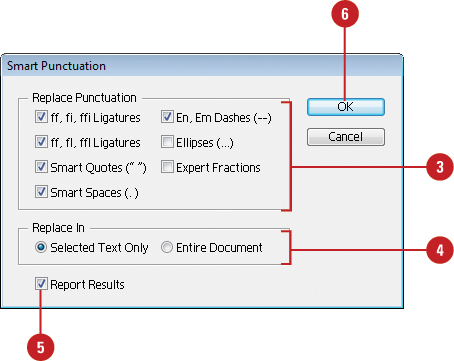
![]() Select the Selected Text Only or Entire Document option.
Select the Selected Text Only or Entire Document option.
![]() Select the Report Results check box to display a list of your changes on the screen.
Select the Report Results check box to display a list of your changes on the screen.
![]() Click OK.
Click OK.
Did You Know?
You can force punctuation marks near the edge to appear outside the type object. Select the type that you want to change, select the Paragraph panel, click the Options menu, and then click Roman Hanging Punctuation.
See Also
See “Setting Up a Document” on page 32 for information on specifying a quotation marks style in the Document Setup dialog box.
Working with Glyphs
A glyph is a style variation—such as ligatures, ordinals, swashes, and fractions—for a given character in an OpenType font. OpenType fonts appear with an “O” next to the font name on the Font submenu. OpenType fonts are designed to work well on both Windows and Macintosh operating systems, which reduces font substitution problems when going back and forth between platforms. However, you can always add more character styles to extend the font format. For example, you can change fractions with numerals and slashes to properly formatted fractions. You can automatically insert alternate glyphs with the OpenType panel or insert them manually with the Glyphs panel to extend the font format.
Replace or Insert a Glyph
![]() Select any type tool, and then select a character (to replace a glyph) or click in text (to insert a glyph).
Select any type tool, and then select a character (to replace a glyph) or click in text (to insert a glyph).
![]() Select the Glyphs panel (from the Type menu).
Select the Glyphs panel (from the Type menu).
• Click the Window menu, point to Type, and then click Glyphs.
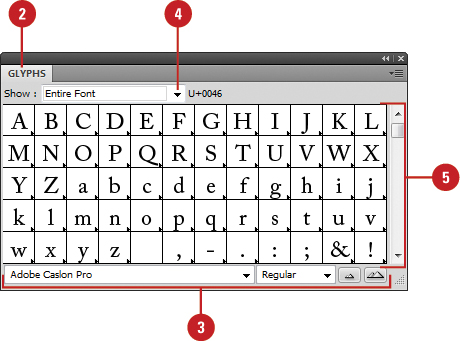
![]() Select a different font and font style.
Select a different font and font style.
![]() Click the Show list arrow, and then select a glyphs category.
Click the Show list arrow, and then select a glyphs category.
Alternative for Current Selection or Entire Font are common choices.
![]() Double-click the glyph that you want to replace or insert.
Double-click the glyph that you want to replace or insert.
Did You Know?
You can use the OpenType panel to insert glyphs. Select the OpenType panel, select the type that you want to change or deselect all text for the entire document, and then select the buttons with the options for glyphs that you want to apply, such as ligatures, swashes, titling, ordinals, and fractions.
Wrapping Type Around an Object
When integrating artwork and graphics with your type, you can wrap the text around objects to create the results that you want. You can wrap area type around a path, a placed graphic, or another type object. When wrapping type around an object, the important thing is to make sure the wrapped object is in front of the area type object in the same top-level, sublayer, or group.
Wrap and Unwrap Type Around an Object
![]() Arrange the object to be wrapped in front of the area type object in the same top-level, sublayer, or group. The objects should be overlapping.
Arrange the object to be wrapped in front of the area type object in the same top-level, sublayer, or group. The objects should be overlapping.
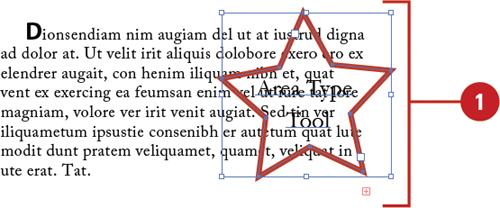
![]() Select the object to be wrapped in the Layers panel.
Select the object to be wrapped in the Layers panel.

![]() Click the Object menu, and then point to Text Wrap Options.
Click the Object menu, and then point to Text Wrap Options.
• If prompted, click OK to create the text wrap.
![]() Click the Object menu, point to Text Wrap, and then click Text Wrap Options.
Click the Object menu, point to Text Wrap, and then click Text Wrap Options.
![]() Select the Preview check box to view your changes as you set options.
Select the Preview check box to view your changes as you set options.
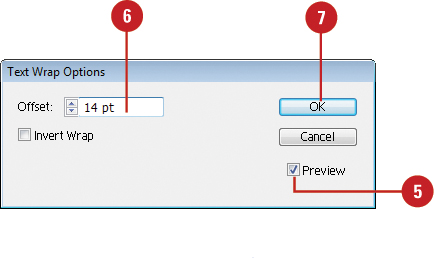
![]() Enter an Offset value to specify the distance between the wrapped object and the type object.
Enter an Offset value to specify the distance between the wrapped object and the type object.
![]() Click OK.
Click OK.
You can move the objects to finalize the results. The type will rewrap around the object.
![]() To unwrap (release) a text wrap, select the wrapped object (not the type object), click the Object menu, point to Text Wrap, and then click Release.
To unwrap (release) a text wrap, select the wrapped object (not the type object), click the Object menu, point to Text Wrap, and then click Release.

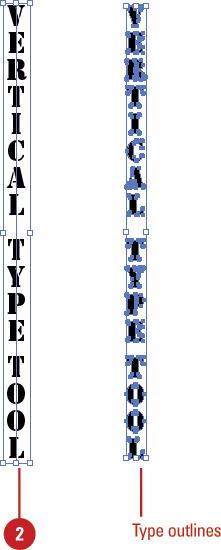
Creating Type Outlines
The Create Outlines command converts characters in a type object into a separate object with a path. Some characters, such as “A” or “B,” that contain an interior shape (known as a counter) are converted into compound objects. After you create an outline, you can reshape the path, use it as a mask object, fill it with a gradient or a mesh, or use it in a compound object. When you create outlines, the fill and stroke attributes and any appearances of the type are applied to the outlines. Before you use the Create Outlines command, it’s a good idea to make a copy of the type object or your document as a backup to preserve a copy of the type layers.
Create Type Outlines
![]() Select the Selection tool on the Tools panel.
Select the Selection tool on the Tools panel.
![]() Select the type object or select characters in the type.
Select the type object or select characters in the type.
![]() Click the Type menu, and then click Create Outlines.
Click the Type menu, and then click Create Outlines.
![]() To release a compound object into separate objects, click the Object menu, point to Compound Path, and then click Release.
To release a compound object into separate objects, click the Object menu, point to Compound Path, and then click Release.
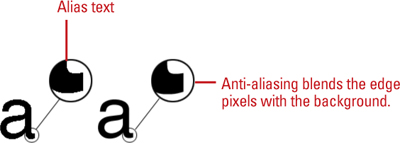
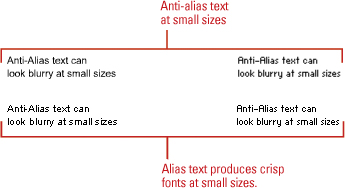
Anti-aliasing Type
Anti-aliasing (New!) affects the pixels on the edge of text by allowing them to blend in with the background. It is a crucial feature when working with text as it makes it appear smoother and more integrated. The drawback with anti-aliasing is that at smaller font sizes the text can appear blurry. To avoid this problem, use sans serif text, such as Helvetica or Arial, and don’t use bold and italic. You apply anti-aliasing to text boxes instead of individual characters. The anti-aliasing settings are saved along with the document and supported for PDF, AIT, and EPS formats.
Set a Text Box to Anti-Alias Text
![]() Select any type tool, and then select the type that you want to change.
Select any type tool, and then select the type that you want to change.
• You can also select the Selection tool, and then click the type object.
![]() Select the Character panel.
Select the Character panel.
• Click the Window menu, point to Type, and then click Character.

![]() Click the Anti-Alias list arrow, and then select one of the following:
Click the Anti-Alias list arrow, and then select one of the following:
• None.
• Sharp.
• Crisp.
• Strong.
Did You Know?
You can set anti-aliasing options when you export text to graphic formats (New!). When you export text to BMP, PNG, Targa, JPEG, or TIFF formats, you can set the following anti-aliasing options: None, Art Optimized, or Type Optimized. These options are also available in the Save For Web dialog box.