16. Designing for the Web and Devices
Introduction
If you need to manipulate a photographic image to place it on the Web, there’s not a better program on the market than Adobe Illustrator that will do the job for you. Illustrator uses various document formats, such as JPEG, GIF, PNG, SWF (Flash movie), SVG, and WBMP (Wireless BMP), to save images for the Web. For example, the JPEG format is used primarily for compressing photographic images, while the GIF format is used for compressing clip art and text. Each format is designed to serve a purpose, and knowing when to use a specific format will help you design fast-loading, dynamic web documents.
However, saving files in a specific file format is not the only way Illustrator helps you create web-friendly images; you can also slice images. When you slice an image, you’re cutting the image into several pieces. Since the Internet handles smaller packets of information more efficiently than one large piece, slicing an image makes the whole graphic load faster, and Illustrator helps you slice images with ease.
Saving for the Web
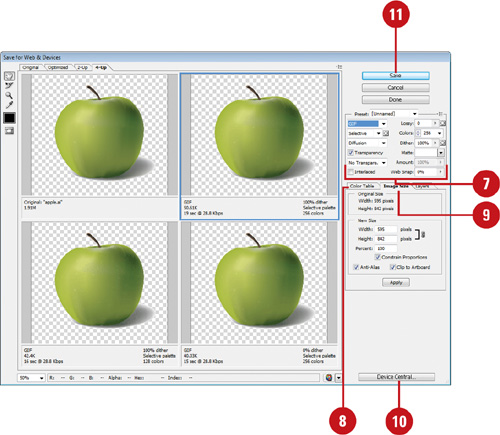
Illustrator’s Save For Web & Devices command is a dream come true for preparing images for the Internet, or even for saving images in a quick-loading format for Microsoft PowerPoint slide presentations, and you don’t even have to leave Illustrator. The Save For Web & Devices command lets you open any Illustrator document, and convert it into a web-friendly format using the GIF, JPEG, PNG, SWF, SVG, or WBMP formats. You can even try different optimization settings or compare different optimizations using the 2-Up or 4-Up panes. In addition, the dialog area below each image provides optimization information on the size and download time of the file.
Save for the Web
![]() Open a document.
Open a document.
![]() Click the File menu, and then click Save For Web & Devices.
Click the File menu, and then click Save For Web & Devices.
![]() Click the Original, Optimized, 2-Up, or 4-Up tabs to view the document using different layouts.
Click the Original, Optimized, 2-Up, or 4-Up tabs to view the document using different layouts.

![]() Click one of the sample images to change its default format.
Click one of the sample images to change its default format.
Important
If you’re viewing the document using 2-Up or 4-Up, the first image is the original. You can’t change the original; you can only edit one of the sample images.
![]() Click the Preset list arrow, and then select a new format from the available options.
Click the Preset list arrow, and then select a new format from the available options.
![]() Click the Optimized File Format list arrow, and then select from the following options:
Click the Optimized File Format list arrow, and then select from the following options:
• GIF. The Graphics Interchange Format is useful for clip art, text, or images that contain a large amount of solid color. GIF uses lossless compression.
• JPEG. The Joint Photographic Experts Group format is useful for images that contain a lot of continuous tones, like photographs. JPEG uses lossy compression.
• PNG-8. The Portable Network Graphics 8-bit format functions like the GIF format. PNG uses lossless compression.
• PNG-24. The Portable Network Graphics 24-bit format functions like the JPEG format. PNG-24 uses lossless compression.
• SWF. The Adobe Flash movie format.
• SVG. The Scalable Vector Graphics image file format.
• WBMP. The Wireless Bitmap format converts an image into black and white dots, for use on output devices like cell phones and PDAs.
![]() Select from the various options that will change based on your File Format selection.
Select from the various options that will change based on your File Format selection.
![]() Click the Color Table palette (available for the GIF and PNG-8 formats), and add, subtract, or edit colors in the selected document.
Click the Color Table palette (available for the GIF and PNG-8 formats), and add, subtract, or edit colors in the selected document.
![]() To change the selected image’s width and height, click the Image Size palette, and then make adjustments.
To change the selected image’s width and height, click the Image Size palette, and then make adjustments.
![]() To move the selected image directly into the Device Central application, click the Device Central button.
To move the selected image directly into the Device Central application, click the Device Central button.
![]() Click Save.
Click Save.
![]() Enter a name, and then select a location in which to save the image file.
Enter a name, and then select a location in which to save the image file.
![]() Click OK.
Click OK.
Illustrator saves the modified file and returns you to the original image.
Working with Save For Web Options
When you choose Save For Web & Devices, you are able to save your image in one of six web formats: GIF, JPEG, PNG, or SWF, SVG, WBMP. The Save For Web & Devices dialog box comes with options that will help you through the process. For example, if you choose the JPEG format, you can select the amount of compression applied to the image or, if you select the GIF format, you can choose how many colors are preserved with the image. The PNG format lets you save images in an 8-bit (256 colors) or a 24-bit (millions of colors) format. The options available with Save For Web & Devices give you the control you need to produce small image files with high quality.
Work with Save For Web Options
![]() Open a document.
Open a document.
![]() Click the File menu, and then click Save For Web & Devices.
Click the File menu, and then click Save For Web & Devices.
![]() Select from the various Save For Web & Devices tools:
Select from the various Save For Web & Devices tools:
• Hand Tool. Drag inside the image to change the view of a document.
• Slice Select Tool. Select a predefined image slice.
• Zoom Tool. Click on the image to expand the view size.
• Eyedropper Tool. Drag within the image to perform a live sampling of the colors.
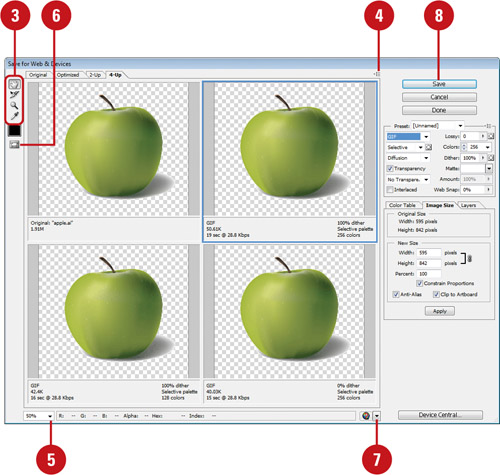
![]() Click the Select Download Speed button, and then select bandwidth options for the selected document.
Click the Select Download Speed button, and then select bandwidth options for the selected document.
![]() Click the Zoom list arrow, and then select a view size for the sample images.
Click the Zoom list arrow, and then select a view size for the sample images.
![]() Click the Toggle Slice Visibility button to show or hide the image slices.
Click the Toggle Slice Visibility button to show or hide the image slices.
![]() Click the Preview in Default Browser list arrow, and then select the image.
Click the Preview in Default Browser list arrow, and then select the image.
![]() Click Save.
Click Save.
Optimizing an Image to File Size
The Save For Web & Devices dialog box has many options to help you create the exact image you need—including helping you compress an image down to a specific file size. For example, you’ve just created an image you want to display on the Web, but the maximum file size you can use is 35 KB. You could experiment with compression options in the Save For Web & Devices settings, or you could use the Optimize to File Size option.
Optimize an Image to File Size
![]() Open a document.
Open a document.
![]() Click the File menu, and then click Save For Web & Devices.
Click the File menu, and then click Save For Web & Devices.
![]() Click the 2-Up tab, and then select the sample image to the right.
Click the 2-Up tab, and then select the sample image to the right.

![]() Click the Optimize Menu button, and then click Optimize To File Size.
Click the Optimize Menu button, and then click Optimize To File Size.
![]() Enter a file size in the Desired File Size data box.
Enter a file size in the Desired File Size data box.
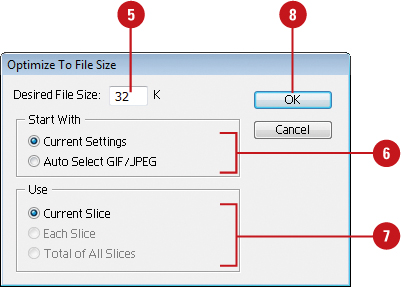
![]() Click the Current Settings option or the Auto Select GIF/JPEG option to let Illustrator choose between the JPEG or GIF format.
Click the Current Settings option or the Auto Select GIF/JPEG option to let Illustrator choose between the JPEG or GIF format.
![]() Click the following Use options:
Click the following Use options:
• Current Slice
• Each Slice
• Total of All Slices
![]() Click OK.
Click OK.
Illustrator compresses the selected sample.
![]() Click Save to save the compressed image.
Click Save to save the compressed image.
Working with Web File Formats
If you design web documents, you know that the size of your images is very important. Illustrator gives you the option of compressing images in one of six formats appropriate for use on the Web: GIF, JPEG, PNG, SWF, SVG, and WBMP. The GIF format compresses images that contain solid colors with sharp, definable edges, such as clip art and text. The JPEG format reduces the size of image files that contain a lot of soft transitional colors, such as photographs. The PNG format is a hybrid format designed to take the place of the GIF and JPEG format. Finally, the WBMP format was created to display images on low-resolution devices like cell phones and PDAs by converting the image into dots of black and white. Illustrator will help you transform your images into whatever format you need in order to create stunning web images.
Work with Web File Formats
![]() Open a document.
Open a document.
![]() Click the File menu, and then click Save For Web & Devices.
Click the File menu, and then click Save For Web & Devices.
![]() Click the Original, Optimized, 2-Up, or 4-Up tabs to view the document using different layouts.
Click the Original, Optimized, 2-Up, or 4-Up tabs to view the document using different layouts.

![]() Select one of the samples.
Select one of the samples.
![]() Click the Optimized File Format list arrow, and then select a format from the available options.
Click the Optimized File Format list arrow, and then select a format from the available options.
![]() Select the options you want to use to change image compression, and then specify your desired color options.
Select the options you want to use to change image compression, and then specify your desired color options.
![]() Click Save.
Click Save.
The Save Optimized As dialog box appears.
![]() Enter a name in the File Name box.
Enter a name in the File Name box.
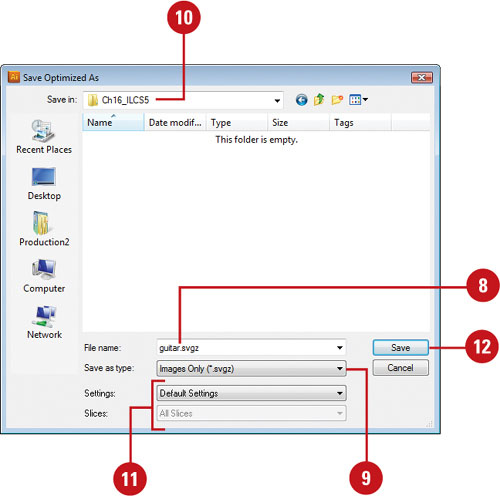
![]() Click the Save as Type (Win) or Format (Mac) list arrow, and then select to save the image in HTML and Images, Images Only, or HTML Only.
Click the Save as Type (Win) or Format (Mac) list arrow, and then select to save the image in HTML and Images, Images Only, or HTML Only.
![]() Click the Save In (Win) or Where (Mac) list arrow, and then select the location in which to save the file.
Click the Save In (Win) or Where (Mac) list arrow, and then select the location in which to save the file.
![]() Click the Settings and Slices list arrows to further define the output files (if you save a single image without slices, you can leave these settings at their default values).
Click the Settings and Slices list arrows to further define the output files (if you save a single image without slices, you can leave these settings at their default values).
![]() Click Save.
Click Save.
Optimizing a JPEG Document
Illustrator comes complete with everything you will need to properly compress any JPEG Document. The Internet can generally be slow to navigate, and your visitors typically do not have much patience. When you compress a JPEG image, you’re essentially removing information from the image to reduce its file size and speed up the loading time. The unfortunate result of that reduction is loss of image quality. Internet graphics are not always the best quality; however, reducing file size is a necessary evil to keep visitors from clicking off your site and moving to another. To keep visitors happy, your JPEG images must load fast, and Illustrator is just the application to help you accomplish that goal.
Optimize a JPEG Document
![]() Open a document.
Open a document.
![]() Click the File menu, and then click Save For Web & Devices.
Click the File menu, and then click Save For Web & Devices.
![]() Click the Original, Optimized, 2-Up, or 4-Up tabs to view the document using different layouts.
Click the Original, Optimized, 2-Up, or 4-Up tabs to view the document using different layouts.

![]() Click one of the sample images to change its default format.
Click one of the sample images to change its default format.
![]() Click the Optimized File Format list arrow, and then click JPEG.
Click the Optimized File Format list arrow, and then click JPEG.
![]() Select from the following Quality options:
Select from the following Quality options:
• Compression Quality. Click the list arrow, and then select a preset JPEG quality from Low (poor quality) to Maximum (best quality).
• Quality Amount. Enter a JPEG quality compression value (0 to 100). The lower the value, the more information (color) is sacrificed for image size.
• Blur. JPEG images compress better when the image has soft edges. Apply the Blur option to increase the softness of the image (at a sacrifice of image quality).
![]() Click the Matte list arrow, and then select from the available options.
Click the Matte list arrow, and then select from the available options.

JPEG images do not support transparency. If your image contains transparent areas, use the Matte option to fill them in using a specific color.
![]() Select the Optimized check box to further compress the image. This is not supported by all browsers.
Select the Optimized check box to further compress the image. This is not supported by all browsers.
![]() Select from the following options:
Select from the following options:
• Progressive. Select the check box to load a JPEG in three progressive scans. Not supported by all browsers.
• ICC Profile. Select the check box to embed an ICC color profile into the JPEG image. This increases file size but helps maintain color consistency between monitors and operating systems.
![]() Click Save to save the current image, and then save it using the Save Optimized As dialog box.
Click Save to save the current image, and then save it using the Save Optimized As dialog box.
Optimizing a GIF Document
The GIF file format is used primarily for images that contain solid colors with sharp edges, such as clip art, text, line art, and logos. Since the Internet can generally be slow to navigate, using the GIF format for images significantly reduces their file size, and will create fast-loading graphics. The GIF format supports 8-bit color, and creates a document with a maximum of 256 colors (the fewer colors, the smaller the file size). The GIF format has been around long enough for it to be considered a “native” Internet format. A native format is one that does not require a specific plug-in for the browser to display the file.
Optimize a GIF Document
![]() Open a document.
Open a document.
![]() Click the File menu, and then click Save For Web & Devices.
Click the File menu, and then click Save For Web & Devices.
![]() Click the Original, Optimized, 2-Up, or 4-Up tabs to view the document using different layouts.
Click the Original, Optimized, 2-Up, or 4-Up tabs to view the document using different layouts.

![]() Click one of the sample images to change its default format.
Click one of the sample images to change its default format.
![]() Click the Optimized File Format list arrow, and then click GIF.
Click the Optimized File Format list arrow, and then click GIF.
![]() Select from the following options:
Select from the following options:
Color Options:
• Reduction. Click to select a visual reduction method for the image’s colors.
• Colors. Enter or select a value from 2 to 256 maximum colors.
• Web Snap. Enter or select a value from 0% to 100% to instruct the GIF compression utility how many of the image colors should be web-safe.
• Method. Click the list arrow, and then select from the available dithering schemes. Dithering refers to how the GIF format mixes the available colors in the image.
• Amount. Enter or select a value from 0% to 100% to instruct the GIF compression utility how many of the image’s colors should be dithered.
Transparency Options:
• Transparency. Check to keep the transparent areas of a GIF image transparent.
• Matte. Click to fill the transparent areas of a GIF image.
• Dither. Click to select a dithering scheme and enter an amount for the mixing of the matte color.
Other Options:
• Interlaced. Check to have the GIF image load in three scans.
• Lossy. Enter or select a value from 0 to 100 to instruct the GIF compression utility how much image loss is allowed.

![]() Click Save to save the current image, and then save it using the Save Optimized As dialog box.
Click Save to save the current image, and then save it using the Save Optimized As dialog box.
Optimizing a PNG-8 Document
The PNG-8 file format is used primarily for images that contain solid colors with sharp edges—clip art, text, line art, and logos—and was designed as an alternative to the GIF file format. Since the PNG-8 format generates an image with a maximum of 256 colors, it significantly reduces an image’s file size. While similar to the GIF file format, the PNG-8 format is not completely supported by older browsers. However, it is considered a native format for the creation of Flash animation movies.
Optimize a PNG-8 Document
![]() Open a document.
Open a document.
![]() Click the File menu, and then click Save For Web & Devices.
Click the File menu, and then click Save For Web & Devices.
![]() Click the Original, Optimized, 2-Up, or 4-Up tabs to view the document using different layouts.
Click the Original, Optimized, 2-Up, or 4-Up tabs to view the document using different layouts.

![]() Click one of the sample images to change its default format.
Click one of the sample images to change its default format.
![]() Click the Optimized File Format list arrow, and then click PNG-8.
Click the Optimized File Format list arrow, and then click PNG-8.
![]() Select from the following options:
Select from the following options:
Color Options:
• Reduction. Click to select a visual reduction method for the colors in the image.
• Colors. Enter or select a value from 2 to 256 maximum colors.
• Web Snap. Enter or select a value from 0% to 100% to instruct the PNG-8 compression utility how many of the image’s colors should be web-safe.
• Method. Click the list arrow, and then select from the available dithering schemes. Dithering is how the PNG-8 format mixes the available image’s colors.
• Amount. Enter or select a value from 0% to 100% to instruct the PNG-8 compression utility how many of the image’s colors should be dithered.
Transparency Options:
• Transparency. Check to keep the transparent areas of a PNG-8 image transparent.
• Matte. Click to fill the transparent areas of a PNG-8 image.
• Dither. Click to select a dithering scheme and enter an amount for the mixing of the matte color.
Other Options:
• Interlaced. Check to have the PNG image load in three scans.
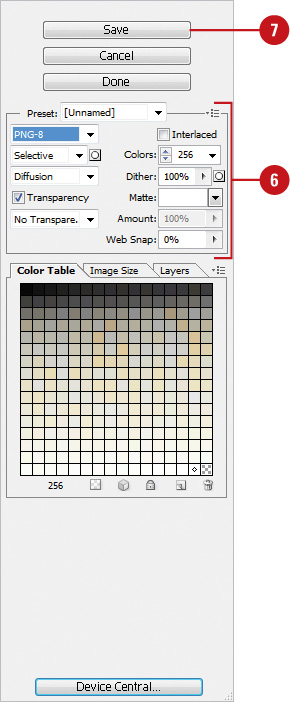
![]() Click Save to save the current image, and then save it using the Save Optimized As dialog box.
Click Save to save the current image, and then save it using the Save Optimized As dialog box.
Optimizing a PNG-24 Document
The PNG-24 file format is used primarily for images that contain lots of colors with soft transitional edges, such as photographs, and was designed as an alternative to the JPEG file format. The PNG-24 format generates an image with millions of colors, and still manages to reduce the size of a file. While similar to the JPEG file format, the PNG-24 uses lossless compression, and does not compress files as small as the JPEG format. So for the time being, most designers are still using the JPEG format for creating faster-loading web graphics.
Optimize a PNG-24 Document
![]() Open a document.
Open a document.
![]() Click the File menu, and then click Save For Web & Devices.
Click the File menu, and then click Save For Web & Devices.
![]() Click the Original, Optimized, 2-Up, or 4-Up tabs to view the document using different layouts.
Click the Original, Optimized, 2-Up, or 4-Up tabs to view the document using different layouts.
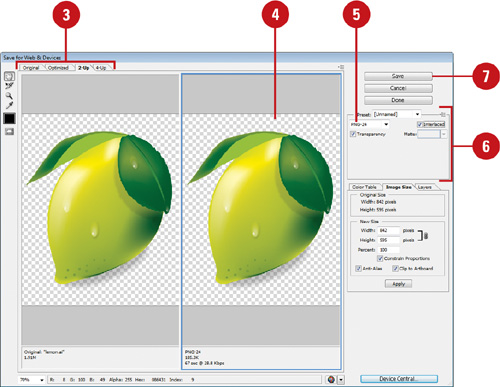
![]() Click one of the sample images to change its default format.
Click one of the sample images to change its default format.
![]() Click the Optimized File Format list arrow, and then click PNG-24.
Click the Optimized File Format list arrow, and then click PNG-24.
![]() Select from the following options:
Select from the following options:
Transparency Options:
• Transparency. Check to keep the transparent areas of a PNG-24 image transparent.
• Matte. Click to fill the transparent areas of a PNG-24 image.
Other Options:
• Interlaced. Check to have the PNG-24 image load in three scans.
![]() Click Save to save the current image, and then save it using the Save Optimized As dialog box.
Click Save to save the current image, and then save it using the Save Optimized As dialog box.
Optimizing a WBMP Document
The WBMP file format is used for images that are displayed on small hand-held devices such as PDAs and cell phones. The WBMP format generates an image with only 2 pixel colors (black and white), which significantly reduces the file size of the image. The WBMP format is new to the world of wireless devices, and while it creates small images, using only black and white pixels results in very low-quality images.
Optimize a WBMP Document
![]() Open a document.
Open a document.
![]() Click the File menu, and then click Save For Web & Devices.
Click the File menu, and then click Save For Web & Devices.
![]() Click the Original, Optimized, 2-Up, or 4-Up tabs to view the document using different layouts.
Click the Original, Optimized, 2-Up, or 4-Up tabs to view the document using different layouts.

![]() Click one of the sample images to change its default format.
Click one of the sample images to change its default format.
![]() Click the Optimized File Format list arrow, and then click WBMP.
Click the Optimized File Format list arrow, and then click WBMP.
![]() Select from the following options:
Select from the following options:
• Method. Click the list arrow, and then select from the available dithering schemes. Dithering is how the WBMP format mixes the available colors in the image.
• Amount. Enter or select a value from 0% to 100% to instruct the WBMP compression utility how many of the image’s colors should be dithered.
![]() Click Save to save the current image, and then save it using the Save Optimized As dialog box.
Click Save to save the current image, and then save it using the Save Optimized As dialog box.
Slicing Images the Easy Way
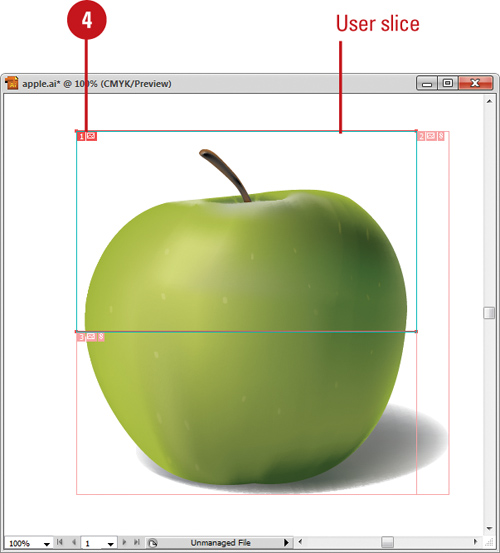
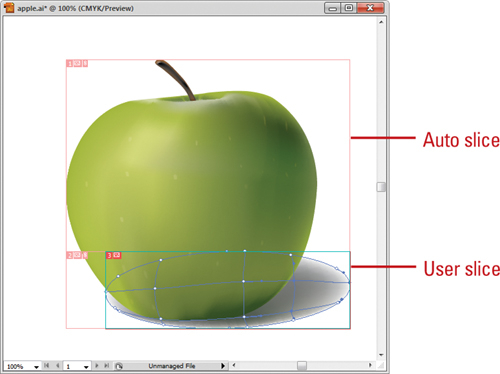
Illustrator allows you to slice a document into smaller pieces. You might want to slice an image to create interactive links; however, the best reason is speed. You gain speed by compressing individual slices to reduce the image size. You can draw directly on an image to create a user-defined slice using the Slice tool. When you create a slice, Illustrator also creates auto slices, which fill the space in the image that is not defined by user defined slices. There are two types of automatic slices: auto slices and subslices. Subslices show overlapping user-defined slices. User-defined slices are identified by a solid blue line, while auto slices are identified by dotted red lines. The slices also are numbered from left to right and top to bottom. If you want to make changes to the slice, you need to select it first. When you edit or move the layer contents, the slice automatically changes.
Create a User Slice with the Slice Tool
![]() Open a document.
Open a document.
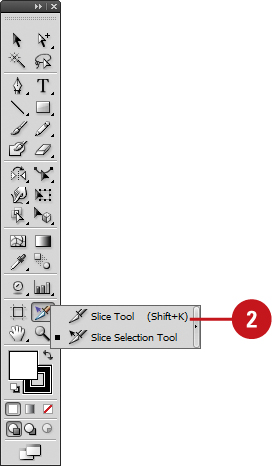
![]() Select the Slice tool on the Tools panel.
Select the Slice tool on the Tools panel.
Important
To make slicing a little easier, drag a few guides from the Ruler bar to help guide your slicing tool.
![]() Drag and release the slice tool in the document to create a rectangular or square slice.
Drag and release the slice tool in the document to create a rectangular or square slice.
• To constrain the slice to a square, hold down Shift as you drag.
![]() Continue to drag and release until you have the image correctly sliced.
Continue to drag and release until you have the image correctly sliced.
Create a User Slice from a Selected Object
![]() Open a document.
Open a document.
![]() Select the object that you want to use to create a slice.
Select the object that you want to use to create a slice.
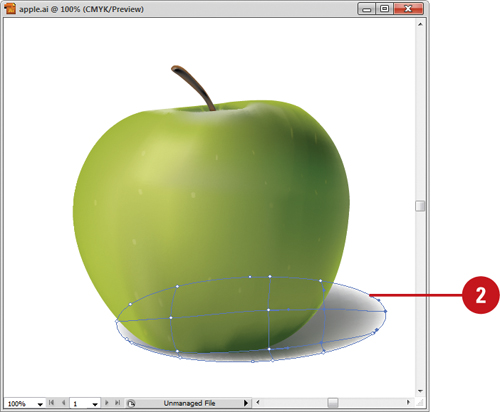
![]() Click the Object menu, point to Slice, and then click Make or Create from Selection.
Click the Object menu, point to Slice, and then click Make or Create from Selection.

Did You Know?
You can create slices from guides. Add guides to the image, select the Slice tool on the tools panel, click the Object menu, point to Slice, and then click Create From Guides.
You can lock guides. To keep a guide from being moved, click the View menu, point to Guides, and then click Lock Guides.
You can remove guides. To remove guides, click the View menu, point to Guides, and then click Clear Guides.
You can show and hide guides. Click the View menu, point to Guides, and then click Show Guides or Hide Guides.
Working with Slices
After you create slices within an image, you can use the Options bar or the Save For Web & Devices dialog box to work with slices. You can select options to show or hide slices, select one or more slices, delete or duplicate slices, and view or change slice settings. If you have an image with more than one slice, you need to optimize the slices in the Save For Web & Devices dialog box. You can use the Optimize menu to link multiple slices together. For linked slices in the GIF and PNG-8 format, Illustrator uses the same color palette and a dithering pattern to hide the seams between slices.
Work with Slices in the Illustrator Window
![]() Open a document with slices.
Open a document with slices.
![]() Use any of the following:
Use any of the following:
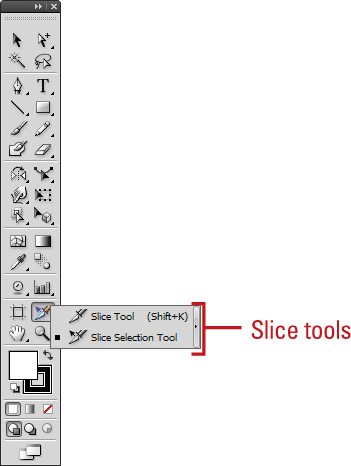
• Show or Hide Slices. Click the View menu, and then click Show Slices or Hide Slices.
• Select Slices. Click the Slice Selection tool, and then click the slice you want. Use Shift+click or drag to select multiple slices.
• Delete Slices. Select the slices, and then press Delete.
• Duplicate Slices. Select the slices, and then Alt (Win) or Option (Mac) and drag the selection.
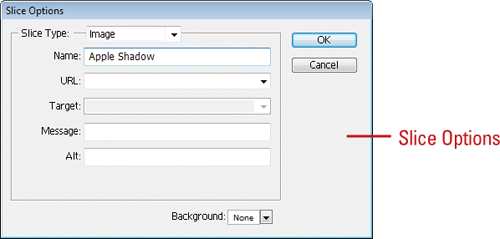
• View Slice Options. Click the Slice Selection tool, select the slice you want, click the Object menu, point to Slice, and then click Slice Options.
Work with Slices in the Save For Web & Devices Dialog Box
![]() Open a document with slices.
Open a document with slices.
![]() Click the File menu, and then click Save For Web & Devices.
Click the File menu, and then click Save For Web & Devices.
![]() Select the file type you want, select any options, and then make any adjustments you want.
Select the file type you want, select any options, and then make any adjustments you want.
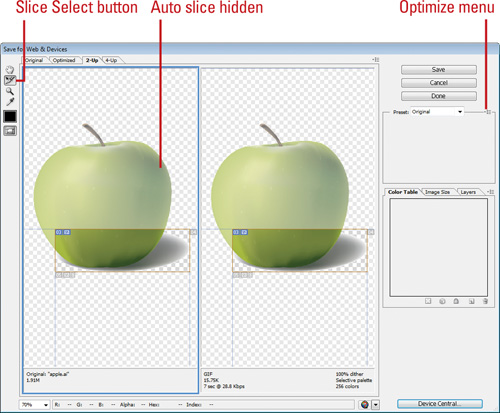
• Show or Hide Slices. Click the Toggle Slices Visibility button.
• Show or Hide Auto Slices. Click the Preview menu, and then click Hide Auto Slices.
• Select Slices. Click the Slice Select tool, and then click the slice you want. Use Shift+click or drag to select multiple slices.
• View Slice Options. Click the Slice Select tool, and then double-click the slice you want.
• Link Slices. Select the slices you want to link, click the Optimize menu double-arrow (Win) or arrow (Mac) button, and then click Link Slices.
A link icon appears on the slices.
• Unlink Slices. Select the slice, click the Optimize menu double-arrow (Win) or arrow (Mac) button, and then click Unlink Slice or Unlink All Slices.
![]() When you’re done, click Save to save the image or click Done to save your settings.
When you’re done, click Save to save the image or click Done to save your settings.

Timesaver
Hold down Ctrl (Win) or Command (Mac) to switch between the Slice tool and the Slice Select tool.
Arranging Slices
Moving and resizing objects in Illustrator is a common task. You can move or resize slices in the same basic way you do other objects. In addition to moving slices, you can also align them along an edge or to the middle, and evenly distribute them horizontally or vertically. When you align and distribute slices, you can reduce the amount of unnecessary auto slices, thereby creating smaller files and faster load times. When you have slices overlapping each other, you can change the stacking order to move them up or down in the order. For example, if you have one slice behind another, you can bring the slice forward one level at a time or to the top (front).
Move or Resize Slices
![]() Open a document with slices.
Open a document with slices.
![]() Select the slices you want to move or resize.
Select the slices you want to move or resize.
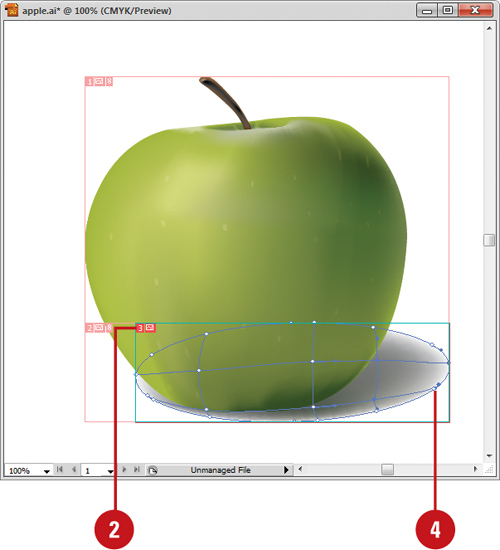
![]() To move a slice selection, drag the slice to a new location. You can press Shift to constrain movement up, down, or diagonally.
To move a slice selection, drag the slice to a new location. You can press Shift to constrain movement up, down, or diagonally.
![]() To resize a slice, drag the side or corner handle of the slice. When you select adjacent slices with common edges, the slices resize together.
To resize a slice, drag the side or corner handle of the slice. When you select adjacent slices with common edges, the slices resize together.
• You can also set exact slice position or size on the Control panel.

Did You Know?
You can copy and paste a slice. You can copy and paste a slice like any other object using the Copy and Paste commands. If you copy a slice to Dreamweaver, it retains information from the original file in Illustrator.
You can snap slices to a guide, user slice, or other object. Click the View menu, and then click Snap To Grid or Snap To Point. When you move a slice toward an element, the slice snaps to the elements within 4 pixels.
Align, Distribute, or Stack Slices
![]() Open a document with slices.
Open a document with slices.
![]() Select the slices you want to arrange.
Select the slices you want to arrange.

![]() To align slices, select the alignment button on the Control panel you want: Horizontal Align Left, Center, or Right, and Vertical Align Top, Center, or Bottom.
To align slices, select the alignment button on the Control panel you want: Horizontal Align Left, Center, or Right, and Vertical Align Top, Center, or Bottom.

![]() To evenly distribute slices, select the distribute button on the Control panel you want: Vertical Distribute Top, Center, or Bottom, and Horizontal Distribute Left, Center, or Right.
To evenly distribute slices, select the distribute button on the Control panel you want: Vertical Distribute Top, Center, or Bottom, and Horizontal Distribute Left, Center, or Right.
![]() To change the slice stacking order, click the Object menu, point to Arrange, and then select the command you want: Bring To Front, Bring Forward, Send Backward, or Send To Back.
To change the slice stacking order, click the Object menu, point to Arrange, and then select the command you want: Bring To Front, Bring Forward, Send Backward, or Send To Back.
Did You Know?
You can combine user and auto slices. Click the Object menu, point to Slice, and then click Combine Slices.
You can divide user and auto slices. Select the slice using the Slice Select tool, click the Object menu, choose Slice, and then click Divide Slices. In the Divide Slice dialog box, select options to divide the slice horizontally or vertically, down or across in equal parts, or enter an exact size in pixels, and then click OK.
Adding HTML Text or an URL Link to a Slice
If you want to include text within a slice for use on the Web, you can enter plain or formatted text with standard HTML tags directly on a slice with the type No Image. The text doesn’t show up in Illustrator; you need to use a web browser to see it. Don’t enter too much text as it might affect the exported layout. You can add text using the Slice Select tool on the Tools panel, or in the Save For Web & Devices dialog box. If you want to create a hyperlink out of a slice for use on the Web, you can add an URL to a slice with the type Image.
Add HTML Text to a Slice
![]() Open a document with the slice.
Open a document with the slice.
![]() Open the Slice dialog box to add text using one of the following:
Open the Slice dialog box to add text using one of the following:
• Tools Panel. Select the Slice Selection tool on the Tools panel, select the slice you want to add HTML text, click the Object menu, point to Slice, and then click Slice Options.
• Save For Web & Devices dialog box. Click the File menu, click Save For Web & Devices, and then double-click the slice to which you want to add HTML text.
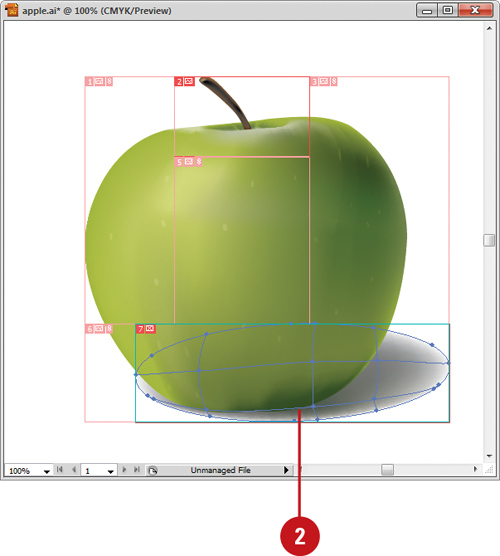
![]() Click the Slice Type list arrow, and then click No Image.
Click the Slice Type list arrow, and then click No Image.
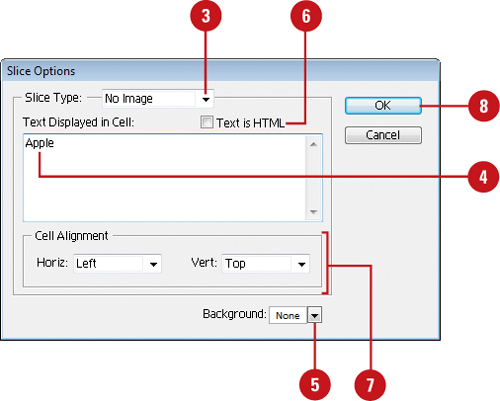
![]() Enter the text you want.
Enter the text you want.
![]() Click the Background list arrow, and then select a background: None, Matte, Eyedropper Color, White, Black, or Other.
Click the Background list arrow, and then select a background: None, Matte, Eyedropper Color, White, Black, or Other.
![]() Select the Text is HTML check box to include HTML formatted tags.
Select the Text is HTML check box to include HTML formatted tags.
![]() Select the horizontal and vertical cell alignment options you want.
Select the horizontal and vertical cell alignment options you want.
• To line up text in cells in the same row, set a common baseline for all cells in the row.
![]() Click OK.
Click OK.
Add an URL Link to a Slice
![]() Open a document.
Open a document.
![]() Select the Slice Selection tool on the Tools panel.
Select the Slice Selection tool on the Tools panel.
![]() Double-click the slice to which you want to add an URL link.
Double-click the slice to which you want to add an URL link.
![]() Click the Slice Type list arrow, and then click Image.
Click the Slice Type list arrow, and then click Image.

![]() Enter an URL address or select a previously created one from the list. Be sure to use the complete URL address, such as http://www.perspection.com.
Enter an URL address or select a previously created one from the list. Be sure to use the complete URL address, such as http://www.perspection.com.
![]() If you want to enter a target frame:
If you want to enter a target frame:
• _blank. Displays the linked file in a new window.
• _self. Displays the linked file in the same frame as the original file.
• _parent. Displays the linked file in its own original parent frameset.
• _top. Replaces the entire browser window with the linked file, removing all current frames.
![]() Click OK.
Click OK.
Saving Slices for the Web
After you create slices within an image, you can export and optimize each slice using the Save For Web & Devices command, which saves each slice as a separate file and creates the code to display them on a web page. After you click Save in the Save For Web & Devices dialog box, the Save Optimized As dialog box appears. You can use this dialog box to access the Output Settings dialog box and set output options to control the format of HTML files, the names of files and slices, and the way Illustrator saves background images.
Save a Slice for the Web
![]() Open a document with the slice you want to save.
Open a document with the slice you want to save.
![]() Click the File menu, and then click Save For Web & Devices.
Click the File menu, and then click Save For Web & Devices.
![]() Select the file type you want, select any options, and then make any adjustments you want.
Select the file type you want, select any options, and then make any adjustments you want.

![]() Click Save.
Click Save.
![]() Click the Save as Type (Win) or Format (Mac) list arrow, and then select whether to save the images in HTML and Images, Images Only, or HTML Only.
Click the Save as Type (Win) or Format (Mac) list arrow, and then select whether to save the images in HTML and Images, Images Only, or HTML Only.

![]() Click the Settings list arrow, and then select the output settings you want. Default Settings is recommended for normal use.
Click the Settings list arrow, and then select the output settings you want. Default Settings is recommended for normal use.
See the next page for details about selecting output settings.
![]() Click the Slices list arrow, and then click All Slices, All User Slices, or Selected Slices.
Click the Slices list arrow, and then click All Slices, All User Slices, or Selected Slices.
![]() Click Save.
Click Save.
Set Output Options for Slices
![]() Open a document with the slice you want to save.
Open a document with the slice you want to save.
![]() Click the File menu, and then click Save For Web & Devices.
Click the File menu, and then click Save For Web & Devices.
![]() Click Save.
Click Save.
![]() Click the Save as Type (Win) or Format list arrow, and then select the format you want.
Click the Save as Type (Win) or Format list arrow, and then select the format you want.
![]() Click the Settings list arrow, and then click Other.
Click the Settings list arrow, and then click Other.
![]() Click the Output Type list arrow, and then click Slices.
Click the Output Type list arrow, and then click Slices.
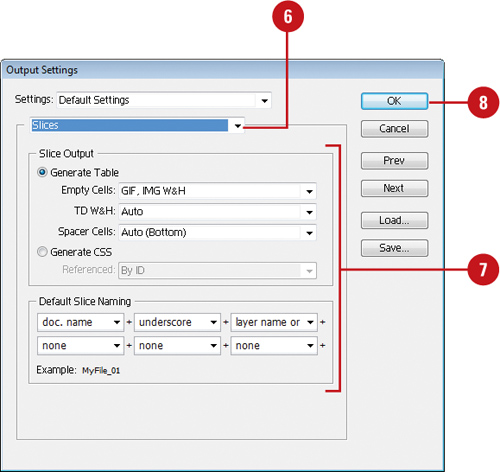
![]() Select the following options:
Select the following options:
• Generate Table. Uses an HTML table to display slices.
• Empty Cells. Specifies the way to convert empty slices to table cells.
• TD W&H. Specifies whether to include width and height for table data.
• Spacer Cells. Specifies when to add empty spacer cells.
• Generate CSS. Creates a Cascading Style Sheet (CSS) to display the slices.
• Referenced. Specifies how to reference slice positions using CSS.
• Default Slice Naming. From the list menus, select the options to specify a slice naming scheme.
![]() Click OK.
Click OK.
![]() Click the Slices list arrow, and then select the slices option you want.
Click the Slices list arrow, and then select the slices option you want.
![]() Click Save.
Click Save.
Saving Selected Slices
Instead of using the Save for Web & Device dialog box to select and save slices, you can select and slices directly from the document window (New!). In the document window, select the slices you want to save, and then use the Save Selected Slices command on the File menu. In the Save Selected Slices dialog box, you can set output options to control the format of graphic or HTML files, the names of files and slices, and the way Illustrator saves background images. Each slice is saved as a separate file and/or creates the code to display them on a web page.
Save a Selected Slice
![]() Open a document with slices.
Open a document with slices.
![]() Select the slices you want to save.
Select the slices you want to save.

![]() Click the File menu, and then click Save Selected Slices.
Click the File menu, and then click Save Selected Slices.
![]() Click the Save as Type (Win) or Format (Mac) list arrow, and then select whether to save the images in HTML and Images, Images Only, or HTML Only.
Click the Save as Type (Win) or Format (Mac) list arrow, and then select whether to save the images in HTML and Images, Images Only, or HTML Only.
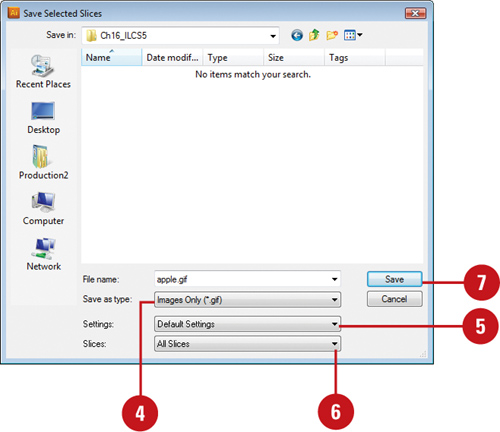
![]() Click the Settings list arrow, and then select the output settings you want. Default Settings is recommended for normal use.
Click the Settings list arrow, and then select the output settings you want. Default Settings is recommended for normal use.
See the previous page for details about selecting output settings.
![]() Click the Slices list arrow, and click All Slices, All User Slices, or Selected Slices.
Click the Slices list arrow, and click All Slices, All User Slices, or Selected Slices.
![]() Click Save.
Click Save.
Optimizing SWF or SVG for the Web
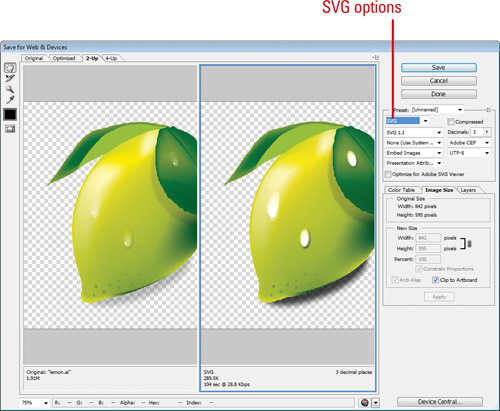
If you’re creating elements for use on the web, the SWF and SVG file formats can do the job. The SWF (Shockwave Flash) file format is used for creating movies and animations using vector graphics and displayed with the Flash Player, typically on the web. The SVG (Scalable Vector Graphics) file format is used for creating high-quality graphics on the web, in print, and on resource-limited handheld devices. SVG is made up of an XML markup language for describing two-dimensional vector graphics, which also supports animation.
Optimize a SWF or SVG Document
![]() Open a document.
Open a document.
![]() Click the File menu, and then click Save For Web & Devices.
Click the File menu, and then click Save For Web & Devices.
![]() Click the Original, Optimized, 2-Up, or 4-Up tabs to view the document using different layouts.
Click the Original, Optimized, 2-Up, or 4-Up tabs to view the document using different layouts.

![]() Click one of the sample images to change its default format.
Click one of the sample images to change its default format.
![]() Click the Optimized File Format list arrow, and then click SWF or SVG.
Click the Optimized File Format list arrow, and then click SWF or SVG.
![]() Select options for the following formats:
Select options for the following formats:
• SWF. Specify options for the Flash Player version, type of export, curve quality, frame rate, compression, protect file, text as outline, loop and preserve (appearance or editability).
• SVG. Specify options for the DTD version, glyphs, embed or link images, CSS properties, compression, decimals, font type, encoding, and Adobe SVG Viewer optimization.
![]() Click Save to save the current image, and then save it using the Save Optimized As dialog box.
Click Save to save the current image, and then save it using the Save Optimized As dialog box.
