
Lesson 13. Using Drag and Drop
Drag and drop is a common user interface technique in desktop applications. It was not so, however, in web applications until the rich Internet applications (RIAs) came along. Flex and Flash Player permit you as a web developer to use drag and drop just as a desktop developer does.
To implement drag and drop in a Flex application, you use the Drag and Drop Manager and the tools it provides. The Drag and Drop Manager enables you to write a Flex application in which users can select an object and then drag it to, and drop it on, a second object. All Flex components support drag-and-drop operations, and a subset has additional drag-and-drop functionality in which implementation requires little more than adding a single property.
In this lesson, you will implement drag and drop in your e-commerce application so a user can click a product and drag it to the shopping cart.
Dragging a grocery item to the shopping cart
Introducing the Drag and Drop Manager
The first step in understanding the Drag and Drop Manager is to learn the terminology surrounding it. The terminology is summarized in the following table.

The following figure gives you a visual representation of the terminology:

There are three phases to a drag-and-drop operation:
- Initiating: A user clicks a Flex component or an item in a Flex component and then begins to move the component or item while holding down the mouse. The component or item is the drag initiator.
- Dragging: While holding down the mouse button, the user moves the mouse around the screen. Flex displays an image called a drag proxy, and the associated non-visual object called the drag source holds the data associated with the component or item being dragged.
- Dropping: When the user moves the pointer over another component that will allow it, the item can be dropped on a drop target. The data is then inserted into the new component in some way.
Flex components fall into two groups when it comes to drag-and-drop support: those with enhanced drag-and-drop functionality and those without. The following list-based controls have enhanced support for drag and drop:
• <s:List>
• <mx:DataGrid>
• <mx:PrintDataGrid>
• <mx:Tree>
• <mx:Menu>
• <mx:List>
• <mx:HorizontalList>
• <mx:TileList>
What this means to you as a developer is that your life will be a little bit easier when implementing drag and drop with those controls that have enhanced support. In fact, in many cases that might require no more than setting a single property value for each of the controls involved in the drag-and-drop operation.
Dragging and Dropping Between Two DataGrids
Your first foray into implementing drag-and-drop operations in Flex will be between two DataGrids. Because they are list-based components and have enhanced drag-and-drop support, you will need to write very little code.
Two properties are important in this first phase: dragEnabled and dropEnabled. Here are their descriptions:
• dragEnabled: Assigned a Boolean value to specify whether the control is allowed to act as a drag initiator (defaults to false). When it’s true, the user can drag items from the component.
• dropEnabled: Assigned a Boolean value to specify whether the control is allowed to act as a drop target (defaults to false). When it’s true, the user can drop items onto the control using the default drop behavior.
Stated most simply, you set the dragEnabled property in the component from which you are dragging to true, and set the dropEnabled property in the component on which you are dropping to true.
So now you will put your drag-and-drop knowledge to use by implementing drag and drop from one DataGrid to another DataGrid.
- Import the DragDropStart.fxp from the Lesson13/independent/ folder into Flash Builder. Please refer to Appendix A for complete instructions on importing a project.
- Open the Task1_DG_to_DG.mxml file.
You will use this project instead of the FlexGrocer one because some of the work in this lesson will not be directly involved with the FlexGrocer site.
- Examine the code in the Task1_DG_to_DG.mxml file, and then run it.
Note that the existing code does not use any concepts you have not already learned in this book. The file uses an HTTPService remote procedure call (RPC) to retrieve grocery info. The file then uses a
resulthandler to place the data into an ArrayCollection, which is then used as adataProviderin a DataGrid. When you run the application, you see you have a DataGrid populated with grocery product information and another DataGrid below it. Try to drag and drop between the DataGrids; you will see that this functionality is not yet working. - In the first DataGrid, set the
dragEnabledproperty totrue. Run the application; you can click one of the rows in the DataGrid and drag the drag proxy around the screen.
Setting this property did two obvious things: It enabled dragging and created the drag proxy, the image attached to the pointer when dragging. Another non-visual event occurred at the same time: A DragSource object was created to hold the data. The data is associated with a format named
items, as the following figure from the debugger shows: - In the
<fx:Script>block below the existing variable declaration, create a bindable private variable namedtargetGridDPof data typeArrayCollectionand assign it a new ArrayCollection. Then bind this variable as thedataProviderof the second DataGrid, whoseidistargetGrid.

These two steps initialize the
dataProviderof the drop target DataGrid. This means it tells the control what the data type is of the data it will be dealing with. If you do not do this, you will get runtime errors. - In the second DataGrid, set the
dropEnabledproperty totrue. Your second DataGrid should appear as follows:

You’ve done three basic steps so far to enable drag-and-drop for the application:
• Added the
dragEnabledproperty to the drag initiator• Initialized the drop target’s
dataProvider• Added the
dropEnabledproperty to the drop targetNow you’re ready to test.
- Run the application and drag from the first DataGrid and drop onto the second.
Notice that the entire set of data for the row is dragged, not just the visible properties in the DataGrid. The
categorycolumn is not displayed in the first DataGrid, but when dropped, that column is displayed in the second DataGrid. This shows you that all the data for the row is in the DragSource, not just the rows that happen to be displayed.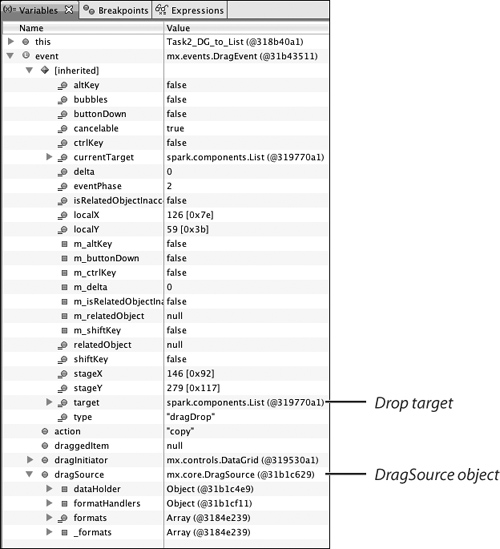

Dragging and Dropping Between a DataGrid and a List
In the description of the dropEnabled property, the following sentence was used: “When it’s true, the user can drop items onto the control using the default drop behavior.” So what is this “default drop behavior”? Basically it means that Flex will try to figure out what should be dropped and do what it thinks is best, but that might not be what you want. In the previous exercise it was clear to Flex that when dragging from one DataGrid to another, the columns in the drop target DataGrid should be filled with like-named properties from the DragSource data.
In this task you will drag from a DataGrid to a List component. In this case the “default drop behavior” won’t know what data to drop into the List component and will dump the whole object into the List, which is not what you want.
You will use a drag event to get the data that you want into the List component. Here is a summary of the events for both the drag initiator and the drop target:


Now it is time to get to work.
- Examine the code in the Task2_DG_to_List.mxml file, and then run it. Drag from the DataGrid to the List; you will see
[object Object]appear in the List.
The default drop behavior did not know what data you wanted placed in the List, so it dropped the whole data object in. Because the List cannot display the entire object, it lets you know what has happened by displaying
[object Object]. The following figure shows the default behavior when dragging from DataGrid to the List.
- Add a
dragDropevent listener to the List, and select Generate DragDrop handler to have Flash Builder create the event handler for you. The code generated calls the newly created event handler and passes the event object as a parameter.
<s:List id="targetList"
width="200"
dropEnabled="true"
dataProvider="{targetListDP}"
dragDrop="targetList_dragDropHandler(event)"/>The event is named
dragDrop, and you have no control over that. The function name is created using the instance name of the dispatching object, followed by an underscore, followed by the event name, finally followed by the wordHandler. - Check that the event handler was created in the
<fx:Script>block.
Note that the event is data typed as
DragEventand the function will not return any data, so the data type isvoid.This function will be called when the user drops the drag proxy onto the List, which is the drop target in this application. Later in this task, you will write code in this function to display just the name of the product in the List.
- Remove the TODO comment from the newly created event handler. As the first line of code in the function, create a variable local to the function named
dgRowtyped as Object. Assign thedgRowvariable the data in the DragSource object associated with theitemsformat. Use thedataForFormat()method.
var dgRow:Object=event.dragSource.dataForFormat("items");
The
dataForFormat()method is a method of the DragSource class. It retrieves from the DragSource object the data associated with the particular format—in this case,items. - Set a breakpoint at the closing brace of the
doDragDrop()function. You do this by double-clicking in the marker bar just to the left of the line numbers in the editor. You will see a small blue dot appear to indicate the breakpoint was set.
The breakpoint will cause Flash Builder to halt execution at the marked line of code, and you will be able to check values of variables. Recall that you first learned about debugging in Lesson 2, “Getting Started.”
- Debug the application and drag a row to the List. When you drop the drag proxy, the process flow will return to Flash Builder. Open the Flash Debug perspective. Examine the
dgRowvariable value in the Variables view. You should see that the variable contains all the data from that DataGrid row.
The following figure shows the row of data being dragged:

Notice that the variable contains an array of length 1, which means you have only 1 index, which is 0. Also note that the
nameproperty contains the name of the product. - Terminate the debugging session by clicking the red square in either the Debug or Console views. Return to the Flash perspective by clicking the chevron (>>) in the upper-right corner of Flash Builder and selecting that perspective.
Normally, the Flash perspective is best to work in because you can see so much more of your code.
- As the third line of code in the function, add the name of the product to the List by using the
addItem()method of the List’sdataProvider. Remember that thedgRowvariable contained an array of length 1, so usedgRow[0].nameto reference the name.
targetList.dataProvider.addItem(dgRow[0].name);
This is a case in which viewing how the data is stored using the debugger is very helpful in retrieving the information.
- Run the application and drag from the DataGrid to the List. You should see the product being placed in the List, but
[object Object]also appears.
The event continued to do what it was supposed to do, even though you displayed some different data; hence, you still see the reference to the object.

- As the last line in the function, use the event class’s
preventDefault()method to cancel the event default behavior.
event.preventDefault();
In this case, you can cancel the default behavior. Not all events can be canceled; you must check the documentation for definitive answers on an event-by-event basis. By canceling this event, you prevent the display of
[object Object]in the List. - Run the application. When you drag from the DataGrid to List, only the name of the product appears in the List.
This wraps up our second task in this lesson on drag and drop.
Using a Non-Drag-Enabled Component in a Drag-and-Drop Operation
So far, you have been taking advantage of enhanced functionality in list-based components when it concerns drag and drop. Now it is time to learn how to implement drag and drop on non-enhanced components. In this particular task, the use case is very simple: You want to drag a Label control to a List. Because the Label does not have enhanced drag-and-drop functionality, there is more of a burden on you as the developer to implement it.
Understanding what the list-based components did for you is a good place to start when having to write all the implementation yourself. Here is a list of mechanisms, hidden from you when using the list-based components, that you will need to use when implementing drag and drop without the help of the enhanced components:
• Assign the data to the DragSource object.
• Check to see whether the formats allow dropping onto the drop target.
• Use the data in the drop target (although in the second exercise you did some of this manually).
• Permit the component to be dragged.
• Accept the drop.
Although you have been using the DragSource class up to now in this lesson, you will need to dig deeper into the class when implementing all the functionality yourself. In this exercise, you use the following methods of the DragSource class:

These methods allow you to implement the first three hidden mechanisms. To implement the last two, you need to use methods of the DragManager class:

Tip
![]()
The doDrag() method has a number of optional parameters to control the look of the drag proxy. You can find these parameters in the Class documentation for DragManager in the Adobe Flex 4 Language Reference.
Now you’re ready to start writing code for this exercise.
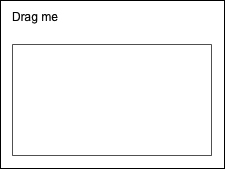
- Examine the code in the Task3_Label_to_List.mxml file, and then run it.
You see you have a Label with the text “Drag me” in it and an empty List below it. At this point, there is no drag-and-drop functionality.
- At the top of the Script block import the four classes shown here that you need in the application:
import mx.core.DragSource;
import mx.managers.DragManager;
import mx.events.DragEvent;
import mx.core.IUIComponent;You could have also just used these classes as data types, and Flash Builder would have imported them for you automatically.
- In the Label, add a
mouseDownevent and have the event call a function nameddragIt(). The function call should pass four parameters; the first is the drag initiator, which in this case is the instance name of the Label:myLabel. The second parameter is the data you will later place in the DragSource object. In this case, just pass a string ofMy data here. The third parameter is the event, which of course is justevent. The last parameter is the format that will be associated with this data. In this task, usemyFormat.
mouseDown="dragIt(myLabel,'My data here',event,'myFormat')"
This is the function that will be called to initiate the drag-and-drop operation. You need to pass the parameters because they are all needed in the function to allow:
• Dragging to start
• Placing the data in the DragSource object associated with the format
- At the bottom of the
<fx:Script>block, create a private function nameddragIt(), which returnsvoid. The function should accept four parameters that, of course, correspond to the data passed to the function. Use the names and data types shown here:
initiator:Label
dsData:String
event:MouseEvent
format:StringOf these parameters, the
initiatorcould be any kind of component, and thedsDatacould be nearly any kind of data you want to be dragged from one component to another. Theeventwill often be themouseDownMouseEvent or themouseMoveevent, but that would not change either theeventparameter name nor the data type used here. Theformatwill always be a String. - As the first line of code in the function, create a variable local to the function named
dstyped as aDragSourceand set it equal to a new DragSource object.
var ds:DragSource=new DragSource();
This creates the DragSource object that will have data added to it.
- Next in the function, use the
addData()method of thedsDragSource object to add the data passed in thedsDataparameter to thedsobject. Associate it with the format passed in theformatparameter.
ds.addData(dsData,format);
An important point here is that you can store data associated with multiple formats, which means you can use multiple
addData()methods on the same DragSource object. You might want to do this if you have multiple drop targets and want to drop different data in each drop target. The different drop targets would use different arguments in thedataForFormat()method to get the appropriate data. - As the last line of code in the function, permit the Label to be dragged by calling the static
doDrag()method of the DragManager class. You pass it the three argumentsinitiator,ds, andevent. Check to make sure your completed function appears as shown here:

Remember that a static method is one you can invoke directly from the class without first instantiating it.
- Run the application and drag the Label. At this point there is no drop target that will accept the Label.
You now move on to coding the List to accept the drop of the Label and to display the data passed in the DragSource in the List.
- In the List, add a
dragEnterevent and have it call a function nameddoDragEnter().
The function should pass two parameters. The first is the
event, and the second is the format—which in this case should match the format used earlier:myFormat.dragEnter="doDragEnter(event,'myFormat')"
You are passing data to the function that allows the initiator, the Label, to be dragged to the drop target, the List.
- At the bottom of the
<fx:Script>block, create a private function nameddoDragEnter(), which returnsvoid. The function should accept two parameters. Name the first parameterevent, typed as aDragEvent, and the second parameterformat, typed as aString.
private function doDragEnter(event:DragEvent,format:String):void
{
}Both these parameter values are needed to allow the dropping of the initiator.
- Insert into the function an
ifstatement that checks to see whether the formats of the two objects match. Use thehasFormat()method of the DragSource object, which is contained in the event object. The argument of thehasFormat()method should be theformatparameter passed to the function. Remember thehasFormat()method returnstrueif the DataSource object contains a matching format of the drop target; otherwise, it returnsfalse.
if(event.dragSource.hasFormat(format)){
}The List is looking in the DragSource object and seeing whether a format exists that matches one of the formats it is allowed to accept. The
hasFormat()function will return eithertrueorfalse. - If the
hasFormat()function returnstrue, use the DragManager’s static function of theacceptDragDrop()method to allow the dropping. The argument of the function should be the List itself, which is best referred to in this case asevent.target.
DragManager.acceptDragDrop(event.target);
You could have actually replaced
event.targetwith the instance name of the List,myList, and the function would have had the same result. The advantage of using the more genericevent.targetis that it makes this function more reusable. You can use the function for anydragEnterresult handler—it will work correctly. - The
acceptDragDrop()method is defined to accept an object of type IUIComponent. For this reason you need to castevent.targetas an IUIComponent to satisfy the compiler.
The IUIComponent class defines the basic set of APIs that must be implemented to be a child of a Flex container or list.
- Be sure that the new function appears as follows, and then run the application.
private function doDragEnter(event:DragEvent,format:String):void{
if( event.dragSource.hasFormat( format )){
DragManager.acceptDragDrop( event.target as IUIComponent );
}
}You should now be able to drag the Label. When it moves over the List, the red
Xdisappears, and you can drop the drag proxy. At this point, nothing happens when you do the drop. - In the List, add a
dragDropevent and have it call a function nameddoDragDrop(). The function should pass two parameters, theeventand the format, which in this case should match the format used earlier:myFormat.
dragDrop="doDragDrop(event,'myFormat')"
You are passing the data needed to have the data retrieved from the DragSource and have it displayed in the List.
- At the bottom of the
<fx:Script>block, create a private function nameddoDragDrop(), which returnsvoid. The function should accept two parameters. Name the first parameterevent, data typed asDragEvent, and the second parameterformat, typed asString.
You need the event object in this function because it contains the DragSource object, and that is where the data is stored. Remember that you stored the String
My data herein the DragSource object in steps 3–6 of this exercise. The format is needed because that is how you pull data from the DragSource object using thedataForFormat()method. - As the first line of code in the new function, create a variable local to the function named
myLabelData, typed asObject. Assign this variable the data being dragged by using thedataForFormat()function to retrieve the data from thedragSourceproperty of the event object. The argument of the function should be theformatparameter passed to the function.
var myLabelData:Object=event.dragSource.dataForFormat(format);
Remember that you can store data associated with multiple formats, so you must specify which format’s data to retrieve when retrieving data.
- Display the data just retrieved in the List. You need to use the
addItem()method on the List’sdataProviderproperty to do this.
myList.dataProvider.addItem(myLabelData);
You have achieved your goal of moving the Label’s data into the List.
- Be sure that the new function appears as follows, and then run the application.
private function doDragDrop(event:DragEvent,format:String):void{
var myLabelData:Object=new Object();
myLabelData=event.dragSource.dataForFormat(format);
myList.dataProvider.addItem(myLabelData);
}
Now when you drag the Label to the List, you will see that the data from the Label, the String “My data here” is displayed in the List. The following figure shows the List after successfully dropping the Label data.

Now that you have a solid background in drag and drop, you will implement drag-and-drop functionality in the e-commerce application of FlexGrocer.
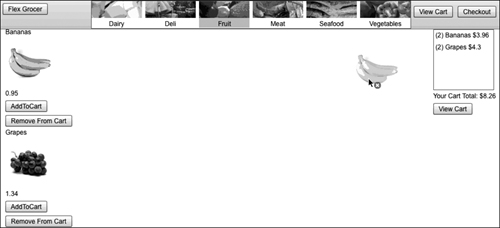
Dragging a Grocery Item to the Shopping Cart
The culmination of your work in this lesson is to implement dragging a grocery item into the shopping cart. The exercises you have performed so far in this lesson have prepared you well for this final exercise; in fact, some of the code you have already written will be copied and pasted for use in this exercise.
In these steps, you will enable the user to click the grocery item, drag it to the small shopping cart, and then drop it in. The grocery item is displayed in a VGroup container, and the shopping cart is a List. Because the VGroup is not a drag-and-drop-enhanced component, you will have to pattern your code here after what you just wrote in the section “Using a Non-Drag-Enabled Component in a Drag-and-Drop Operation.”
- Open the FlexGrocer project you used in the previous lesson.
Alternatively, if you didn’t complete the previous lesson or your code is not functioning properly, you can import the FlexGrocer.fxp project from the Lesson13/start folder. Please refer to Appendix A for complete instructions on importing a project should you ever skip a lesson or if you ever have a code issue you cannot resolve.
- Open ProductItem.mxml from the components package.
This is the component in which the grocery data is displayed; so this is where you will have to permit the data to be dragged.
- Locate the
<s:VGroup>just below the<fx:Declarations>tag set. In that container, locate the<mx:Image>tag that displays the product. Add anidproperty to the Image tag and assign it the valueimg.
You will be referencing this image several times and need to give it an instance name.
- Add a
mouseDownevent in the Image tag and select Generate DragDrop handler to have Flash Builder create the event handler for you. Note that the event object was automatically passed. Add a second parameter, which is the format that will be associated with this data. In this task, use the stringcartFormat.
mouseDown="img_mouseDownHandler(event,'cartFormat')"
By placing the
mouseDownevent on the Image, it will enable the user to start the drag process by clicking the image. - Locate the newly created event handler in the
<fx:Script>block and remove the TODO comment. Add a second parameter namedformattyped as aString.
protected function img_mouseDownHandler(event:MouseEvent,format:String):void{
}This function has two main purposes: to get data into the object being dragged and to permit the component to be dragged.
- As the first line of code in the event handler, create a new variable local to the function named
dragSourceand assign it a new DragSource object. Next, use theaddData()method to associate the newly created object with the product and format.
var dragSource:DragSource=new DragSource();
dragSource.addData(product,format);If you used code-completion, DragSource was imported for you. Else, import mx.core.DragSource manually. Remember that the
addData()method’s two parameters assign the data and the format to the DragSource object. In this case the data is the product being displayed in the VGroup, and the format is the format string passed to the event handler. - As the last line of code in the function, permit the Image to be dragged by calling the static
doDrag()method of the DragManager class. Recall that you must pass the method three parameters, the initiator, the DragSource object, and the event. In this case the initiator isevent.target as IUIComponent. The DragSource is thedragSourceobject you created. Lastly, the event is theeventparameter passed to the event handler.
DragManager.doDrag(event.currentTarget as IUIComponent, dragSource, event);
If you used code-completion, IUIComponent and DragManager were imported for you. If not, import mx.core.IUIComponent and mx.managers.DragManager now. You had to cast the initiator as IUIComponent because
event.currentTargetis typed as an Object by default, which is not a visual component and hence cannot be dragged. - Run the FlexGrocer.mxml application. You should be able to drag the grocery item data.
You see the drag proxy is the outline of the Image, or a rectangular box. Later in this task, you will change the drag proxy to the image of the grocery item.
At this point there is no drop target, so you cannot drop the data anywhere.
- Open the ShoppingView.mxml from the views package.
This file contains the List that is your shopping cart to which grocery items are dragged.
- Locate the List with the
idofcartListand add adragEnterevent to the List. Select Generate DragDrop handler to have Flash Builder create the event handler for you. In addition to the event object automatically passed, add a second parameter of the StringcartFormat.
dragEnter="cartList_dragEnterHandler(event,'cartFormat')"
- Locate the newly generated event handler and remove the TODO comment. From the file Task3_Label_to_List.mxml, copy the contents (not the entire function) of the
doDragEnter()function and paste it in the newly generated event handler. Also add a second parameter namedformat, typed as aString. Be sure your handler appears as shown here.
private function cartList_dragEnterHandler(event:DragEvent,format:String):void{
if(event.dragSource.hasFormat( format )){
DragManager.acceptDragDrop( event.target as IUIComponent );
}
}This function has only one purpose: to check whether formats enable the drag initiator to be dropped. The
ifstatement determines whether there are matching formats; then theacceptDragDrop()method allows the actual dropping to take place. - At the top of the Script block, import the
mx.managers.DragManagerandmx.core.IUIComponentclasses.
These classes are used in the function you just copied into the file, and therefore not automatically imported.
- Run the FlexGrocer.mxml application. You should be able to drag the grocery item data; when you drag the pointer over the shopping cart List, you should see the red
Xdisappear, and you can drop the drag proxy.
At this point, nothing happens when you drop the drag proxy.
- In ShoppingView.mxml, locate the List with the
idofcartListand add adragDropevent to the List. Select Generate DragDrop handler to have Flash Builder create the event handler for you. In addition to the event object automatically passed, add a second parameter of the StringcartFormat.
dragDrop="cartList_dragDropHandler(event,'cartFormat')"
You pass the information to this function, which will place data in the shopping cart.
- Locate the newly generated event handler and remove the TODO comment. Also accept a second parameter in the function named
formattyped asString.
protected function cartList_dragDropHandler(event:DragEvent, format:String):void
{
} - As the first line of code in the function, create a variable local to the function named
product, typed as aProduct. Assignproductthe result of calling thedataForFormat()method of the event.dragSource object, passing the format as an argument. You will need to cast the result as a Product.
var product:Product = event.dragSource.dataForFormat( format ) as Product;
This Product object is needed to create a ShoppingCartItem in the next step of the task. The
dataForFormat()method retrieves data based on the format used as the argument of the function. In this case, the data stored in the DragSource object was the product data added in step 6 of this task using theaddData()method. - Next in the function, create a variable local to the function named
shoppingCartItem, typed as aShoppingCartItem. Assign that variable equal to a new ShoppingCartItem. The arguments of the ShoppingCartItem constructor should be theProductobject created in the last step and the number1.
var shoppingCartItem:ShoppingCartItem = new ShoppingCartItem(product,1);
Here is a quick review of how the Product object got in the DragSource:
• In steps 4, 5 and 6 of this exercise, you passed a Product object to the
img_mouseDownHandler()function.• The function placed the Product object into the DragSource object using the
addData()method and associated it with thecartFormatformat.• In the event handler just created, you retrieved that same Product object and will now place it in the shopping cart.
- As the last line of code in the function, invoke the
addItem()method of theshoppingCartobject and pass theshoppingCartItemvariable as a parameter.
Check to be sure your function appears as shown here:
protected function cartList_dragDropHandler(event:DragEvent, format:String):void{
var product:Product = event.dragSource.dataForFormat( format ) as Product;
var shoppingCartItem:ShoppingCartItem = new ShoppingCartItem(product,1);
shoppingCart.addItem( shoppingCartItem );
}The method invocation actually places the ShoppingCartItem object in the shopping cart.
- Run the application. You can now drag grocery items into the shopping cart.
You see that the drag-and-drop operation is working, but the drag proxy is the default proxy for the Image. In the next step you add code so the drag proxy becomes the image of the grocery item.
- Return to ProductItem.mxml. At the bottom of the
<fx:Script>block, locate theimg_mouseDownHandler()function. At the top of the function create a variable local to the function namedproxyof typeBitmapImage. Assign the newly created variable a newBitmapImageobject. As the next line of code in the function, assignproxy.sourcethe valueimg.content.
var proxy:BitmapImage = new BitmapImage();
proxy.source = img.content;Here you are creating a new image to act as the proxy. This code may cause you to have some questions.
Your first question might be, why not just use the existing Image object as the proxy? This is because by default the drag-and-drop operation removes the drag proxy from its source. You could have simply used the existing Image as the drag proxy, but after dragging and dropping, the image would no longer be shown with the other grocery item data.
The next question could be, what is a BitmapImage and why use it instead of another Image instance? Actually you could have used another Image instance, but it would not be the best choice. The Image tag is quite complex and performs many functions, including retrieving an actual image. This makes the component quite “heavy.” The BitmapImage only has the ability to display data that is already loaded and is therefore a perfect fit for this implementation since the Image tag has already loaded the actual image. BitmapImage is much more svelte than the Image tag, so a better choice in this case.
Finally, it may seem odd that you assign the
sourceproperty of the BitmapImage the value of thecontentproperty of the Image tag. Why not just assign thesourceproperty of Image to thesourceproperty of BitmapImage? This, again, goes back to the functionality of the Image tag. You specify asourcein the Image tag, which is the path to the object to load. The Image tag then places the retrieved image in thecontentproperty. The BitmapImage uses thesourceproperty as the actual image, not an object to retrieve as does the Image tag, henceproxy.source = img.content. - In the
DragManager.doDrag()method invocation, add a fourth parameter ofproxy.
DragManager.doDrag( event.target as IUIComponent, dragSource, event, proxy);
This fourth parameter represents the
dragImage. Instead of the outline of the Image of the grocery item data being the drag proxy, you have now specified that the image of the item should be displayed when dragging is taking place. - Save the file and check the Problems view. You get the following error:
Implicit coercion of a value of type spark.primitives:BitmapImage to an unrelated type mx.core:IFlexDisplayObject;
The fourth parameter, the drag proxy, must implement the interface
IFlexDisplayObjectto be a valid drag proxy. BitmapImage does not do this, hence the error. You will solve this issue in the next step. - Immediately below the code you’ve just written, create a variable local to the function named
imageHolder, data typed as aGroup, and assign it a new Group object. Next use theaddElement()method of theimageHolderGroup object and pass as a parameter theproxyobject.
var imageHolder:Group = new Group();
imageHolder.addElement(proxy);Be sure to either use code-completion or manually import spark.components.Group. Since the Group class does implement
IFlexDisplayObject, you will place the BitmapImage in a Group so it can be used as a drag proxy. - In the
DragManager.doDrag()method invocation, change the fourth parameter fromproxytoimageHolder.
DragManager.doDrag(event.currentTarget as IUIComponent, dragSource, event, imageHolder);
After this change, save the file and you will see the error is no longer in the Problems view.
- Check to be sure that your
img_mouseDownHandler()function appears as follows, and then run the application. You should be able to drag the image of the grocery item and drop it in the cart.

What You Have Learned
In this lesson, you have:
• Implemented drag-and-drop operations between two drag-enabled components and used the default drop process (pages 329–332)
• Implemented drag-and-drop operations between two drag-enabled components and customized the drop process to use the data stored in the DragSource object (pages 333–336)
• Implemented drag-and-drop operations between non-drag-enabled components and used a custom dragImage (pages 337–343)
• Implemented drag-and-drop operations in the shopping cart (pages 343–349)