
Lesson 8. Using Data Binding and Collections
In the last lesson you created a ShoppingCart class to hold items for purchase in your application. This lesson will continue building on the ShoppingCart, as you enable it to work with a visual interface and learn to use the advanced features of the collection classes to manipulate and display up-to-date information to the user automatically.
The key to all these tasks resides in the Flex concept of data binding. So you will start this lesson by learning how this important concept works, allowing you to successfully apply it and determine when and where to use it appropriately.

The FlexGrocer application with a visual shopping cart
Examining Data Binding
Data binding is likely one of the key concepts that define Flex. In fact it inspires one of the mottos used in our daily consulting: In Flex, the goal is to change the model (the data) and let the view (the components) follow. In other words, you should try to avoid directly manipulating the components that make up the visual display at runtime and, instead, let those components react to changes you make to the data. This is the essence of data binding.
In Lesson 4, “Using Simple Controls,” you started using data binding as a method of updating the view automatically when the underlying data changed. Since then you have used it periodically; now you are going to visit this concept in earnest.
Note
![]()
Flex 4 also offers something called two-way binding. This is particularly useful with data input forms where you may want the data you type to update a variable. It will be addressed in Lesson 15, “Using Formatters and Validators,” along with other form concepts such as formatting and validation.
Breaking a Simple Example
You will start by examining a simple example where data binding works to manipulate the view. You will then begin breaking it to see exactly when and where data binding ceases to work.
- Import the DataBindingLab.fxp from the Lesson08/independent/ folder into Flash Builder. Please refer to Appendix A for complete instructions on importing a project.
- Open the DataBindingLab.mxml file and run it.
This is an extremely simple application designed to illustrate two use cases for data binding. Note that on startup the Simple Example shows the word red and the Value Object Example shows John Doe between the title and the buttons.

- Click the Change Color, Change Whole Person, and Change Last Name buttons.
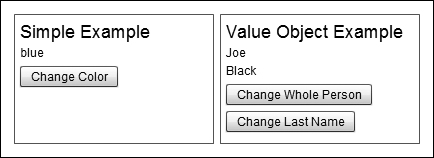
Not surprisingly, both examples change, but now let’s examine why.
- Close your web browser and return to Flash Builder. Find the lines of code that display the Simple Example and identify the property bound to the
colorNameLabel:

Note that the
textproperty of thecolorNameLabel references thesomeColorproperty surrounded by curly brackets (braces){}. You should read this line of code as, “Thetextproperty of thecolorNameLabel is bound tosomeColor.” In this case, the braces{}are your way of telling Flex it should watch thesomeColorproperty for changes. If a change occurs, it should update thecolorNameLabel with the new value. - Hold down the Control key (Command on the Mac) and click the word
someColor.
This is a shortcut called “go to definition” in Flash Builder. It will move the cursor and focus to the location where that particular property is defined, even if it is in another class.
- Remove the
[Bindable]metadata tag from above thesomeColorproperty. - Save the file.
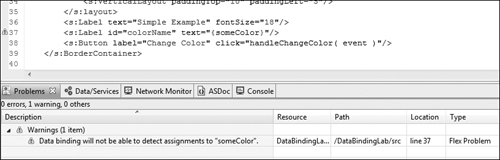
You will now see a warning symbol appear to the left of the line of code where the
someColorproperty was being used. If you check your Problems view, you will also see a warning that says, Data binding will not be able to detect assignments to “someColor”.The Flex compiler is once again trying to provide you with some valuable debugging information. It is letting you know that you have asked it (by using the braces) to watch the property
someColor; however, it is not capable of doing so, assomeColoris not bindable. - Debug the application.
Note that the word red appears on the screen at start-up. At this point it appears as though everything is still working correctly without the
[Bindable]tag. - Click the Change Color button.
Regardless of how many times you click, the word red never changes to blue as it did previously.
- Leave the application running, but switch back to Flash Builder. Set a breakpoint on the closing brace of the
handleChangeColor()method. This method is responsible for changing thesomeColorproperty from red to blue.

Remember, you can set or remove a breakpoint by double-clicking in the area to the left of the line numbers. You can do this before you debug the application or, as you are doing presently, while the application is running.
- Return to the web browser and click the Change Color button. Flash Builder will stop at the breakpoint. Return to the Flash Builder Debug perspective.
- Select
someColor, right-click, and choose Create Watch Expression from the pop-up menu.
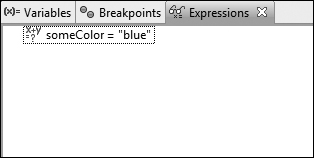
Even though the word red will continue to appear on the screen, the actual value of the
someColorproperty isblue.Tip

At any time you may remove all the items from the Expressions panel by clicking the double X or remove just a single item by highlighting it and clicking the X.
The
[Bindable]metadata tag that you place above a property likesomeColorallows Flex to watch that property for changes and react to that change by updating the view (visual components). Without the[Bindable]metadata tag, the property will still change when you assign it a new value; however, the view will not know to refresh. - Terminate the debug session.
Intentionally, you have now made the most common error that new Flex developers experience. Without the [Bindable] metadata tag, the word red still appears on start-up, but the Label fails to update later in the process. It is this behavior that the Flex compiler is attempting to bring to your attention via the warning: Data binding will not be able to detect assignments to “someColor”. Many developers ignore this warning and believe their application will work because the data appears correctly on start-up; unfortunately, however, the view will never update when the data changes.
Breaking a More Complicated Example
Having successfully broken a simple example, you are ready to break something more complicated. Previously you were working with the someColor property of the DataBindingLab application, which is a simple String type. When you use more complicated objects, data binding also becomes more complicated.
- Make sure the DataBindingLab.mxml file is open, and examine the declaration of the
somePersonproperty.
[Bindable]
private var somePerson:Person = new Person( "John", "Doe" );At start-up the
somePersonproperty is set to a new Person object, with the initial argumentsJohnandDoepassed to the constructor. As you want Flex to notice changes to this Person instance, the[Bindable]metadata tag is also present above the declaration. - Hold down the Control (Command) key and click the class name Person.
You are again using the “go to definition” shortcut in Flash Builder. This time the definition you clicked was not a property, but rather a class, so Flash Builder opens the Person class for you.
package valueObjects {
[Bindable]
public class Person {
public var firstName:String;
public var lastName:String;
public function Person( firstName:String="", lastName:String="" ) {
this.firstName = firstName;
this.lastName = lastName;
}
}
}Note that the Person class is a simple value object, much like the Product value object you built in previous lessons. The Person class defines two properties,
firstNameandlastName, both of which are strings and defined as public.The entire class is marked
[Bindable], meaning that bothfirstNameandlastNamecan be watched by Flex for changes. As a reminder, marking the whole class[Bindable]is equivalent to marking each individual property with its own metadata tag.Unlike the previous example with the
someColorproperty, you have two[Bindable]metadata tags in this example. One tag is used in the DataBindingLab.mxml file, where thesomePersonproperty is defined, and another is used on the top of the Person class. Each serves a different purpose. - Remove the
[Bindable]metadata tag from the top of the Person class definition. - Save the file.

If you look at the DataBindingLab.mxml class, you will see warning symbols appear to the left of the line of code where the
somePersonproperty is used. If you check your Problems view, you will see two additional warnings. These say, Data binding will not be able to detect assignments to “firstName” and Data binding will not be able to detect assignments to “lastName”.The Flex compiler is once again trying to provide you with some valuable debugging information. It is letting you know that you have asked it (by using the braces) to watch the properties
firstNameandlastName. However, it is not capable of doing so, as neither is marked as bindable. - Debug the application and again click the Change Whole Person button.
You may be surprised by the initial result. When you click the Change Whole Person button, the person information does indeed change.
- Click the Change Last Name button.
Regardless of how many times you click, the word Smith never changes to Black as it did previously. So, by removing the
[Bindable]tag from the Person class, you broke one of the two cases being demonstrated for the complex object. - Terminate the debug session and return to Flash Builder.
- Examine the method that is executed when you click the Change Last Name button. It is called
handleChangePersonName().
private function handleChangePersonName( event:MouseEvent ):void {
somePerson.lastName = "Black";
}When you executed this method, it changed the
lastNameproperty inside the Person object. - Now, examine the method that is executed when you click the Change Whole Person button. It is called
handleChangePerson().
private function handleChangePerson( event:MouseEvent ):void {
somePerson = new Person( "Joe", "Smith" );
}When you execute this method, it assigns a brand-new Person to the
somePersonproperty.You can think of these two cases in the following way: In one case, you are swapping the entire Person object out for a new Person. When you do that, you expect Flex to respond by showing you the new Person on the screen.
In the second example, you are not changing the whole Person, but rather changing something about the Person. In this case, you are changing the Person’s last name; the person remains the same. When you change something inside the Person object (like the last name), you also expect Flex to respond by updating the view.
These two use cases need two separate
[Bindable]metadata tags, one to indicate that you want Flex to watch for the Person to change, and one to indicate that you want Flex to watch whether the properties of the existing Person change. - Finish breaking this example by removing the
[Bindable]metadata tag from above thesomePersonproperty, and save the file.
In the DataBindingLab.mxml class, you will see additional warning symbols to the left of the line of code where the
somePersonproperty is used. If you check your Problems view, you will also see two additional warnings, both saying, Data binding will not be able to detect assignments to “somePerson”. Flex is letting you know that this class is broken.
- Run the application and click buttons at will.
While the properties behind the scenes are changing values, the visible Flex components are unaware that these changes are occurring and cannot update.
Being the Compiler
As much fun as it was to spend a bit of time intentionally breaking code, it is time to be constructive again. You are going to fix the someColor property to ensure data binding works again. Although you could do this by simply re-adding the [Bindable] metadata tag above the property, it will be significantly more interesting and informative to use this opportunity to gain an understanding of what the [Bindable] tag does on your behalf.
[Bindable] and the braces ({}) are among the many examples of code generation in Flex. Back in Lesson 7, you learned about a compiler option (-keep-generated-actionscript) that allowed you to see the ActionScript classes that the Flex compiler created from the MXML files you wrote.
The Flex compiler takes the MXML, along with any ActionScript code in the Script block, and creates completed ActionScript classes. That is an example of code generation, in that Flex generates ActionScript code based on the MXML you wrote. Any single line of MXML may very well become multiple lines of ActionScript code.
[Bindable] and the braces ({}) work in a very similar way. When Flex is compiling your code and sees a [Bindable] tag, it realizes that you intend Flex to watch that property for changes. It takes this opportunity to create some new code to make that possible. Similarly, when the compiler encounters the braces, it writes code to update your control when the data changes. In this exercise, you will manually replicate some of that same code to gain an understanding of the binding mechanism.
Implicit Getters and Setters
The first concept employed by the Flex compiler during code generation is called an implicit getter and setter. Implicit getters and setters are a way to create a pair of functions that act like a property. You have already created many properties inside Flex classes:
public var someColor:String;
You access this property in your code by simple assignments or reads:
someColor = "blue";
trace( someColor );
Implicit getters and setters allow you this same freedom of simply setting and reading values, but with the option of doing extra work when the property changes (for example, recalculating a subtotal when a quantity changes). Using an implicit getter and setter, this same code can be written in the following way:
private var _someColor:String;
private function get someColor():String {
return _someColor;
}
private function set someColor( value:String ):void {
_someColor = value;
//do some extra interesting stuff
}
Did you notice the underscore added to the beginning of the variable? You would continue to access this property in your code by simple assignments or reads:
someColor = "blue";
trace( someColor );
The opportunity to do that other stuff is one key to making data binding work in Flex. Whenever you mark a variable [Bindable], either on its own or as part of a whole class of bindable properties, Flex changes that variable to a property defined as an implicit getter and setter.
- Open the DataBindingLab.mxml file and find the declaration of the
someColorproperty. Change the property name to prefix it with an underscore as follows:
private var _someColor:String = "red";
In Flex, the underscore in front of a variable is often used to indicate that a private variable will have an implicit getter and setter that should be used to access this data.
- Create a private getter function that will return the
_someColorvariable namedsomeColor. Its return type will be String. A getter is created just like a function; however, the wordgetappears between the keywordfunctionand the name of the function. A getter cannot accept any parameters.
private function get someColor():String {
return _someColor;
} - Create a private setter function that will accept a single parameter named
valueof typeString. It will returnvoid. When called, this method will set the_someColorvariable to thevalueparameter. A setter is created just like a normal function; however, the wordsetappears between the keywordfunctionand the name of the function. A setter always accepts a single parameter and returns nothing. By convention this parameter is namedvalue.
private function set someColor( value:String ):void {
_someColor = value;
} - Save the file.
You should not see any errors in your Problems view, although you will continue to receive the data binding warnings for the moment. Note that you didn’t change any of the code that accessed the someColor property. This code will still continue to function as it did before.
Event Dispatching and Listening
Data binding is just event dispatching and listening. In fact, armed with the knowledge learned in this lesson and in Lesson 5, “Handling Events,” you already have almost enough information to replicate data binding on your own.
What follows is a brief introduction to dispatching events in ActionScript. You will learn this in much greater detail in Lesson 11, “Creating and Dispatching Events.”
Listening to an Event
So far you have listened for events dispatched by Flex components using MXML. You have done this by specifying the name of a function that is called when the event occurs and then generally passing the event object. Listening to an event from ActionScript is a similar process, as illustrated by the following MXML example:
<s:Button label="A Perfect Button" id="someButton"
click="doSomethingPlease( event )"/>
is written in ActionScript as:
someButton.addEventListener( "click", doSomethingPlease );
You are simply calling a method named addEventListener() on the someButton instance. You are passing two arguments, the name of the event that is important to you (click), and the name of the function you would like to call if that event occurs (doSomethingPlease).
Therefore, the general form of addEventListener() is:
objectThatDispatchesEvent.addEventListener( eventName, functionToCall );
Dispatching an Event
So far, you have relied on Flex controls to dispatch all events; however, it is quite easy to dispatch your own events as well. Here is an example of dispatching an event from ActionScript:
var event:Event = new Event( "myEvent" );
this.dispatchEvent( event );
First, you create a new Event object with the name myEvent. Then you simply call a method named dispatchEvent() on an object, passing myEvent as an argument. Often you will see this combined into a single statement.
Therefore the general form of dispatchEvent() is:
objectThatDispatchesEvent.dispatchEvent( new Event( eventName ) );
Data Binding as Events
In this section, you will fill in the missing pieces to make the someColor property work as it did before you began breaking it earlier in this lesson.
- For the last line of the setter function for the
someColorproperty, you will now dispatch a new Event calledsomeColorChanged.
private function set someColor( value:String ):void {
_someColor = value;
this.dispatchEvent( new Event( "someColorChanged" ) );
}Now each time that the
someColorproperty is set, you will call thedispatchEvent()method of the Application object (thisrefers to the Application, because the code is located in the Application Script block and runs in the Application context). Anyone listening for asomeColorChangedevent will be notified when it is dispatched. - Find the
handleCreationComplete()method of the DataBindingLab.mxml class. Here you will add an event listener to the Application for thesomeColorChangedevent. When that event occurs, you will call a function namedhandleSomeColorChanged().
private function handleCreationComplete( event:FlexEvent ):void {
this.addEventListener( "someColorChanged", handleSomeColorChanged );
}When the
someColorsetter dispatches its event, thehandleSomeColorChanged()handler will be called. - Directly below the
handleCreationComplete()method, create a new private function namedhandleSomeColorChanged(). This method will accept a single parameter namedeventof typeEventand return nothing (void).
private function handleSomeColorChanged( event:Event ):void {
} - Inside the
handleSomeColorChanged()method, set thetextproperty of thecolorNameLabel equal to the value ofsomeColor.
private function handleSomeColorChanged( event:Event ):void {
colorName.text = someColor;
} - Find the
colorNameLabel and remove the code that sets thetextproperty.
<s:Label id="colorName"/>
You no longer need this code, as you are doing the work that the
[Bindable]tag and the braces normally do on your behalf. - Directly below the
addEventListener()call inside thehandleCreationComplete()method, set the value of thecolorName.textproperty tosomeColor.
private function handleCreationComplete( event:FlexEvent ):void {
this.addEventListener( "someColorChanged", handleSomeColorChanged );
colorName.text = someColor;
}Just as Flex set the initial value of your color regardless of any data binding later in the process, so you will set up your initial value here.
- Run the application.
You will now be able to click the Change Color button again and see it change from red to blue.
Understanding Bindable Implications
In the previous exercise you replicated a fair amount of the code that Flex writes each time you use braces and bindable metadata. The most important things to understand regarding this process are:
• Flex writes code on your behalf when you use these constructs.
• Data binding is just event dispatching and listening hidden behind the scenes.
• In order for data binding to work properly, objects must be able to dispatch events when something changes.
The last point has many implications. By default, not all classes in Flex can dispatch events. For example, the Product value object you created in Lesson 7 cannot dispatch events on its own. Classes that can dispatch events are called event dispatchers. In Flex all user interface components are a type of event dispatcher.
Fortunately, for classes like Product, when Flex sees the [Bindable] metadata tag, it changes your class during compilation to be an event dispatcher as well as generating all the code we discussed in this lesson.
It is important to remember that Flex does that work while it compiles your source code. However, that demonstrates an important prerequisite: Flex can do this work on the classes you write only where the source is present in your project. It cannot change classes that are already compiled and no longer exist as source. An important example of this is the Array. The source code for the Array is not in your project; it exists inside Flash Player itself. That means that Flex has no capability of changing the code in the Array to dispatch events or add any of the code we have discussed. Therefore arrays cannot be used in data binding directly, as they cannot dispatch events that cause the user interface to update. In the next sections, you will learn how Flex deals with these limitations through a technique called proxying.
Using ArrayCollections
In Lesson 7, you worked with ActionScript Array instances to store and retrieve shopping cart data. Throughout the book you have worked with various types of XML and Object instances. All three of these classes are built into the Flash Player itself; that is, you won’t find an ActionScript class file that describes their behavior. They simply exist as part of the toolbox you have available when writing ActionScript code.
They form part of a fundamental set of types available to you in Flex that includes other common types such as Number, String, int, uint, and Boolean. However, unlike those simple types, Arrays, Objects, and XML are complex, meaning that they don’t store simple values like a Number, but rather store more complex data and often have methods (such as the push() method of the Array) that can be called on the type.
In the previous exercise, you learned that Flex enables data binding on complex objects by manipulating the source code during compilation to allow objects to dispatch events. With these built-in types, such manipulation is not possible, and so another strategy must be used to allow their use in data binding. This strategy is called proxying. In Lesson 6, “Using Remote XML Data,” you used two such proxies: an XMLListCollection, which was used so that your categories List would update when new data arrived from the server, and an ObjectProxy, which you observed when examining data retrieved from your HTTPService.
When used with data binding, a proxy’s job is to act as a go-between for components you wish to be updated when a change occurs and a type, such as the Array, that does not have the proper logic to facilitate such an interchange.

Put simply, an ObjectProxy is a proxy for an Object, an XMLListCollection is a proxy for an XMLList, and an ArrayCollection is a proxy for an Array. This arrangement allows the use of these complex types with data binding.
In reality, the Array is fortunate to have two distinct proxies available, the ArrayList and the ArrayCollection. In this section, you will learn about the ArrayCollection as it not only provides the benefit of data binding but also has a rich set of additional features for sorting, filtering, and finding data quickly.
In the remainder of the book, you will use ArrayList, as it is a simple and lightweight choice when you only need proxying capabilities.
Populating an ArrayCollection
In this exercise, you will create an ArrayCollection of Product objects, using a remote XML file for their source. This ArrayCollection of Product objects will represent the list of available products in your FlexGrocer store. You will continue to use and manipulate this list through the remainder of the book.
- Open a web browser and go to the following URL:
http://www.flexgrocer.com/categorizedProducts.xml
Notice the structure of the XML.

Unlike the previous product data you used, the product nodes are listed beneath category nodes. Also, the critical information about the products is not described in nodes, but rather as attributes of the product node. You will need to use E4X operators to retrieve this data.
Table 8.1. Data Nodes and Attributes

Finally, note that in our older XML, the values of the isOrganic and isLowFat nodes are represented by the words
trueorfalse. In this version, the wordsNoorYeshave been substituted. This is typical of the real-world frustration of loading remote data from different sources. You will learn how to deal with this change shortly. - Open the FlexGrocer.mxml file that you used in Lesson 7.
Alternatively, if you didn’t complete the previous lesson or your code is not functioning properly, you can import the FlexGrocer.fxp project from the Lesson08/start folder. Please refer to Appendix A for complete instructions on importing a project should you ever skip a lesson or if you ever have a code issue you cannot resolve.
- Inside FlexGrocer.mxml, below the HTTPService named categoryService, but still inside the Declarations block, add an HTTPService tag, with an
idofproductService. Set theurlattribute of this tag to http://www.flexgrocer.com/categorizedProducts.xml.
<s:HTTPService id="productService"
url="http://www.flexgrocer.com/categorizedProducts.xml"/> - Your new HTTPService should return its results as XML, so set the
resultFormattoe4x. Also, specify that you will handle theresultevent ofHTTPServicewith a new function namedhandleProductResult(), and pass the event object when it is called.
<s:HTTPService id="productService"
url="http://www.flexgrocer.com/categorizedProducts.xml"
resultFormat="e4x"
result="handleProductResult(event)"/> - Find the
handleCreationComplete()method and delete the lines that build a new product fromgroceryInventoryand the line that traces thetheProductvariable. - Still inside the
handleCreationComplete()method, add a call toproductService.send()to retrieve your data from the server.
private function handleCreationComplete( event:FlexEvent ):void {
categoryService.send();
productService.send();
}Remember, simply creating the HTTPService tag does nothing to retrieve your data. You must call the
send()method to issue the request for the categorizedProducts.xml file. - Create a new private function directly below the
handleCategoryResult()function namedhandleProductResult(). The function will accept a single parameter namedeventof typeResultEvent, returning nothing.
private function handleProductResult( event:ResultEvent ):void {
}You will use this function to turn the data from the HTTPService into a series of Product objects.
- Save your application and set a breakpoint on the closing bracket of your new
handleProductResult()function.
Remember you can set a breakpoint by double-clicking in the marker bar just to the left of the code and line numbers. A small blue dot will appear in the marker bar, indicating where the program execution will halt.
- Debug your application.
When you reach your breakpoint, return to Flash Builder and ensure you are in the Debug perspective.
- Double-click the Variables view. Expand the
eventobject and theresultproperty. Further expand the<catalog>node beneath theresultto ensure you are retrieving the correct data.
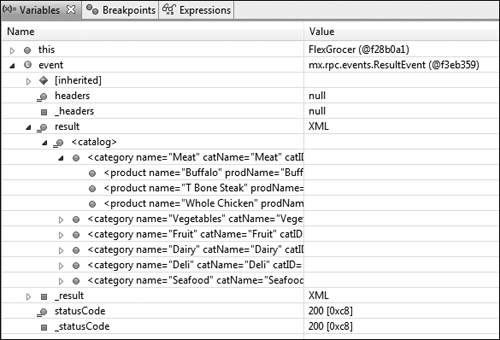
You should see category nodes and, if you expand further, product nodes. Each product node will have a variety of attributes corresponding to the properties of your Product object.
- Terminate your debugging session and return to the Flash perspective.
- Open your Product value object class.
Previously, you created a static
buildProduct()method that could build a Product from a generic object. Now you will create a new method that will create a Product from the attributes of XML. - Below the
buildProduct()method, create a new public static method namedbuildProductFromAttributes(). This method will accept a single parameter nameddataof typeXML. It will return aProductinstance.
public static function buildProductFromAttributes( data:XML ):Product {
} - Immediately inside the method, create a local variable named
pof typeProduct.
public static function buildProductFromAttributes( data:XML ):Product {
var p:Product;
}This variable will refer to your new Product instance. Next you will deal with the minor difference in the way the isLowFat and isOrganic nodes are handled in this XML file.
- Now, create another local variable named
isOrganicof typeBoolean. Set it equal to an expression that checks whetherdata@isOrganicis equal toYes.
var isOrganic:Boolean = ( data.@isOrganic == "Yes" );
This expression will check the attribute
isOrganicagainst the StringYes. If they match, the variableisOrganicwill betrue. - Create a new local variable named
isLowFatof typeBoolean. Set it equal to an expression that checks whetherdata@isLowFatis equal toYes.
var isLowFat:Boolean = ( data.@isLowFat == "Yes" );
- Instantiate a new
Productinstance, passing the attributes from thedataXML as the arguments of the Product constructor. In the case of the isOrganic and isLowFat nodes, pass the localBooleanvariables instead. Finally returnp, your new Product instance. Your code should read as follows:
public static function buildProductFromAttributes( data:XML ):Product {
var p:Product;
var isOrganic:Boolean = ( data.@isOrganic == "Yes" );
var isLowFat:Boolean = ( data.@isLowFat == "Yes" );
p = new Product( data.@catID,
data.@prodName,
data.@unitID,
data.@cost,
data.@listPrice,
data.@description,
isOrganic,
isLowFat,
data.@imageName );
return p;
}You now have three ways to create a new Product. You can call the constructor directly. You can call
buildProduct()and pass an object or XML structure using nodes for the property names, or you can callbuildProductFromAttributes()and pass it an XML structure with the properties as attributes. You will use this method shortly to make constructing your ArrayCollection much easier. - Return to the FlexGrocer.mxml file.
- Find the
<fx:XML/>tag with anidofgroceryInventoryand delete it.
As your data is now going to come directly from the server at runtime, you will no longer need the local XML file.
- Directly below the
categoriesXMLListCollection in your Script block, add a new bindable private variable namedgroceryInventory.
If you used code completion, the ArrayCollection will be imported for you. Otherwise, be sure to import
mx.collections.ArrayCollection. - Return to your
handleProductResult()method and create a new local variable namedproductsof typeArray. Set this variable equal to a newArrayinstance.
private function handleProductResult( event:ResultEvent ):void {
var products:Array = new Array();
} - Below the
productsarray, create another local variable namedresultDataof typeXMLList. Set this variable to the E4X expressionevent.result..productas follows:
private function handleProductResult( event:ResultEvent ):void {
var products:Array = new Array();
var resultData:XMLList = event.result..product;
}This E4X expression is referred to as a descendant search. As you learned in Lesson 6, you are indicating that you want all
<product>nodes from the XML returned from the server, regardless of whether they are under other nodes (such as the category node in this case). - Next, you will use another type of loop, named
for each..in, to loop over each piece of XML in theresultDataXMLList.
for each (var p:XML in resultData) {
}The
for each..inloop is similar to theforloop that you used previously. However, instead of a counter that moves from one number to the next over iterations, thefor each..inloop understands items in a set and how to loop over them. In this case, the value ofpwill change at each loop to become the next product node in your XMLList. - Inside the
for each..inloop, create a new local variable namedproductof typeProduct. Assign this variable to the result of the static methodbuildProductFromAttributes()on the Product class, passing it the variablep.
for each (var p:XML in resultData) {
var product:Product = Product.buildProductFromAttributes( p );
}This uses the new method you just created to create a typed Product object from the attributes of the XML node p.
- Still inside the
for each..inloop, use thepush()method of theproductsarray to add the newly created Product instance to the end of theproductsarray.
for each (var p:XML in resultData) {
var product:Product = Product.buildProductFromAttributes( p );
products.push( product );
}When your
for each..inloop finishes executing, you will have an Array of Product objects that reflects the same data in your XMLList of product nodes. - Just below and outside the
for each..inloop, instantiate a new ArrayCollection, passing theproductsarray as the constructor parameter. Assign the result to thegroceryInventoryproperty.
groceryInventory = new ArrayCollection( products );
In this example, you are passing the Array instance that the ArrayCollection will proxy to its constructor. Later in this lesson you will learn other ways to accomplish this same goal.
Your completed method should read as follows:
private function handleProductResult( event:ResultEvent ):void {
var products:Array = new Array();
var resultData:XMLList = event.result..product;
for each (var p:XML in resultData) {
var product:Product = Product.buildProductFromAttributes( p );
products.push( product );
}
groceryInventory = new ArrayCollection( products );
}This method will handle the
resultevent from the HTTPService, and parse the returned XML, turning it into Product value objects. Those objects are then added to an ArrayCollection, where they can be used to update the user interface. - Save your application and debug it. When you encounter the breakpoint, switch to the Flash Debug perspective.
- Add the
groceryInventoryproperty to your Expressions panel by highlighting it, right-clicking, and choosing Create Watch Expression. Expand thegroceryInventoryvariable in the Expressions view, and you should see a list of Product objects.

- Terminate your debugging session and return to Flash Builder. Remove your breakpoints.
Using Data from an ArrayCollection
In the previous exercise, you populated an ArrayCollection from XML data converted to objects. In this exercise you will use that data to populate the components in your view.
Data from an ArrayCollection can be accessed in several ways, as you will learn through the remainder of this lesson. Two of the most popular are via Array notation and via a special method of the ArrayCollection called getItemAt().
The following statements will return the same data:
myArrayCollection[ 0 ];
myArrayCollection.getItemAt( 0 );
While these two statements are functionally equivalent, the call to getItemAt() has two distinct advantages. First, it is faster at runtime than the Array syntax, which exists primarily as a convenience to developers. Second, you can use getItemAt() with data binding to update your components at runtime.
- Open the FlexGrocer.mxml file that you used in the previous exercise.
Alternatively, if you didn’t complete the previous lesson or your code is not functioning properly, you can import the FlexGrocer-PreGetItem.fxp project from the Lesson08/intermediate folder. Please refer to Appendix A for complete instructions on importing a project should you ever skip a lesson or if you ever have a code issue you cannot resolve.
- Find the Button instance with the label AddToCart. Presently, when that Button is clicked, you call the
addToCart()method, passing ittheProduct. Change the click handler to instead pass the data retrieved from calling thegetItemAt()method of thegroceryInventorycollection, passing it a0. You will need to cast this data as a Product instance.
<s:Button label="AddToCart" id="add"
click="addToCart( groceryInventory.getItemAt( 0 ) as Product )"/>Your application would be very boring if it displayed only one product, so you can likely assume that we will be adding multiple products in the near future. While this bit of code is certainly uglier than the code that was here before, it prepares your code for the important change from static to dynamic.
- Find the RichText instance that uses the
descriptionproperty of thetheProductproperty. Change thetextproperty to use thedescriptionproperty of thegroceryItemcollection’s first item (index 0).
<s:RichText
text="{( groceryInventory.getItemAt( 0 ) as Product ).description}"
width="50%"/>This code, while still ugly, illustrates an important point. If the data inside the first position of the ArrayCollection were to change, this RichText instance’s
textproperty would update automatically. You will see that happen as you evolve the application in the upcoming lessons. - Update the Certified Organic and Low Fat Label instances in the same way, using the
getItemAt()method.
- Remove the
theProductvariable declaration and the[Bindable]tag above it.
These are no longer needed because you are now referencing the collection directly.
- Save and run your application.
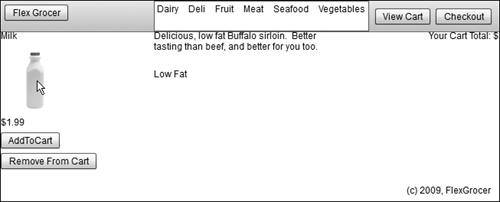
If all the instances were changed correctly, the application should execute as before; however, when you hover over the bottle of milk, you should now receive the description and information for the first item in the groceryInventory collection, which happens to be Buffalo. You will continue to see the Milk bottle and the word Milk, as those are hard-coded in your application and will be changed in the next lesson.
Sorting Items in an ArrayCollection
In this lesson so far you have used the ArrayCollection to allow you to make Array instances bindable. That is one of its most important uses; however, collections such as the ArrayCollection and XMLListCollection can do much more. In this exercise you will replace the Array inside your ShoppingCart class with an ArrayCollection.
You will also use the sorting feature provided by the ArrayCollection to keep the items in your shopping cart in order at all times.
To sort an ArrayCollection, you will use both the Sort and SortField classes. The following steps outline the process of sorting an ArrayCollection. You will implement these steps with more detail later in the task:
- Create a new Sort object.
- Create one or more SortField objects.
- Assign the
fieldsproperty of the Sort object an array of SortField objects (created in step 2). - Assign the Sort object to the
sortproperty for the ArrayCollection. - Apply the sort by calling the
refresh()method of the ArrayCollection.
Here is sample code that performs the steps to sort the items in an ArrayCollection.

In the sample code, a SortField object was created to sort on the someField property of the objects in the collection. The constructor for the SortField object can take multiple arguments; however, only the first is required: the property name used while sorting. In this example the sort will use the someField property. Three other optional constructor parameters are available:
• Case sensitivity (false by default)
• Ascending versus descending (descending by default)
• Numeric versus alphabetic (alphabetic by default)
A single Sort object can have several sort fields (for example, you could sort first by category, then by price), which is why the fields property of the Sort class requires that an array of SortField instances to be specified. Even for a single-field sort, you create an array with only one SortField within it, as shown in the example.
Tip
![]()
When specifying multiple SortFields, the order in the array is the order in which the sort fields would be applied. If you sort by category and then price, your code would look like this:

- Open the ShoppingCart.as file that you built in the previous lesson.
Alternatively, if you didn’t complete the previous lesson or your code is not functioning properly, you can import the FlexGrocer-PreSort.fxp project from the Lesson08/intermediate folder. Please refer to Appendix A for complete instructions on importing a project should you ever skip a lesson or if you ever have a code issue you cannot resolve.
- Find the
itemsarray. Add a[Bindable]tag above this property and change the property’s type to an ArrayCollection, assigning it to a new instance of the ArrayCollection without any constructor arguments.
[Bindable]
public var items:ArrayCollection = new ArrayCollection();If you used code completion, the ArrayCollection will be imported for you. Otherwise, be sure to import
mx.collections.ArrayCollection. As you learned previously, ArrayCollections proxy an Array. When you create a new ArrayCollection without specifying the Array instance to proxy, Flex creates a new Array on your behalf. In other words, these two lines are equivalent:new ArrayCollection();
new ArrayCollection( new Array() ); - Find the
totalproperty and add a[Bindable]tag above it.
[Bindable]
public var total:Number = 0;You are allowing the view to watch this property and update if it changes.
- In the constructor for the ShoppingCart class, create a new local variable named
prodSortof typeSort. Set it equal to a new instance of the Sort class.
public function ShoppingCart() {
var prodSort:Sort = new Sort();
}If you used code completion, the Sort class will be imported for you. Otherwise, be sure to import
mx.collections.Sort. The Sort class is used to define the order in which an ArrayCollection will keep its children. - After the
prodSortvariable, create another new local variable namedsortFieldof typeSortField. Set it equal to a new instance of the SortField class. Pass the string product to the SortField constructor.
public function ShoppingCart() {
var prodSort:Sort = new Sort();
var sortField:SortField = new SortField( "product" );
}If you used code completion, the SortField class will be imported for you. Otherwise, be sure to import
mx.collections.SortField. The SortField class is used to define various fields within your data structure that the Sort class will use when ordering. - After the
sortFieldvariable, you will set thefieldsproperty of theprodSortinstance to an Array containing thesortField.
public function ShoppingCart() {
var prodSort:Sort = new Sort();
var sortField:SortField = new SortField( "product" );
prodSort.fields = [ sortField ];
}The square brackets in ActionScript are a shortcut to creating an Array instance. Here you are creating an array with one element: the
sortField. Thefieldsproperty accepts an array of SortField instances, so you may sort by multiple properties of the object. - Set the
sortproperty of theitemsArrayCollection to theprodSortinstance. Then call therefresh()method of theitemsArrayCollection. Your constructor should look like the following code:
public function ShoppingCart() {
var prodSort:Sort = new Sort();
var sortField:SortField = new SortField( "product" );
prodSort.fields = [ sortField ];
items.sort = prodSort;
items.refresh();
}The
sortproperty of the ArrayCollection references a Sort object that knows how to sort the collection. After applying a new sort to a collection, you must call therefresh()method to allow the sort to reorder its children and set up its internal state. - Find the
addItem()method. Currently, when a new item is added to the cart, it is pushed onto theitemsarray. However,itemsis now an ArrayCollection. Change thepush()method of the Array to theaddItem()method of the ArrayCollection instead:
public function addItem( item:ShoppingCartItem ):void {
if ( isItemInCart( item ) ) {
updateItem( item );
} else {
items.addItem( item );
}
calculateTotal();
}The
addItem()method will add the item to the collection and ensure that it stays properly sorted. - Switch to the ShoppingCartItem class. Add a
[Bindable]metadata tag above the class definition for the ShoppingCartItem.
[Bindable]
public class ShoppingCartItem {
public var product:Product;
public var quantity:uint;
public var subtotal:Number;You want all the properties of the ShoppingCartItem to participate in data binding.
- Switch to the FlexGrocer.mxml file and locate the VGroup named cartGroup.
- Just above the Label with the text Your Cart Total: $, add a new
<s:List/>tag, with anidofcartList. Bind thedataProviderproperty of the List to theshoppingCart.itemsArrayCollection. Finally, specify that this List will appear in State1 using only theincludeInattribute.
<s:List id="cartList"
dataProvider="{shoppingCart.items}" includeIn="State1"/>This list will visually display the items in your ShoppingCart and update automatically thanks to data binding.
- Save and run your application. As you click the AddToCart button repeatedly, Buffalo should initially appear and subsequently increment its item count.

Refactoring to Search with a Cursor
One of the features added to your shopping cart was the ability to determine whether a newly selected ShoppingCartItem already existed in the cart. Presently you are looping through items and doing a comparison to see whether that is the case.
In this exercise you are going to refactor the code responsible for that operation in the ShoppingCart to use a concept called a cursor. A cursor is a position indicator within the collection class that allows direct access to any particular item in the collection, allowing for the easy manipulation of items. Once you have a cursor created in a collection, you can
• Move the cursor backward and forward
• Find specific items with the cursor
• Retrieve the item at the cursor location
• Add and remove items at the cursor position
All this functionality is available natively to the ArrayCollection class, meaning you do not need to write verbose loops to achieve any of these goals.
Note
![]()
Cursors are not unique to ArrayCollections; they are available to several classes. For more information, read about the IViewCursor interface. For more information about interfaces in general, please refer to the “About Interfaces” section of the “Creating and Extending Flex Components” documentation.
The general steps to using a cursor in a collection class are:
- Create a cursor for the collection using the
createCursor()method. - Make sure that the collection is sorted.
- Use the
findFirst(),findAny(),moveNext(),movePrevious(), andseek()methods to move the cursor and find items within the collection.
Now you will use the cursor while refactoring the ShoppingCart class.
- Open the ShoppingCart.as class.
- Find the
getItemInCart()method and delete theforloop.
private function getItemInCart( item:ShoppingCartItem ):ShoppingCartItem {
var existingItem:ShoppingCartItem;
return null;
}Going forward, you will use cursors to accomplish the same task.
- Below the
existingItemvariable, create a new local variable namedcursorof typeIViewCursor. Set this variable equal to the result of calling thecreateCursor()method on theitemsArrayCollection.

If you used code completion, the IViewCursor interface will be imported for you. Otherwise, be sure to import
import mx.collections.IViewCursor. The I that prefaces the IViewCursor name indicates that it is an interface. ThecreateCursor()method is not unlike thebuildProduct()method you created earlier. It creates a new cursor, sets some initial values, and returns it for your use.Note

Put simply, an interface is a contract between two objects. While you don’t need to thoroughly understand interfaces to complete this section, you will need to understand the concept to use Flex effectively. There are many object-oriented references available online with great explanations and examples of interfaces.
- After the call to
createCursor(), pass theitemparameter to the cursor’sfindFirst()method, and store the results in a Boolean variable namedfound.
var found:Boolean = cursor.findFirst(item);
In this step, you are using the
findFirst()method of the cursor to search through the collection of ShoppingCartItems looking for a match. ThefindFirst()method expects an object as its argument. Flex uses the properties and values within that object to look for a matching item. For example, the following code would search through a fictional collection of Flower objects looking atnameproperties:var o:Object = new Object();
o.name = "Rose";
cursor.findFirst( o );In this case, Flex notes a property called
namein the object, andRoseas the value of that property. It then searches the collection for Rose. However, there’s one very important point: You can search a collection only by the fields in your sort criteria. In your ShoppingCart, you created a sort based on theproductfield. So, even if you passed an object with hundreds of properties, Flex will compare only items in theproductfield.If the
findFirst()finds a match, the method will return a value oftrue, and the cursor will be positioned at the matching record. If no match is found, a value offalsewill be returned. - After the call to
findFirst(), create anifstatement that checks thefoundvariable. If it istrue, assign the cursor’scurrentproperty to theexistingItemvariable, casting it as a ShoppingCartItem.

If
findFirst()is successful, thecurrentproperty of the cursor is a reference to the object at the present position of the cursor, which will be the ShoppingCartItem you just found. If the operation is not a success, this property is indeterminate and cannot be used safely. - Finally, change the
returnstatement to return theexistingItem. Your final method should look like this:

Once a collection is sorted, the cursor’s find methods are much faster, especially on large collections, than looping through the collection manually.
Removing Items with a Cursor
Your ShoppingCart is still missing one key feature, the ability to remove an item. You will add that ability now using cursor logic.
- Open the ShoppingCart.as class.
- Add a new public method just below
addItem(), calledremoveItem(). The method will accept a single parameter nameditemof typeShoppingCartItem. - Create a new local variable within the
removeItem()method namedcursorof typeIViewCursor, and assign the result of calling thecreateCursor()method on theitemscollection to it.
public function removeItem( item:ShoppingCartItem ):void {
var cursor:IViewCursor = items.createCursor();
} - Create an
ifstatement that evaluates whether a call tocursor.findFirst()passingitemreturnstrue.
public function removeItem( item:ShoppingCartItem ):void {
var cursor:IViewCursor = items.createCursor();
if ( cursor.findFirst( item ) ) {
}
} - Inside the
ifblock, call thecursor.remove()method.
This method removes the item at the cursor’s current position.
- Finally, call the
calculateTotal()to re-total the cart after an item is removed. Your final method should look like this:
public function removeItem( item:ShoppingCartItem ):void {
var cursor:IViewCursor = items.createCursor();
if ( cursor.findFirst( item ) ) {
cursor.remove();
}
calculateTotal();
} - Open FlexGrocer.mxml and find the Button with the label AddToCart.
You will now add a Remove button.
- Directly below this Button, add a new Button with the
idofremove. Set thelabelto Remove From Cart.
Similar to what you did for the Add button, you will call a method when this button is clicked, passing it the current item.
- On the
clickevent of this Remove button, call a new method namedremoveFromCart(). Pass this new method the first (index 0) item from thegroceryInventorycollection, cast as a Product.
<s:Button label="Remove From Cart" id="remove"
click="removeFromCart( groceryInventory.getItemAt( 0 ) as Product )"/> - Create a new private function named
removeFromCart()directly below theaddToCart()method in your Script block. The method will accept a single parameter namedproductof typeProduct. - Inside this method, create a new local variable named
sciof typeShoppingCartItemand set it equal to a new instance of a ShoppingCartItem, passingproductas the constructor argument. - As the last line of this method, call the
removeItem()method of theshoppingCartinstance and pass itscias an argument.
private function removeFromCart( product:Product ):void {
var sci:ShoppingCartItem = new ShoppingCartItem( product );
shoppingCart.removeItem( sci );
} - Save and run your application. You now have the ability to add and remove items from the ShoppingCart with very little additional work, thanks to the cursor.
Filter Items in an ArrayCollection
Collections provide one more crucial piece of functionality: filtering. Filtering provides a way for you to reduce the number of visible items in an ArrayCollection based on the results of a function.
Remember that an ArrayCollection is just a proxy to an Array. You already know that this proxy layer is useful in data binding, but it has other uses, namely, lying to you.
Each time you want a piece of data from the Array, you ask the ArrayCollection, which retrieves it for you. If you want to know how many items are in the Array, you ask the ArrayCollection, and it provides a length. However, what if the ArrayCollection is dishonest? What if it reports fewer items in the Array than there really are? What if you ask for the item at position 3, and it returns the one at position 5 of the Array?
This seems extremely negative on the surface, but you have already used this lying behavior with success. When you sorted your ArrayCollection, the actual items in the Array (the data the ArrayCollection is proxying) remained unchanged. Instead, when you asked for the item at index number 2, the ArrayCollection simply returned what would be at index 2 if the Array were sorted in the way you requested.
Filtering is another very convenient way to lie. To filter an ArrayCollection you will need to implement these steps:
- Create a new function that accepts a single parameter named
item. This parameter will be the same type of whatever items are in your collection (for example, Products), or it can be generically of type Object. The function will return a Boolean, indicating whether the item should be included in the ArrayCollection’s data. - Assign this function to the
filterFunctionproperty of the ArrayCollection. - Apply the function by calling the
refresh()method of the ArrayCollection.
Here is sample code that performs the steps to filter the items in an ArrayCollection.
protected function filterOrganic( item:Product ):Boolean {
var includeMe:Boolean = item.isOrganic;
return includeMe;
}
myArrayCollection.filterFunction = filterOrganic;
myArrayCollection.refresh();
In the sample code, once refresh() is called, the ArrayCollection automatically passes each item in the Array to the filterOrganic() method. If this method returns a true (if the item is organic in this example), the ArrayCollection will continue to retrieve that item when asked. If the filterOrganic() method returns false, the ArrayCollection will decrement its length property by 1 and pretend that item never existed.
In all cases, the real data in the Array remains unchanged. This may seem overly complex, but it allows for a tremendous amount of functionality. Because the data in the Array remains unchanged, you can simultaneously see the data sorted or filtered in multiple ways, all using the same source Array. You will use this functionality in the coming lessons to filter your products by the category selected in the application control bar.
Refactoring ShoppingCartItem
With the new information learned in this lesson, one more piece of refactoring should occur. Right now, each time you change the quantity of a ShoppingCartItem, you also manually call calculateSubtotal().
private function updateItem( item:ShoppingCartItem ):void {
var existingItem:ShoppingCartItem = getItemInCart( item );
existingItem.quantity += item.quantity;
existingItem.calculateSubtotal();
}
In object-oriented programming, you strive to hide the internal workings of objects from the end user. Here, the internal workings are painfully obvious. Using the implicit getter and setter logic learned in this lesson, you can correct this issue.
- Open the ShoppingCart.as class.
- Find the
updateItem()method and remove the call tocalculateSubtotal()on theexistingItem.
The ShoppingCart will no longer be responsible for executing this internal logic of the ShoppingCartItem class.
- Open the ShoppingCartItem.as class.
- Change the public variable named
quantityto a private variable. Change the name fromquantityto _quantity(quantitywith an underscore before it). - Just below the variable declarations, add a new public getter for the
quantityproperty, with a return type ofuint. Inside the getter, return the_quantityvariable.
public function get quantity():uint {
return _quantity;
} - Just below the getter, add a new public setter for the
quantityproperty. It will accept a parameter namedvalueof typeuint. Inside the setter, set the_quantityvariable equal tovalue.
public function set quantity( value:uint ):void {
_quantity = value;
} - Inside the setter, after the
_quantityvariable is set, call thecalculateSubtotal()method.
public function set quantity( value:uint ):void {
_quantity = value;
calculateSubtotal();
}Now, anytime someone sets the
quantity, the ShoppingCartItem will automatically recalculate its subtotal. - As the last step, and to reinforce this point of encapsulating (hiding) internals, change the
calculateSubtotal()method from public to private.
private function calculateSubtotal():void {
this.subtotal = product.listPrice * quantity
}Now code outside this class will be unable to call this method directly.
- Save and run your code.
As with any refactoring, the code execution should be identical, with the ability to add, update, and delete shopping cart items.
What You Have Learned
In this lesson, you have:
• Learned how data binding works and common mistakes that cause it to cease to function (pages 168–173)
• Replicated data binding with event listeners (pages 173–179)
• Programmatically added items to an ArrayCollection built from remote XML data (pages 180–187)
• Used the getItemAt() method of the ArrayCollection to retrieve data (pages 187–189)
• Sorted an ArrayCollection (pages 189–192)
• Used a cursor to find and remove data (pages 195–196)
• Created a method to remove shopping cart items (pages 196–199)
• Hid internal functionality using getters and setters (pages 200–201)