1. Getting Started with Edge Animate
What You’ll Do
Find Out What You Can Do with Edge Animate
Explore Edge Animate and Edge Tools
Preview an Animation in a Browser
Introduction
Adobe Edge Animate 1.0 is a web motion and interaction design tool that allows you to bring animated content to websites using standards like HTML5, CSS3, and JavaScript/jQuery. You can use Edge Animate to create motion content that runs on desktop browsers, such as Firefox, Chrome, Safari, and Internet Explorer 9 or later, and mobile devices, such as Apple iOS and Android.
Edge Animate is a standalone program that you can use independently or along side other Edge tools and services, such as Edge Inspect or Edge Web Fonts. However, you do use other tools to create assets and content for use in Edge Animate. For example, you can use Adobe Illustrator, Fireworks or Photoshop to create graphics and artwork, which you can import into your project in Edge Animate. In Edge Animate, you can create new projects, known as compositions, from scratch using HTML (Hyper Text Markup Language) building blocks, text, and imported web graphics—JPG/JPEG, PNG, SVG, and GIF files—and adding animation and interactivity. You create responsive compositions that adjust to different screen sizes. In addition to creating new compositions, you can also open existing HTML documents created in other programs, such as Adobe Dreamweaver, and add animation to it in Edge Animate. Edge Animate makes minimal, non-intrusive changes to existing HTML code in order to reference its own JavaScript files.
Edge Animate uses a familiar user-interface based on a stage, timeline, and panels for elements and properties similar to those used in Adobe After Effects and Flash Professional. So, if you’re familiar with these Adobe programs, then you’re one step ahead. However, if you’re new, Edge Animate is an easy program to learn and use.
Finding Out What You Can Do with Edge Animate
Where Does Edge Animate Fit In?
Adobe Edge Animate is a new addition to the existing set of Adobe web tools, such as Dreamweaver, Flash Professional, and Flash Builder. Each tool has strengths for their respective use.
Adobe Edge Animate
Adobe Edge Animate is best used for creating advertising, simple animations and motion design for new compositions or using existing CSS-based page layouts. Edge Animate uses the following technologies: JavaScript, JSON (JavaScript Object Notation), HTML/HTML5, CSS, web graphics including SVG, jQuery-based animation framework. Edge Animate works natively with HTML along with related JavaScript files, so you can run it in your web browser.
Adobe Dreamweaver
Adobe Dreamweaver is best used for creating websites and web application for desktops, smartphones, and other devices. Dreamweaver uses the following technologies: HTML/HTML5, CSS, JavaScript, PhoneGap, site management, FTP, CMS frameworks, and SVN (Subversion). The HTML documents you create in Dreamweaver can be opened and modified natively in Edge Animate. This means you can create HTML web pages in Dreamweaver, and add animations to them in Edge Animate, while still preserving the integrity of CSS-based layouts.
Adobe Flash Professional
Adobe Flash Professional is best used for creating full-featured interactive experiences, mobile application, gaming, premium video, or complex advertising. Flash uses the following technologies: ActionScript, Flash Player, AIR for desktop and mobile devices.
Adobe Flash Builder
Adobe Flash Builder is best used for creating Rich Internet applications (RIAs) and mobile applications. Flash Builder uses the following technologies: Professional ActionScript IDE, Flex, Flash Player, AIR for desktop and mobile devices.
Adobe Illustrator, Adobe Fireworks, and Adobe Photoshop
Adobe Illustrator, Adobe Fireworks, and Adobe Photoshop are best used for creating and modifying vector and bitmap graphics for website and print-based projects. The web graphics—including JPG/JPEG, PNG, SVG, and GIF files—you create using these Adobe programs can be added to your compositions in Edge Animate.
Understanding Animations in Edge Animate
Animation is simply change over time. You can create an animation by making one or more property changes for an element over time. A composition is the framework for an animation. Each composition has its own timeline. A typical composition includes multiple layers that represent elements, such as shapes, text, and graphics. You add elements to a composition by creating an animated layer. You can arrange layers within a composition in space and time. Layers are the elements that make up a composition. Each layer has properties, which you can modify and animate.
Exploring Edge Animate and Edge Tools
What Can I Do with Edge Tools?
Along with Edge Animate, there are other tools and services you can use to develop content for the web. These tools and services include Edge Reflow, Edge Code, Edge Inspect, Edge Web Fonts, Typekit, and PhoneGap Build.
Edge Animate
With Edge Animate, you can create interactive and animated content using HTML and JavaScript.
Edge Reflow
With Edge Reflow, you can create responsive layouts and visuals with standards-based CSS. This program allows you to use the power of CSS to create designs simultaneously for all screen sizes without sacrificing your design look, quality, or capability.
Edge Code
With Edge Code, you can view and work with code content and program with HTML, CSS, and JavaScript. This program allows you to preview CSS, edit code, and use integrated visual design tools to help speed up the development process.
Edge Inspect
With Edge Inspect, you can preview and inspect your web designs on mobile devices. This program allows you to synchronize browsing in Chrome for wirelessly paired iOS and Android devices, update a device with remote inspection, and capture screenshots from all connected devices.
Edge Web Fonts
With Edge Web Fonts, you can get access to a free web font library from Adobe and Google for use in your site designs.
Adobe Typekit
With Typekit, you can browse commercial fonts by classification, properties, or recommended use, and add them to your site designs.
PhoneGap Build
With PhoneGap Build, you can build mobile apps with HTML, CSS, and JavaScript by reusing existing skills, frameworks, and tools and package mobile apps in the cloud.
Getting Edge Animate and Edge Tools & Services
Adobe Edge Animate and Edge Tools & Services are available for download on the web using Adobe Creative Cloud services at create.adobe.com or html.adobe.com/edge. After you sign up for a membership, you’ll have access to Edge Animate and other Adobe Edge Tools & Services. You can download Edge Animate and its related tools on either the Apple OS X or Windows platforms as separate programs from the site to your hard drive before you install each one on your system. Some tools may be still in the development or preview process, so check with Adobe for the latest version available.
You can get specific instructions on preparing for, downloading, and installing Edge Animate and Edge Tools & Services in Appendix A, “Installing Edge Animate and Tools” in the back of the book.
Starting Edge Animate
You can start Edge Animate in several ways, depending on the platform you are using. When you start Edge Animate, your system displays a splash screen and then the Edge Animate window. When you start a new Edge Animate session or close all documents, a Welcome screen appears, providing easy access links to create new documents, open existing documents, and open recent items to help you get started with the product. You can also use links to access websites to learn more about the product and download sample documents.
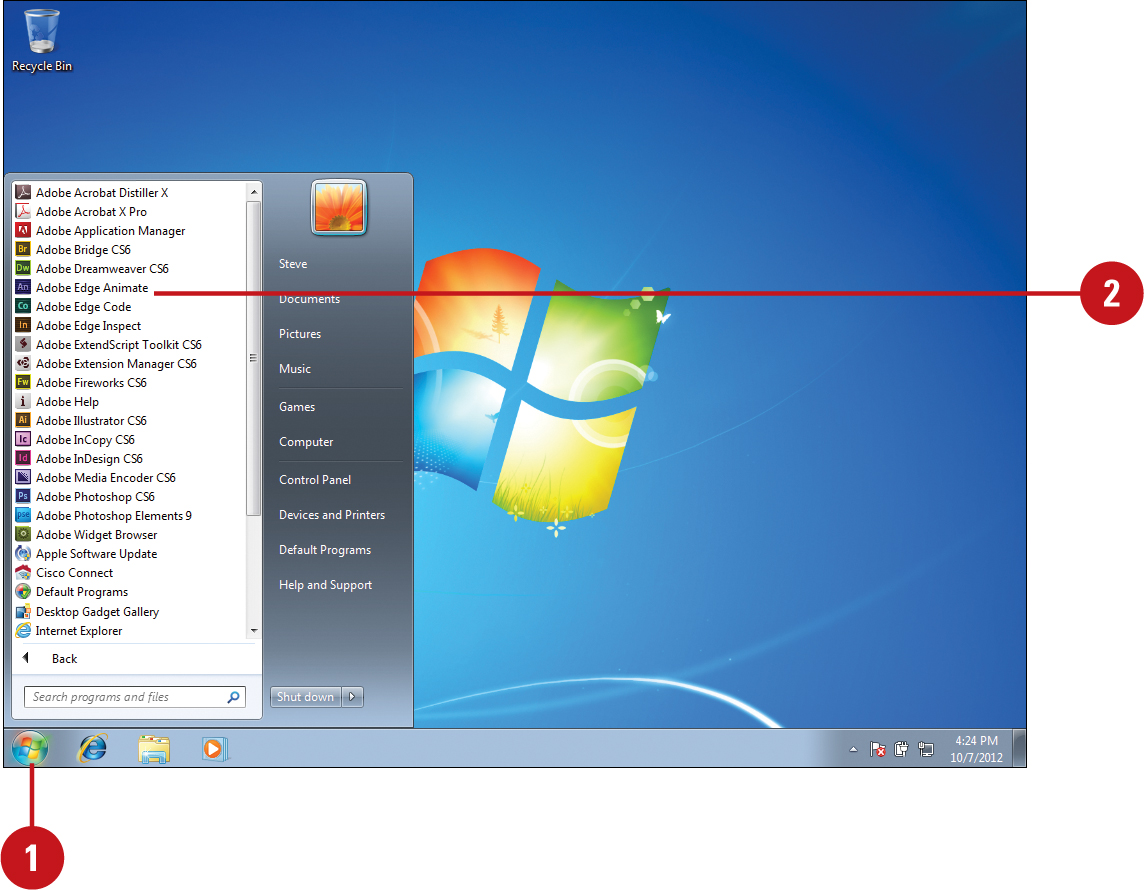
Start Edge Animate in Windows
![]() Start Windows, if necessary, and then use the method for your Windows version.
Start Windows, if necessary, and then use the method for your Windows version.
• Windows 7. Click Start on the taskbar, and then point to All Programs (which changes to Back).
• Windows 8. Display the Start screen; click or tap the Start button on the Charm bar.
![]() Click Adobe Edge Animate.
Click Adobe Edge Animate.
The Edge Animate window opens, displaying the Welcome screen.

Did You Know?
You can find out the version number. Click Edge Animate (Mac) or Help (Win) menu, and then click About Edge Animate. The version number appears along with a scrolling list of information about the product. Click the screen to exit it.
Start Edge Animate in Macintosh
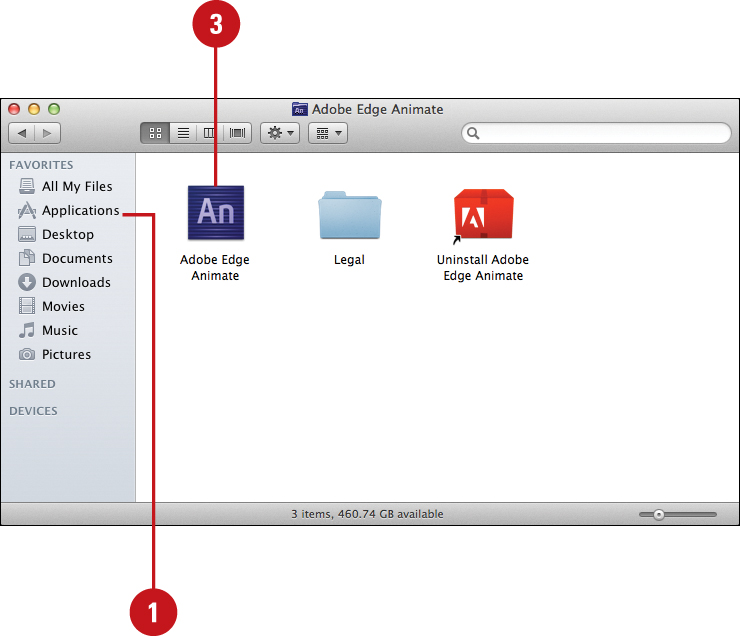
![]() In the Finder, open the Applications folder.
In the Finder, open the Applications folder.
• Mac OS X Lion and OS X Mountain Lion. You can click the Launchpad icon on the Dock, and then click the Edge Animate icon.
![]() Double-click the Adobe Edge Animate folder.
Double-click the Adobe Edge Animate folder.
![]() Double-click the Edge Animate application icon.
Double-click the Edge Animate application icon.
The Edge Animate window opens, displaying the Welcome screen.

Did You Know?
You can create a shortcut on the Macintosh. Drag and drop the Edge Animate program to the bottom of the monitor screen, and then add it to the dock.
Using the Welcome Screen
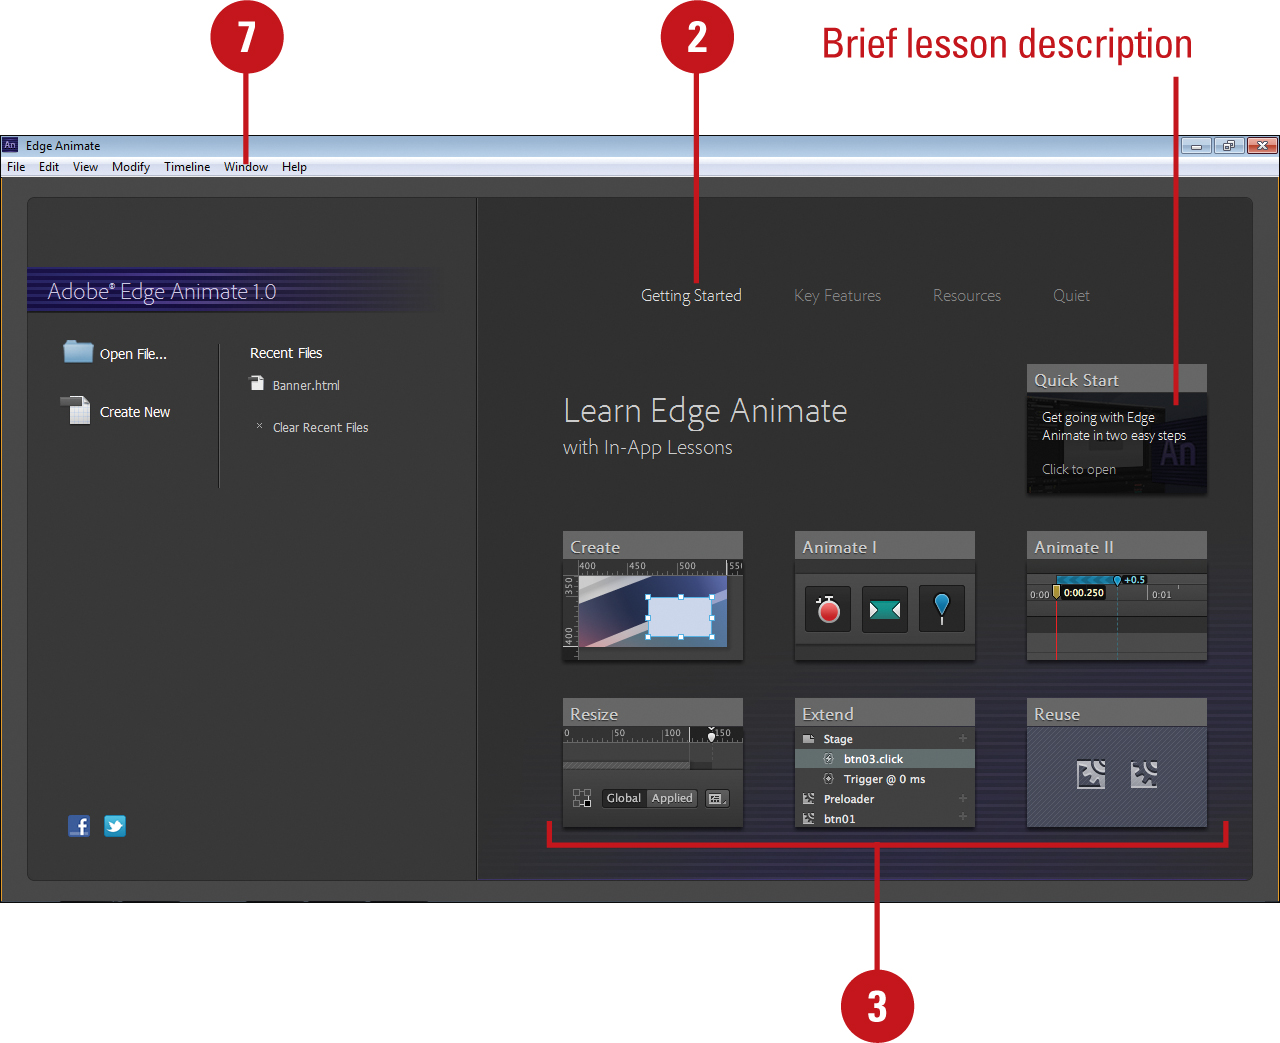
When you start Edge Animate, the program displays a Welcome screen, which provides a place to get started with Edge Animate. You can create a new composition, open existing or recent files, or learn Edge Animate using In-App Lessons to help you get started with the project. The In-App Lessons provide seven step-by step topics with the aid of the Lessons panel to walk you through the process of creating animations with Edge Animate. The lessons include Quick Start to help you get going, Create to teach you how to work with shapes, text and images, Animate I and II to show you how to use keyframes and pins, Resize to learn how to respond to size changes, Extend to learn how to loop and handle user interaction, and Reuse to show you how to create reusable objects with symbols. You can also use links to access a list of key features and product release notes, and helpful resources from online content, including Help and Tutorials, videos on Adobe TV, community forums, and sample projects. In addition, you can access social media, Facebook and Twitter, to get more information about Edge Animate.
Use the Welcome Screen
![]() Start Adobe Edge Animate, or close all open documents (click the File menu, and then click Close All).
Start Adobe Edge Animate, or close all open documents (click the File menu, and then click Close All).
![]() To work with Edge Animate projects, use the Create New, Open File, or Recent Files links to create or open projects.
To work with Edge Animate projects, use the Create New, Open File, or Recent Files links to create or open projects.
![]() To access social media for Edge Animate, click the Facebook or Twitter icon.
To access social media for Edge Animate, click the Facebook or Twitter icon.
![]() Click a link to access training, information, and resources.
Click a link to access training, information, and resources.
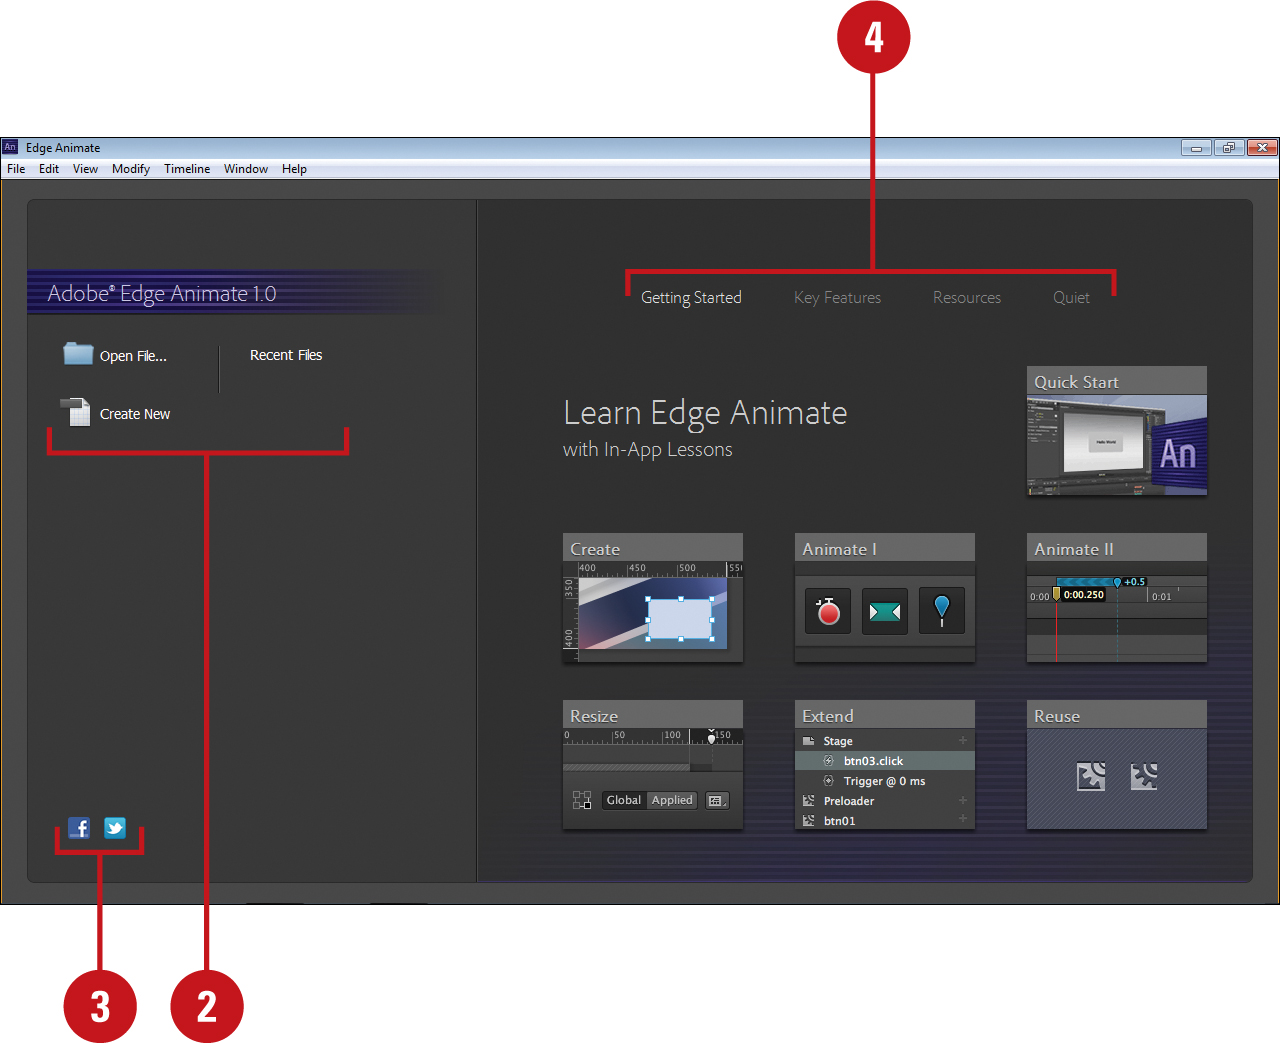
• Getting Started. An area to start an In-App Lesson.
• Key Features. An area to review the main features of Edge Animate and access product release notes.
• Resources. An area to access links to Help and Tutorials, Adobe TV, Community forums, view and download samples, and JavaScript reference material.
• Quiet. A blank area reserved for future content.
Use an In-App Lesson
![]() Start Adobe Edge Animate, or close all open documents (click the File menu, and then click Close All).
Start Adobe Edge Animate, or close all open documents (click the File menu, and then click Close All).
• When the Welcome screen is closed, you can also click the Window menu, and then click Lessons to open the Lessons panel.
![]() Click Getting Started, if necessary.
Click Getting Started, if necessary.
![]() Point to a lesson tile to view a brief description, and then click a lesson tile to start it.
Point to a lesson tile to view a brief description, and then click a lesson tile to start it.
The Welcome screen closes, Edge Animate creates a new Untitled project, and the Lessons panel opens with the selected lesson.
![]() Read and perform the lesson steps in the Edge Animate window as indicated in the Lessons panel; be sure to scroll down as needed to complete all the steps.
Read and perform the lesson steps in the Edge Animate window as indicated in the Lessons panel; be sure to scroll down as needed to complete all the steps.
![]() At the bottom of the Lessons panel, click the Next Step link.
At the bottom of the Lessons panel, click the Next Step link.

![]() Follow the additional steps or click links to start other lessons.
Follow the additional steps or click links to start other lessons.
After you complete the lesson, you can save or close the Untitled project.
![]() To close the Lessons panel, click the Window menu, and then click Lessons.
To close the Lessons panel, click the Window menu, and then click Lessons.
See Also
See “Saving an Animation” on page 20 for more information on saving an Edge Animate composition.
Viewing the Edge Animate Window

Preparing for a Project
As you prepare for a project in Edge Animate, you need to create work folders. The work folders should contain all the elements of the project. You first start with a main folder for the project. The main folder contains all the elements of the project; every single piece of the project is included within this folder.
Creating a main folder will help you in the creation and the moving of the project. If everything involving the construction of your project is contained within a single folder, it helps to keep you organized and in control.
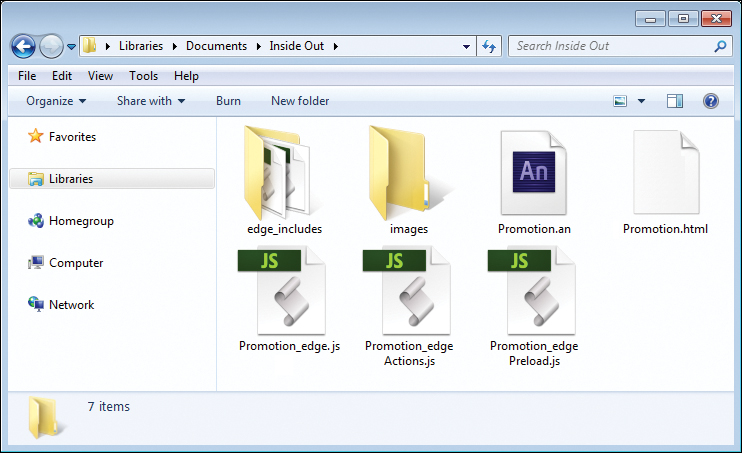
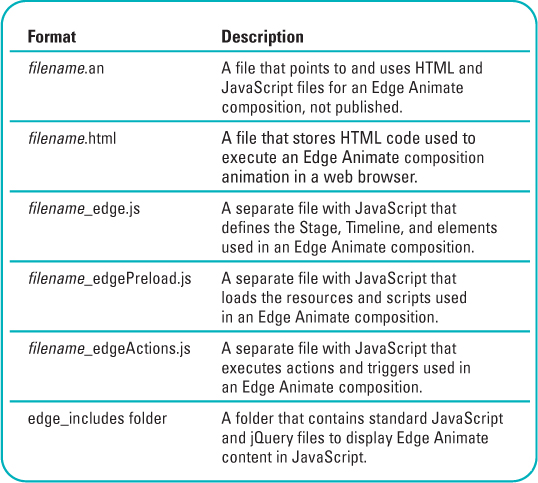
It’s critical that you save a new Edge Animate composition in the main folder, because the program saves multiple files needed to display Edge Animate content. It saves a composition as an Edge Animate AN file and as an HTML file. In addition, it also saves related files—JS (JavaScript) and Edge Animate includes—and creates an empty images folder, where it places a copy of the graphics you import into a composition. If any of these files are renamed, deleted, or moved, the Edge Animate composition will not run properly, if at all. Within the main folder, you can also set up other folders based on your own needs. See “Examining Edge Animate Files,” on page 242 for more information on the composition files.
Create a Project Folder
![]() Right-click on the desktop or in a folder, point to New, and then click the Folder button from the context menu (Win) or control-click on the desktop or in a folder, and then click New Folder from the popup menu (Mac).
Right-click on the desktop or in a folder, point to New, and then click the Folder button from the context menu (Win) or control-click on the desktop or in a folder, and then click New Folder from the popup menu (Mac).
![]() Name the main folder according to your project (in this example, Banner).
Name the main folder according to your project (in this example, Banner).
![]() Double-click to open the folder, and then add additional subfolders to the main folder as desired to meet your needs.
Double-click to open the folder, and then add additional subfolders to the main folder as desired to meet your needs.
Preparing for Project Management
An Edge Animate project starts with a project plan, which provides the client, developers, and other team members with a plan to complete the overall design, development, and implementation of the animation. A project plan should include the following phases: (1) Define, (2) Structure, (3) Design, and (4) Build and publish. The project plan becomes the roadmap for assigning project management tasks and responsibilities, and determining schedules and due dates.
The Define phase consists of a project overview, goals and target audience, content and style information, content collection, and delivery requirements. The Structure phase consists of text scripts and schematic flowcharts. The Design phase consists of design comps, design review and redesign, and production storyboard. The cycle of client review, feedback, and redesign continues until the client approves the design. Upon approval, you combine the flowcharts and final designs into production storyboards with a detailed visual look at page layouts and navigation links. The Build and publish phase consists of Edge Animate production, technical testing against storyboards and bug list, usability testing, revision, revision testing, and final publishing based on delivery requirements.
Creating a Project Plan
Before you begin to create an animation in Edge Animate, it’s important to develop a project plan first. The project plan provides a roadmap for you to follow as you build your project in Edge Animate. Without a project plan, you’ll inevitably hit road blocks, which will cause you to waste time redesigning all or portions of the animation. Planning a project involves (1) defining its purpose and identifying the audience, (2) logically developing content and organizing the structure of the content, (3) developing the layout and design, and (4) building and publishing the project. With a project plan in place, you’ll be ready to create an animation.
Plan an Animation
Creating an animation can take a long time; it’s worth the effort to plan carefully. The tendency for most first-time developers is to start creating an animation without carefully planning the project. Before you begin, you need to develop and follow a plan. Otherwise, you might end up spending a lot of time fixing or completely changing parts of the animation, which you could have avoided from the beginning. You need to figure out the goal of the project, the look and feel of your production, its length and size, how it will interact with the viewer, and how and for whom it will be distributed. When planning an animation, it’s important to accomplish the following:
Define the purpose and audience
Is it for training? Sales? Entertainment? Informing? The answer will determine the types of features you may want to include or exclude in your design. If the purpose is to create a training site, you might want to include easy-to-use instructional material, simple navigation, and a help system. On the other hand, if the purpose is to create a sales promotion, you might want to include eye-catching graphics to get users’ attention and draw them into the animation.
How you create your animation will depend on how you classify the target audience. If the intended audience consists of novice computer users, you will have to concentrate on making the navigational controls and layout as simple to use as possible. If the users are experienced computer users, you can include more advanced interactions.
Develop the content and structure
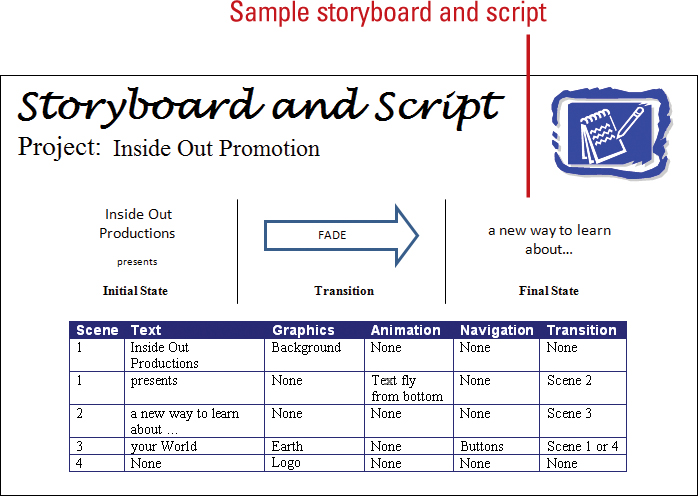
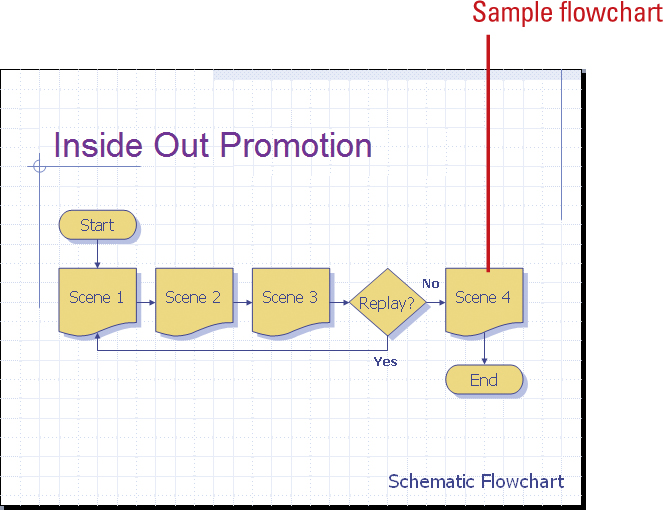
The most beneficial planning tools for the multimedia developer are the script and schematic flowchart. The script tells the story of your production in text form. Just like in the movies, a script is used to describe each section, to list media elements, and to provide a basis for the text that will appear onscreen. Schematic flowcharts are the best way to sketch the navigational structure of an animation and make sure that each of the sections is properly connected. After you have the script and schematic flowchart mapped out on paper, you will quickly see the correlation between what you have developed and what you will begin to set up in Edge Animate.
Develop the layout and design
The storyboard tells the story of your animation in visual form. It helps you design the layout of each screen in your animation. The storyboard follows the script and develops a visual perspective of the animation’s main transitional points, which help you develop the media elements you will use to create your animation. A storyboard can take a long time to develop, but the media elements you assemble and create in the process will shorten the overall development time. As you develop your layout and design, be sure to keep consistency and usability in mind:
• Navigation and layout. Create similar and consistent controls (bars, menus, buttons, and graphics) and layout on every page for ease-of-use.
• Color. Create a consistent look and feel and layout for the audience; and use a limited color palette for simplicity.
• Text and fonts. Create easy to read text; use scroll bars similar to the desktop software; and use a limited group of fonts (typically 2 or 3).
• Transitions. Use similar and consistent transitions between pages.
• Size. Keep the main folder size as small as possible for faster downloads and playback. Optimize and compress graphic images to reduce file sizes.
Build and publish the animation
Now, you can work in Edge Animate to implement your layout and design based on the storyboards. As you build the animation, you need to include technical testing against storyboards and bug list, usability testing, revision, and revision testing based on delivery requirements before you publish the product.
Some computers are more up-to-date than others. You need to determine the minimum computer and server hardware and software requirements in which your animation will be delivered. Some hardware requirements you need to consider for the delivery computer are (1) CPU (central processing unit), which determines the speed with which your computer can compute data; (2) RAM (system memory), which determines how fast files load and how smoothly they run; (3) Sound hardware, which determine if you can use any related sound files; (4) Video hardware, which determine the quality and speed of the graphic and video display, and (5) Monitor resolution, which determines the color display (number of available colors), size, and overall look of your animation. Some software requirements you need to consider are the operating system version and supported web browser type and version. See “Preparing for Edge Animate and Tools” on page 280 for specific details about these requirements.
Building an Edge Animate Project
After you develop a project plan, you can use Edge Animate to create an animation based on it. Creating an animation in Edge Animate involves six main steps: (1) setting up Stage properties, (2) assembling media elements, (3) positioning the elements on the Stage and sequencing them in the Timeline, (4) adding custom functionality and interactive elements, (5) previewing and testing the animation, and (6) publishing it for distribution.
Build an Animation
Before you start creating an animation using Edge Animate, it’s important to understand the process of development. The basic steps for developing web motion and interaction with Edge Animate are listed below.
Step 1: Set up Stage properties
You can open and work on an existing web composition or create a new one from scratch. Before you start a new composition in Edge Animate, you need to set up initial Stage properties—such as the user’s screen size and background color—for how your animation looks and operates. It’s important to specify these property settings, especially the user’s screen size, that affect the entire animation at the beginning of the project, so you don’t have to redesign the animation later.
Step 2: Create or import media elements
Media elements include shapes, graphics, and text. You can create new media elements in Edge Animate or import ones that have already been developed. Edge Animate provides shape and text creation tools for creating new media elements. You can import other media elements, such as buttons and photographs. As you import graphics, it’s important to size and compress them beforehand to reduce file sizes and Internet download times. Media elements are either static or dynamic. Static media is an element, such as text or graphics, created or imported into an animation that doesn’t change unless the author makes the change and republishes it. Dynamic media is an element, such as data, stored outside of the animation and loaded when needed or changed by scripting, which makes updating easy and provides information to the user.
Step 3: Position the elements on the Stage and sequence them in the Timeline
A composition is the framework for an animation. A typical composition includes layers that represent media elements, such as shapes, text, and graphics. Each composition has its own Stage and Timeline. The Stage is the viewing area you use to display where elements appear in an animation, and the Timeline is the area you use to organize what you want to occur with the elements (layers) at the time and duration you specify. You use the Stage and Timeline together to add and sequence elements within a composition to create animated layers in space and time. The Stage represents the elements’ position in space (where) and the Timeline represents the elements’ position in time (when).
Step 4: Add navigation, interactivity, and motion effects
After you add media elements and sequence them in the Timeline, you can use scripts to add functionality to the elements to make them perform actions. Scripting allows you to add custom functionality to your animation, such as moving elements on the Stage and controlling the animation in response to specific conditions and events, such as a mouse click. In Edge Animate, scripts are written as Actions. To help you get started scripting and save you some time, Edge Animate comes with built-in scripts known as snippets. For example, Edge Animate includes snippets to play or stop the timeline, open URL, and change text. In addition, you can use built-in Timeline effects to add motion to elements.
Step 5: Preview and test the animation
After you create your project, you use the Publish In Browser command to preview and test the animation to make sure it runs the way you want it to in your web browser. It’s important to test the technical functionality and visitor usability of your animation; check to make sure all buttons and links work properly, according to the flowchart, and all text (including spelling and grammar), layout, graphics, and animation work property according to the storyboard.
Step 6: Publish the animation
When the animation runs the way you want it to, you can publish your production three different ways. You can publish your animation as a web HTML file for display on a web page using a web browser, as a Deployment Package (.oam) for use in other Adobe programs, such as Adobe InDesign, or to Apple iBooks Author as an iBooks/OS X Dashboard Widget (.wdgt). You can publish your animation by using the Publish Settings and Publish commands. For use on the web, you use an FTP (File Transfer Protocol) program or one with those capabilities, such as Adobe Dreamweaver, to transfer all the files in your main folder to your web server. It’s critical that you keep all the files together using the same file and folder structure, otherwise the animation will not run properly, if at all.

Creating a New Animation
You can create new animations in Edge Animate by using the New command on the File menu or the Create New link in the Welcome screen. When you create a new animation in Edge Animate, it creates a blank HTML file, ready for you to create or insert shapes, graphics, and text. By default, the first HTML file in Edge Animate is titled Untitled-1.html, which appears on the Document tab and Window menu in Edge Animate. Edge Animate numbers new HTML files consecutively. You can create and work on as many new HTML files as you have memory (RAM) for, which is typically as many as you want. Each new animation contains its own Stage, Timeline, Elements, and Library panel. When you save a new HTML file, Edge Animate also creates an Edge Animate file with the AN filename extension and other related JavaScript files, so you can run it in your web browser. The AN file contains information that points to and uses the HTML and JavaScript files created by Edge Animate.
Create a New Blank Composition
• Welcome screen. Start Adobe Edge Animate or close all open files, and then click Create New.
• To close all open files, click the File menu, and then click Close All.
• File menu. Click the File menu, and then click New.
Timesaver
Press Ctrl+N (Win) or ![]() +N (Mac).
+N (Mac).
Edge Animate creates a blank Untitled HTML file.

See Also
See “Working with Multiple Animations” on page 18 for more information on working with multiple documents at the same time.
Getting Sample Animations
If you’re not sure where to start, you can download and view sample Edge Animate projects to see how they work. They say a picture is worth a thousand words. Well, they are right. Opening and viewing sample animations can help you see what’s happening in an Edge Animate project from a time-based perspective. So, it’s a good idea to take the time to download some sample documents and experiment with them. You can quickly access samples on the web from Adobe Creative Cloud by using the Welcome screen.
Download Sample Animations
![]() Start Adobe Edge Animate, or close all open files (click the File menu, and then click Close All).
Start Adobe Edge Animate, or close all open files (click the File menu, and then click Close All).
![]() In the Welcome screen, click Resources.
In the Welcome screen, click Resources.
![]() Click the View and download samples link.
Click the View and download samples link.
Your default web browser opens, displaying a web page with Adobe Edge Animate showcase sample files.

![]() Locate the link to the download the sample files.
Locate the link to the download the sample files.
![]() Scroll through the page, locate the sample you want, and then click the Download link associated with the sample you want.
Scroll through the page, locate the sample you want, and then click the Download link associated with the sample you want.
• If prompted (Win), click Save or Save as, select a destination folder, and then click Save.
The sample files are typically compressed in a ZIP file, which you need to uncompress before you can use it with Edge Animate.
![]() When you’re done, close your web web browser.
When you’re done, close your web web browser.

See Also
See “Previewing an Animation in a Browser” on page 19 for more information on viewing an Edge Animate animation.
Opening an Existing Animation
In Edge Animate, you can use the Welcome screen or Open commands on the File menu to open existing Edge Animate compositions or web pages. You can open web pages with the HTML or HTM file format, which you can create in Edge Animate or another web design program, such as Adobe Dreamweaver, and then add an animation to it. A composition is made up of multiple files, including an Edge Animate file with the AN filename extension. When you open an HTML or AN file in Edge Animate, the HTML file for the composition opens in the Document tab and on the Stage. You can open multiple HTML files during a session, which you can switch between using the Window menu or the Document tab. After you’ve opened an HTML file in Edge Animate, you can quickly re-open it by using the Open Recent list on the File menu or the Recent Files list in the Welcome screen. Since a composition in Edge Animate is made up of multiple files, it’s critical that you keep all the files together for the project using the same file and folder structure, otherwise the animation will not run properly, if at all.
Open an Existing Composition or HTML Web Page File
![]() Click the File menu, and then click Open.
Click the File menu, and then click Open.
Timesaver
Press Ctrl+O (Win) or ![]() +O (Mac).
+O (Mac).
Timesaver
Click Open File in the Welcome screen.
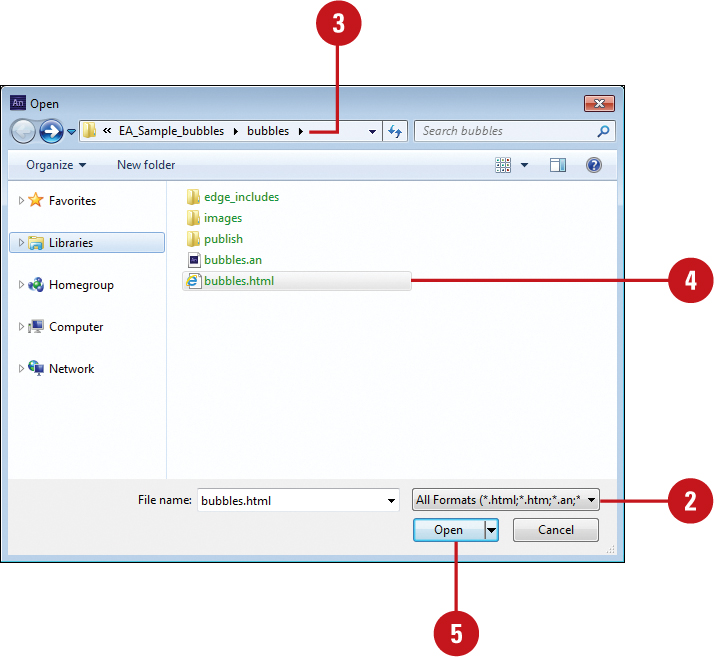
![]() To open a specific type of file, click the File as type list arrow (Win), or the File type popup (Mac), and then select the file format you want.
To open a specific type of file, click the File as type list arrow (Win), or the File type popup (Mac), and then select the file format you want.
• All Formats. Displays all valid formats (.html, .htm, .an, .edge).
• HTML File. Displays all .html files.
• HTM File. Displays all .htm files.
• Edge Animate File. Displays all .an or .edge files; .an is the default file format for Adobe Edge Animate; .edge is the old default file format.
![]() Navigate to the drive and folder where the file is located.
Navigate to the drive and folder where the file is located.
![]() Click the file you want to open.
Click the file you want to open.
![]() Click Open.
Click Open.
Open a Recently Opened File Using the Welcome Screen
![]() Start Adobe Edge Animate, or close all open documents (click the File menu, and then click Close All.
Start Adobe Edge Animate, or close all open documents (click the File menu, and then click Close All.
![]() In the Welcome screen, click the HTML file you want to open.
In the Welcome screen, click the HTML file you want to open.

Did You Know?
You can open a recent file quickly from the Start menu (Win7). Click the Start button, point to Adobe Edge Animate, and then click the file name you want to open.
Open a Recently Opened File Using the File Menu
![]() Click the File menu, and then point to Open Recent.
Click the File menu, and then point to Open Recent.
![]() Click the HTML file you want to open.
Click the HTML file you want to open.

Did You Know?
You can clear the Open Recent list. Click the File menu, point to Open Recent, and then click Clear Recent or click Clear Recent Files in the Welcome screen.
You can open an Edge Animate file from Windows/File Explorer or the Finder. In Windows/File Explorer (Win) or the Finder (Mac), double-click the Edge Animate file with the .an extension.
Working with Multiple Animations
When you open multiple composition or HTML files, you can use the Window menu or the down arrow on the Document tab to switch between them. You click the Document tab arrow next to the active HTML file name, and then click a file name to switch and activate the already opened HTML file. By default, the tab list is displayed in the order in which you open or create files. When you want to move or copy information between files, it’s easier to display several files on the screen at the same time and move them around. However, you must make the window active to work in it. The Document tab also includes a Close button to quickly close the active HTML file.
Switch Between Multiple Animations
![]() Open more than one composition or HTML file.
Open more than one composition or HTML file.
![]() Click the Document tab arrow, and then click the file name to switch to the file.
Click the Document tab arrow, and then click the file name to switch to the file.
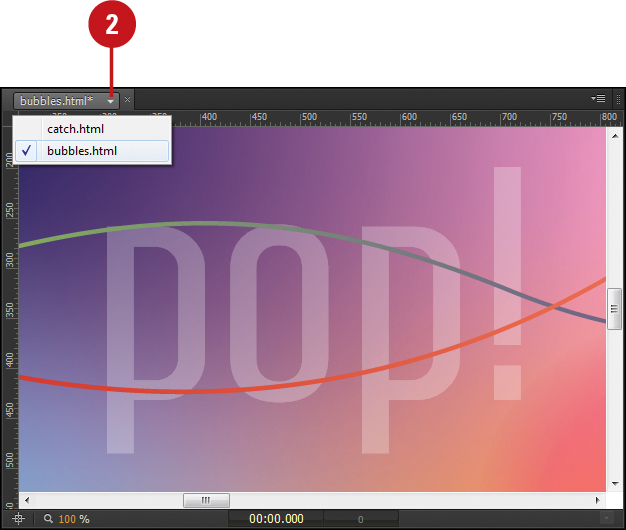
• You can also click the Window menu, and then click a file name at the bottom of the menu.
Previewing an Animation in a Browser
As you work on the development of an Edge Animate project, you will probably want to occasionally stop and see what it looks like when previewed within a web browser. One of the most used features for testing your documents is the Preview In Browser command on the File menu. This is one of the most used when working in Edge Animate. It lets you see what your animation will look like in your default browser. When testing an animation on a web page, it’s a good idea to check it out in more than one browser, and in more than one version of the browser on different operating systems. For example, it may look great in Safari on the Macintosh, and not even work in Internet Explorer on Windows. Edge Animate works with Firefox, Chrome, Safari, and Internet Explorer 9. If you don’t have access to other browsers and operating systems, you can use Adobe Browser- Labs, an online service that you can use from within Adobe Dreamweaver, to view your web pages.
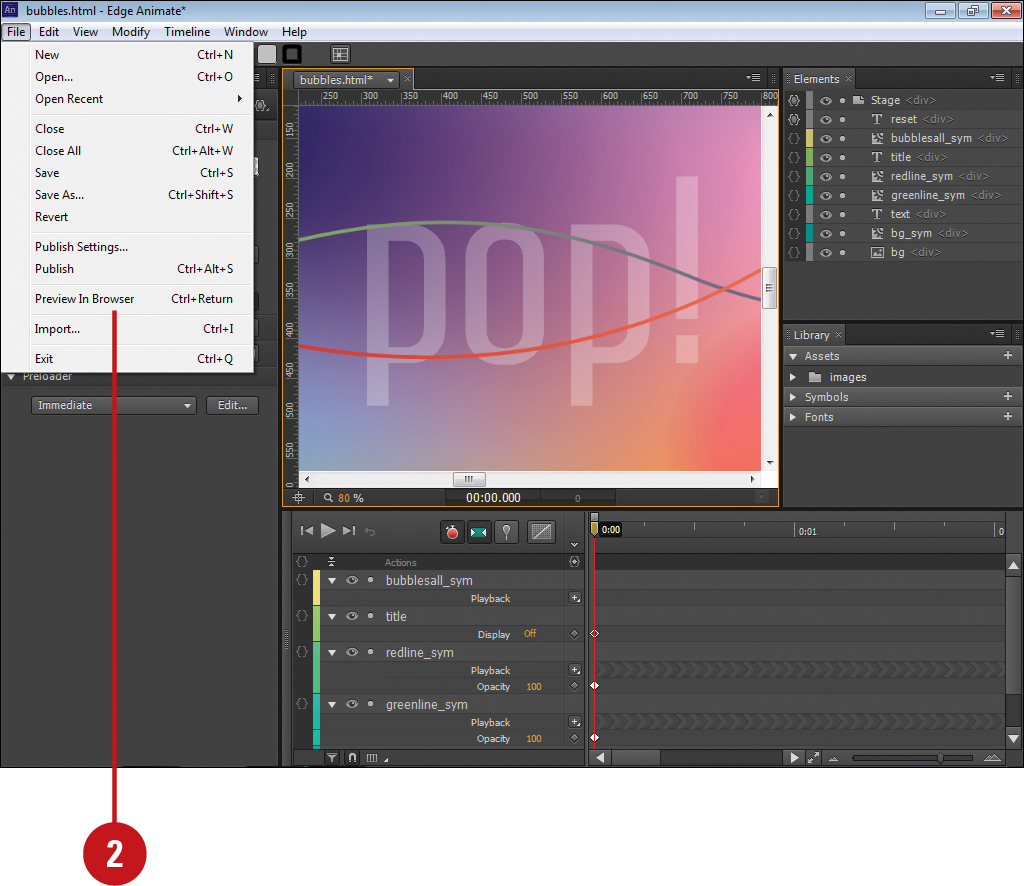
Preview an Animation in a Web Page
![]() Open the HTML file with the animation you want to view.
Open the HTML file with the animation you want to view.
![]() Click the File menu, and then click Preview In Browser.
Click the File menu, and then click Preview In Browser.
Timesaver
Press Ctrl+Enter (Win) or ![]() +Return (Mac).
+Return (Mac).
![]() If prompted, save your Edge Animate composition.
If prompted, save your Edge Animate composition.
Your default web browser opens, displaying your content on a web page.
Trouble?
If the web page doesn’t open, your web browser, such as Internet Explorer 8 or lower, is not compatible.
![]() When you’re done, close the web browser.
When you’re done, close the web browser.

Did You Know?
You can check HTML5 compatibility. You can test your browser to make sure it’s compatible with HTML5. Go go http://html5test.com. You can also get information at http://html5please.com.
Saving an Animation
When you save a project in Edge Animate, the program saves an HTML file and an AN file along with other related files—JS (JavaScript) and Edge Animate includes—needed to display Edge Animate content. When you save a new composition, you should select or create a folder location in which to save all the files and give it a name. Name your project clearly so you can easily locate it later. Edge Animate uses the name in all its file naming conventions. It’s critical that you keep all the files together for an Edge Animate project using the same file and folder structure, otherwise the animation will not run properly, if at all. An unsaved Edge Animate composition displays an asterisk (*) after the name in the title bar or Document tab. If you don’t want to keep currently unsaved content, you can revert to the most recently saved version of the composition by using the Revert command on the File menu. To keep interim versions of an Edge Animate composition and all its related files as you make changes, you need to use the Save As command and give each version a new name, such as project1, project2 and so forth, and save it in a new folder.
Save an Edge Animate Composition
![]() Click the File menu, and then click Save.
Click the File menu, and then click Save.
Timesaver
Press Ctrl+S (Win) or ![]() +S (Mac).
+S (Mac).
If you are saving a composition for the first time, continue. Otherwise, Edge Animate saves the current one.
![]() Type the new file name.
Type the new file name.
![]() Navigate to the drive and folder location where you want to save the composition.
Navigate to the drive and folder location where you want to save the composition.
• To create a new folder, click the New Folder button, type a folder name, and then press Enter (Win) or click Create (Mac).
![]() Click the Format popup (Mac) or Save As Type list arrow (Win), and then click Html File (*.html) or Htm File (*.htm).
Click the Format popup (Mac) or Save As Type list arrow (Win), and then click Html File (*.html) or Htm File (*.htm).
![]() Click Save.
Click Save.

Save an Edge Animate Composition in a Different Folder and Name
![]() Click the File menu, and then click Save As.
Click the File menu, and then click Save As.
Timesaver
Press Ctrl+Shift+S (Win) or ![]() +Shift+S (Mac).
+Shift+S (Mac).
![]() Type the new file name.
Type the new file name.
![]() Navigate to the drive and folder location where you want to save the composition.
Navigate to the drive and folder location where you want to save the composition.
![]() To create a new folder, click the New Folder button, type a folder name, and then press Enter (Win) or click Create (Mac).
To create a new folder, click the New Folder button, type a folder name, and then press Enter (Win) or click Create (Mac).
![]() Click the Format popup (Mac) or Save As Type list arrow (Win), and then click Html File (*.html) or Htm File (*.htm).
Click the Format popup (Mac) or Save As Type list arrow (Win), and then click Html File (*.html) or Htm File (*.htm).
![]() Click Save.
Click Save.

Did You Know?
You can revert to the most recently saved version. Click the File menu, click Revert, and then click Revert. All your unsaved changes are lost and the most recently saved version of your project is opened.
There is a difference between Save and Save As. When you save an existing composition using the Save command, Edge Animate performs a quick save, which appends new content to the existing files. When you save a new composition using the Save As command, Edge Animate performs a complete save, which includes all the related content files.
Edge Animate Composition Files
Getting Online Support
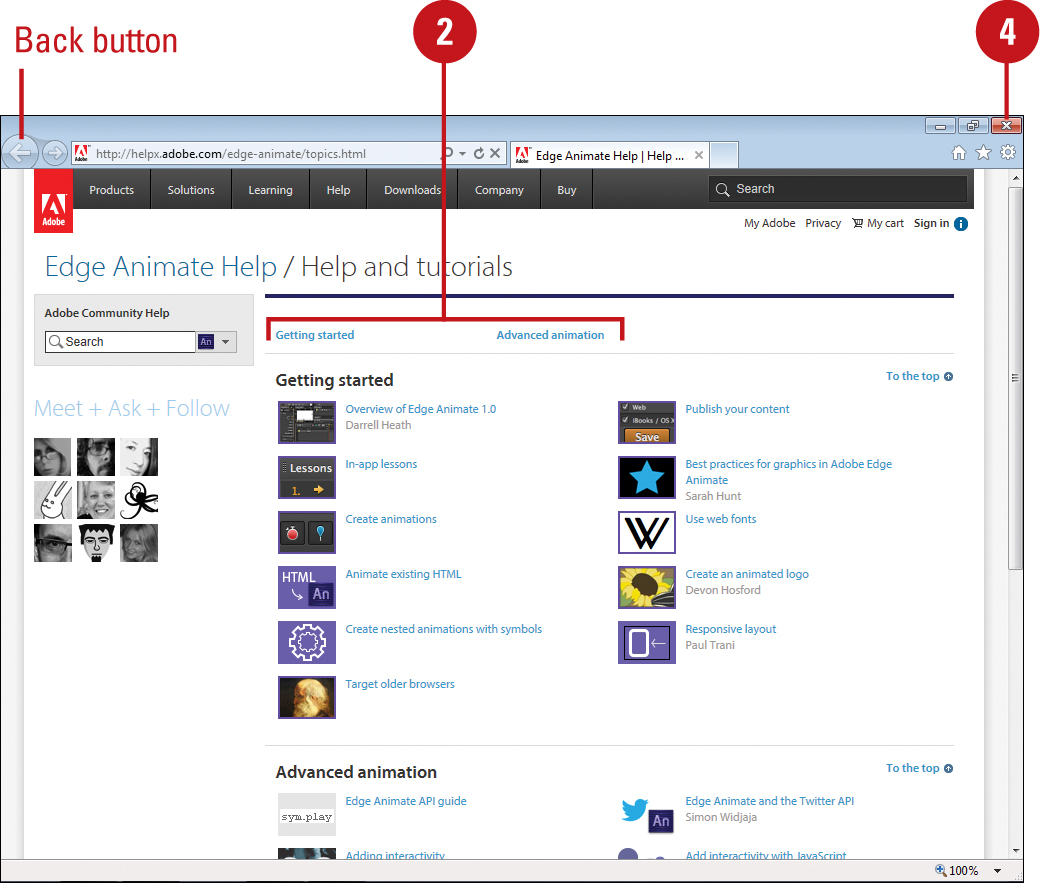
If you need more detailed information about Edge Animate or want to find out about available resources, you can find out on the web from Edge Animate Help, Edge Animate JavaScript API, and Edge Animate Community Forum websites. Edge Animate Help provides access to information and tutorials for beginner and advanced users to help you develop and design web-based content in Edge Animate. Edge Animate JavaScript API provides information on how Edge Animate uses JavaScript and how you can too. Edge Animate Community Forum provides a place to ask questions and get answers from other Edge Animate users. You can access the online resources by using the Help menu or links under Resources in the Welcome screen.
Get Edge Animate Help
![]() Click the Help menu, and then click Edge Animate Help.
Click the Help menu, and then click Edge Animate Help.
Your web browser opens, displaying the Edge Animate Help and tutorials website.
![]() Scroll through the web page to access software help.
Scroll through the web page to access software help.
• Getting Started. Provides introductory topics to help you get started with Edge Animate.
• Advanced animation. Provides more advanced topics to help you take Edge Animate to the next level.
![]() Click a link to the topic you want to find out more about.
Click a link to the topic you want to find out more about.
Note
Some topics take you to third-party web sites.
• Click the Back button in your web browser to return back to the main page as needed.
![]() When you’re done, close your web browser.
When you’re done, close your web browser.
Get Help from the Edge Animate Community Forum
![]() Click the Help menu, and then click Edge Animate Community Forums.
Click the Help menu, and then click Edge Animate Community Forums.
Your web web browser opens, displaying the Adobe Community Forum for Edge Animate website.
![]() To ask a question, click in the What can we help you with? text box, type a question, and then press Enter.
To ask a question, click in the What can we help you with? text box, type a question, and then press Enter.
![]() To browse through Frequently Asked Questions or Get Started With Edge Animate, click a link to the topic to find out more.
To browse through Frequently Asked Questions or Get Started With Edge Animate, click a link to the topic to find out more.
• Click the Back button in your web browser to return back to the forum as needed.
![]() When you’re done, close your web web browser.
When you’re done, close your web web browser.

Get Help from the Edge Animate JavaScript API
![]() Click the Help menu, and then click Edge Animate JavaScript API.
Click the Help menu, and then click Edge Animate JavaScript API.
Your web browser opens, displaying the Adobe Edge Animate JavaScript API website.
![]() Click a link to the topic you want to find out more about.
Click a link to the topic you want to find out more about.
• Adobe Edge Animate overview.
• Triggers, events and actions.
• Work with symbols.
• JavaScript API.
• Advanced topics.
![]() When you’re done, close your web browser.
When you’re done, close your web browser.

Finishing Up
When you finish working on a composition, you can close it to keep Edge Animate open and work on another project or exit Edge Animate. Exiting Edge Animate closes the current composition and the Edge Animate program and returns you to the desktop. Before you close a composition or exit Edge Animate, you should save your work. A composition that needs to be saved displays an asterisk (*) after the name in the title bar or Document tab. As a safe guard, if you try to close a composition or exit Edge Animate without saving your changes, a dialog box opens, asking if you want to do so.
Close a Composition
![]() Click the Close button on the Document tab, or click the File menu, and then click Close.
Click the Close button on the Document tab, or click the File menu, and then click Close.

Timesaver
Press Ctrl+W (Win) or ![]() +W (Mac).
+W (Mac).
Timesaver
Click the File menu, and then click Close All to close all open documents.
![]() If necessary, click Yes (Win) or Save (Mac) to save any changes you made to your open composition before it closes.
If necessary, click Yes (Win) or Save (Mac) to save any changes you made to your open composition before it closes.
Exit Edge Animate
![]() Choose one of the following:
Choose one of the following:
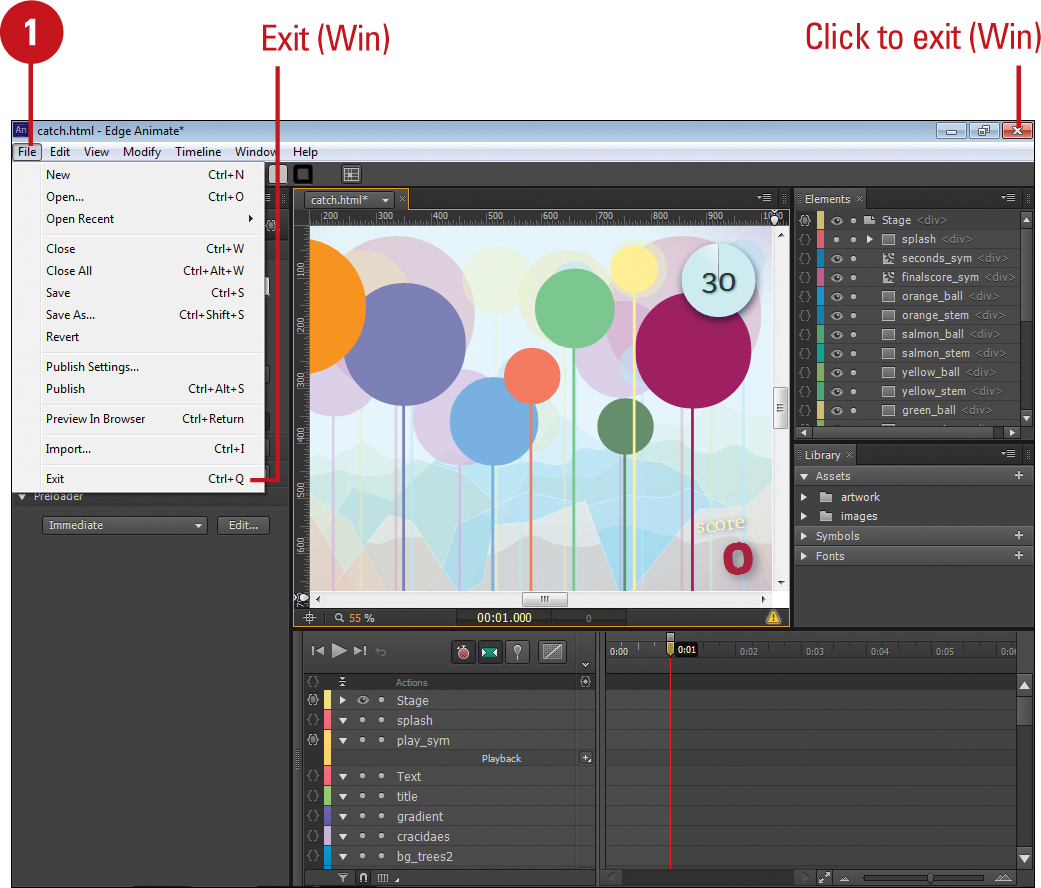
• Click the Edge Animate menu, and then click Quit Edge Animate (Mac).
• Click the Close button, or click the File menu, and then click Exit (Win).
Timesaver
Press Ctrl+Q (Win) or ![]() +Q (Mac).
+Q (Mac).
![]() If necessary, click Yes (Win) or Save (Mac) to save any changes you made to your open compositions before the program quits.
If necessary, click Yes (Win) or Save (Mac) to save any changes you made to your open compositions before the program quits.