
Chapter 16. Active Directory Security: Permissions and Auditing
Permissions can be set in Active Directory in much the same way they are set for files. Although you may not care that every user in the directory can read all your users’ phone numbers, you may want to store more sensitive information and restrict that access. Reading is not the only problem, of course. You also have create, modify, and delete privileges to worry about, and the last thing you need is a disgruntled or clever employee finding a way to delete all the users in an organizational unit.
Managing the permissions in Active Directory doesn’t have to be a headache. You can design sensible permissions schemes using guidelines on inheritance and complexity that will allow you to have a much easier time as a system administrator. The GUI that Microsoft provides is effective for simple tasks, but more cumbersome for managing complex permissions. Management of Active Directory permissions is also supported by Active Directory Service Interfaces (ADSI), which opens up a whole raft of opportunities for you to use scripts to track problems and manipulate access simply and effectively. Finally, Windows PowerShell and the DSACLS utility allow administrators to manage permissions from a command line if you prefer an alternative to the GUI.
Yet permissions are only half the story. If you allow a user to modify the details of every user in a specific branch below a certain organizational unit, you can monitor the creations, deletions, and changes to objects and properties within that branch using auditing entries. In fact, you can monitor any aspect of modification to Active Directory using auditing. The system keeps track of logging the auditing events, and you can then periodically check them or use a script or third-party tool to alert you quickly to any problems.
Dynamic Access Control (DAC) is a major new feature in Windows Server that Active Directory helps bring to life. Configuring your forest to support claims-based authorization to resources as well as new features such as compound identity and central access policies is a task that will require close coordination of Active Directory administrators along with other members of the IT organization and the business as a whole.
16.1. Permission Basics
Figure 16-1 shows the
basics. Each object stores a value called a security
descriptor (SD), in the nTSecurityDescriptor attribute. This attribute
holds all the information describing the security for that object.
Included with this information are a flag indicating whether or not the
security descriptor is protected against inheritance and two important
collections called access control lists (ACLs), that hold the relevant
permissions.
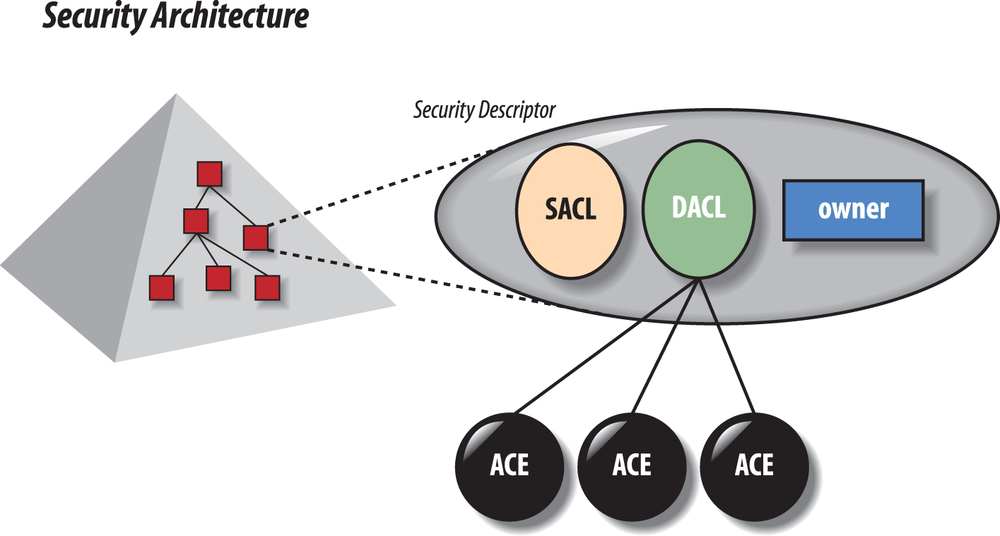
The first ACL, called the System ACL or SACL, defines the permission events that will trigger both success and failure audit messages. The second, called the Discretionary ACL or DACL, defines the permissions that users have to the object, its properties, and its children. Each of the two ACLs holds a collection of access control entries (ACEs) that correspond to individual audit or permission entries.
Audit and permission ACEs can apply to the object as a whole or to the individual properties of the object. This allows an administrator to control all aspects of access and auditing. Audit ACEs are discussed further later in this chapter, but we will briefly document permission ACEs in the following section so that other permission-related topics discussed first are more readily understood.
Permission ACEs
Each permission ACE is made up of several pieces of information:
- Trustee
The SID of the user or group to which the ACE applies, such as the SID for the group COHOVINESDomain Admins.
- ACE Type
Determines whether the ACE is an allow or a deny.
- Object Type
The
schemaIDGUIDfor the attribute or object class that the ACE applies to or therightsGuidfor the property set, validated write, or extended right that the ACE applies to (such as thememberattribute,Personal Informationproperty set,Change Passwordextended right, oruserobjects). For Delete or Create Child Objects permissions, theobjectTypeshould be configured to theschemaIDGUIDof the object class delegated.- Inherited Object Type
The
schemaIDGUIDfor the types of object that the ACE applies to when an attribute, property set, or validated right is specified or when the ACE is inherited—e.g.,userobjects.- Access Mask
A bit flag that describes the type of access, such as Read, Write, List, Create, Delete, Control Access, etc. See Table 16-1 for more detail.
- Flags
There are actually two different fields for flags. The flags specify inheritance settings such as ACE is inherited, ACE is allowed to be inherited, ACE is not inheritable, etc.
Name of the property | Sample value to be stored |
| Names the security principal that is to have the permission. |
| Gives write access to a specific property. |
| This is an allow permission. |
| The permission is inherited only and does not apply to this object. Child objects inherit this ACE. |
| Both |
| This is the |
| This is the |
Every permission granted in Active Directory is based on these ACE structures. Objects and properties are only revealed to users who have the appropriate permissions on those objects. Any attribute that doesn’t have an ACE specifically granting the requested access to a trustee is implicitly denied. The security descriptor also allows an administrator to specifically deny access with a deny ACE, but this isn’t needed unless you are attempting to override another more generic ACE that is granting access.
This permission mechanism allows different users or groups of users to have completely different and very granular access to an object. For example, all users might be granted read access to the telephone number and email properties, but only a subset will have access to modify the description.
Property Sets, Validated Writes, and Extended Rights
Microsoft has introduced several new “tools” that are not present
in the NTFS ACLs. These tools are called property sets, validated
writes, and extended rights. Instead of inserting the schemaIDGUID into the Object Type field of an
ACE, you can insert the rightsGuid
attribute of the property set, validated write, or extended right
object. These objects are all stored in the cn=extended-rights subcontainer of the
Configuration container.
Note
Property sets, validated writes, and extended rights are all
stored as controlAccessRight
objects. You can determine what specific type of controlAccessRight they are by looking at
the validAccesses attribute of the
object with any utility that allows viewing of all attribute values on
an object, such as LDP or ADSI Edit.
Property sets have a value of 48, validated writes have a value of
8, and extended rights have a value
of 256. For more information,
reference this
website.
Property sets are collections of attributes that can be referenced in a single permission ACE. The big win here is that you could assign one ACE to an SD and have it grant access to 5, 10, 20, or more attributes. The savings in SD size should be immediately obvious: a single ACE that can substitute for 20 different ACEs is a good data reduction ratio. There are several predefined property sets in a default forest; some of these are Personal Information, Public Information, Web Information, and Account Restrictions. You can also add your own property sets as desired. Exchange adds a number of property sets to ease delegation, including Exchange-Personal-Information and Exchange-Information.
While property sets are a great boon for securing the directory in a manner that is simpler than could otherwise have been achieved, the implementation does suffer a major shortcoming. An attribute can only be part of a single property set. Unfortunately, many of the base schema attributes are already included in existing property sets; while most of these can be successfully removed from those property sets or moved to other property sets, you can never be sure doing so won’t break some application. It is generally much safer to stick to managing property sets comprised of your own custom attributes that you add to the directory.
Validated writes are writes that go through additional verification. You cannot modify the validated writes, nor create your own; what comes with AD is what you get. The only validated writes that are currently defined are:
Validated write to service principal name
Validated write to DNS host name
Add/Remove self as member
Extended rights are the mechanism used to delegate special operations such as password changes or password resets. While you can add additional extended rights to the directory, you cannot create extended rights that are enforced by the directory. Any new extended rights that you create will simply be additional permissions that can control an application you write that knows how to use the permissions. Your primary use of these extended rights will generally be to delegate to admins the right to set passwords on user objects with the Reset Password extended right.
Inherited Versus Explicit Permissions
Many Windows administrators are used to quoting the mantra, “Deny overrides everything.” Fortunately (or maybe unfortunately, depending on what you are trying to accomplish), Active Directory ACLs are a little more complicated than that. You need to specifically be aware of inherited versus explicit permissions. Explicit permissions are permissions that are directly applied to an object. Inherited permissions are permissions that are applied at some level of the tree above the object and “flow down” to the object and its children. When working with inherited and explicit permissions on an object, a deny doesn’t necessarily override a grant.
The rules for what access will result from a set of inherited and explicit ACEs are easiest to understand when taken in steps:
Deny ACEs override grant ACEs of the same type (inherited versus explicit) and application point in the directory tree.
Explicit ACEs override inherited ACEs.
Inherited ACEs are hierarchical (e.g., an inherited deny applied to a container will be overridden by an inherited grant applied to containers nested below it in the same tree).
Most simply, the closest ACEs to an object will dictate the access for that object. If you use an inherited deny to prevent access to some attribute on objects in an OU and the deny isn’t effective, look for inherited grant permissions applied further down the branch or for explicit grant permissions applied on the objects themselves.
Default Security Descriptors
Every object defined in the schema has the attribute defaultSecurityDescriptor. This attribute is
the Security Descriptor Definition Language (SDDL)
format of the object’s default SD. It will be applied to any object
created without an SD specified during the object creation. These
default permissions are rather extensive in Active Directory and are
composed entirely of explicit ACEs, so that they override any inherited
denies (this tends to make denying access to specific attributes a
little more challenging than it probably should be). The DACL defined by
the default security descriptor for the user object is listed in Table 16-2.
Trustee | Permission |
DomainDomain Admins | Full Control |
BuiltinAccount Operators | Full Control |
System | Full Control |
Self | Read Permissions List Contents Read Property List Object Read/Write Personal Information Read/Write Phone and Mail Options Read/Write Web Information Change Password Send As Receive As |
Authenticated Users | Read Permissions Read General Information Read Public Information Read Personal Information Read Web Information |
DomainRAS and IAS Servers | Read Account Restrictions Read Logon Information Read Group Membership Read Remote Access Information |
DomainCert Publishers | Read/Write userCertificate |
BuiltinWindows Authorization Access Group | Read tokenGroupsGlobalAndUniversal |
BuiltinTerminal Server License Servers | Read/Write terminalServer |
Everyone | Change Password |
Permission Lockdown
You can see from Table 16-2 that in a default
Active Directory installation members of the Authenticated Users group
have access to quite a bit of information. There is even more
information available if you have added Authenticated Users to the
Pre-Windows 2000 Compatible Access group, as this allows them to see all
properties of groups, users, and inetOrgPerson objects. Open access to this
information is a sore spot for many companies who don’t want employees
to have quite that much information available to them; maybe they want
to restrict access to employee phone numbers, or addresses, or other
personal information.
Removing the ability to see this information can be difficult to accomplish, especially for the items granted through explicit property set ACEs. In addition, any modification you make needs to be thoroughly tested to verify it doesn’t break any of your line of business applications. Microsoft Exchange is particularly sensitive to permission lockdowns, and if you take away the Authenticated Users group’s access to some attributes, you may need to re-grant the permissions back to the Exchange servers. ADSI is another common tool that is very sensitive to changes to the default permissions. You may find ADSI calls fail with inexplicable errors if assumed permissions have been removed.
Warning
You cannot permanently lock down the directory from Domain Admins. At any point, anyone from that group can take ownership of any object (if they don’t already have it) and rewrite the security descriptor to grant access to Domain Admins or any other security principal. There should be very few Domain Admins in your forest. We generally recommend a total number in the realm of five or fewer, even for the largest organizations.
Once you have decided to proceed with the lockdown, your next step is to decide how to accomplish it. The “how” and the resulting workload and impact depend entirely on the attribute in question and how the access is being granted.
By far, the simplest case is when the access is granted through
inheritance. You can either remove the inherited grant if it is just the
one attribute, or add an inherited deny for the attribute or attributes
you want protected. An example of an inherited permission you may want
to remove is read access to the employeeID property. Authenticated Users are
granted read access to employeeID
through an ACE applied to the root of the domain that grants the
Pre-Windows 2000 Compatible Access group permission to read all
properties of users. Inserting an inheritable deny read ACE on the root
of the domain or other container for Authenticated Users will
effectively block the inherited grant read access to this attribute.
Read access can be re-added further down the tree beneath the deny ACE
if desired, with either an additional explicit or inherited grant read
access ACE.
If the access is granted through an explicit ACE, locking down is considerably more involved and may actually be so difficult it isn’t feasible. There are several mechanisms available for locking down explicitly granted access:
If the access is granted through a property set, modify the membership of the property set involved.
Change the default security of the object class definition in the schema to remove the explicit Authenticated Users permissions, or add a deny ACE for the specific attribute and then “fix” the ACLs on every instance of the object in existence in the directory. Any new objects will be created with the new security descriptor.
Strip the explicit grant ACE from every instance of the object in the directory. You will need to keep doing this as new instances of the object are created, or if someone resets the ACL to schema defaults on any of the objects.
Add an explicit deny ACE on every instance of the object in the directory. Like the previous solution, this requires “fixing” new instances of the objects that are created or reset to schema defaults.
You may be able to use the confidentiality bit. This capability is described in the following section.
The Confidentiality Bit
After five years of customers wrestling with the directory
lockdown difficulties previously outlined, Microsoft added a feature
called “confidential attributes.” As part of this feature, a new
searchFlags bit called the
confidentiality bit was added. This is bit 7, which has the value 128. When the bit is enabled, the attribute is
considered to be confidential. Only users with both Read Property
permission and Control Access permission for the
attribute on an object can view the attribute. This means anyone with
Full Control or All Extended Rights (Control Access for object) or
Control Access for the specific attribute. Assuming default permissions,
this means access would be granted to:
BuiltinAdministrators (inherited Full Control)
BuiltinAccount Operators (explicit Full Control)
NT AuthoritySystem (explicit Full Control)
DomainDomain Admins (explicit Full Control)
DomainEnterprise Admins (inherited Control Access)
Object CreatorOwner (explicit Control Access)
As you can see, this would appear to give us a great new solution to the issues mentioned previously with explicit permissions. In theory, you can simply mark any troublesome attributes as confidential, and normal users will no longer be able to see them. This is a great plan, but there is still a challenge: you cannot set the confidentiality bit on Category 1 attributes, which are more generically known as base-schema attributes. So, many of the attributes companies may be trying to lock down can’t be locked down with this capability.
Unfortunately, there is not an easy mechanism to grant the Control Access right with a GUI tool. The best available tool is LDP. The ACL editor in ADUC and ADSI Edit only supports granting Control Access over all the attributes of an object (via the All Extended Rights permission), not just a single attribute. For more information on managing ACLs with LDP, refer to Chapter 20.
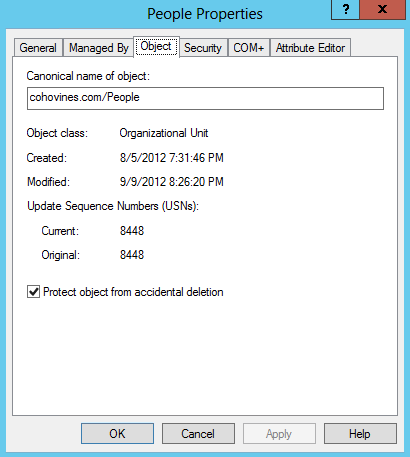
Protecting Objects from Accidental Deletion
A common problem Active Directory administrators have faced is when an object or an entire OU tree is accidentally deleted. Usually this happens because of a careless mistake made with the Active Directory Users and Computers tool. The ensuing recovery process often involves authoritative restores and business downtime. Newer versions of ADUC include a checkbox in the MMC called “Protect object from accidental deletion.” Behind the scenes, this checkbox simply adds an ACE to the ACL for the object it is applied to and prevents deletion. Consequently, this will prevent a tree from being deleted, since its parent cannot be deleted. In order to delete that object or tree, the administrator must first uncheck the checkbox or remove the ACE manually.
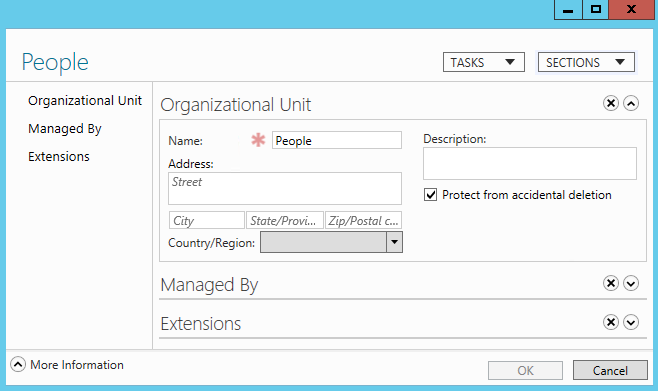
In order to see the “Protect object from accidental deletion” checkbox, you must first select View→Advanced Features in ADUC. Once you have done this, you can right-click an object in the directory and select Properties, and then access the Object tab. Figure 16-2 shows the People OU being protected in ADUC, and Figure 16-3 shows the People OU being protected with ADAC.
If you try to delete an object that is protected from accidental deletion, you will receive an error similar to the one in Figure 16-4. In order to delete the object, you must go back into the properties and uncheck the “Protect object from accidental deletion” (“Protect from accidental deletion” in ADAC) checkbox.
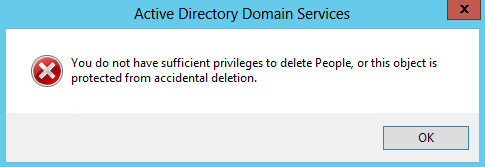
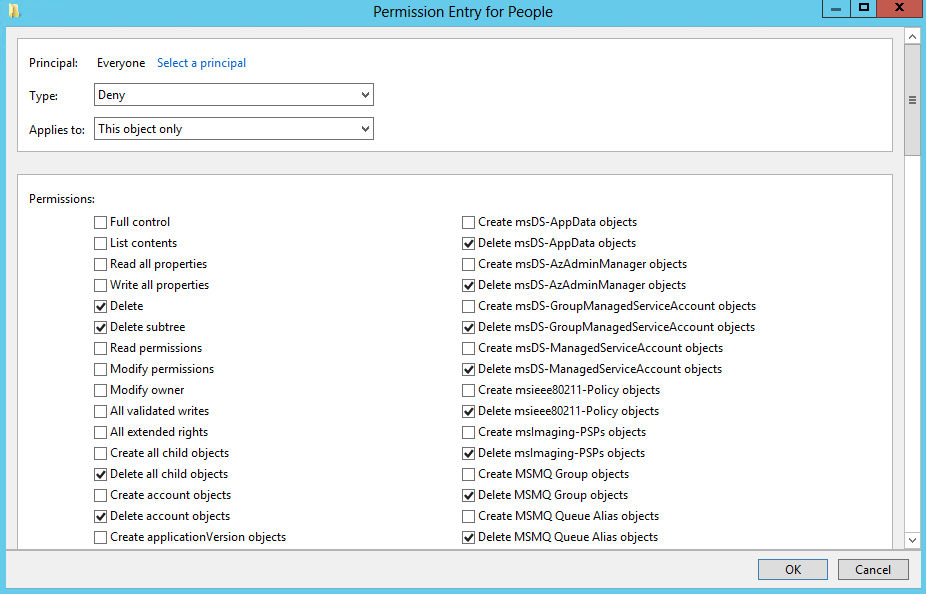
Figure 16-5 shows the ACE that was added to the ACL for the People OU in order to protect it. Notice that the well-known Everyone security principal has been denied the rights to delete the object or the subtree.
16.2. Using the GUI to Examine Permissions
To access the permissions for any object, select the Active Directory Users and Computers MMC snap-in and right-click on it. Choose Properties from the drop-down menu and select the Security tab of the properties window that is displayed.
Note
To make the Security tab visible, you need to select View→Advanced Features. If you reopen the properties window of the object to which you wish to assign permissions, you should see a Security tab.
The window in Figure 16-6 is your first point of contact for permissions. The top area contains a complete list of all groups and users who have permissions to the object whose properties we are viewing. The Permissions section below this list displays which general permissions are allowed and denied for the highlighted user or group. The general permissions listed are only those deemed to be the most likely to be set on a regular basis. Each general permission is only an umbrella term representing a complex set of actual implemented permissions hidden underneath the item. For example, the general permission called Read translates to specific permissions like Read All Properties and List Contents, as we will show later.

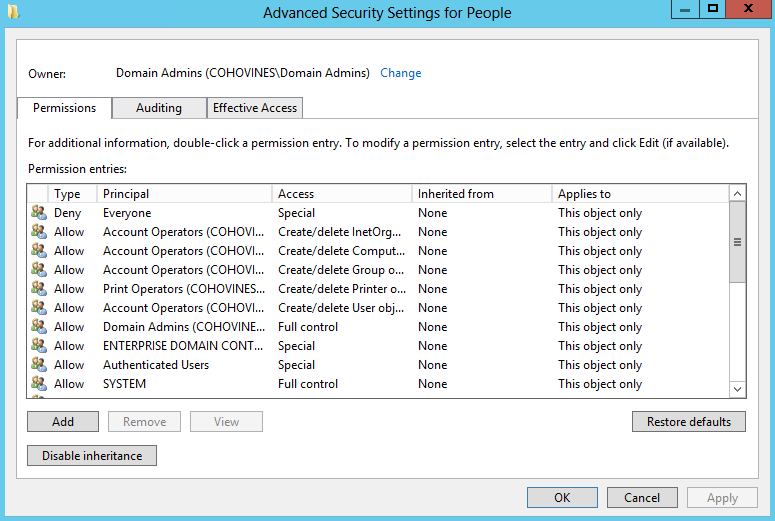
While the Advanced Security Settings window shown in Figure 16-7 gives only slightly
more information than the previous window, it serves an important purpose:
it is a gateway to some of the lowest, most granular permissions. The
Advanced window allows you to view the globally set permissions from Figure 16-6 as well as a brief summary
of the advanced permissions that may be set for each object. While the
Principal and Access columns effectively duplicate information from Figure 16-6, the Type field shows
whether the permissions to the object for this user or group are allow or
deny permissions. If a group has some allow and some deny permissions, two
entries are recorded in this window. The “Inherited from” column allows
you to see what object, if any, the permission was inherited from. The
“Applies to” column usefully indicates what the permission applies to; it
could be to this object only, to the object and all subobjects, or just to
an individual property (say, the telephoneNumber property of a user
object).
Note
The permission dialog boxes contain quite a lot of information and are usually too small to see the information comfortably. This makes it painful to look at permissions, because you are constantly resizing the individual columns or scrolling the dialog back and forth. Unfortunately, there is no way to modify these dialog boxes to better display the information they contain.
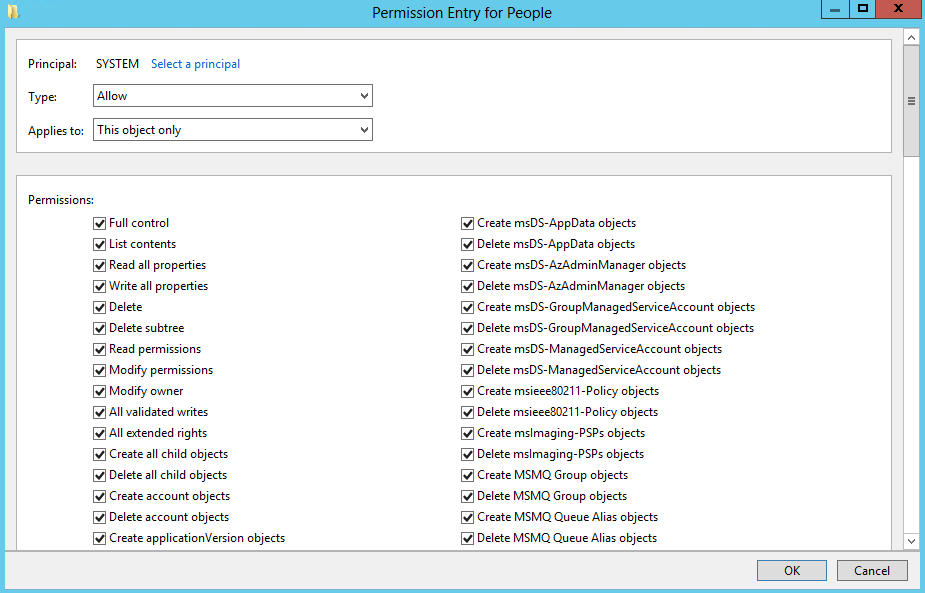
You now have two choices to view the atomic permissions. You can click Add, which pops up a window allowing you to add a new user or group to those with permissions set on this object. Alternatively, you can highlight an existing user or group and click the Edit button. If you highlight a user or group or add one from the pop-up window, the next screen you see is the Permission Entry (PE) window, shown in Figure 16-8.
Note
Until you know exactly what you are doing with permissions, we suggest that you use a test forest to experiment with permissions settings. The last thing you want to do is make a simple mistake with a built-in group or user and deny yourself access to the tree. If you create two test users and three test groups, put each user in a separate group, and then put both users in the third group, you will have the basis of a test system.
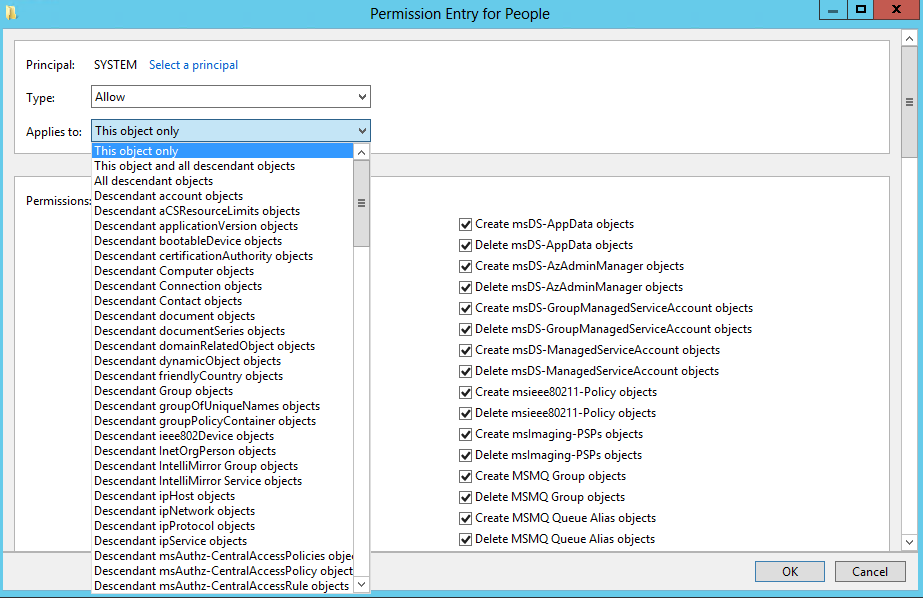
The object name is displayed in the title of the permissions editor window, with the name of the user or group that has permissions prominently displayed in the field at the top. The user or group then has permissions allowed and denied from the column entries. The entries in the window are relative and vary depending on the entry in the drop-down list under the heading “Applies to”. What is not immediately obvious from this window is how large the drop-down box can actually get. Figure 16-9 shows this nicely. If you look at the scroll bar, you will get an idea of how many items are currently not displayed.
To set a permission from the permissions editor window, pick where you want to apply the permission and then check the relevant Allow and Deny boxes, selecting OK when you’re done. Since Microsoft has not provided an Apply button, you cannot specify a set of permissions to apply one area, click Apply, and then repeat the cycle until you are done with this user and group. You have to click OK, which means the window closes, whereupon you then have to click Add again, and so on. This is a tiresome problem if you are implementing multiple changes from a set of prepared designs, but one you have to live with if you choose to use the GUI to set permissions.
Reverting to the Default Permissions
In Figure 16-7,
you may have noticed the “Restore defaults” button at the bottom of the
screen. This button allows you to revert the current permission set to
the defaults, as defined in the schema for the objectClass of the object. If you click
“Restore defaults” for an object on which you have not modified the
permissions, you may notice that the list still changes. If you look
more closely, you’ll see that the inherited permissions were the ones
removed. That is because inherited permissions are not defined as part
of the default security of an object. Even if you then click OK to apply
the permissions, as long as the “Disable inheritance” button isn’t
pressed, the inherited permissions will still apply. Having the ability
to apply the default permissions is a useful feature, especially for
administrators who are trying to determine what changes have been made
from the default installation.
Viewing the Effective Permissions for a User or Group
The Effective Access (or Effective Permissions in some versions of Windows) tab is available from an object’s Advanced Security Settings screen (accessible in ADUC by viewing the object’s properties, selecting the Security tab, and clicking the Advanced button). This screen allows you to select a user or group and determine its effective (or actual) access to the object, taking into account group membership and permission inheritance. Figure 16-10 shows the effective permissions for Authenticated Users on the People OU object. As you can see, Authenticated Users have List Contents, Read All Properties, and Read Permissions rights. All objects in the forest will inherit these permissions unless inheritance has been blocked. As you might guess, this is a significant feature that allows for much easier troubleshooting of permission problems. There are some limitations to be aware of, however.

The Effective Permissions tool provides only an approximation of the actual permissions a user or group has and does not take into account many of the well-known security principals, such as Anonymous Logon and Network. Another potential issue to be mindful of is that the user running the Effective Permissions tool must have the rights to read the group membership of the target user or group. By default, the Authenticated Users has group this right.
Using the Delegation of Control Wizard
To help with delegating permissions for objects in Active Directory, Active Directory Users and Computers comes with a Wizard called the Delegation of Control wizard. It is intended to allow administrators to delegate management of certain types of objects to key individuals or groups in the organization. It is activated by right-clicking almost any container in the tree and selecting the wizard from the pop-up menu. Builtin and LostAndFound are the two containers for which it does not work by default.
The wizard is useful only when you need to clearly apply general allow permissions to one or more object types below a container. It is not useful if you want to specify deny permissions (which it doesn’t support), remove previously delegated control, delegate control over individual objects, or apply special permissions to branches of the tree. The wizard’s great strength is its ability to set permissions and apply them to multiple users and groups at the same time. We use the wizard to set these sorts of permissions, although much less regularly than we do the standard GUI, since it is much more limited in what it can do. Scripting with ADSI also provides a solution here that is more adaptive to an administrator’s own needs.
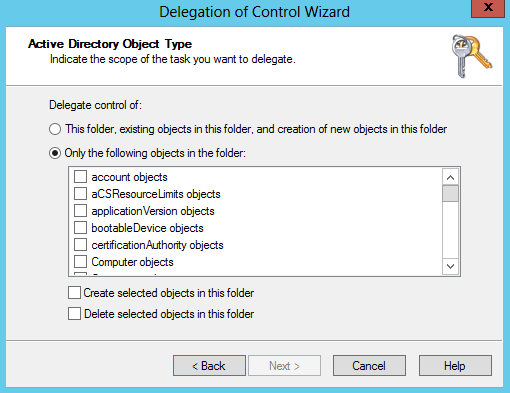
The wizard provides several screens for you to navigate through. The first is the welcome screen, which tells you what the wizard does. The second is an object picker for you to select which users or groups to delegate to. The third screen asks what task you wish to delegate control for in that container. Figure 16-11 shows this window.

The default is to delegate control for a specific task, and there are several to choose from. Since the list scrolled off the screen in Figure 16-11, we’ll list them here:
Create, delete, and manage user accounts
Reset user passwords and force password change at next logon
Read all user information
Modify the membership of a group
Join a computer to the domain
Manage Group Policy links
Generate Resultant Set of Policy (Planning)
Generate Resultant Set of Policy (Logging)
Create, delete, and manage inetOrgPerson accounts
Reset inetOrgPerson passwords and force password change at next logon
Read all inetOrgPerson information
If you choose the Custom radio button and click Next, an extra page opens, allowing you to specify individual objects. Figure 16-12 shows this.
If you want to delegate certain permissions to computer or user objects in a specific container or branch, you can do it from here. The next screen of the wizard allows you to specify what permissions you wish to assign for the selected users/groups. Figure 16-13 shows this screen.
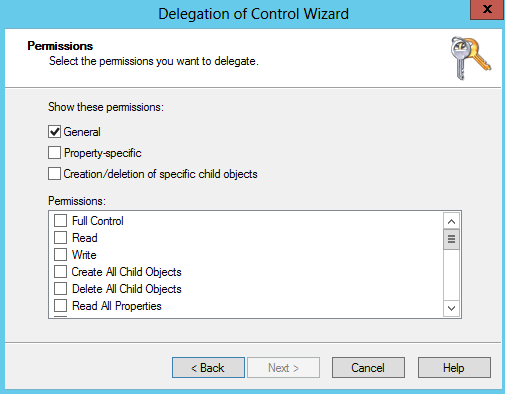
When the window opens initially, only the first checkbox is checked. As you click each of the other boxes, the list of specific permissions that you can delegate becomes very large as it encompasses all of the permissions that you could potentially delegate. Finally, the last screen of the wizard summarizes the previous answers and allows the user to go back, cancel, or finish and grant the permissions.
However, just as the permissions listed in the security properties for an object (Figure 16-6) can change, so can the permissions listed in the access rights box, depending on the object(s) to which permissions are being applied. A good demonstration of this is to open up the security properties for any user and scroll through the displayed list of permissions. Next, open up the wizard on any container and select “Create a custom task to delegate” (see the screen shown in Figure 16-11) and only user objects (see Figure 16-12). The screen shown in Figure 16-13 should then display the same list of permissions that the screen in Figure 16-6 does. This makes sense—available permissions for one user should be the same as the available permissions for all users—but is still nice to see the correlation in the flesh, so to speak.
16.3. Using the GUI to Examine Auditing
Examining auditing entries is almost identical to viewing permissions entries. If you go back to the screen shown in Figure 16-6 and click on the Auditing tab, a screen similar to that in Figure 16-14 is displayed.

This window shows the list of auditing entries (AEs) that have been defined on the object. It’s not very helpful viewing them from here, though, as the detail is limited. So, just as you would do with permissions, you can select an entry, click the Edit button, drill down, and view the individual AE itself.
Figure 16-15 shows the successful and failed items that are being audited.

16.4. Designing Permissions Schemes
Having worked through many designs for different domain structures, we have come up with a series of rules or guidelines you can follow to structure the permissions design process effectively. The idea is that if you design your permissions schemes using these rules, you will be more likely to create a design with global scope and minimum effort.
The Five Golden Rules of Permissions Design
This list of rules is not exhaustive; we are sure you will be able to think of others. If, however, these rules spark your creative juices and help you design more effectively, they will have done their job.
The rules are:
Whenever possible, assign object permissions to security groups containing users rather than to individual users.
Design group permissions so that you have a minimum of duplication.
Manage permissions globally whenever possible.
Allow inheritance: do not protect sections of the tree from inheritance.
Keep a log of every unusual change that you have made to the tree, especially when you have protected sections of it from inheritance or applied special rights to certain users.
Let’s look at these rules in more detail.
Rule 1: Apply permissions to groups whenever possible
By default, you should use groups to manage your user permissions. At its simplest, this rule makes sense whenever you have more than one user for whom you wish to set certain permissions.
We’re not advocating the use of one group or two, as we’ll explain in more detail in the next section on how to plan permissions. We are advocating that whichever way you choose to implement group permissions, you should add users to groups and apply permissions to groups, even if the group initially contains only one user. This removes organizational dependence on one particular account.
Time after time, we have seen organizations in which individual users with a whole raft of permissions to various objects suddenly leave or change roles. The new administrator then has to go in and unravel differing permissions settings from this account. We have even seen one administrator, looking in anguish at the tangled mess of a recently departed administrator’s account, delete his own account and rename the departed user’s account just so that he could get the correct permission set without having to figure out the mess! If the old administrator had been a member of, say, five different groups, each with the relevant permissions, the new administrator could simply have replaced the group memberships of the old account with his new account. This is a much simpler approach, and we are sure that none of the preceding common sense is very new to system administrators.
Rule 2: Design group permissions so that you have minimal duplication
It makes much more sense to create groups with simple, distinct permission sets than it does to create multiple groups with overlapping permissions. If you decide that some of your users need, say, create and modify permissions, while others need modify and delete permissions, and a third set of users need just modify permissions, it makes much more sense to create three separate groups with create, delete, and modify rights, respectively, than it does to make three groups with the permissions sets described. Let’s consider an example. Suppose we were to create three groups called Create and Modify, Modify and Delete, and Modify. Now say we added 10 users to each group. If the only modifications ever to happen to these groups were occasional membership changes, this solution would fit adequately. However, suppose that (as happens in every large organization) the permissions requirements were to change over time. If Dave Peace, a member of Create and Modify, now needs delete permissions, what do we do? Do we make a special case of Dave’s account and add the delete permission to his account only? Arguably, that is the simplest solution, but according to Rule 1, we really should create a group to manage the permission set. Do we create a Delete group and add Dave’s account to it, or create a Create, Modify, and Delete group and move his membership from Create and Modify to the new group? Both are valid solutions.
Let’s say we go with the former and create a Delete group, adding Dave as a member of that group. Then things change again, and Mark Newell joins the organization. Mark needs all three permissions, so we add him to Create and Modify—but do we also add him to Modify and Delete or just Delete? Either way, we now have potential confusion. Whenever we have to check for members who can modify and delete, we have to check three groups, not one.
If we’d taken the second approach and chosen to create Create, Modify, and Delete rather than the Delete group, we could simply add Mark to Modify and Delete when he joins, and things would seem to work fine. Now suppose Paul Burke moves from another team and requires create permissions only, so a Create group is created and his account is added to that. Later, three others join the Create group, but Paul now needs create and delete, so Create and Delete is created, and he is moved to this group. Now we have six groups: Create, Modify, Create and Delete, Create and Modify, Modify and Delete, and Create, Modify, and Delete. Unfortunately, if we ever have to check who has create and modify permissions, we have to check three groups: Create, Modify, and Create and Modify.
The minimal solution that would require the fewest ACEs and groups would be to have one group for each permission granted, Create, Modify, and Delete. Users can then be added to the groups as needed. If you prefer a more “role”-based approach, you could create role-based groups such as Create and Modify and the others and nest them in the Create and Modify groups that have the actual permissions in the directory.
This example was heavily contrived. However, we hope it serves to show that duplication will occur whenever you have users requiring separate permissions to an object or property and users requiring combinations of those permissions. It is for this very reason that we suggest creating separate groups for the lowest-common-denominator permissions that you need to set. Keep possible future enhancements and role redefinitions in mind, because you won’t usually want to be changing permissions in the directory in an ad hoc manner any time new requirements pop up.
If you have users who always need read, list, and create permissions but require different combinations of delete and modify, it may not make sense to have the three groups—one each for read, list, and create. You could instead create one group with the read, list, and create permissions assigned to it, one group for delete, and one for modify. Then you could use multiple group memberships to assemble the group permissions as you require them. Of course, if later you have a requirement to grant only read or create permissions, you’ll end up separating out the permissions anyway. Try to think ahead.
The most important point to note is that we are talking about minimizing and simplifying the number of ACEs applied to the directory. If you need to grant only create, modify, and delete rights to an object across the board, you probably don’t need to create three groups. But don’t necessarily rule out this approach if you think the requirements are apt to change.
If, after you have created a group with multiple permissions, you find that you now need groups with individual permissions, you can always create the smaller groups and migrate the users. Active Directory is flexible enough to allow you to operate like this, but it can be considerable work to clean up after the fact and must be done in a slow, painstaking way to avoid impacting the users.
Rule 3: Manage advanced permissions only when absolutely necessary
(Please note that this says “permissions” and not “auditing.” Auditing entries can be accessed only from the Advanced tab, so this rule makes less sense for auditing entries.)
Whenever you right-click an object to view its properties, the security properties window that appears has an Advanced button on it. This was shown in Figure 16-6 in the section “Using the GUI to Examine Permissions” (page 451). The security properties window itself typically has the following allow and deny options as general permissions:
Full Control
Read
Write
Create All Child Objects
Delete All Child Objects
The general permissions are not limited to those five, though, and indeed they change depending on the object you are looking at. For example, the security properties for any user object display additional general permissions, such as Reset Password, Modify Web Information, and Send As. While these general permissions make sense for the user object, they are not all appropriate for other objects. This rule suggests that you manage permissions for objects from the security properties window as often as you can. Use the Advanced button only when you wish to allow or deny a permission to one aspect of an object rather than the whole object. An example would be manipulating the permission to read or modify a user object’s telephone number rather than the account details as a whole.
While there is nothing wrong with managing atomic permissions to objects and properties, permissions are much easier to manage from a higher level. The main permissions that administrators might want to set were put here for this express purpose, so that users and groups can easily manage the tree without having to worry about the large amount of individual properties.
If you choose to get very granular with permissions, you will want to look at using DSACLS at the command line for setting the permissions. DSACLS does a better job of showing all of the permissions and in some situations is more intelligent about ACEs that are applied than ADUC. Finally, DSACLS can be used in scripts for consistent results.
Rule 4: Allow inheritance; do not protect sections of the domain tree from inheritance
If you allow or deny permission for a group or user to all
objects of a certain type in a container, by default the permissions
are applied recursively to all objects of that type in all the child
containers down the tree. It is possible to block inheritance, but we
recommend leaving inheritance in place (the default) and protecting
branches on an individual basis only when there are good
justifications for doing so. The reason is simple: if you specify that
children do not inherit permissions from their parents, you are adding
additional complexity to your Active Directory environment. There are
several examples of inheritance blocking found in every default
domain. You can simply look at any administrative ID, or alternatively
drill down into the System container, then the Policies container, and
look at any of the groupPolicyContainer objects.
The groupPolicyContainer
objects are protected for similar security reasons. As discussed in
Chapter 11, these objects contain
information about security policies applied to the domain. Microsoft
rightfully decided to protect these objects from being accidentally
impacted by permissions delegations higher up in the directory. You
will not generally have to manipulate these objects directly, so you
could manage Active Directory for years and never notice these
objects; the complexity involved with protecting them won’t directly
impact you.
Ultimately, there is nothing wrong with protecting objects or sections of the tree from inheritance. However, it is important to remember that every time you do it, you are possibly creating more work and potential confusion for yourself and other administrators. As an administrator, you should keep track of these changes in a log, so that you can easily reference your special cases when required.
Rule 5: Keep a log of changes
This may sound like an obvious statement, but it is surprising how many administrators overlook such a simple requirement. Simply put, it is always wise to keep a log of custom changes that you make to a default installation so that you and others have something to refer back to. There will be times when you may not be available and this sort of information is required. The following list shows the relevant fields of a basic Active Directory ACL log:
Unique name of object or LDAP location of object in tree
Object class being modified
Object or property being modified
User or group to whom permissions are being assigned
Permissions being assigned
Notes on reasons why this change is being made
Some additional items outside of ACL changes worth logging are schema default security descriptor changes, property set modifications, attribute index changes, and attribute confidentiality changes.
Let’s now look at how you can put these rules into practice in your own designs.
How to Plan Permissions
There are a number of Active Directory Users and Computers permission sets that administrators may need to implement in their organizations. Some examples are:
A set of centralized teams, each with responsibility for certain areas. Users can be members of more than one team: account modifiers, printer managers, computer account managers, publishing managers, and so on.
A manager for each individual major organizational unit under a domain.
A manager for each individual major organizational unit under a domain who is able to delegate responsibility for organizational units lower down the tree.
While we could go through each of these cases and show how to design permissions for each, every organization is different. For that reason, it seems better to try to show what we consider to be the best method to use when designing Active Directory permissions for all types of organizations.
First, create two documents, one called Allow and the other called Deny. On each document, label two sections, one called Global Tree Permissions and the other Specific Tree Permissions. Place two subheadings under each of the two sections, calling one General Permissions and the other Special Permissions. Then, under each general and special heading, create three columns: “LDAP path,” “What to set,” and “To whom.”
The first six columns relate to permissions that will apply throughout the whole tree; the last six relate to permissions that will apply to specific locations in the tree. The latter is likely to be the much larger of the two lists. The General columns relate to permissions that can be set without needing to use the Advanced button, such as read access to all objects below an organizational unit. The Special columns relate to those permissions that you have to manually bring up a permissions editor window for, such as allowing read access to all telephone numbers of user objects below a particular organizational unit. In each section, the “LDAP path” column should display the LDAP path to the object that is to have properties set, the “What to set” column should show the permissions that are being set, and the “To whom” column should display the group or user to whom the permissions are being assigned.
The LDAP path under Global Tree Permissions is, strictly speaking, unnecessary, since these columns relate to permissions applied to the domain as a whole. If, however, you have a special need to apply permissions to a large number of organizational units directly below the root, you could use this column for this purpose.
Now go through your Active Directory design and begin to populate both the Allow and Deny tables. For a first pass, you should concentrate on a thorough design, listing all the permissions that you think you will need. Print out a number of copies of the table. Once you have a list in front of you, you can start amalgamating identical permissions into groups. It is likely that you will need to go through many iterations of these designs until you get a pared-down list that you are happy with. As you go through the design, you will start identifying groups of users to which you need to apply permissions. When designing the groups, you have two choices, as previously discussed under Rule 2. You can either create a single group to which permissions are applied and that contains users, or you can create two groups: one to apply permissions to and one to hold users, which is nested in the first group.
The decision on whether to go for single or dual groups is not necessarily an easy one. Our preference is to use single groups as often as possible, unless we need extra flexibility or have a lot of permissions to assign to many groups. In order to help you to make a bit more sense of the decision, a few reasons why you would want to consider one or the other are shown in Table 16-3.
You should consider one group if | You should consider two groups if |
You want to keep the number of groups to a minimum. | You want greater flexibility. Having one group for applying permissions and one for users means that you are always able to manage the system with a minimum of fuss. |
You have only a small or simple tree, where it would be fairly easy to track down problems. | You have a large or complex tree, in which you need to be able to identify any problems quickly. |
You need to assign only a few simple permissions. | You need to assign a large number of permissions. |
You have very little change in the membership of groups and very few changes to permissions. | You have regular changes in your group membership or permissions. |
You have little cross-membership of groups. | You have major cross-membership of groups, where a user could exist in more than one group with conflicting permissions. (Two groups make it easier to debug problems in a large environment.) |
You very rarely need new groups. | You regularly need new groups with subsets of your existing users who have been assigned to some task. |
You very rarely have to split user groups so that each user group subset has different permissions than the original group had. | You regularly have to split an existing group into more than one group, because each requires a different set of permissions than the old group used to have. |
One last point: if you are creating permission groups and user groups, remember to name them sensibly from the outset. Maybe use something such as Finance – Allow User Modify for a group granting user modification rights on the Finance OU and Finance – User Admins for the user admin role over the Finance OU. It makes it easier when managing and scripting if you can easily identify which types of groups are which.
Bringing Order out of Chaos
We’ve had people ask what we would recommend to someone arriving at a new company where the previous directory services administrator had left a tree with no proper permissions design or consistency. In this situation, start by analyzing what the organization requires and work from there. You also should analyze what permissions Active Directory currently has assigned, although concentrating solely on this could be detrimental. After all, if the last administrator was not competent or knowledgeable enough to set up a sensible permissions scheme from the start, he may not have accurately implemented the permissions required by the organization.
When analyzing Active Directory, you need to start by identifying the members of the built-in groups on the server, such as Domain Admins, Backup Operators, and so on. Now do the same for the other groups that are specific to the organization. Once this is done, using the previously described tables, you need to list the permissions on the root of the first domain in the tree you are responsible for. Then look at the permissions for the first container or organizational unit in that list. Next, navigate through the branch represented by that container, looking sequentially at the child containers, continually recursing through the tree. Once this first branch of the root is mapped out for the container permissions, you should be getting an idea of what permissions are required. Now go through all the objects in that branch, including printers, users, shares, and so on. This is time-consuming and annoying, but after a while you should start getting an idea of what is going on. All of this is just a sensible approach to going through Active Directory, not a quick-fix solution. You still have to continue throughout the domains you are responsible for to complete the process. It is also often helpful to use a script to iterate through Active Directory and display all of the ACLs for an object.
Your first main goal should be to move the individual user permissions to groups with users assigned to them as often as possible, thus making Active Directory simpler to manage and comprehend. These groups should be sensibly named for what they do rather than whom they contain (after all, you are looking to understand Active Directory first). Ideally, you can start consolidating users with identical permissions into the same group.
Your second goal is to remove permissions that users or your newly created groups should not have. This may, of course, mean that your new groups need to have their members split into two or more separate extra groups. For example, a group that has Read All Properties rights and Write All Properties rights to an object may need to be split into three groups with more limited permissions instead: one with Read All Properties, one with Write All Properties, and one with selected write permissions rather than complete write access. This may be evident from your Active Directory analysis, or it may come out of discussions with users or their managers, with whom you should at least confirm the changes before implementing them just to make sure your analysis is correct.
Ultimately, your third goal, having rationalized the array of Active Directory permissions, is to try to limit the inheritance blocking of objects and branches and to try to move as many advanced permissions to general permissions as you can. You might think that it makes more sense to do this earlier, and in some cases, this is true. However, if you complete the first two goals, you will have an Active Directory tree that you understand and that has been brought back into line with sensible rules. It is much easier to attempt to fix problems with inheritance blocking and advanced permissions once you have a manageable and rationalized tree. You may end up going back and changing groups or permissions that you already sorted out in attaining the first two goals, but consider how much more difficult it would be to attempt to do these concurrently. After all, you are trying to make the best of an already annoying task. There is no sense in trying to do everything at once. As you go through the tree checking for inheritance blocking, you should document the blocked objects and branches, as specified in Rule 5, just as if you had set up the blocking from scratch yourself. That way, you can use the tables to analyze and keep track, crossing off those that are of no use as you rationalize the tree.
This whole section can be boiled down to two simple words: simplify and secure. You want to end up with the simplest, least delegated model you can attain while meeting the requirements at hand, resulting in the most locked-down directory you can live with.
16.5. Designing Auditing Schemes
Designing auditing schemes, in contrast to permissions, is a relatively easy process. Imagine the circumstances in which you may need to check what is happening in Active Directory, and then set things up accordingly.
Warning
You must remember that every Active Directory event that is audited causes the system to incur extra processing. Having auditing turned on all the time at the root for every modification by anyone is a great way to get all DCs to really slow down if a lot of Active Directory access occurs on those DCs.
That point bears repeating. Auditing changes to any object in the Domain naming context (NC) will propagate domain-wide and cause logging to the security event log on every DC that services the Domain NC. Auditing changes to the Configuration NC or Schema NC will cause all DCs in a forest to begin auditing to their security event logs. You must have tools in place to retrieve logs from multiple DCs if you wish to see every security event that occurs. After all, if you have 100 DCs and are logging Configuration NC changes, because changes can occur on any DC, you will need to collect and combine 100 security event logs to gather a complete picture.
Here are a few examples where designing auditing schemes could come in handy:
Someone complains that user details are being modified without a known cause.
You notice that objects have been unexpectedly created or deleted in a container.
The Active Directory hierarchy has changed and you weren’t informed.
You suspect a security problem.
Although the preceding reasons are all great reasons for enabling auditing, they are better reasons for removing native update access rights to the directory and pushing updates through some sort of provisioning system, such as Microsoft’s Forefront Identity Manager product (FIM, formerly known as ILM and MIIS), Quest’s Active Roles Directory Management tool, or even home-grown web-based tools. With these kinds of tools, you can implement good, solid features that are sorely missing from Active Directory, such as the following:
- Centralized logging
Enables all information concerning all requested changes to be easily deposited in one location with no additional work.
- Business rules
Allow you to force naming standards or specifically allow/disallow values in attributes.
- Triggers
Send notifications to various individuals when certain things are requested, such as notifying the asset management group of a new computer being added to Active Directory.
- Custom authorization levels
Allow you to set limits; for example, to specify that a data admin can create no more than five users a day.
- Prevention rather than cure
Auditing the directory for things that shouldn’t have happened is reactive; securing the directory so those things can’t happen in the first place is proactive and involves considerably less work in the long run.
In all of these scenarios, you will need to set auditing options on a container or a leaf object. These auditing entries do not have to exist all the time, so you could write them up and then code them into a script that you run at the first sign of trouble. That way, the system is immediately updated and ready to monitor the situation. This can happen only if you are prepared.
You need to analyze the scenarios that you envisage cropping up and then translate them into exact sets of auditing entry specifications. Once you have written up each scenario, if an emergency occurs you will be able to follow the exact instructions that you previously laid down and set up a proper rapid response, which is what auditing is all about.
Implementing Auditing
Windows Server 2008 introduced a completely new Active Directory auditing capability that greatly improves upon the capabilities in Windows Server 2003. On Windows Server 2003 domain controllers, if you enabled the “Audit directory service access” setting, a generic event was logged each time a user succeeded or failed to access an object with a System access control list (SACL) defined. From a practicality standpoint, this functionality was of limited value and could easily flood the security logs on your domain controllers.
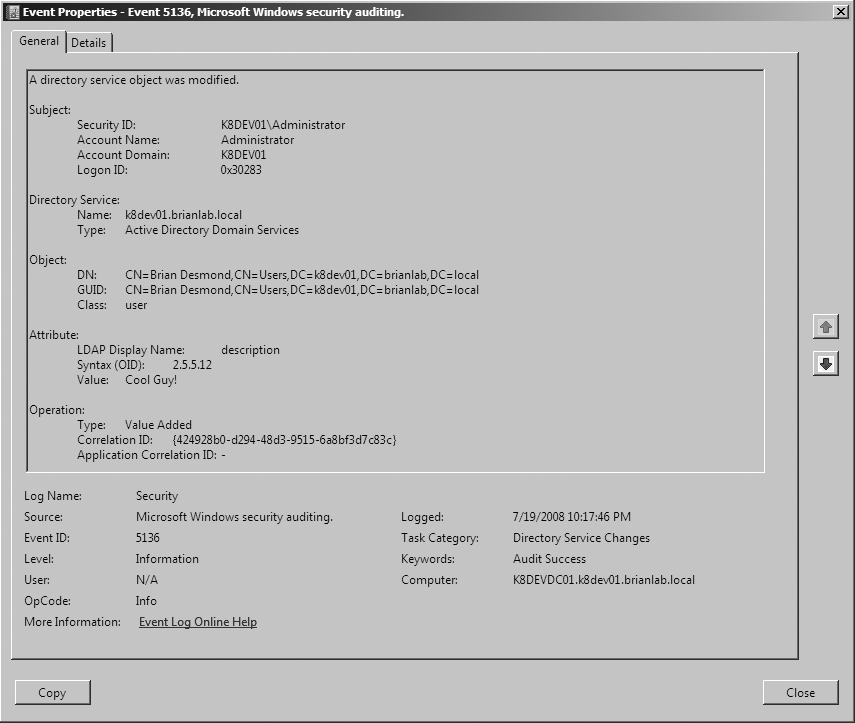
Active Directory now allows you to audit changes to the directory on a granular level, as well as to view previous and current values when changes occur. Figure 16-16 shows an example of an attribute-modify audit event. A number of new auditing events have been created that will be logged to the security log when changes occur. See Table 16-4 for a listing of these events.
Event ID | Change type | Description |
5136 | Modify | Logged anytime an attribute on an audited object is changed when the relevant Write Property audit is set in the SACL |
5137 | Create | Logged anytime an object is created under a parent when the Create Child audit is set in the SACL |
5138 | Undelete | Logged anytime an object is reanimated under a parent when the Create Child audit is set in the SACL |
5139 | Move | Logged anytime an object is moved to a parent when the Create Child audit is set in the SACL |
5141 | Delete | Logged anytime an object is deleted when the Delete Self audit is set in the SACL, or when an object is deleted under a parent when the Delete Child audit is set in the SACL |
Note
The Directory Service Access event 566 that was logged under Windows Server 2003 and Windows 2000 is still present; however, the event ID has changed to 4662.
Enabling the new auditing functionality is a three- or four-step process:
Enable the “Audit directory service access” Group Policy setting.
Configure the “Advanced audit policies” Group Policy settings.
Configure the SACL on the objects in the domain that you want to audit.
Exclude attributes from auditing forest-wide by modifying the attributes definitions in the schema.
To enable the “Audit directory service access” setting, browse to it under Computer ConfigurationPoliciesWindows SettingsSecurity SettingLocal PoliciesAudit Policy inside of a group policy that applies to your domain controllers, and audit Success attempts.
Next, you’ll need to configure “Advanced audit policies” in group policy. These settings can be found under Computer ConfigurationPoliciesWindows SettingsSecurity SettingAdvanced Audit Policy ConfigurationAudit PoliciesDS Access.
In order for change audits to be logged, you will need to configure the SACL on the objects to be audited, as discussed earlier in this chapter. Make sure to enable the correct auditing entries, as outlined in Figure 16-15.
Change auditing can be disabled globally for attributes by
modifying the searchFlags attribute
on the attributeSchema object in the
Active Directory schema. The searchFlags attribute is a bit mask, and
auditing is managed by the ninth bit. To disable auditing for the
info attribute using
adfind and admod, you would
run the following command:
adfind -sc s:info systemFlags -adcsv | admod systemFlags::{{.:SET:256}} -upto 1To enable auditing for the info
attribute, run this command:
adfind -sc s:info systemFlags -adcsv | admod systemFlags::{{.:CLR:256}} -upto 1You must be a member of Schema Admins to modify this attribute.
Tracking Last Interactive Logon Information
Active Directory supports a series of attributes that, when
enabled, store the date and time of the last successful and failed
Ctrl-Alt-Delete logons for a user in the directory, as well as the
hostnames of the machines on which they occurred. These attributes are
part of the user class in the
directory. You may be wondering how this is different from the lastLogonTimeStamp attribute. The lastLogonTimeStamp attribute uses special
functionality to limit the update frequency to an infrequent (every 10
to 14 days, roughly) interval, and it does not store the hostname
associated with the logon attempt. These new attributes are updated
immediately.
There are a number of limitations to this feature that you should keep in mind when considering whether or not it is appropriate for your environment. The first is that this functionality only tracks interactive logons. In other words, only logons that occur when a user presses Ctrl-Alt-Delete on a Windows Vista or newer machine are tracked. In order for the tracking to occur at all, the user’s domain must be running at the Windows Server 2008 functional level or better, and a registry setting must be enabled on the client and on the domain controllers.
The registry setting is a REG_DWORD called DisplayLastLogonInfo located at HKLMSotwareMicrosoftWindowsCurrentVersionPoliciesSystem.
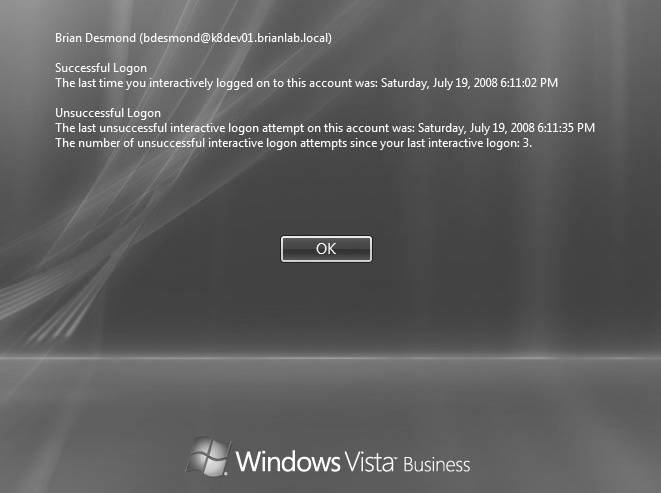
If, on a domain controller, you set DisplayLastLogonInfo to 1, it will begin storing logon statistics in
Active Directory. If you set this value to 1 on a client, the client will begin reporting
last logon statistics similar to what’s shown in Figure 16-17 when a user logs
in.
In lieu of setting a registry setting, we recommend that you instead use the corresponding Group Policy setting for this feature. The Group Policy setting is available under Computer ConfigurationPoliciesAdministrative TemplatesWindows ComponentsWindows Logon Options. The particular setting you want to enable is “Display information about previous logons during user logon.” This setting needs to be enabled in policies that apply to both domain controllers and clients in order to enable storage and display of logon statistics, respectively.
If you enable this setting on clients that have users logging into domains not running at the Windows Server 2008 or better functional level, clients will receive an error similar to Figure 16-18 and be unable to log in. You will also receive the error in Figure 16-18 if this setting is enabled on clients, but not domain controllers.

There are four attributes that are used to provide this additional logon information functionality in the directory:
msDS-LastSuccessfulInteractiveLogonTimeThis is the time of the user’s last successful Ctrl-Alt-Delete logon.
msDS-LastFailedInteractiveLogonTimeThis is the time of the user’s last failed Ctrl-Alt-Delete logon.
msDS-FailedInteractiveLogonCountThis is the number of logon failures that have occurred for the user since the feature was enabled.
msDS-FailedInteractiveLogonCount
          AtLastSuccessfulLogon
This is the number of failed Ctrl-Alt-Delete logons for the user since the last successful Ctrl-Alt-Delete logon.
Unlike the lastLogonTimeStamp
attribute, there is no update frequency safeguard for these attributes.
If you enable this feature, keep in mind that every single time these
attributes are updated, they will replicate in the next cycle. There
could potentially be thousands of updates a day to these attributes in a
busy domain. Also, there is no guarantee that the values shown to the
user (like in Figure 16-17) are in fact the
most accurate values in an environment with more than one domain
controller in the domain, since these attributes replicate like any
other change to the directory.
Warning
If you have deployed read-only domain controllers, they will update these attributes locally, but the changes will not be replicated to the rest of the domain.
The implementation of the last interactive logon statistics feature discussed in this section was designed primarily for compliance with Common Criteria (http://www.commoncriteriaportal.org). Unless you have a business need for this feature or you are enabling it in a small (e.g., single-site) domain, we do not recommend that you enable it.
16.6. Real-World Active Directory Delegation Examples
It now seems appropriate to put what we have laid out in this chapter into practice. We will use a series of tasks that could crop up during your everyday work as an administrator. The solutions we propose probably are not the only solutions to the problems. That is often the case with Active Directory; there are many ways of solving the same problem.
Hiding Specific Personal Details for All Users in an Organizational Unit from a Group
In this example, an organizational unit called Hardware Support Staff contains the user accounts of an in-house team of people whose job is to repair and fix broken computers within your organization. Whenever a user has a fault, he rings the central faults hotline to request a support engineer. An engineer is assigned the job, which is added to the end of her existing list of faults to deal with. The user is informed about which engineer will be calling and approximately when she will arrive. As with all jobs of this sort, some take longer than others, and users have discovered how to find the mobile or pager number of the engineer they have been assigned and have taken to calling the engineer to get an arrival-time update rather than ringing the central desk. Management has decided that they want to restrict who can ring the pagers or mobiles, but they do not want to stop giving out the engineers’ names as they feel it is part of the friendly service. Consequently, they have asked you to find a way of hiding the pager and mobile numbers in Active Directory from all users who should not have access.
The solution that we will use is to remove the default ability of
every user to see the pager and
mobile properties of the engineer
objects by default. The first thing we need to find out is how the
permissions are currently granted to the users. We look at the ACL on a
user object and we do not see either attribute listed specifically. We
do, however, see an inherited Read Property (RP) access for the entire
object granted to the Pre-Windows 2000 Compatible Access group. We also
see explicit RP access for several property sets granted to
Authenticated Users.
Next, we look at the schema definition for the two attributes and
we see that both have the attributeSecurityGUID set to {77B5B886-944A-11D1-AEBD-0000F80367C1}, which
means the attributes are in a property set. We scan through the cn=extended-rights container and determine
that the property set these attributes are in is the Personal
Information property set. We look at the ACL again and see that the
Personal Information property set is one of the property sets that has
RP access granted to Authenticated Users. We know that the domain has
Pre-Windows 2000 Compatible Access enabled, so users are getting access
to the pager and mobile attributes through two different ACEs,
both explicit and inherited. Recall from the earlier section Permission Lockdown that the explicit property set ACE is
the more difficult of the two to deal with. We will focus on that one
initially.
The first thing we will do is create a sub-OU under Hardware
Support Staff called Engineers and move all of the engineer user objects
into that OU. We could try to individually lock down the engineer user
objects in the parent OU, but that is a layer of complexity that isn’t
needed and should be avoided. Now that all of the engineers are isolated
in their own OU, we need to decide which of the previously discussed
mechanisms is appropriate to lock down access to the pager and mobile attributes. Again, these options
are:
Remove the
pagerandmobileattributes from the Personal Information property set.Change the
defaultSDof the user object class to remove the Personal Information property set.Strip the Personal Information ACE from each of the engineer objects and add inherited deny ACEs for the
mobileandpagerattributes.Add an explicit deny ACE for the
mobileandpagerattributes on each engineer object.
Options 1 and 2 could be used, but we would have to go back
through the rest of the forest and add inherited ACEs granting RP access
to the pager and mobile attributes for Authenticated Users. All
of this extra work would be needed to attain the net effect of a
permission change only on the targeted OU. If you think that you will be
locking these attributes down for more OUs or maybe for all users in the
forest, these options would become more palatable.
With option 3, you target only the engineer objects. When you
strip the Personal Information ACE, not only will access to the mobile and pager attributes be affected, but also access
to every other attribute in the Personal Information property set, which
includes 46 attributes in the default Windows Server 2008 forest.
For all three of these options, if the domain is in Pre-Windows 2000 Compatible mode, users will still have access to all attributes through the inherited ACE granted to the Pre-Windows 2000 Compatible Access group. In order to lock down the two targeted attributes, we would also need to add an inherited deny ACE for each attribute on the Engineers OU. This would work great and everyone would be happy until later on, maybe a year or two down the road after you’ve forgotten all about this change, when you decide, “We don’t need to be in Pre-Windows 2000 Compatible mode anymore” and remove the Authenticated Users group from the Pre-Windows 2000 Compatible Access group. As soon as you do this, the permissions removed in options 1, 2, and 3 would quite suddenly impact you by disallowing access to all attributes that are in the Personal Information property set. Obviously, this could be quite a surprise! You might think it was because you still needed to be in Pre-Windows 2000 Compatible mode, but it would actually just be a delegation issue.
The last option, option 4, would target just the engineer user objects, and there would be no unintended side effects later with other domain changes. This is probably the best solution in this case, though it will require is a good amount of initial work plus ongoing maintenance as new engineer users are added. It would be best if a script were built strictly for doing this work.
You may wonder, “Wouldn’t this be a great place to use the
confidential bit?” Unfortunately, no, this isn’t a good example, because
it would impact all users in the forest; also more importantly, both the
mobile and pager attributes are Category 1 attributes, so
you can’t modify them to make them confidential.
Allowing Only a Specific Group of Users to Access a New Published Resource
The Finance Department has created a new share called Budget_Details and published it in the tree. The permissions to the share itself allow only the correctly authorized staff to read and view the contents, but everyone by default can see the volume object describing the share in the tree. The Finance Department does not want the share visible in Active Directory to anyone who is not a member of the Finance group.
Again, the first thing we need to determine is how the permissions are currently granted to the users. We look at the ACL on a volume object, and the only permission granted to normal users is a Generic Read ACE for Authenticated Users. Since this is a single object, it probably doesn’t make sense to create a whole OU for it, so we open up the permissions editor window for the volume object and remove the Authenticated Users group entry. We then add an entry for the Finance group and assign Read and List permissions.
Restricting Everyone but HR from Viewing National/Regional ID Numbers with the Confidential Bit
After much discussion, it is decided that national/regional ID numbers will be moved from a proprietary database and inserted into Active Directory. There is quite a bit of concern about the visibility of the attribute, as only the HR Department and Domain Admins should be able to see it by default.
You extend the schema with a new national/regional ID number
attribute and you set the searchFlags
attribute to 128 to indicate that the
attribute should be protected using the confidential attribute feature.
Now you simply have to create a new group called
HR-Confidential and assign a single inheritable ACE
at the root of each domain that grants this group Control Access to the
national/regional ID number attribute on user objects.
Later, if someone decides they want to secure the attribute from domain administrators as well, you will need to go through and apply an explicit deny ACE to every single object for that group. However, trying to deny access to data in the directory to domain administrators is not actually enforceable. At any point that a domain admin would like to get access to the attribute again, she can simply modify the ACL herself. If you absolutely cannot allow domain administrators access to the data, you need to find some other way of protecting the data, such as using third-party encryption or placing it on a machine that isn’t in the domain and therefore is not under the control of the domain administrators.
16.7. The AdminSDHolder Process
One of the background processes in Active Directory that has been a source of confusion for administrators since Windows 2000 is AdminSDHolder. This name derives from the name of the object in Active Directory that stores the security descriptor that is applied in order to protect sensitive objects. Sensitive objects are users, groups, and computers that are members of the following groups::
Account Operators
Administrators
Backup Operators
Domain Admins
Domain Controllers
Enterprise Admins
Print Operators
Read-Only Domain Controllers
Replicator
Server Operators
Schema Admins
In addition, the following objects are explicitly protected, irrespective of group membership:
Administrator
krbtgt
Active Directory protects these objects in order to prevent privilege elevation by users who have been delegated rights over members of these groups. Typically these are users who are delegated administrators, e.g., in the helpdesk. If a helpdesk user was allowed to reset the password of a member of the Domain Admins or Account Operators group, for example, he could reset the user’s password and then log in as that user—greatly elevating the helpdesk administrator’s privileges.
The AdminSDHolder process runs in the
background on the PDC emulator FSMO role holder every 60 minutes by
default and applies a special ACL that does not inherit permissions to
each object that is in scope. The ACL is stored in the ntSecurityDescriptor attribute of the CN=AdminSDHolder,CN=System object under the root
of the domain.
Note
If you want to modify the frequency at which the
AdminSDHolder process runs, you can set the
AdminSDProtectFrequency registry
setting (REG_DWORD) located in
HKLMSYSTEMCurrentControlSetServicesNTDSParameters
to a value between 60 and 7200 (seconds). We recommend leaving the
default, 3600, in place.
Administrators often run into this process for the first time in a couple of scenarios. The first is in the case that a user used to be an administrator but then had those permissions revoked. The second common scenario is with Exchange 2010 and newer. If users are using their day-to-day user accounts for administrative tasks (not recommended), the first time they try to connect a mobile device for ActiveSync, the connection will fail as Exchange needs additional access to create a special object under the user’s account to track the mobile device.
There is no automatic “undo” process for removing the protection
AdminSDHolder adds when an object is no longer
considered to be protected. Instead, you must manually configure the
object to once again inherit permissions. In addition, you should reset
the adminCount attribute’s value to
0.
Both of the scenarios discussed here can be avoided by implementing the best practice of using a second user account for all administrative tasks and treating an administrator’s standard account as a least-privileged account that is identical to the accounts for traditional employees. You could also modify the AdminSDHolder object’s ACL, but this would simply avoid confronting poor security design.
In some cases you may want to exclude some of the groups listed earlier from AdminSDHolder. Active Directory allows you to exclude the following groups (and their members) from protection. In general, we do not recommend that you use these groups, but if you choose to and have a need to exclude their members from protection, you may. The groups are:
Account Operators
Server Operators
Print Operators
Backup Operators
Note
If a user who is a member of one of these groups is also a member of another protected group, that user will continue to be protected by AdminSDHolder.
To exclude any of these groups, you will need to modify the dsHeuristics attribute with ADSI Edit by
following these steps:
Launch ADSI Edit (Start→Run→
adsiedit.msc) and open the Configuration NC.Browse to
CN=Windows NT,CN=Services.Open the properties of the
CN=Directory Serviceobject.If the
dsHeuristicsattribute is not set, set it to000000000100000f. If the attribute is already set, move on to the next step.Warning
Do not overwrite the
dsHeuristicsattribute with the default in step 4 if there is already a value set. There are many other behaviors that are controlled bydsHeuristics!Each of the first four characters in the
dsHeuristicsattribute controls excluding one of the four groups listed earlier:To exclude Account Operators, set the first character of
dsHeuristicsto1(e.g.,100000000100000f).To exclude Server Operators, set the second character of
dsHeuristicsto1(e.g.,010000000100000f).To exclude Print Operators, set the third character of
dsHeuristicsto1(e.g.,001000000100000f).To exclude Backup Operators, set the fourth character of
dsHeuristicsto1(e.g.,000100000100000f).
Once you have completed your changes, you may want to force the AdminSDHolder process to run so that you can test your changes. You can do this by invoking the background process with an operational attribute using LDP:
Launch LDP and then bind to the PDC emulator FSMO role holder.
Open the Browse→Modify dialog.
Enter
RunProtectAdminGroupsTaskin the Attribute box, as shown in Figure 16-19.Enter
1in the Values box and then click Enter.Change the operation to Replace.
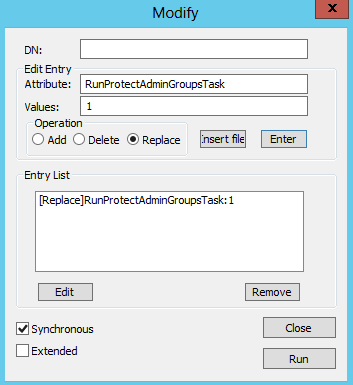
16.8. Dynamic Access Control
One of the most talked about new features in Windows Server 2012 is Dynamic Access Control. DAC attempts to solve a problem that has plagued Windows administrators forever—managing filesystem access control lists and ever-changing group memberships. One of the challenges with the NTFS ACL structure is that you cannot construct a compound expression. That is, you can’t grant read access to a file or folder for users who are members of both the Finance Users group and the Managers group. In order to meet this requirement, you need to create a new group—say, Finance Managers—and grant that group read access. Over time, the number of permutations that arise due to common scenarios like this leads to an explosion of groups in Active Directory, token bloat issues, and IT management challenges related to keeping all these groups current.
DAC aims to solve both of these problems by moving to an expression-based ACL structure for the filesystem that is based on both group membership and attributes of the user object in AD. These attributes are expressed as claims and are added to the user’s security token when the user is authenticated by a Windows Server 2012 DC.
Note
If a user is authenticated by a DC running a version of Windows prior to Windows Server 2012, a Windows Server 2012 file server can reach out to a Windows Server 2012 DC in the file server’s site and obtain an access token that includes claims data.
In addition to attributes of the user, Windows 8 workstations can participate in DAC through a feature called compound identity. Compound identity enables claims from the user’s workstation to be included in the user’s token, and thus the access control expressions on the resource. With this functionality, you can mandate that a user is accessing a folder from a corporate machine, for example.
Finally, attributes of the files and folders can be included in access and auditing expressions. These attributes can come from manual end user classifications, or from the File Classification Infrastructure (FCI) feature in Windows Server.
As you can see, DAC is a broad feature, and a successful deployment will require the involvement of resources across the organization, both inside and outside of IT. We’ll discuss the Active Directory configuration component of this feature here, as well as a quick walk-through to validate your configuration steps. We’ll leave the discussion of how to best deploy DAC and the various file server–specific features to other publications that are more qualified to discuss these topics.
Configuring Active Directory for DAC
There a couple of different paradigms for deploying DAC, which makes this discussion more complicated. You can take advantage of the compound ACL functionality with just group membership without any additional configuration. But if you want to start constructing ACLs based on attributes of the users (or their devices), you’ll need to configure claim types in Active Directory as well as some Group Policy settings.
Finally, you can publish filesystem access policies that dynamically apply or model ACLs to filesystem data based on properties of the files themselves. These policies are known as central access policies. Central access policies are comprised of a series of central access rules that govern the ACL that will be applied to matching files and folders. The properties that can be set on files and folders are published via resource properties.
Fortunately, Microsoft has provided a GUI for configuring most of the DAC feature set. If you haven’t already explored the Dynamic Access Control node in the Active Directory Administrative Center (ADAC), take a few minutes to do so. Each of the components we just discussed is configurable under the Dynamic Access Control node. The only component that must be configured solely via Windows PowerShell is the claims transformation functionality that is used when you need to pass claims across a forest trust.
Configuring claim types
The first task you’ll likely want to take on is making
attributes available as claims. This is configured by creating claim
types in Active Directory. Claim types map an attribute of the user or
the user’s device in Active Directory to a claim that is included in
the user’s access token. To create a claim type, launch ADAC and
browse to Dynamic Access ControlClaim Types. In
Figure 16-20, we are creating a
claim type called Employee Type. This claim is
sourced from the employeeType
attribute.

If there are a well-known set of values that will be in the claim, you can configure suggested values at the bottom of the screen that will be displayed in a drop-down list in the ACL editor. Figure 16-21 shows how to add a suggested value for full-time employees. The value field corresponds to the actual data that is stored in the Active Directory attribute, while the display name field is what is shown in the ACL editor. Once you create a claim type, it will be available for use on Windows Server 2012 file servers across the forest.

It is very important that you think about the new dependencies that are being created on the data in the attributes that you are publishing as claims. As soon as you publish an attribute as a claim, you will not be able to change the format of the data stored in the attribute without coordinating an update to all of the ACLs that reference that attribute’s format. If you are sourcing attribute values directly from another system (such as a human resources database), you will need to communicate this dependency to the owners of the source system. The values in the source system will not be able to be changed without coordination across the Active Directory and file server teams.
Configuring central access policies
Central access policies enable organizations to apply access rules to data based on properties of the data from a central location (Active Directory). This functionality is especially useful when you have a mechanism in place to classify data and specific policies or regulations to comply with. For example, you might have a policy that any data that contains personally identifiable information (PII; e.g., national/regional ID numbers) that is classified at moderate impact or higher must only be accessible to full-time employees.
To begin, use ADAC to enable the Personally Identifiable Information resource property. This is a resource property that is included out of the box with DAC. You can add as many resource properties as you like and/or customize the resource properties that are included.
Next, you need to use ADAC to define a central access rule that describes the access control you want to implement. A central access rule is comprised of scoping criteria that determine the data that the rule applies to and an ACL to apply to that data. To scope the rule to apply only to PII, edit the target resource criteria as shown in Figure 16-22.

Next, configure the permissions to restrict access only to Domain Users who have the Employee Type claim with a value of Full Time Employee, as shown in Figure 16-23. You can either configure permissions to operate in a “proposed” mode, whereby resources that have permissions that don’t match the policy will be logged in the event log, or enforce the permissions on all matching resources. We recommend that you begin with the audit/proposal mode to assess the impact of your policies.

When you’re done, your central access rule should look similar to Figure 16-24.
Once you have created the rules you want to apply to a resource, you need to add them to a central access policy. Figure 16-25 shows a basic policy that contains the rule we just created. Once you have the policy ready to apply, you’ll need to make it available to the file server via Group Policy.

Browse to the Computer ConfigurationPoliciesWindows SettingsSecurity SettingsFile SystemCentral Access Policy node in the group policy with which you’ll be applying the central access policy. You can apply one or more policies by right-clicking and selecting Manage Central Access Policies. Add the policy you created in the previous step.
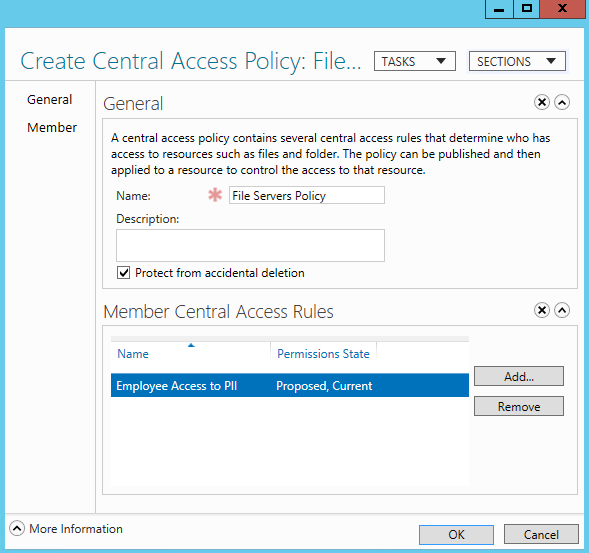
You’ll also want to enable the central access policy auditing features to take advantage of the audit/proposal mode we selected in the central access rule. You can do this by browsing to the Advanced Audit Policy ConfigurationAudit PoliciesObject Access node under Security Settings in the Group Policy Management Editor. Enable success and failure auditing for the Audit Central Access Policy Staging and Audit File System entries.
Once you’ve published a central access policy to a file server, you must apply the policy to a folder structure. Only once you’ve completed this step will the rules in the policy take effect. To complete this step, open the properties of the folder you want to apply the policy to and access the Security tab. Click Advanced, switch to the Central Policy tab, and apply the policy created earlier, as shown in Figure 16-26.
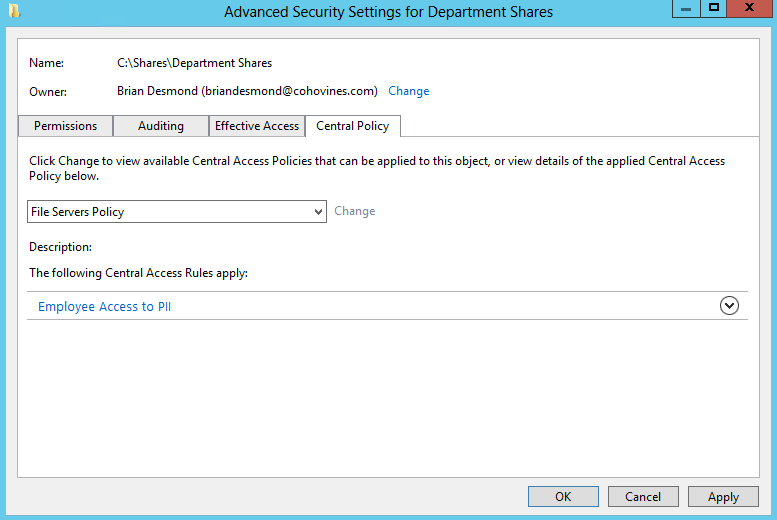
Kerberos policies
If you are running in a forest that is not at the Windows Server 2012 forest functional level, you’ll probably need to tweak one or more policies that apply to your domain controllers and/or file servers in order to ensure that DAC is available on your Windows Server 2012 file servers. The first policy you’ll need to configure is to enable issuance of claims and compound identity on your domain controllers. Edit the Default Domain Controllers Policy (or another GPO that applies to your DCs) and browse to Computer ConfigurationPoliciesAdministrative TemplatesSystemKDC. Set the “KDC support for claims, compound authentication, and Kerberos armoring” policy to Supported.
If you are using claims in your ACLs on a file server but you have not deployed one or more central access policies to that file server, you’ll need to ensure that the file server requests a service ticket on behalf of the user from a Windows Server 2012 DC when the user’s token doesn’t include claims information.
If you have Windows 8 clients and you want to take advantage of device claims, you’ll need to enable compound identity in a GPO that applies to all of your clients. To do this, browse to Computer ConfigurationPoliciesAdministrative TemplatesSystemKerberos in the GPME and set the “Kerberos client support for claims, compound authentication and Kerberos armoring” policy to Enabled. You must also enable the “Support compound authentication” policy and configure the policy with the Always option.
Using DAC on the File Server
While we’ve looked at how to apply ACLs via a central access policy, it’s also possible to simply start using claims and the new ACL functionality that DAC brings without going through the central access policy processes.
Compound expressions with groups
Out of the box, you can start creating ACLs on Windows Server 2012 file servers that simply involve existing group memberships. The power in this new feature is that you can define Boolean expressions using the AND and OR operators, as well as setting matching (such as requiring that the user is a member of one or more groups in a list).
Consider our earlier example, where we needed to restrict access to a folder to users who were members of the Finance Users group as well as the Managers group. To complete this task, open the security properties of the folder, and then click Advanced. Add the Finance Users group to the ACL and configure the permissions (e.g., read or write access). Next, add a condition that the user is also a member of the Managers group, as shown in Figure 16-27.

While this is a simple example consisting of only two groups, you can see how you can easily construct much more complex expressions that model the structure of your organization using existing Active Directory groups. It would not be out of the question to reduce the number of groups some users are a member of considerably just by taking advantage of this feature on your file servers.
Using claims in your ACLs
The same editor we used in Figure 16-27 can be used to construct expressions based on user and device claims as well as properties of the target resource. As a simple example, let’s extend the expression we constructed earlier that allows access to members of the Finance Users and Managers groups to require that the users not be vendors.
To do this, add a rule that says Employee Type does not equal Vendor, as shown in Figure 16-28. You’ll see that the drop-down list is prepopulated with the list of suggested values we defined when we created the claim type.
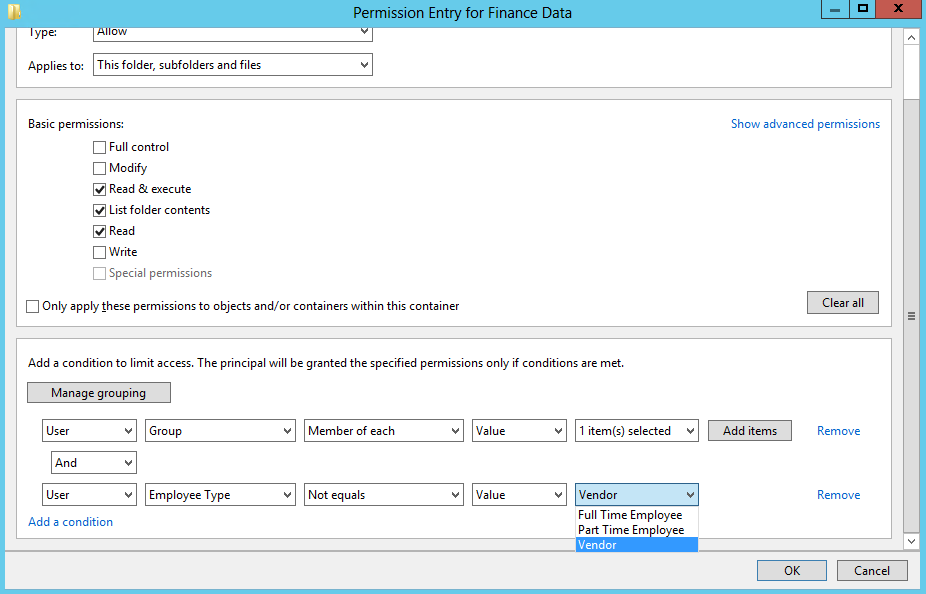
Auditing
You can use the same concepts we just explored for file access to configure auditing as well. This makes the filesystem auditing functionality in Windows substantially more useful. Previously, auditing was essentially an information overload as there was little flexibility in configuring what operations were audited.
Take into account the ability to construct expressions based on user, device, and resource properties, and you might configure an auditing rule that only audits access to resources that contain PII, as shown in Figure 16-29.
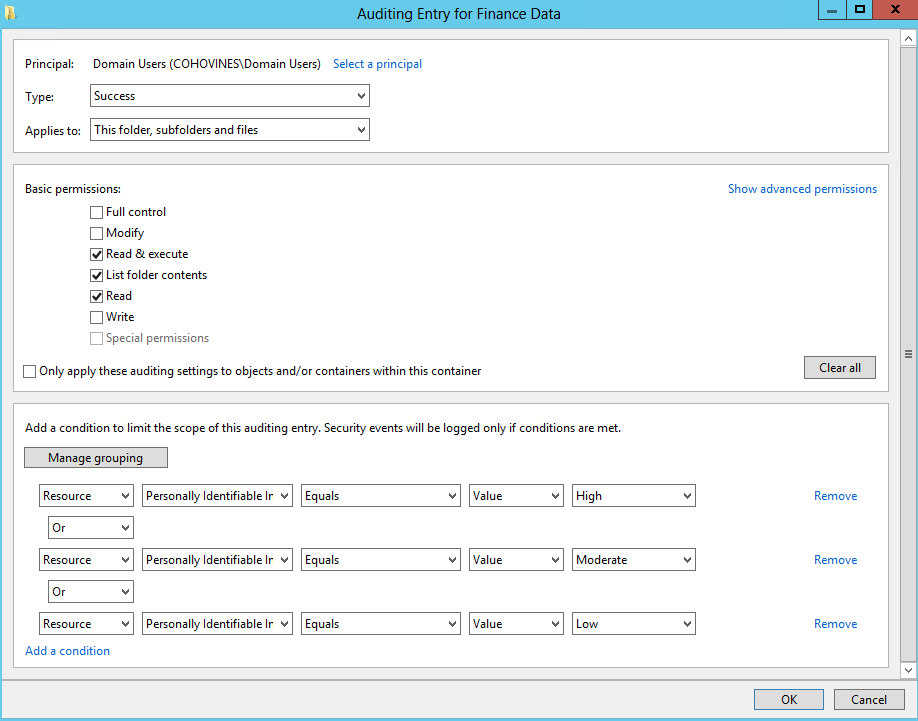
16.9. Summary
Security is always important, and where access to your organization’s network is concerned, it’s paramount. We hope this chapter has given you an understanding of how permission to access can be allowed or denied to entire domains or individual properties of a single object. Auditing is also part of security, and having mechanisms already designed—so that they can be constantly working or dropped in when required—is the best way to keep track of such a system.
Assigning permissions and auditing entries to an object appears to be a simple subject on the surface. However, once you start delving into the art of setting permissions and auditing entries, it quickly becomes obvious how much there is to consider. Global design is the necessary first step. Dynamic Access Control makes planning even more important, with the ability to create security dependencies on individual attribute values in Active Directory.
Although expanding your tree later by adding extra containers is rarely a problem, in a large tree it makes sense to have some overall guidelines or rules that allow you to impose a sense of structure on the whole process of design and redesign. Ideally, the golden rules and tables that we showed you here should allow you to plan and implement sensible permissions schemes, which was the goal of this chapter.